Thank you for purchasing our extension. If you have any questions that are beyond the scope of this document, do not hesitate to leave us an email via our email address below.
By: Magenest | Support Portal: http://servicedesk.izysync.com/servicedesk/customer/portal/69
Introduction
Payeezy Payment extension for Magento 2 by Magenest is a smart extension that helps customers to make payments online without wasting time. Customers can pay directly in the Magento shop with any card, in their native currencies.

Highlight Features
For Admin
- Support direct refund.
- Support partial invoice and refund.
- Select between Authorize Only and Authorize and Capture payment mode
- Manage all Payeezy transactions easily (both in Magento & Payeezy First Data).
- AVS/CVV verification.
- Capture, cancel, and refund payments easily.
For Customer
- Allow customers to checkout using credit card
- Support Save-card function for logged in customers
- Customers can manage Paya saved credit cards in My account
System Requirements
Your store should be running on Magento 2 version 2.2.x, 2.3.x or 2.4.x.
Create a Payeezy account
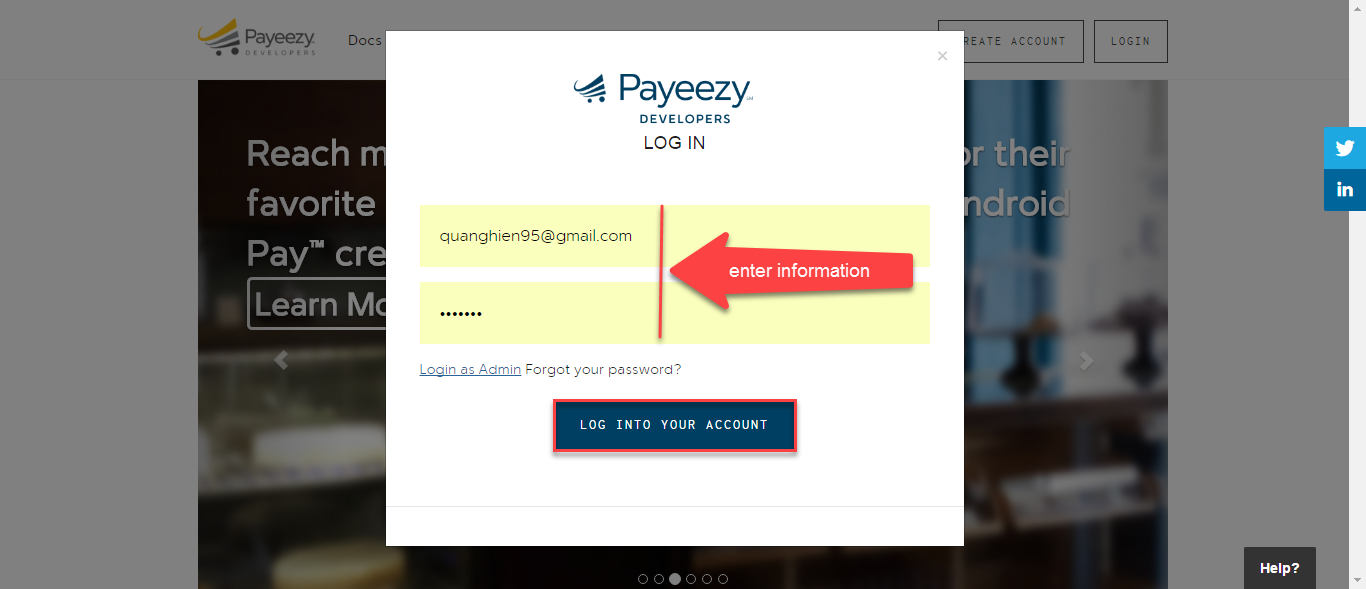
![]() To create a Payeezy Account, please follow our instructions below:
To create a Payeezy Account, please follow our instructions below:
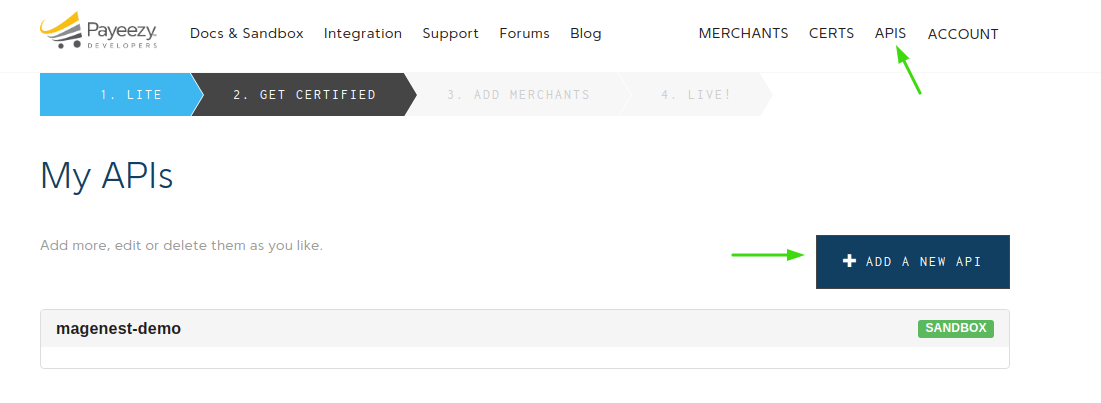
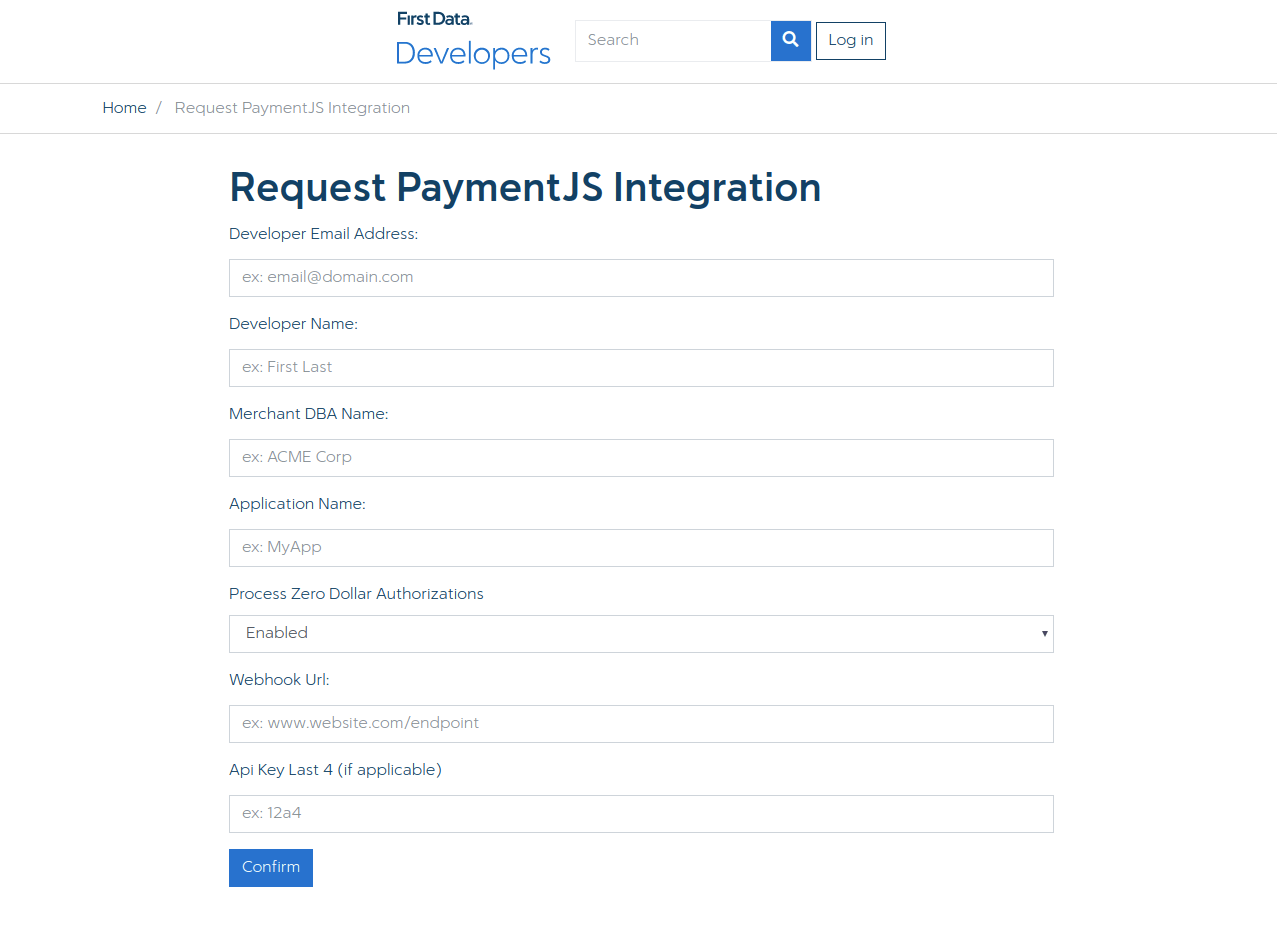
- Log into your Payeezy account, click on APIs > select Add a New API.
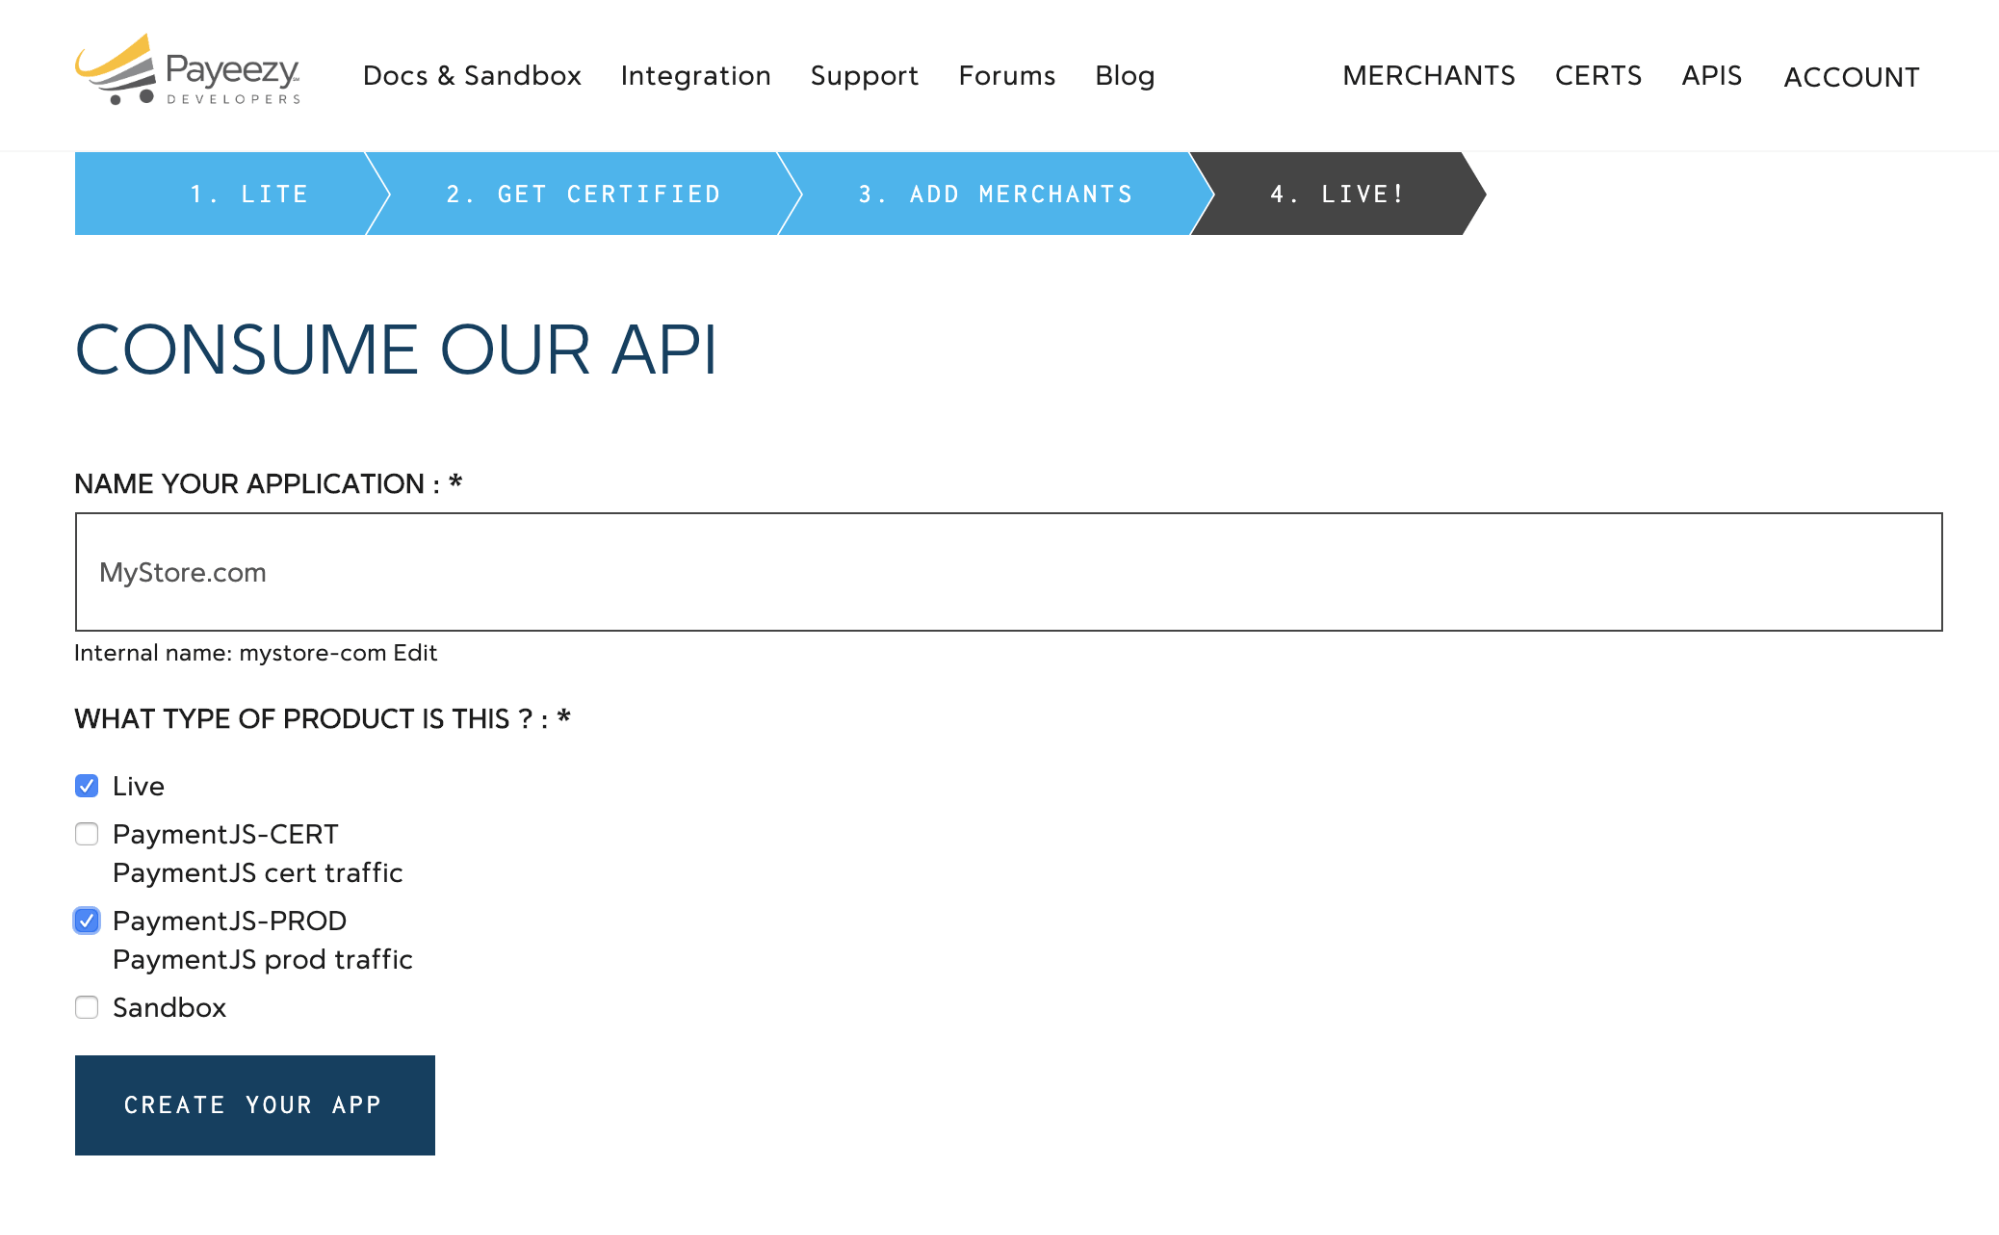
2. Enter a name for your application > select your environment > Select “Live” and “PaymentJS-PROD” to process live payments through Payment.JS.
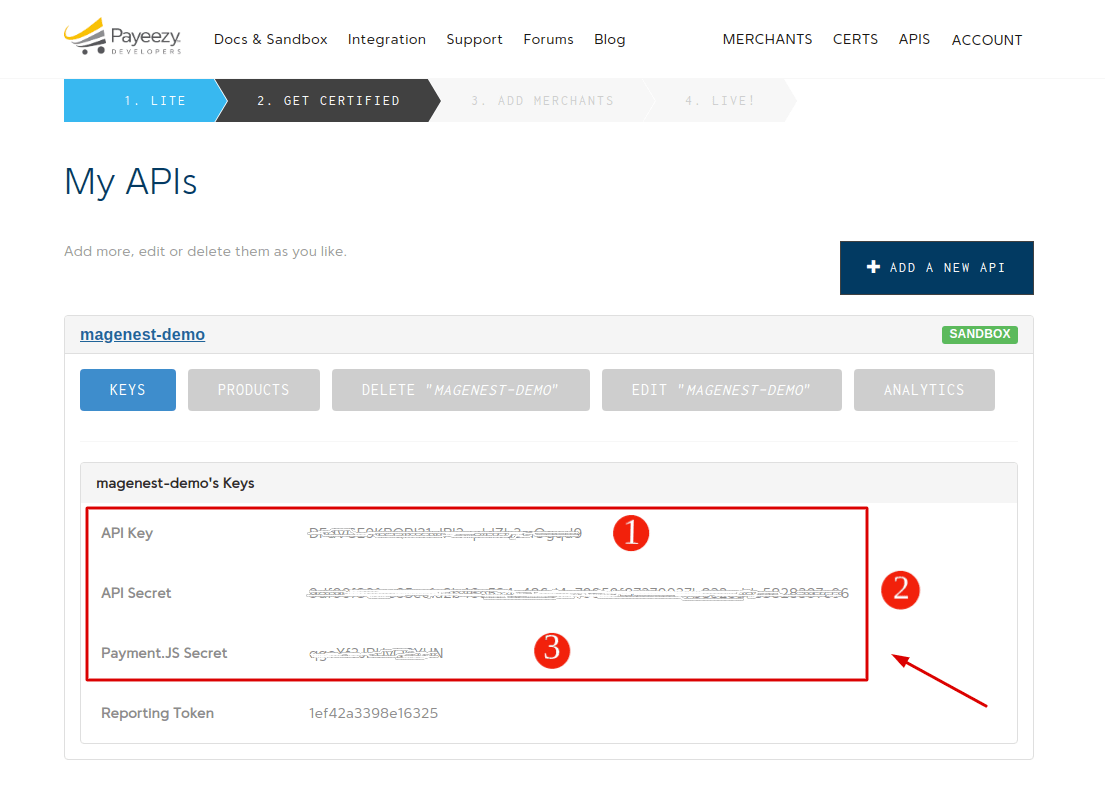
3. Once your application is created, copy your API Key, API Secret, and Payment.JS Secret. Save these in the plugin’s Connection Settings.
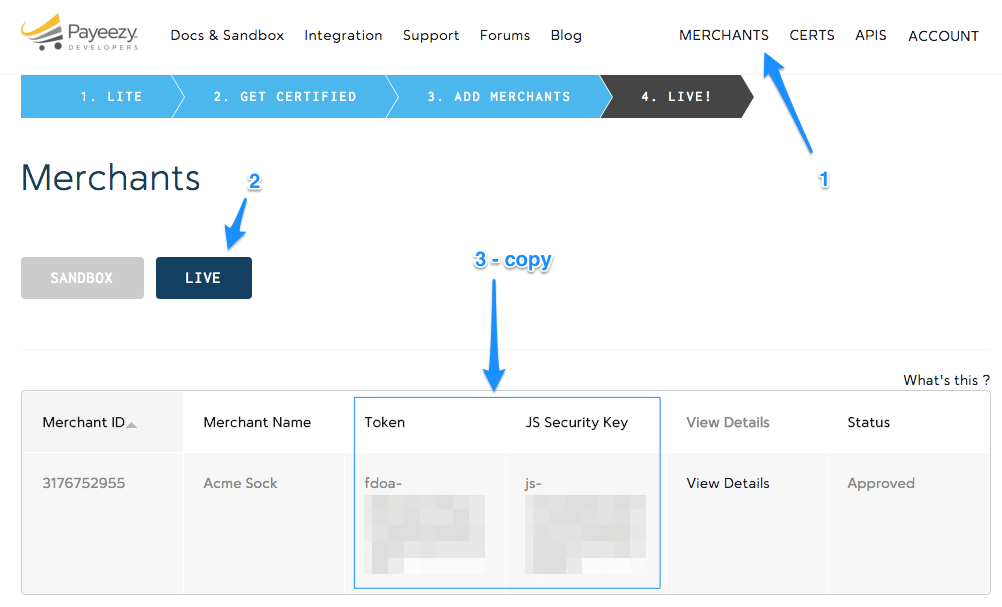
4. Now go to Merchants and select the Live tab to get your account-specific live credentials. If you want the test credentials, select the Sandbox tab. Copy your Merchant Token.
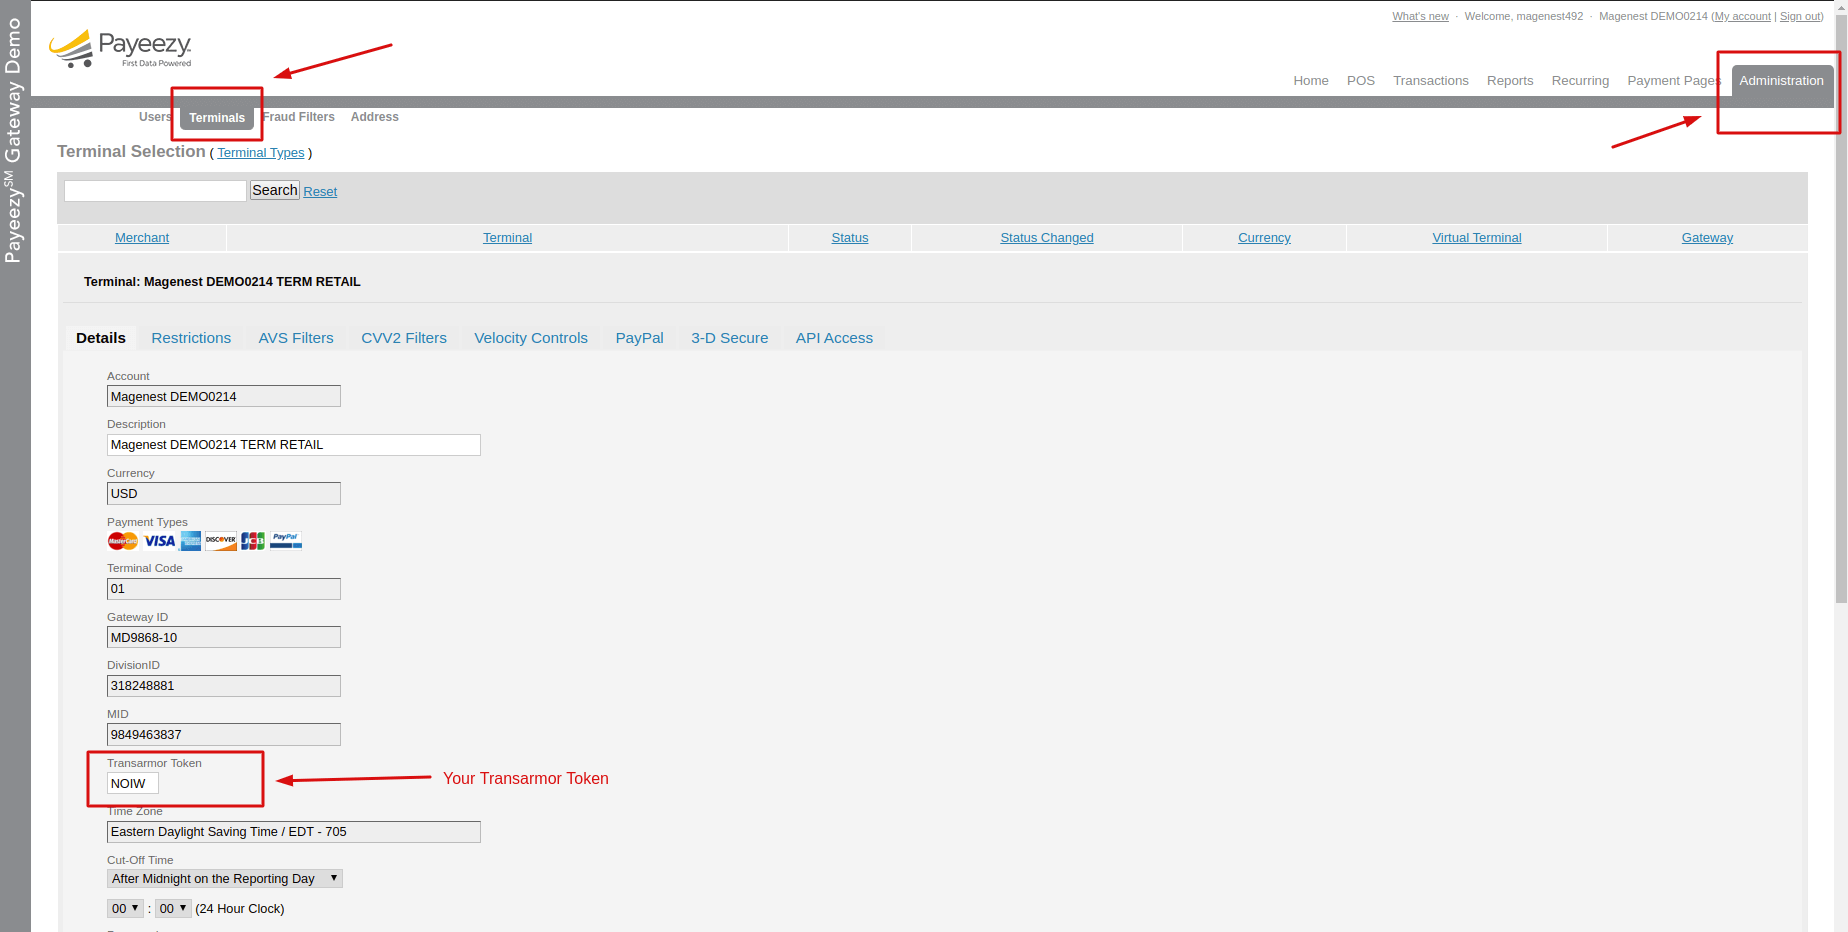
![]() Next, you'll need a Transarmor Token. Please follow these steps:
Next, you'll need a Transarmor Token. Please follow these steps:
2. On the home page, click on Administration→Terminals
Configuration
![]() In order to configure the Payeezy Payment, on the Admin sidebar, go to Configuration>Sales>Payment Methods
In order to configure the Payeezy Payment, on the Admin sidebar, go to Configuration>Sales>Payment Methods
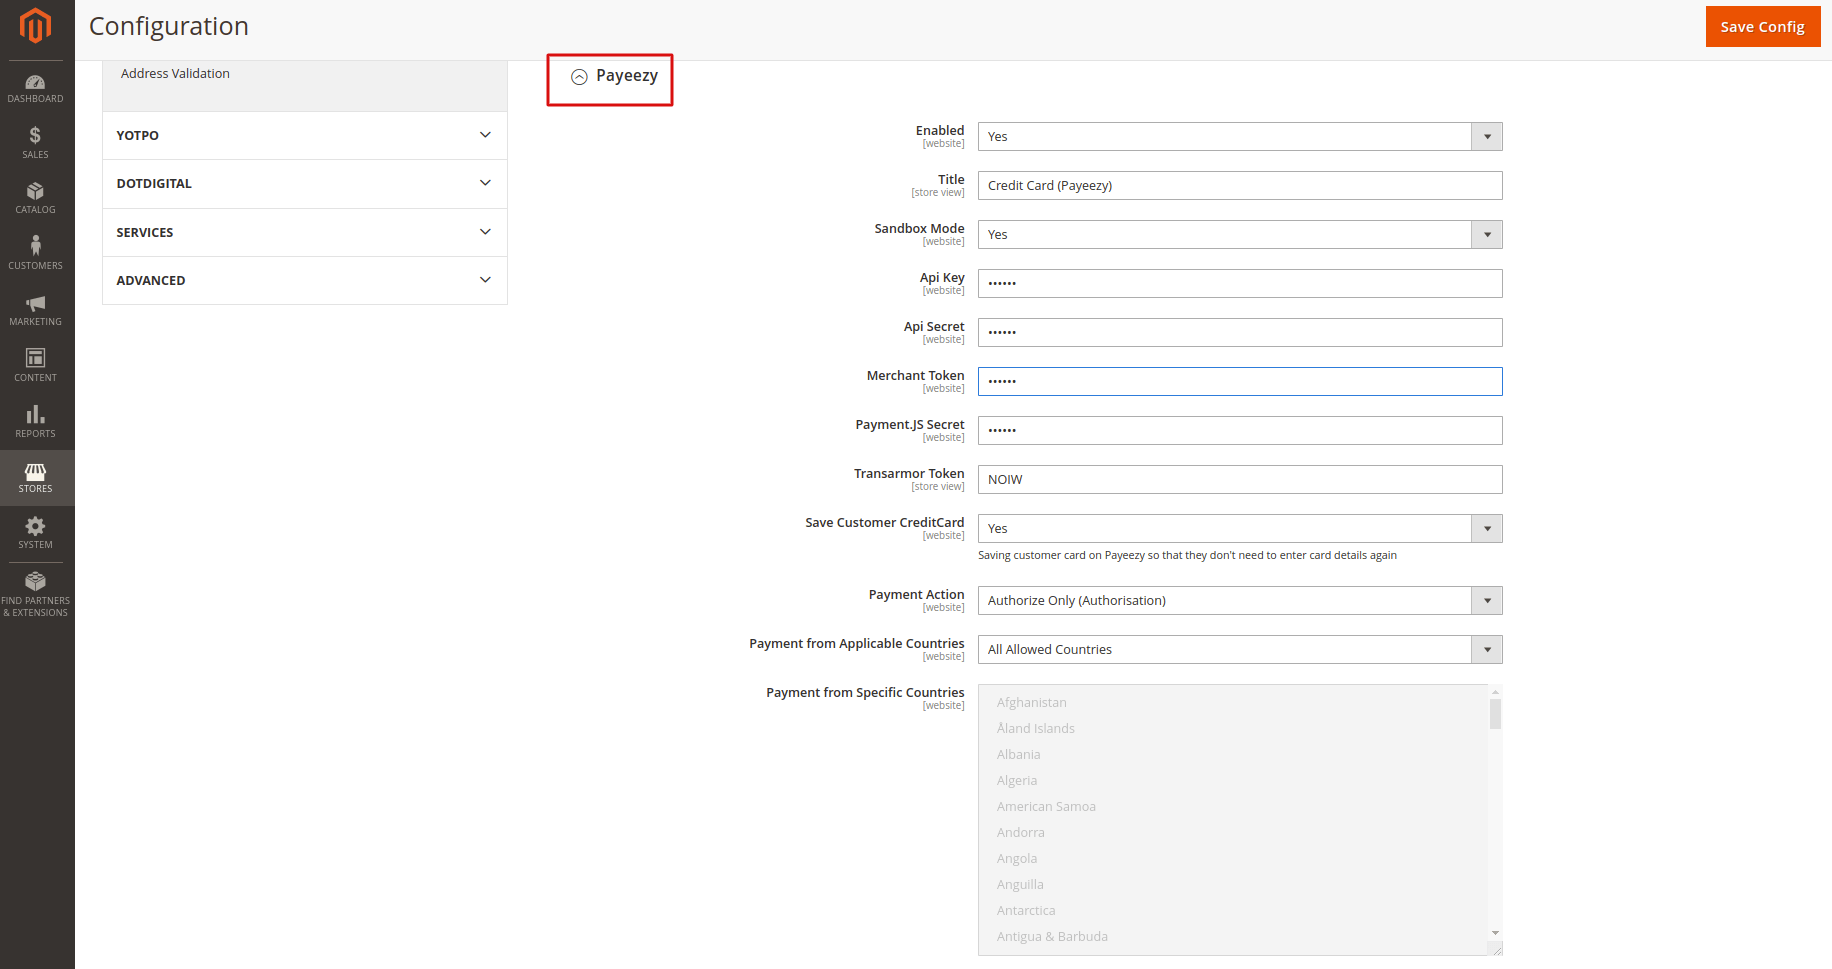
- Enable: Select Yes to enable this payment gateway on your store.
- Title: Enter the name of the payment method that customers will see at the checkout.
- Sandbox Mode: Select Yes to switch to sandbox mode.
- API Key – This is the API Key for the currently selected environment. The API Key is not the same as your login name. Get the API Key here
- API Secret: This is the API Secret for the currently selected environment. The API Secret is not the same as your account password. Get the API Secret here
- Merchant Token – This is the Merchant Token used for the enhanced security in your merchant. Get the Merchant Token here
- Payment.JS Secret – This is the Payment.JS Secret used to authenticate the Payment.JS script. Get the Payment.JS Secret here
- Transarmor Token – This is the TransArmor Token for your merchant account. You must get this information from your First Data representative when enabling TransArmor Tokenization. Get the information here
- Save Customer CreditCard: Select Yes to allow customers to save their card details on Payeezy
- Payment Action: Admin can select between Authorize Only and Authorize and Capture mode
- Authorize Only: Check the card for validity but not charge the account until the order is approved and invoiced.
- Authorize and Capture: Charge the debit/credit card at the time of the order submission
- Payment from Applicable Countries:
- All Allowed Countries: Enable all allowed countries to make payment.
- Specific Countries: Restrict some countries by unselecting them from the Payment from Specific Countries.
- Sort Order: Set the position of the payment in the payment methods list.
Switching to Payment.JS
On March 15th, 2020 Payeezy has completely disabled the legacy Payeezy.JS script and stopped all payment processing through this script. As such, all merchants must switch to Payment.JS by following the below steps:
- Register the Webhook URL with Payeezy. You will need to fill out this form in order to register your site’s webhook URL with Payeezy.
Note: the webhook URL will have this form https://mystore.com/payeezy/webhook
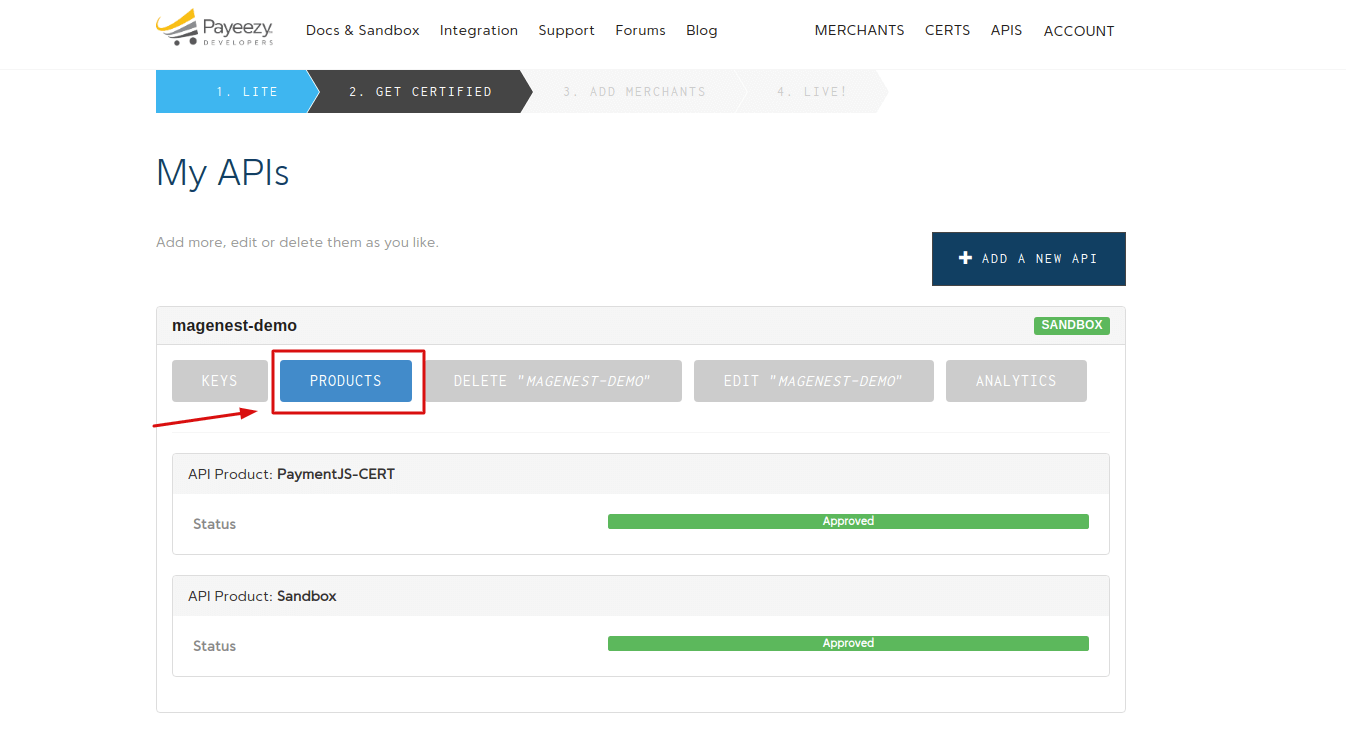
2. Ensure that Payment.JS is enabled. Log into your Payeezy account, click APIs, expand the API for your site, then head to the Products tab and ensure that Payment.JS is enabled.
Storefront Payment Action
Payeezy Payment Form
- When the customer purchases order and reaches the checkout, they'll be able to select Credit Card(Payeezy). In the payment form, the customer will see a save card checkbox, if they select this option, their card details will be saved for the next purchase.
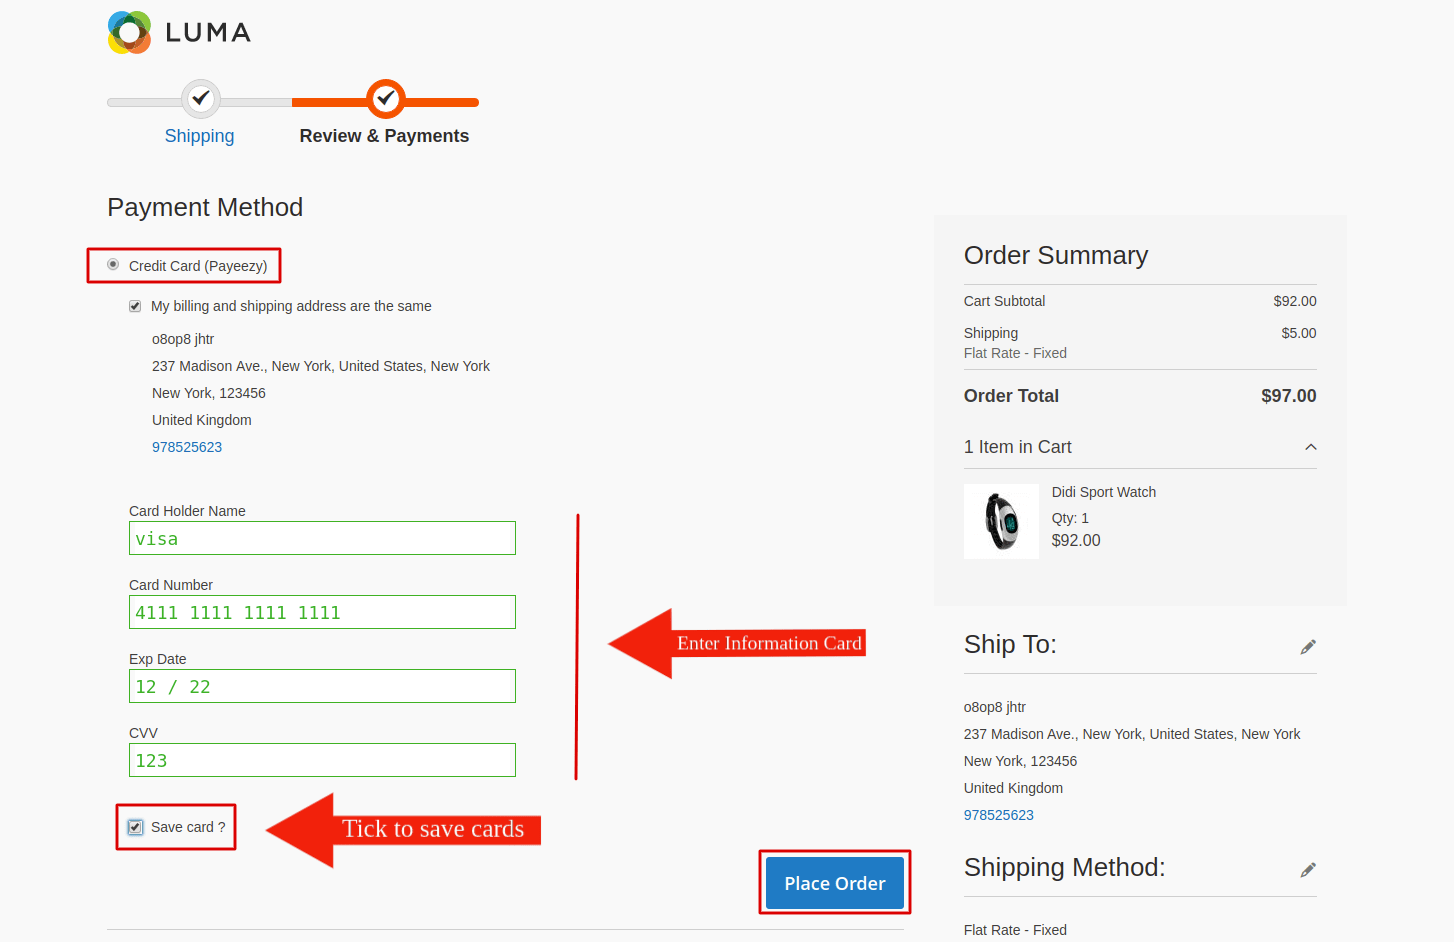
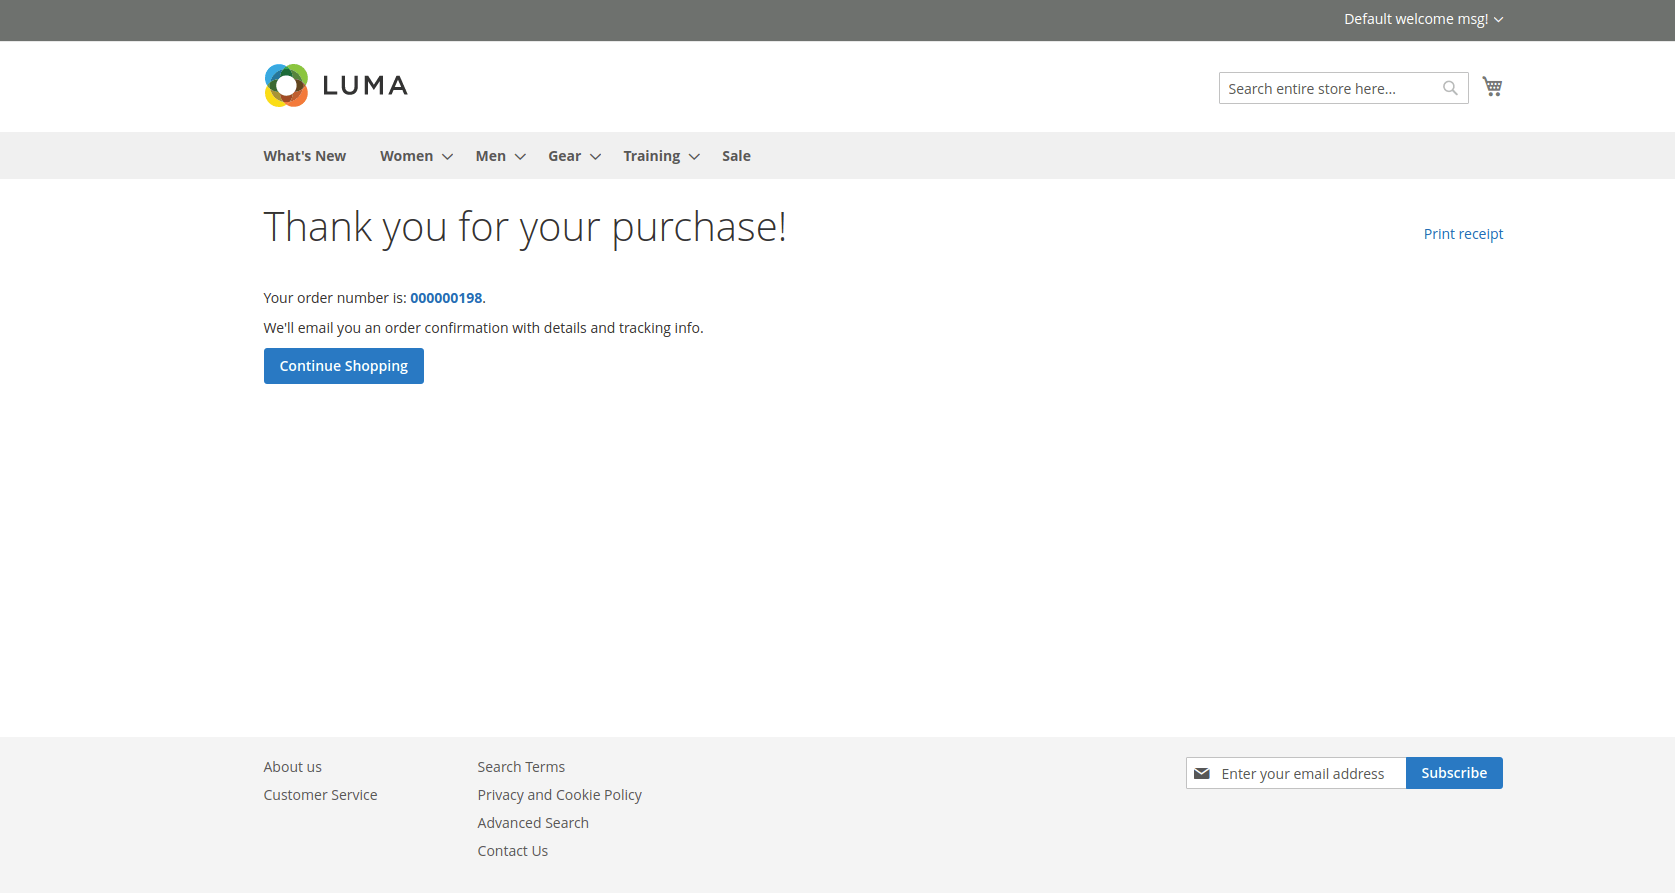
- After entering all valid information for a Payeezy transaction and clicking on the Place Order button, Payeezy system will process and redirect the customer to the success payment page
- Customer can then view their card details in My Account > Payeezy Card Management
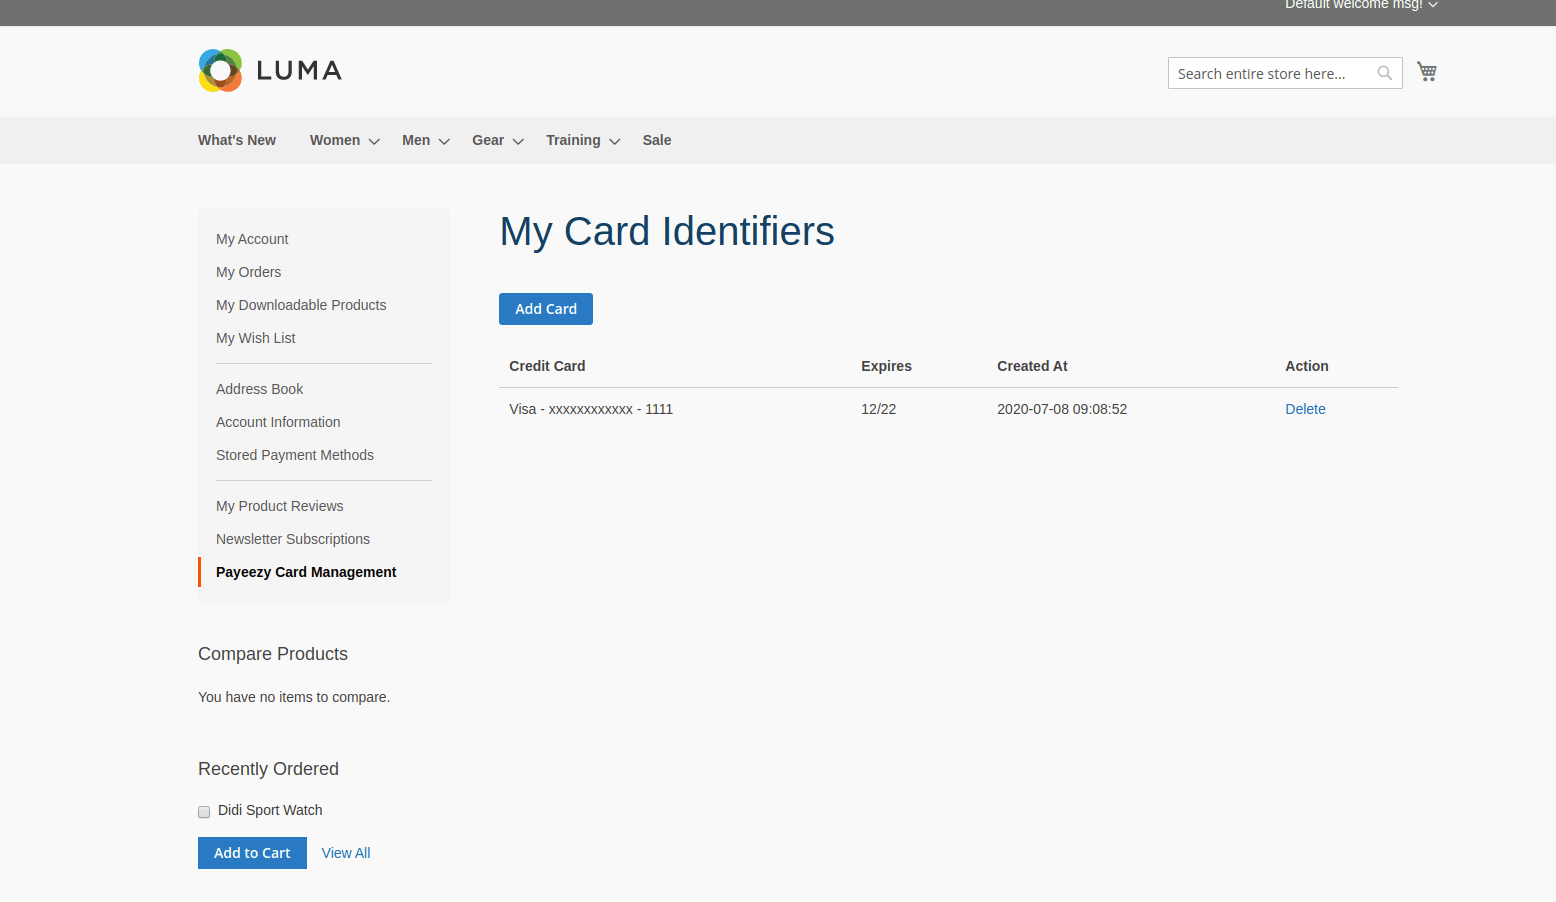
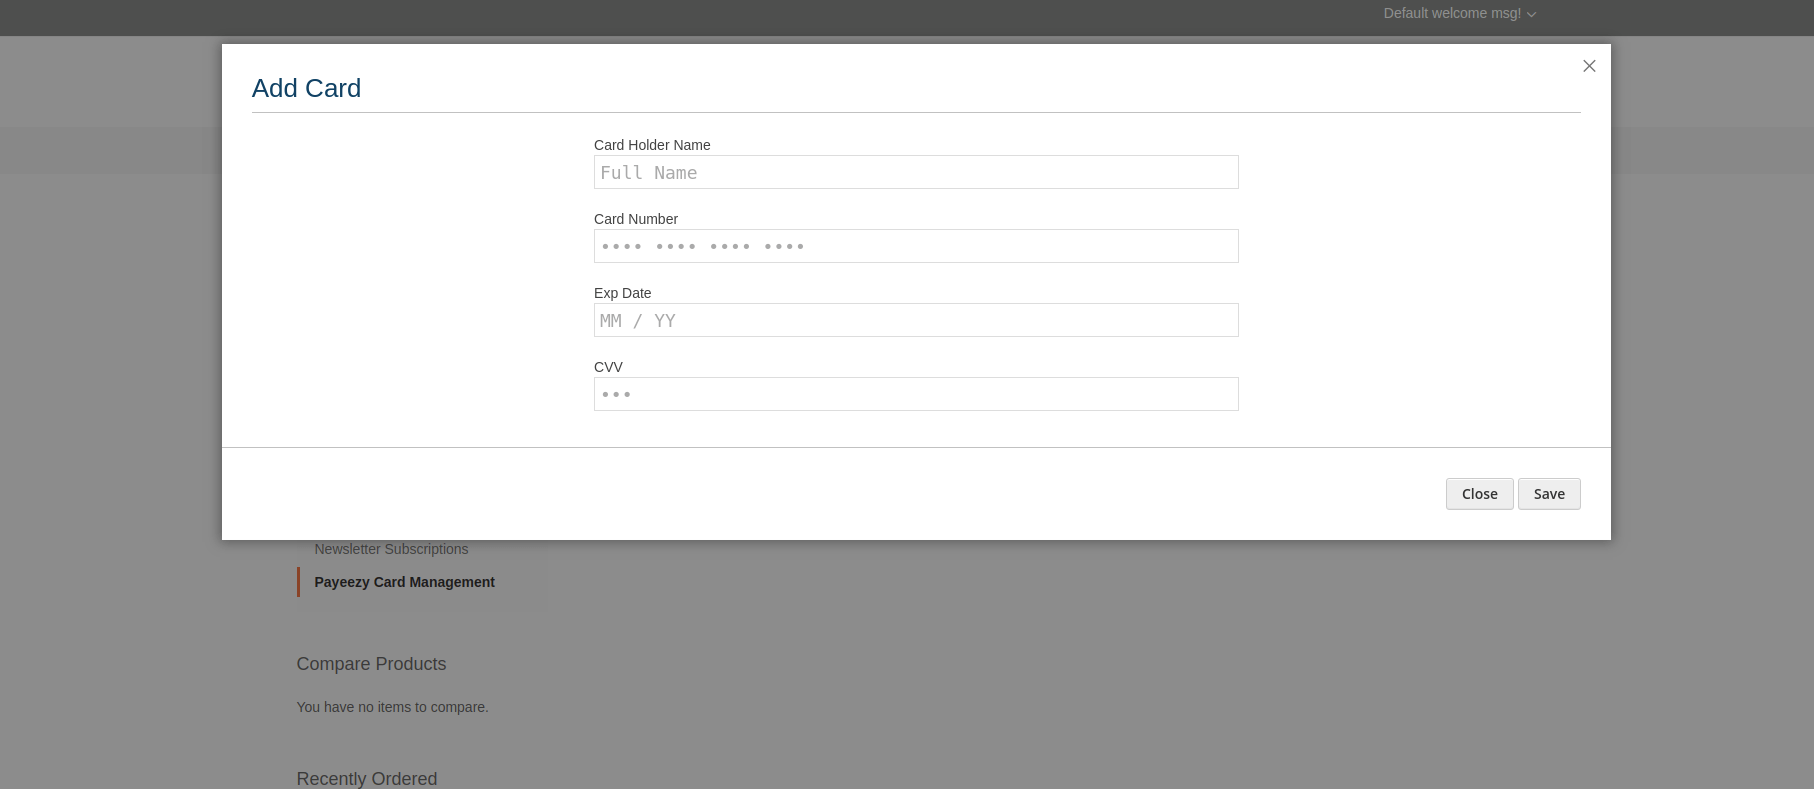
- If the customers haven't saved their card details at the checkout and they want to add their card later, they could also click on the Add Card button here and fill out the form
Order Management
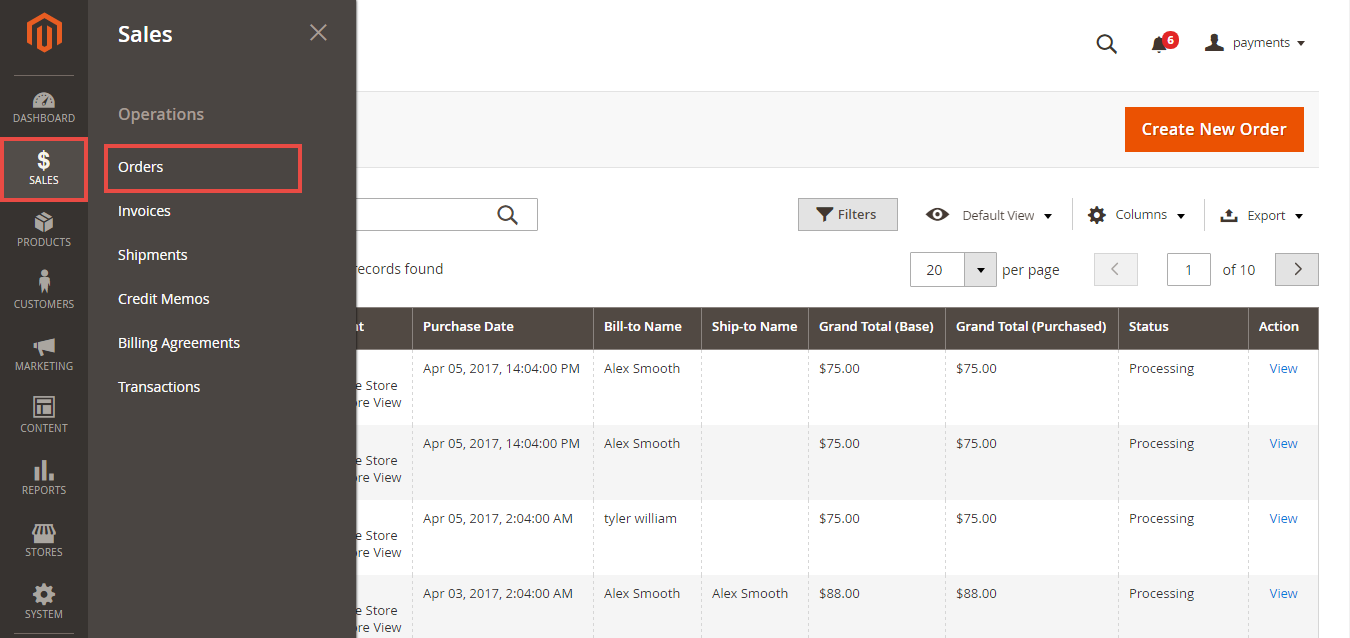
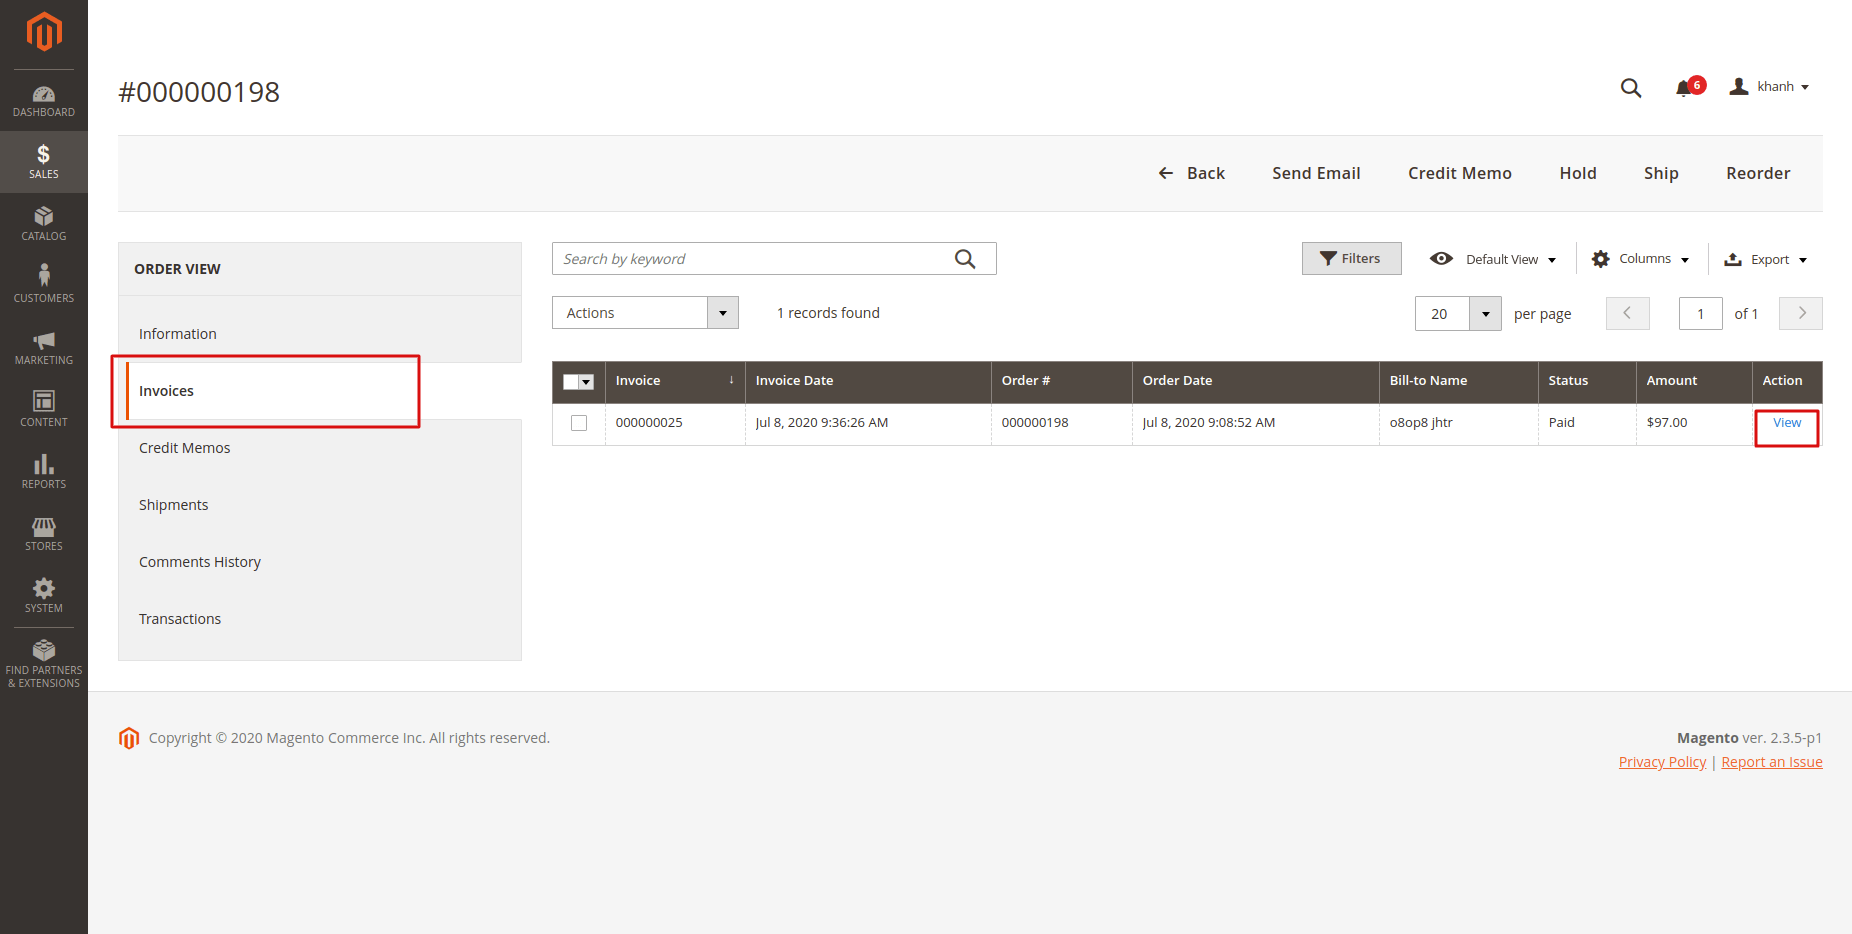
![]() To view Order grid, click Sales > Orders > View
To view Order grid, click Sales > Orders > View
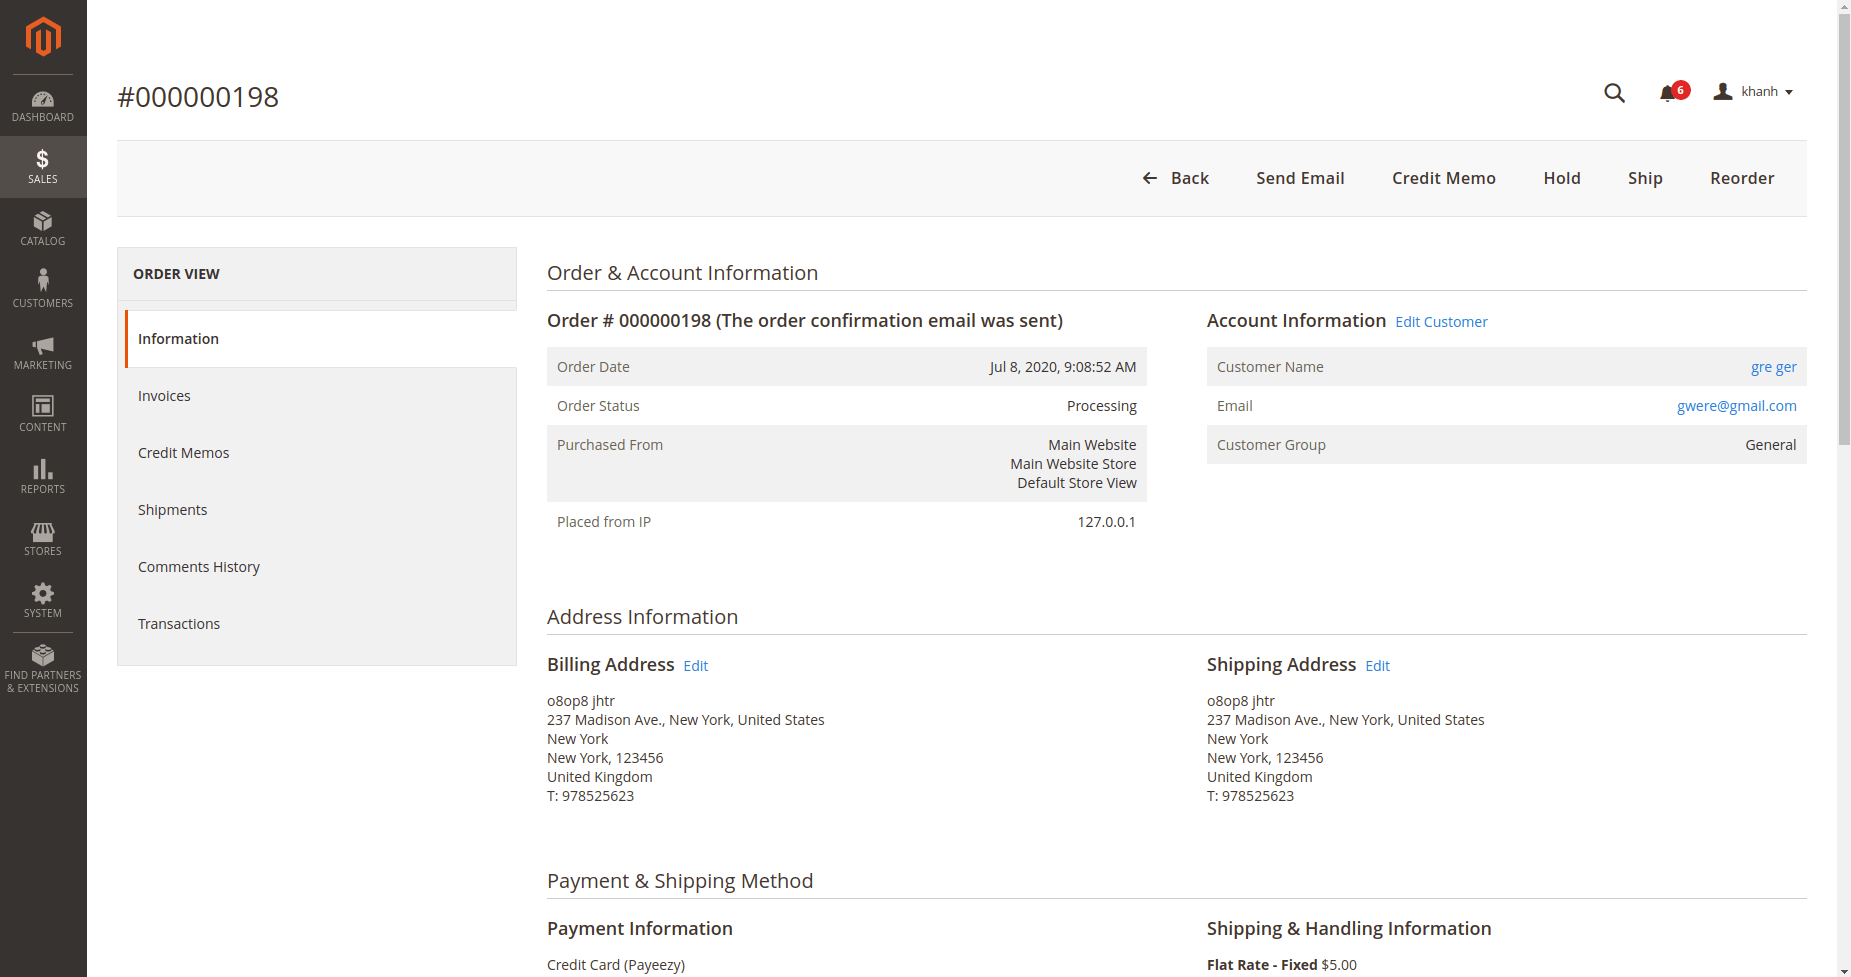
- On the order detail page, admin will be able to CAPTURE the payment (if the gateway is in Authorize Only mode) by sending Invoice to customers, or admin can full refund/partial refund the order.
- To refund an order, please follow the below steps:
- Click Invoices-> View
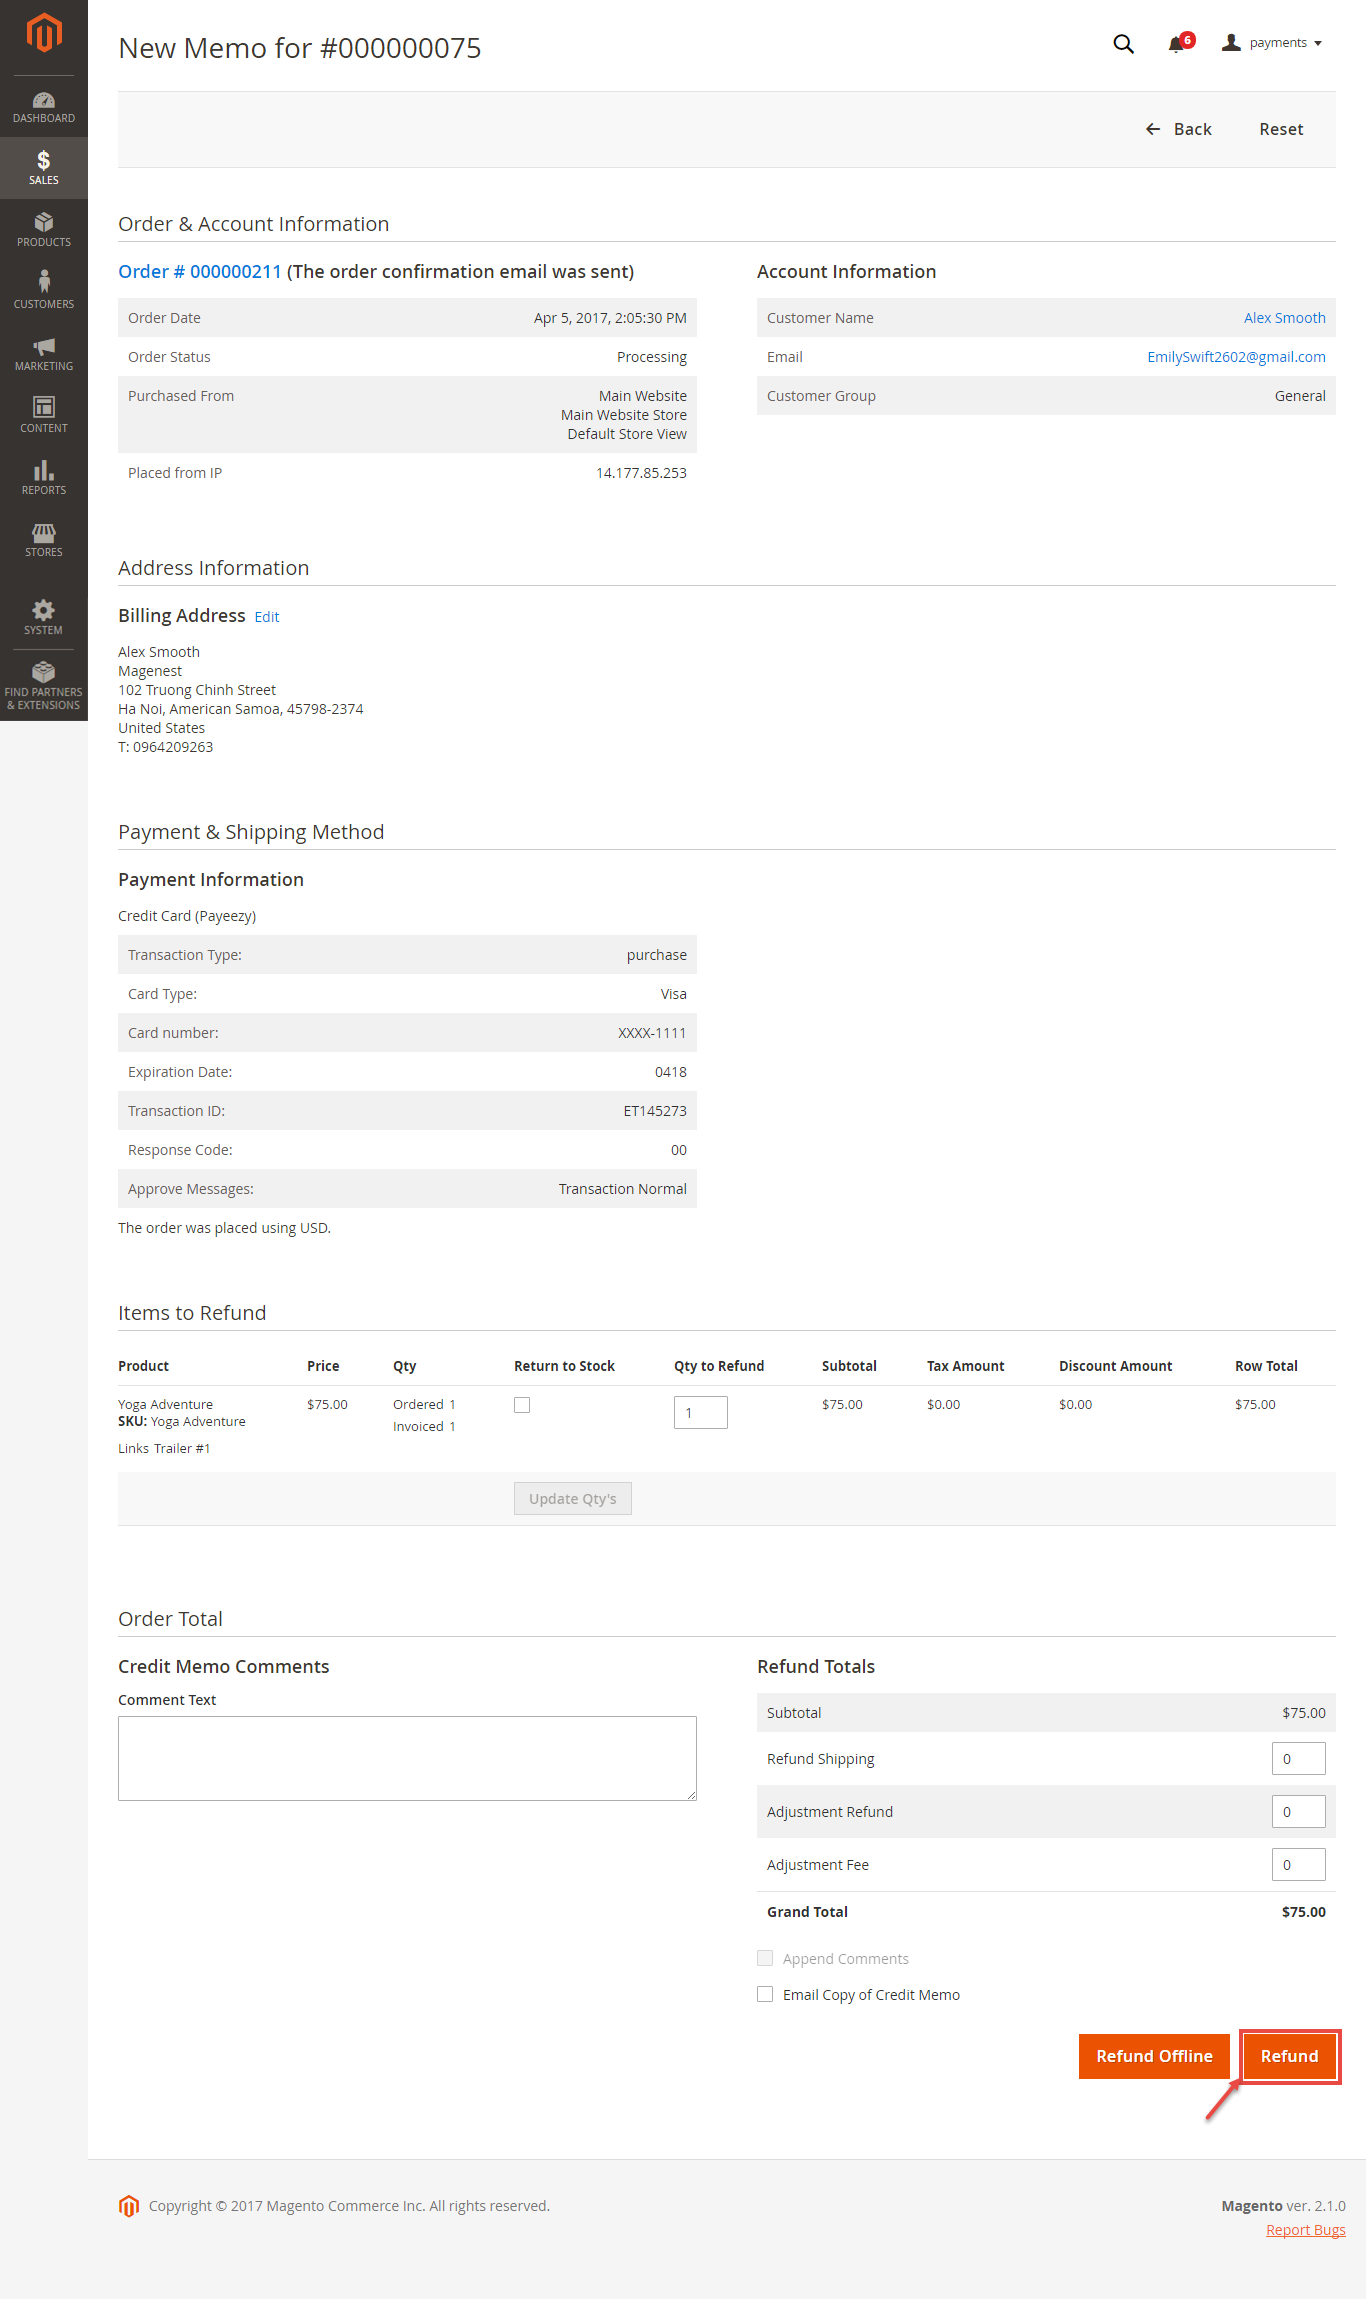
- On the Invoice page, click on the Credit Memo button on the top right corner

- Click on the Refund button at the bottom of the page. In case your order has more than 1 items, you will be able to edit the quantity of refund item
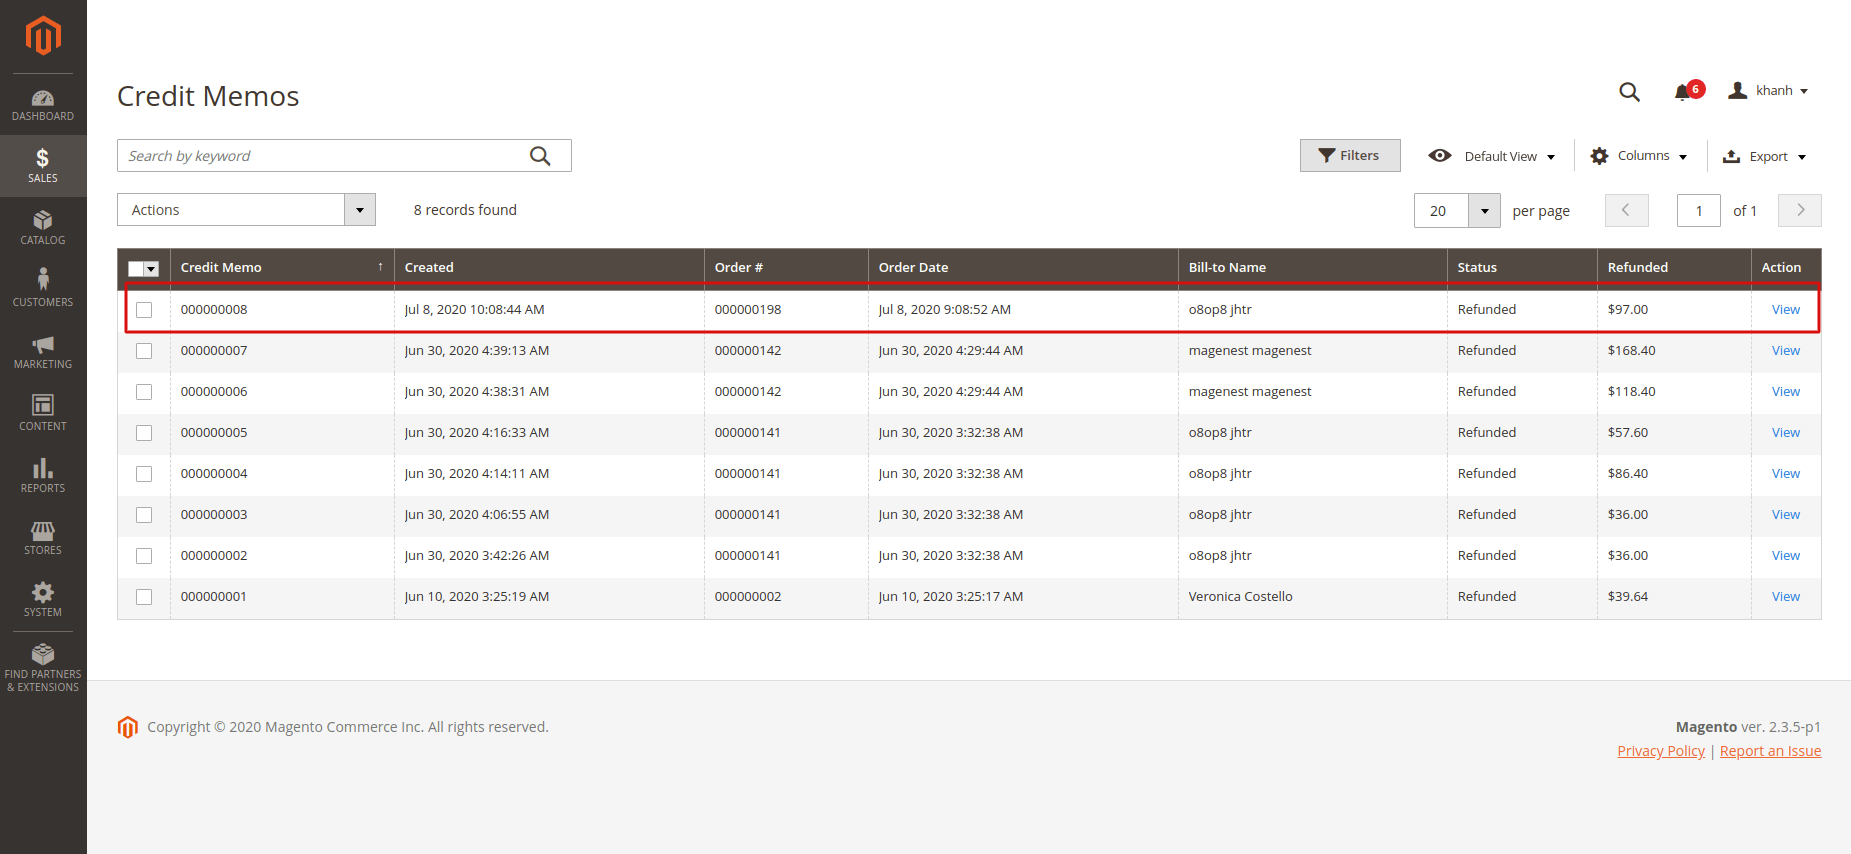
- To see the information of the Refunded product, click Sales > Credit Memos > View
![]() Note: All of the payment processes operate in Payeezy's payment site, NOT in Magento.
Note: All of the payment processes operate in Payeezy's payment site, NOT in Magento.
Update
- When a new update is available, we will provide you with a new package containing our updated extension.
- You will have to delete the module directory and repeat the installation steps above.
- Flush the config cache. Your store and newly installed module should be working as expected.
Support
- We will reply to support requests after 2 business days.
- We will offer a lifetime free update and 6 months of free support for all of our paid products. Support includes answering questions related to our products, bug/error fixing to make sure our products fit well in your site exactly like our demo.
- Support DOES NOT include other series such as customizing our products, installation, and uninstallation service.
Once again, thank you for purchasing our extension. If you have any questions relating to this extension, please do not hesitate to contact us for support.