Thank you for purchasing our extension. If you have any question that is beyond the scope of this document, do not hesitate to leave us an email via [email protected]
Updated: 21/05/2019 | By:Magenest | Support Portal: http://servicedesk.izysync.com/servicedesk/customer/portal/54
Introduction
Rental System for Magento 2 by Magenest is a powerful rental management system. Along with typical products for selling, merchants are able to create products for renting such as clothes, books, cars, etc.
Features for Admin
![]()
- Easily create a rental product with a new product type - Rental product
- Set rental period for products: hour(s), day(s)
- Set the rental price for fixed rental period and additional rental time
- 2 delivery types: shipping or store pickup
- Set the address for store pickup and lead time for shipping
Additional options for rental products with fixed price or based on rental hours
Set advanced reservation period and maximum rent duration for rental products
Set store’s days off and available hours for renting
Add store’s rental policy
Create and assign email templates for rental receipt with unique identification code
Track stock qty, available qty and times rented of rental products
View and change status of rental orders
Change the calendar's locale settings
Features for Customers
- Choose flexible rental duration and multiple options
- View local pickup locations with integrated google maps
- View personal rental history and status
System Requirements
You store must be running on:
Magento Open Source 2.1.x, 2.2.x, 2.3.x
Magento Commerce 2.1.x, 2.2.x, 2.3.x
Configuration
![]() On Magento 2 back end, go to Stores > Configuration.
On Magento 2 back end, go to Stores > Configuration.
![]() On the Configuration page, expand the Magenest section then select Rental System to set general configuration for the extension.
On the Configuration page, expand the Magenest section then select Rental System to set general configuration for the extension.
General Settings
- Pattern To Generate Code: This is the setting for the rental receipt code format. [A2] is to generate 2 random alphabet characters, [N4] is to generate 4 random numbers while "Magenest" is the hard code.
- Google API Keys: Fill in your Google API Keys to integrate Google map. This map will be displayed on the product page. To learn more about the way to get API Key, please visit here.
Rental Settings
Hold: Set the maximum reserved and waiting for payment quantity.
This feature changes how unpaid orders can affect the rentable qty of the product. If you don't want unpaid orders to affect the rentable quantity of other customers, set hold to 0. If you want unpaid orders to fully affect the rentable quantity of other customers, set hold equal to the total quantity of the rental product.Example: rental product has qty = 10, hold =5. A customer placed an order for the duration X to Y with qty = 10, but haven't paid. Hold qty for the product in duration X to Y will be whichever number is smaller between unpaid qty and hold qty, or min(unpaid, hold) = min(10, 5) = 5.
Another customer looking to rent in this duration can rent maximum (stock qty - qty in hold - paid qty) = (10 - 5 - 0) = 5 products. However if the first customer pays for their order, then hold becomes 0 but paid qty becomes 10, so other customers can rent maximum (stock qty - qty in hold - paid qty) = (10 - 0 -10) = 0 product. as in product will be out of stock in this duration.
- Enable Qty Rented: Choose Yes to display the rented quantity on the rental product detail page.
Advance Reservation Period(days): Set a maximum period from now can a rent start. This prevents selecting renting time too far in the future. The default unit for this field is "day".
- Enable Calendar: Choose Yes to enable the rental calendar on My Account page.
Maximum rent duration: Set the maximum length of time for rent.
 Note: Admin can set the maximum rent duration for each rental product on the product setting page.
Days off: Select one or more days off for the store. On the selected day(s), customers can’t choose as start/end date of rent duration.
Opening Hours: Set the store opening time. This is also the available time that customers can select in the hour field.
Default Pickup Address: Set the default address for local pickup products.
Note: Each product can have its own pickup address on the product setting page.

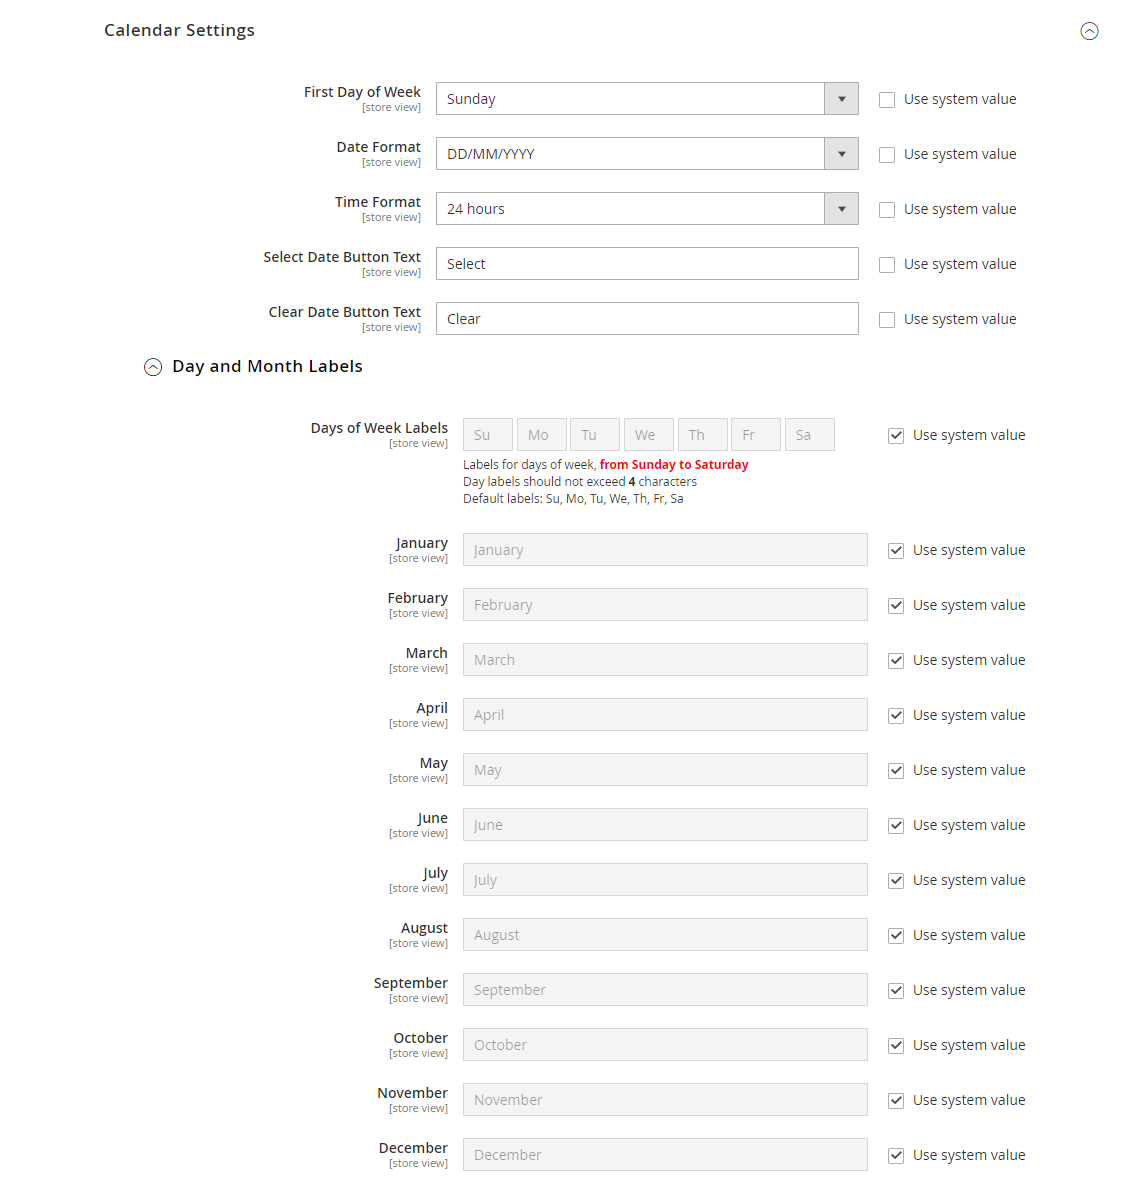
Calendar Settings
This section allows setting the time format on the storefront.
- First day of week: Select the first day of a week that suitable for the schedule of each store.
If you tick on the box Use System Value, the default first day of a week will be set as Sunday. - Date format: Choose the date format that will display on the date box after customers select dates for their rental period. If you tick on Use system value, the default format will be set as MM/DD.
- Select date button text: Enter the text for the select button that customer will click on to set their rental date. The default text is Select.
- Clear date button text: Enter the text for the button which is used to reset the rental period. The default text is Clear.
- First day of week: Select the first day of a week that suitable for the schedule of each store.
Day and Month Label
In this section, admin can set the label for date and month that will display on the Date Picker box when the customer sets their rental period.
- Day of Week Labels: Enter the label for each day of a week on each small box. A week is set from Sunday to Saturday. Note: The Day labels should not exceed 4 characters. If you choose Use system value, the default labels will be set with 2 characters as Su, Mo, Tu, We, Th, Fr, Sa.
- Then enter the labels for each month. You can tick on the boxes Use system value to set the labels as default. The default labels for each month is set with full character
- Day of Week Labels: Enter the label for each day of a week on each small box. A week is set from Sunday to Saturday.
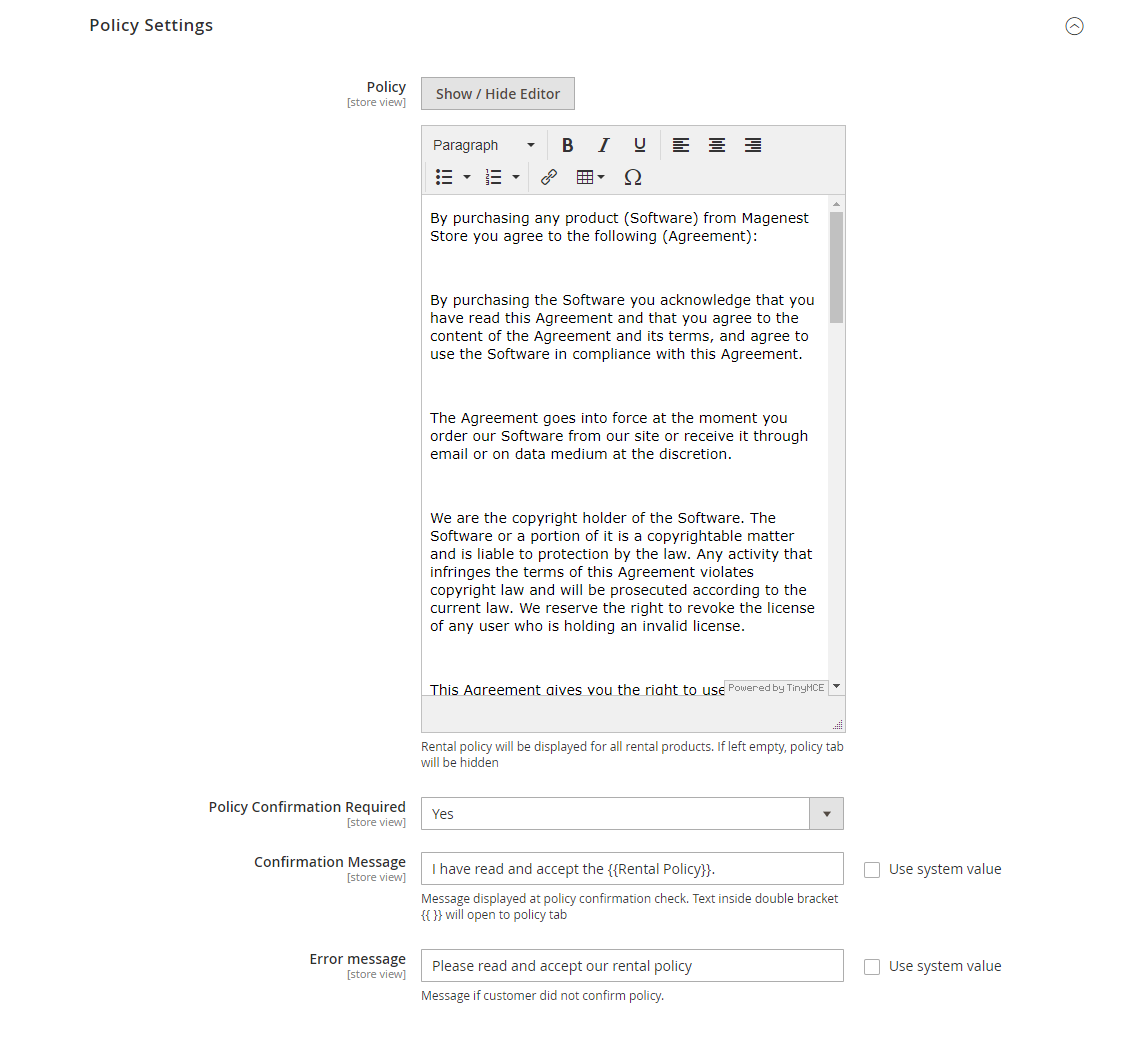
Policy Setting
- Click on the button Show/Hide Editor to edit the policy. You can insert the illustrated image for the policy. Then enter the rental policy.
Note that rental policy will be display for all rental products. If the text is left empty, the policy tap will be hidden. - Policy Confirmation Required: If choose Yes, customers will be required to tick on the confirmation box before renting any product.
- Confirmation Message: Enter the message that will be displayed at the policy confirmation checkbox. The text inside the double bracket will redirect to the policy tab. The default message on this section is “I have read and accept the {{rental policy}}”.
- Error message: Enter the message that will show up in case the customer does not confirm the policy. The default message in this section is “Please read and accept our rental policy”.
Manage Rental Orders
Paid rental orders will generate rental data in Products > Magenest Rental Management > Orders.
On this page, you can:
View rental data
Set pending rentals to delivered
Set delivered rentals to returned
View order
Resend receipt
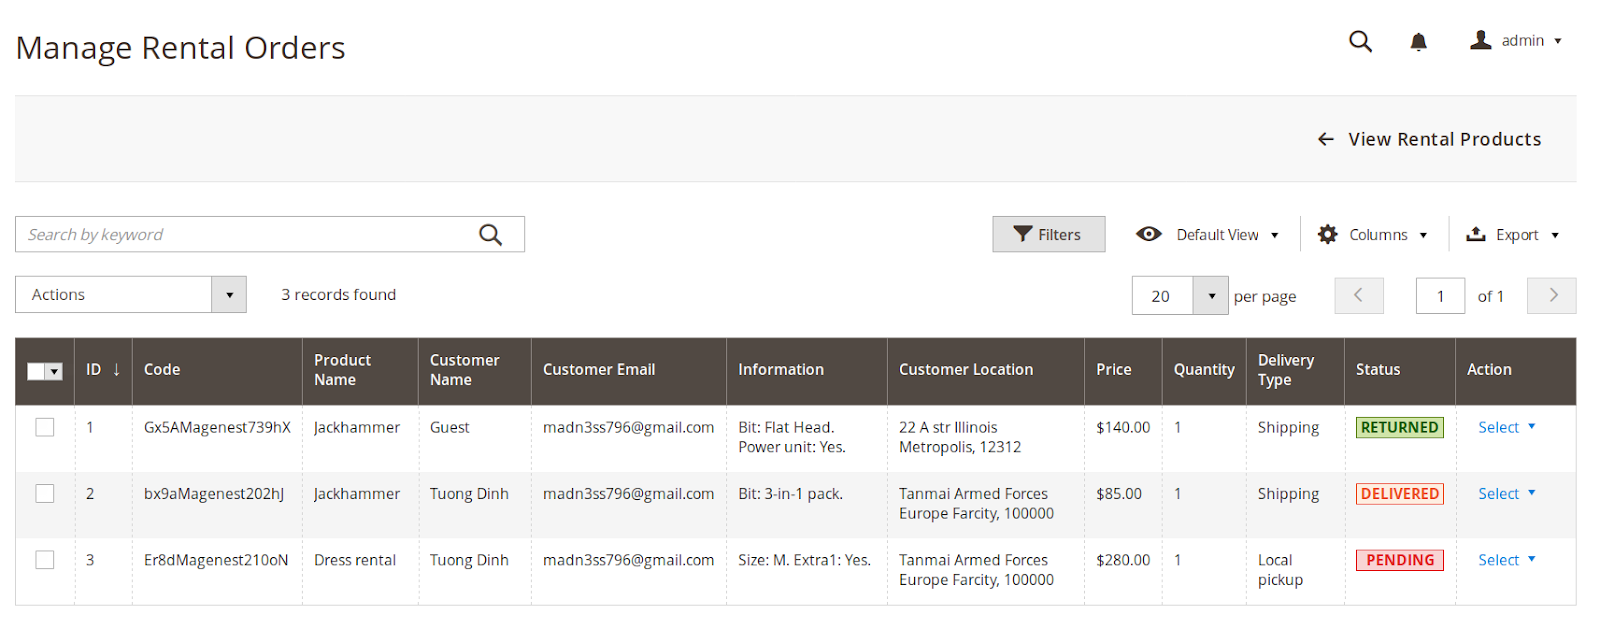
View rental item data
From backend, when viewing orders/invoices/creditmemos with rental products, rent duration and additional options will be displayed:

Storefront Functions
From category view, customers can see the pricing of rental product. Add to Cart will bring customer to product page. Customer can choose start and finish time of the rent. Google maps is displayed for local pickup products if pickup address is fulfilled.
For shipping products, approximate ship time (lead time) will be shown instead:
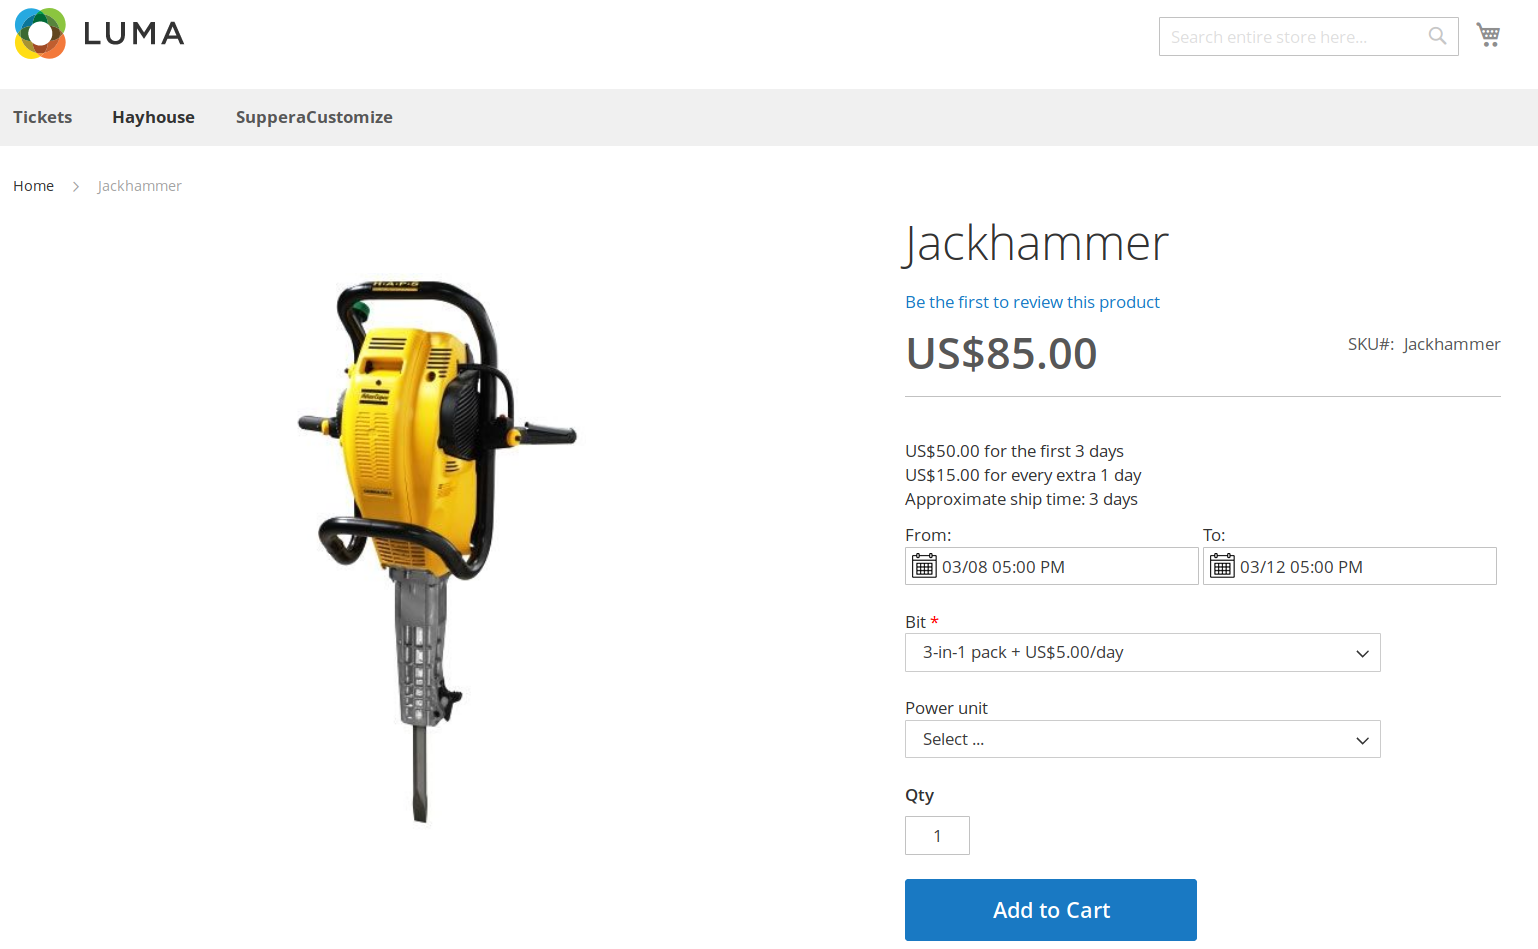

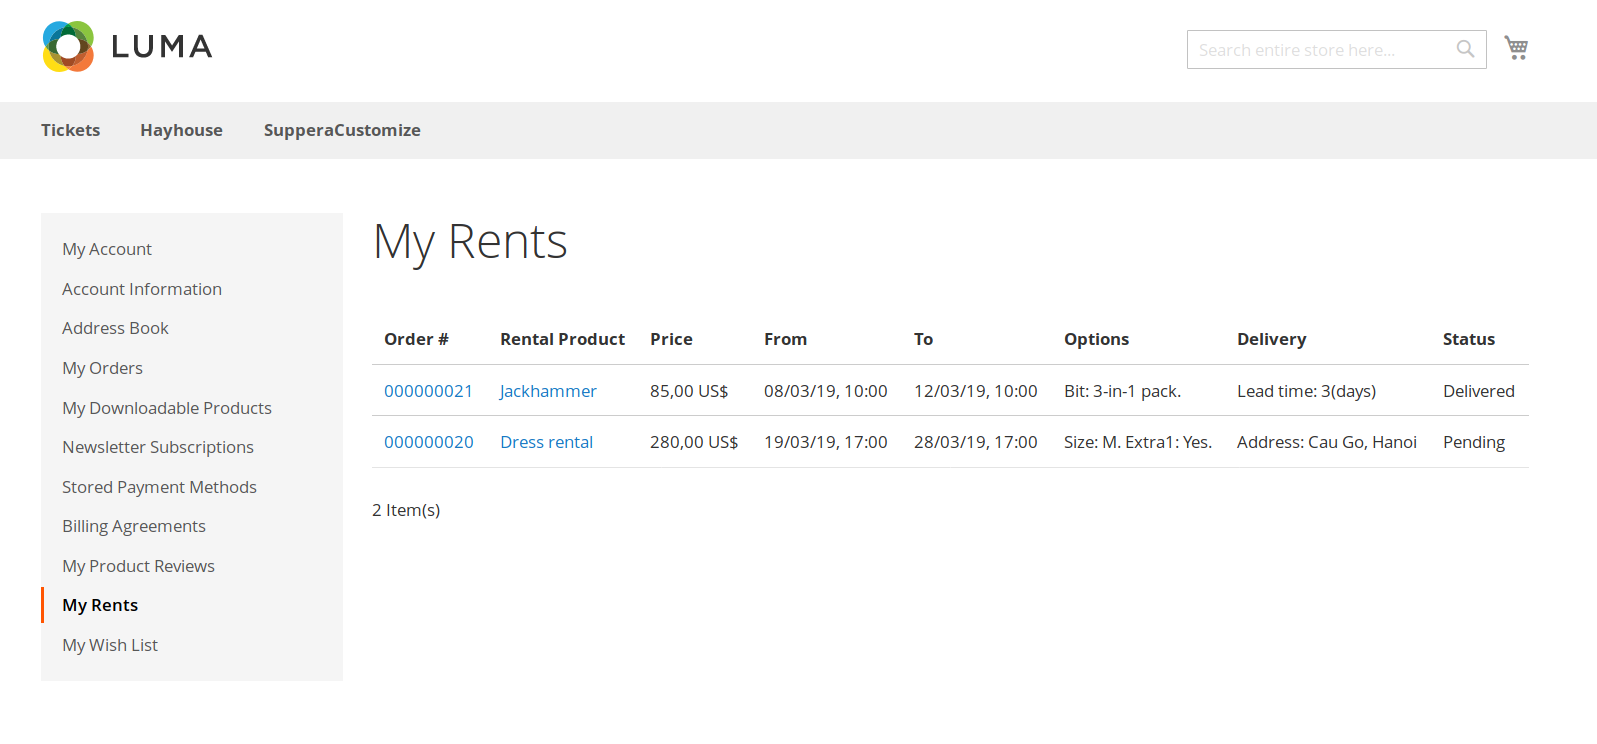
After the order is paid for, customer can view it from their Dashboard -> My Rents. Here customer can check the duration, options, related product/order and status.
Translation
- Translation for frontend phrases is supported. Please follow Magento's guide on the site below to translate to your own language https://devdocs.magento.com/guides/v2.3/frontend-dev-guide/translations/xlate.html
Note that default US English i18n is provided under /i18n/en_US.csv
Update
- When a bug fix or new feature is released, we will provide you with the extension's new package.
- All you need to do is repeating the above installing steps and uploading the package onto your store. The code will automatically override.
- Flush the config cache. Your store and newly installed extension should be working as expected.
Support
- We will reply to support requests within 2 business days.
- We will offer lifetime free update and 6-month free support for all of our paid products. Support includes answering questions related to our products, bug/error fixing to make sure our products fit well in your site exactly like our demo.
- Support DOES NOT include other services such as customizing our products, installation and uninstallation service.
Once again, thank you for purchasing our extension. If you have any questions relating to this extension, please do not hesitate to contact us for support.
Add a new rental product
![]() On the admin sidebar, go to Catalog > Magenest Rental Management > Rental Products.
On the admin sidebar, go to Catalog > Magenest Rental Management > Rental Products.
![]() On the Manage Rental Products page, admin can edit or delete available rental products on list gird. Export using CSV and Excel XML are supported.
On the Manage Rental Products page, admin can edit or delete available rental products on list gird. Export using CSV and Excel XML are supported.
![]() To add a new rental product, click on Add Rental Product button, go to New Product page.
To add a new rental product, click on Add Rental Product button, go to New Product page.
- Set the basic configuration for the new product such as name, quantity, category, image.

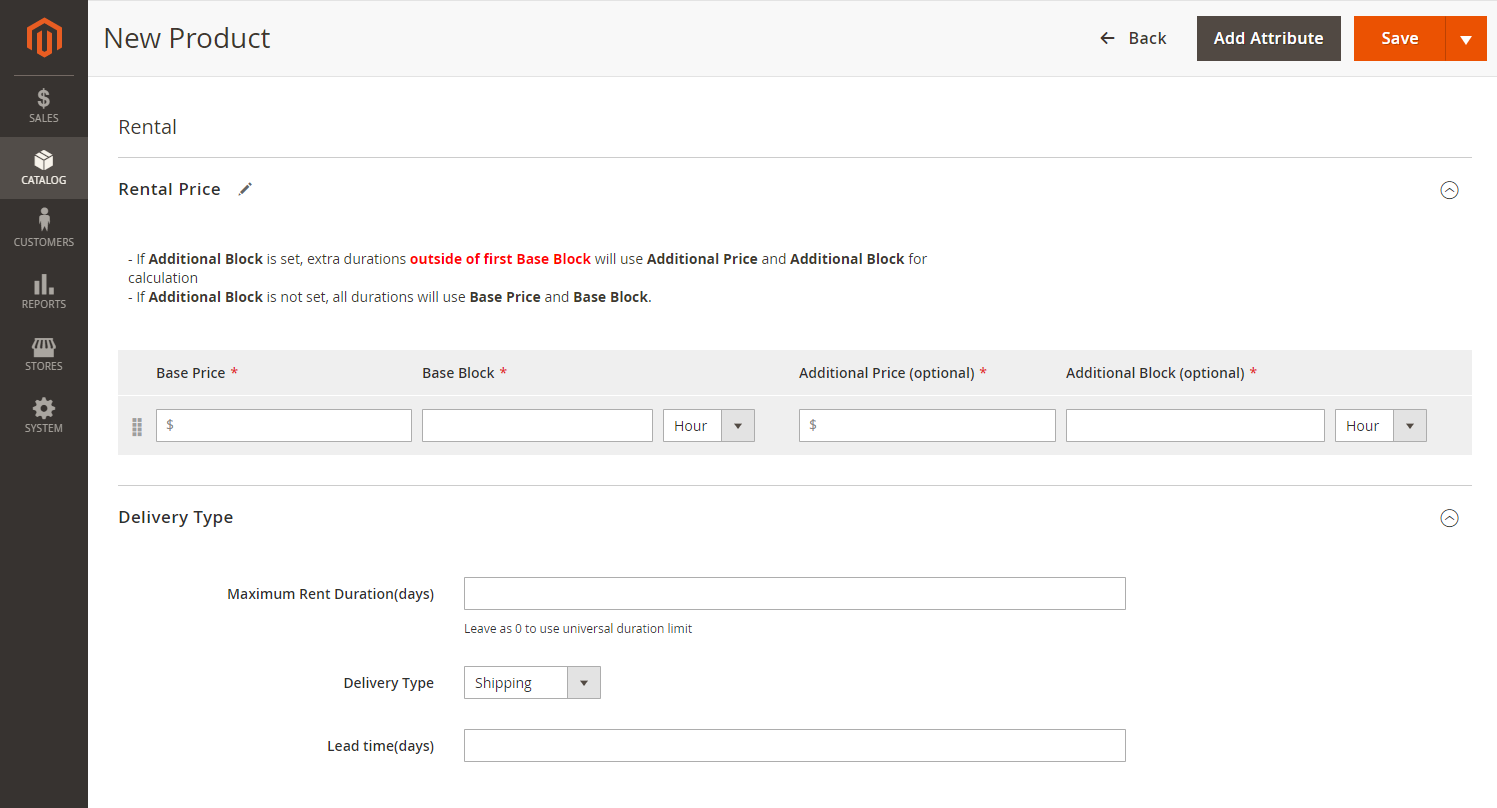
![]() Expand the Renal section to set the rent functions for the product.
Expand the Renal section to set the rent functions for the product.
Rental Price
Base price and Base block (required): Set the rental price for each rental period/duration (odd duration are treated as extra block/period). The base rental price will override the product’s base price value.
Additional price and additional block (optional): Set a different price for an additional duration which exceeds the base block.
For example, the base price for Lady Dress is $10 for 5 days. From the 6th day, the additional charge for the Lady Dress is $5 per day.
Rental price calculation:
Without additional block: (duration/base block) rounded up, then multiply by base price.
With additional block:
If the duration is smaller or equals base block: base price
If the duration is longer than base block: Base price + [(duration - base block)/(additional block) rounded up, then multiply by additional price]
Delivery type
Maximum rent duration (days): If empty, products will use default maximum rent duration value from Store Configuration.
Delivery Type: select a delivery type for rental products. There are 3 options: Shipping, Local Pickup and Both.
If choose Shipping, set the lead time. Customer cannot start renting during the lead time period. Lead time is displayed on the product page.
If choose Local Pickup, enter an address that customer can get the rental products. The address will be displayed on the product page on Google map.
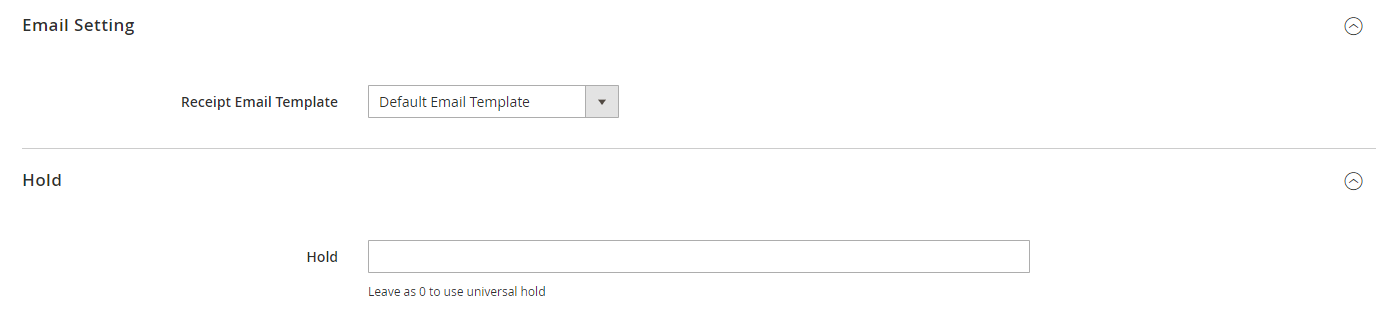
Email Setting
Select a template for receipt email. Admin can choose between default template or another customized template (created from Marketing -> Email Templates). Default email template is as follows:
{{template config_path="design/email/header_template"}}

<p>{{trans "Your rental order from %store_name." store_name=$store.getFrontendName()}}</p>
<ul>
	<li><strong>{{trans "Product: "}}</strong> <em> {{var title}}</em></li>
	<li><strong>{{trans "Order: "}}</strong> {{var order_id}}</li>
	<li><strong>{{trans "Customer: "}}</strong> {{var customer_name}}</li>
	<li><strong>{{trans "Code: "}}</strong> {{var rental_code}}</li>
	<li><strong>{{trans "Rent From: "}}</strong> {{var start_time}}</li>
	<li><strong>{{trans "Rent To: "}}</strong> {{var end_time}}</li>
	<li><strong>{{trans "Qty: "}}</strong> {{var qty}}</li>
	<li><strong>{{trans "Delivery type: "}}</strong> {{var rent_type}</li>
	<li><strong>{{trans "Additional Option: "}}</strong> {{var additional_options}}</li>
</ul>

{{template config_path="design/email/footer_template"}}
Hold
- Hold: Set the maximum reserved and waiting for payment quantity.
This feature changes how unpaid orders can affect the rentable qty of the product. If you don't want unpaid orders to affect the rentable quantity of other customers, set hold to 0. If you want unpaid orders to fully affect the rentable quantity of other customers, set hold equal to the total quantity of the rental product.
Example: rental product has qty = 10, hold =5. A customer placed an order for the duration X to Y with qty = 10, but haven't paid. Hold qty for the product in duration X to Y will be whichever number is smaller between unpaid qty and hold qty, or min(unpaid, hold) = min(10, 5) = 5.
Another customer looking to rent in this duration can rent maximum (stock qty - qty in hold - paid qty) = (10 - 5 - 0) = 5 products. However if the first customer pays for their order, then hold becomes 0 but paid qty becomes 10, so other customers can rent maximum (stock qty - qty in hold - paid qty) = (10 - 0 -10) = 0 product. as in product will be out of stock in this duration.
![]() Note: the Hold setting here will override the same setting on the configuration page.
Note: the Hold setting here will override the same setting on the configuration page.
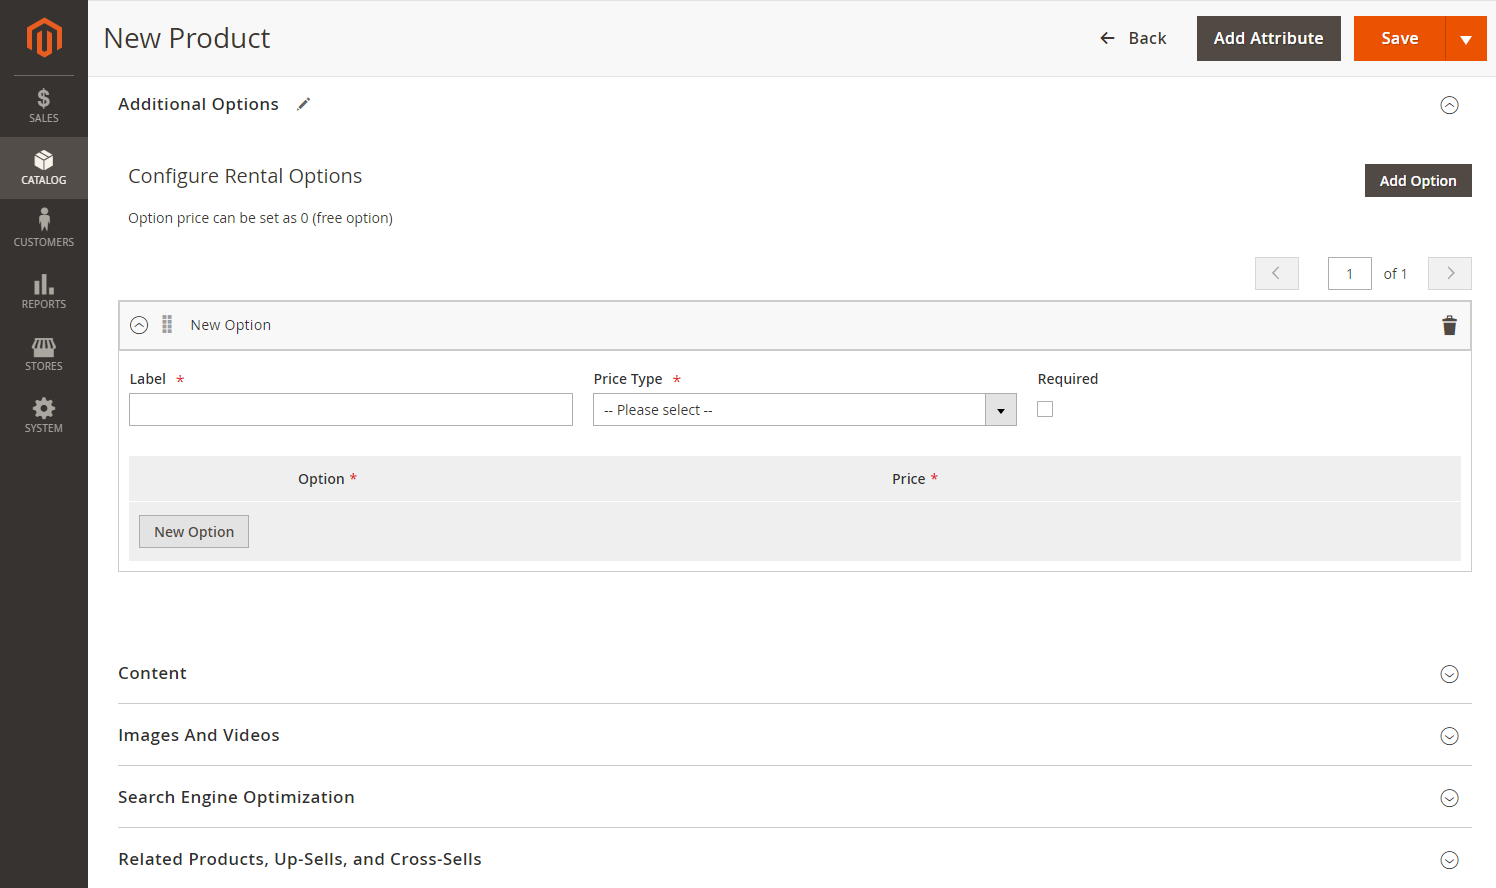
Additional Options
- Admin can add unlimited additional items that customers can rent with the main product.
- The option price can fixed, or calculated per day/per hour.
Manage Rental Orders
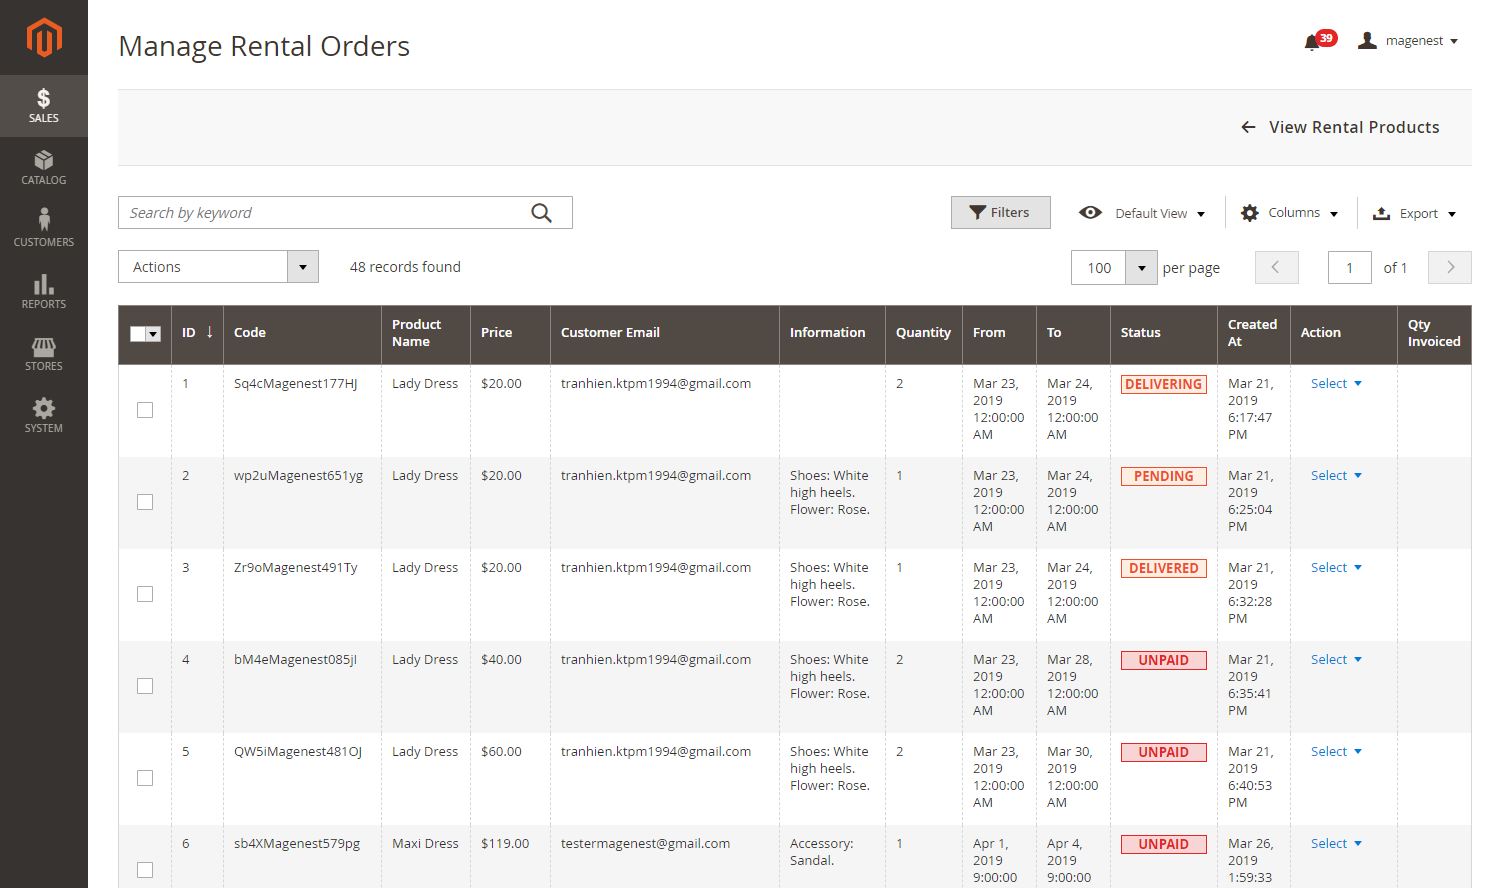
![]() On the admin sidebar, go to Sales > Rental Orders. On Manage Rental Orders page, admin can view orders, send receipt and change rental order status manually.
On the admin sidebar, go to Sales > Rental Orders. On Manage Rental Orders page, admin can view orders, send receipt and change rental order status manually.
![]() There are some default status of rental orders:
There are some default status of rental orders:
- Pending: Customers place a rental order successfully.
- Delivering: Rented items are being shipped to billing address.
- Delivered: Customers receive the rented items.
- Returning: Rented items are in the way back to store.
- Complete: When items already back in store.
- Cancel: Khi cancel order thì item chưa invoice (invoice = 0) thì status chuyển thành cancel, còn invoice rồi thì giữ nguyên status cũ