Thank you for purchasing our extension. If you have any questions that are beyond the scope of this document, do not hesitate to leave us an email via our email address below.
Created: 09/01/2018 | By: Magenest | Support Portal: http://servicedesk.izysync.com/servicedesk/customer/portal/37
Introduction
![]()
Magento 2 Sage Pay and Subscription Extension is the most secured payment gateway in UK.
Highlight Features
- Allow admins to integrate their SagePay account to their magento stores.
- Allow customers to checkout using credit card payment
- Enable or disable the gateway.
- Keep revenue coming consistently with subscription plan manager.
- Specify allowed credit card types and countries.
- Secure payment info with iFrame payment.
- Support multiple stores.
- Integrate Save Card Function.
- Choose between Authorize Only or Authorize and Capture.
- Add a layer of security with 3D Secure Checkout.
- Enable CVC verification.
- Customer can capture invoice up to quantity product that they desired.
- Admins can easily check transaction history.
- Admins can easily manage profiles in the backend.
- Customers can also manage their profiles and cancel them if desired.
- Admin can create credit memo for refunding.
Easily perform Gift Aid enabled in Sage Pay.
System Requirements
Your store should be running on Magento 2 version 2.1.x.; 2.2.x, 2.3.x
Video Tutorial
Configuration
Firstly, you have to configure the SagePay Payment Extension at Magento back end by clicking on Stores > Configuration > Sales > Payment Methods > SagePay Payment Gateway.
![]() In Global Config:
In Global Config:
Fill in Vendor Name, Integration Key, Integration Password obtained from your SagePay credentials. (Click on Create API credentials)
In our example, we use account and API of SagePay to implement transaction in test mode. You can obtain this by going to https://test.sagepay.com/mysagepay/transactions.msp
![]() Turn on Test Mode when you use test credentials. Choose the Live Mode when you go live.
Turn on Test Mode when you use test credentials. Choose the Live Mode when you go live.
You can also turn on Ignore address check to skip the address and postcode check in test mode.
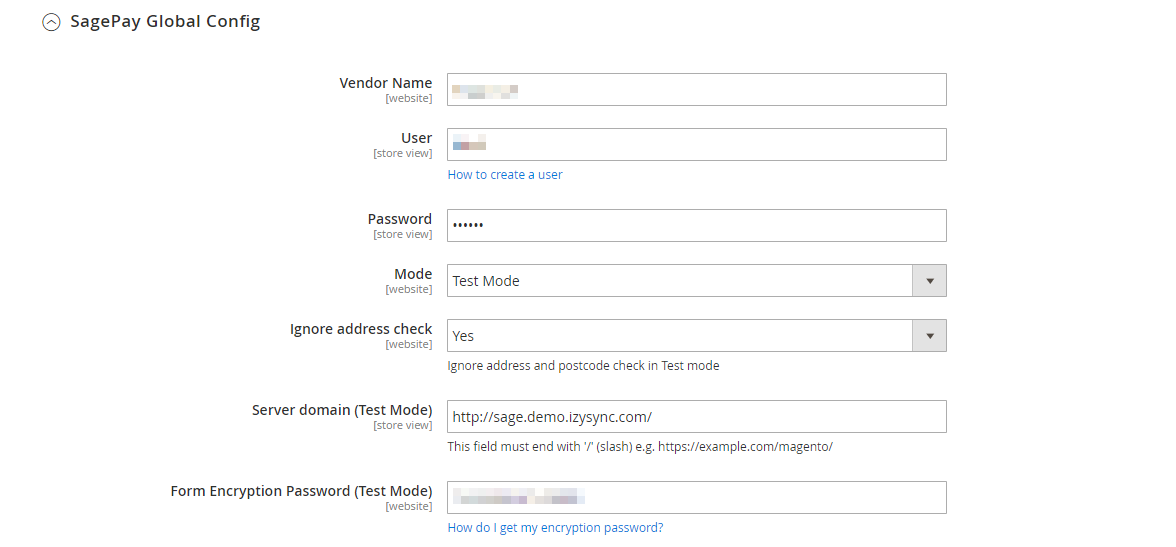
![]() Vendor Name, User and Password: The credentials you got from Sage Pay in the above step.
Vendor Name, User and Password: The credentials you got from Sage Pay in the above step.
![]() Server domain: Fill in your site domain
Server domain: Fill in your site domain
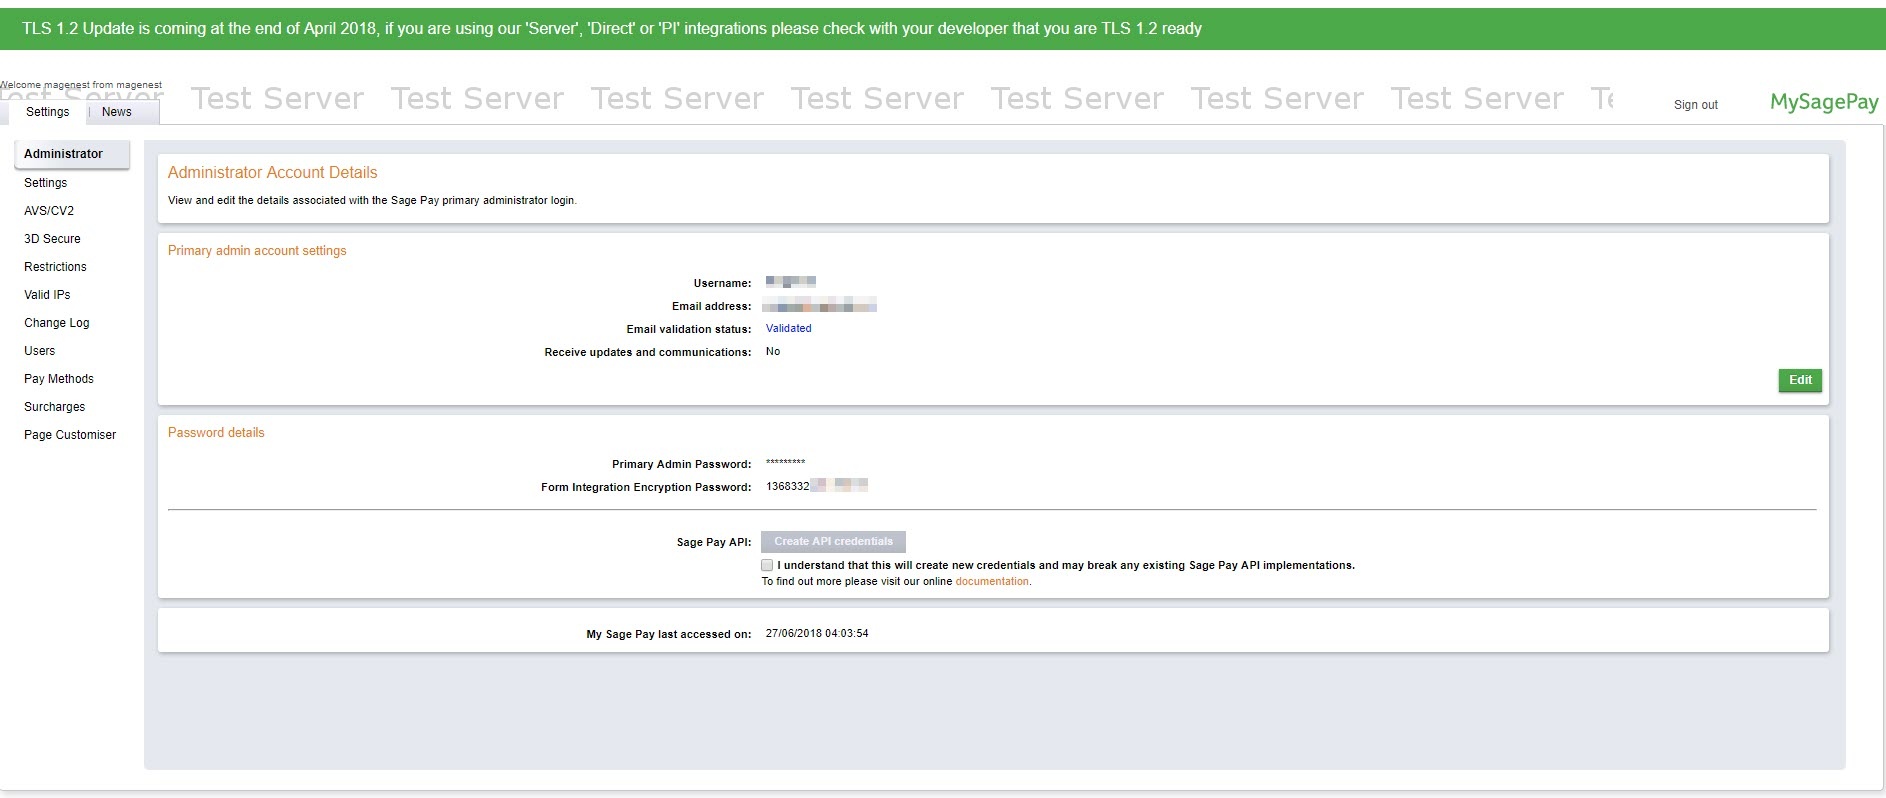
![]() Form Encryption Password: Obtained from SagePay. Go to Settings > Administrators > Password Details
Form Encryption Password: Obtained from SagePay. Go to Settings > Administrators > Password Details
![]() Apply 3D Secure with 4 options: Default, Force, Disable, Force & Ingore
Apply 3D Secure with 4 options: Default, Force, Disable, Force & Ingore
- Default: Use Default My SagePay Settings
- Force: Apply authentication even if the 3D Secure is turned off
- Disable: Disable authentication and rules
- Force & Ignore: Apply authentication but ignore rules
![]() Apply AVS, CVC Check with 4 options: Default; Force; Disable; Force & Ingore
Apply AVS, CVC Check with 4 options: Default; Force; Disable; Force & Ingore
- Default: Use Default My SagePay Settings
- Force: Apply authentication even if the AVS, CVC Check is turned off
- Disable: Disable authentication and rules
- Force & Ignore: Apply authentication but ignore rules
![]() Allow Gift Aid: Allow customers to donate to charity. Note that this function only works if your Sage account is enabled for Gift Aid.
Allow Gift Aid: Allow customers to donate to charity. Note that this function only works if your Sage account is enabled for Gift Aid.
![]() Collect Recipient Details:
Collect Recipient Details:
![]() Send transaction email: There are 3 options
Send transaction email: There are 3 options
- Do not send to neither customer or vendor email: Will not send Sage Pay transactions to customers or vendors via emails
- Send customer and vendor transaction email: Will send Sage Pay transactions to both customers and vendors via emails
- Send vendor email but not customer email: Will send Sage Pay transactions to vendor email.
![]() Payment language: The language of the payment page (English, French, German, Spanish, Portuguese, Dutch).
Payment language: The language of the payment page (English, French, German, Spanish, Portuguese, Dutch).
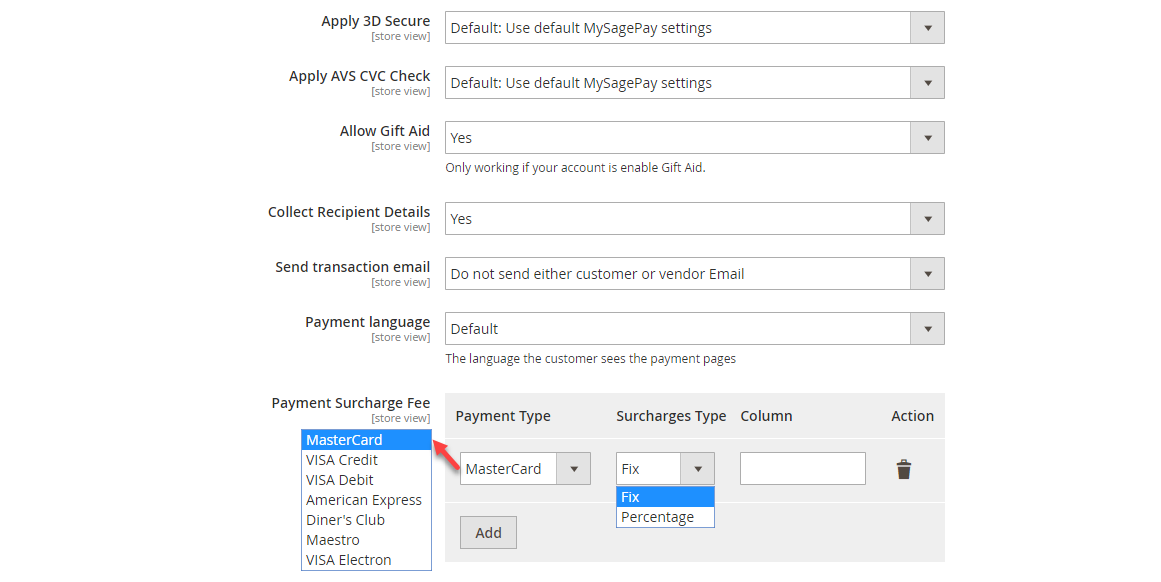
![]() Payment Surcharge Fee: You can add the extra fee for selected payment type (MasterCard, Visa Credit, Visa Debit, American Express, Diner's Club, Maestro, VISA Electron) . The fee could be defined as fixed price or percentage of the payment.
Payment Surcharge Fee: You can add the extra fee for selected payment type (MasterCard, Visa Credit, Visa Debit, American Express, Diner's Club, Maestro, VISA Electron) . The fee could be defined as fixed price or percentage of the payment.
![]() In Sage Pay PI Integration
In Sage Pay PI Integration
![]() Enabled: Choose Yes to enable direct checkout for SagePay Payment
Enabled: Choose Yes to enable direct checkout for SagePay Payment
![]() Title: The title of the payment method displayed on the checkout page.
Title: The title of the payment method displayed on the checkout page.
![]() PI Integration Key & PI Integration Password: Obtained from your Sage Pay account
PI Integration Key & PI Integration Password: Obtained from your Sage Pay account
Click on Check API button to check whether the API is working or not.
![]() Enable MOTO: Allow you to make payments in admin panel for customers buying through email or telephone.
Enable MOTO: Allow you to make payments in admin panel for customers buying through email or telephone.
![]() User drop-in interface: Turn this on to show Sage Pay with drop-in box.
User drop-in interface: Turn this on to show Sage Pay with drop-in box.
![]() Save Customer CreditCard Token: Allow customers to save credit card token for future purchase.
Save Customer CreditCard Token: Allow customers to save credit card token for future purchase.

- Authorize Only: check for the card for validity but not charge the account yet until the order is approved and invoiced.
- Authorize and Capture (Payment): charge the debit/credit card at the time of the order is placed.
![]() New Order Status: Processing, Suspected Fraud
New Order Status: Processing, Suspected Fraud
- Processing: The payment is made successfully and an order invoice is issued.
- Suspected Fraud: No invoice is issued.
![]() Credit Card Types: You can choose which credit card types you want by choosing one or more items.
Credit Card Types: You can choose which credit card types you want by choosing one or more items.
![]() Payment from Applicable Countries:
Payment from Applicable Countries:
- All allowed countries: Enable all allowed countries to make payment.
- Specific Countries: Restrict some countries by unselecting them from the Payment from Specific Countries.
![]() In addition, you can add/edit the Instructions to instruct customers how to do payment.
In addition, you can add/edit the Instructions to instruct customers how to do payment.
![]() Sort Order: The order of the payment method that will be displayed on the checkout page.
Sort Order: The order of the payment method that will be displayed on the checkout page.
![]() Minimum Order in Total: If the order value is less than this figure, the payment method will not be displayed on the checkout page.
Minimum Order in Total: If the order value is less than this figure, the payment method will not be displayed on the checkout page.
![]() Maximum Order in Total: If the order value is bigger than this figure, the payment method will not be displayed on the checkout page.
Maximum Order in Total: If the order value is bigger than this figure, the payment method will not be displayed on the checkout page.
Save Configuration.
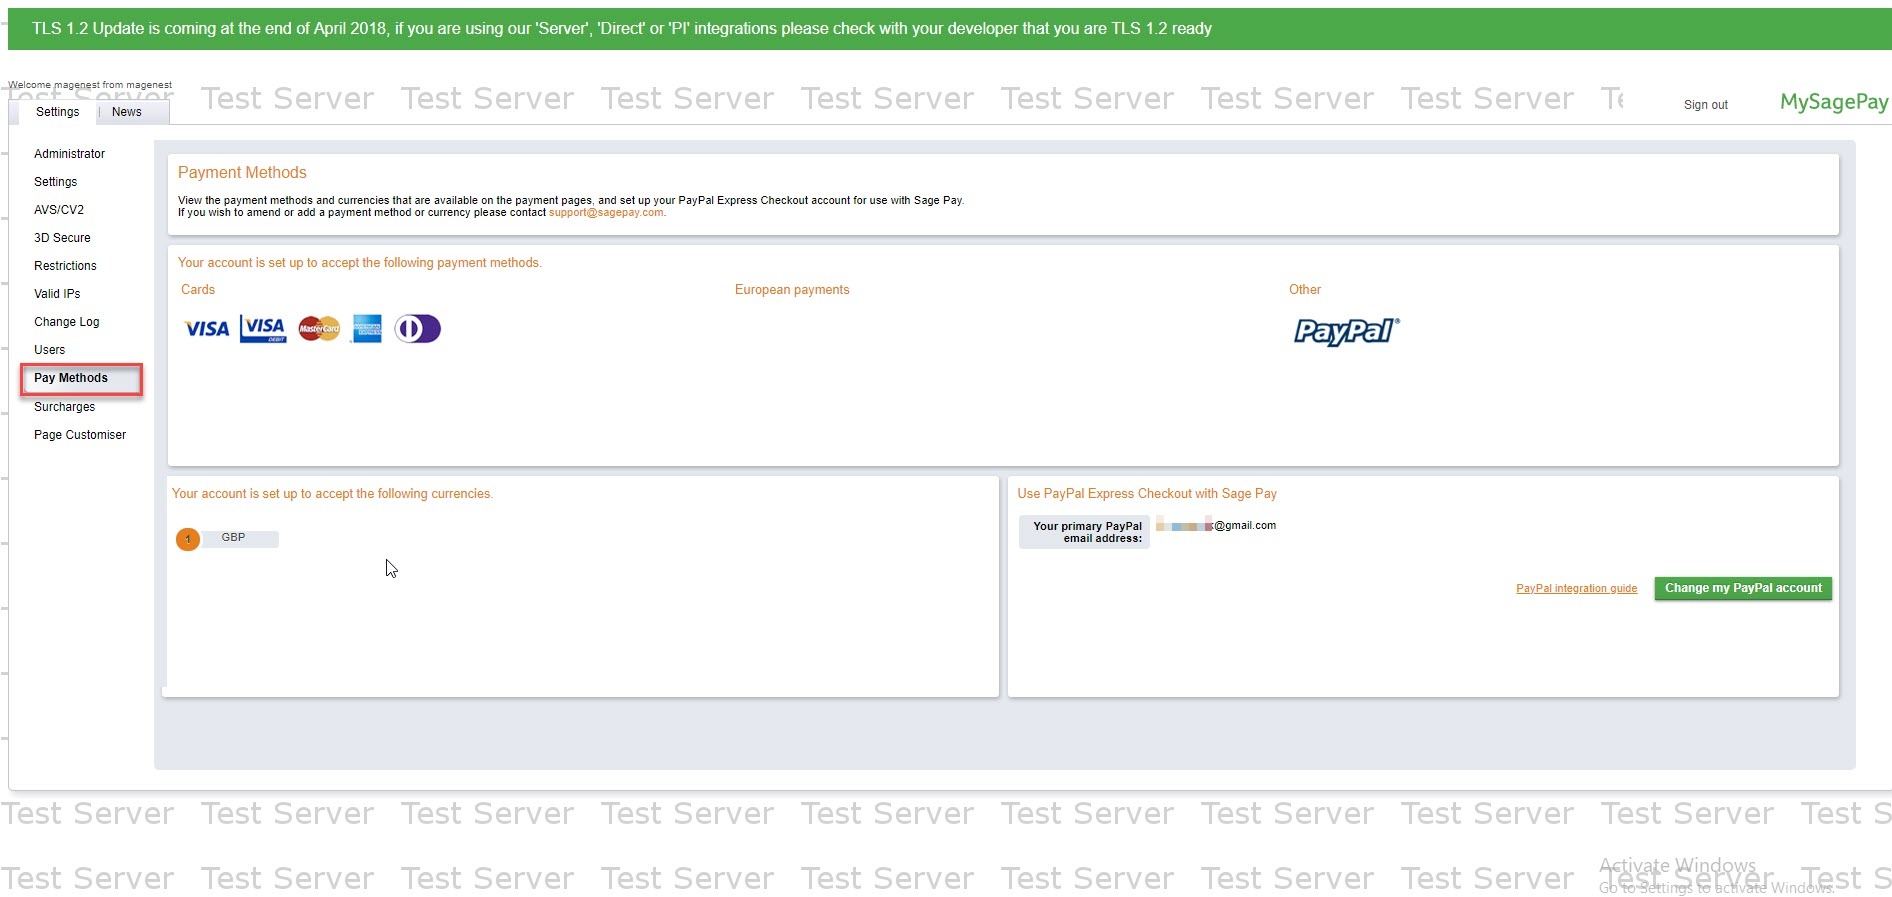
![]() Integrate with Paypal
Integrate with Paypal
On the left menu column, choose Pay methods then add your Paypal account on the right in the Use Paypal Express Checkout with Sage Pay
Please read these documents from SagePay for more details:
https://www.sagepay.co.uk/support/12/36/adding-paypal-to-your-test-account
https://www.sagepay.co.uk/support/12/36/enabling-sage-pay-on-your-paypal-test-account
https://www.sagepay.co.uk/support/16/36/linking-paypal-to-your-live-account
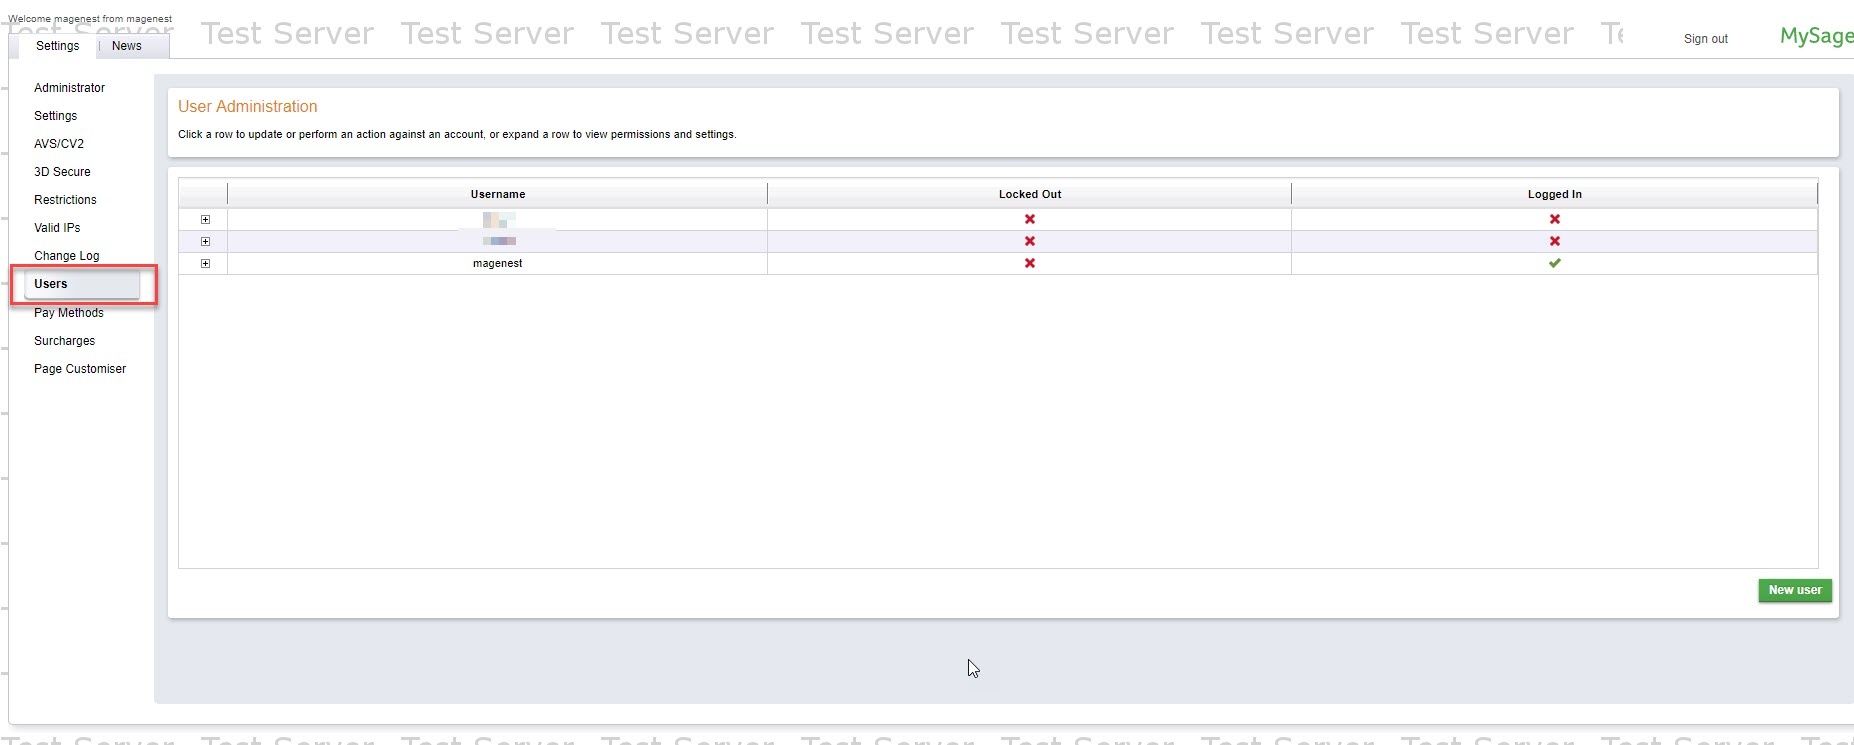
Create User in Sage Pay
In Sage Pay page, choose Users in the Settings, then create an user by clicking on the New user button. You will use this user account to link Paypal with your Sage Pay
![]() In Sage Pay Form Integration/Paypal
In Sage Pay Form Integration/Paypal
![]() Enabled: Enable Sage Pay Form with Paypal option
Enabled: Enable Sage Pay Form with Paypal option
![]() Title: The title of the payment method displayed on the checkout page
Title: The title of the payment method displayed on the checkout page
![]() Payment Action: You can choose between Authorize Only (Deferred) and Authorize and Capture (Payment)
Payment Action: You can choose between Authorize Only (Deferred) and Authorize and Capture (Payment)
- Authorize Only: check for the card for validity but not charge the account yet until the order is approved and invoiced.
Authorize and Capture (Payment): charge the debit/credit card at the time of the order is placed.
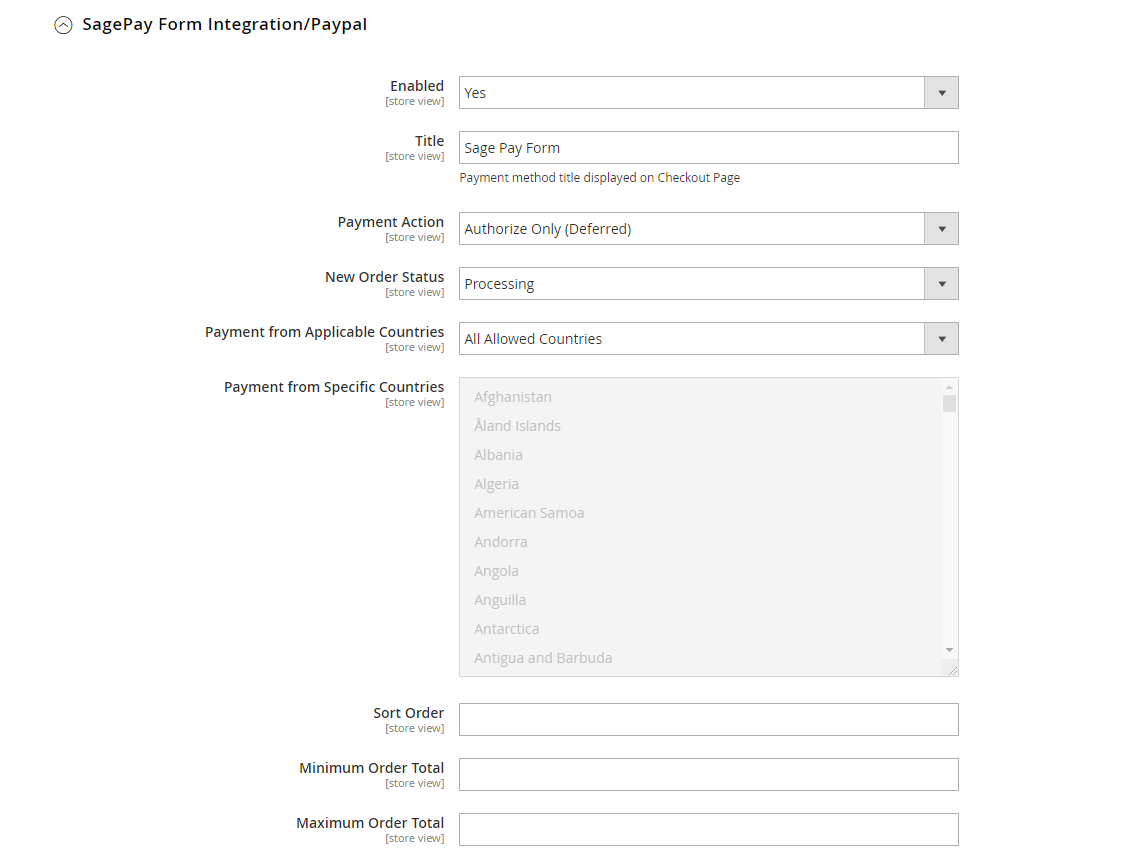
![]() New Order Status: Processing, Suspected Fraud
New Order Status: Processing, Suspected Fraud
- Processing: The payment is made successfully and an order invoice is issued.
- Suspected Fraud: No invoice is issued.
![]() Payment from Applicable Countries:
Payment from Applicable Countries:
- All allowed countries: Enable all allowed countries to make payment.
- Specific Countries: Restrict some countries by unselecting them from the Payment from Specific Countries.
![]() Sort Order: The order of the payment method that will be displayed on the checkout page.
Sort Order: The order of the payment method that will be displayed on the checkout page.
![]() Minimum Order in Total: If the order value is less than this figure, the payment method will not be displayed on the checkout page.
Minimum Order in Total: If the order value is less than this figure, the payment method will not be displayed on the checkout page.
![]() Maximum Order in Total: If the order value is bigger than this figure, the payment method will not be displayed on the checkout page.
Maximum Order in Total: If the order value is bigger than this figure, the payment method will not be displayed on the checkout page.
![]() In Sage Pay Server Integration
In Sage Pay Server Integration
![]() Enabled: Enable Sage Pay Server
Enabled: Enable Sage Pay Server
![]() Title: The title of the payment method displayed on the checkout page
Title: The title of the payment method displayed on the checkout page
![]() Payment Action: You can choose between Authorize Only (Deferred) and Authorize and Capture (Payment)
Payment Action: You can choose between Authorize Only (Deferred) and Authorize and Capture (Payment)
- Authorize Only: check for the card for validity but not charge the account yet until the order is approved and invoiced.
Authorize and Capture (Payment): charge the debit/credit card at the time of the order is placed.
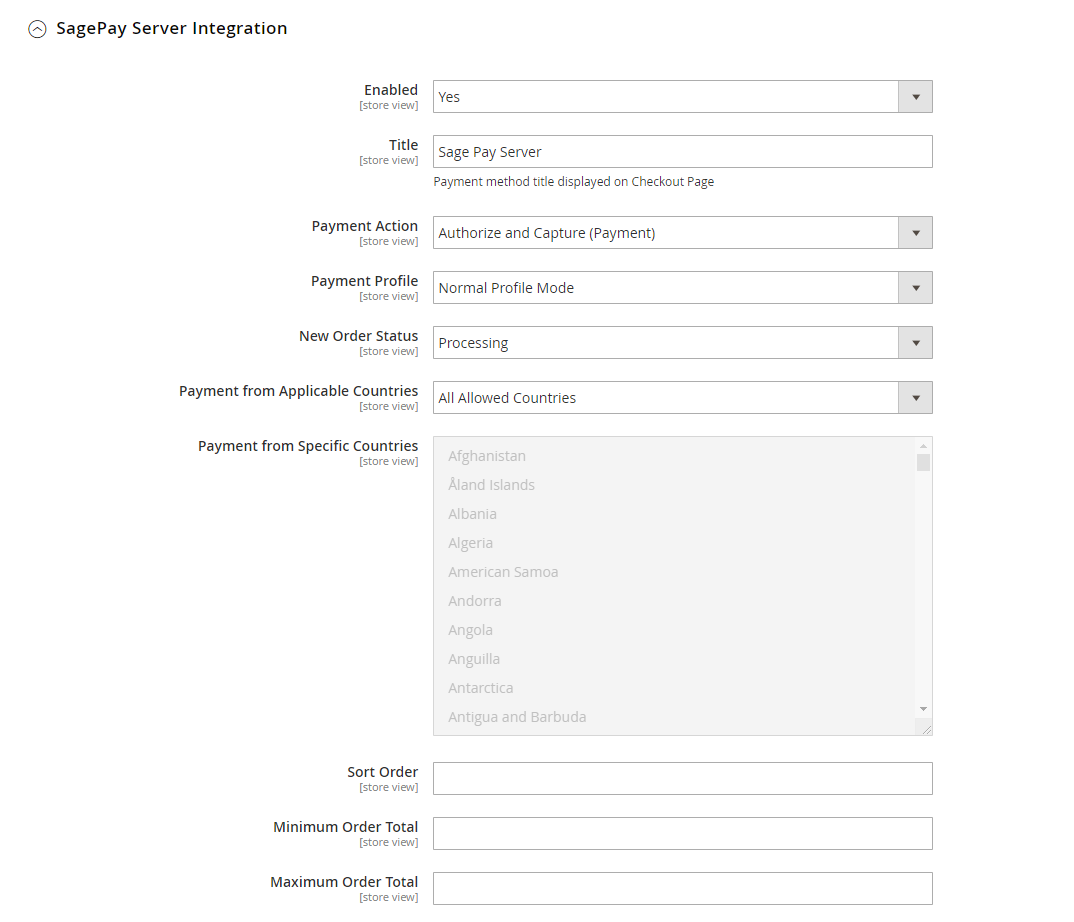
![]() New Order Status: Processing, Suspected Fraud
New Order Status: Processing, Suspected Fraud
- Processing: The payment is made successfully and an order invoice is issued.
- Suspected Fraud: No invoice is issued.
![]() Payment from Applicable Countries:
Payment from Applicable Countries:
- All allowed countries: Enable all allowed countries to make payment.
- Specific Countries: Restrict some countries by unselecting them from the Payment from Specific Countries.
![]() Sort Order: The order of the payment method that will be displayed on the checkout page.
Sort Order: The order of the payment method that will be displayed on the checkout page.
![]() Minimum Order in Total: If the order value is less than this figure, the payment method will not be displayed on the checkout page.
Minimum Order in Total: If the order value is less than this figure, the payment method will not be displayed on the checkout page.
![]() Maximum Order in Total: If the order value is bigger than this figure, the payment method will not be displayed on the checkout page.
Maximum Order in Total: If the order value is bigger than this figure, the payment method will not be displayed on the checkout page.
![]() In Sage Pay Direct Integration
In Sage Pay Direct Integration
![]() Enabled: Enable Sage Pay Direct Payment
Enabled: Enable Sage Pay Direct Payment
![]() Title: The title of the payment method displayed on the checkout page
Title: The title of the payment method displayed on the checkout page
![]() Payment Action: You can choose between Authorize Only (Deferred) and Authorize and Capture (Payment)
Payment Action: You can choose between Authorize Only (Deferred) and Authorize and Capture (Payment)
- Authorize Only: check for the card for validity but not charge the account yet until the order is approved and invoiced.
Authorize and Capture (Payment): charge the debit/credit card at the time of the order is placed.
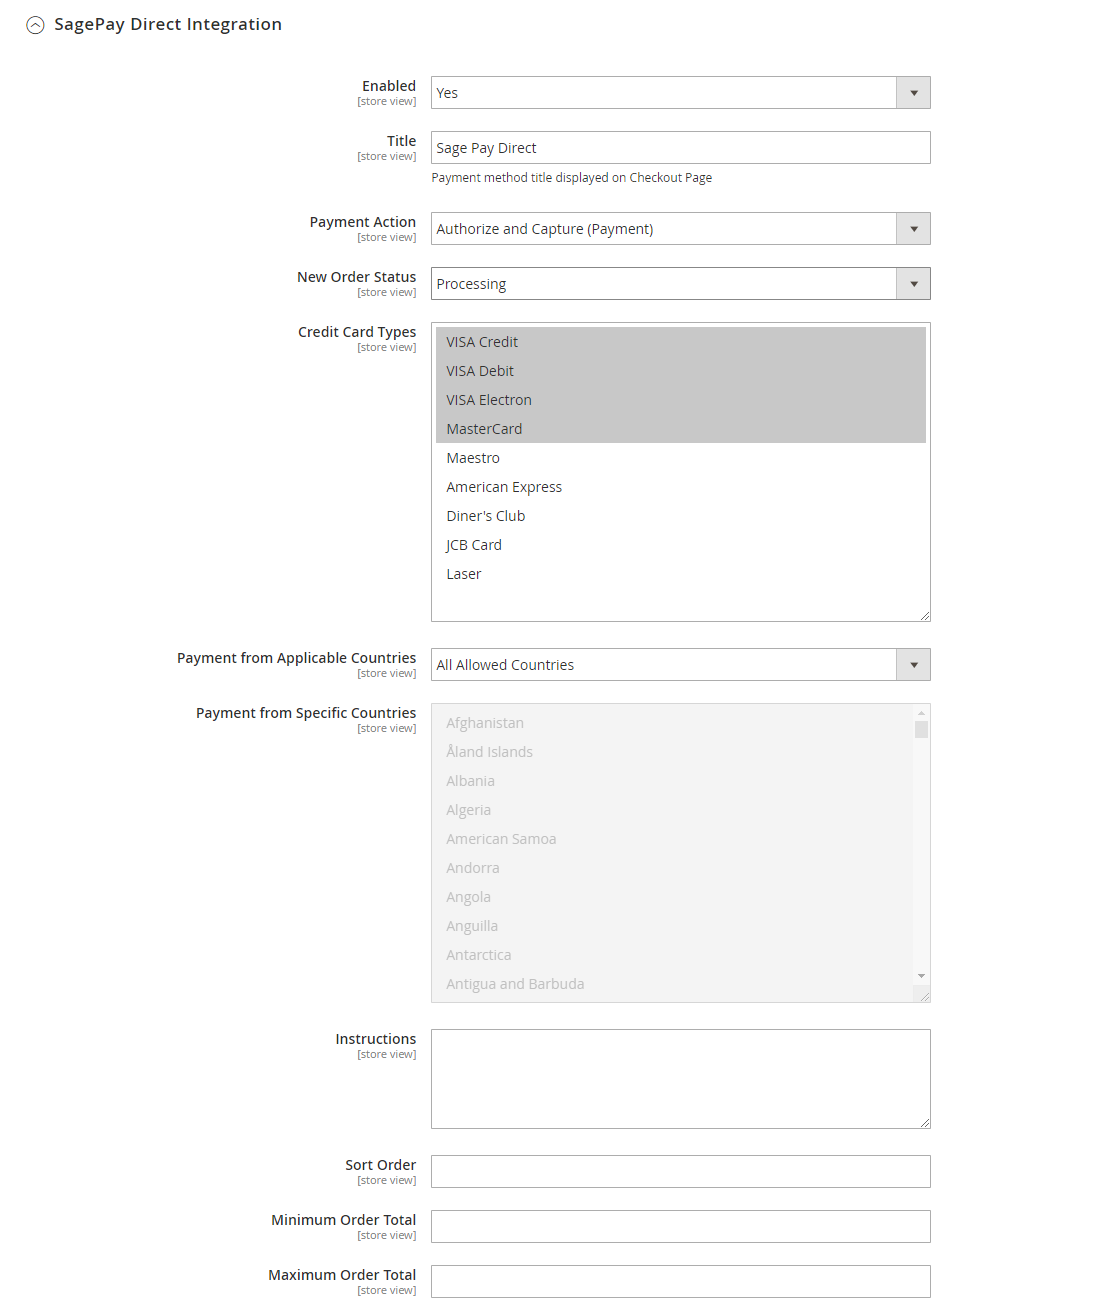
![]() New Order Status: Processing, Suspected Fraud
New Order Status: Processing, Suspected Fraud
- Processing: The payment is made successfully and an order invoice is issued.
- Suspected Fraud: No invoice is issued.
![]() Payment from Applicable Countries:
Payment from Applicable Countries:
- All allowed countries: Enable all allowed countries to make payment.
- Specific Countries: Restrict some countries by unselecting them from the Payment from Specific Countries.
![]() Sort Order: The order of the payment method that will be displayed on the checkout page.
Sort Order: The order of the payment method that will be displayed on the checkout page.
![]() Minimum Order in Total: If the order value is less than this figure, the payment method will not be displayed on the checkout page.
Minimum Order in Total: If the order value is less than this figure, the payment method will not be displayed on the checkout page.
![]() Maximum Order in Total: If the order value is bigger than this figure, the payment method will not be displayed on the checkout page.
Maximum Order in Total: If the order value is bigger than this figure, the payment method will not be displayed on the checkout page.
![]() In Sage Pay PayPal:
In Sage Pay PayPal:
![]() Enabled: Enable Sage Pay PayPal Payment
Enabled: Enable Sage Pay PayPal Payment
![]() Title: The title of the payment method displayed on the checkout page
Title: The title of the payment method displayed on the checkout page
![]() Payment Action: You can choose between Authorize Only (Deferred) and Authorize and Capture (Payment)
Payment Action: You can choose between Authorize Only (Deferred) and Authorize and Capture (Payment)
- Authorize Only: check for the card for validity but not charge the account yet until the order is approved and invoiced.
Authorize and Capture (Payment): charge the debit/credit card at the time of the order is placed.
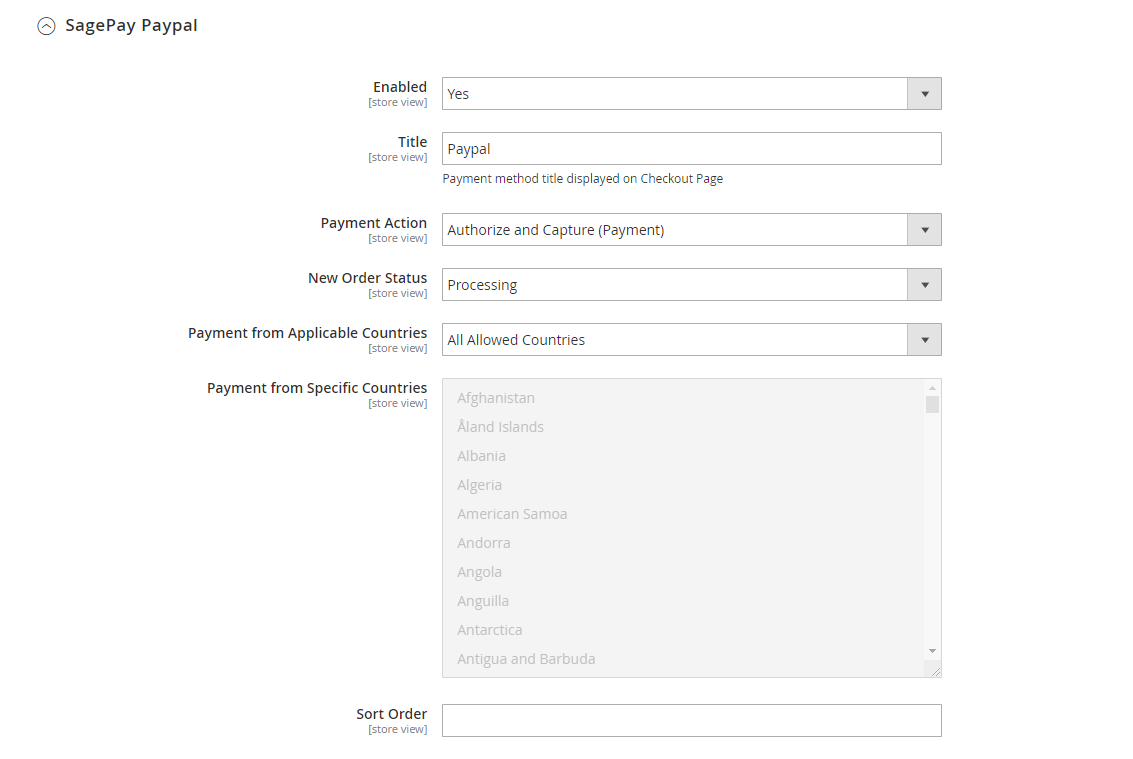
![]() New Order Status: Processing, Suspected Fraud
New Order Status: Processing, Suspected Fraud
- Processing: The payment is made successfully and an order invoice is issued.
- Suspected Fraud: No invoice is issued.
![]() Payment from Applicable Countries:
Payment from Applicable Countries:
- All allowed countries: Enable all allowed countries to make payment.
- Specific Countries: Restrict some countries by unselecting them from the Payment from Specific Countries.
![]() Sort Order: The order of the payment method that will be displayed on the checkout page.
Sort Order: The order of the payment method that will be displayed on the checkout page.
![]() Minimum Order in Total: If the order value is less than this figure, the payment method will not be displayed on the checkout page.
Minimum Order in Total: If the order value is less than this figure, the payment method will not be displayed on the checkout page.
![]() Maximum Order in Total: If the order value is bigger than this figure, the payment method will not be displayed on the checkout page.
Maximum Order in Total: If the order value is bigger than this figure, the payment method will not be displayed on the checkout page.
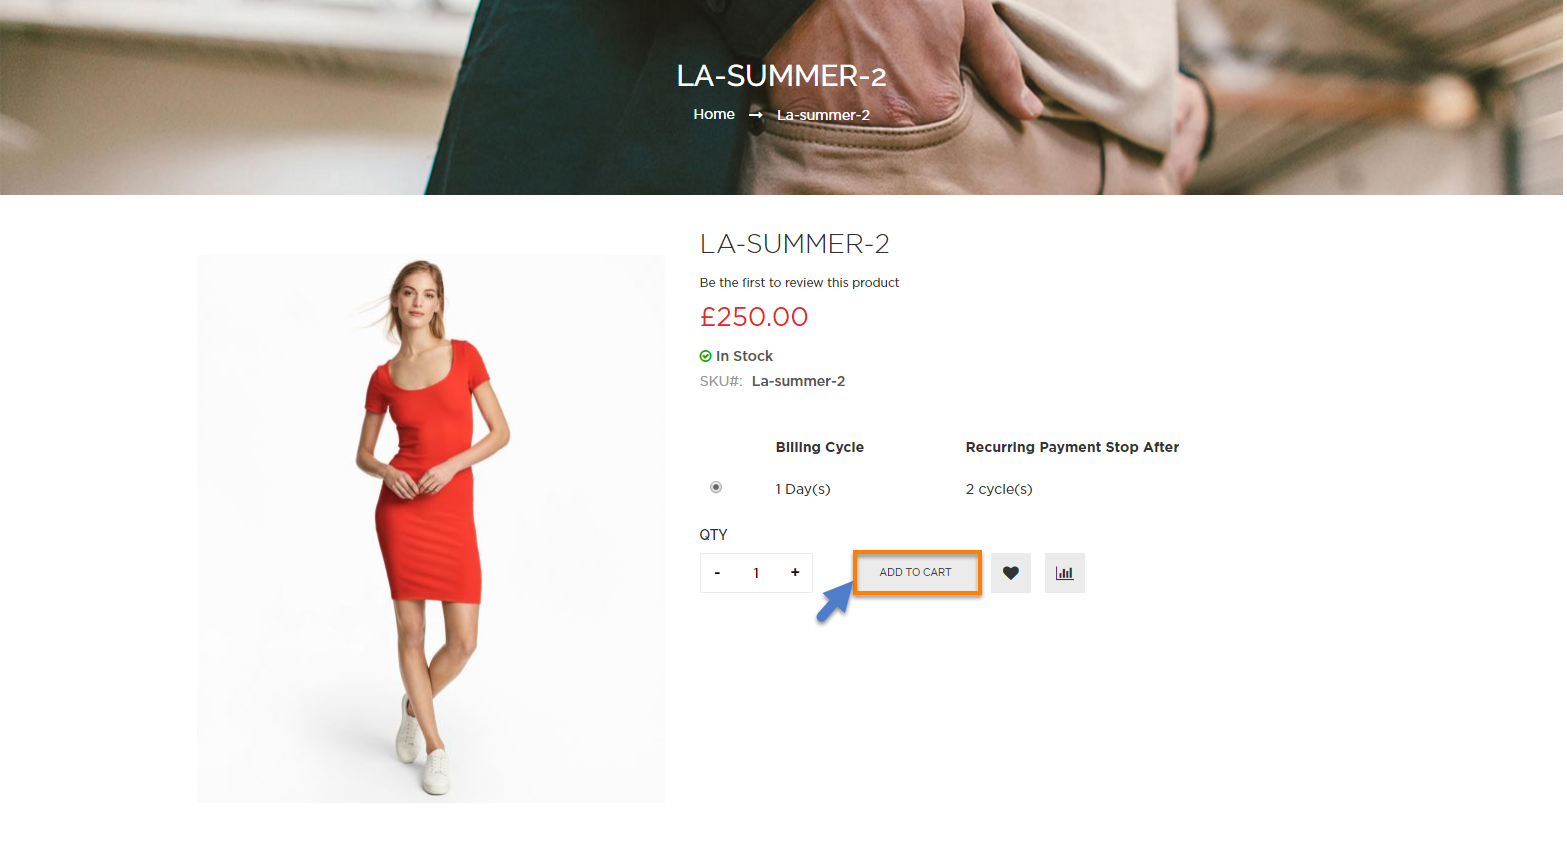
For Subscription Products
Create a subscription product
To create a subscription product, click on Products > Catalog
On the right side, press Add product button, click on the arrow and choose among 6 types of product: Simple Product, Configurable Product, Grouped Product, Virual Product, Bundle Product, Downloadable Product.
Then, the New Product page will be shown.
In the SagePay Subscriptions Options, there are two sections: General Config, Options
General Config: Enable the subscription mode of the product.
Options: Click Add option to add subscription plan for the product.
- Period Unit: Set the subscription period in terms of Day, Week, Month, Year
- Billing Frequency: How many times the customers want to repeat the subscription circle.
- Billing Cycle: How long will customer has to repay the subscription fee.

Click on Save button to complete.
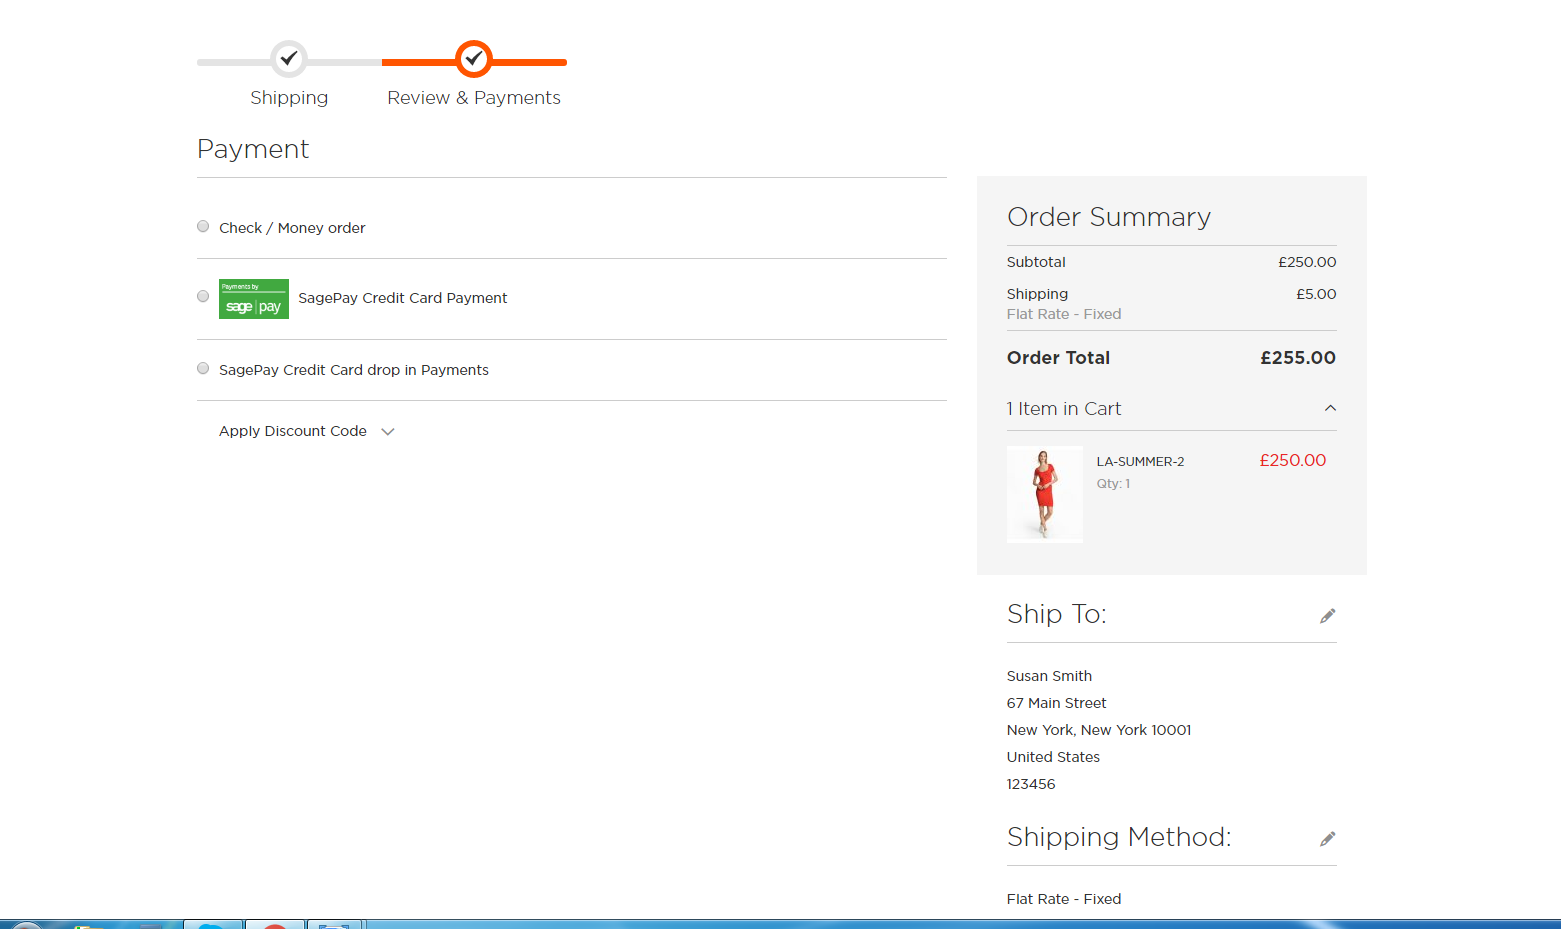
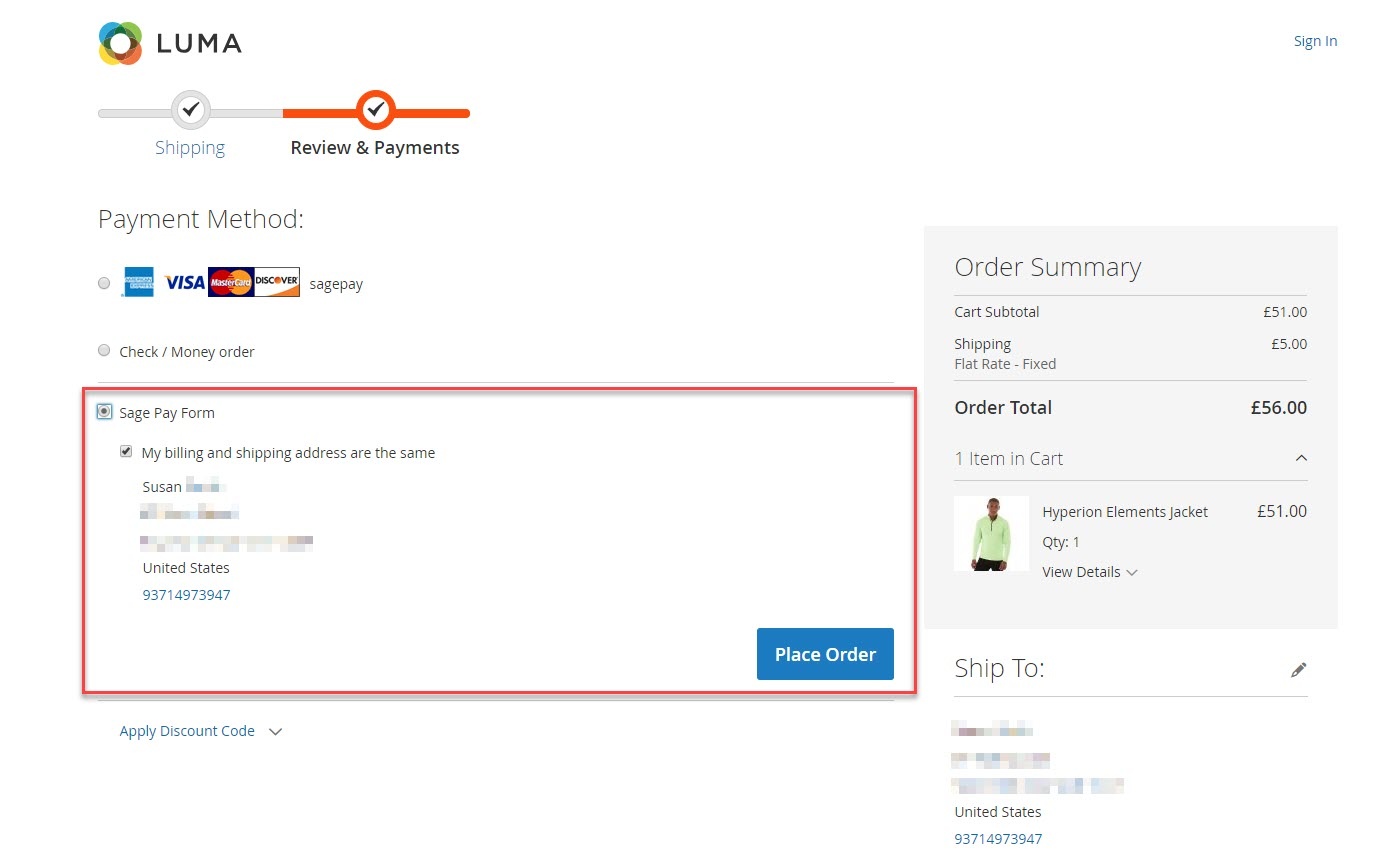
Check out with SagePay in an easy way
Customers can add their desired items to the shopping cart by clicking on Add to Cart button.
Then, the customer can go to the checkout page easily with the Checkout Button in the drop down of the shopping cart icon .
Next. customer fills in his/her shipping address and selects the payment method.
At the review and payments section,there are two SagePay payment methods: SagePay Credit Card drop in Payments and SagePay Direct Payment.
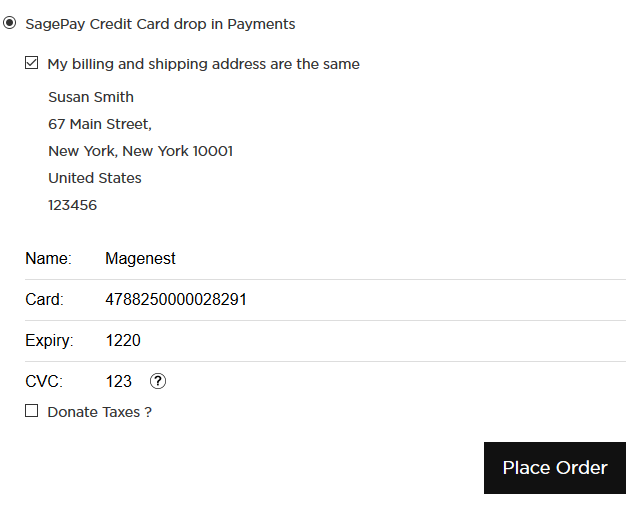
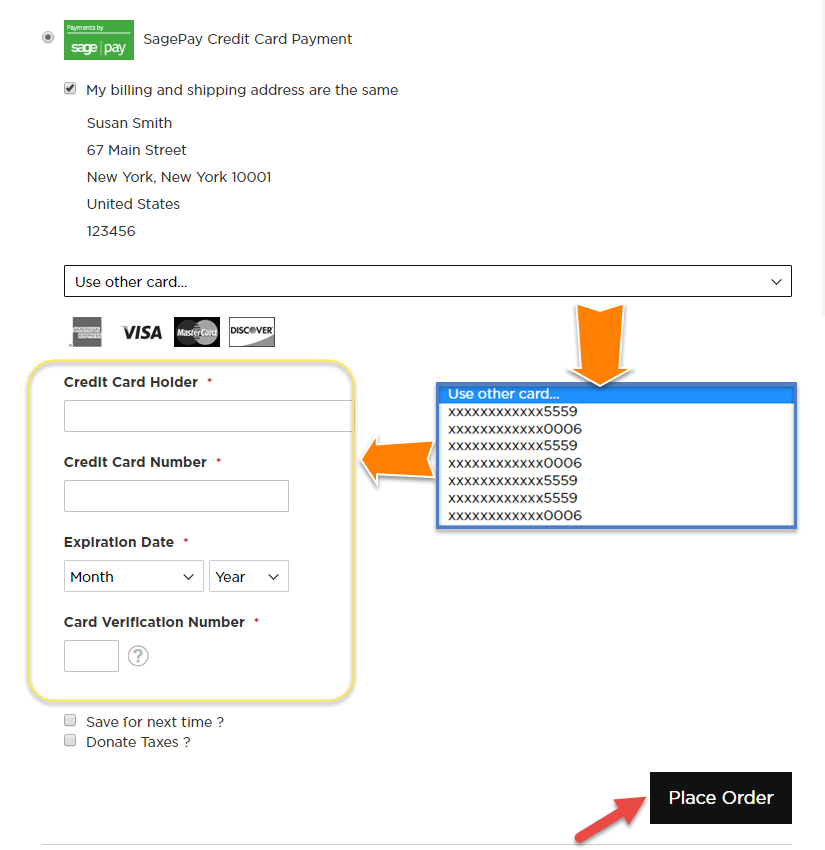
![]() With SagePay Credit Card Payment:
With SagePay Credit Card Payment:
- Mark the checkbox "My billing and shipping addresses are the same" if the shipping address and the billing address are not different.
- If they are different, fill in the billing address then click "Update".
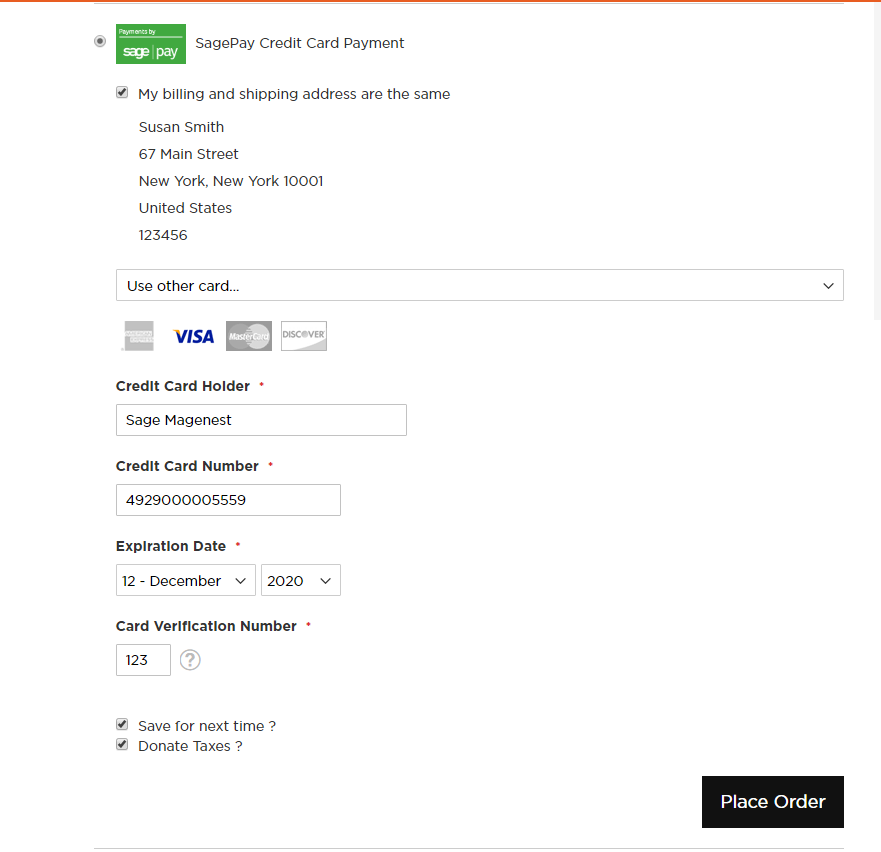
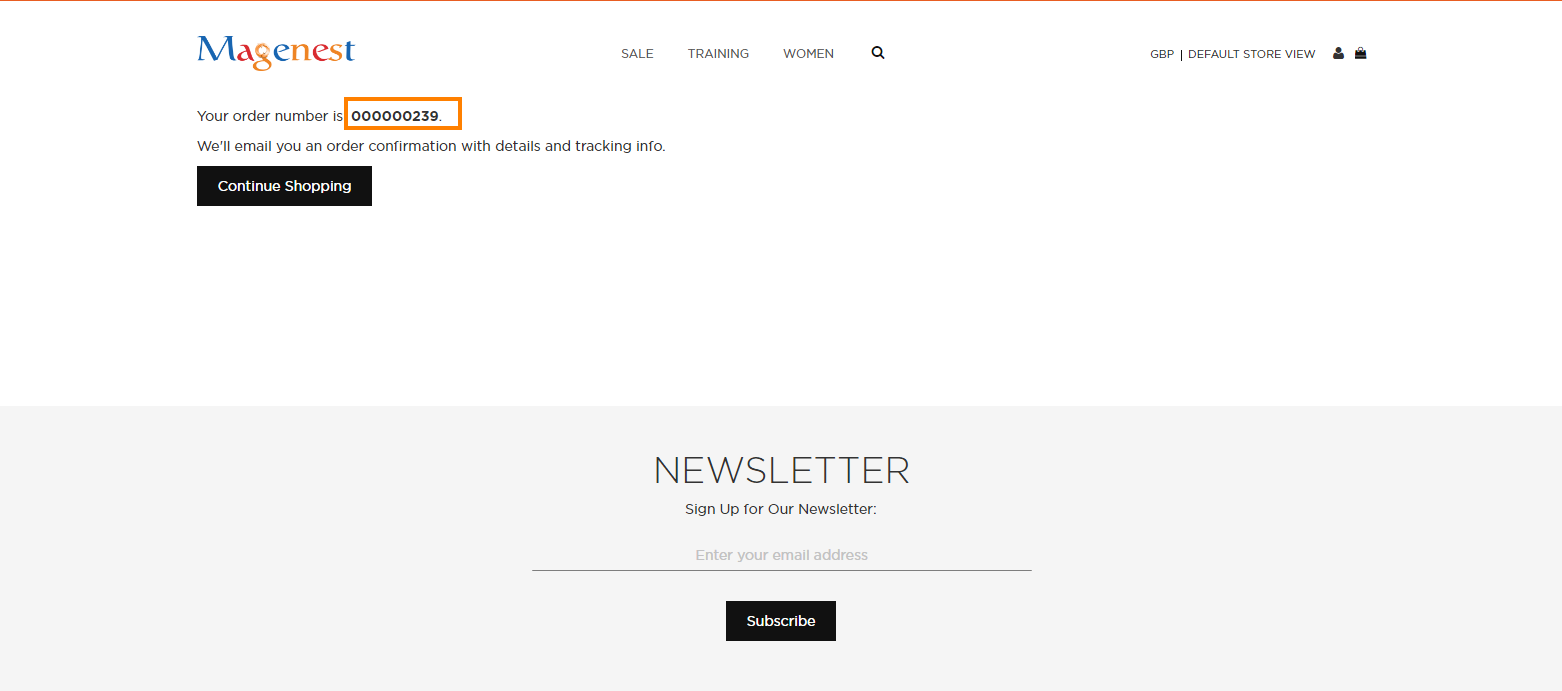
Customer fill credit card information into the checkout form and click Place Order button. The system will process with Sage and return the result with customer's order number.
![]() With SagePay with Drop-In Interface :
With SagePay with Drop-In Interface :
- Mark the checkbox "My billing and shipping addresses are the same" if the shipping address and the billing address are not different.
- If they are different, fill in the billing address then click "Update".
In this section, customer will enter his/her credit card info into a drop-in that is more secured.
![]() Sage Pay Form/Paypal
Sage Pay Form/Paypal
With Sage Pay Form, all transactions will be handled by Sage Pay. When customer Place order, it will redirect to Sage Pay Form
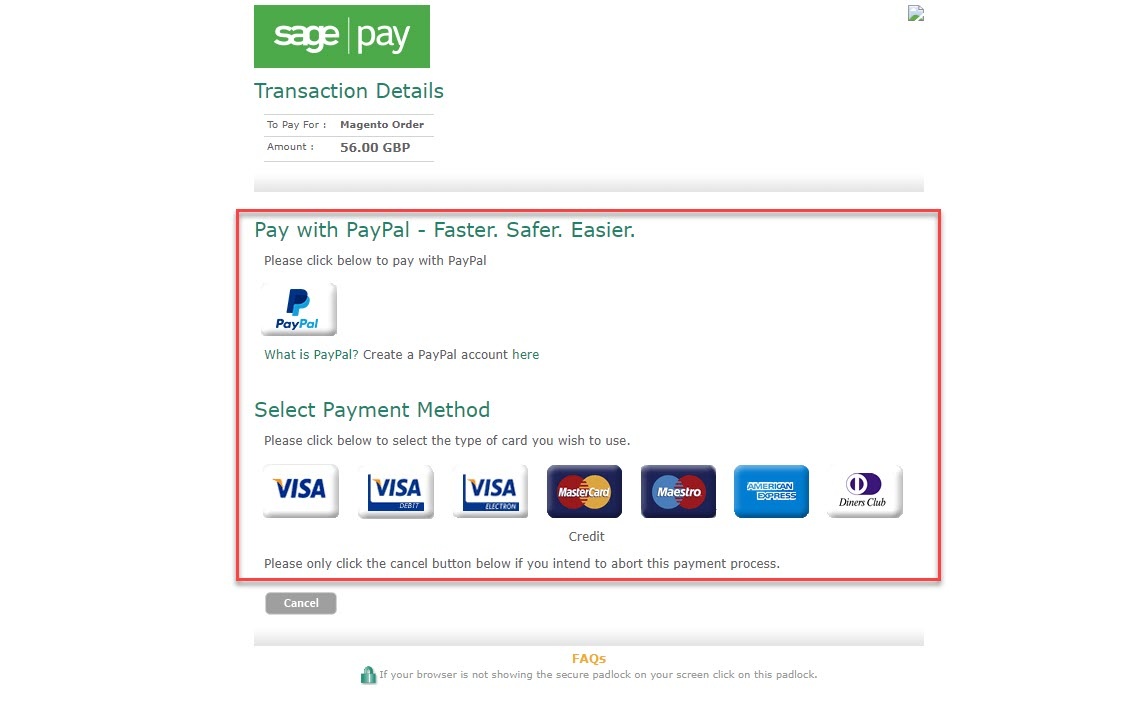
Customers can pay with Paypal or Credit Cards up to their choice.
![]() Support 3D Secure:
Support 3D Secure:
When customers use type of card provided with 3D secure mode. SagePay will turn on automatic mode to check. The operation will redirect to processing page.
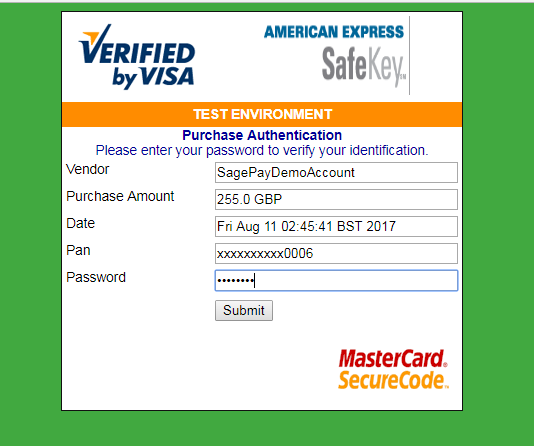
Click Submit to finalize the payment.
![]() Save card function:
Save card function:
We design this function to help customers pay more conveniently. Customers could save time from typing a long range of numbers.
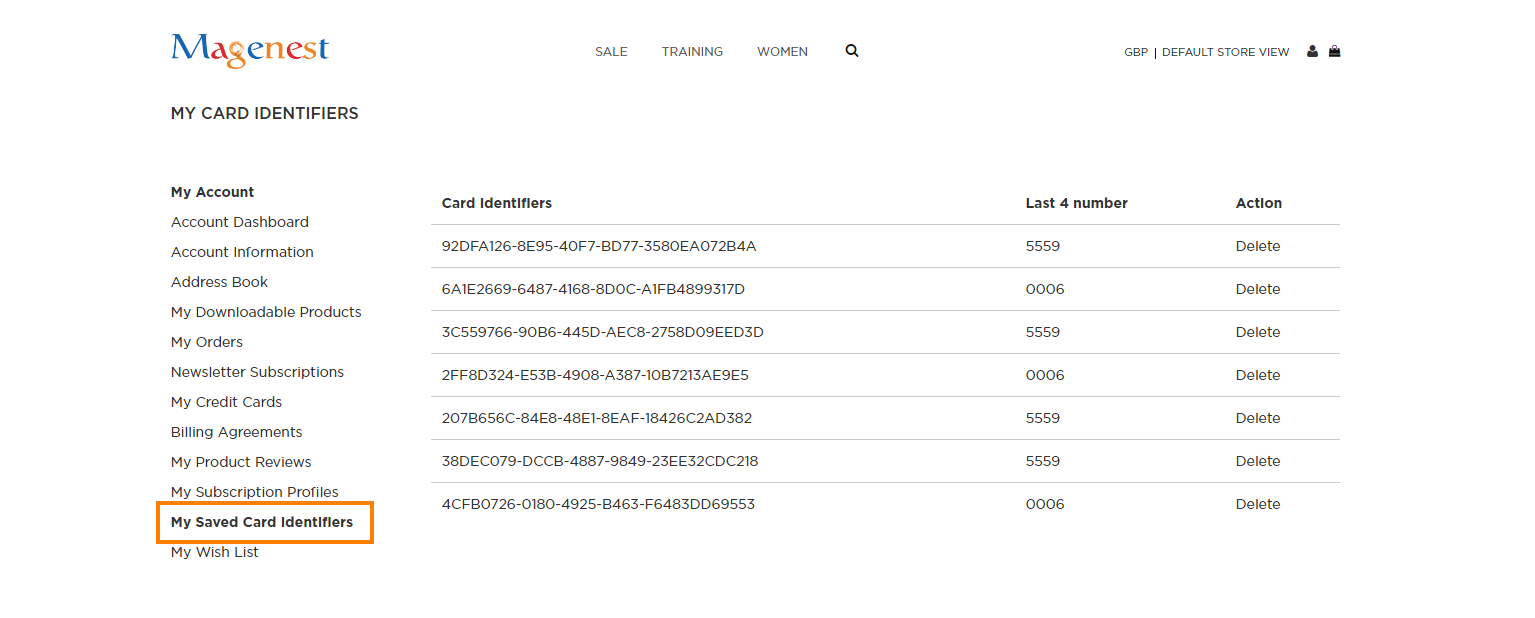
![]() My Saved Card Indentifiers:
My Saved Card Indentifiers:
Customers can see the cards that they used by clicking My Account > My Saved Card Identifiers:
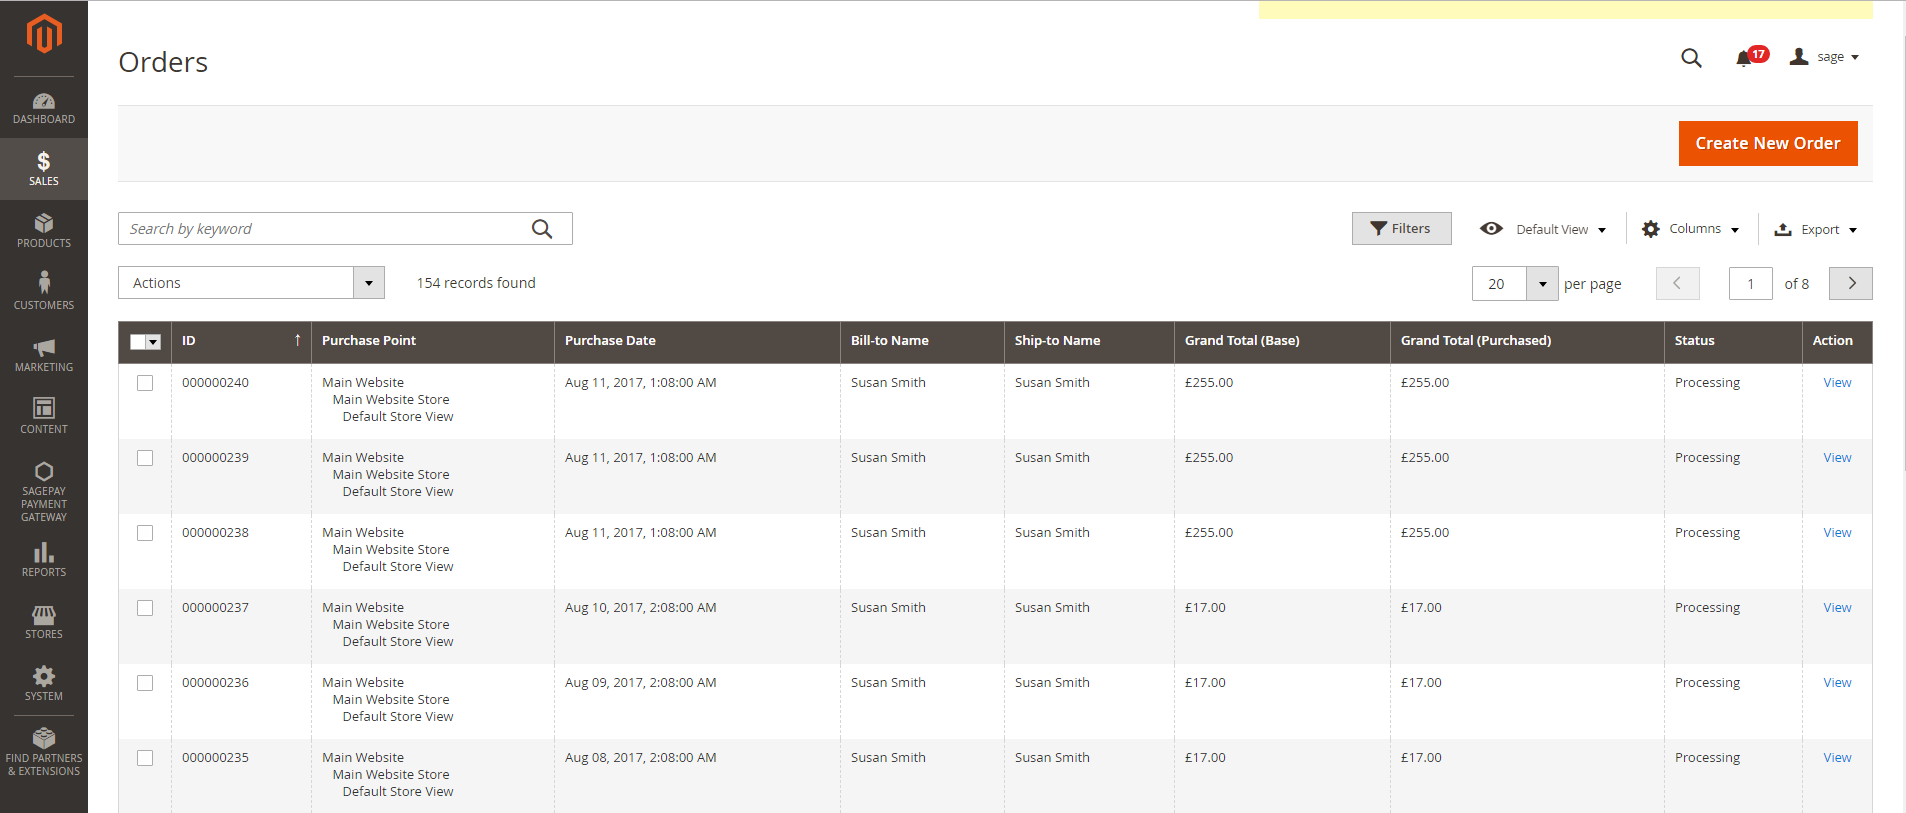
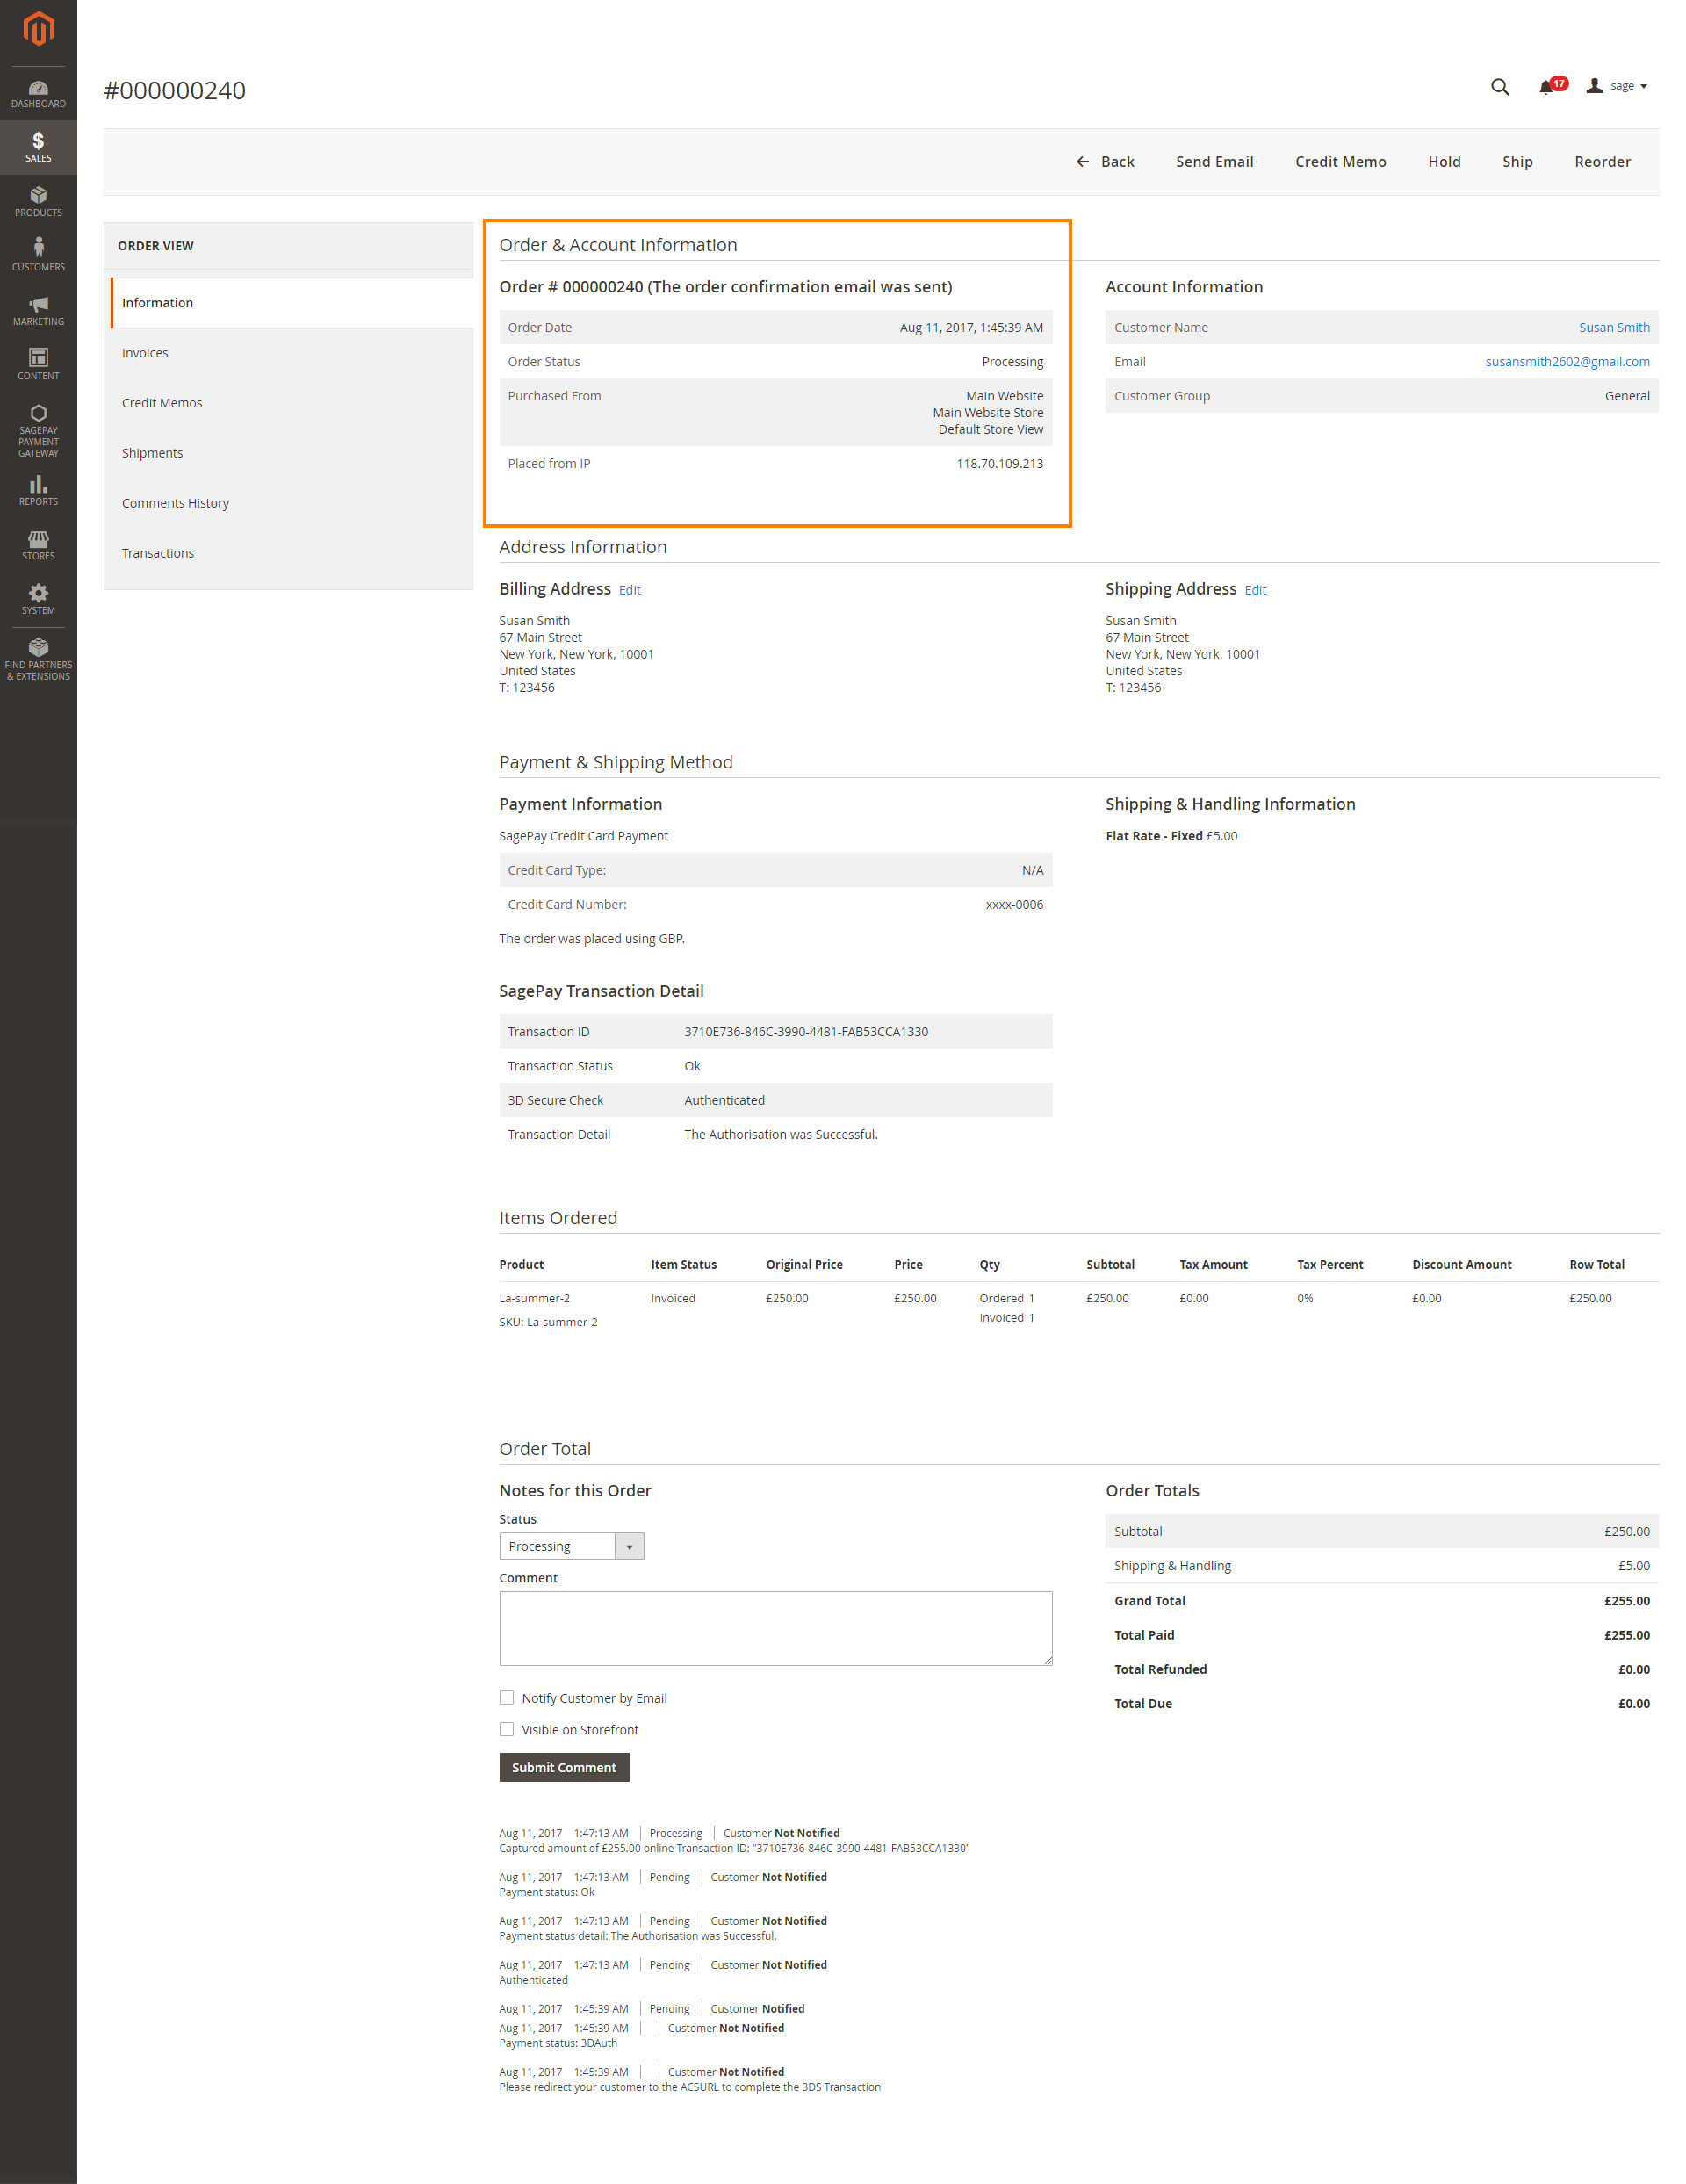
![]() View Order:
View Order:
When the transaction is completed, merchants can review their orders by clicking Sales > Orders >View
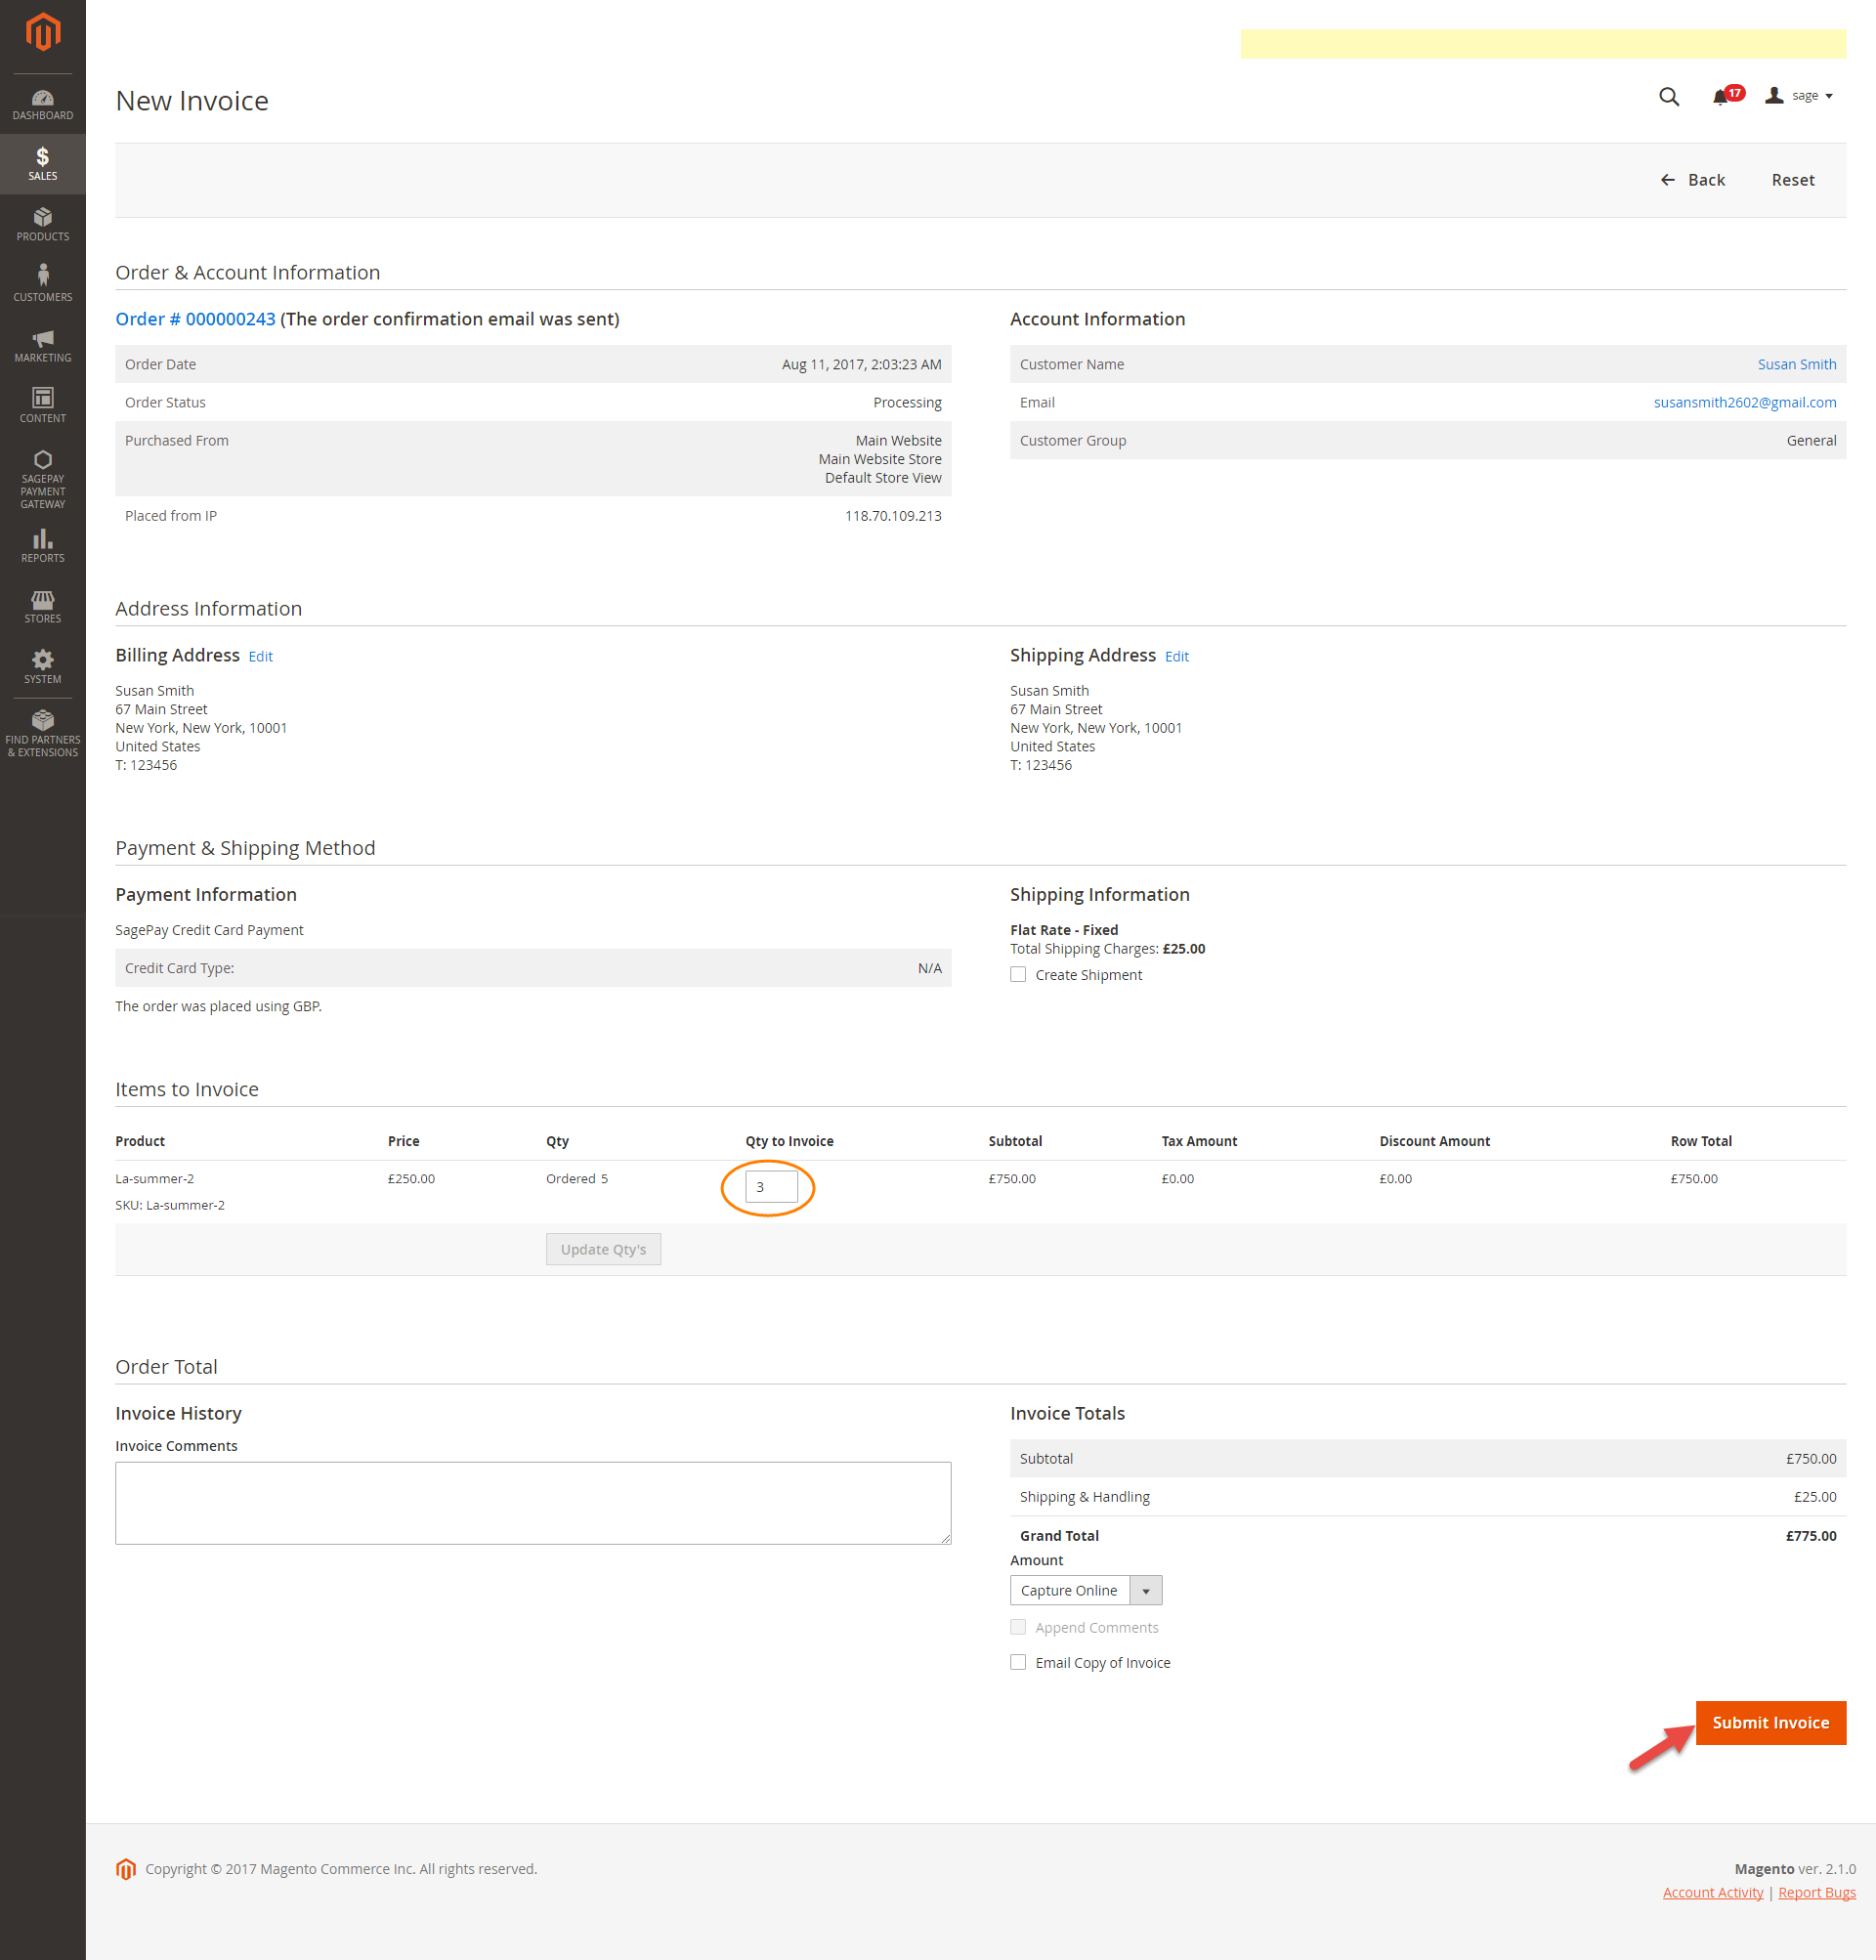
![]() Capture Invoice:
Capture Invoice:
If you set the Payment Action as Authorize Only, invoice will not be created. You have to capture invoice in your request. However, the quantity of the products in the new invoice must be smaller than or equal to the pre-order.
![]() This extension does not support multiple invoices.
This extension does not support multiple invoices.
![]() View Invoice:
View Invoice:
You can manage invoices by going to Sales > Invoices
Click on View button to see the details of invoice that you want.
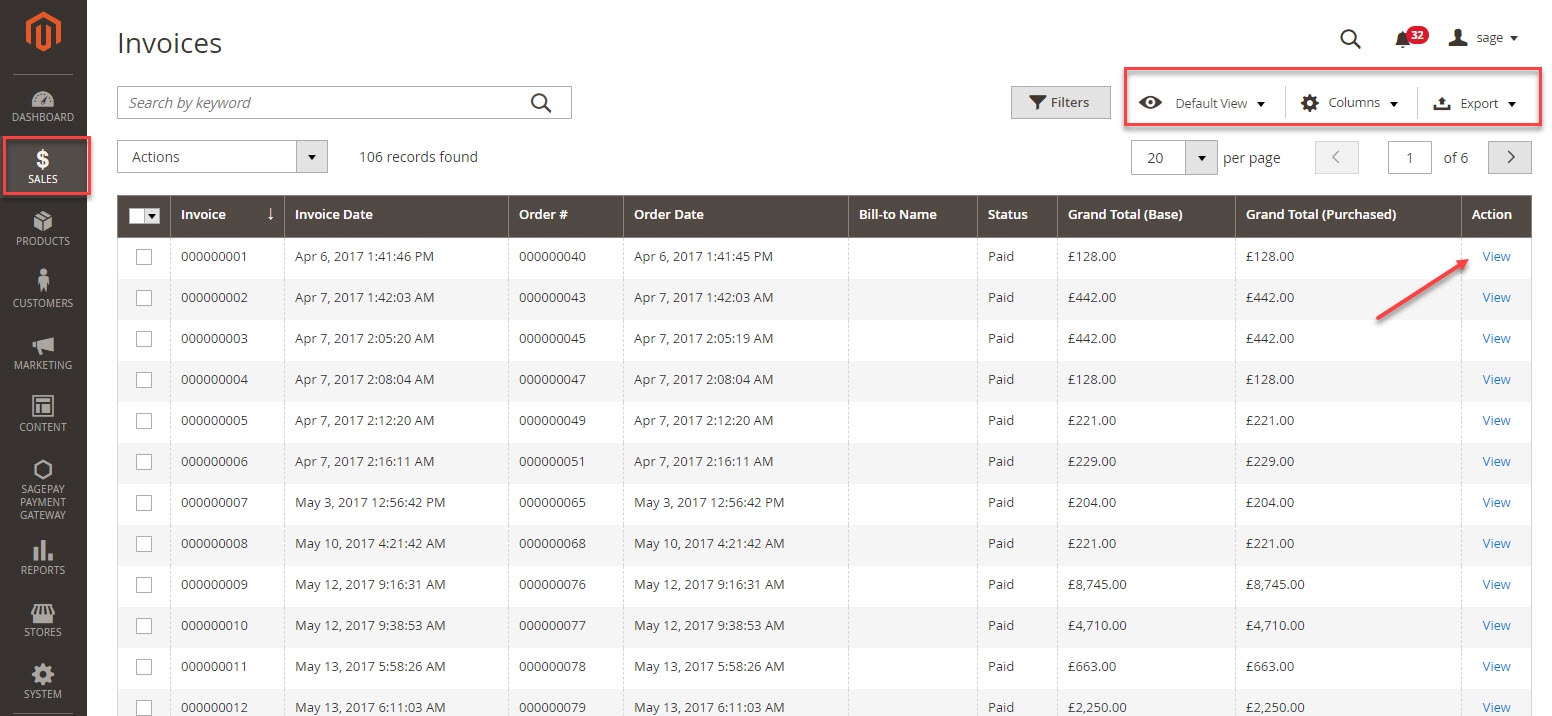
You can change the column content by clicking on the Columns icon on the top right. Next to it is the Export icon that allows you to export the invoices list into CSV and XML files.
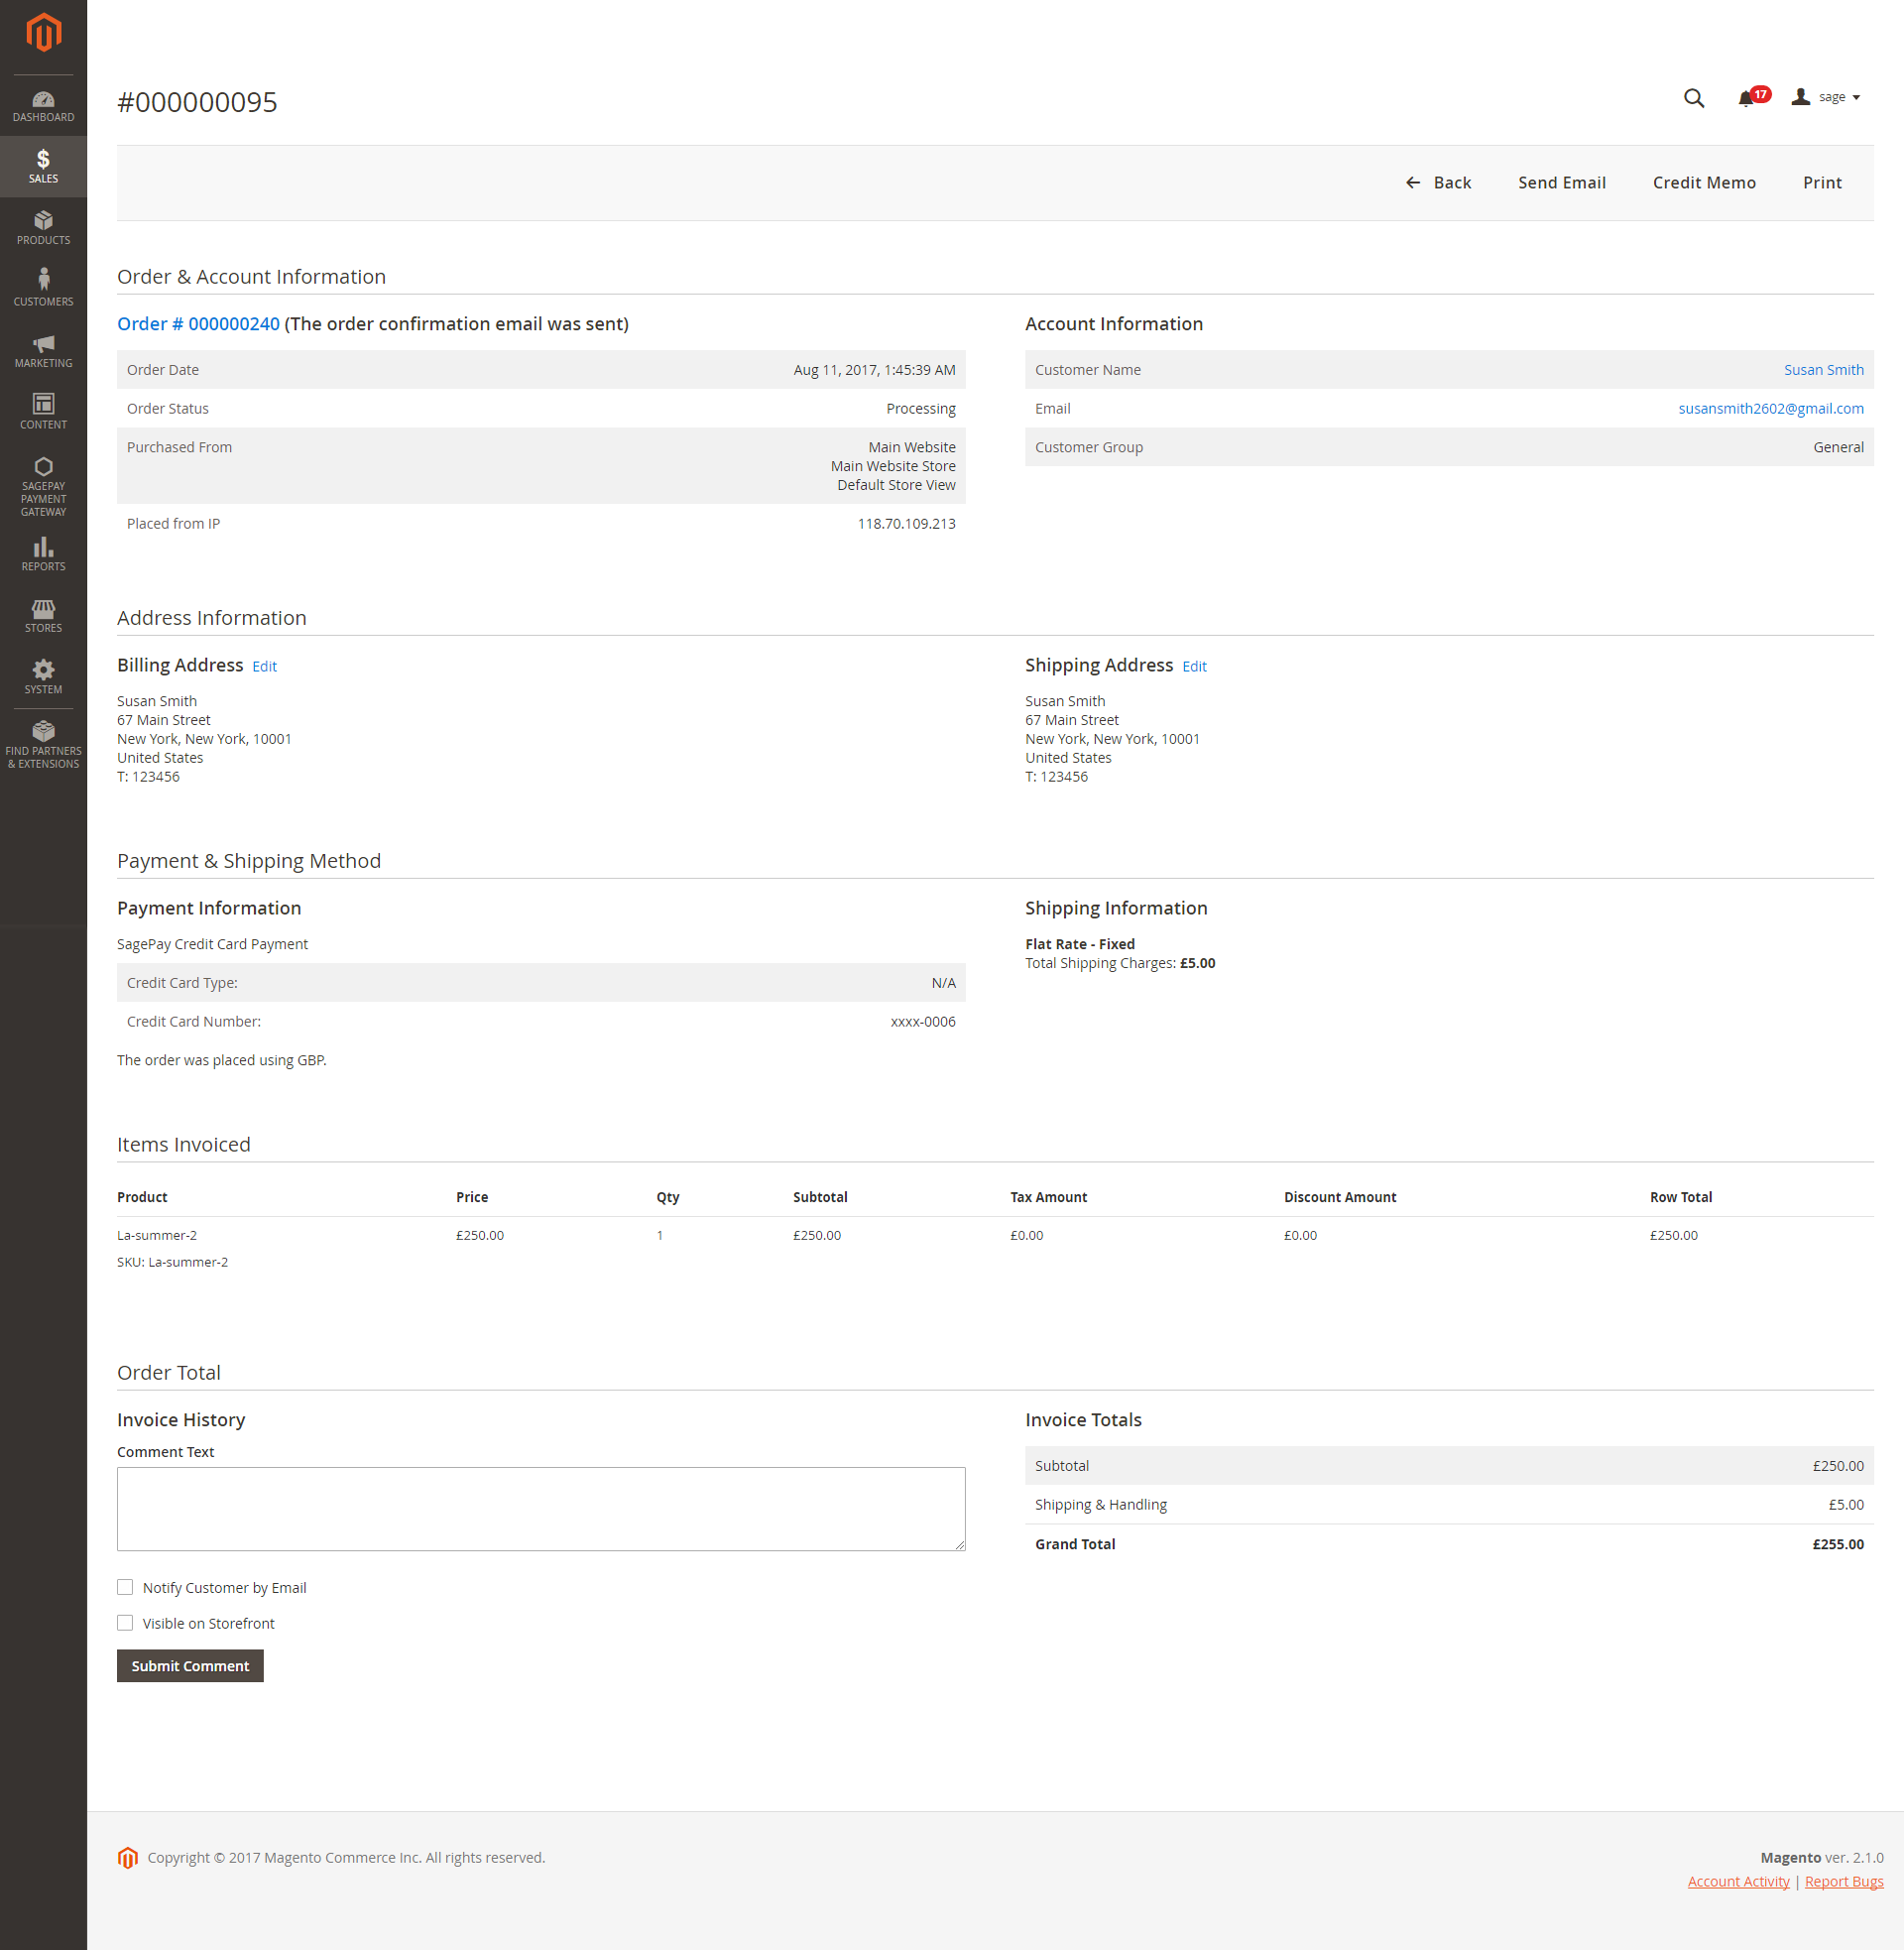
On the right side, there are three important buttons: Send email, Credit memo, and Print
- Send email: Allow you to send the current invoice to customer
- Credit memo: Allow you to make the refund
- Print: Print out the current invoice
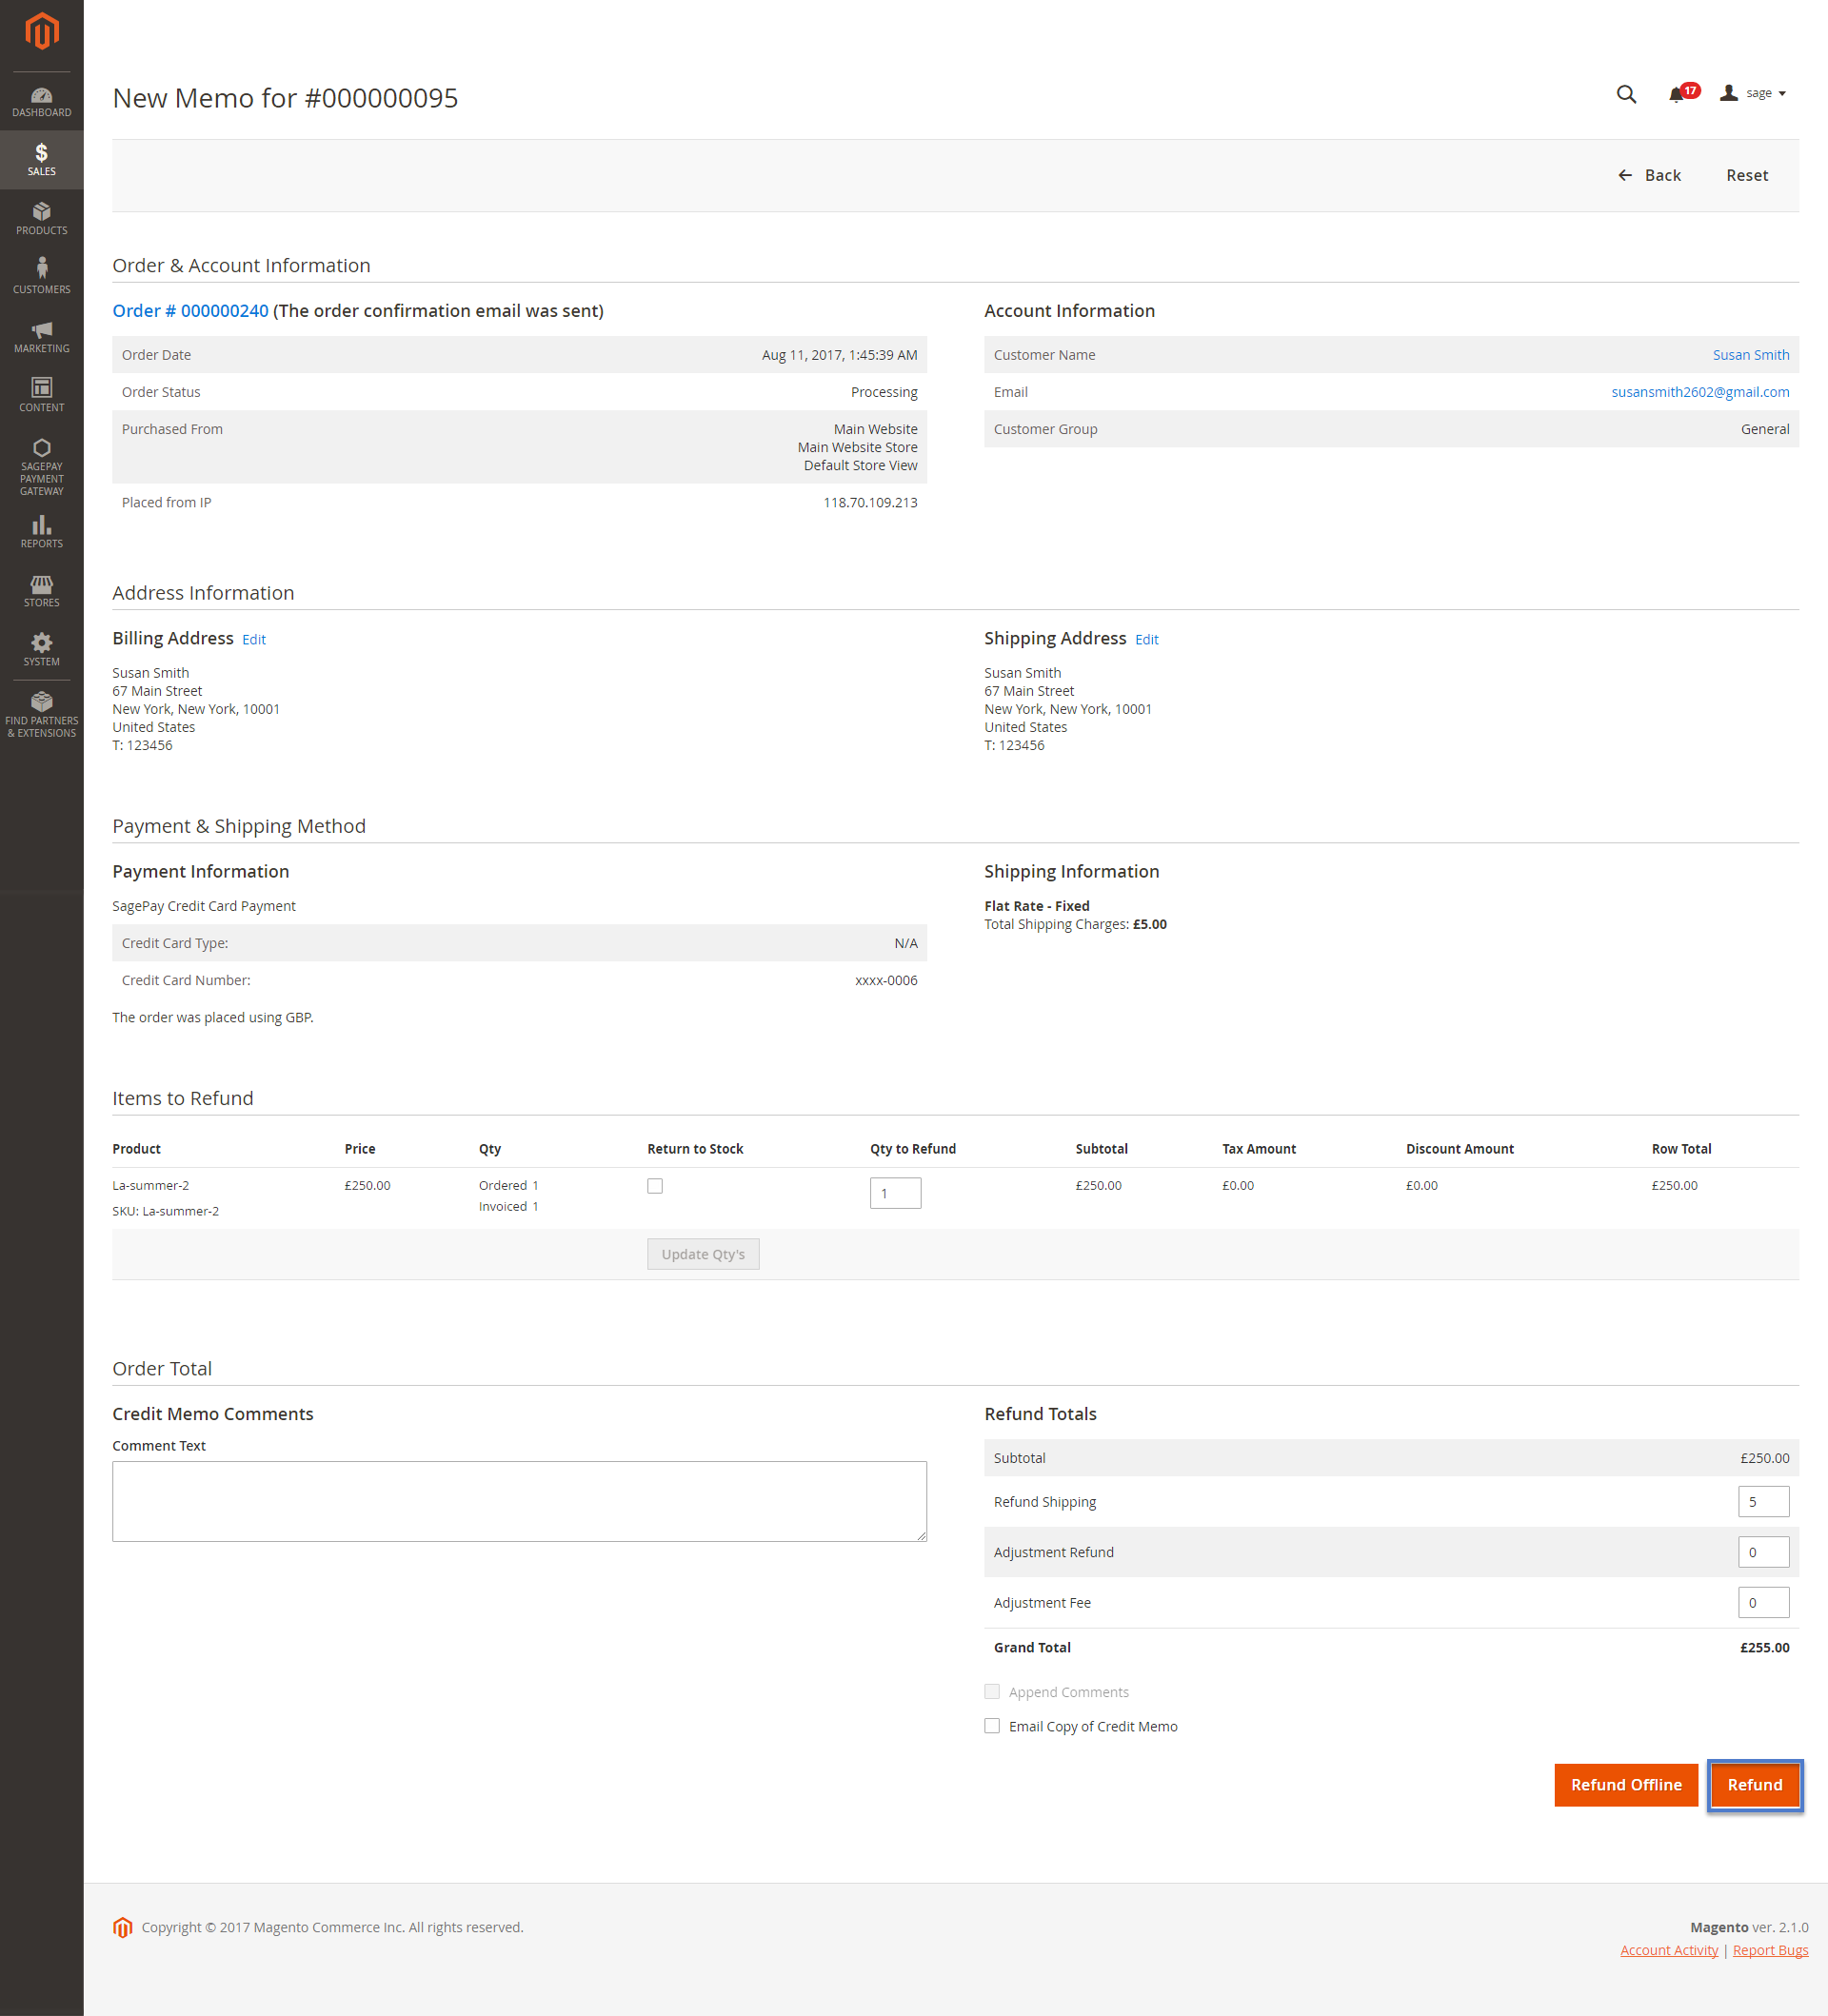
![]() Partial or total refund:
Partial or total refund:
Customer can refund partially or totally by clicking Credit Memo > Refund.
This plugin does not support multiple invoices.
![]() Transaction:
Transaction:
To view transactions in SagePay, log in Magento backend and choose SagePay Payment Gateway > Transactions
![]()
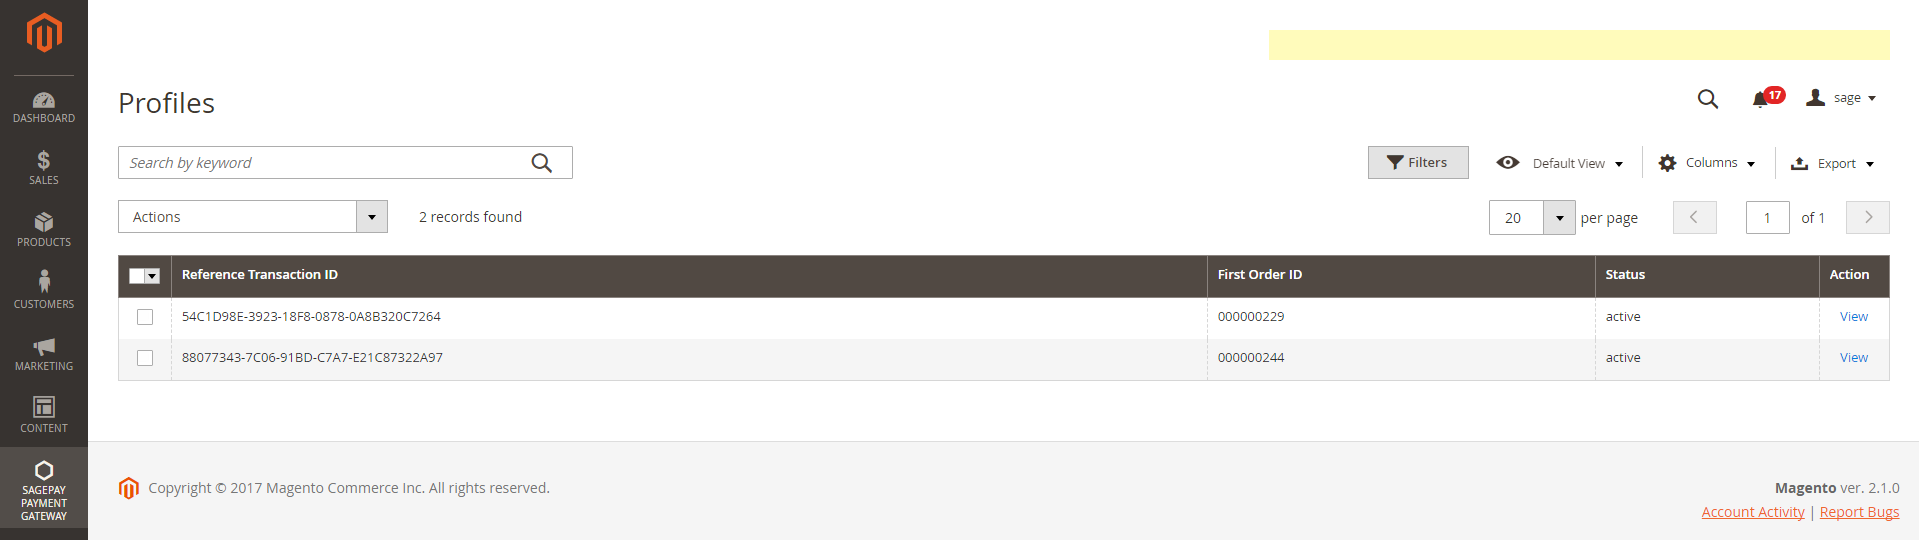
![]() Subscription Profiles:
Subscription Profiles:
To view all subscription that you implemented, click on SagePay Payment Gateway > Subscription Profiles
In there you can enter the order ID or the transaction ID in the search bar to find the subscription plan in need.
Update
- When a new update is available, we will provide you with a new package containing our updated extension.
- You will have to delete the module directory and repeat the installing steps above.
- Flush the config cache. Your store and newly installed module should be working as expected.
Support
- We will reply to support requests within 2 business days.
- We will offer lifetime free update and 6 months free support for all of our paid products. Support includes answering questions related to our products, bug/error fixing to make sure our products fit well in your site exactly like our demo.
- Support DOES NOT include other series such as customizing our products, installation and uninstallation service.
Once again, thank you for purchasing our extension. If you have any questions relating to this extension, please do not hesitate to contact us for support.