...
Updated: 22/10/2018 | By: Magenest | Support Portal: http://servicedesk.izysync.com/servicedesk/customer/portal/7
| Table of Contents |
|---|
...
Introduction
![]()

...
For admin
- Create product as the event ticket type
- Support multiple locations, multiple dates, multiple sessions/timeslot for the event.
- Specify custom ticket type for each event (ticket options) and set name, price, quantity, and sequence of available tickets for each type
- Automatically generate Bar code and QR code
- Design pdf template with XY coordinates in the admin panel
- Preview and print the pdf ticket instantly in the admin panel
- Add Google map to event details
- Create unlimited email templates
- Assign email template to each event
- Allow customers to fill in attendee information at the checkout page
- Easily track attendees, purchased number of tickets of each event
- Add terms and conditions for each event
- Send ticket confirmation emails to event attendees
- Send pdf tickets to all the attendees or to the purchaser only
- Export event attendees, event list, ticket list into CSV, XML files
For customers
- Choose from multiple ticket options (location, date, time and ticket type)
- View the location of each event with a pinpoint on Google map integrated on product page
...
Your store should be running on
Magento Open Source 2.1.x, 2.2.x, 2.3.x
Magento Commerce 2.1.x, 2.2.x,2.3.x
Video Tutorial
Widget Connector width 853 url https://www.youtube.com/watch?v=EIiS2UAkIno height 480
...
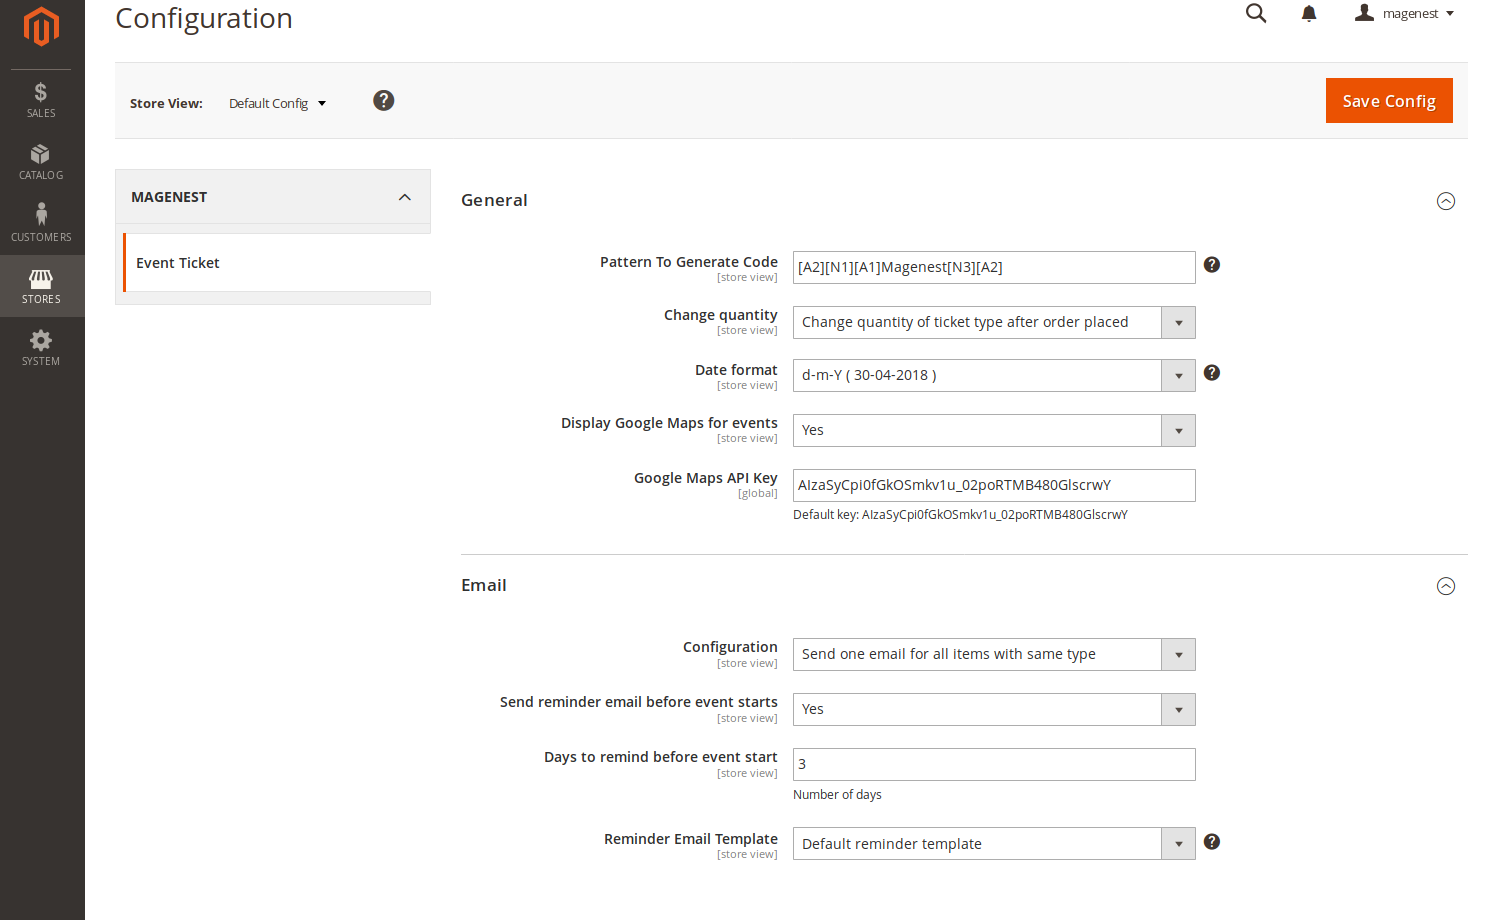
In the back end, go to Stores > Configuration > Magenest > Event Ticket.
![]() General:
General:
- Pattern to generate code: The ticket code format. [A2] is to generate 2 random characters, [N4] is to generate 4 random numbers while "Magenest" is the hard code
- Change quantity: You can choose to deduct the ticket stock after the order is placed or is invoiced
- Date format: You can choose from 16 available date formats for the event
- Display Google Maps for events: Choose Yes to display Google map for each event location
- Google API Keys: Fill in your Google API Keys to integrate Google map. Learn more
...
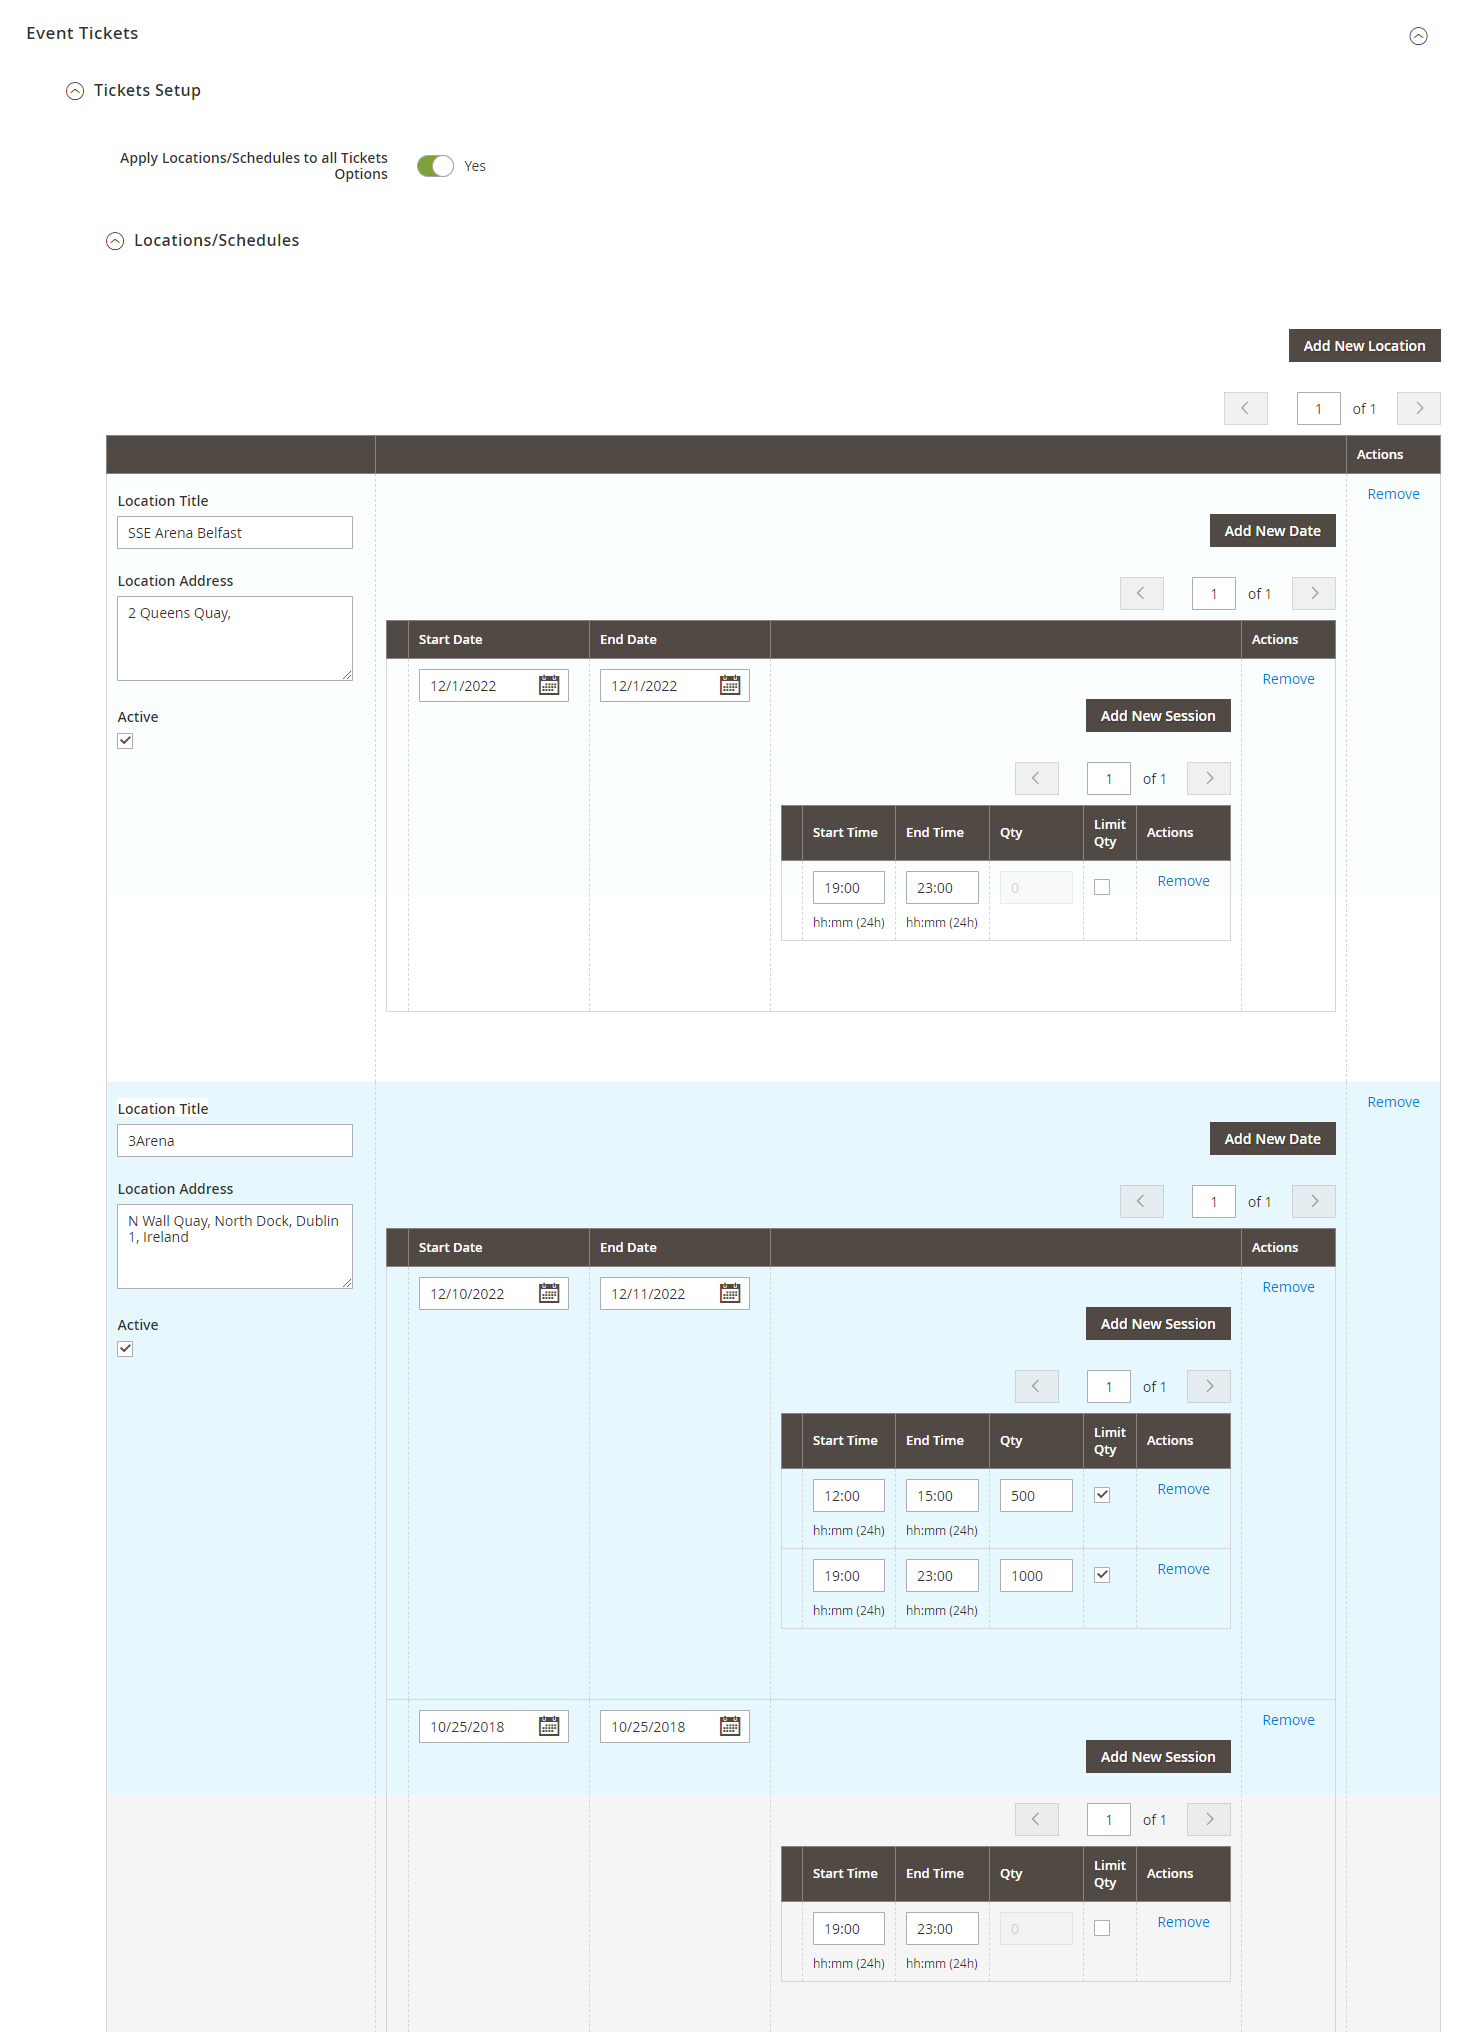
- Locations/Schedules: You can add multiple locations, with multiple dates and sessions/timeslot. You can set the limited quantity for each session.
Note that the total of limited quantities must be equal or less than the product quantity.
Ticket options:
You can add unlimited ticket options with its own price, quantity and description.
Price: The price modifier is added to the product base price. There are two price type (fixed and percent).
For example: Product base price is $100
Fixed price: The option for VIP seat costs $50, then the total price for the ticket will be $150.
Percent: The option for VIP seat costs 10% more from the product price. The total price for the ticket will be $110.
Input front type: You can choose to display the ticket options from 3 types (Drop-down, radio buttons, checkbox).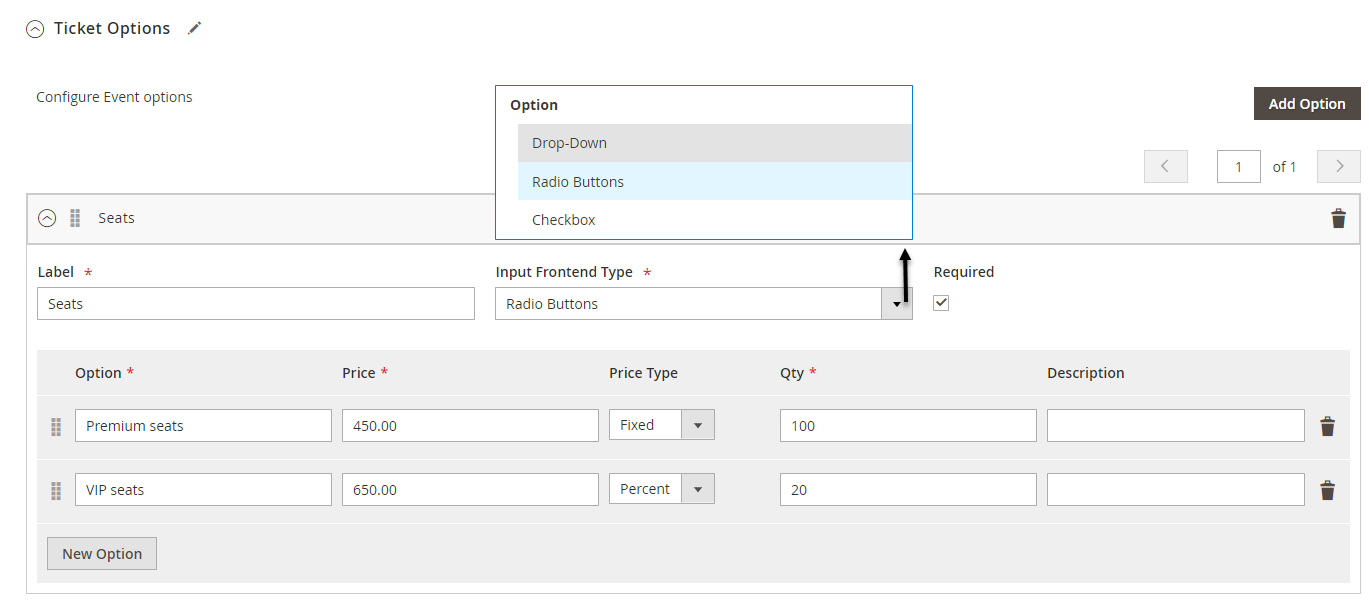
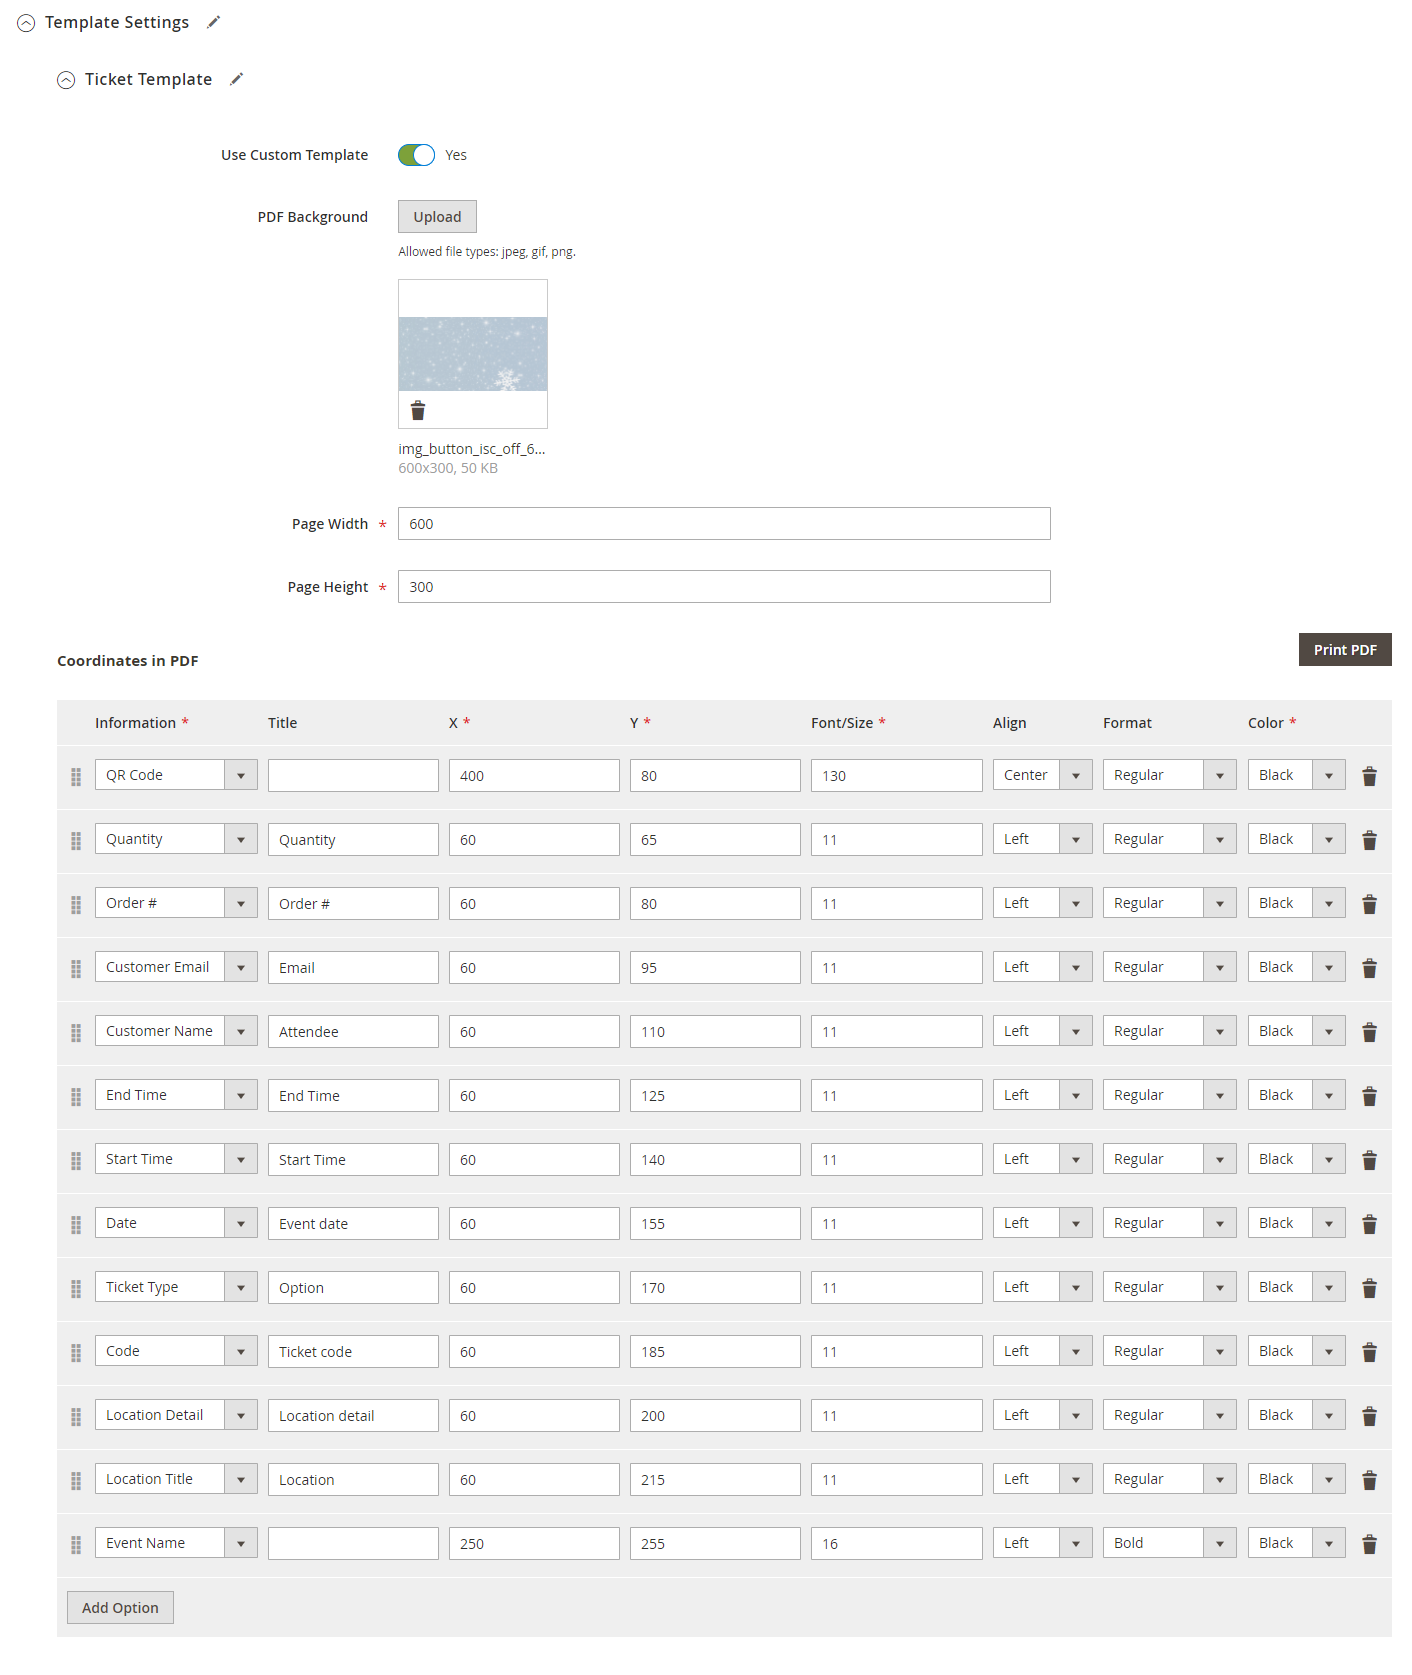
![]() Template Settings:
Template Settings:
...
You can use the PDF Template created in Catalog > Event Management > PDF Template or a Custom Template. If you use the PDF Template, switch the Use Custom Template to No.
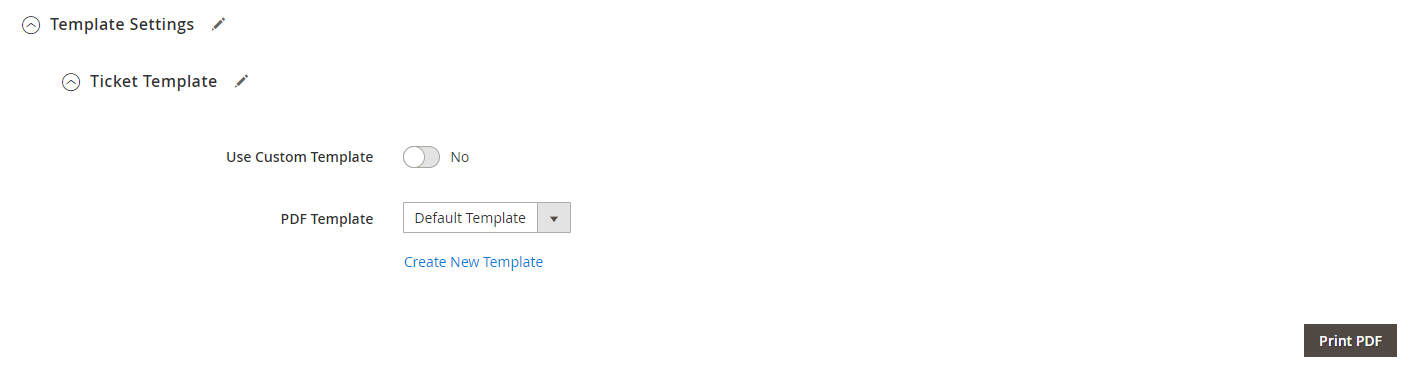
PDF Template
You can create any manage PDF Template in Catalog > Event Management > PDF Template
...
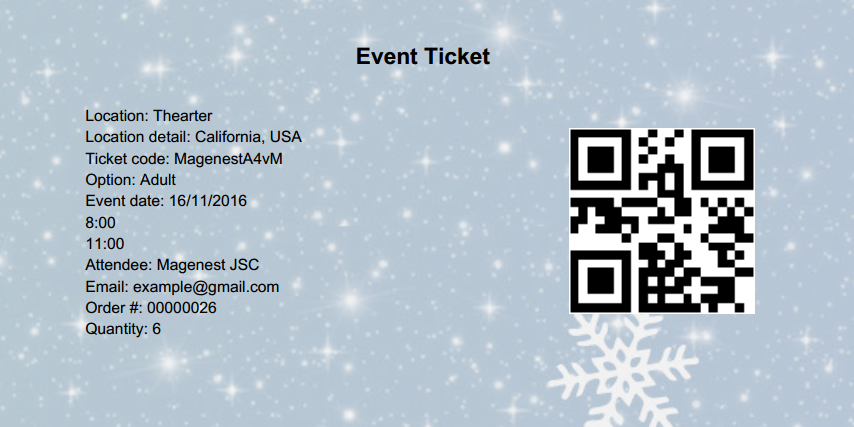
You can preview the template by clicking on the Print PDF button.
![]() Email Template:
Email Template:
You can use the Default Email Template or you can customize your own email template in Marketing > Email Template. Any template created in there will be listed in the email template drop-down for you to select.

Below is the default email template:
| Code Block | ||||||||
|---|---|---|---|---|---|---|---|---|
| ||||||||
{{template config_path="design/email/header_template"}}
<p>{{trans "Welcome to %store_name." store_name=$store.getFrontendName()}}</p>
<ul>
 <li><strong>{{trans "Event Name: "}}</strong> <em> {{var title}}</em></li>
 <li><strong>{{trans "Customer Name: "}}</strong> {{var customer_name}}</li>
 <li><strong>{{trans "My Code: "}}</strong> {{var ticket_code}}</li>
 <li><strong>{{trans "Location Title: "}}</strong> {{var location_title}}</li>
 <li><strong>{{trans "Location Detail: "}}</strong> {{var location_detail}}</li>
 <li><strong>{{trans "Date: "}}</strong> {{var date}}</li>
 <li><strong>{{trans "Time: "}}</strong> {{var time}}</li>
 <li><strong>{{trans "Quantity: "}}</strong> {{var qty}}</li>
 <li><strong>{{trans "Option: "}}</strong> {{var option_type}}</li>
</ul>
{{template config_path="design/email/footer_template"}} |
...
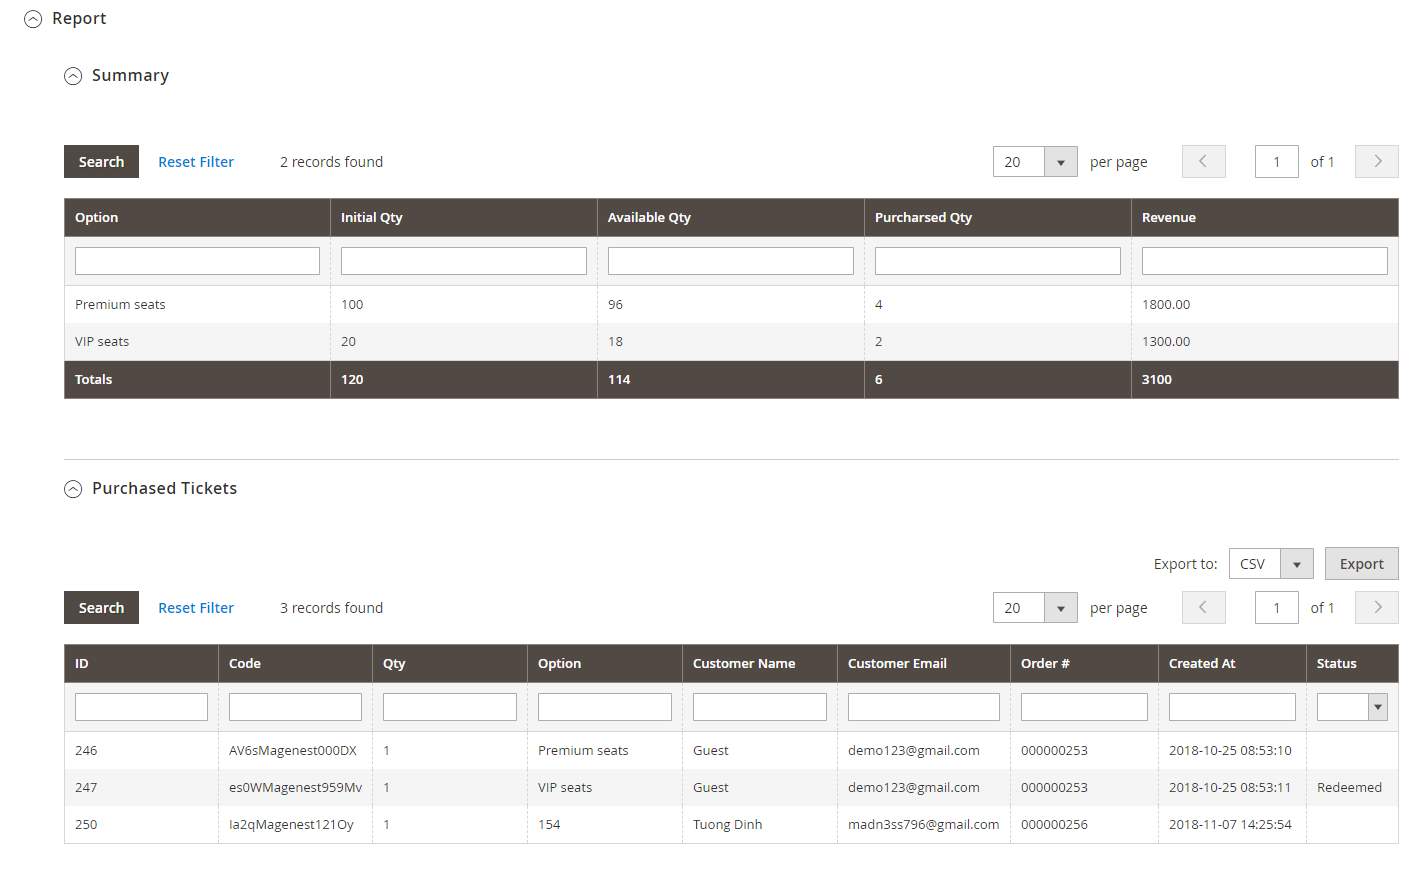
- Purchased Tickets: The information of each ticket sold in your store, with customer information for each order.
![]() Terms and conditions
Terms and conditions
You can add the terms and conditions for each event in this setting.
...
Below is the default email template:
| Code Block | ||||||||
|---|---|---|---|---|---|---|---|---|
| ||||||||
{{template config_path="design/email/header_template"}}

<p>{{trans "This is your reminder from %store_name." store_name=$store.getFrontendName()}}</p>
<p>{{trans "Your event starts in the next"}} {{var remind_day}} {{trans "days"}} </p>
<ul>
	<li><strong>{{trans "Event: "}}</strong> <em> {{var title}}</em></li>
	<li><strong>{{trans "Customer Name: "}}</strong> {{var customer_name}}</li>
	<li><strong>{{trans "Your Code: "}}</strong> {{var ticket_code}}</li>
	<li><strong>{{trans "Location: "}}</strong> {{var location_title}}, {{var location_detail}}</li>
	<li><strong>{{trans "Date: "}}</strong> {{var event_date}}</li>
	<li><strong>{{trans "Time: "}}</strong> from {{var start_time}} to {{var end_time}}</li>
	<li><strong>{{trans "Quantity: "}}</strong> {{var qty}}</li>
	<li><strong>{{trans "Option: "}}</strong> {{var option_type}}</li>
</ul>

{{template config_path="design/email/footer_template"}} |
...
You can export this table to the CSV/XML file.
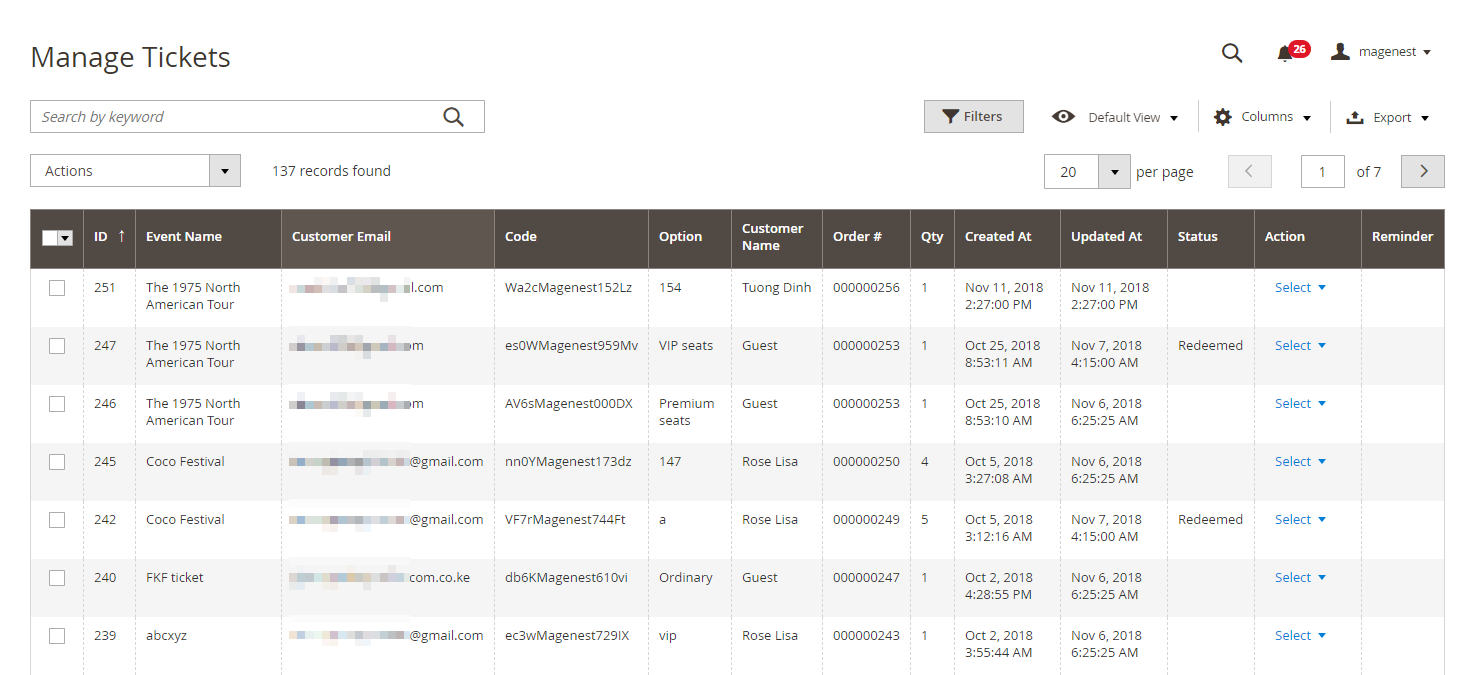
Manage Tickets
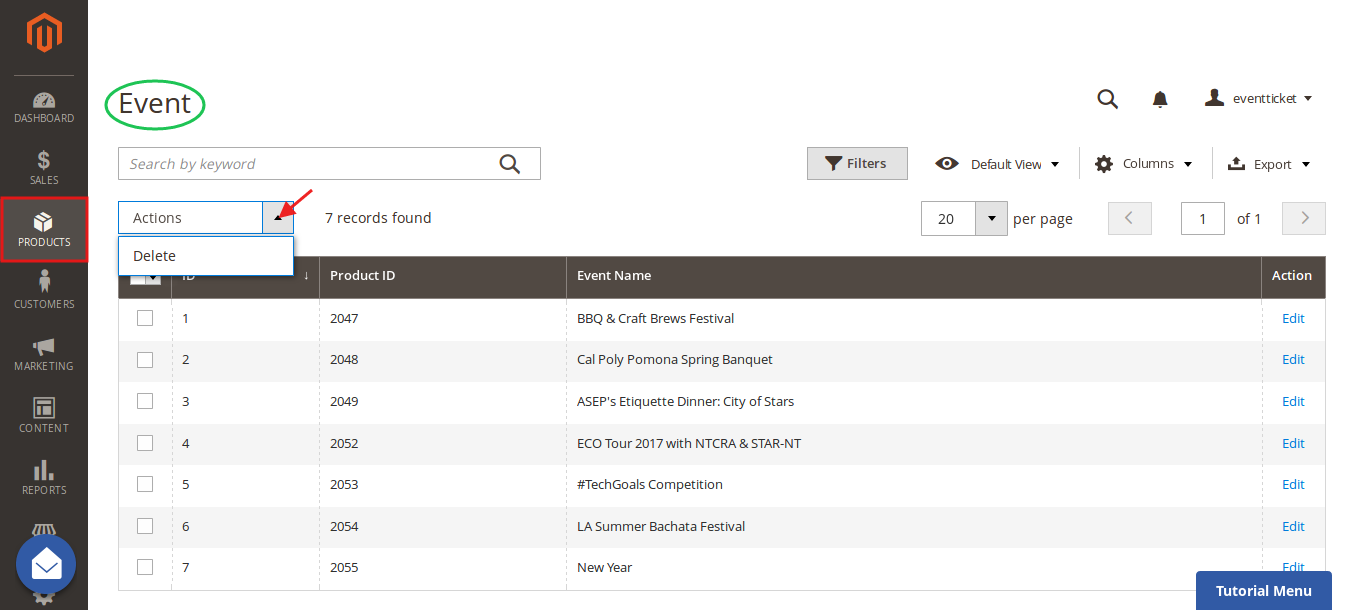
You can manage the events on your store in Catalog > Event Management > Event Ticket.
...
You can also export this table to the CSV/XML file.
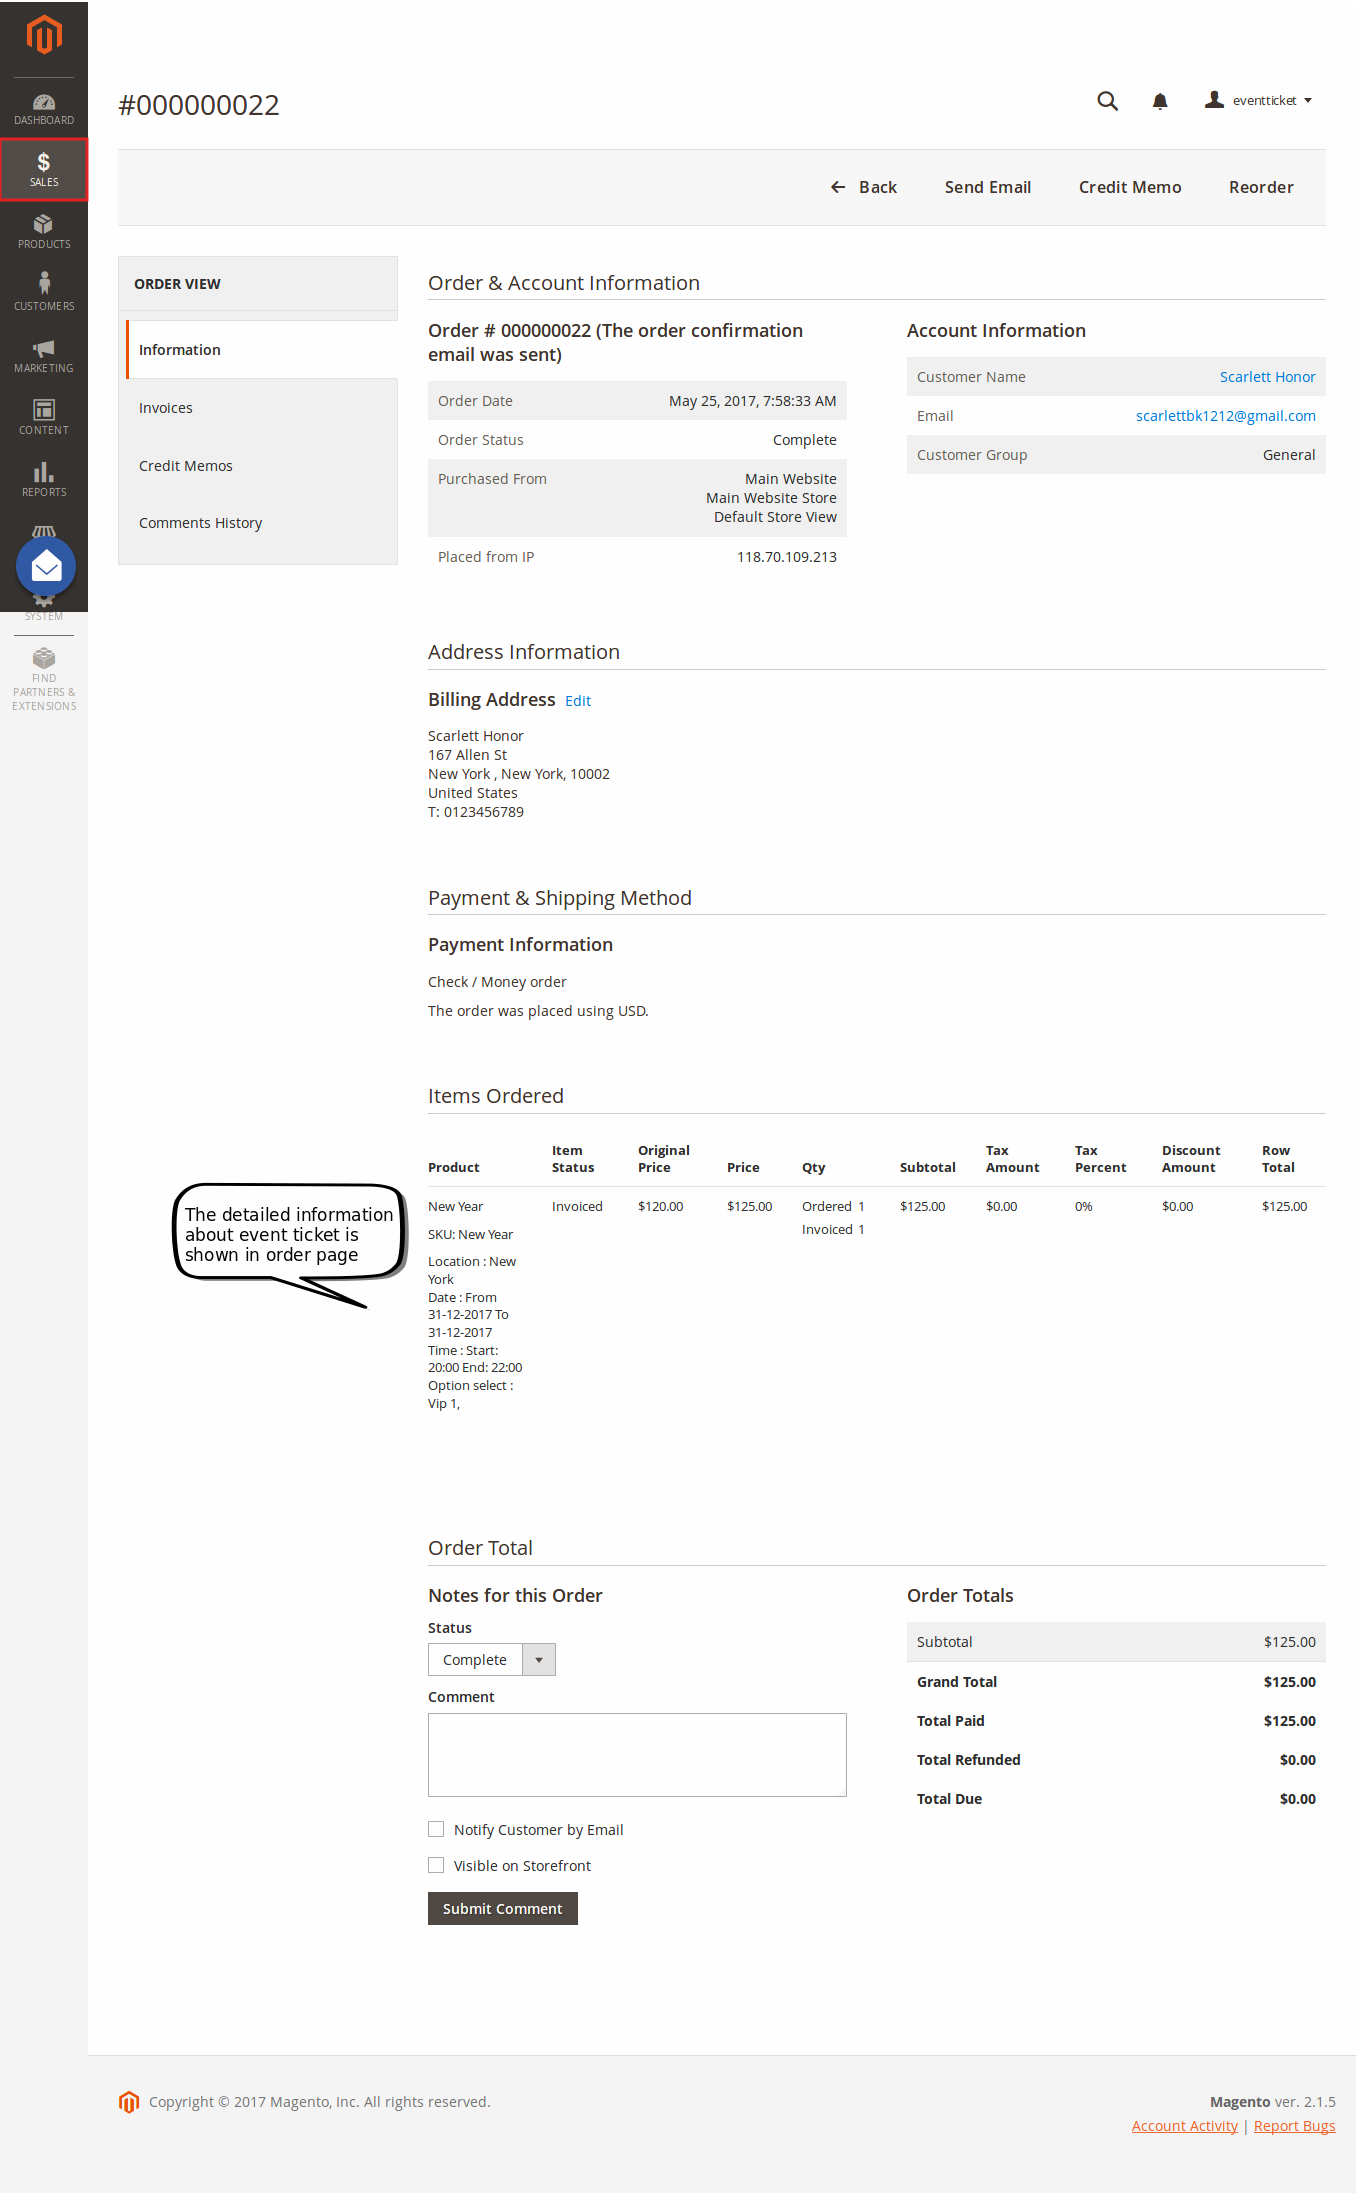
View Order
You can view the ticket info in each order
...
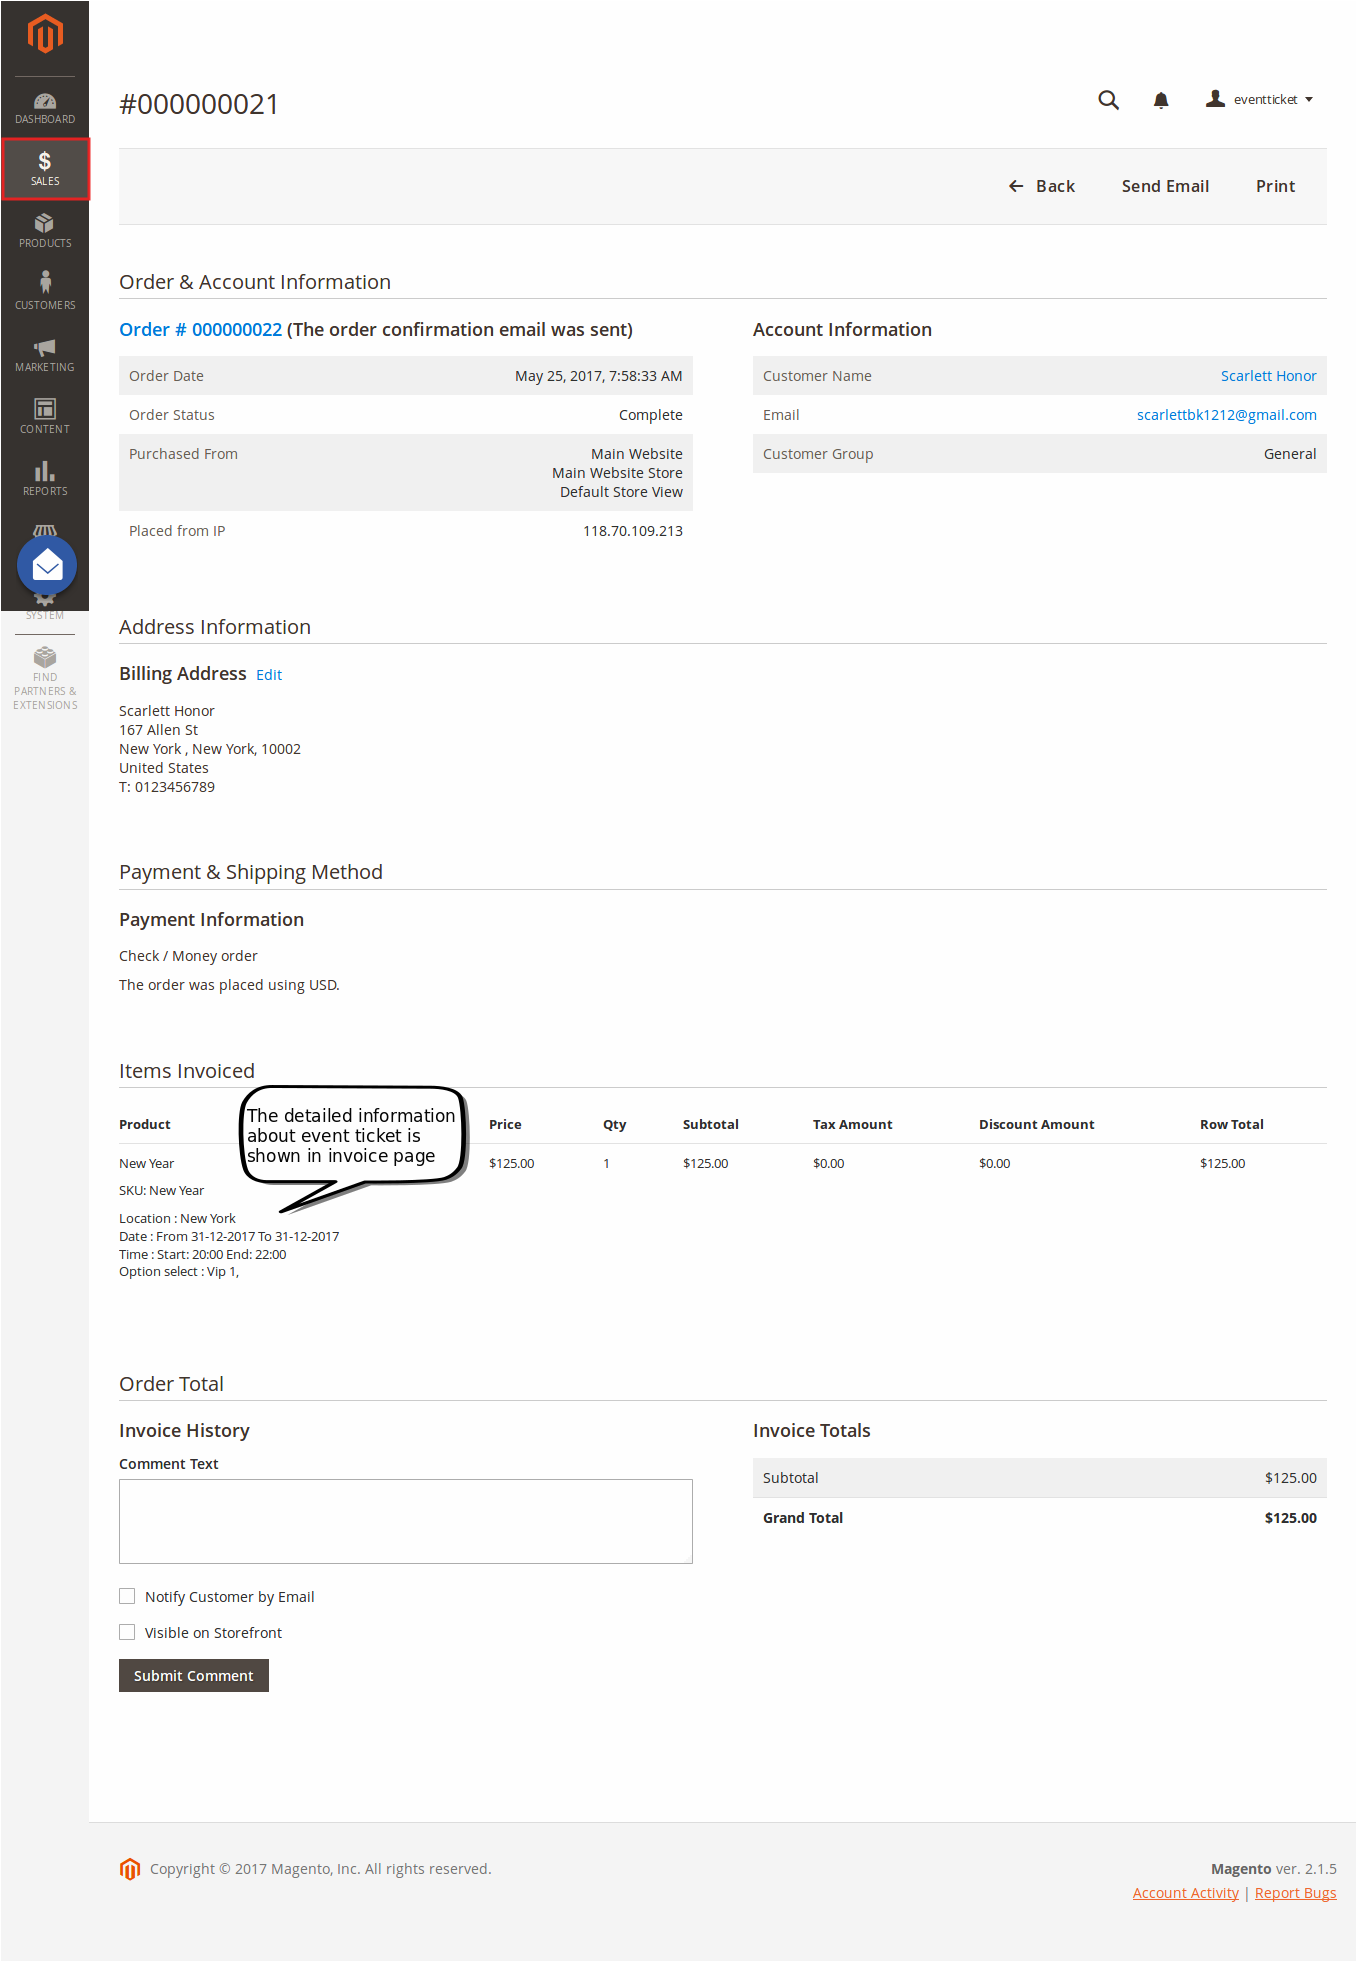
And Invoice:
...
Store Front Functions
Select ticket options
Customers can choose the event location, date and time. They can also choose the ticket option and view the event location with the pinpoint on Google Map right on the product page.

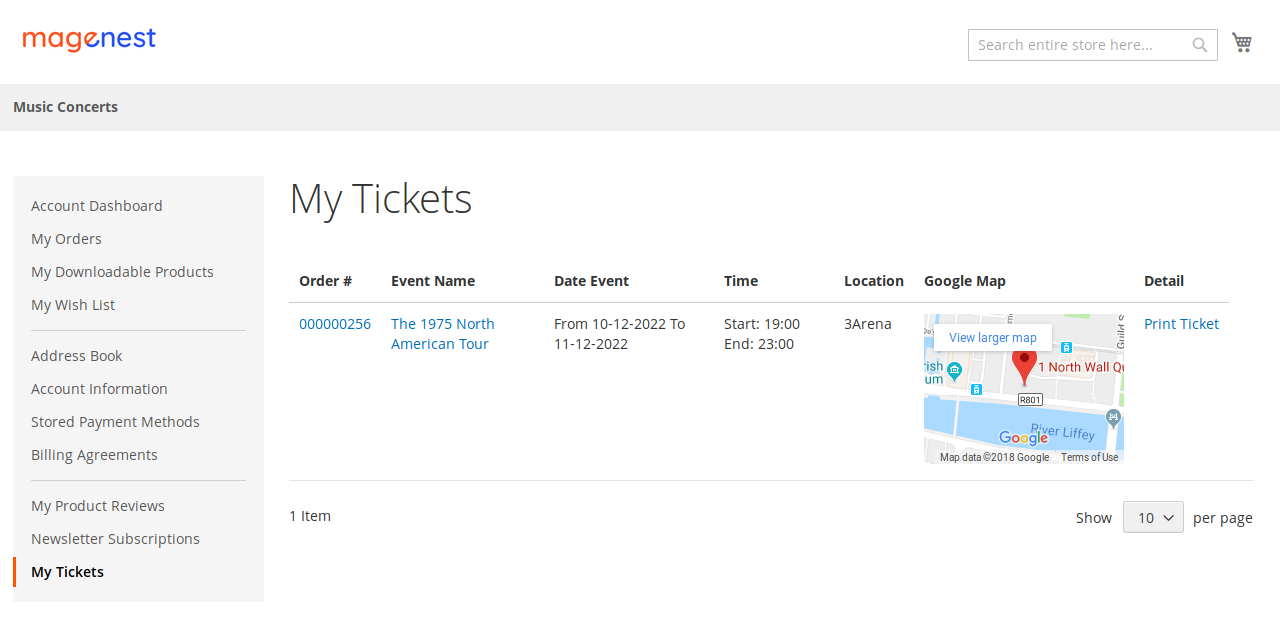
After buying the event ticket successfully and the order is invoiced, in My Account tab, click on My Ticket, customers can view ticket price, status, duration, and location as well as print PDF Ticket.
...
Update
- When a bug fix or new feature is released, we will provide you with the module's new package.
- All you need to do is repeating the above installing steps and uploading the package onto your store. The code will automatically override.
- Flush the config cache. Your store and newly installed module should be working as expected.
Support
- We will reply to support requests within 2 business days.
- We will offer lifetime free update and 6 months of free support for all of our paid products. Support includes answering questions related to our products, bug/error fixing to make sure our products fit well in your site exactly like our demo.
- Support DOES NOT include other services such as customizing our products, installation, and uninstallation service.
Once again, thank you for purchasing our extension. If you have any questions relating to this extension, please do not hesitate to contact us for support.