...
Introduction
![]()
Sage Pay Payments and Subscriptions extension for Magento 2 is great tool allowing the store owners to sync data form their magento store to Sage Pay Payment Gateway. the most secured payment gateway in UK.
Extension's page: Sage Pay Payments and Subscriptions
...
Your store should be running on Magento 2 version 2.1.x.; 2.2.x
Main Functions
Configuration at Magento backend
Firstly, admin need you have to configure the SagePay Payments extension Payment Extension at Magento back end by by clicking on Store Stores > Configuration > Sales > Payment Methods > SagePay Payment Gateway.In addition, admin can set information for:
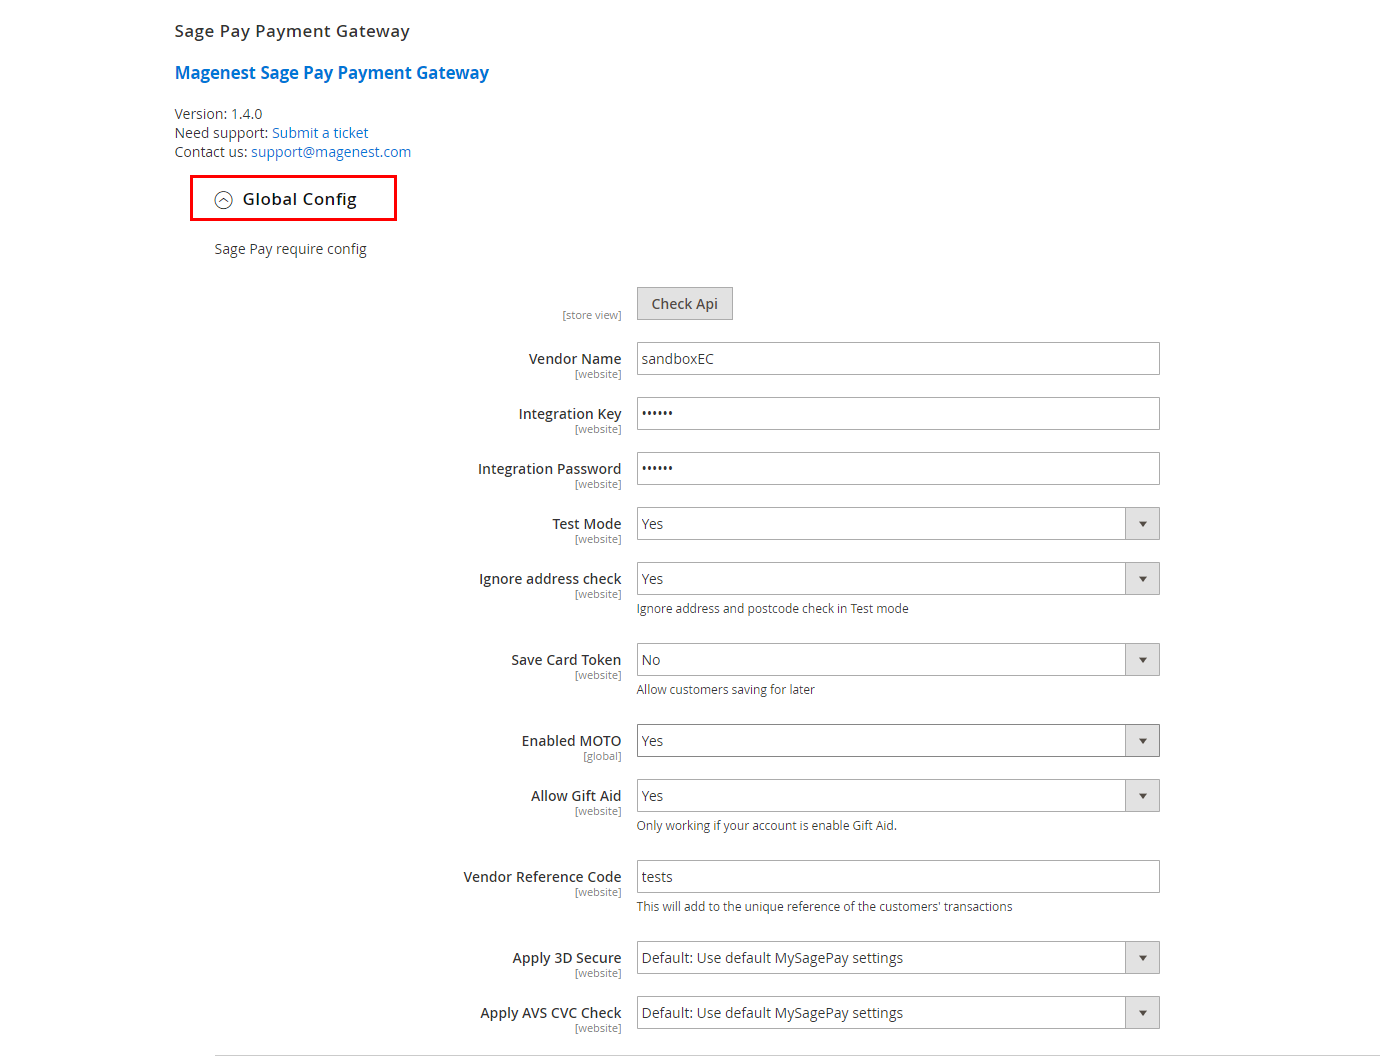
![]() In Global Config:
In Global Config:
Fill in Vendor Name, Integration Key, Integration Password
your SagePay credentials
In our example, we
use account and API of SagePay to implement transaction in test mode
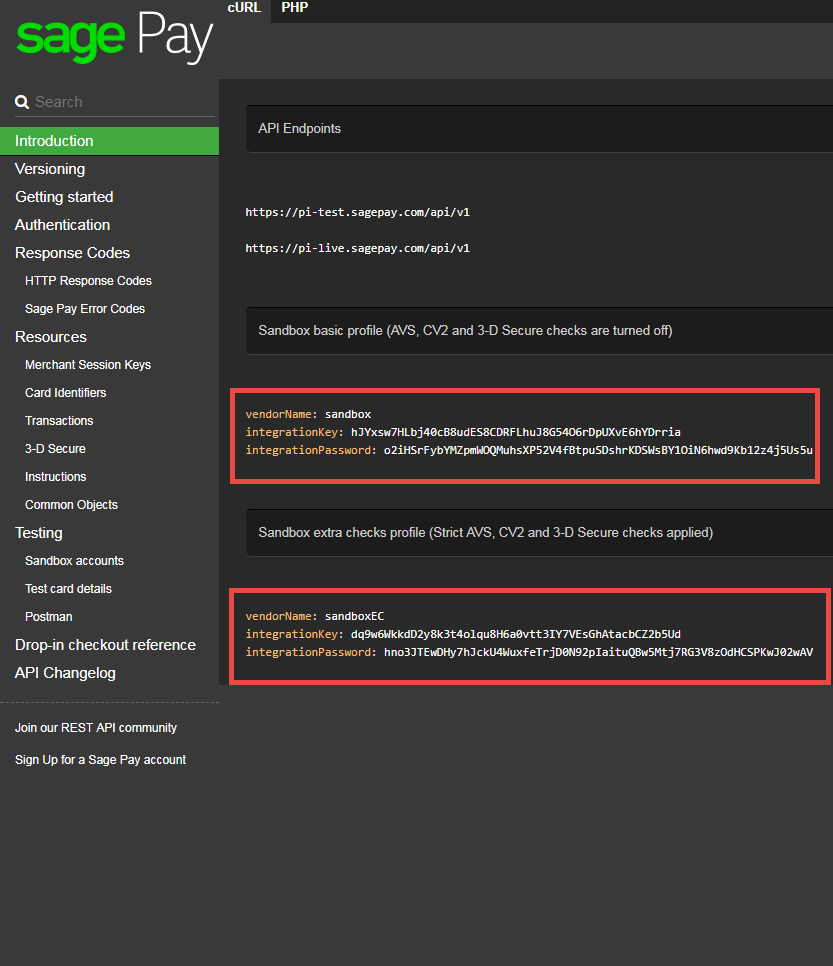
There are two accounts that customers can use: sandbox and sandboxEC. With SandboxEC accounts, users can be supported furthermore such as: 3-D Secure Checked, Strict AVS, CV2
.
Note: Customer must use correct SagePay account to config. If account does not belong to SagePay, SagePay could not process your transaction. Payment is unsuccessful.
![]() Payment Action: Authorize and Capture:
Payment Action: Authorize and Capture:
...
![]() Turn on Test Mode (Choose Yes) when you use test credentials. Turn off the Test Mode (Choose No) when you go live.
Turn on Test Mode (Choose Yes) when you use test credentials. Turn off the Test Mode (Choose No) when you go live.
You can also turn on Ignore address check to skip the address and postcode check in test mode.
Then Click on Check API button to check whether the API is working or not.
![]() Save Card Token: Allow customers to save credit card token for future purchase.
Save Card Token: Allow customers to save credit card token for future purchase.
![]() Enable MOTO: Allow you to make payments in admin panel for customers buying through email or telephone.
Enable MOTO: Allow you to make payments in admin panel for customers buying through email or telephone.
![]() Allow Gift Aid: Allow customers to donate to charity. Note that this function only works if your Sage account is enabled for Gift Aid.
Allow Gift Aid: Allow customers to donate to charity. Note that this function only works if your Sage account is enabled for Gift Aid.
![]() Vendor Reference Code: This will add to the unique reference of the customers' transactions. Doing this will help you recognize the source of the transactions in case you have multiple stores.
Vendor Reference Code: This will add to the unique reference of the customers' transactions. Doing this will help you recognize the source of the transactions in case you have multiple stores.
![]() Apply 3D Secure with 4 options: Default, Force, Disable, Force & Ingore
Apply 3D Secure with 4 options: Default, Force, Disable, Force & Ingore
- Default: Use Default My SagePay Settings
- Force: Apply authentication even if the 3D Secure is turned off
- Disable: Disable authentication and rules
- Force & Ignore: Apply authentication but ignore rules
![]() Apply AVS, CVC Check with 4 options: Default; Force; Disable; Force & Ingore
Apply AVS, CVC Check with 4 options: Default; Force; Disable; Force & Ingore
- Default: Use Default My SagePay Settings
- Force: Apply authentication even if the AVS, CVC Check is turned off
- Disable: Disable authentication and rules
- Force & Ignore: Apply authentication but ignore rules
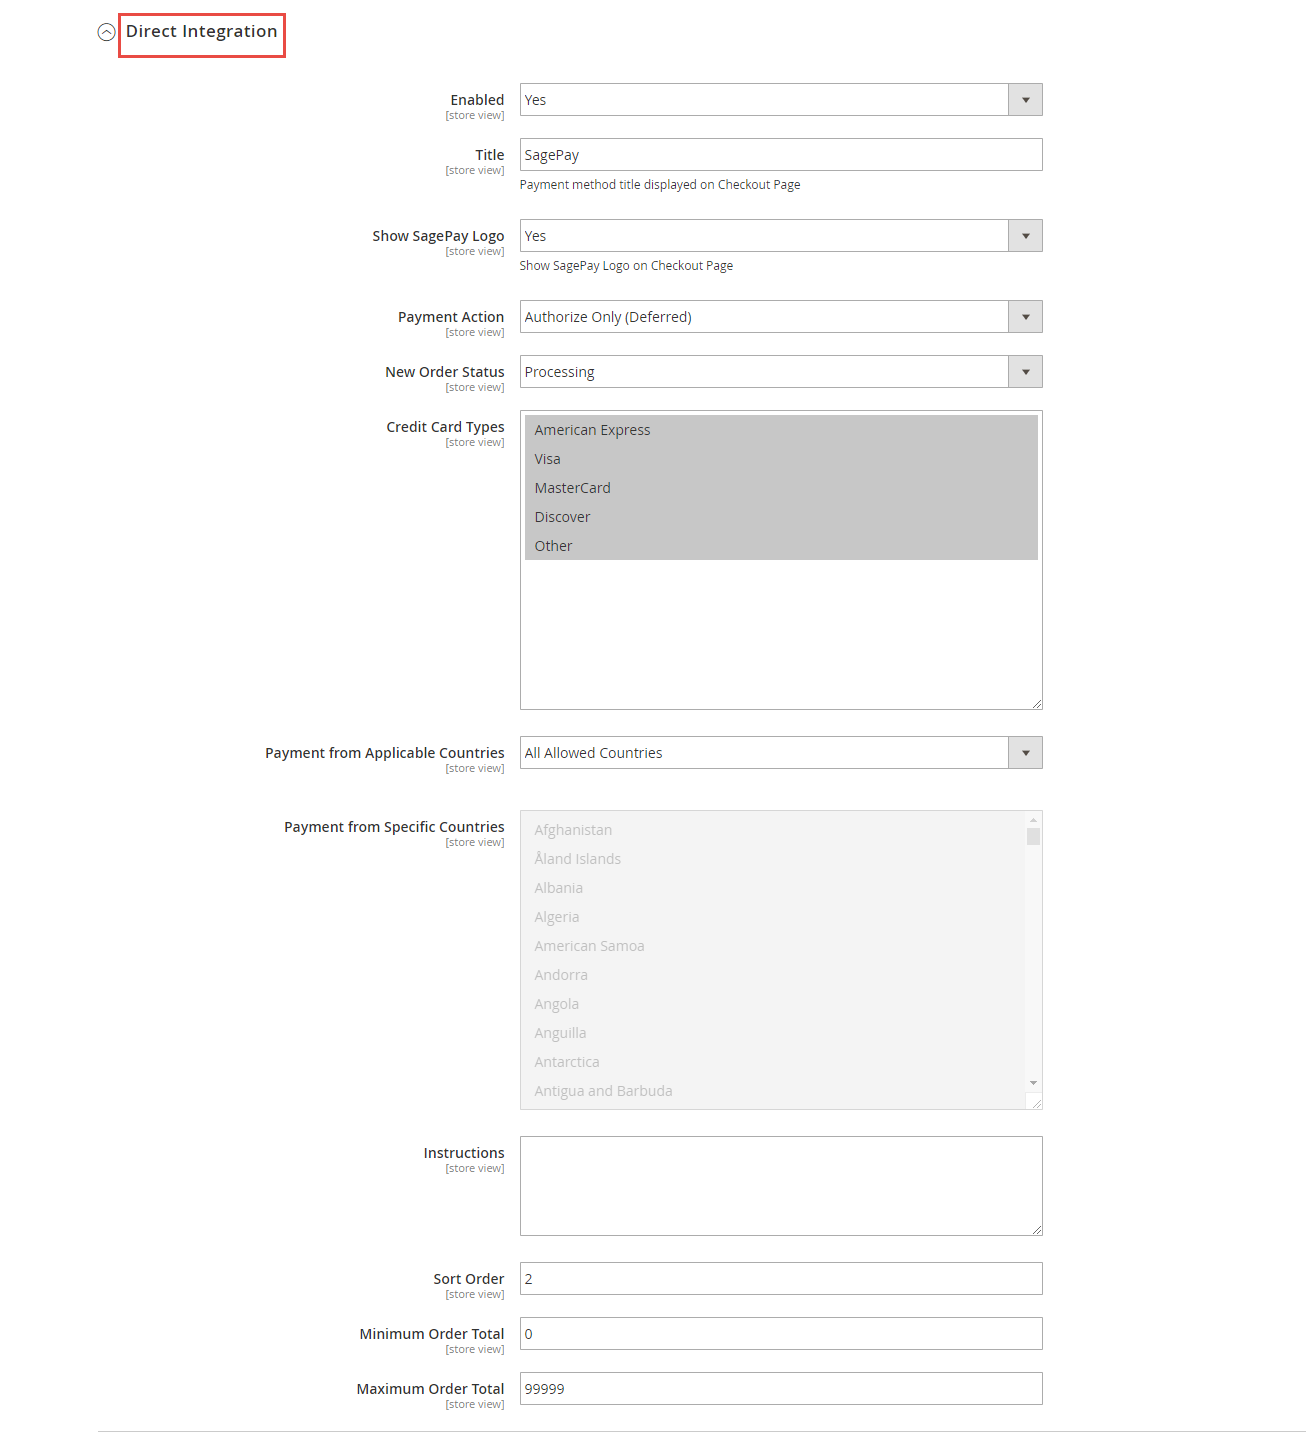
![]() In Direct Integration
In Direct Integration
![]() Enabled: Choose Yes to enable direct checkout for SagePay Payment
Enabled: Choose Yes to enable direct checkout for SagePay Payment
![]() Title: The title of the payment method displayed on the checkout page.
Title: The title of the payment method displayed on the checkout page.
![]() Show SagePay Logo: Display SagePay logo on the checkout page.
Show SagePay Logo: Display SagePay logo on the checkout page.
![]() Payment Action: You can choose between Authorize Only (Deferred) and Authorize and Capture (Payment)
Payment Action: You can choose between Authorize Only (Deferred) and Authorize and Capture (Payment)
- Authorize Only: check for the card for validity but not charge the account yet until the order is approved and invoiced.
- Authorize and Capture: charge the debit/credit card at the time of the order is placed.
![]() New Order Status: Processing, Suspected Fraud
New Order Status: Processing, Suspected Fraud
- Processing: The payment is made successfully and an order invoice is issued.
- Suspected Fraud: No invoice is issued.
![]() Credit Card Types: You can choose which credit card types you want by choosing one or more items.
Credit Card Types: You can choose which credit card types you want by choosing one or more items.
![]() Payment from Applicable Countries:
Payment from Applicable Countries:
- All allowed countries: Enable all allowed countries to make payment.
- Specific Countries: Restrict some countries by unselecting them from the Payment from Specific Countries.
![]() In addition, you can add/edit the Instructions to instruct customers how to do payment.
In addition, you can add/edit the Instructions to instruct customers how to do payment.
...
![]() New Order Status: Processing
New Order Status: Processing
![]() Can Save Card: Yes to turn on Save Card mode
Can Save Card: Yes to turn on Save Card mode
![]() Addtional Configuration: to install 3D secure mode.
Addtional Configuration: to install 3D secure mode.
![]() Apply 3D Secure: Use default MySagePay settings.
Apply 3D Secure: Use default MySagePay settings.
![]() Apply AVS CVC Check: Use default MySagePay settings.
Apply AVS CVC Check: Use default MySagePay settings.
![]() Allow Gift Aid: In the UK, customers can claim back part of their tax money by donating through Gift Aid, a tax relief incentive created to benefit charities and Community Amateur Sports Clubs.
Allow Gift Aid: In the UK, customers can claim back part of their tax money by donating through Gift Aid, a tax relief incentive created to benefit charities and Community Amateur Sports Clubs.
With Gift Aid enabled in Sage Pay, customers can now easily perform this task when donating to a charity. They only need to read the agreement, tick in the checkbox, and everything is automatically.
When done, please press Save Configuration, your configuration is ready to use.
...
![]() Sort Order: The order of the payment method that will be displayed on the checkout page.
Sort Order: The order of the payment method that will be displayed on the checkout page.
![]() Minimum Order in Total: If the order value is less than this figure, the payment method will not be displayed on the checkout page.
Minimum Order in Total: If the order value is less than this figure, the payment method will not be displayed on the checkout page.
![]() Maximum Order in Total: If the order value is bigger than this figure, the payment method will not be displayed on the checkout page.
Maximum Order in Total: If the order value is bigger than this figure, the payment method will not be displayed on the checkout page.
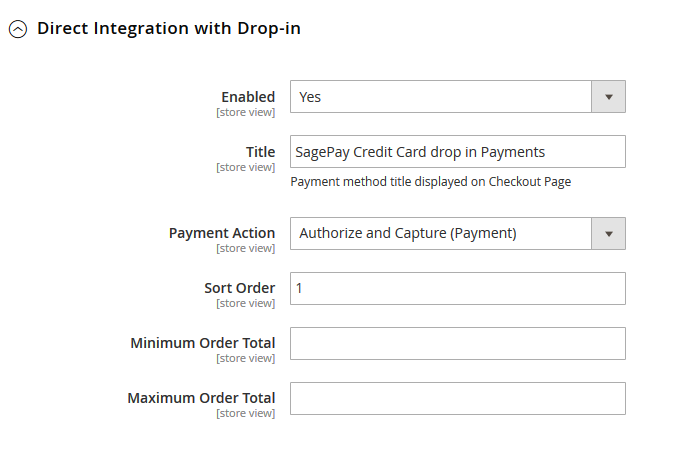
![]() In Direct Integration with Drop-in
In Direct Integration with Drop-in
![]() Enabled: Choose Yes to enable direct checkout with drop-in for SagePay Payment
Enabled: Choose Yes to enable direct checkout with drop-in for SagePay Payment
![]() Title: The title of the payment method displayed on the checkout page.
Title: The title of the payment method displayed on the checkout page.
![]() Payment Action: You can choose between Authorize Only (Deferred) and Authorize and Capture (Payment)
Payment Action: You can choose between Authorize Only (Deferred) and Authorize and Capture (Payment)
- Authorize Only: check for the card for validity but not charge the account yet until the order is approved and invoiced.
- Authorize and Capture: charge the debit/credit card at the time of the order is placed.
![]() Sort Order: The order of the payment method that will be displayed on the checkout page.
Sort Order: The order of the payment method that will be displayed on the checkout page.
![]() Minimum Order in Total: If the order value is less than this figure, the payment method will not be displayed on the checkout page.
Minimum Order in Total: If the order value is less than this figure, the payment method will not be displayed on the checkout page.
![]() Maximum Order in Total: If the order value is bigger than this figure, the payment method will not be displayed on the checkout page.
Maximum Order in Total: If the order value is bigger than this figure, the payment method will not be displayed on the checkout page.
When done, press Save Configuration. This direction can be applied with both Subscription product and non-subscription product.
...
For Subscription Products
Create new subscription plan for a product
To create a subscription product, admin click on Products > Catalog and choose a product type.
Then, the New Product page will be shown. Regarding the Sage Payment and Subscriptions extension, admin needs to consider two tabs named Sage Subscription and Sage Subscription Billing Options.
At Sage Subscription tab, admin will set whether a product is a stripe subscription product or not.
+ YES: This product will be shown as a stripe subscription product at front end. This means this product's plans which were set at the Sage Subscription Billing Options tab will be shown with this product at this product detail page (e.g. Plan ID, Billing Frequency ...). Customers will choose one of them and payment.
+ NO: This product will be shown as a simple product (don't show this product's plans, it will be hidden).
- At Sage Subscription Billing Options tab, admin will need to set plans if they wish it is a subscription product. There are some fields that admin need to set, include:
+ Plan ID.
+ Period Unit: Select one of the period units (Day, Week, Month, Year).
+ Billing Frequency.
Also, if admin want to add more plans for a product, they only click on Add Option button. Then, admin can add the same as above.

Please click on Save button to complete.
...