...
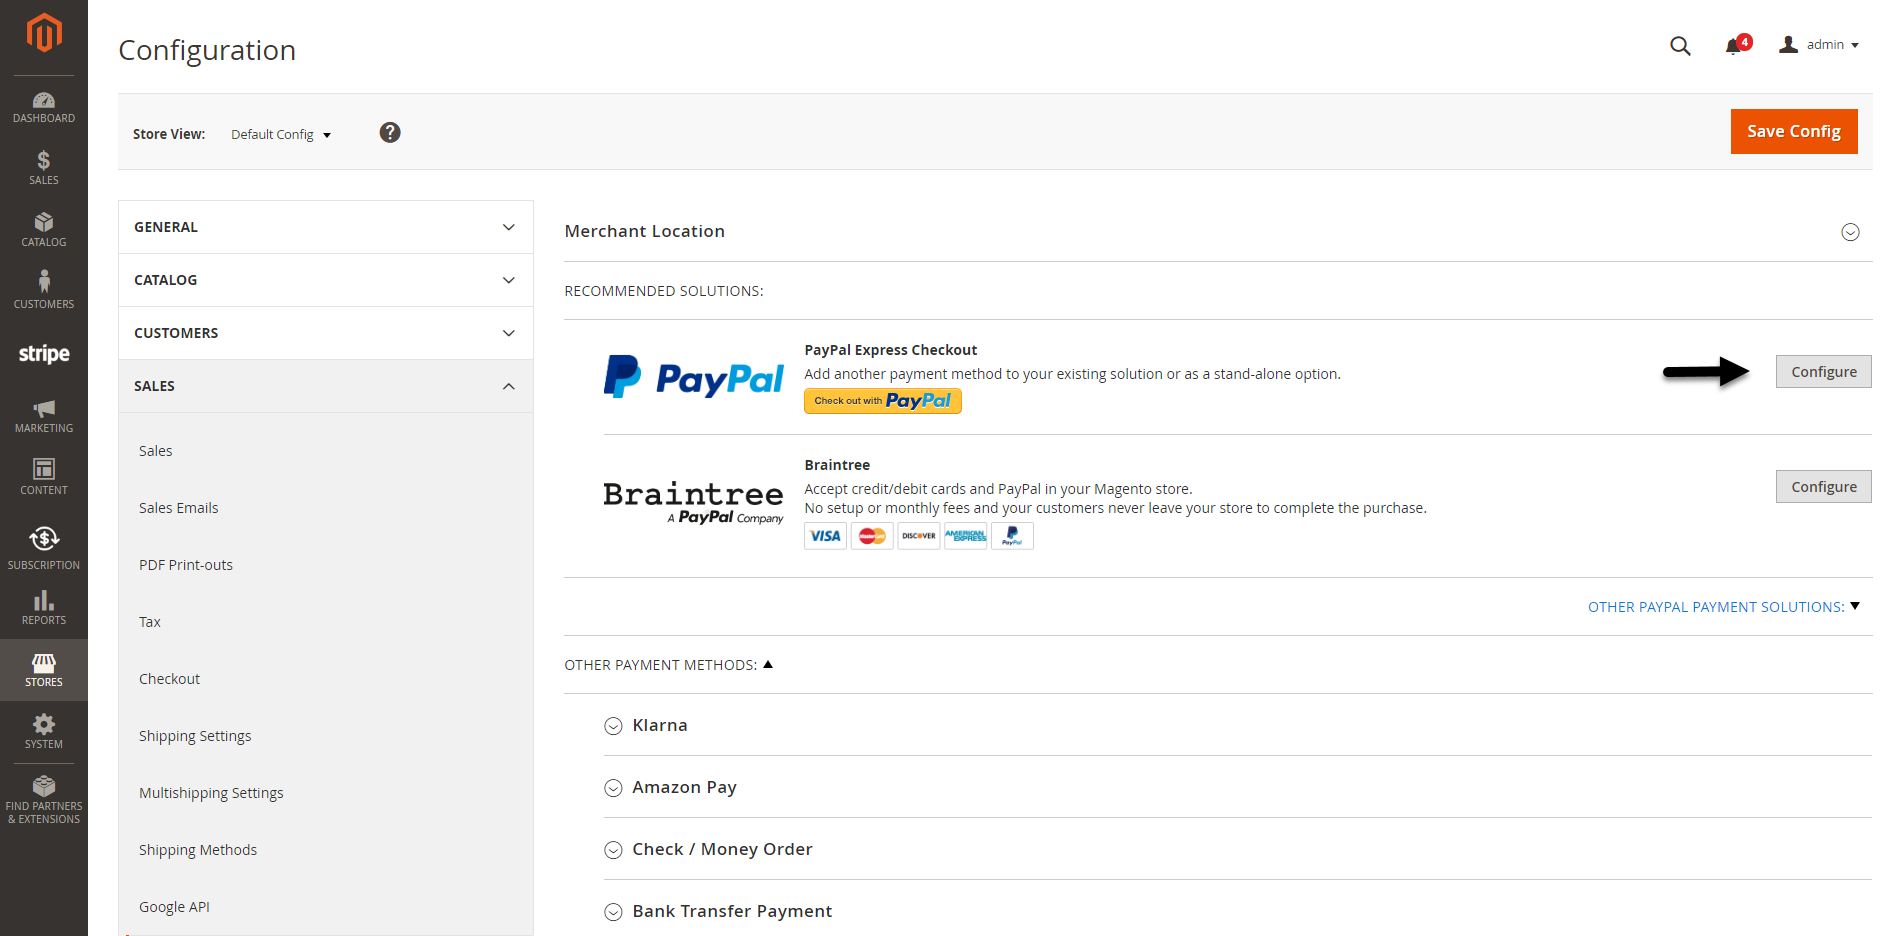
In the admin panel, go to Configuration > Sales > Payment Methods > Recommended Solutions then click on Configure button in Paypal Express Checkout.
Enter your Email Associated with PayPal Merchant Account
Select API Signature in API Authentication Methods
Enter API Username, API Password and API Signature associated with your PayPal account. To get your Paypal Credentials, click on Get Credentials from Paypal button, to get sandbox credentials, click on Sandbox Credentials button
Enable Sandbox Mode if you are using a sandbox PayPal account. Disable Sandbox Mode if you go live
Choose Yes in the Enable this Solution field to enable Paypal Payment.
Enter the Merchant Account ID.
On the top right corner, click Save Config.
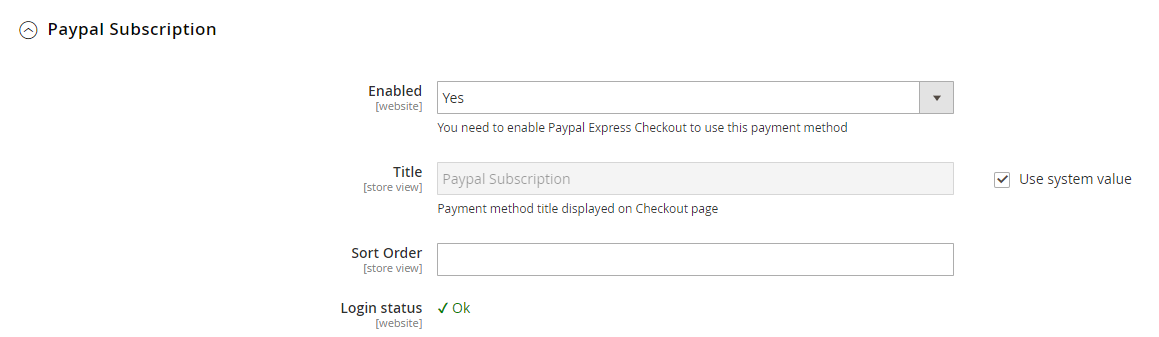
In Other Payment Methods > Paypal Subscription
...
Click on the Save Config button to save data entered.
 IPN (Instant Payment Notification) config
...
- Sandbox Mode Enabled: Turn this on (Yes) for test mode, remember to use the test key and test cards for testing. Other please turn this off (No) when you go Live.
If you use the Test Key:
You should fill in Stripe API Test Keys in Test Publishable Key, Test Secret Key to connect Magento and Stripe Payment Gateway.
Turn on the Sandbox Mode Enabled by choosing Yes.
If you use the Live Key:
Fill in your Stripe API Keys in Live Publishable Key, Live Secret Key to connect Magento with Stripe Payment Gateway.
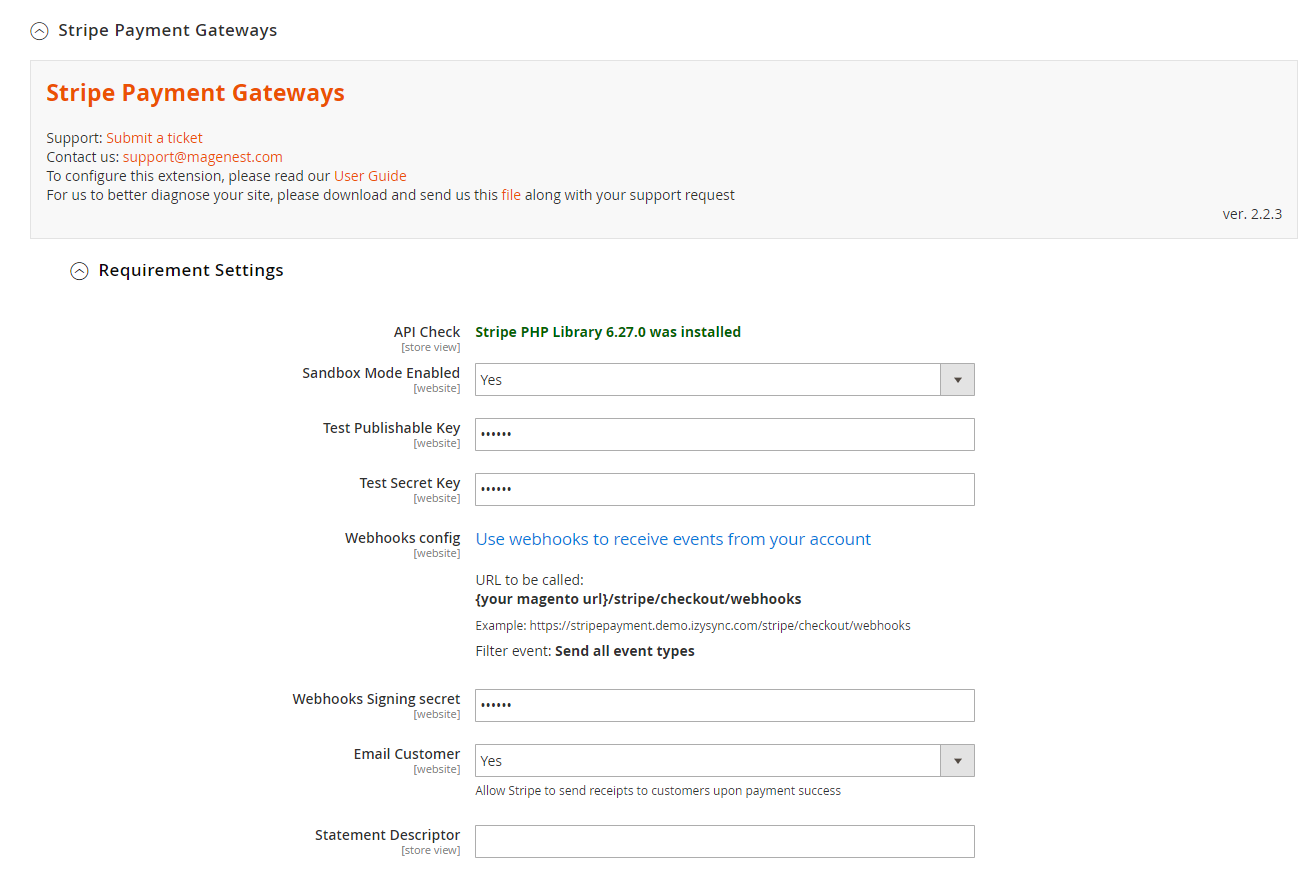
- Webhooks config: You can configure Stripe webhooks by going to Use webhooks to receive events from your account.
- Login to your Stripe account, then in the Webhooks configuration, click on on the Add endpoint button.
The URL to be called follows the format: {your Magento url}/stripe/checkout/webhooks. Then select the filter event as Send all event types.
...
- Copy the signing secret and paste it to Webhooks signing secret box.
...
- Enabled: Choose Yes to enable the Stripe payment method.
- Title: the title of the payment method displayed on the Checkout Page.
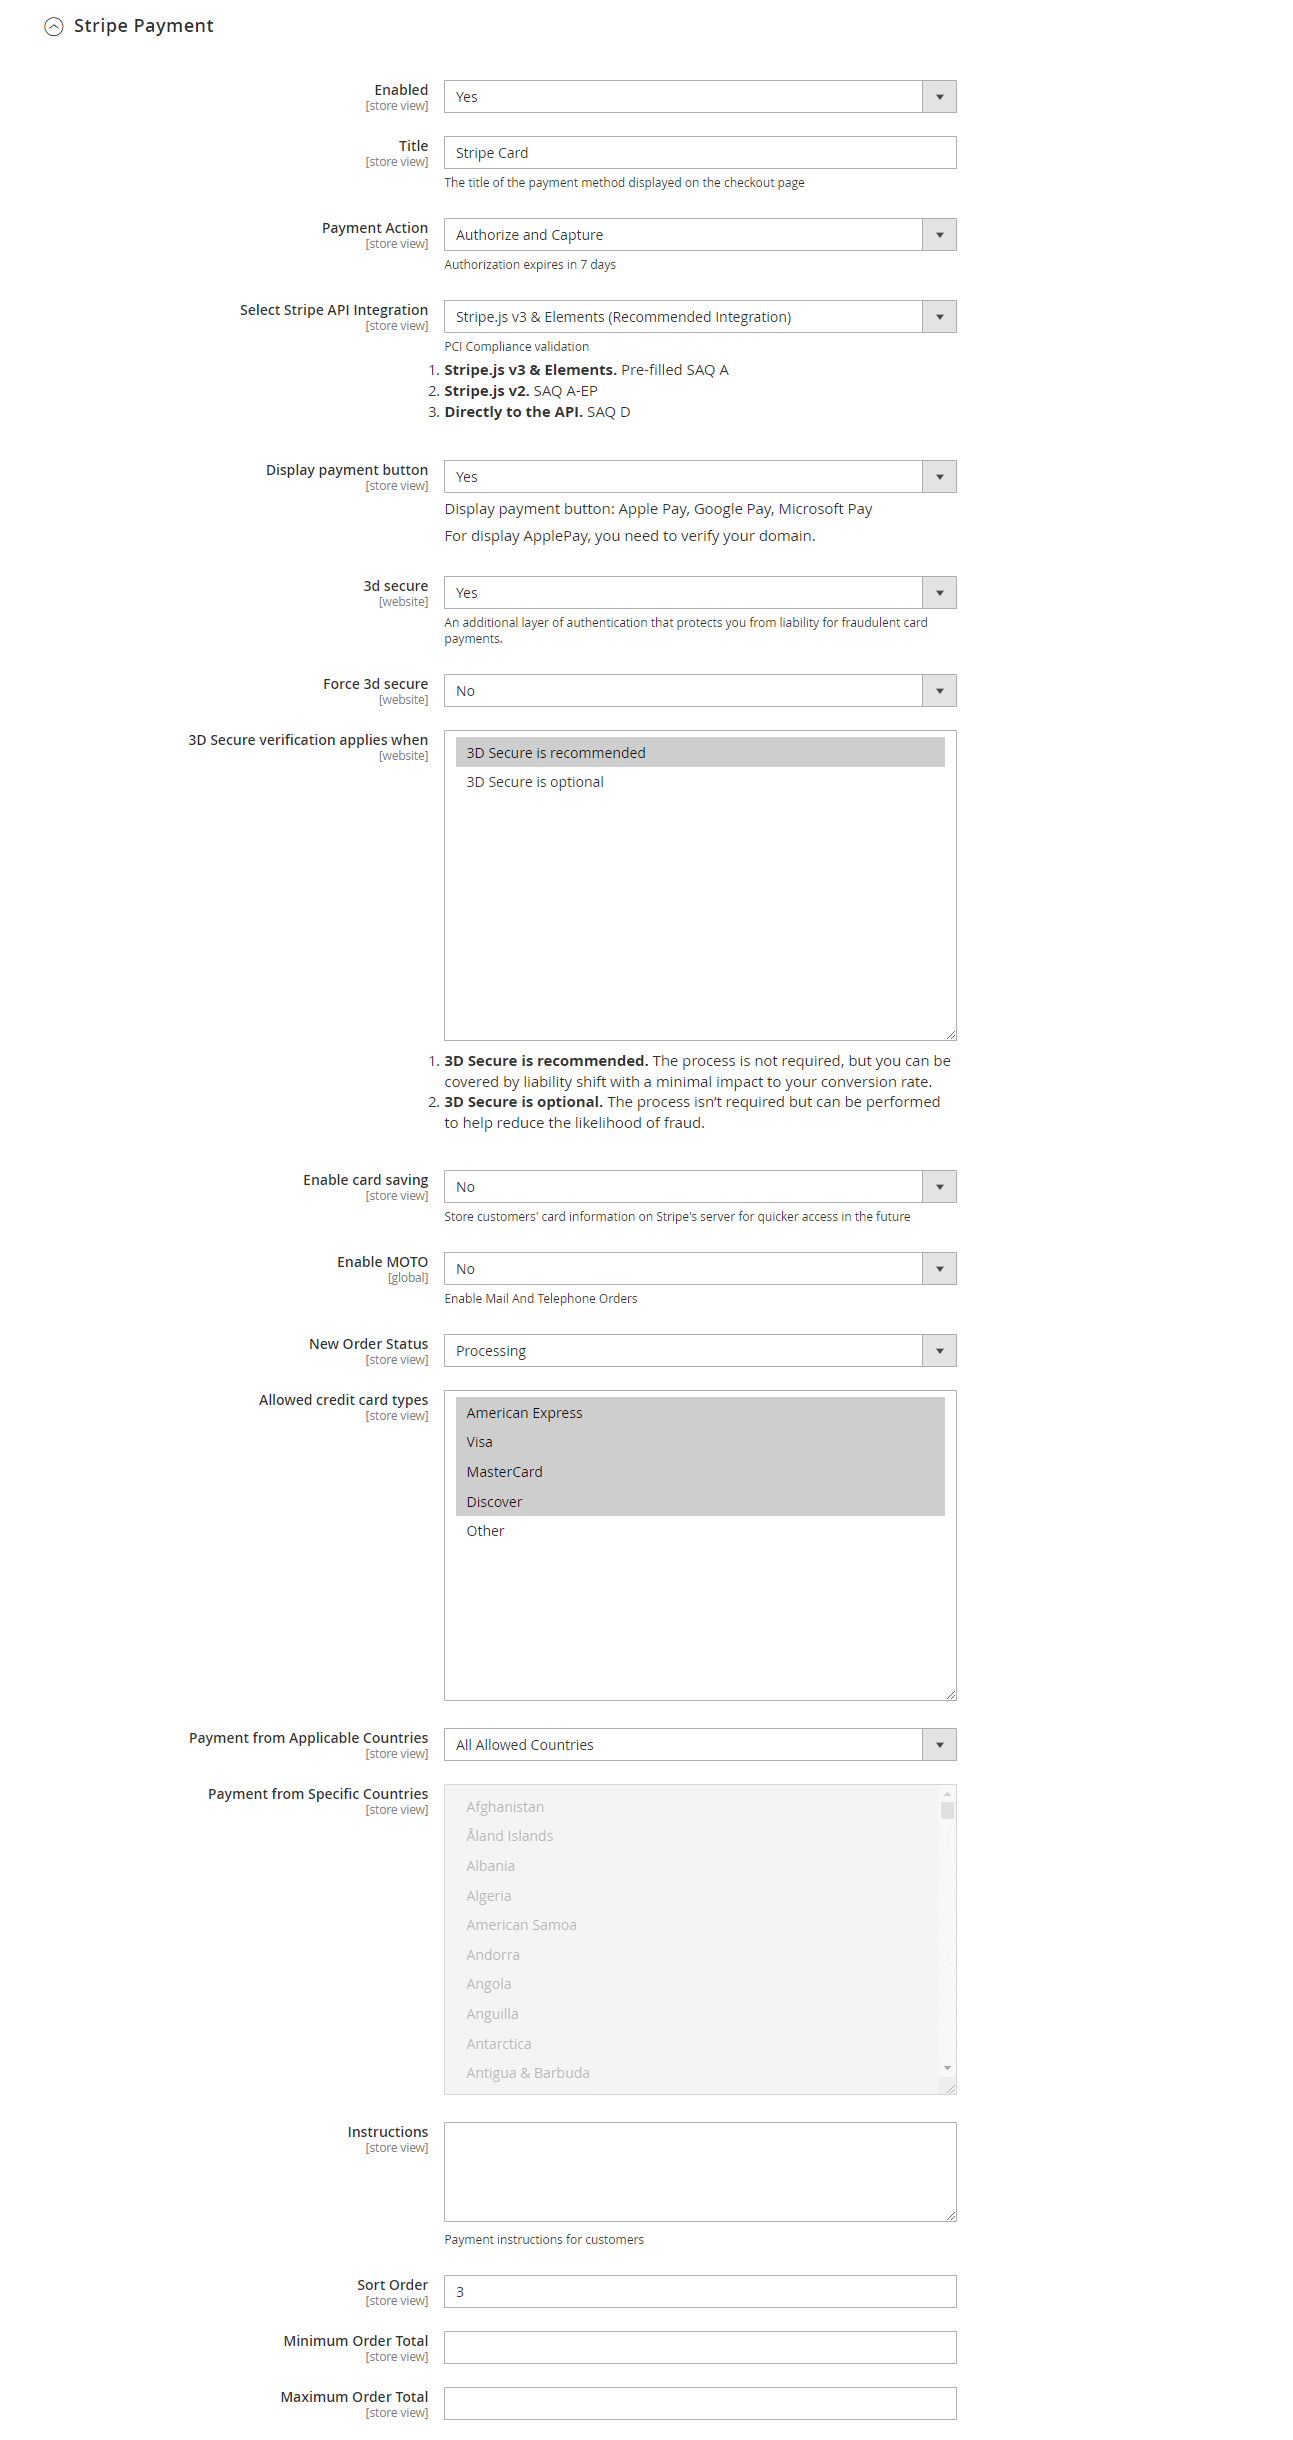
- You can set the Payment Action to be Authorize and Capture or Authorize Only
- Authorize Only (Authorization): will check the card for validity but not charge the account yet until the order is approved and invoiced.
- Authorize and Capture(Sale): will charge the debit/credit card at the time of the order submission.
- Select Stripe API Integration: There are 3 Stripe API to choose
- Stripe.js v3 & Elements. Pre-filled SAQ A
- Stripe.js v2. SAQ A-EP
- Directly to the API. SAQ D
...
- Enabled: Choose Yes to enable the IFrame checkout form method
- Title: Edit the title for the payment method. Here we recommend you to set it as "Stripe Checkout IFrame"
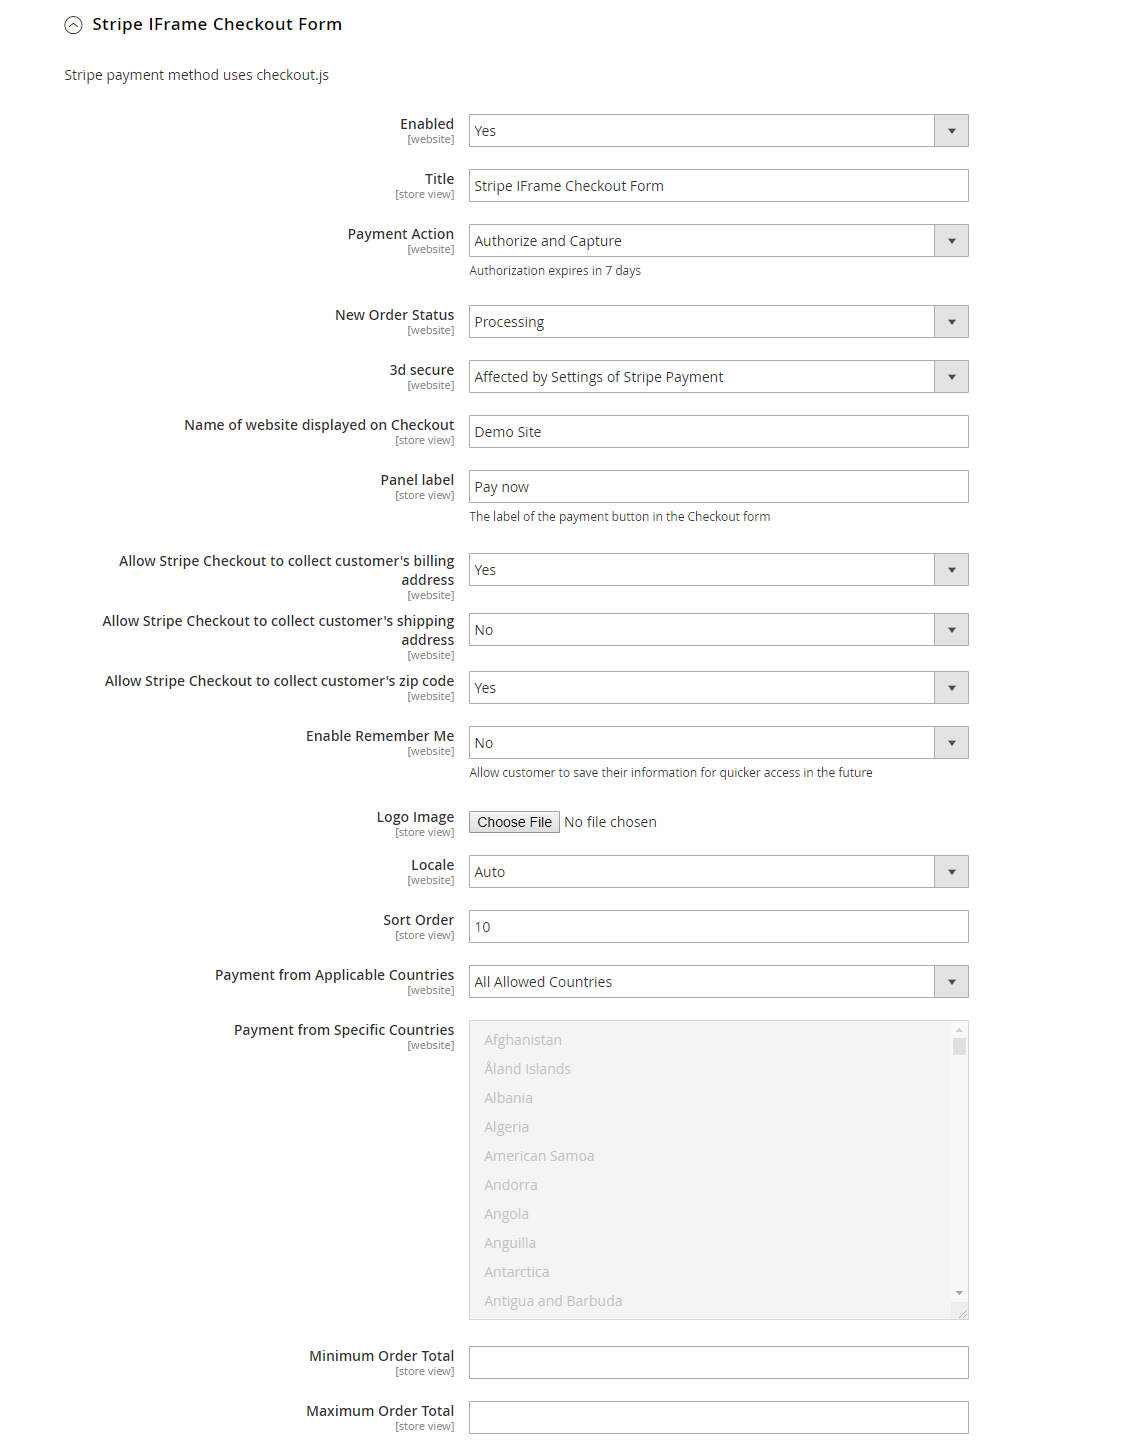
- You can set the Payment Action to be Authorize and Capture or Authorize Only
- Authorize Only (Authorization): will check the card for validity but not charge the account yet until the order is approved and invoiced.
- Authorize and Capture(Sale): will charge the debit/credit card at the time of the order submission.
- You can set the New Order Status: Processing, Suspected Fraud
- Processing: The payment is made successfully and an order invoice is issued.
- Suspected Fraud: No invoice is issued.
- 3D secure: The 3D secure settings for this method will follow the 3D secure settings in Stripe Payment Settings. Note that you don't have to enable Stripe Payment Settings to make it work, just change the 3D secure settings then Save Config.
- Name of the website displayed on Checkout: Your store name.
- Panel Label: The label of the payment button in the Checkout form
- You can turn on Allow Stripe Checkout to collect the customer's billing address, shipping address, and zip code
- Remember Me: If you set this option to Yes, Stripe will save the customer's information for later purchase on every website that uses Stripe Payment Gateway.
- Logo image:
- Sort Order: The order of the payment method that will be displayed on the checkout page.
- Payment from Applicable Countries:
- All allowed countries: Enable all allowed countries to make payments.
- Specific Countries: Restrict some countries by unselecting them from the Payment from Specific Countries.
...
- Register Apple Pay: Enter your domain here to verify for Apple Pay.
- Enabled: Choose Yes to enable Apple Pay, Google Pay, Microsoft Pay
- Title: Fill in the title for the payment method
- You can set the Payment Action to be Authorize and Capture or Authorize Only
- Authorize Only (Authorization): will check the card for validity but not charge the account yet until the order is approved and invoiced.
- Authorize and Capture(Sale): will charge the debit/credit card at the time of the order submission.
- You can set the New Order Status: Processing, Suspected Fraud
- Processing: The payment is made successfully and an order invoice is issued.
- Suspected Fraud: No invoice is issued.
- Replace default Place order button: Enable to replace the default Place Order button with Apple Pay, Google Pay, or Microsoft Pay Place Order button. Note that this option can cause conflict with the One-step Checkout extension, so if currently, you are using One Step Checkout, turn this option off.
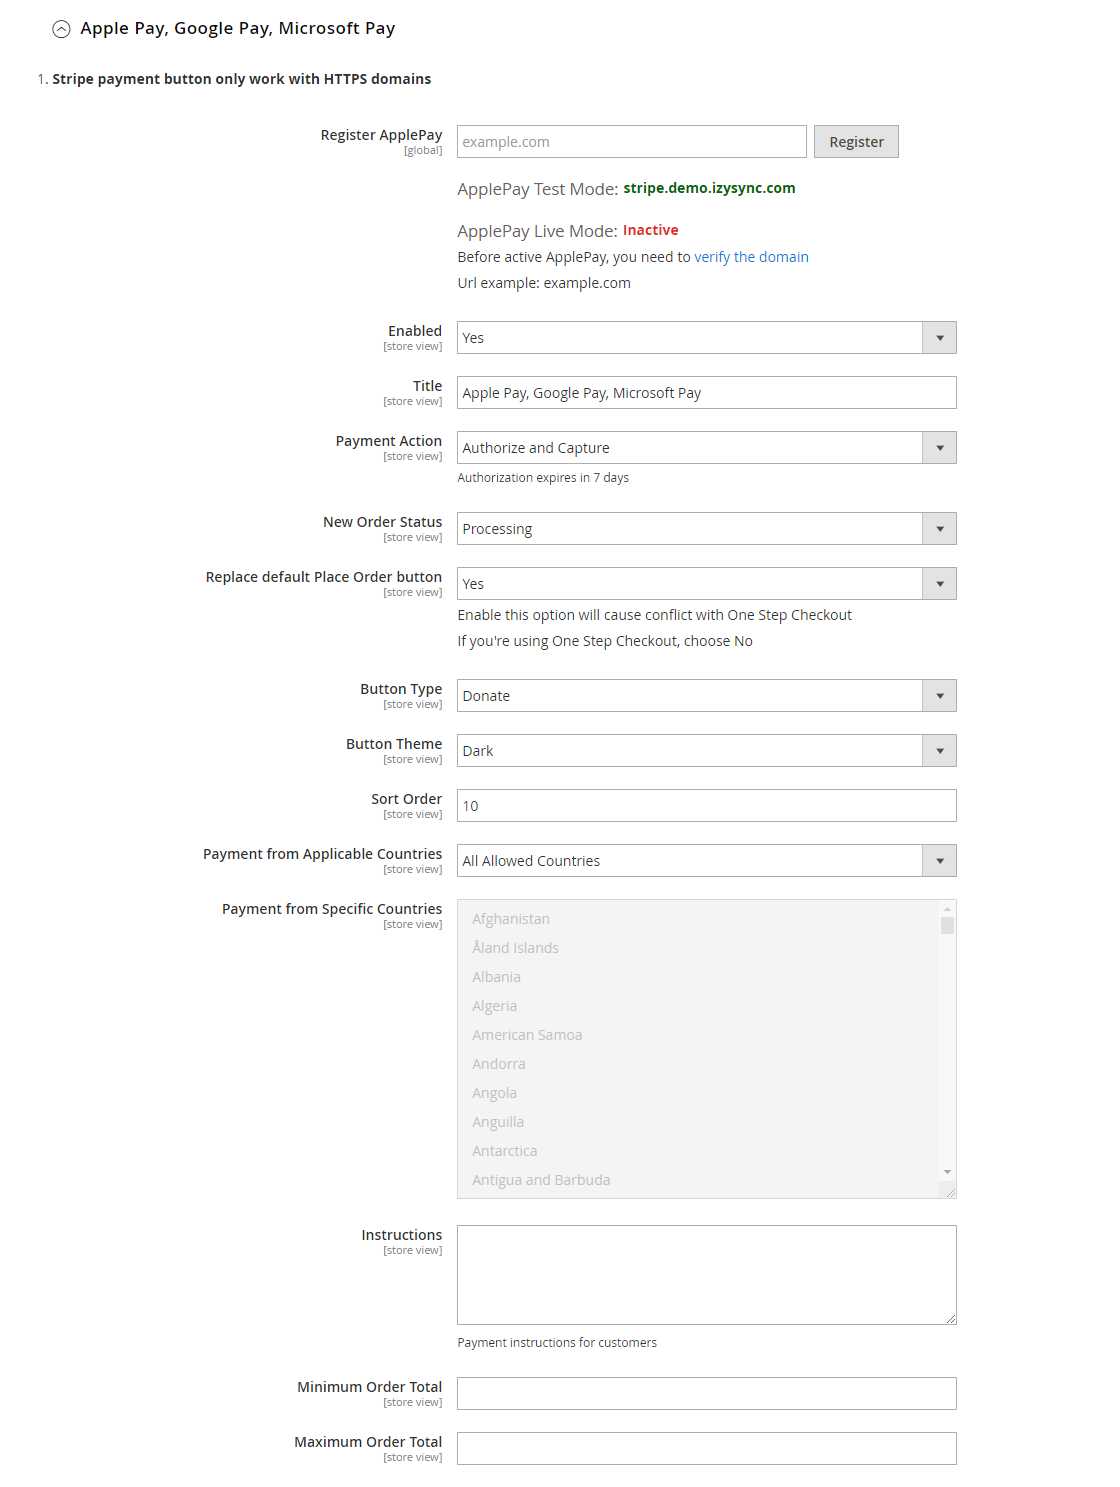
![]() Note: To use Google Pay (for PC), customers have to add their credit cards to the browser.
Note: To use Google Pay (for PC), customers have to add their credit cards to the browser.
...
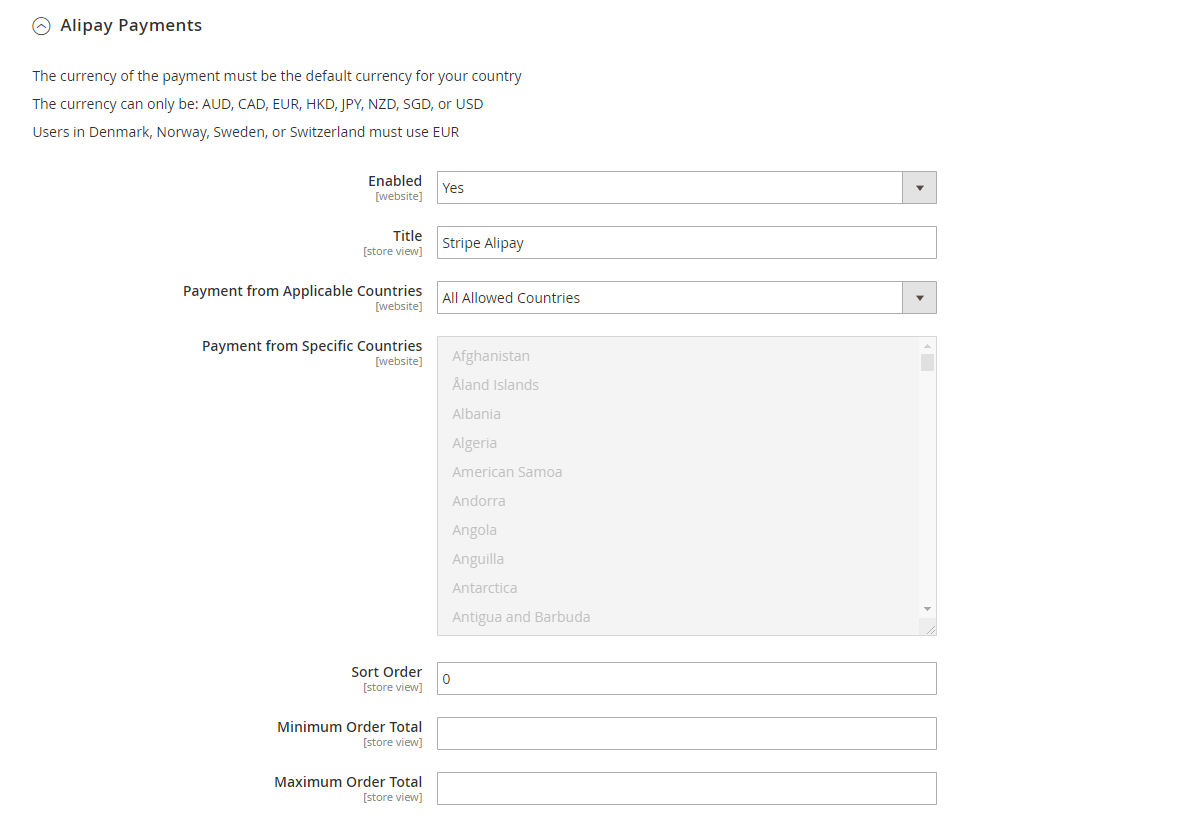
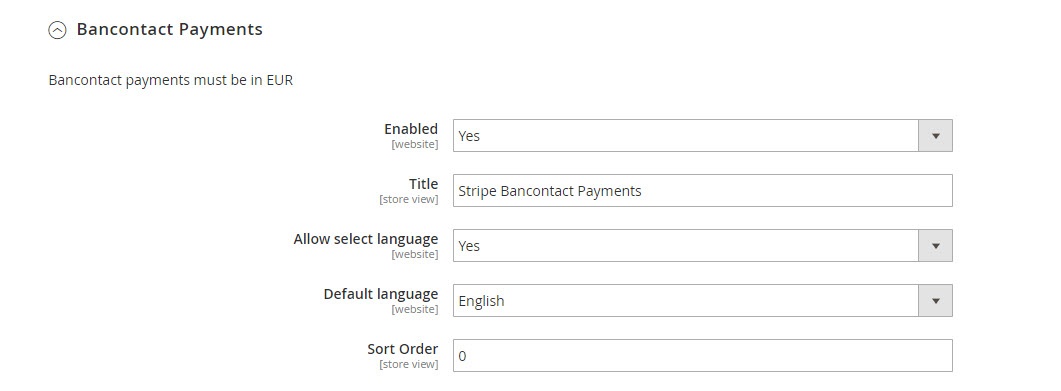
![]() Note: The currency of the payment must be the default currency of your country. It could be AUD, CAD, EUR, HKD, NZD, SGD, or USD. In Denmark, Norway, Sweden, and Switzerland, the currency for the payment will be exchanged to EUR.
Note: The currency of the payment must be the default currency of your country. It could be AUD, CAD, EUR, HKD, NZD, SGD, or USD. In Denmark, Norway, Sweden, and Switzerland, the currency for the payment will be exchanged to EUR.
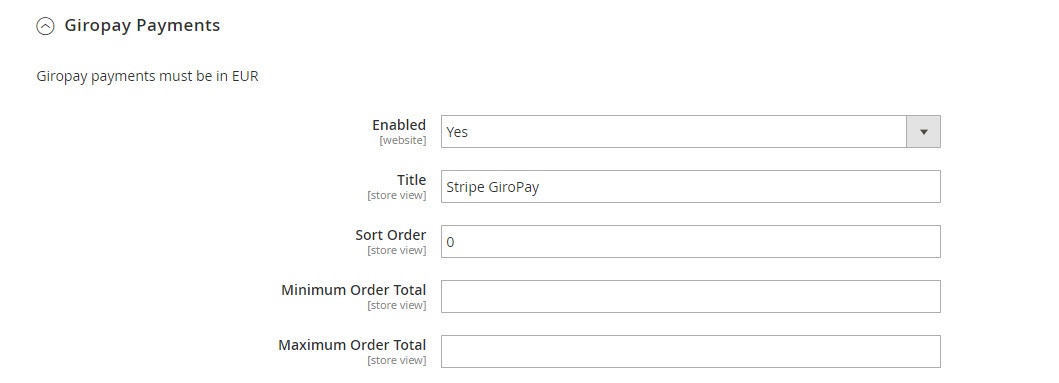
Giropay Payments
...
Choose Yes in Enabled then Save Config.
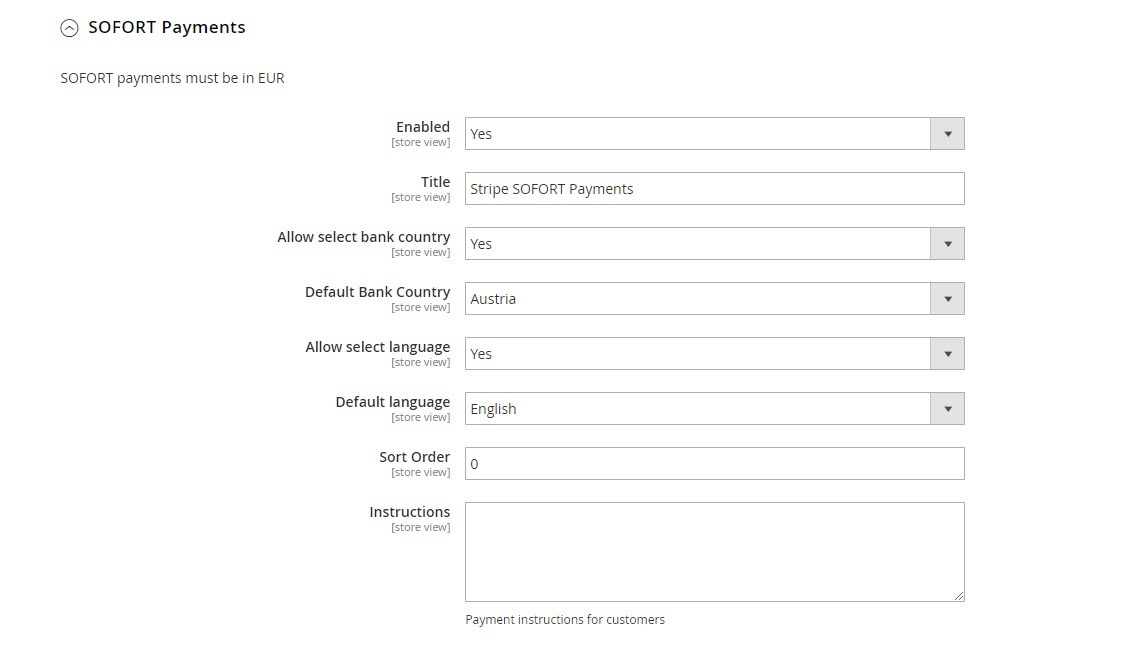
SOFORT Payments
...
In addition, you can add/edit the Instructions to instruct customers on how to make payments.
iDEAL Payments
...
- Title: Fill in the title for the payment method
- Use iDEAL Bank Element Interface: If you choose Yes, the payment method will be displayed with the iDEAL interface.
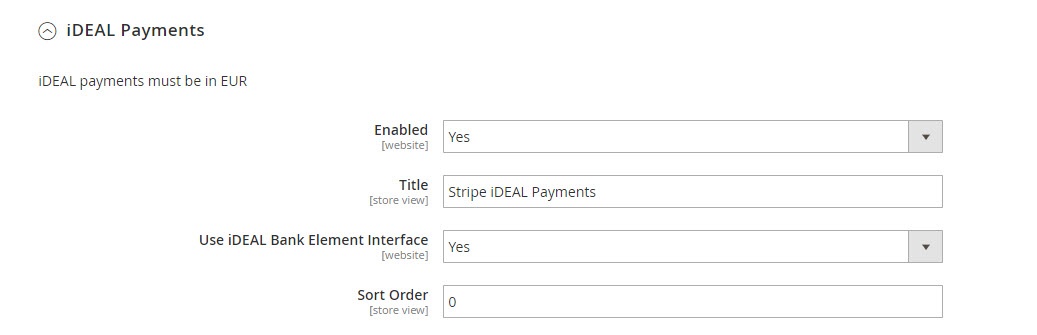
If you don't use the iDEAL interface, you can choose No and change the settings as follows:
- Allow select bank country: Enable customers to choose their country to make payments.
- Default Bank: If you don't want to allow customers to choose their bank. You can set a default bank.
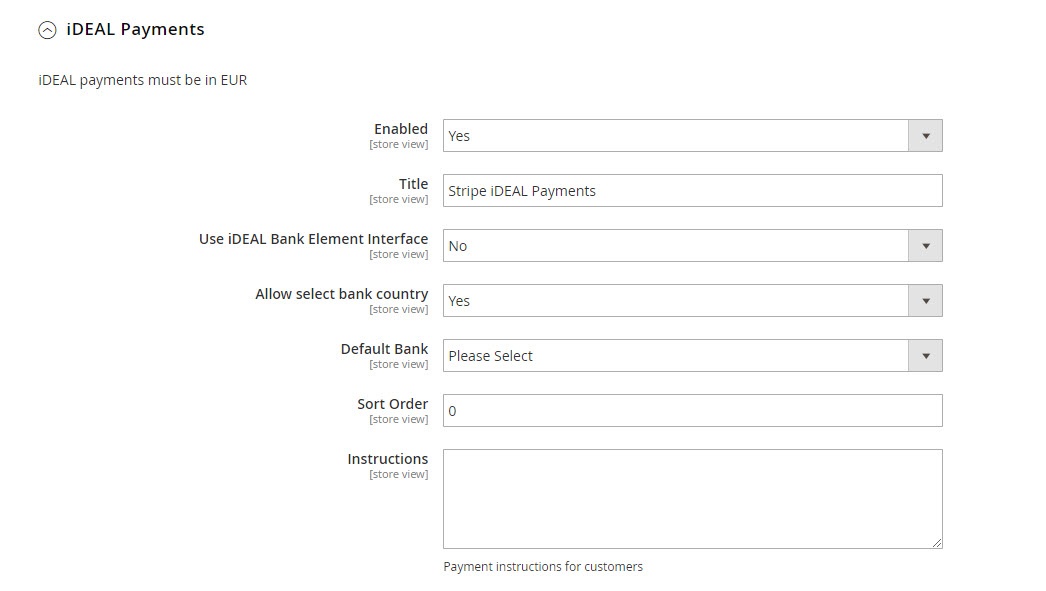
In addition, you can add/edit the Instructions to instruct customers on how to make payments.
...
In addition, you can add/edit the Instructions to instruct customers on how to make payments.
P24 Payments/ EPS Payments/ Multibanco Payments
...
You can add/edit the Instructions to instruct customers on how to make payments.
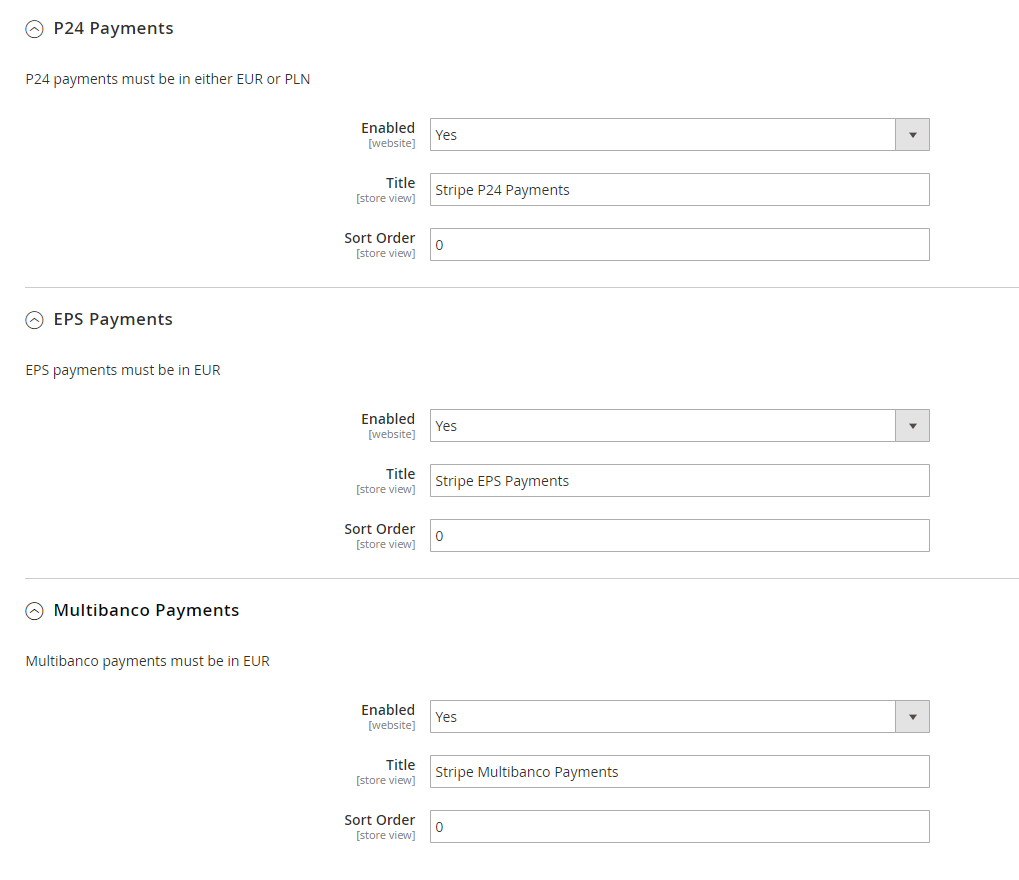
When done, please press Save Configuration then go to Cache Management to flush the cache.
...
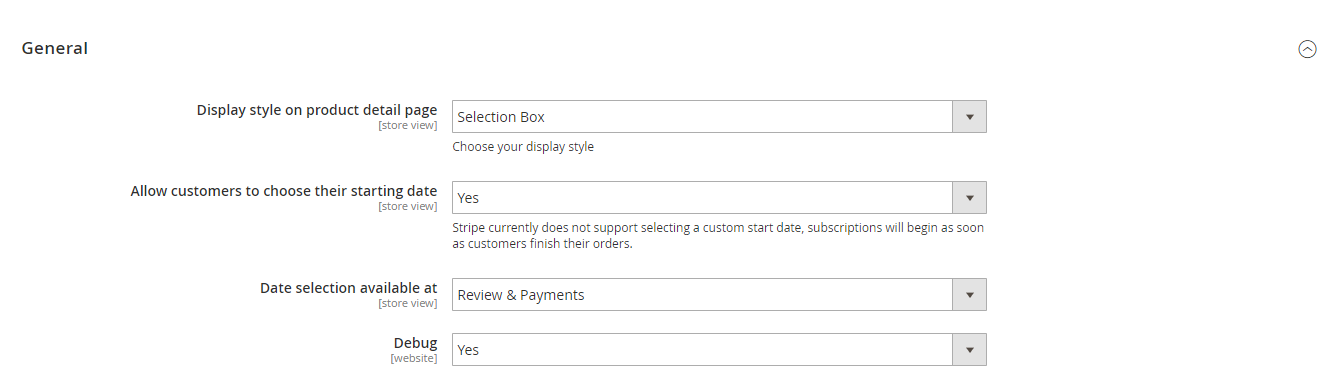
Display style on product detail page: Subscription options on the front end product detail page will be displayed as a drop-down list or Radio button or Selection Box
Allow customers to choose their starting date: Stripe currently does not support selecting a custom start date, subscriptions will begin as soon as customers finish their orders. If you want to allow customers to choose the starting date, enable this setting
Date selection available at: Choose the step at which the start date will be captured.
![]() Mail Settings
Mail Settings
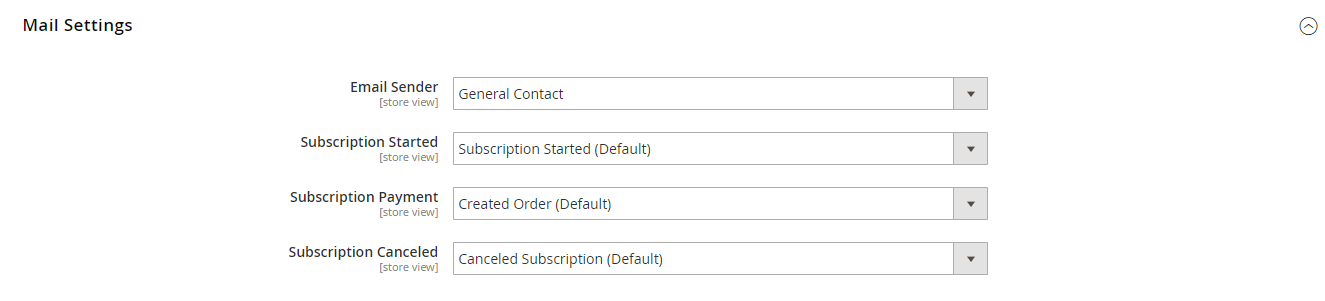
Email Sender: Choose the department you want to take charge of sending customers emails
Subscription Started: You can set whether not to send email (Don't send email) or send email by email templates when the subscription started
Subscription Canceled: You can set whether not to send email (Don't send email) or send email by email templates when the the the subscription is canceled
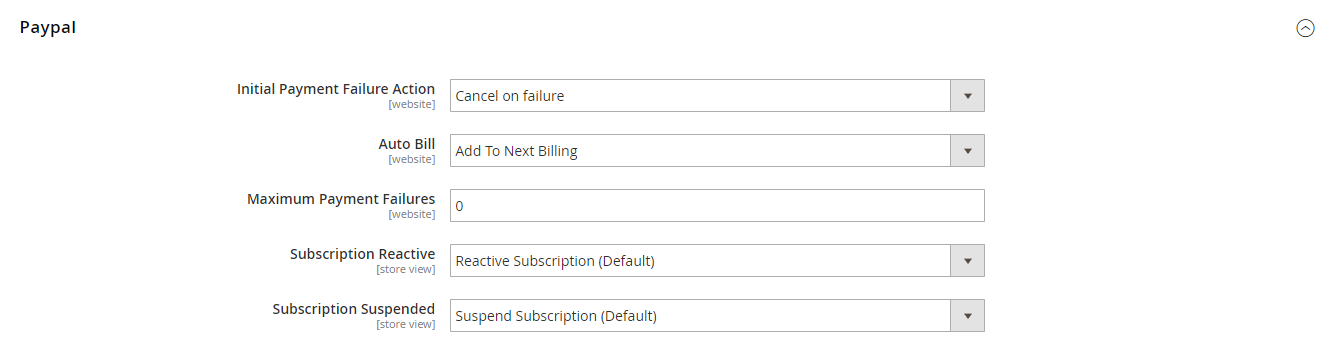
![]() Paypal
Paypal
Initial Payment Failure Action: You can choose whether to Continue payment on failure or cancel it.
Auto Bill: To automatically bill the next subscription amount of the next billing cycle or not.
Maximum Payment Failures: Allows you to set the maximum number of times that customers can fail to pay. When the number is reached, an IPN (Instant Payment Notification) message is sent to you and customer’s account will be suspended automatically.
Subscription Reactive: Select the email template to send to customers when the subscription is reactivated. You can create a new email template in Marketing > Email Templates. Choose Don't send email to turn off this setting.
Subscription Suspended (Paypay Only): Select the email template to send to customers when the subscription is reactivated. You can create new email template in Marketing > Email Templates. Choose Don't send email to turn off this setting.
- Customer Cancel Subscription: whether merchants allow the customer to cancel their subscription or not.

![]() Stripe
Stripe
Subscription Billing: Either charge_automatically or send_invoice. When charging automatically, Stripe will attempt to pay this subscription at the end of the cycle using the default source attached to the customer. When sending an invoice, Stripe will email your customer an invoice with payment instructions
- Customer Cancel Subscription: Allow customers to cancel the subscription.
- Invoice Subscription: You can set whether not to send email (Don't send email) or send email by email templates when Stripe creates an invoice.
Subscription End Trial: You can set whether not to send email (Don't send email) or send email by email templates when the the the subscription trial is ended
...
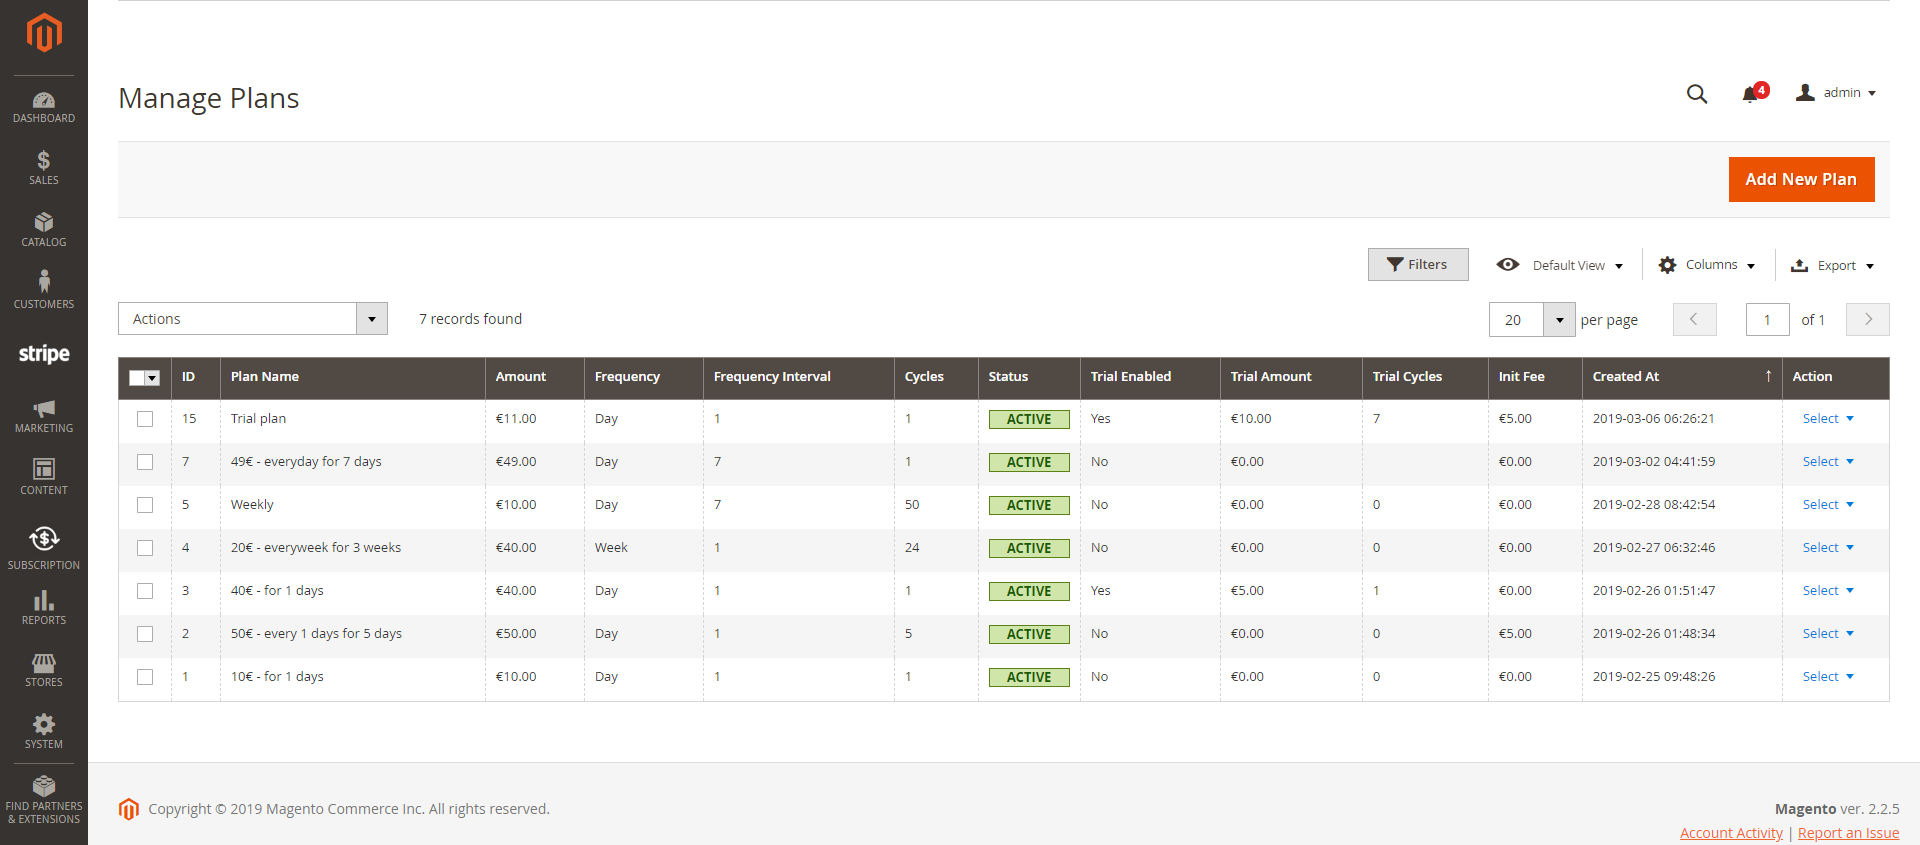
You can manage all available subscription plans in the grid table, or create a new one by clicking on Add New Plan button.
![]() Plan Configuration
Plan Configuration
...