Thank you for purchasing our extension. If you have any questions that are beyond the scope of this document, please feel free to contact us via [email protected]
By: Magenest | Support Portal: https://servicedesk.izysync.com/servicedesk/customer/portal/158
Introduction
In the time of growing competition between businesses, customer communication has been playing a decisive role in increasing sales and strengthening business-customer relationships. And in order to achieve this, business owners need to adopt a digital-first business strategy - Chatbot.
Magenest Chatbot extension could help engage customers 24/7 and effectively improve customer experience. This is a scalable tool to manage customer requests with instant responses and boost customer satisfaction.
Highlight Features
For Admin
- Enable or Disable chatbot extension.
- Enable or Disable human support.
- Build custom auto-messages with different trigger rules to correspond to the user’s needs.
- Display and link products and categories list from Magento store in Facebook messenger.
- Add multiple items to the persistent menu.
- Display call-To-Action buttons for each product option.
For User
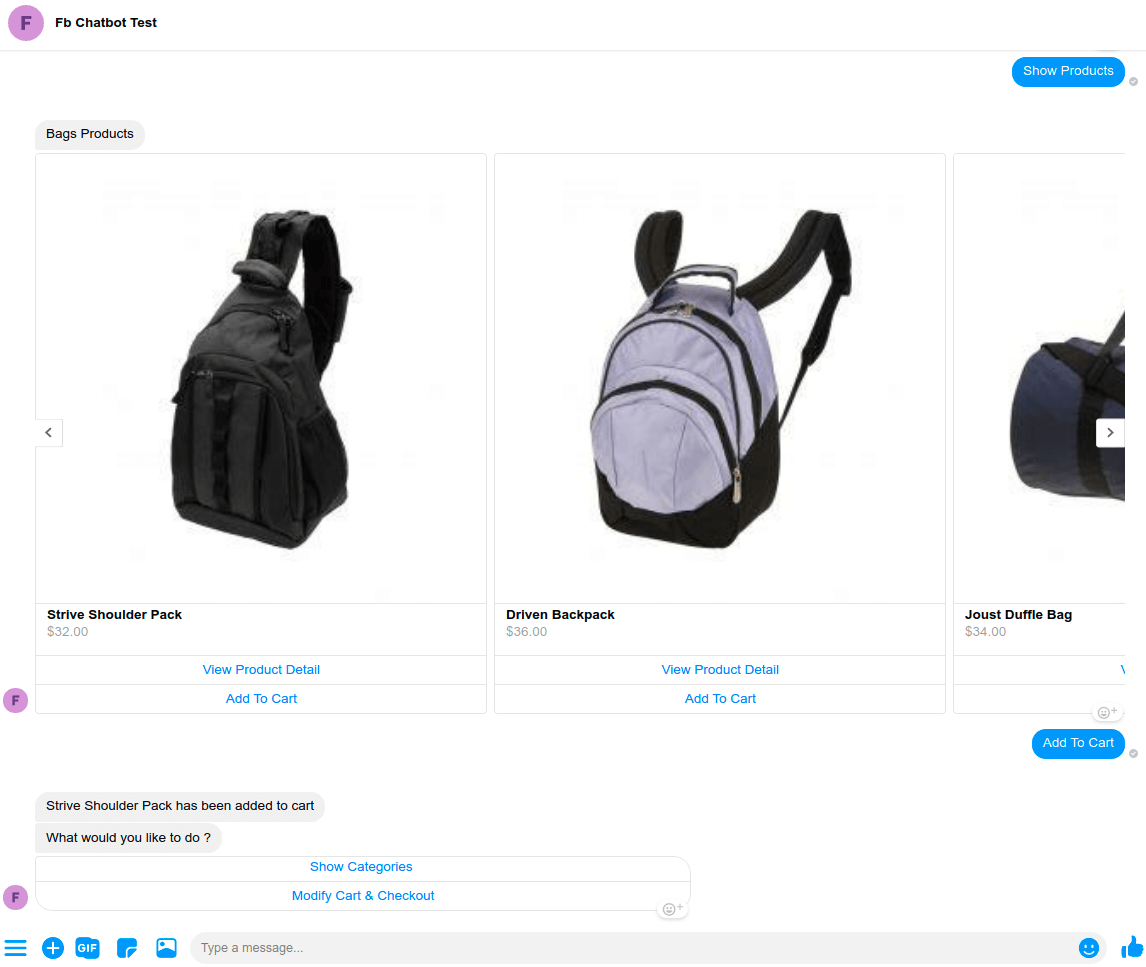
- Customers can directly add products to cart from Messenger.
- Create Order: start the order creation process [NEW]
- Cancel Order Creation: cancel order creation [NEW]
- Customers can request for human support
System Requirements
Your store should be running on Magento 2 version 2.2.x; 2.3.x.
Connect your Magento website with Facebook Messenger
Requirement
You would need a Facebook Page. Please navigate here to create a Facebook Page https://www.facebook.com/pages/create
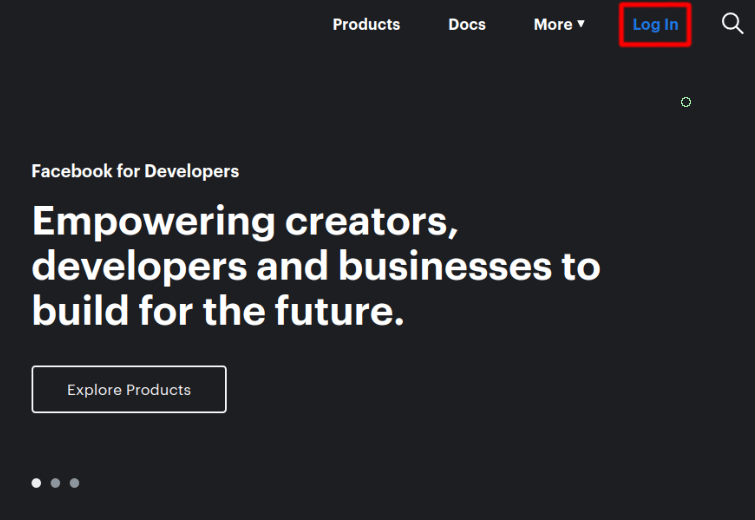
Then follow these steps to generate a Facebook Token for the connection:
Redirect here https://developers.facebook.com/ to login to your Facebook Developers (Using your Facebook account)
2. Click on the Create App option
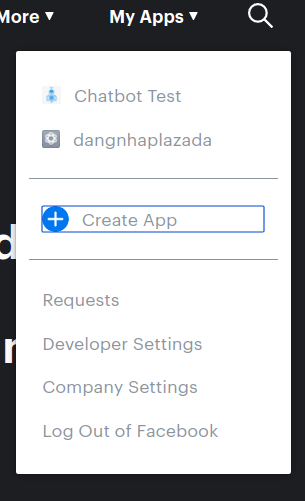
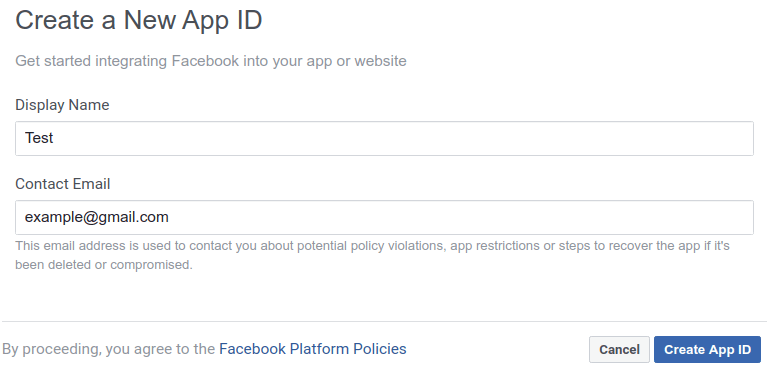
3. Then enter the App Display Name and add contact email to create New App ID
4. On the left menu navigation bar: Click Add Products
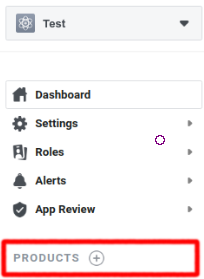
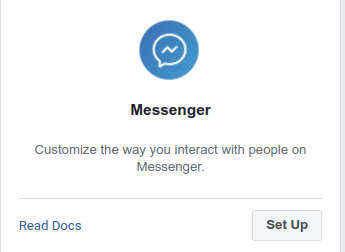
5. Choose Messenger: Click Set up
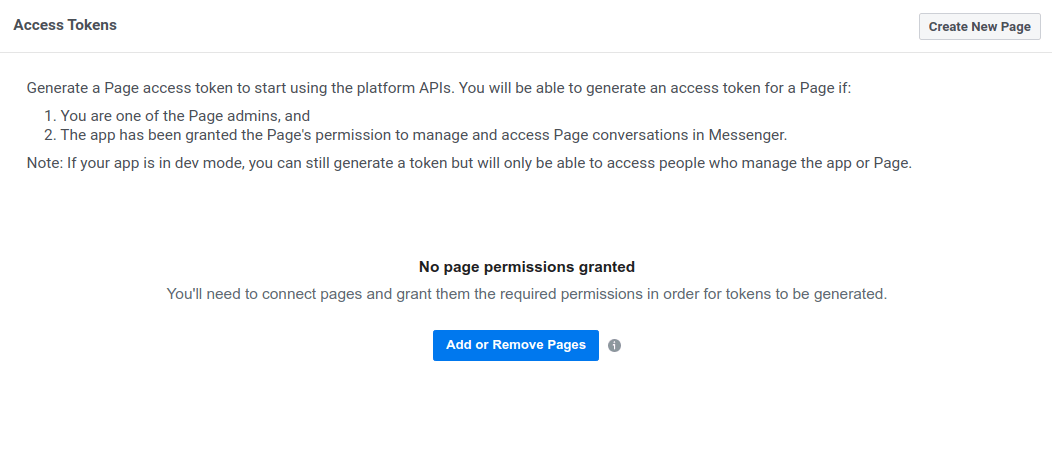
6. Scroll down to see the Access Tokens section to add the newly created page
Generate Token
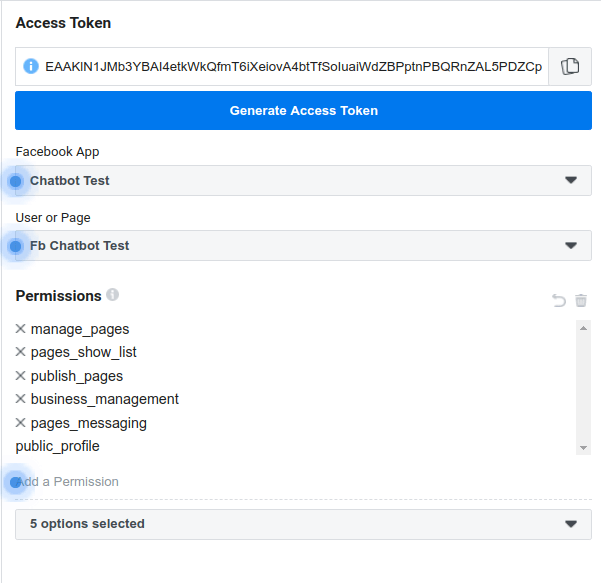
![]() After adding your page, continue to generate a Token to start using the API
After adding your page, continue to generate a Token to start using the API

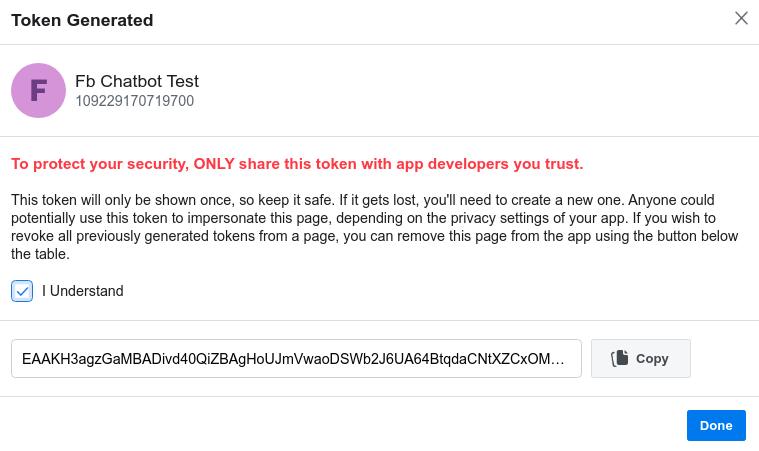
After generating the Facebook Token as instructed, click on Copy to get the Token for your Magento store connection.
![]() On your Magento Admin sidebar, go to Facebook chatbot menu > Configuration.
On your Magento Admin sidebar, go to Facebook chatbot menu > Configuration.
![]() On the Facebook Connection section.
On the Facebook Connection section.
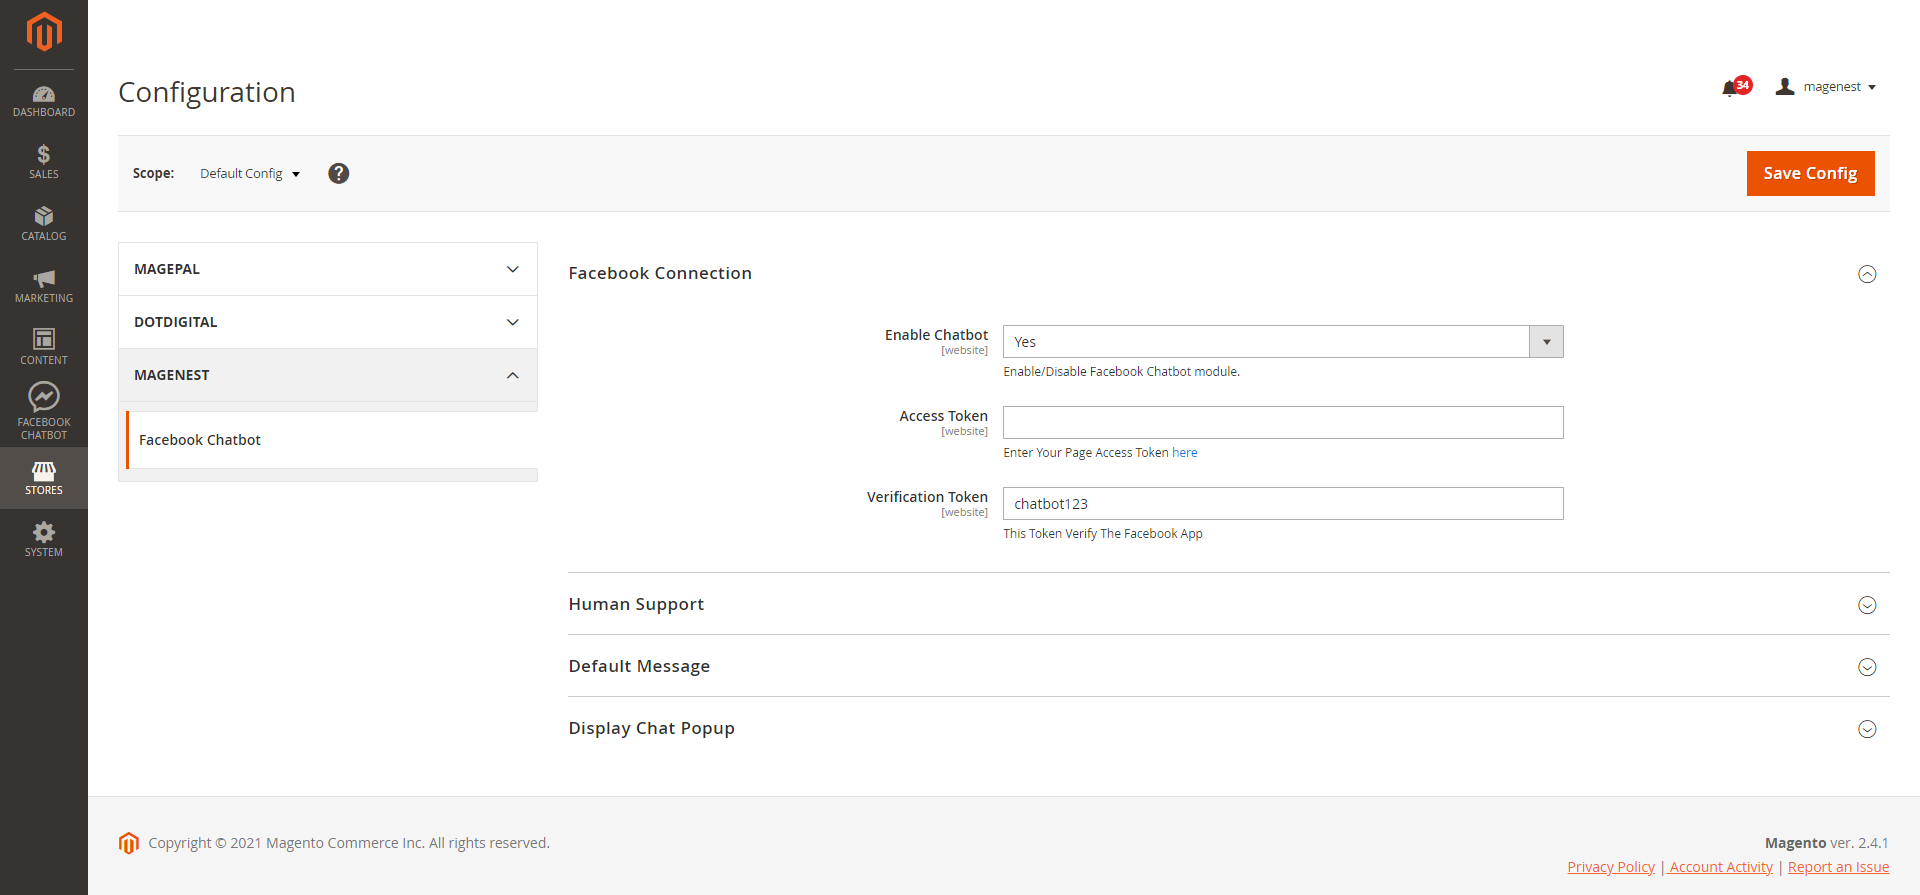
- Enable Chatbot: Select Yes to enable the Facebook Chatbot extension.
- Access Token: Fill in this field with the Access Token that you’ve copied in the previous step.
- Verification Token: Define your own Verification Token
![]() After finishing the above steps, click on the Save Config button. Then open your Facebook App again, in the Webhook section, click Add Callback URL.
After finishing the above steps, click on the Save Config button. Then open your Facebook App again, in the Webhook section, click Add Callback URL.
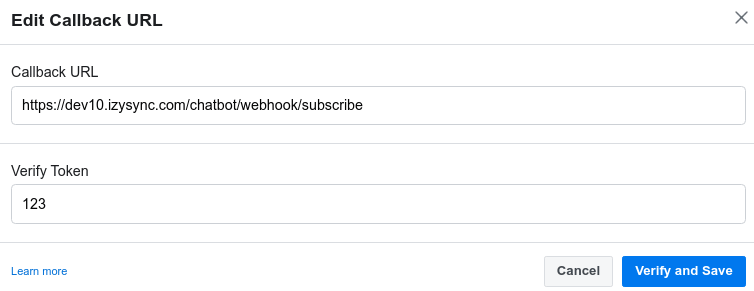
- Callback URL: your_url/chatbot/webhook/subscribe
- Verify Token: Enter the verification token that you’ve defined previously.
- Click on Verify and Save
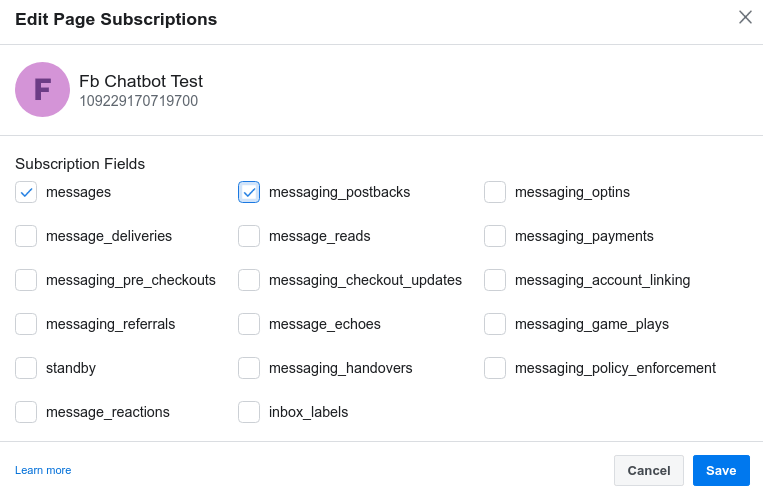
![]() After the verification step, you’ll be able to see this page. Click on the Add Subscription button
After the verification step, you’ll be able to see this page. Click on the Add Subscription button
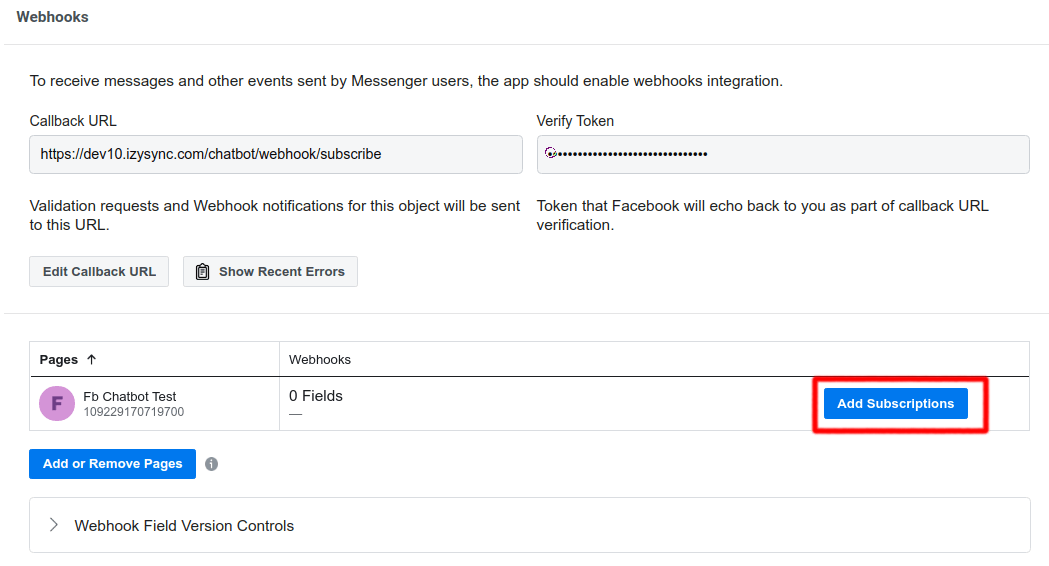
- Then, choose at least 2 options: messages and messaging_postbacks
Human Support Configuration
![]() In the development mode, redirect to this link to Add Permissions for Human Support https://developers.facebook.com/tools/explorer/v2/
In the development mode, redirect to this link to Add Permissions for Human Support https://developers.facebook.com/tools/explorer/v2/
After that, please follow the confirmation steps here https://developers.facebook.com/tools/debug/accesstoken/
Configuration
On the Admin sidebar, go to Store > Configuration > Magenest > Facebook Chatbot
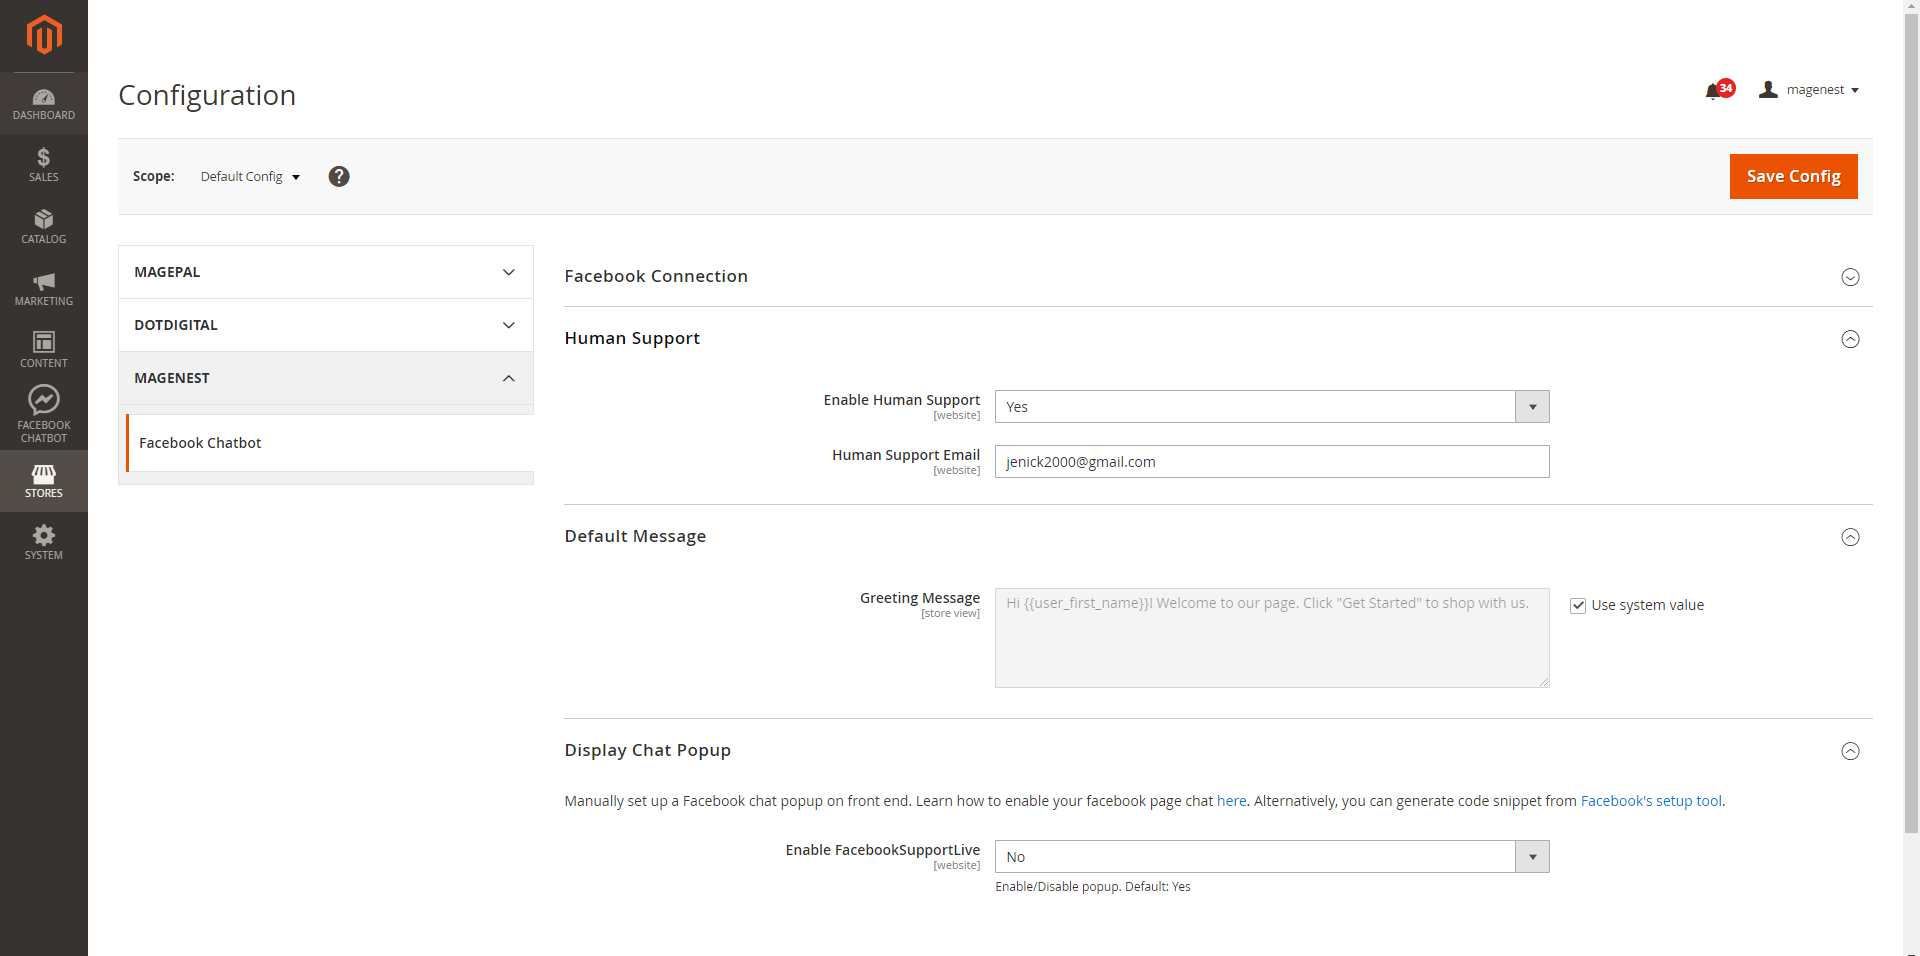
- Human Support: Select Yes to enable the human support feature
- Human Support Email: Fill in the email of your human support. This provided email will receive a notification when the user submits a request.
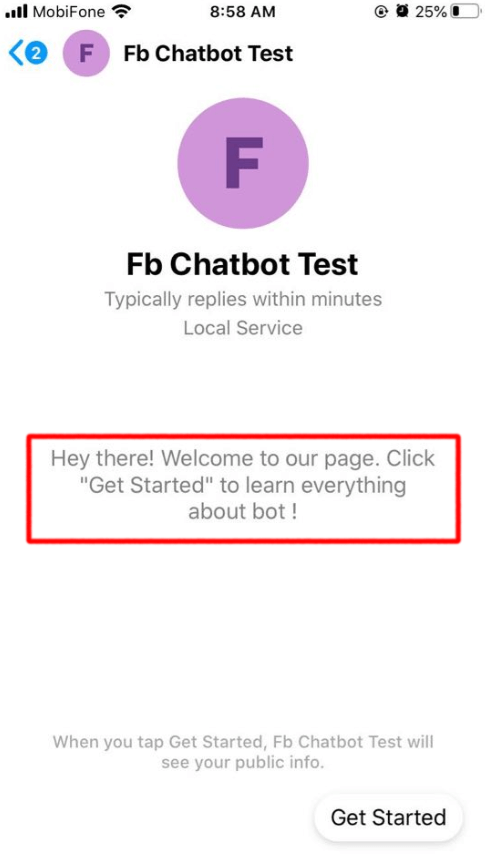
- Greeting Message: Specify the greeting message that customers will see when they first open the chat.
- Enable Facebook Support Live: choose Yes to enable Facebook Support Live
Manually set up a Facebook chat popup on front end. Learn how to enable your Facebook page chat here. Alternatively, you can generate code snippet from Facebook's setup tool.
Create Persistent Menu
![]() On the Admin Sidebar, go to Facebook Chatbot > Persistent Menu
On the Admin Sidebar, go to Facebook Chatbot > Persistent Menu
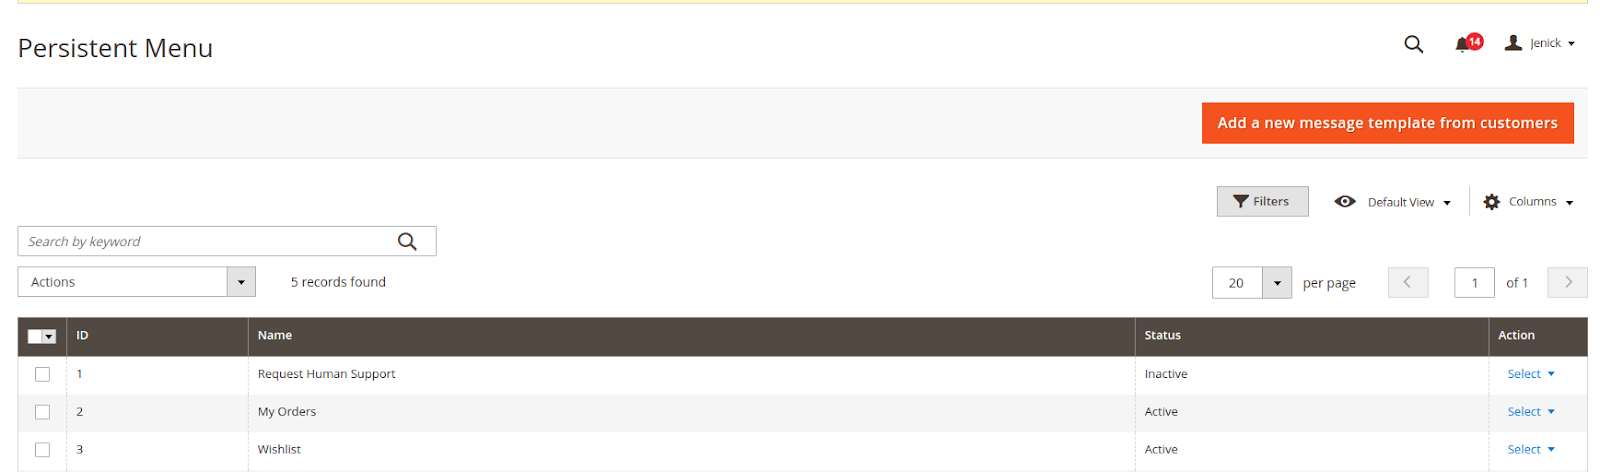
![]() On the Persistent Menu page, you will see some default menu such as Request Human Support, My order and My Wishlist.
On the Persistent Menu page, you will see some default menu such as Request Human Support, My order and My Wishlist.
Please note that you won’t be able to change the name of Request Human Support menu, or delete it.
![]() Click on Add a new message template from customers
Click on Add a new message template from customers
On the Edit Menu page:
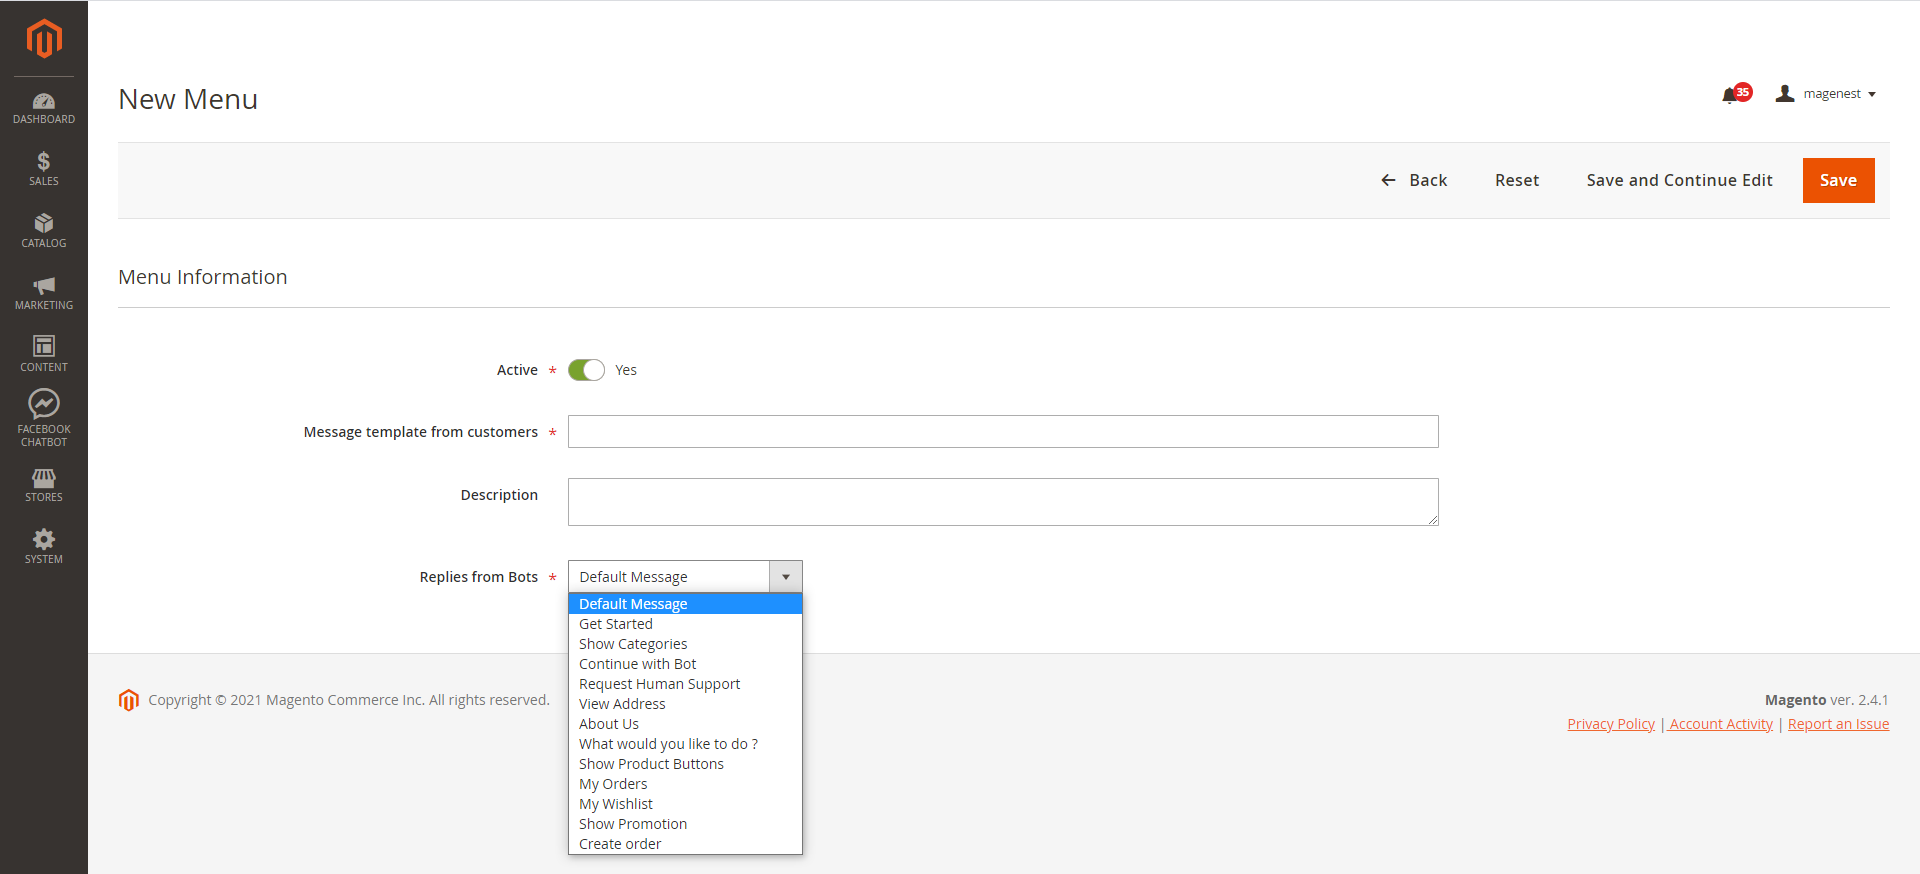
- Active: Switch to Yes to activate the menu
- Name: Fill in the label for the persistent menu messenger
- Description: This field is non-mandatory. You could fill in the menu description.
- Replies from Bots: Fill in this field with the message (get from message grid) that the bot will reply when the user selects the menu
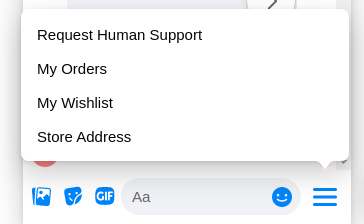
![]() Display on the front end
Display on the front end
Create Message
![]() On the Admin Sidebar, go to Facebook Chatbot > Automated messages from Bots
On the Admin Sidebar, go to Facebook Chatbot > Automated messages from Bots
![]() On the Messages page:
On the Messages page:
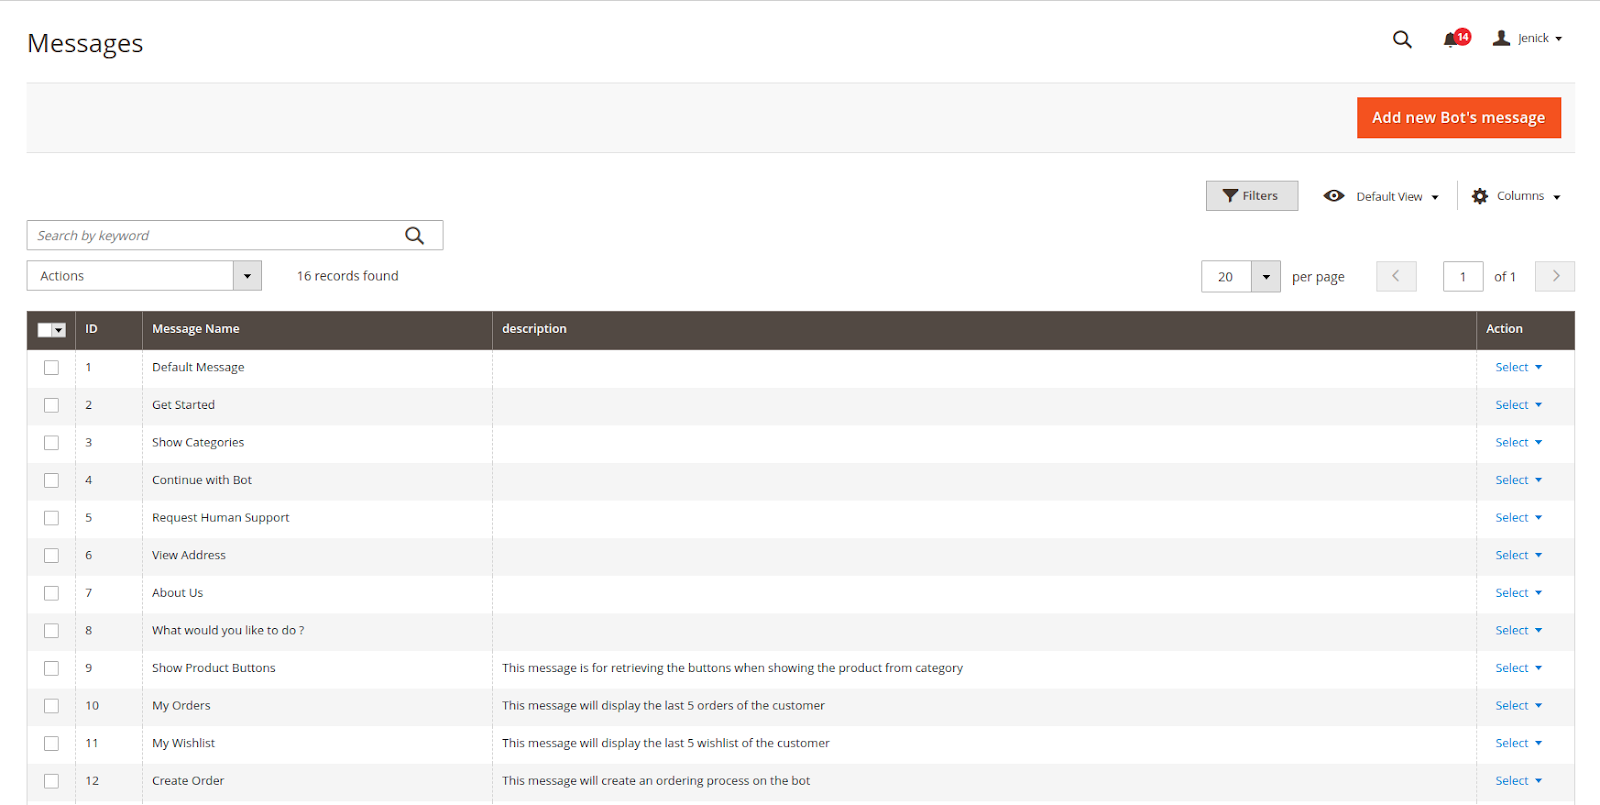
- There are 12 default messages when you first install the module. Please note that you cannot delete and change the message name for the Message ID: 1, 2, 4, 5.
- Click on Add new Bot's message on the New Message page:
Message Information
- Name: Fill in a title for the message to better management on the backend
- Description: Describe the content of the message
Sender Actions
- Show typing time: Switch to Yes to allow the bot to delay the message
- Bot's typing time(s): Enter the time (measured in seconds) you want to let the customer aware that his message is received and an answer is being processed
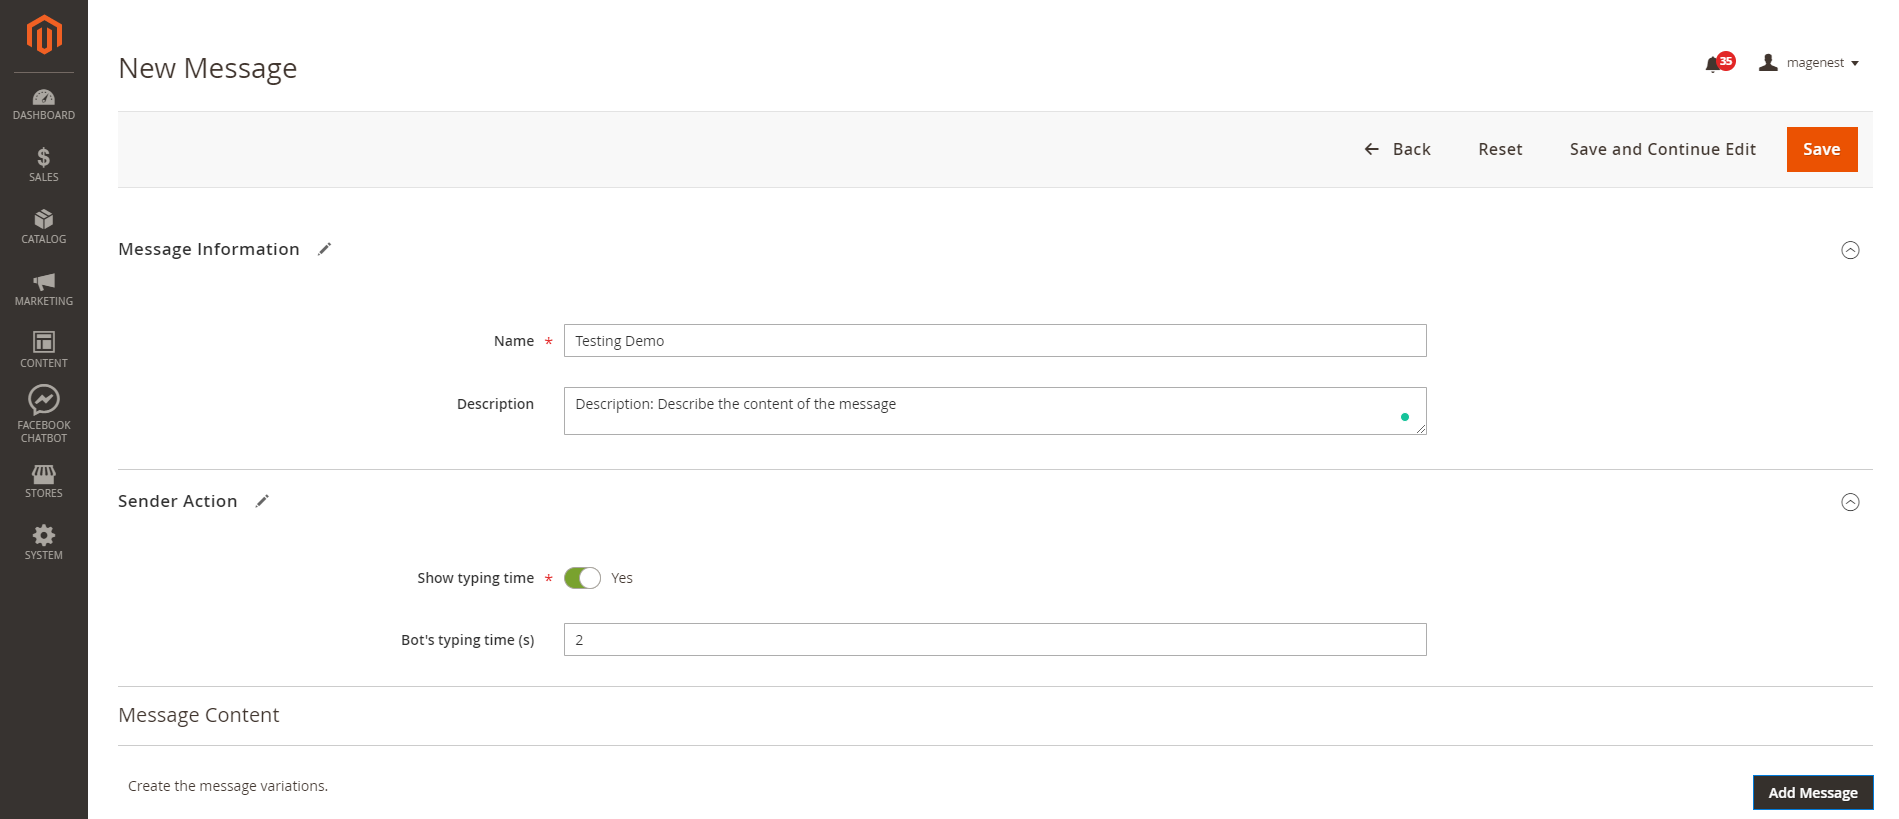
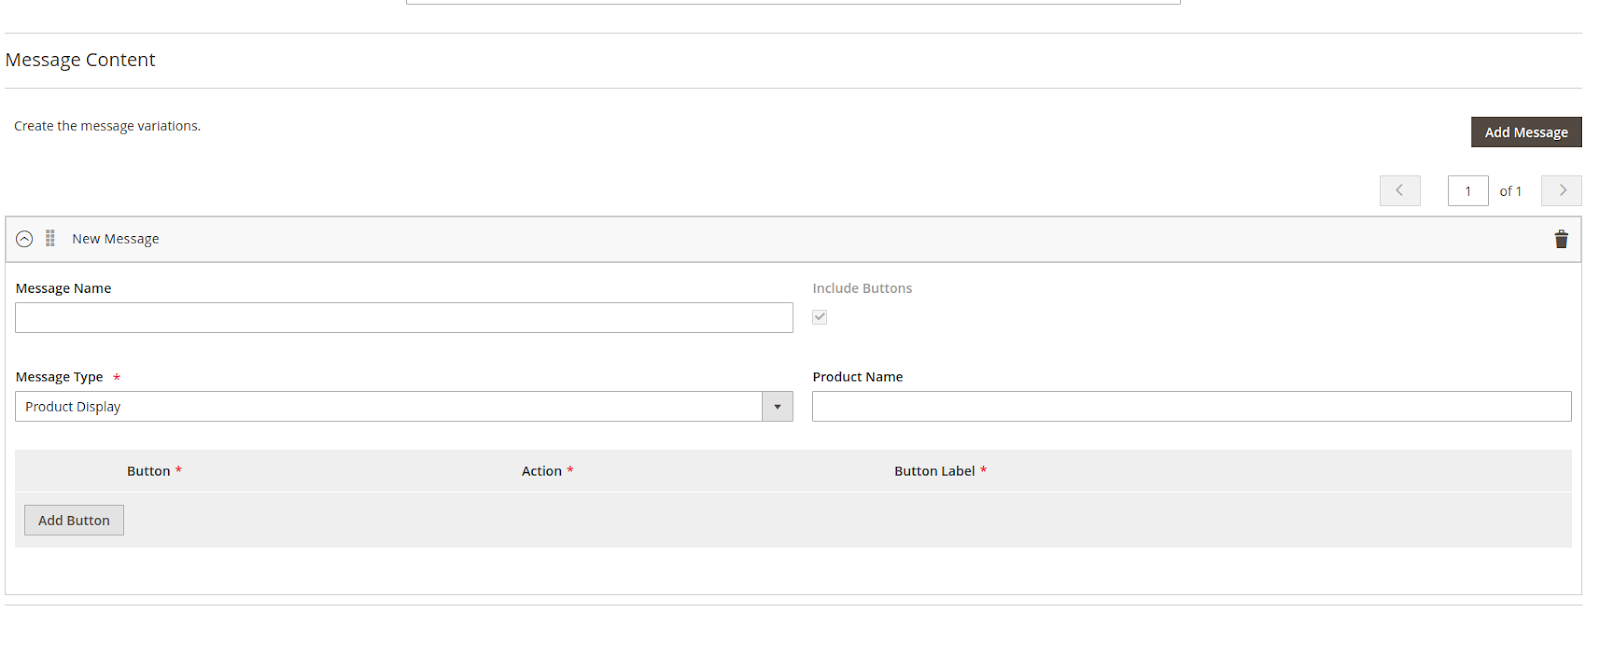
![]() Message Content
Message Content
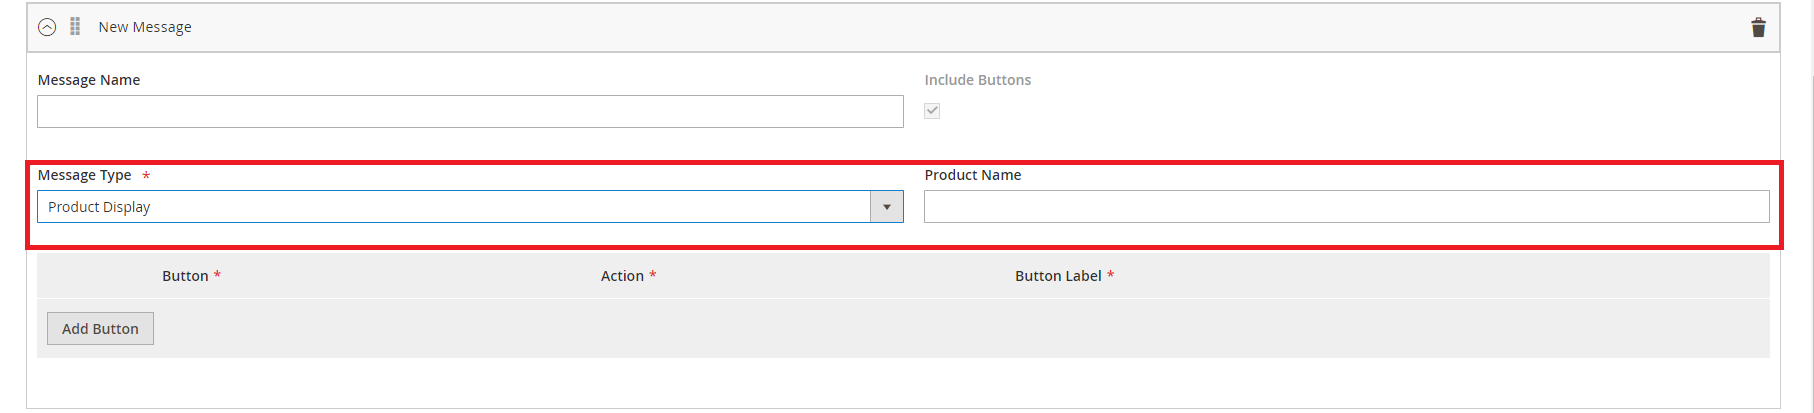
Message Name: Only used to describe the message content item.
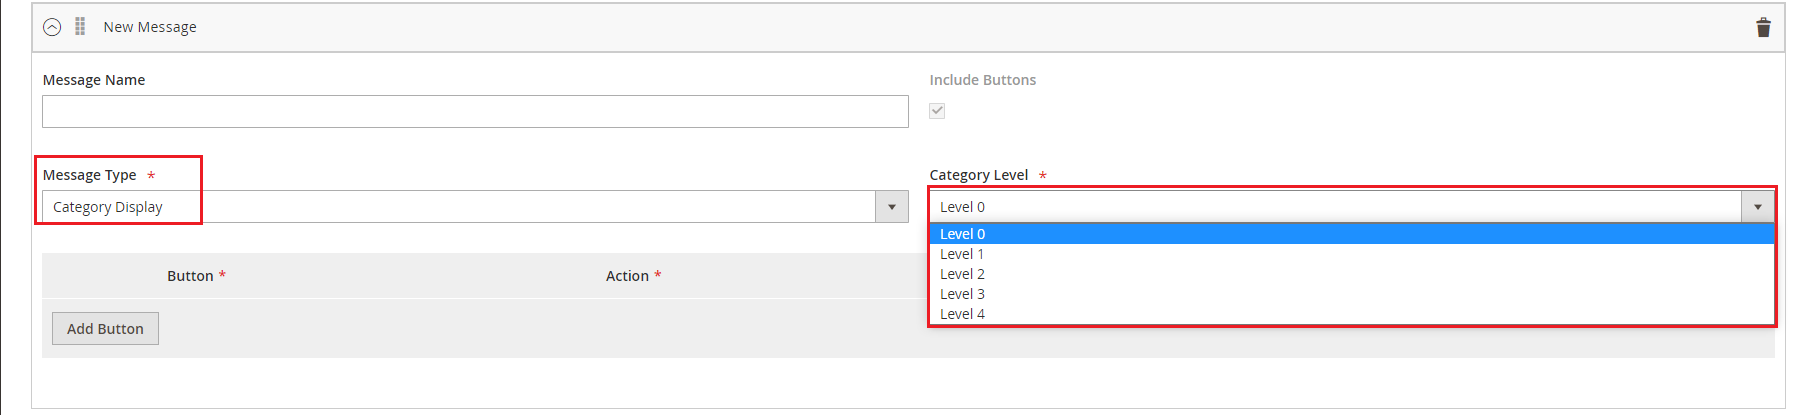
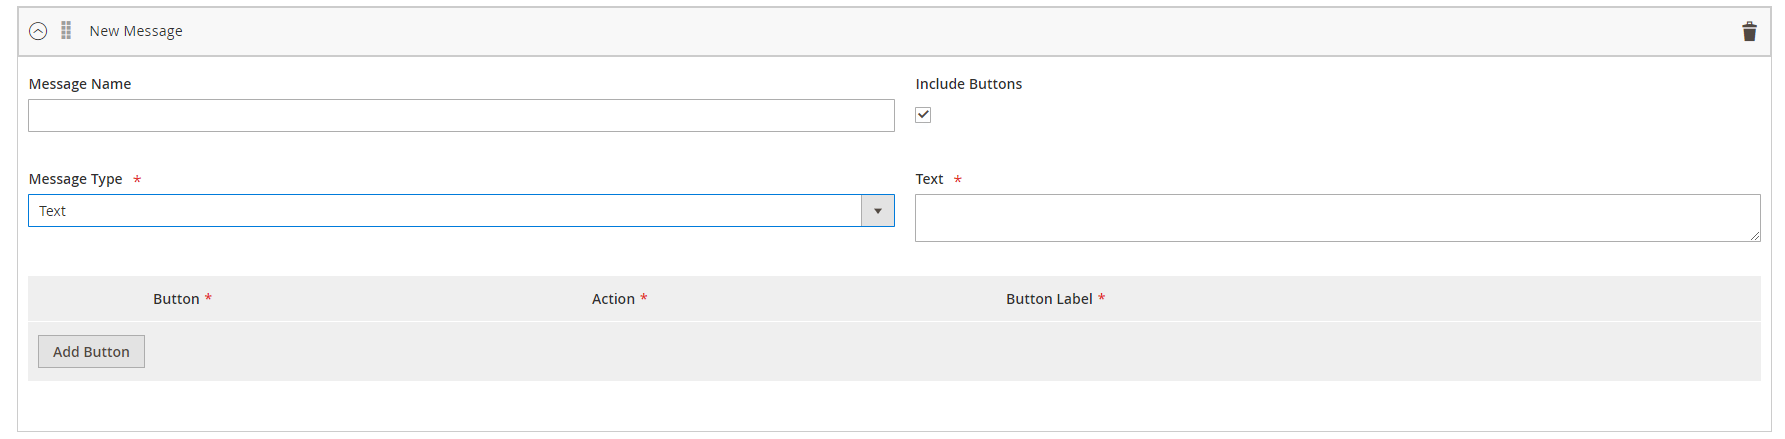
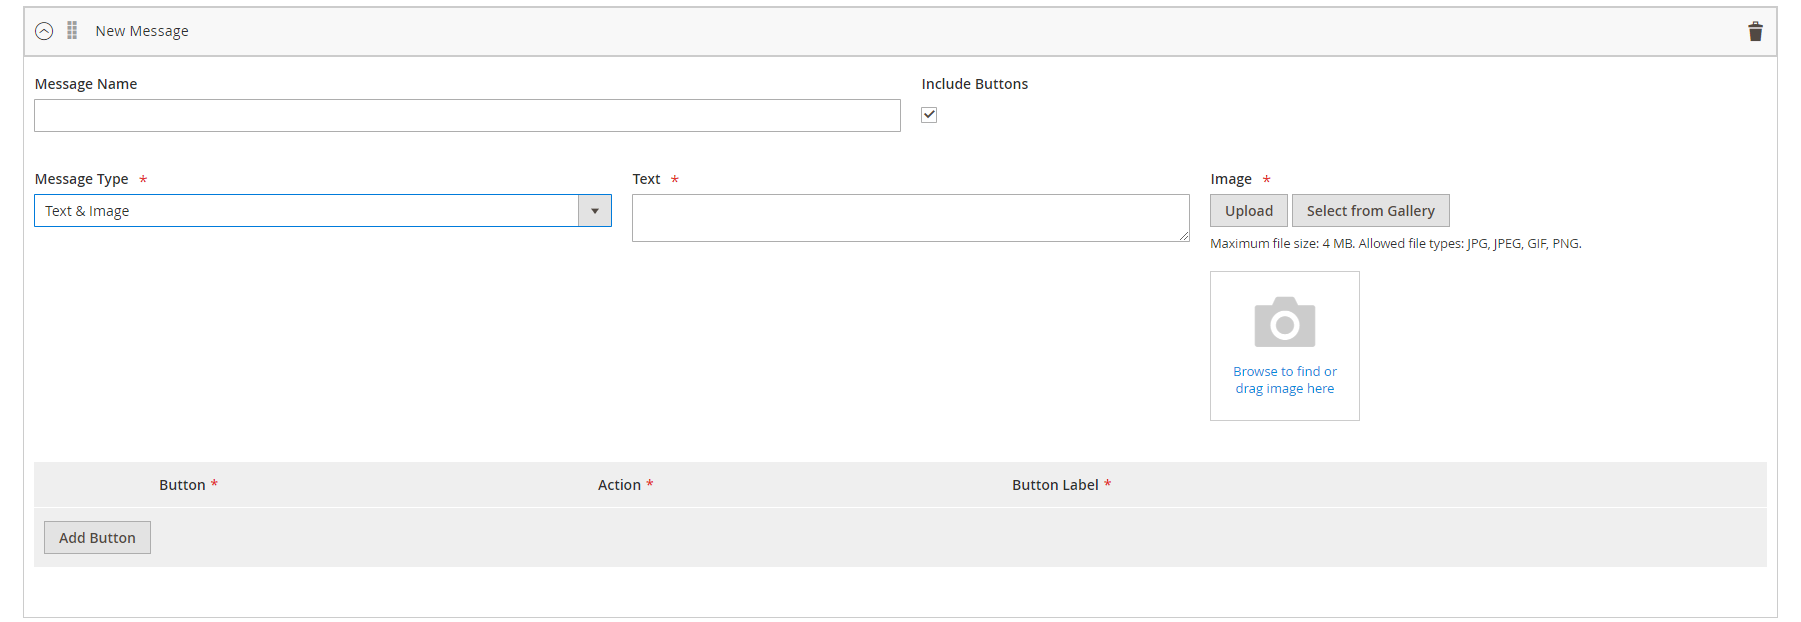
Message Type: You will be able to see 1 of 8 message types.
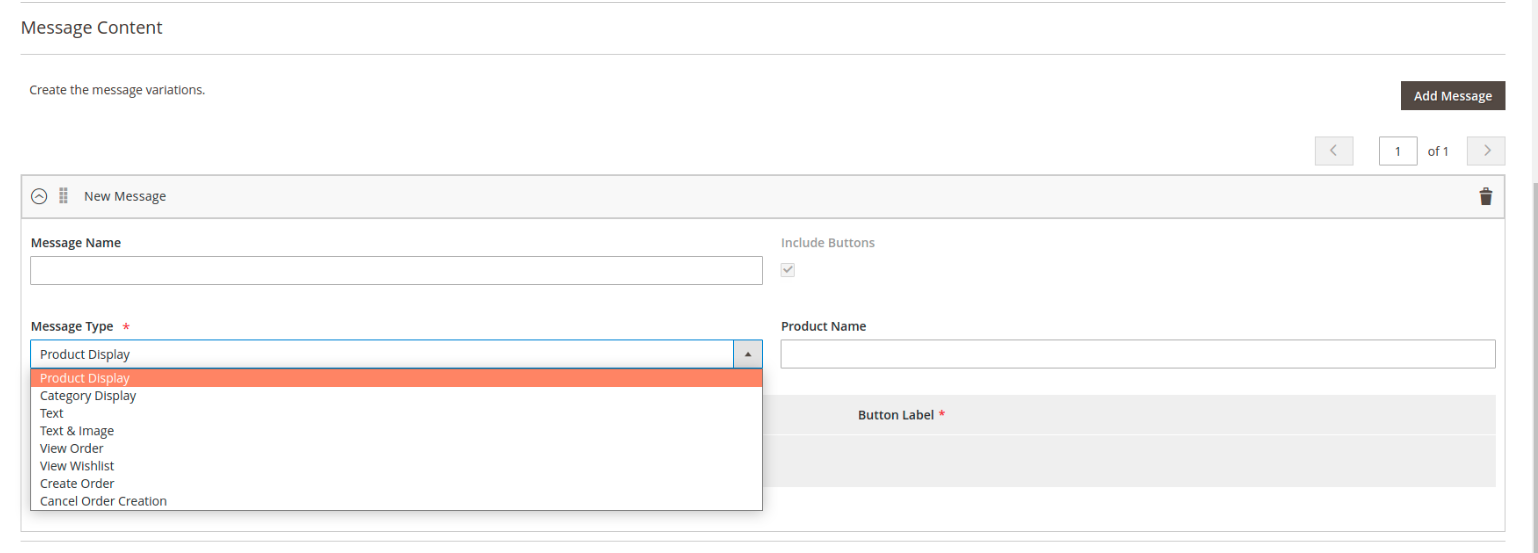
- Product display: show product list.
Product Name: will display products whose names like the value in this field. If not entered, product random will be displayed.
- Categories: display categories by level
- Text: display message as text
- Text & Image: Display image and text
Image: upload image from local or gallery
- View Order: display 5 previous orders generated by bot
- View Wishlist: display 5 item of customer's wishlist
- Create Order: start the order creation process [NEW]
- Cancel Order Creation: cancel order creation [NEW]
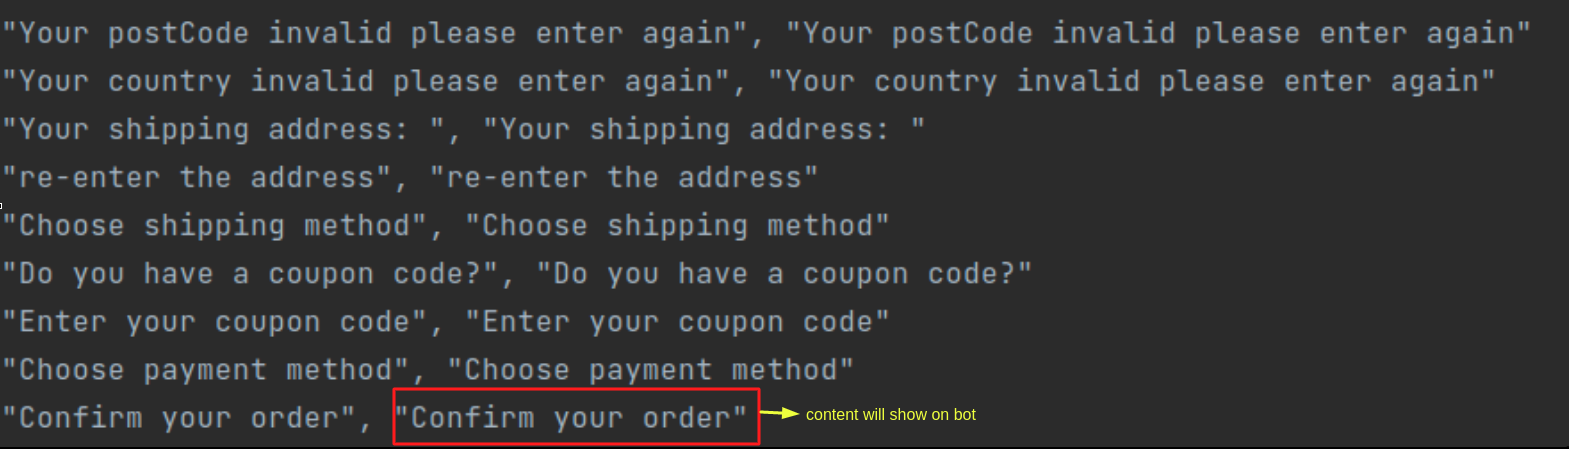
![]() Note: The default message script in the bot can be changed by updating the csv file available in the module
Note: The default message script in the bot can be changed by updating the csv file available in the module
Fbchatbot/i18n/en_US.csv
![]() Include Button
Include Button
To include buttons in the message (In addition to Text and Text & Image message type, all must include buttons), click Add Button.
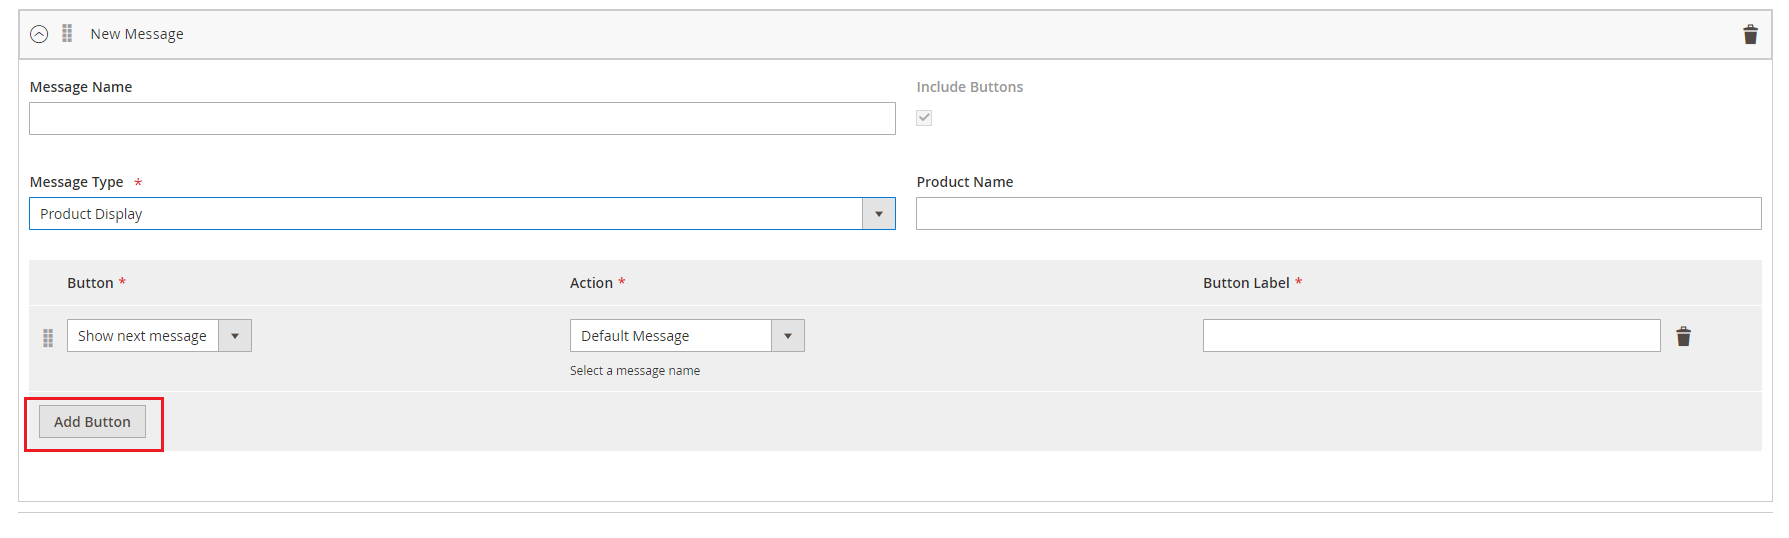
- Button: Select a button type enclosed in the message. There are 4 Button Types:
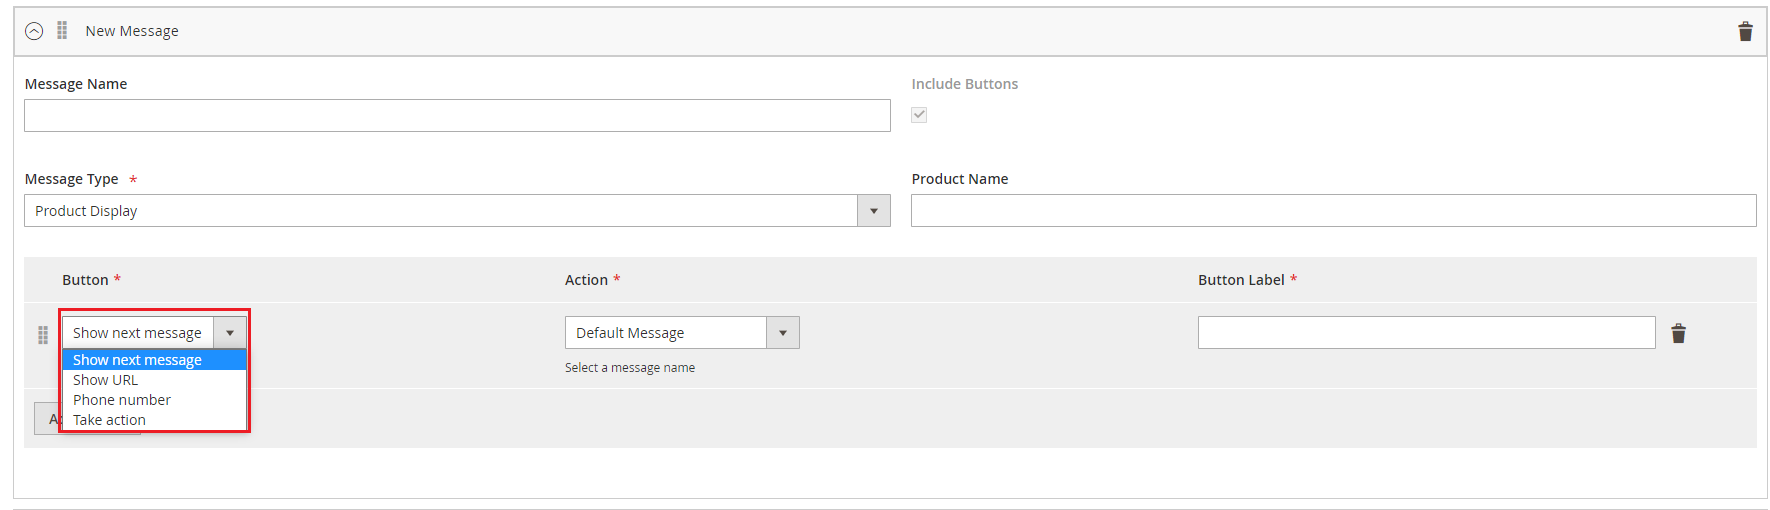
- Action: this field depends on the field Button
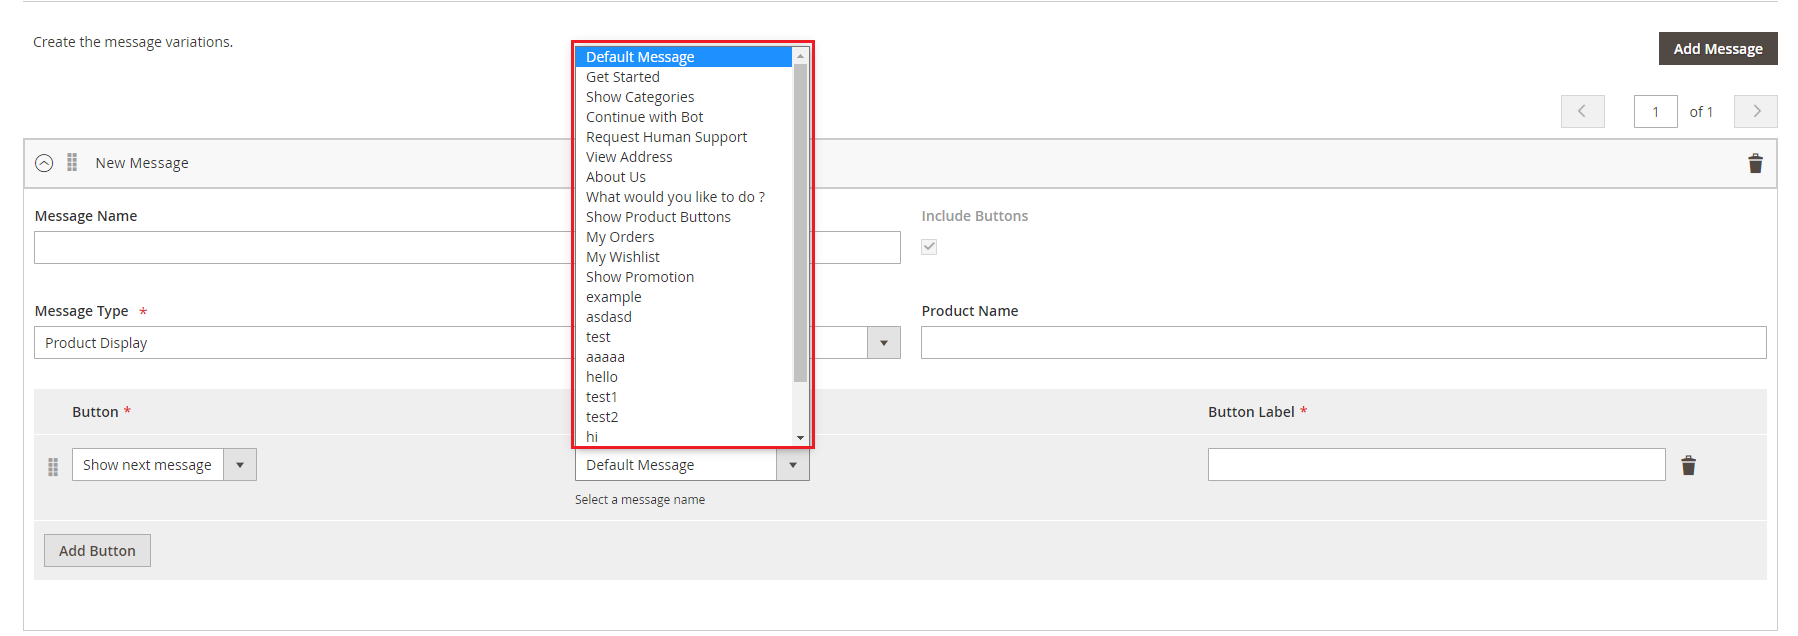
Select Show next message to select one of the corresponding options.
Select URL to enter a redirect link.

Select Telephone to enter a hotline.

Select Take Action to choose one of the corresponding actions.

- Button Label: display label for button
Configure Your Facebook App
![]() You are required to provide the following basic information in the app console under Settings > Basic:
You are required to provide the following basic information in the app console under Settings > Basic:
- App Icon
- Privacy Policy URL
- Category
- Business Use

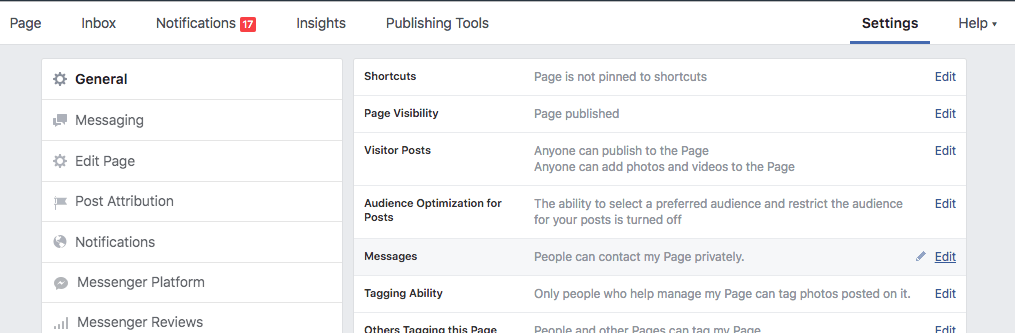
![]() In order to allow Users to Message Your Page, you must enable messaging on your Page. Go to Page Settings > General.
In order to allow Users to Message Your Page, you must enable messaging on your Page. Go to Page Settings > General.
- In the 'Messages' section, click the 'Edit' button.
- Select the 'Allow people to contact my Page privately by showing the Message button' checkbox.
- Click 'Save Changes'
![]() Then, please Activate Your app in Live Mode
Then, please Activate Your app in Live Mode

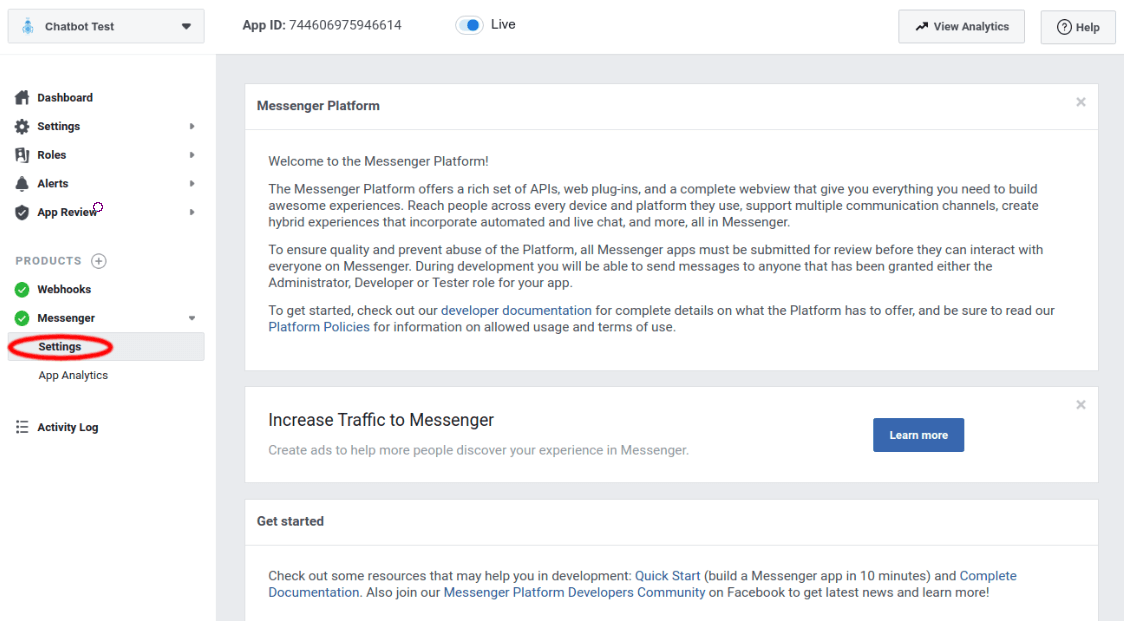
![]() In order to add more permissions, please sign in to your App Dashboard and click on your app. Under Products, click Messenger > Settings. (If Messenger does not appear under Products, click the + icon and add it.)
In order to add more permissions, please sign in to your App Dashboard and click on your app. Under Products, click Messenger > Settings. (If Messenger does not appear under Products, click the + icon and add it.)
![]() Scroll down to the App Review for Messenger section, then click the Add to Submission button for the pages_messaging permission.
Scroll down to the App Review for Messenger section, then click the Add to Submission button for the pages_messaging permission.

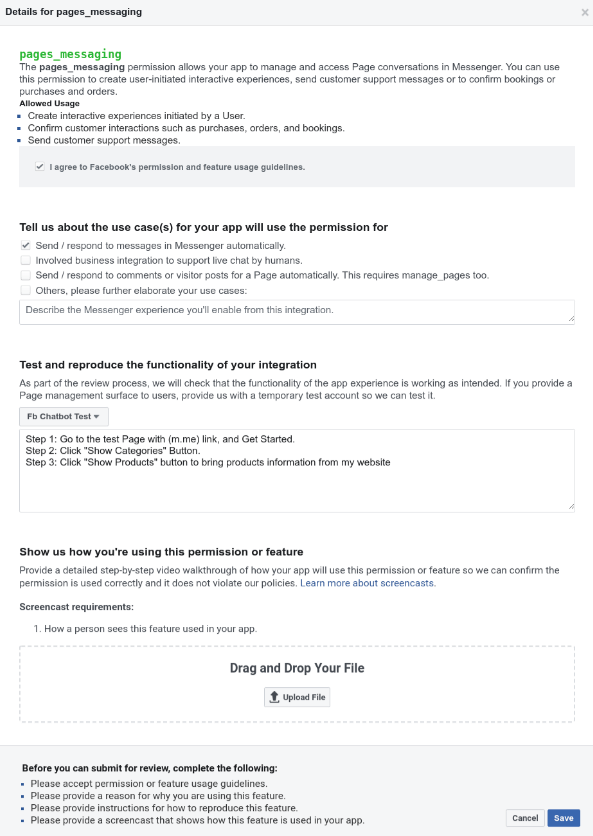
![]() Then, to Describe Data Usage, you could follow the steps below
Then, to Describe Data Usage, you could follow the steps below
![]() Download file and drag into screencast requirements: File
Download file and drag into screencast requirements: File
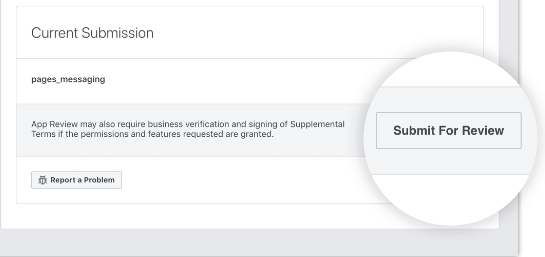
After providing all the necessary information, you will need to have a reviewer to verify that your app uses the pages_messaging permission correctly, click Submit For Review.
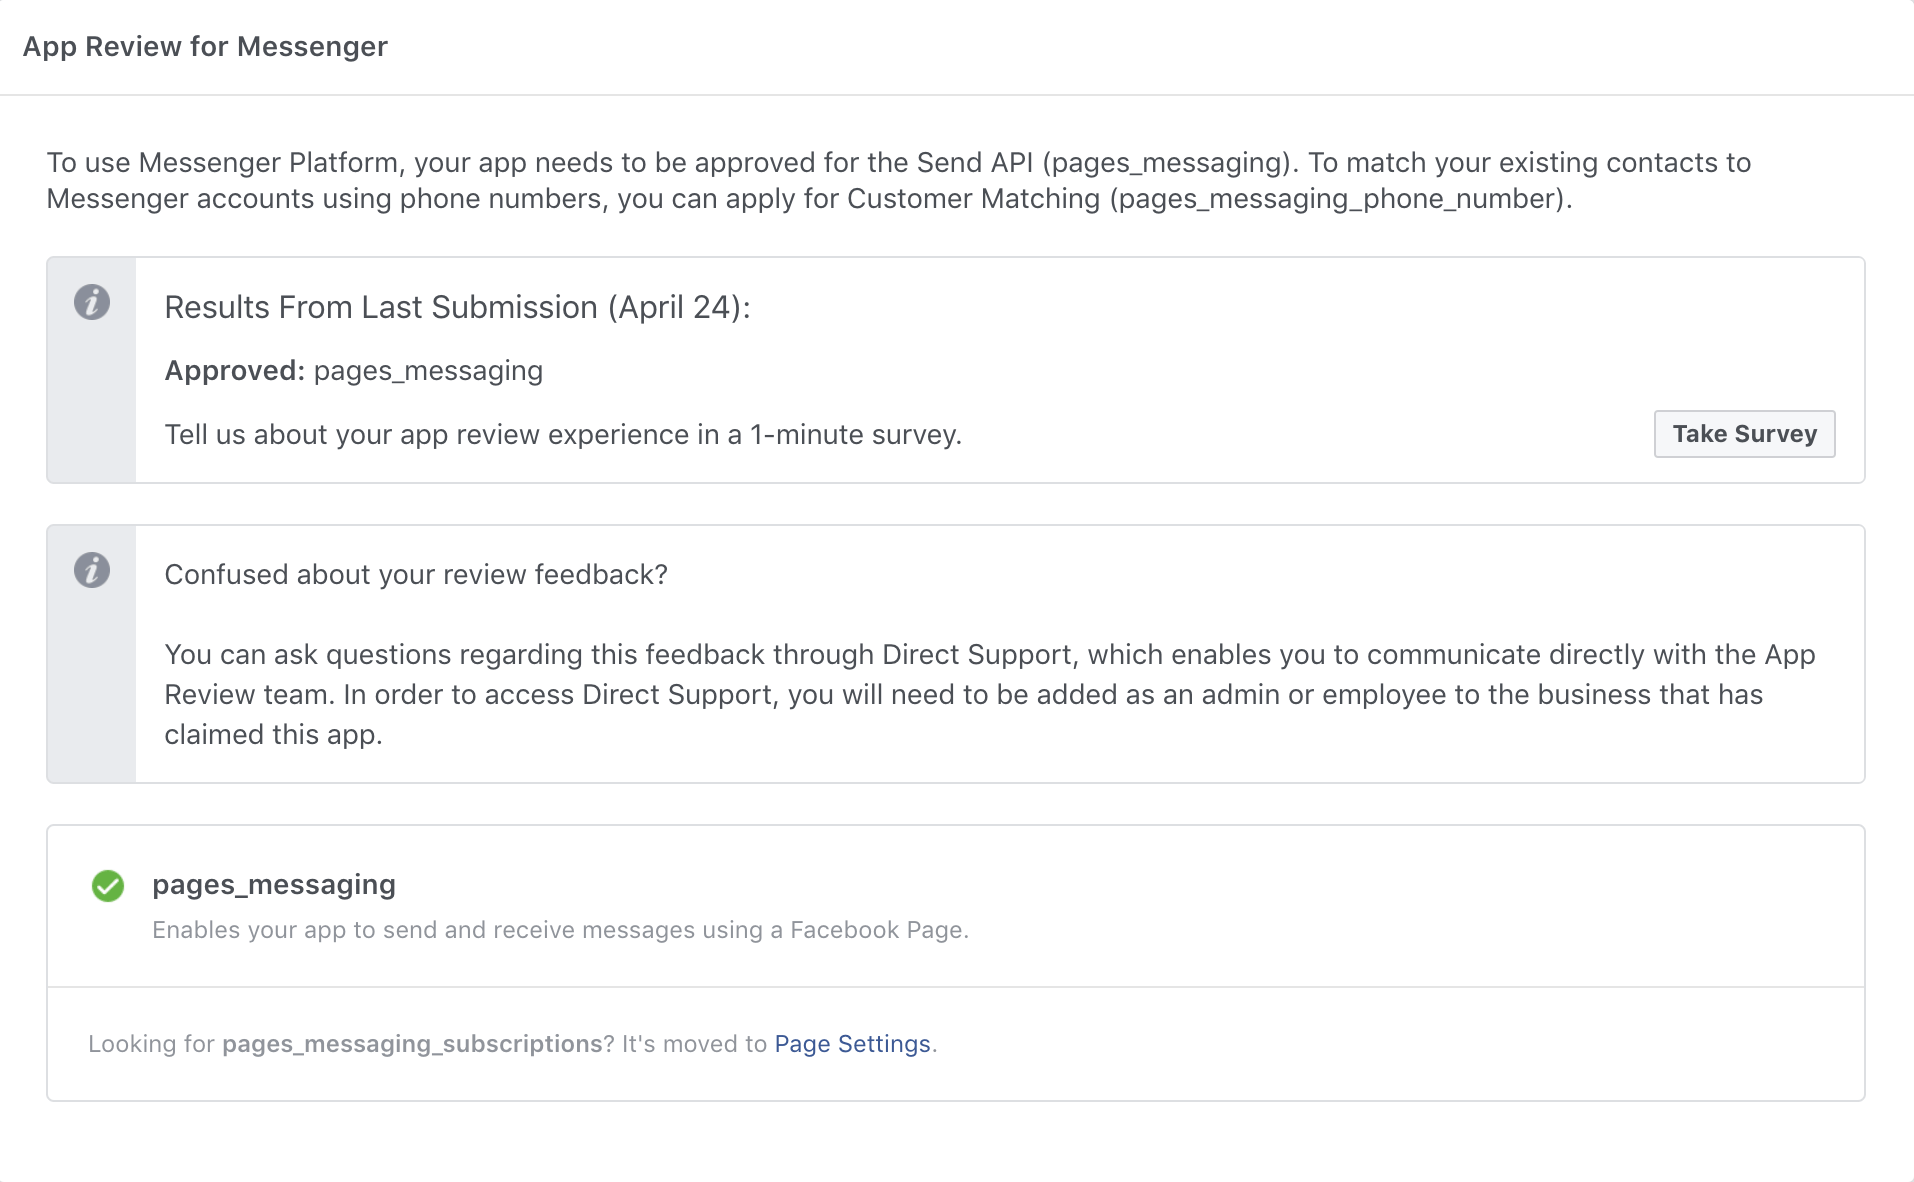
![]() When approved, a green checkmark will also appear next to the pages_messaging permission under 'App Review for Messenger'.
When approved, a green checkmark will also appear next to the pages_messaging permission under 'App Review for Messenger'.
![]() In rare cases that your app is not approved, click the 'Add to Submission' button next to 'pages_messaging' to see the feedback from Facebook review team.
In rare cases that your app is not approved, click the 'Add to Submission' button next to 'pages_messaging' to see the feedback from Facebook review team.
If you have any questions, you can communicate directly with the review team to clarify how you can update your app by using the 'Ask a Question' button below the rejection notice.
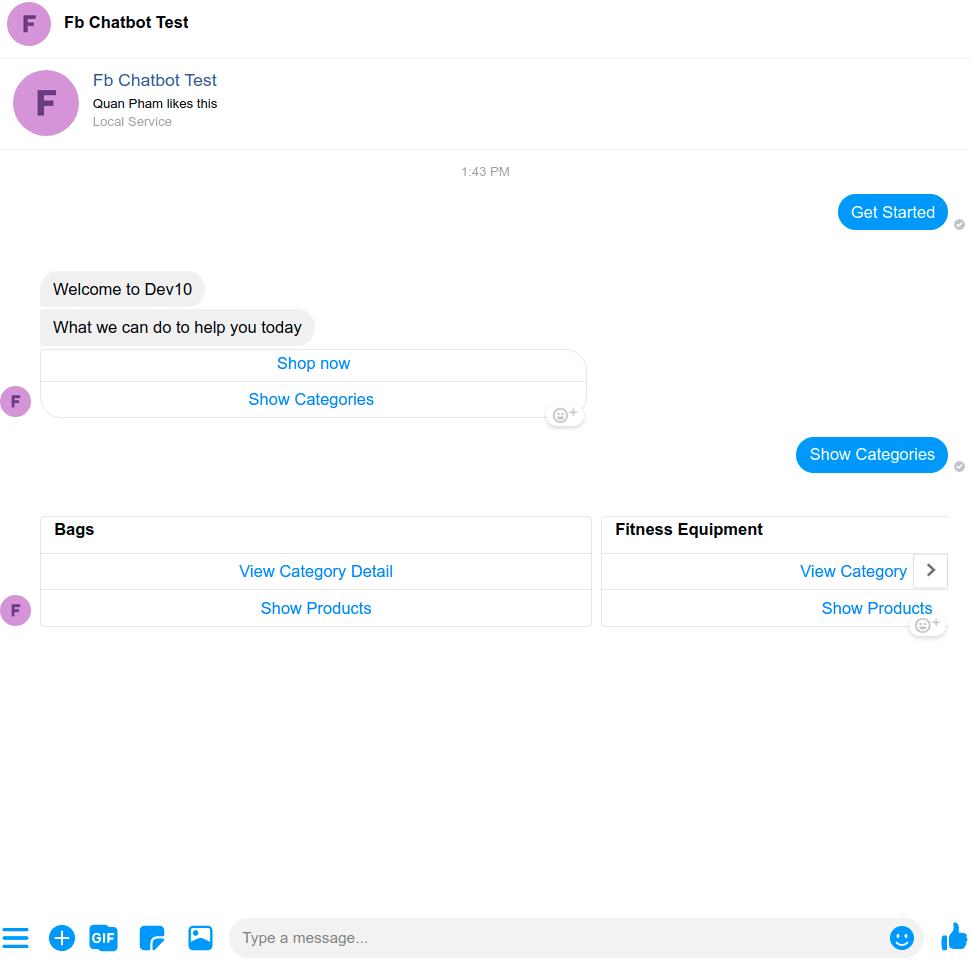
Live Facebook Chatbot
![]() After finishing all the required configurations, you could see your Bot ready to serve the customer and boost your business.
After finishing all the required configurations, you could see your Bot ready to serve the customer and boost your business.
Update
When a bug fix or new feature is released, we will provide you with the module's new package.
All you need to do is repeating the above installing steps and uploading the package onto your store. The code will automatically override.
Flush the config cache. Your store and newly installed module should be working as expected.
Support
- We will reply to support requests within 2 business days.
- We will offer a lifetime free update and 6 months of free support for all of our paid products. Support includes answering questions related to our products, bug/error fixing to make sure our products fit well in your site exactly like our demo.
- Support DOES NOT include other services such as customizing our products, installation, and uninstallation service.