Thank you for purchasing our extension. If you have any questions that are beyond the scope of this document, do not hesitate to leave us an email via our email address below.
Created: 18/12/2016 | By: Magenest | Support Portal: http://servicedesk.izysync.com/servicedesk/customer/portal/55
Introduction
SMS Marketing extension for Magento 2 is a powerful tool which allows store owners to send personalized SMS messages to customers on various occasion of the customer journey, including when they register a new account, when they order a product, when the status of the product changes, etc.
Features
- Customize SMS template according to the store owner’s wish.
- Send SMS text messages to customers when they register.
- Send SMS text messages to customers when orders are created.
- Send SMS text messages to customers when orders are canceled.
- Send SMS text messages to customers when orders are refunded.
System Requirements
Your store should be running on Magento 2 Community Edition version 2.1.
How does it work
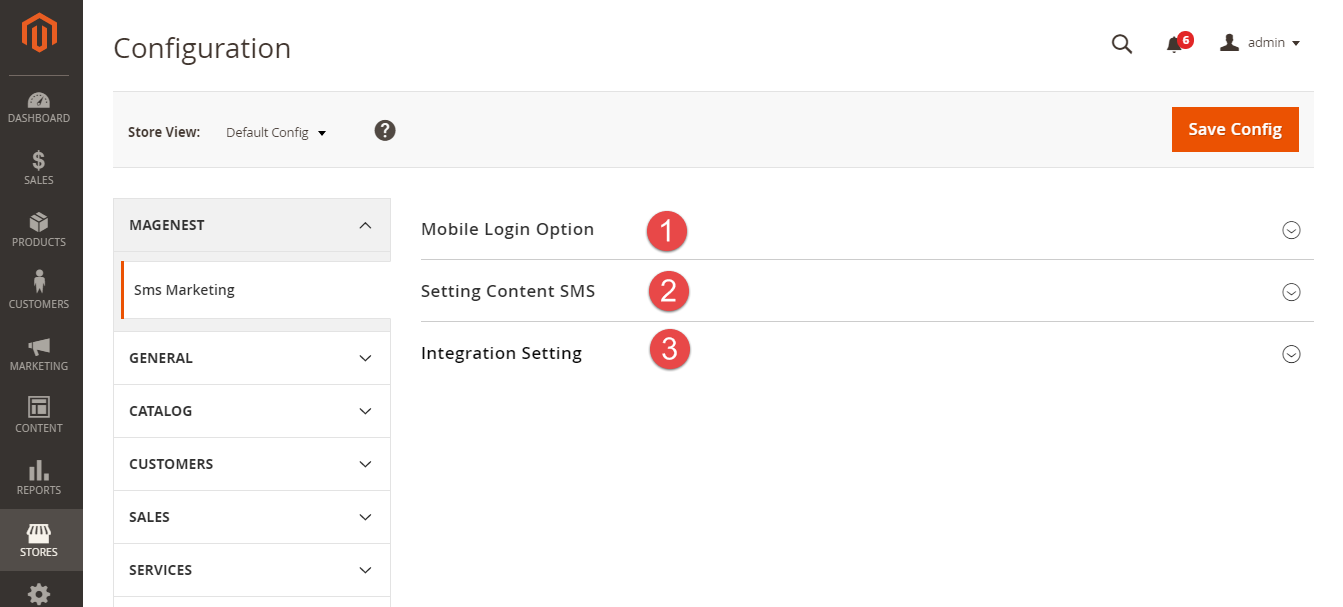
In order to start using the SMS Marketing extension, you need to do some configuration by going to Stores > SMS Marketing.
There are three sections that admins need to consider:
+ Mobile Login Option.
+ Setting Content SMS.
+ Integration Setting.
- Mobile Login Option
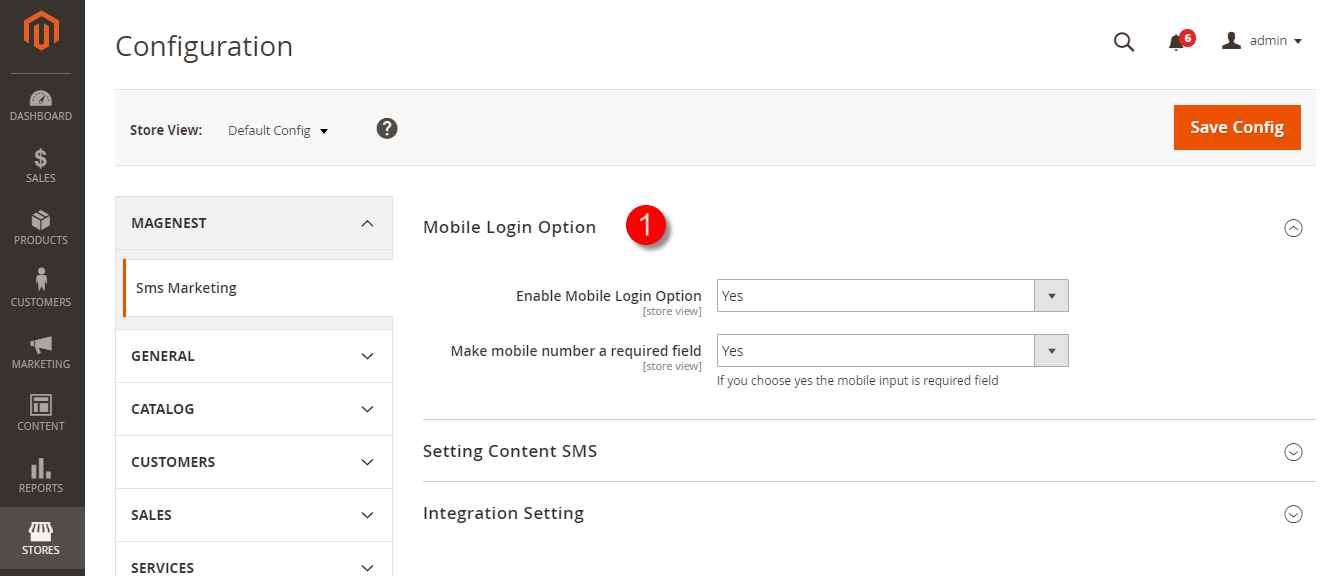
Expand the Mobile Login Option section. Then, there are two following fields showed:
The Enable Mobile Login Option filed: Allow admins to set whether this field is able to show on Create an Account page when customers register a new account or not.
Yes: This field will be shown.
No: This field will be hidden.
The Make mobile number a required field: Allows admins to set whether the mobile field is a required field on Create an Account page when customers register or not.
Yes: The mobile field is a required field.
No: The mobile field is not a required field.
- Setting Content SMS
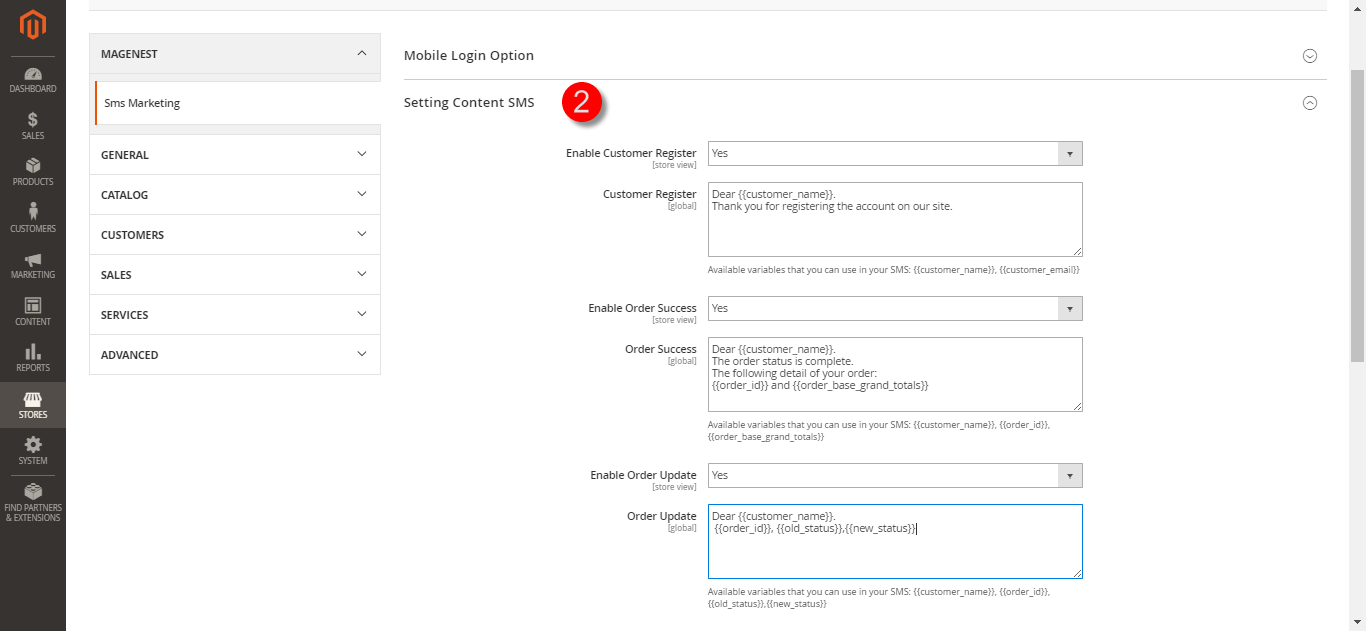
Expand the Setting Content SMS section, there are three following fields showed:
The Enable Customer Register field: Allows merchants to set whether they want to send a text message to customers' cell phone when customers create a new account on their site or not.
Yes: Customers will receive a text message as soon as they register a new account on the site.
Also, the Customer Register field will be shown allowing store owners to set content of the message.
Note that the extension supports two following variables which are available to use in the SMS:
| {{customer_name}}, {{customer_email}} |
|---|
The Enable Order Success field: Allows merchants to set whether customers can be able to receive a text message when their order status is complete.
Yes: Customers will receive a text message when their order status is complete.
Also, the Order Success field will be shown allowing store owners to set content of the message.
Note that the extension supports three following variables which are available to use in the SMS:
{customer_name}}, {{order_id}}, {{order_base_grand_totals}} |
|---|
No: Customers will not receive a text message when their order status is complete.
The Enable Order Update field: Allow merchants to set whether customers can be able to receive a text massage when their order status changed.
Yes: Customers will receive a text message when their order status is changed.
Also, the Order Update field will be shown allowing store owners to set content of the message.
Note that the extension supports three following variables which are available to use in the SMS:
{{customer_name}}, {{order_id}}, {{old_status}},{{new_status}} |
|---|
No: Customers will not receive a text message when their order status is changed.
- Integration Settings
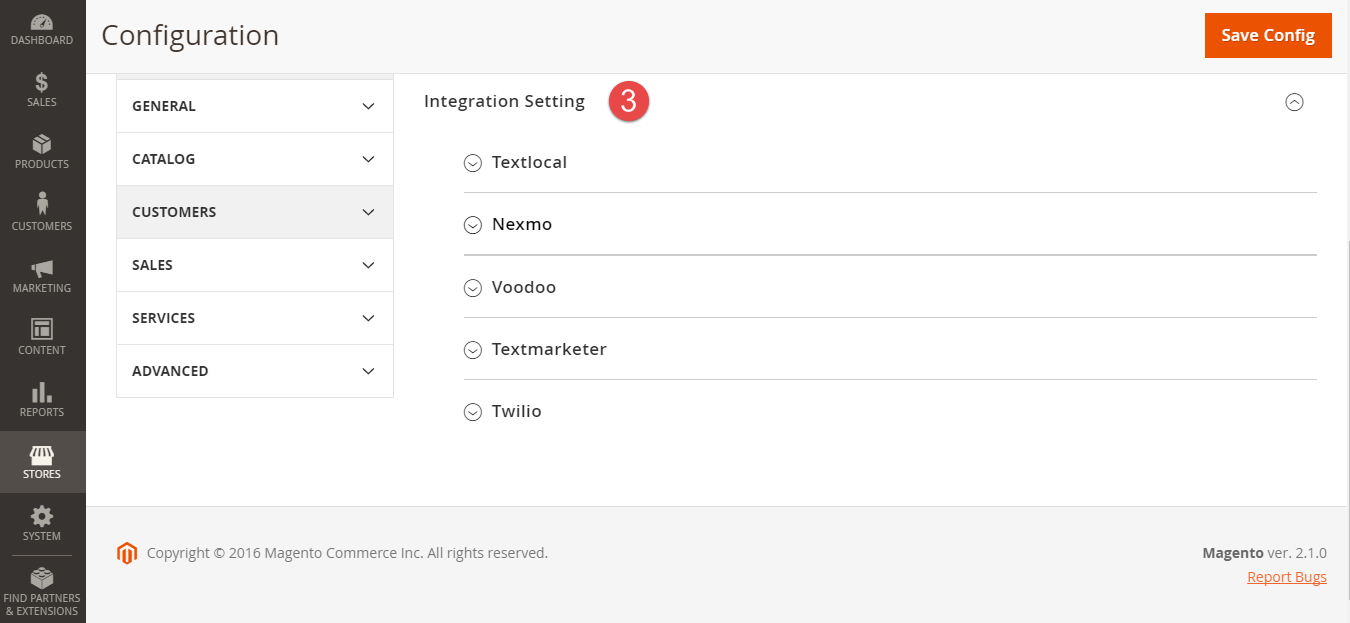
Expand the Integration Settings section, there are five subsections showed:
+ Text Local.
+ Nexmo.
+ Voodoo.
+ Text Marketer.
+ Twilio.
 Text Local
How to get information from your Text Local account
If store owners do not have a Text Local account, please create a new account by clicking on the following link: https://www.textlocal.com
Then, please enter the required information to complete the process of creating new accounts.
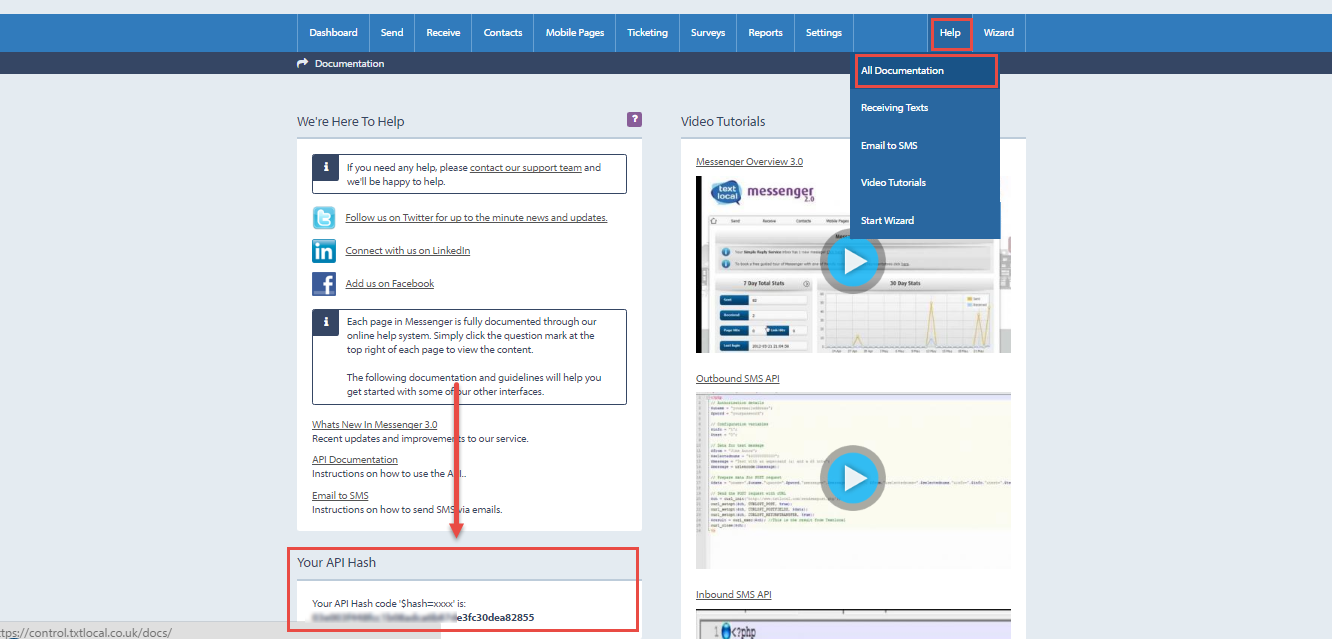
After registering an new account successfully or you had an existing account, please log in your account and go to Help > API Documentation.
Then, please find the Your API Hash and save this information.
Admins will save the information of these two fields to use with the SMS Marketing extension.
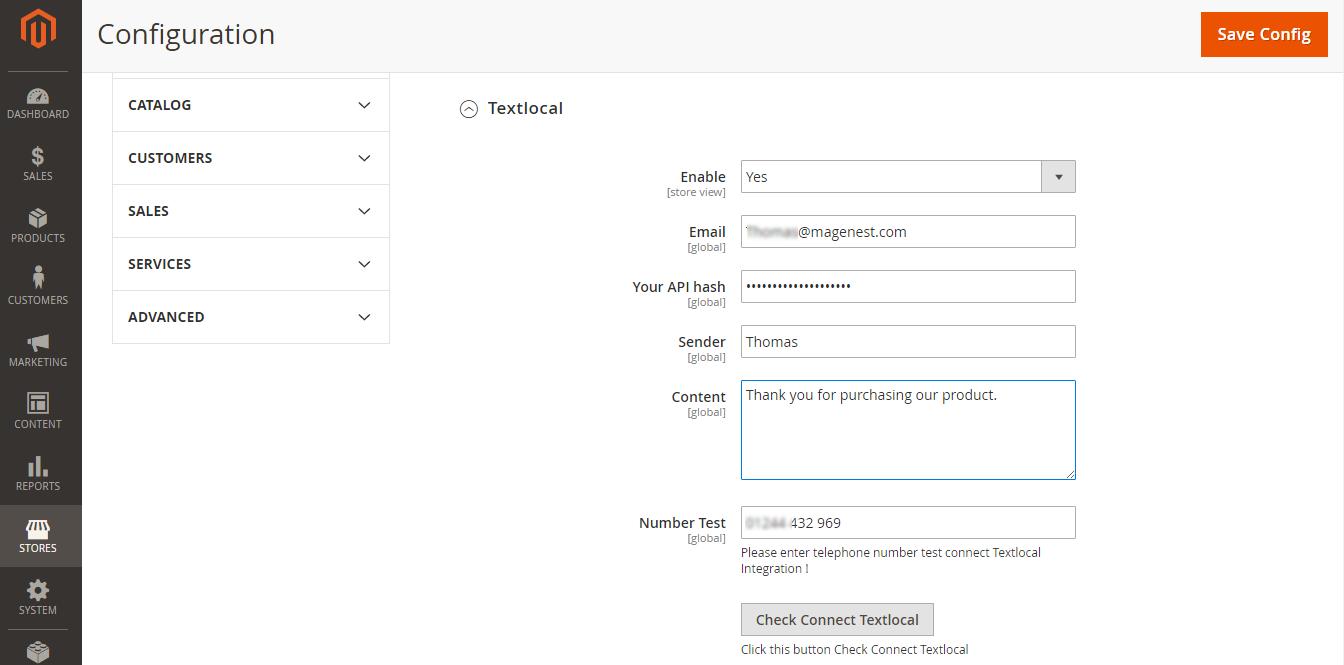
Expand the Textlocal subsection, then the Enable field will be shown.
The Enable field: Allows admins to set whether they use the Text Local platform to send text messages to their customers or not.
No: Merchants will not use the Text Local SMS platform to send text messages to customers.
Yes: Merchants will use the Text Local SMS platform to send text messages to customers.
Then, there are five fields will be shown:
+ The Email field: Using the the email that admins used to register new account.
+ The Your API hash field: Using the API Hash information saved in the step above.
+ The Sender field: Enter a name that admins want.
+ The Content field: Enter the content of the text message that you sent customers.
+ The Number Test field: Admins will enter your phone number here if you want to test the sending SMS feature.
Please click on Save Config button, then click on Check Connect Textlocal button to check connect.
If admins want to change the Text Local status at the Enable field from Yes to No or vice versa, you need to click Save Config button. Then, you will enter the rest of fields.
 Nexmo
Nexmo
How to get information from your Nexmo account
If store owners do not have a Nexmo account, please create a new account by clicking on the following link: https://www.nexmo.com
Then, please enter the required information to complete the process of creating new accounts.
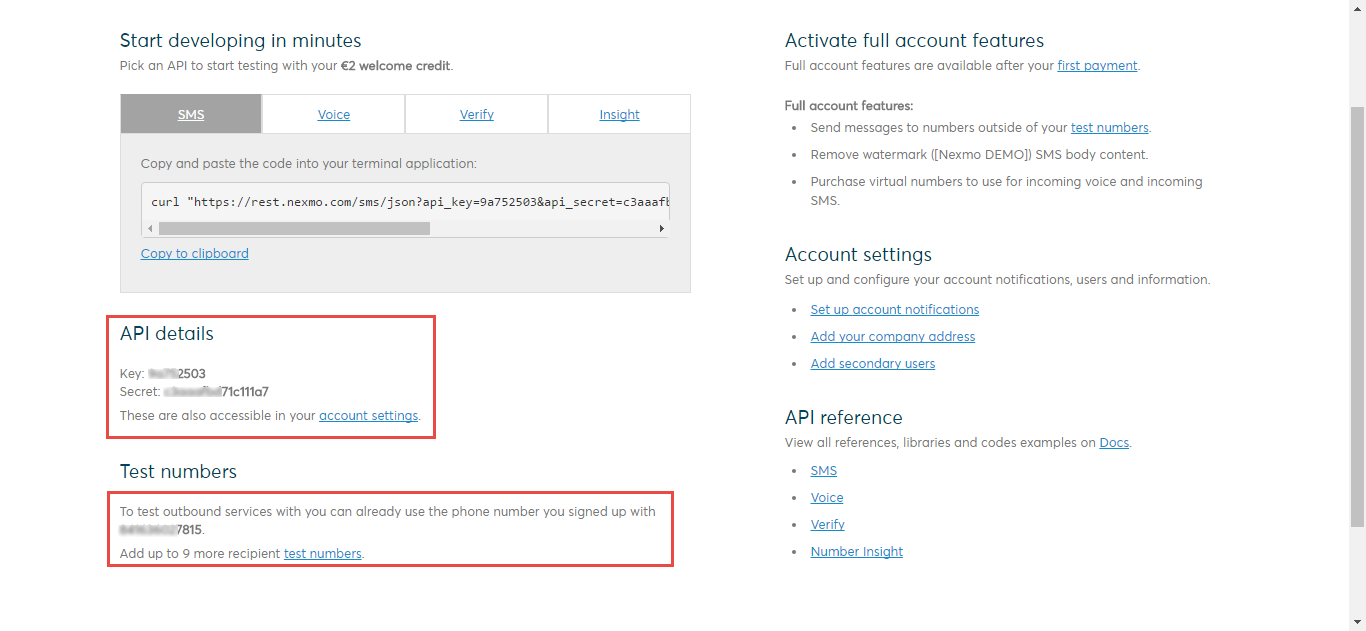
After registering an new account successfully or you had an existing account, please log in your account.
At Getting Started page, admins will need to save information from two fields:
+ API details: Key and Secret.
+ Test numbers.
Then, admins will save the information of these two fields to use with the SMS Marketing extension.
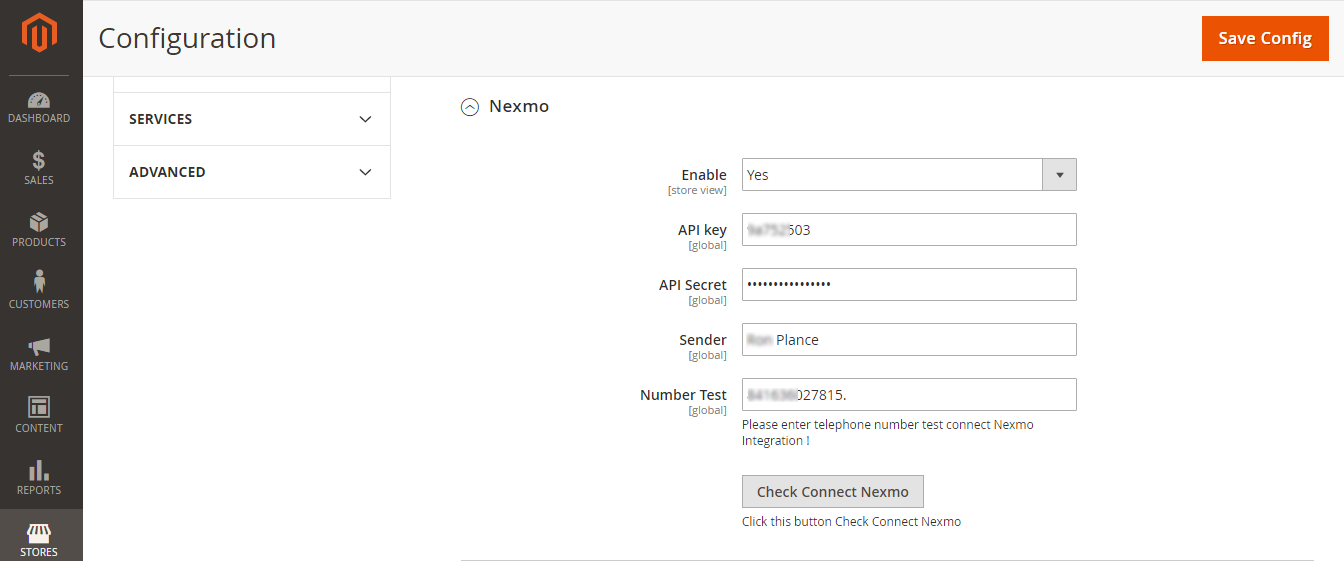
Expand the Nexmo subsection, then the Enable field will be shown.
The Enable field: Allows admins to set whether they use the Voodoo platform to send text messages to their customers or not.
No: Merchants will not use the Nexmo SMS platform to send text messages to customers.
Yes: Merchants will use the Nexmo SMS platform to send text messages to customers.
Then, there are four fields will be shown:
+ The API key field: Using the Key information saved in the step above.
+ The API Secret field: Using the Secret information saved in the step above.
+ The Sender field: Enter a name that admins want.
+ The Number Test field: Admins will enter your phone number saved in the step above (the Test numbers field).
Please click on Save Config button, then click on Check Connect Nexmo button to check connect.
If admins want to change the Nexmo status at the Enable field from Yes to No or vice versa, you need to click Save Config button. Then, you will enter the rest of fields.
 Voodoo
How to get information from your Voodoo account
If store owners do not have a Voodoo account, please create a new account by clicking on the following link: https://www.voodoosms.com
Then, please enter the required information to complete the process of creating new accounts.
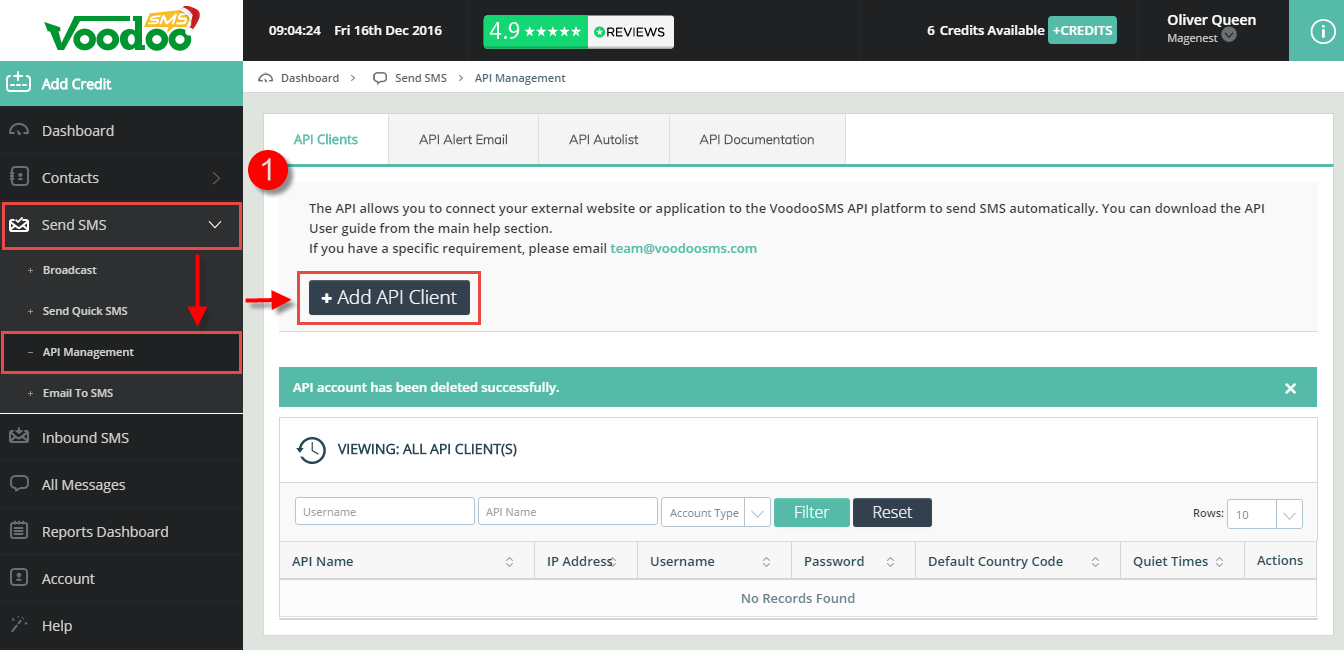
After registering an new account successfully or you had an existing account, please log in your account and go to Send SMS > API Management.
Then, click on + Add API Client button.
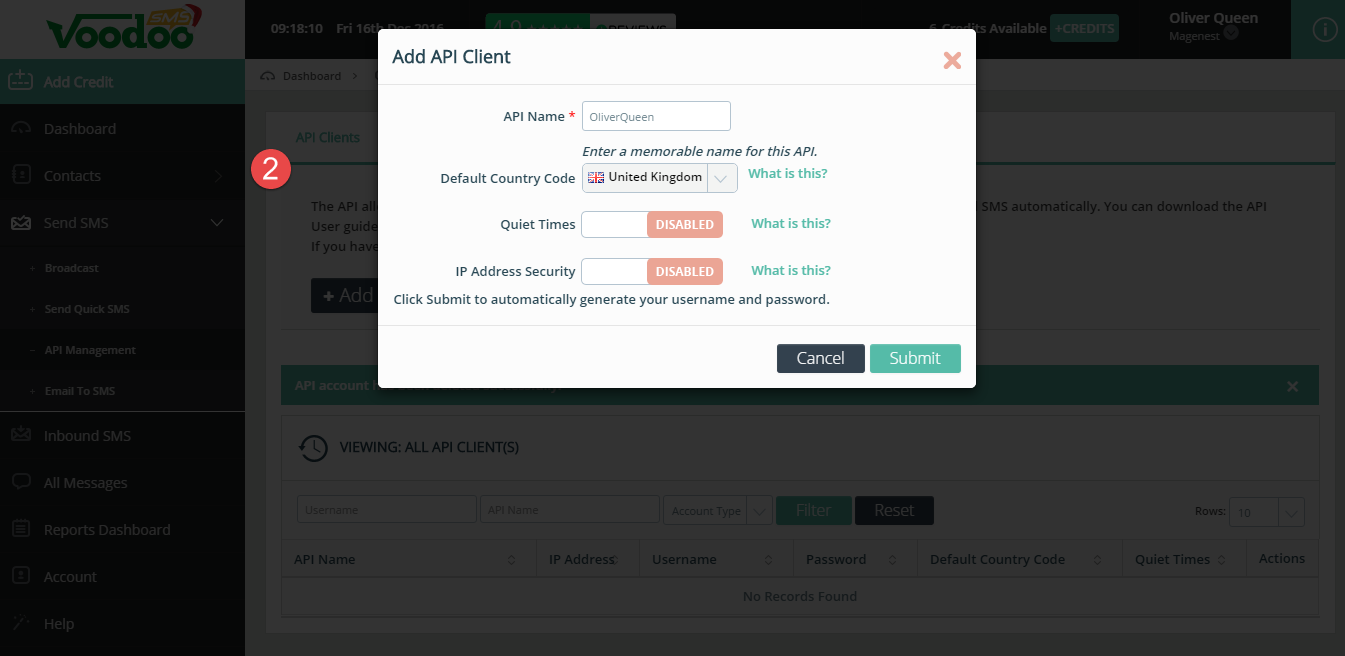
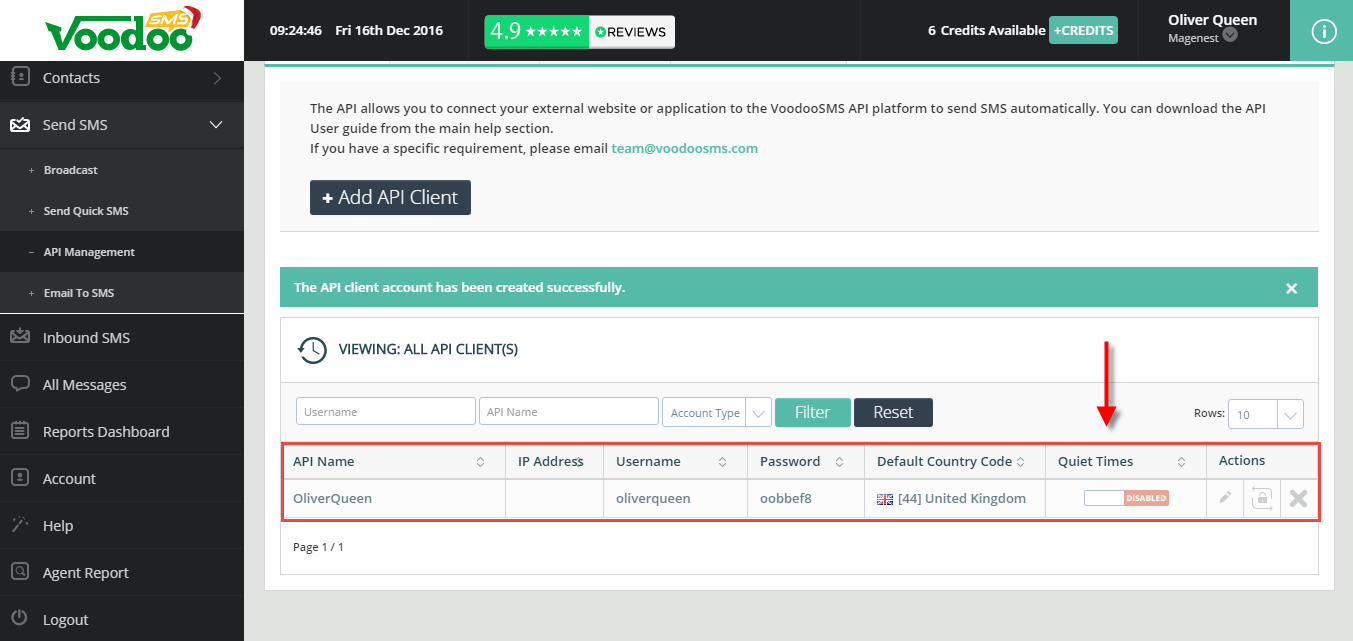
Please follow the following screenshots to view more detail.
Please click no Submit button to complete.
Merchants will need to get information from two fields:
+ Username.
+ Password.
Then, admins will save the information of these two fields to use with the SMS Marketing extension.
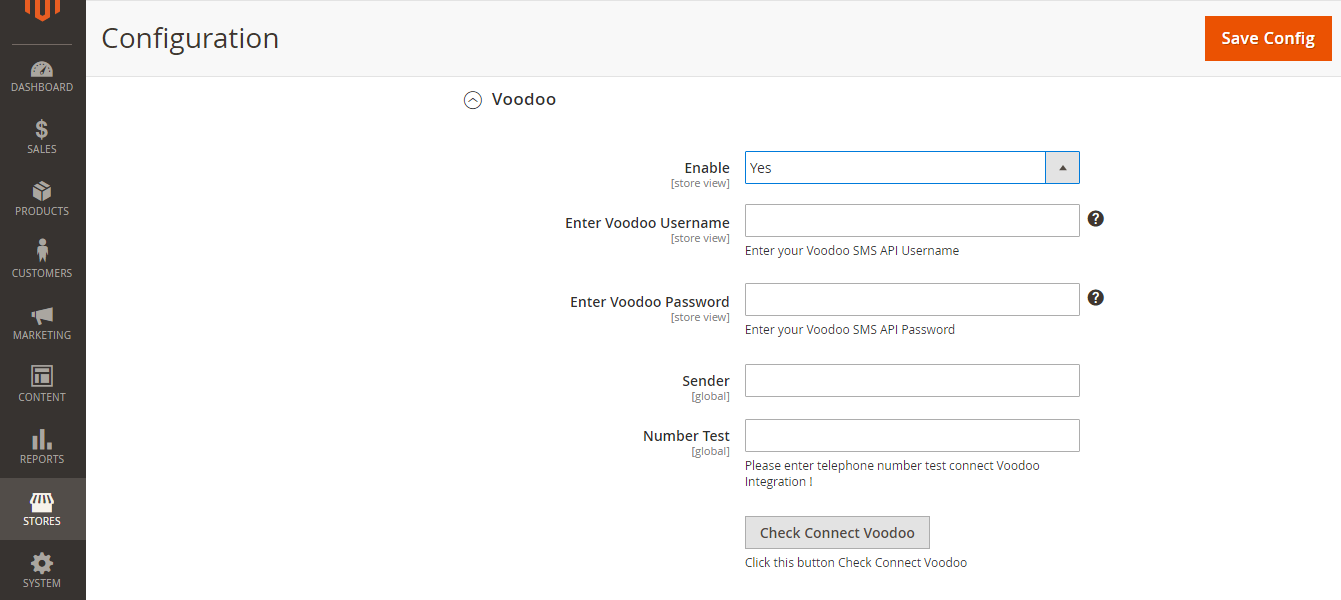
Expand the Voodoo subsection, then the Enable field will be shown.
The Enable field: Allows admins to set whether they use the Voodoo platform to send text messages to their customers or not.
No: Merchants will not use the Voodoo SMS platform to send text messages to customers.
Yes: Merchants will use the Voodoo SMS platform to send text messages to customers.
Then, there are four fields will be shown:
+ The Enter Voodoo Username field: Using the Username information saved in the step above.
+ The Enter Voodoo Password field: Using the Password information saved in the step above.
+ The Sender field: Enter a name that admins want.
+ The Number Test field: Admins will enter their phone number here if you want to test the sending SMS feature.
Please click on Save Config button, then click on Check Connect Voodoo button to check connect.
If admins want to change the Woodoo status at the Enable field from Yes to No or vice versa, you need to click Save Config button. Then, you will enter the rest of fields.
 Text marketer
How to get information from your Text marketer account
If store owners do not have a Voodoo account, please create a new account by clicking on the following link: https://www.textmarketer.co.uk
Then, please enter the required information to complete the process of creating new accounts.
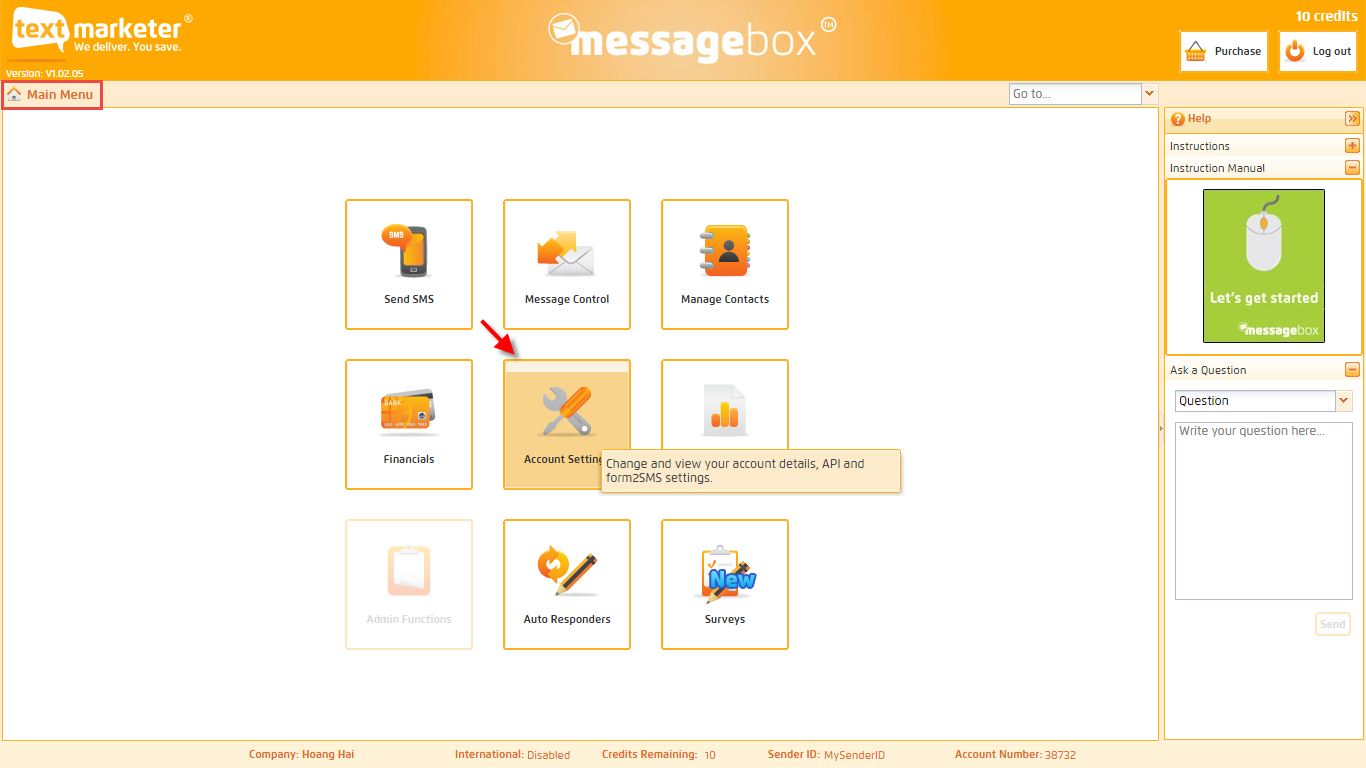
After registering an new account successfully or you had an existing account, please log in your account and go to Main Menu > Account Settings.
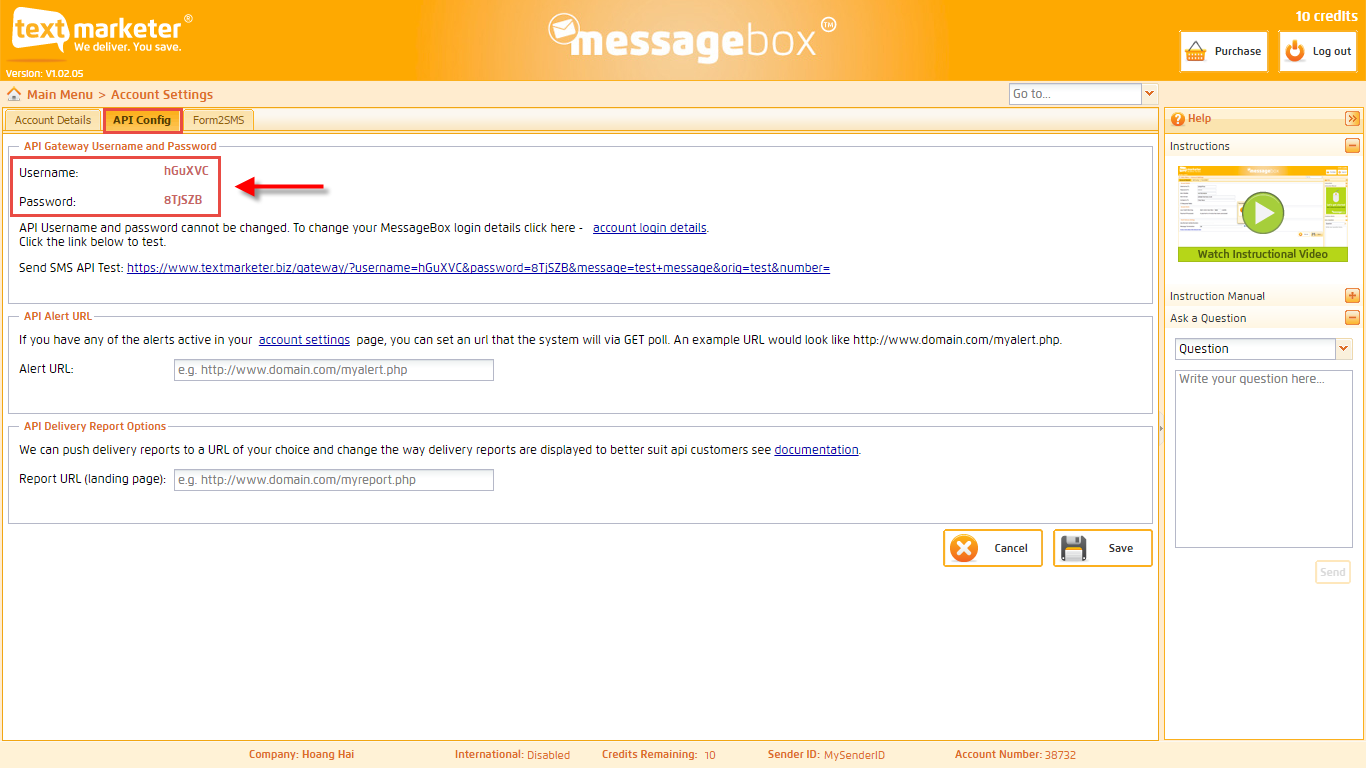
Please follow the following screenshots to view more detail.
At API Config tab, merchants will need to get information from two fields:
+ Username.
+ Password.
Then, admins will save the information of these two fields to use with the SMS Marketing extension.
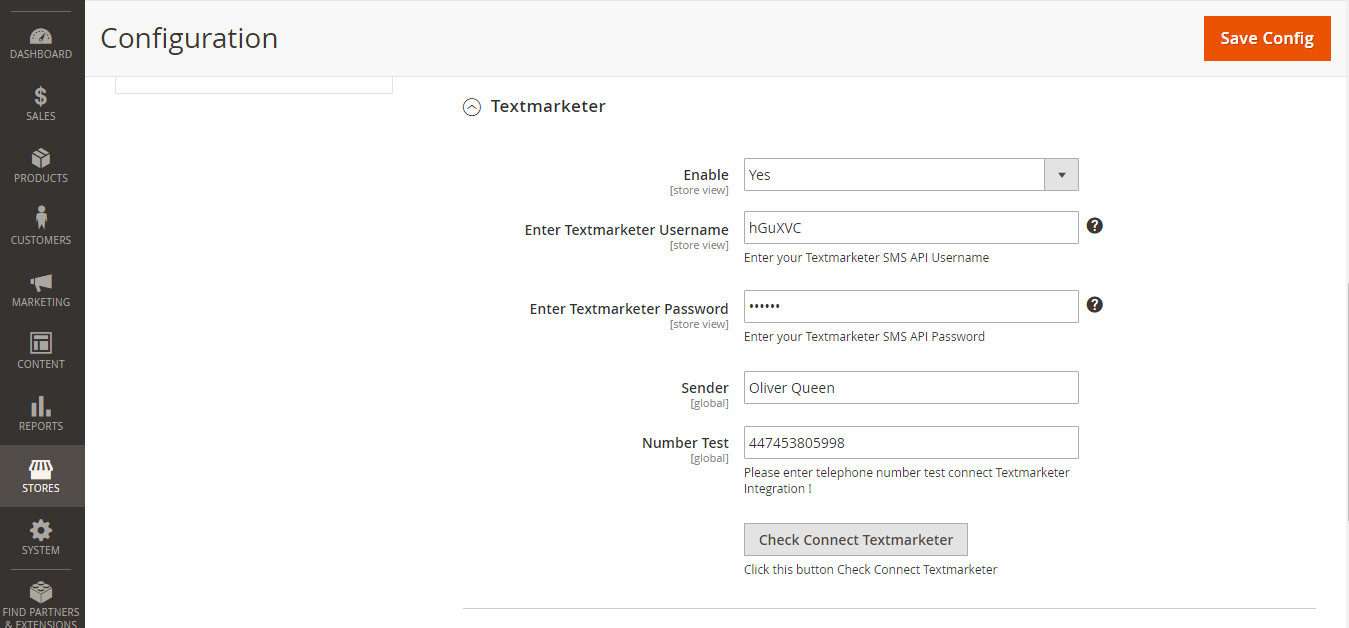
Expand the Textmarketer subsection, the Enable field will be shown.
The Enable field: Allows admins to set whether they use the Text Marketer to send text messages to their customer or not.
No: Merchants will not use the Text Marketer platform to send text messages to customers.
Yes: Merchants will use the Text Marketer platform to send text messages to customers.
Then, there are four fields will be shown:
+ The Enter Textmarketer Username field: Using the Username information saved in the step above.
+ The Enter Textmarketer Password field: Using the Password information saved in the step above.
+ The Sender field: Enter a name that admins want.
+ The Number Test field: Admins will enter their phone number here if you want to test the sending SMS feature.
Please click on Save Config button, then click on Check Connect Voodoo button to check connect.
If admins want to change the Text Marketer status at the Enable field from Yes to No or vice versa, you need to click Save Config button. Then, you will enter the rest of fields.
 Twilio
How to get information from your Twilio account
If store owners do not have a Twilio account, please create a new account by clicking on the following link: https://www.twilio.com
Then, please enter the required information to complete the process of creating new accounts.
After registering an new account successfully or you had an existing account, please log in your account.
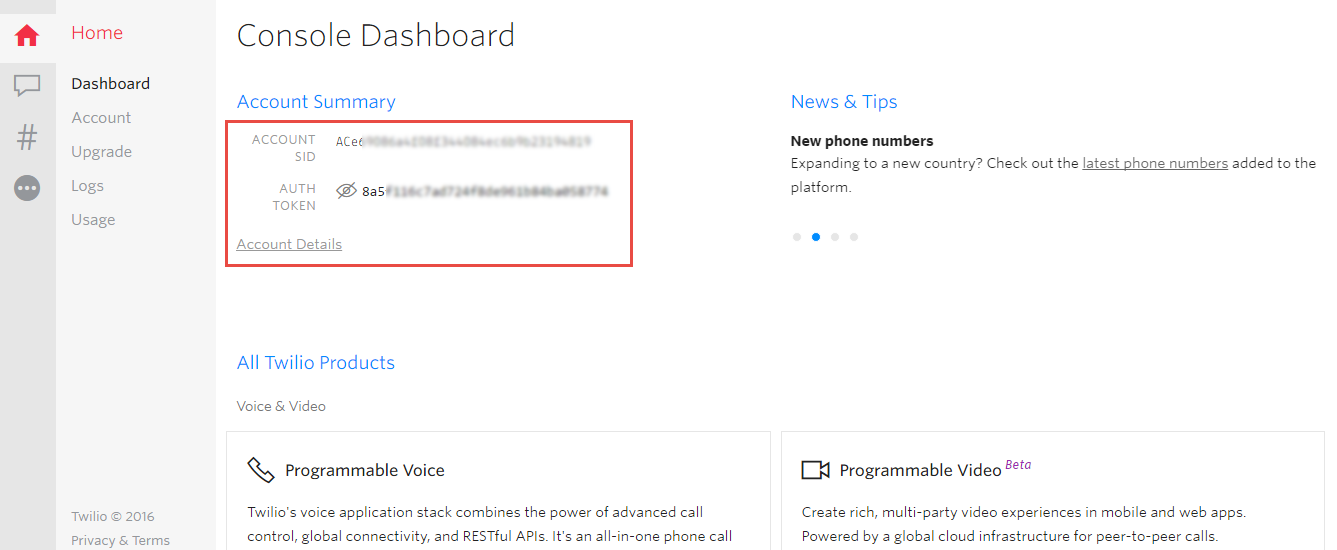
At the Console Dashboard page, admin will save information of two fields:
+ ACCOUNT SID.
+ AUTH TOKEN.
Then, admins will save the information of these two fields to use with the SMS Marketing extension.
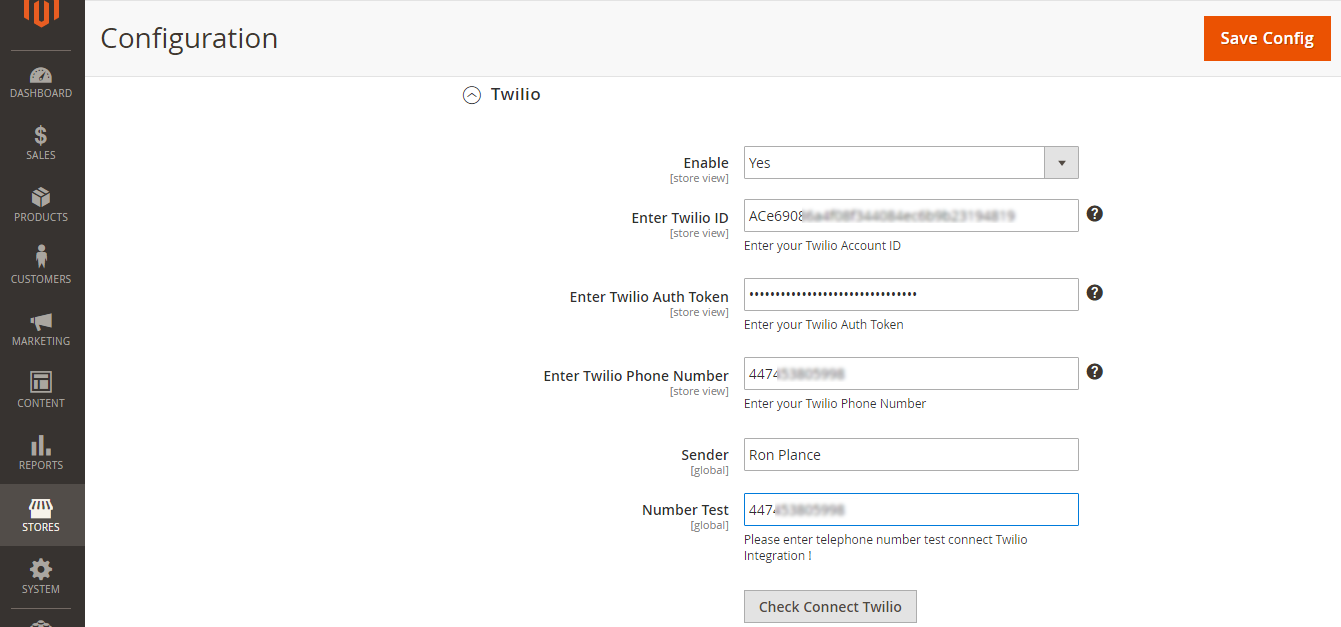
Expand the Twilio subsection, the Enable field will be shown.
The Enable field: Allows admins to set whether they use the Twilio platform to send text messages to their customer or not.
No: Merchants will not use the Twilio platform to send text messages to customers.
Yes: Merchants will use the Twilio platform to send text messages to customers.
Then, there are four fields will be shown:
+ The Enter Twilio ID field: Using the ACCOUNT SID information saved in the step above.
+ The Enter Twilio Auth Token field: Using the AUTH TOKEN information saved in the step above.
+ The Enter Twilio Phone Number field: Enter merchants' Twilio phone number.
+ The Sender field: Enter a name that admins want.
+ The Number Test field: Admins will enter their phone number here if you want to test the sending SMS feature.
Please click on Save Config button, then click on Check Connect Twilio button to check connect.
If admins want to change the Twillio status at the Enable field from Yes to No or vice versa, you need to click Save Config button. Then, you will enter the rest of fields.
Front End
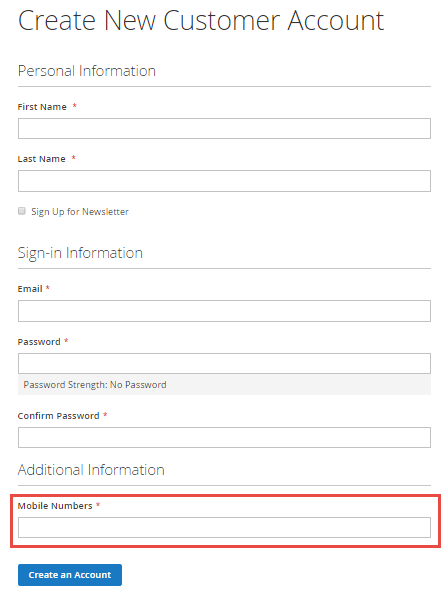
SMS Marketing extension create a new field in the Create New Account form. The extension will use the phone number which is entered by customers when they register a new account to send text messages.
Update
- When a new update is available, we will provide you with a new package containing our updated extension.
- You will have to delete the module directory and repeat the installing steps above.
- Flush the config cache. Your store and newly installed module should be working as expected.
Support
- We will reply to support requests after 2 business days.
- We will offer lifetime free update and 6 months free support for all of our paid products. Support includes answering questions related to our products, bug/error fixing to make sure our products fit well in your site exactly like our demo.
- Support DOES NOT include other series such as customizing our products, installation and uninstallation service.
Once again, thank you for purchasing our extension. If you have any questions relating to this extension, please do not hesitate to contact us for support.

