Thank you for purchasing Magenest extension. If you have any query that is beyond the scope of this document, please contact us via the support portal below.
Updated: 13/12/2018 | By: Magenest | Support Portal: http://servicedesk.izysync.com/servicedesk/customer/portal/34
Introduction
Extension's page: Instagram Integration.
Hot Features
- Pull all photos or specific photos using hashtags from your Instagram to your Magento 2 store
- Create an Instagram gallery page for the store
- Show all the photos in the gallery and filter by hashtags
- Manage which photos appear on and which are hidden from Instagram slider and gallery
- Set the widget as Instagram slider or static block
- Engaging Call-to-Action button upon hovering on photos
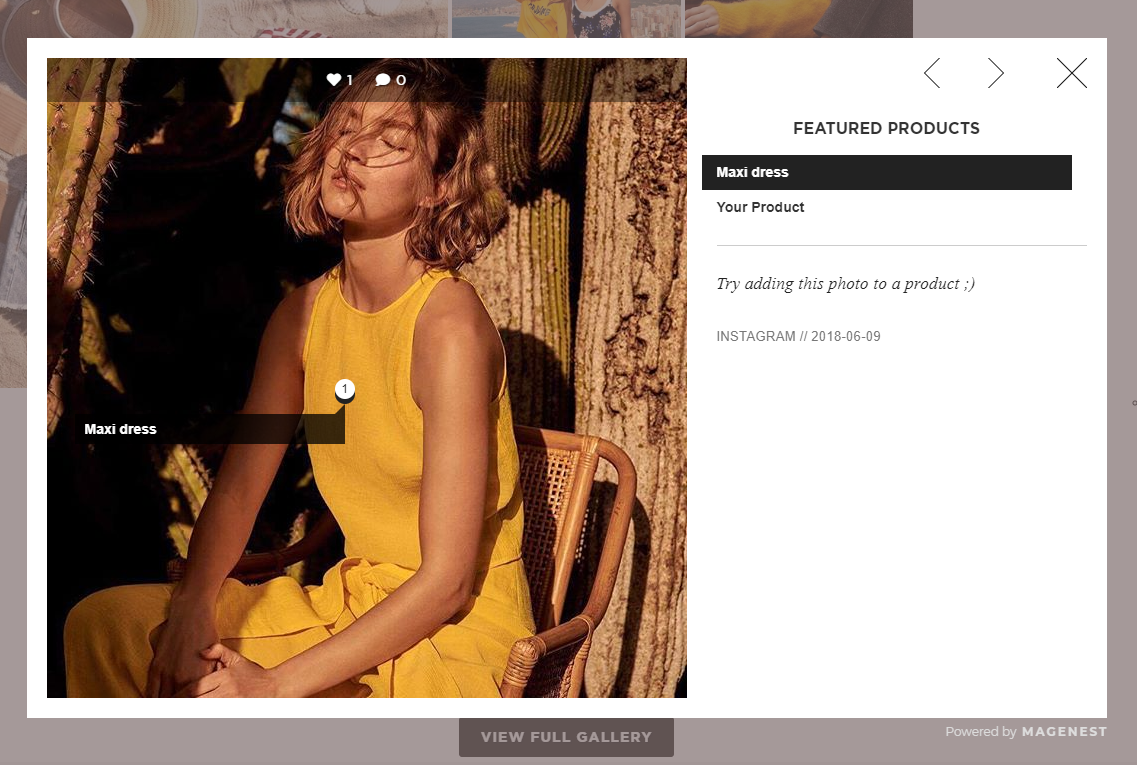
- Add featured products to Instagram photos (on Magento 2 store)
- Featured products will have links redirecting the corresponding product pages
- Add hotspot(s) to pin products on Instagram photos (on Magento 2 store)
- Social Sharing buttons for customers to share your products online
- Customize your slider to suit your website layout
- Change the order/position of the photos displayed on Instagram widget and gallery
- Easy setup and configuration
- Mobile responsive
- Performance report
System Requirements
Your store should be running on Magento 2 Community Edition version 2.0.x, 2.1.x, 2.2.x, 2.3.x
Configuration
Set configuration
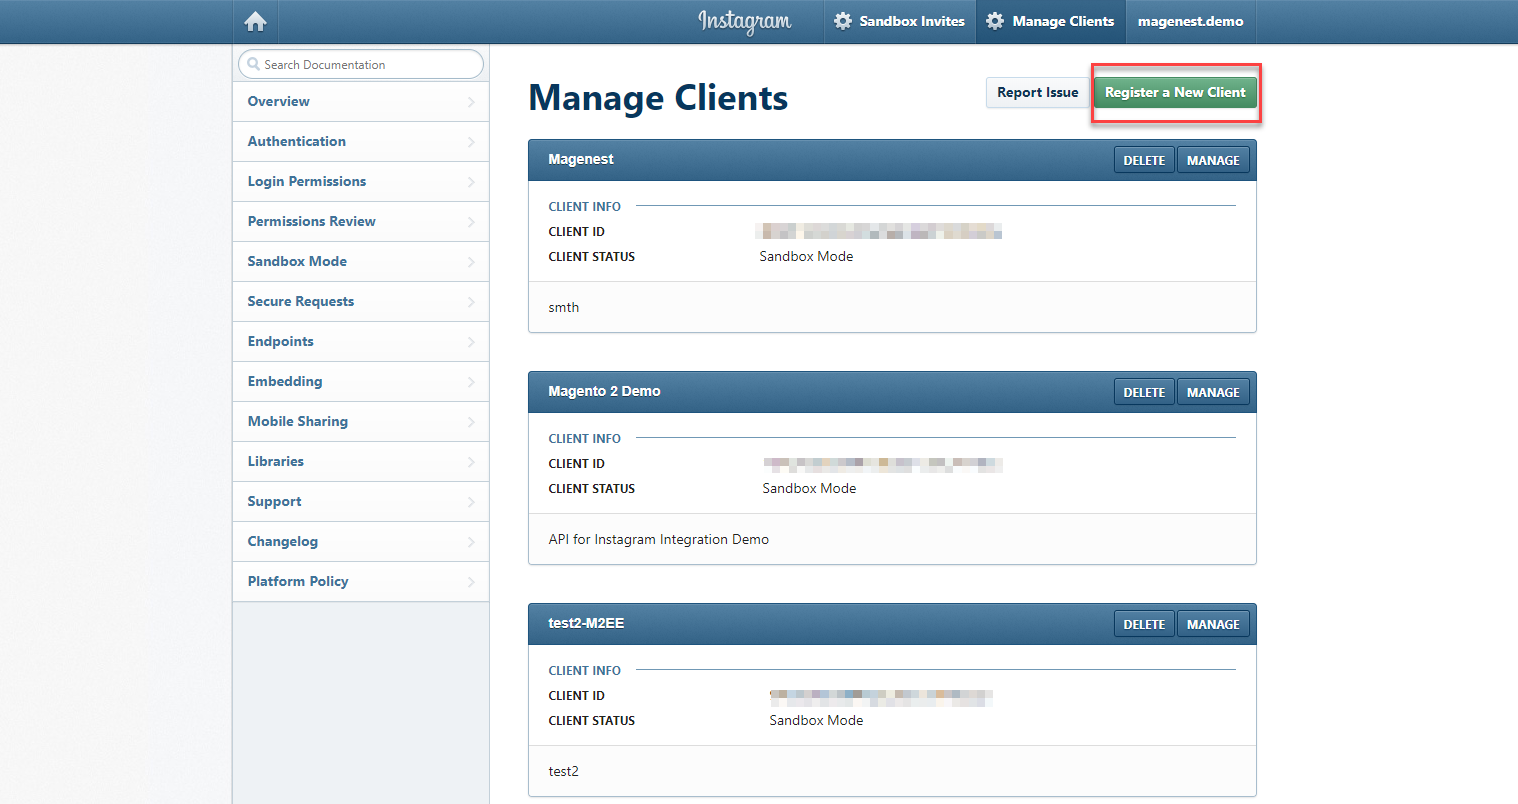
First, you must have an Instagram client account.
Please go to https://www.instagram.com/developer/
On the top menu bar, choose Manage Clients
Click on Register a New Client to create an Instagram client account
If you already have the client account, just copy it and paste to the configuration in Magento backend.
![]() In the admin panel, please go to Stores > Configuration > Instagram Shop
In the admin panel, please go to Stores > Configuration > Instagram Shop
Fill in Client ID and Client Secret obtained from Instagram
Then Get Authorization

![]() General settings:
General settings:
In this section, you can set
- Add Link to Gallery in frontend Main Menu: Add the Instagram Gallery category in the top menu bar
- Media Type will be pulled from Instagram: You have option to pull Only Image or Both Image and Video.
If you choose the Only Image, note that the video pulled from Instagram will be displayed with only the thumbnail of that video.
If you choose the Both Image and Video, you should setup and run the Cron Job for your server to update the video links. Otherwise, you have to update the links manually by clicking on the Get Photos Now button in the Get Photos on your Instagram Account settings (below). - Add Instagram Photos to Product View: Display corresponding Instagram photos in each product detail pages
- Linked Products Layout: To display the featured products on the Instagram posts (on M2 store). There are 2 options for the display: Product Name & Product Name with Image
- Button Title: The title of the button under the Instagram Slider
- Button CSS: Flexible to change the button style with CSS
- Hover text: The content of the Call-to-action button displayed when hovering over the Instagram image (in the Instagram slider)
- Hashtag: The hashtag linked with Instagram hashtag, displayed in the Instagram block on the product detail page
- Block title: The title of the Instagram block on product detail page
- Block content: The content of the Instagram block on product detail page
- Gallery Layout: The plus version gives you 2 options for the gallery page layout
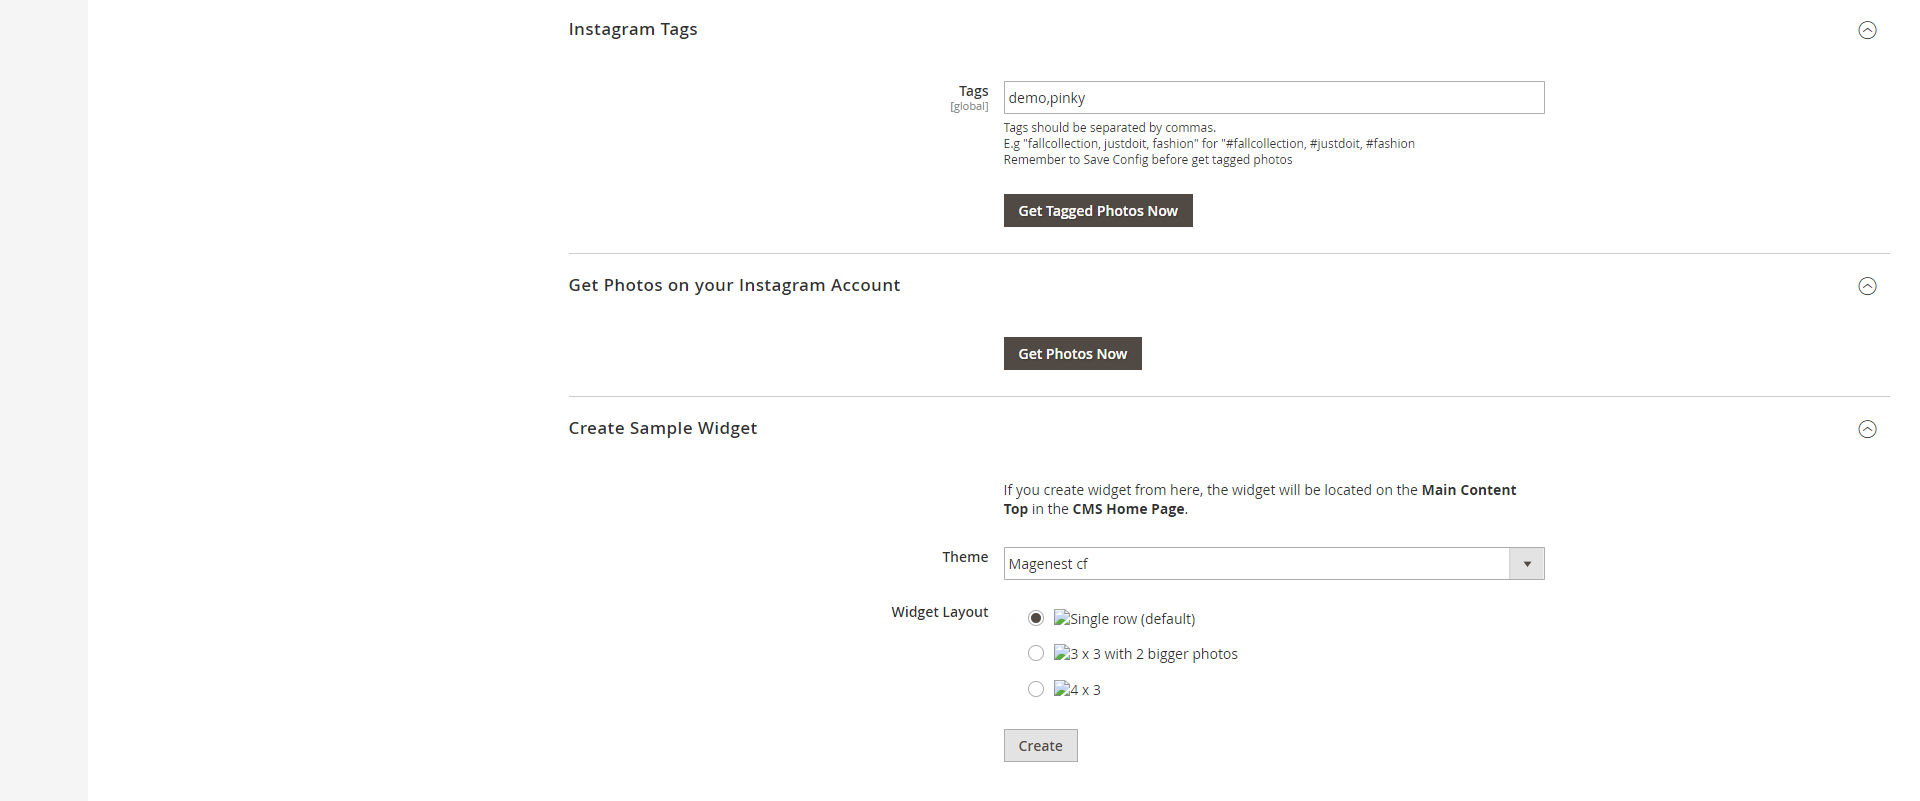
![]() Instagram Tags: Fill in the hashtags of the Instagram photos you want to get from your Instagram to Magento store.
Instagram Tags: Fill in the hashtags of the Instagram photos you want to get from your Instagram to Magento store.
Note that the hashtags must be separated by commas.
Save the configuration then click on Get Tagged Photos Now button to pull the photos from Instagram to Magento 2 by hashtags
![]() Get Photos on your Instagram Account: Click on the Get Photos Now button to get all photos of your Instagram account.
Get Photos on your Instagram Account: Click on the Get Photos Now button to get all photos of your Instagram account.
Remember to save configuration after setting.
Back-end settings
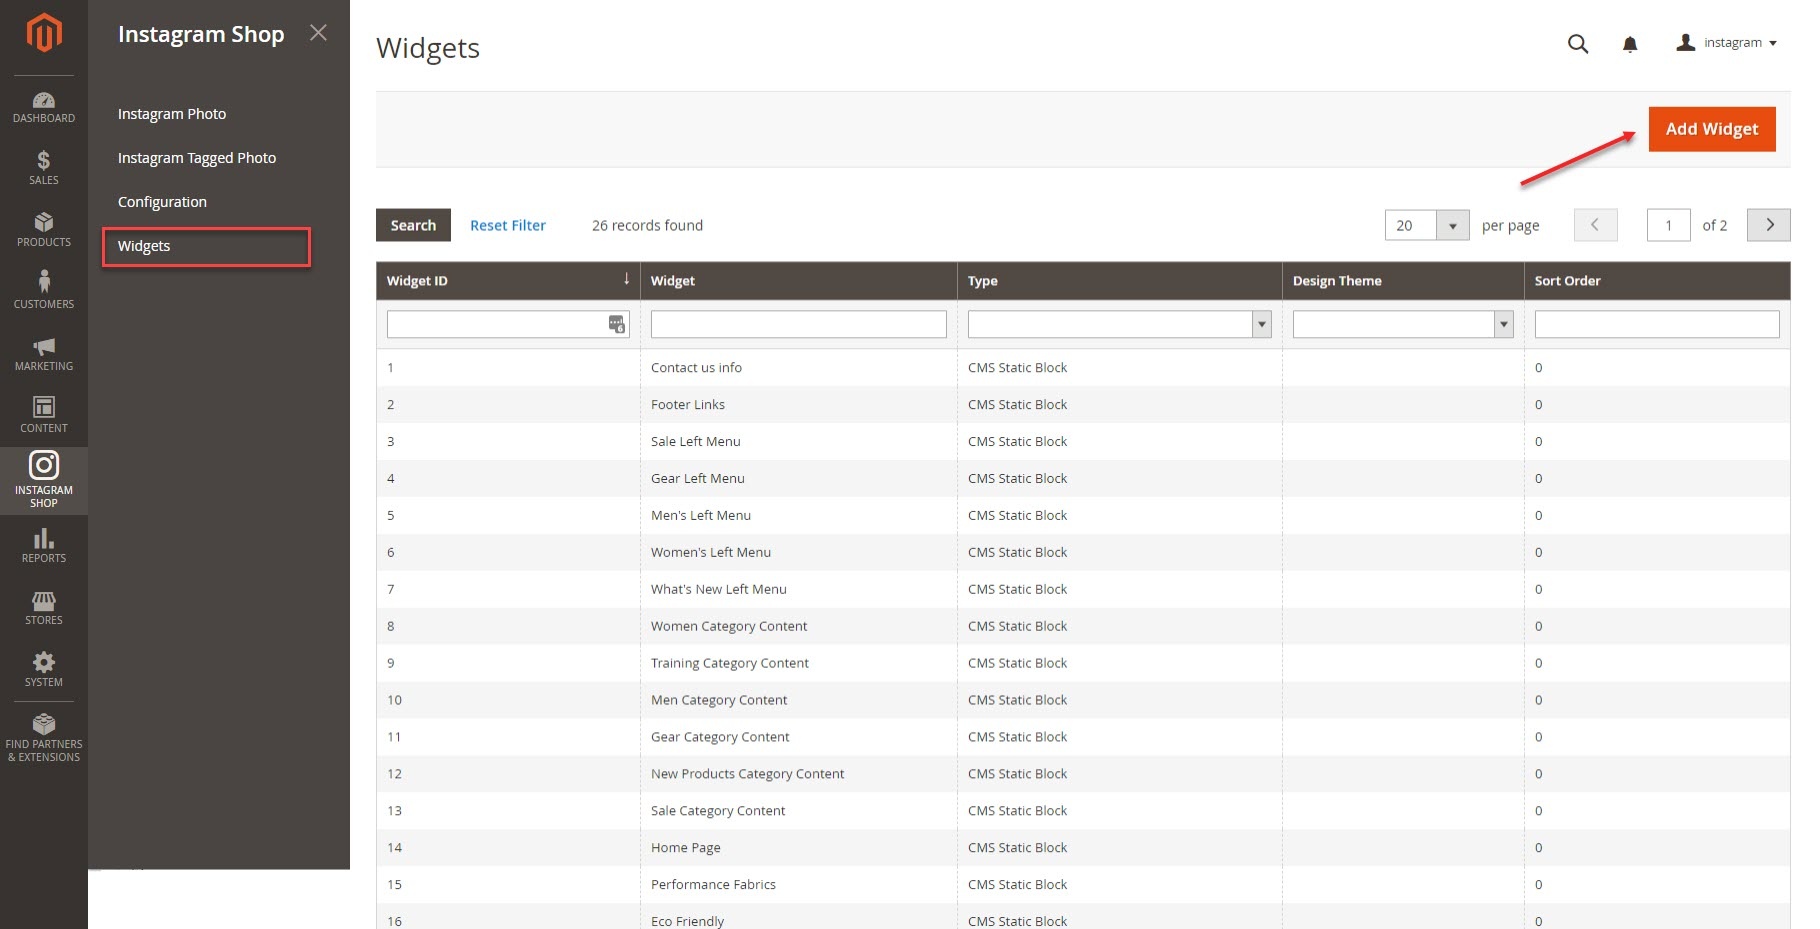
Add Instagram Widget
You can add Instagram widget by going to Instagram Shop > Widget > Add Widget
- Type: Choose Instagram Slider
- Design Theme: Your theme
Then Continue
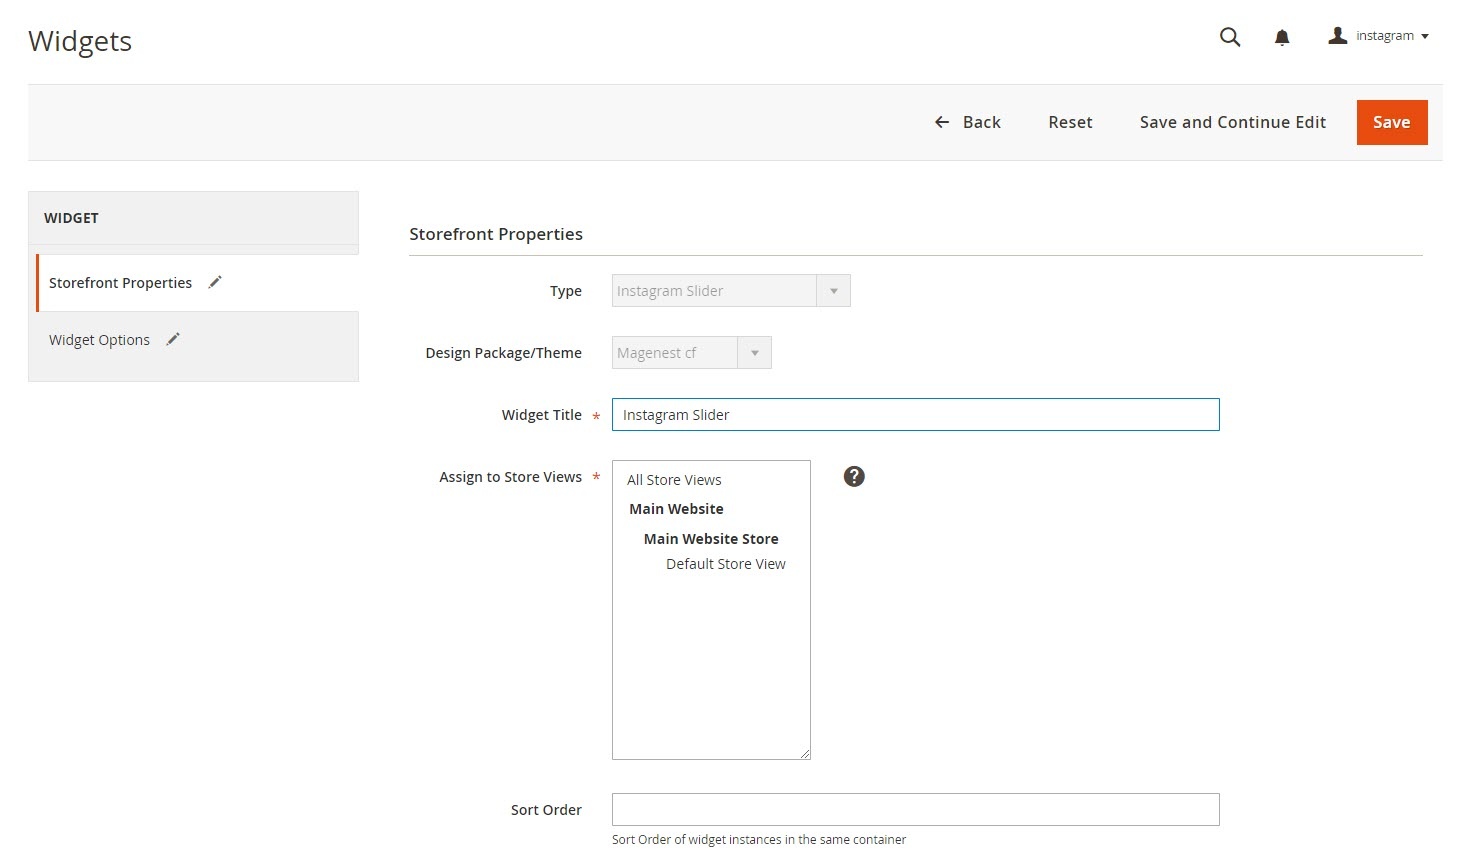
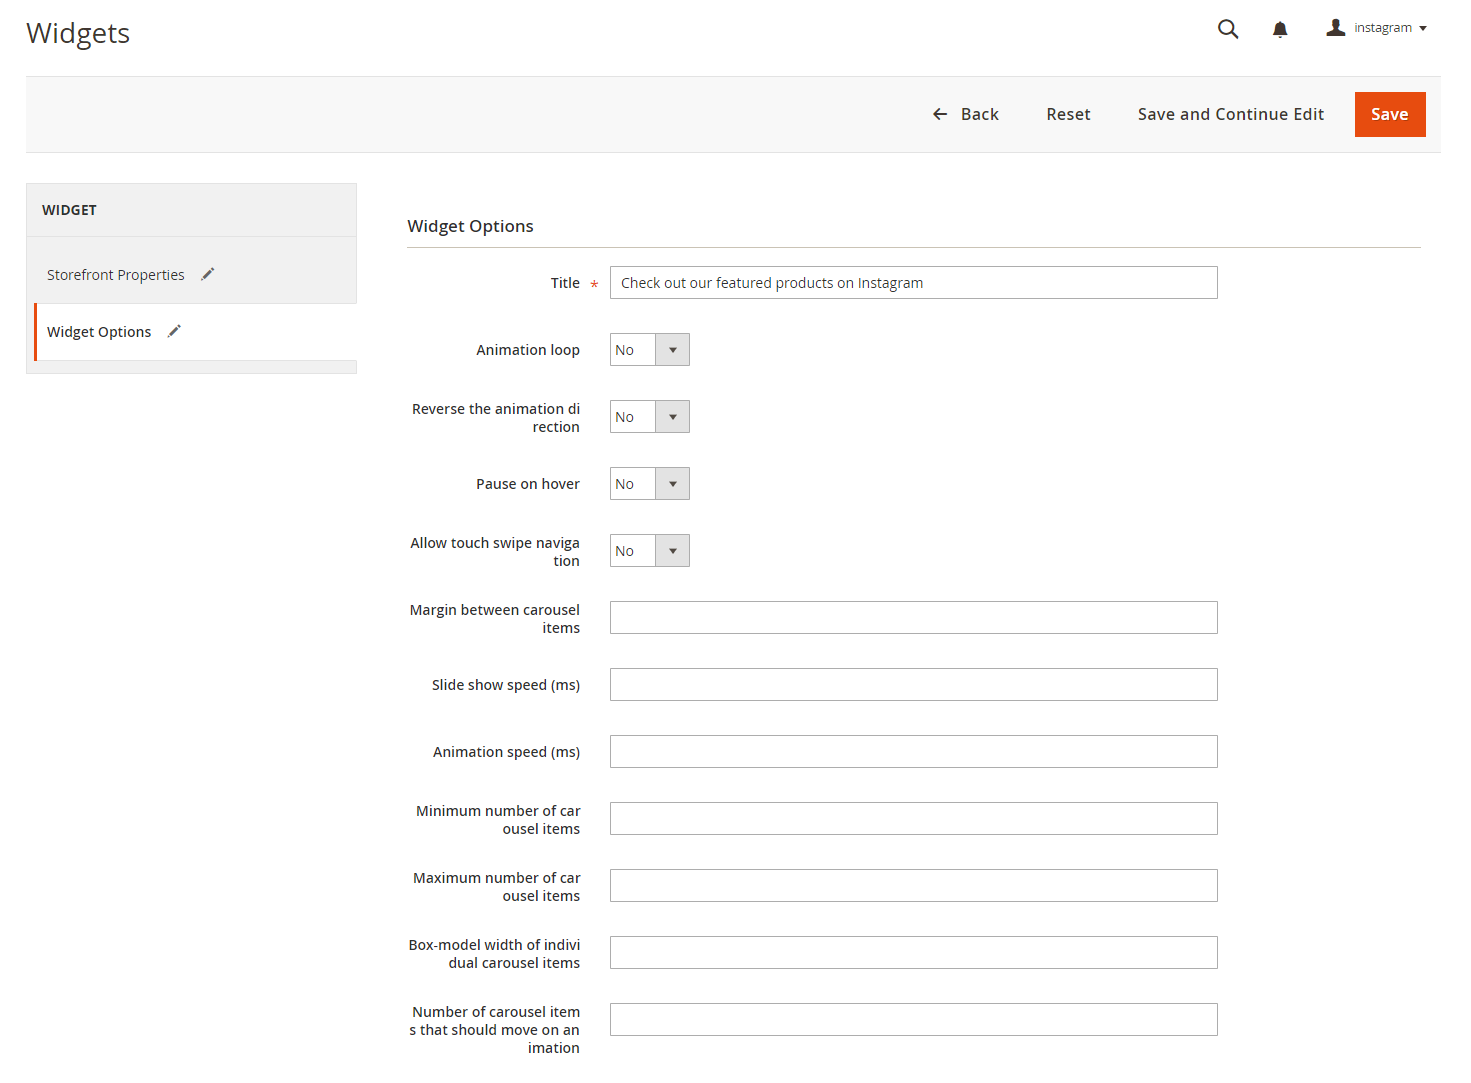
- Title: The title of the Instagram widget displayed on front-end store
- Animation loop: If Yes, the slider will have no end when it reaches the final image. Otherwise, it will stop at the final image
- Reverse the animation direction: To reverse the direction of the slider shown
- Pause on hover: Pause the slideshow when hovering over slider, then resume when no longer hovering
- Allow touch swipe navigation: Allow touch swipe navigation of the slider on touch-enabled devices
- Margin between carousel items: The space between 2 images in the silder
- Slide show speed: Set the speed of the slideshow cycling, in milliseconds
- Animation speed: Set the speed of animations, in milliseconds
- Minimum number of carousel items: The minimum number of slider's images that should be visible. Items will resize fluidly when below this.
- Maximum number of carousel items: The Maxmimum number of slider's images that should be visible. Items will resize fluidly when above this limit
- Box-model width of individual carousel items: including horizontal borders and padding.
- Number of carousel items that should move on animation: Number of carousel items that should move on animation. If 0, slider will move all visible items.
Manage Photos
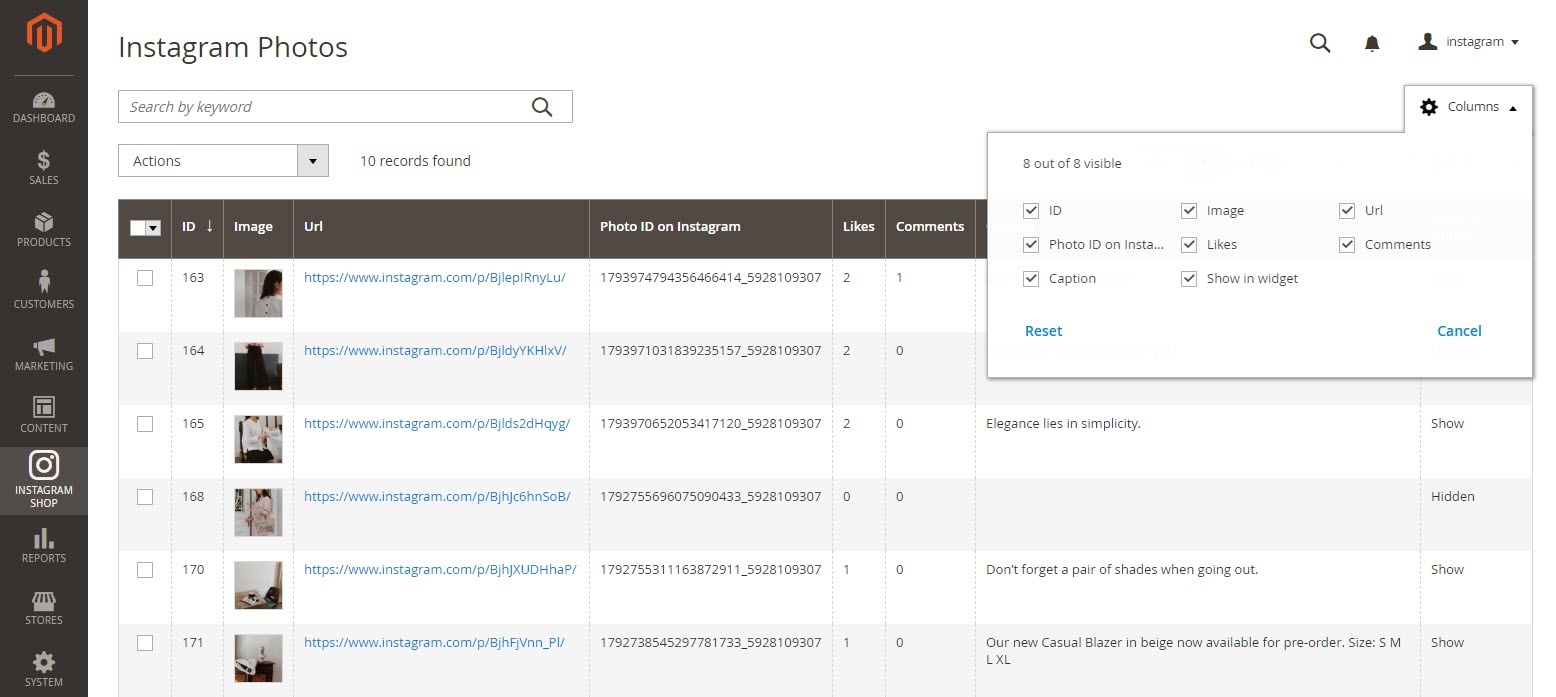
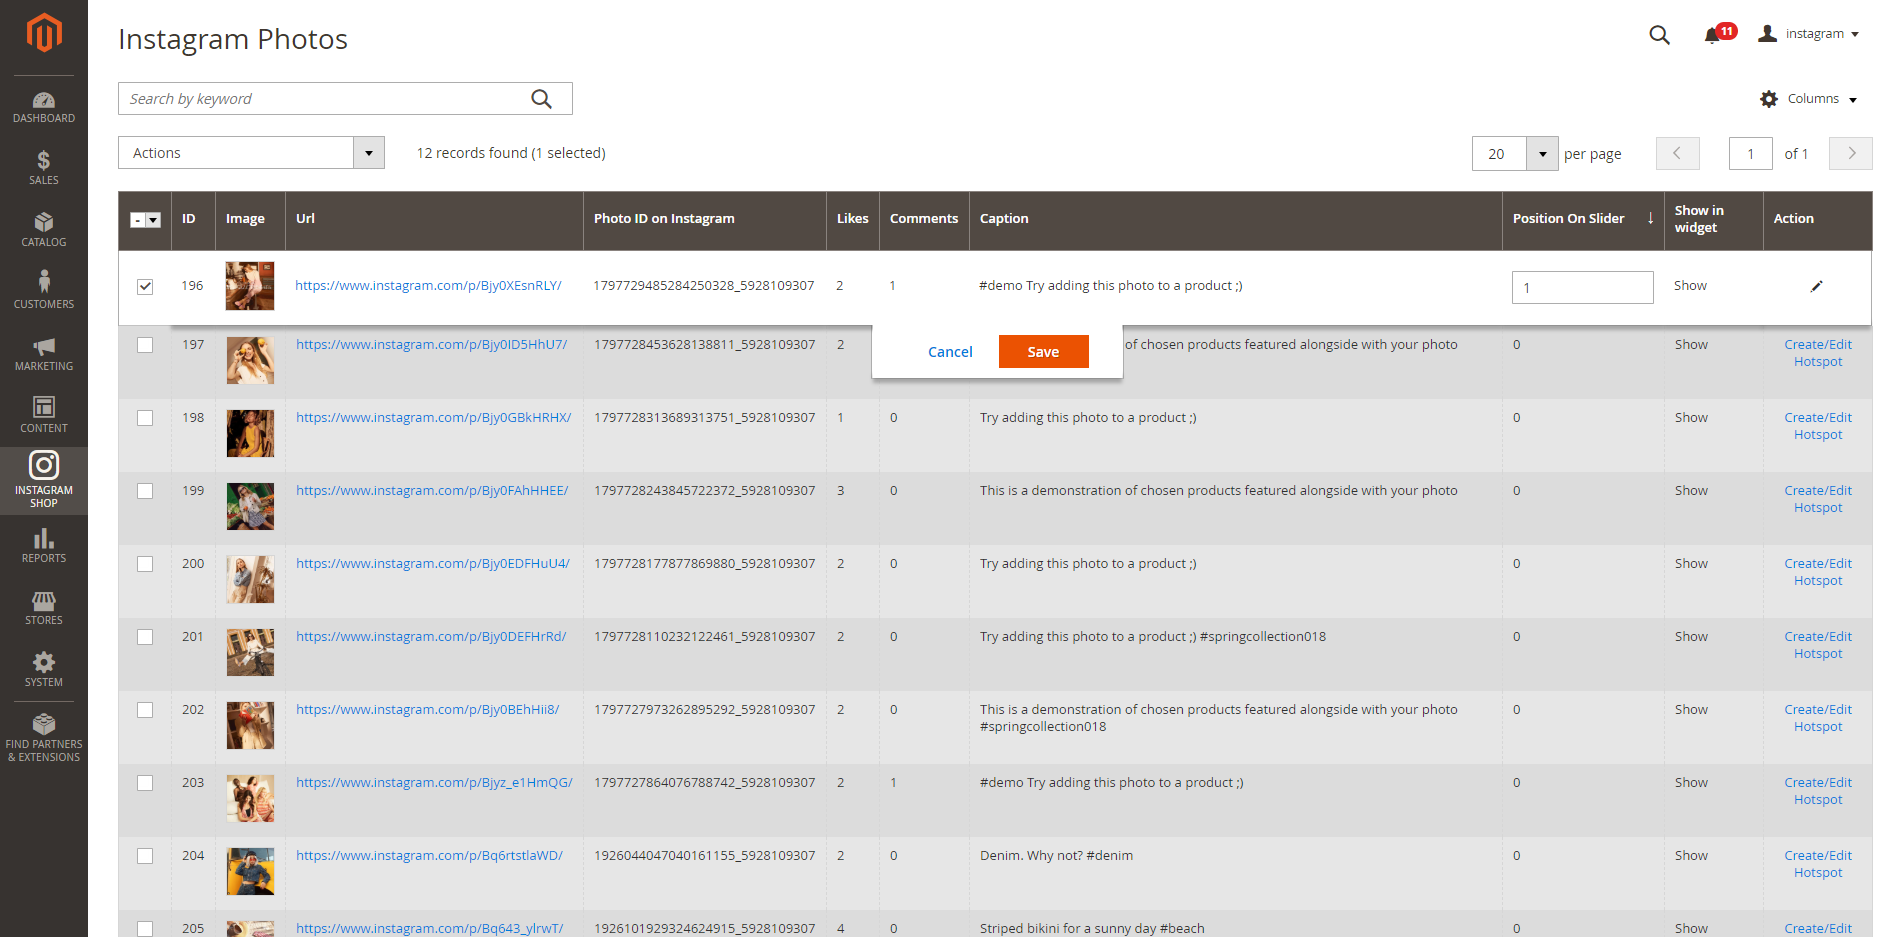
In the backend, you can go to Instagram Shop > Instagram Photo to see all of the photos pulled from your Instagram account.
You can choose Actions to delete, show or hide the selected image(s) on the Instagram widget.
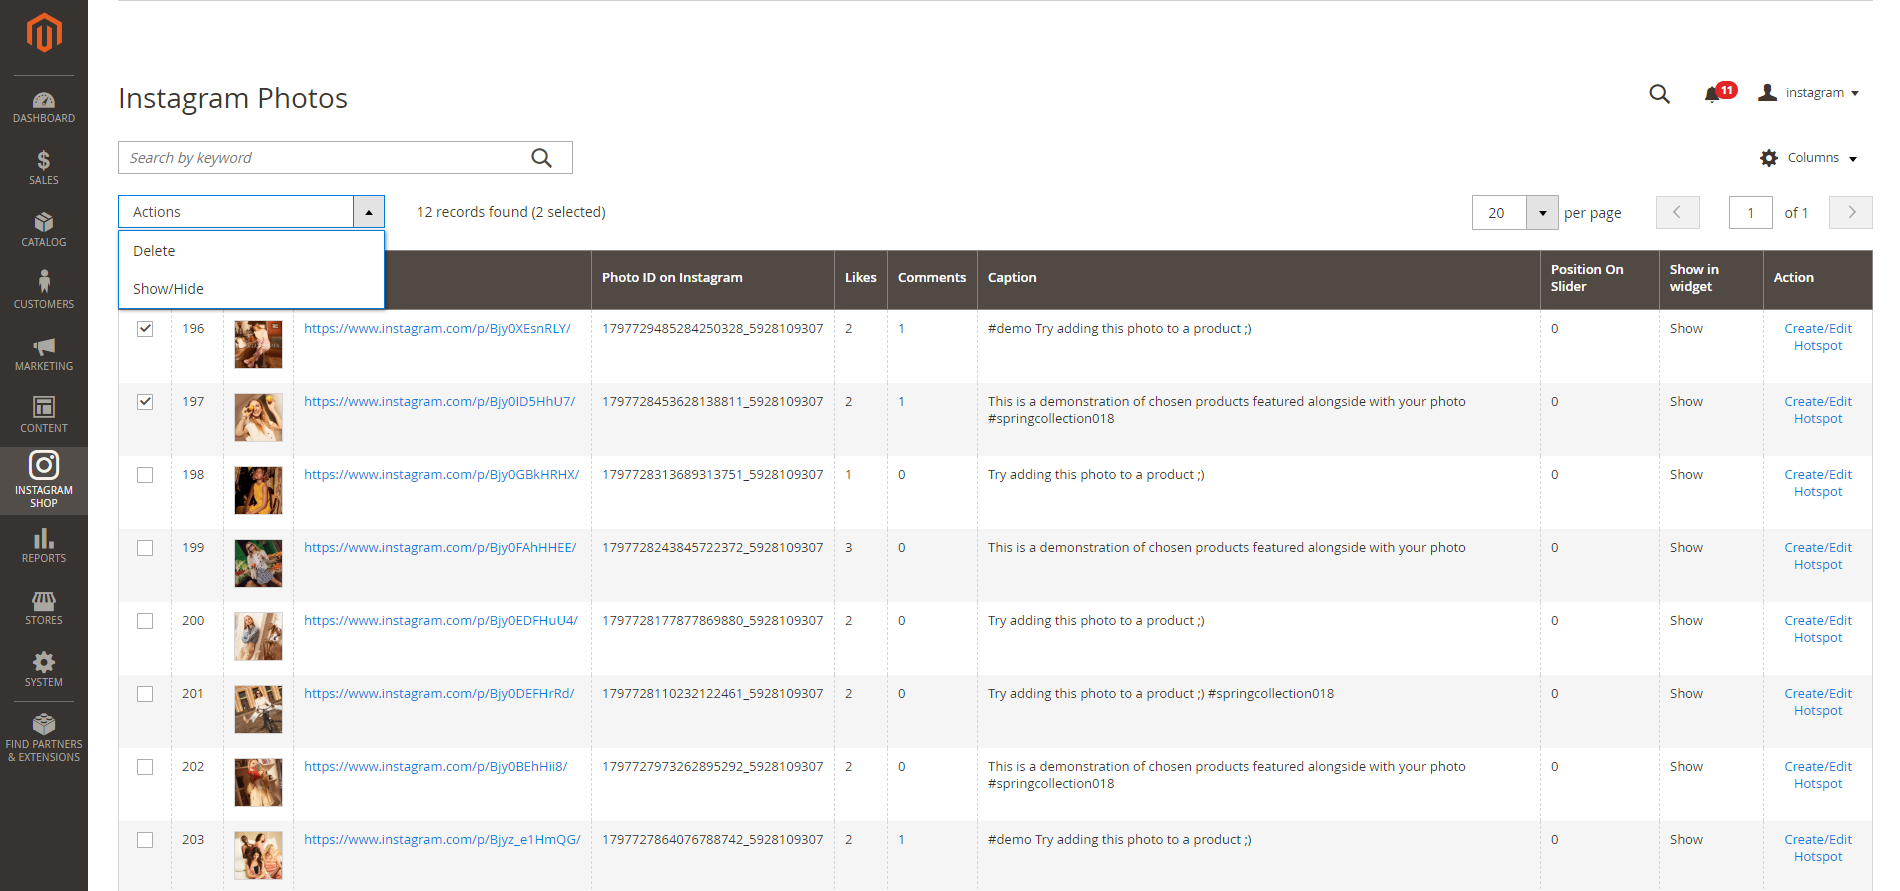
You can choose which information to show by clicking on the Column icon
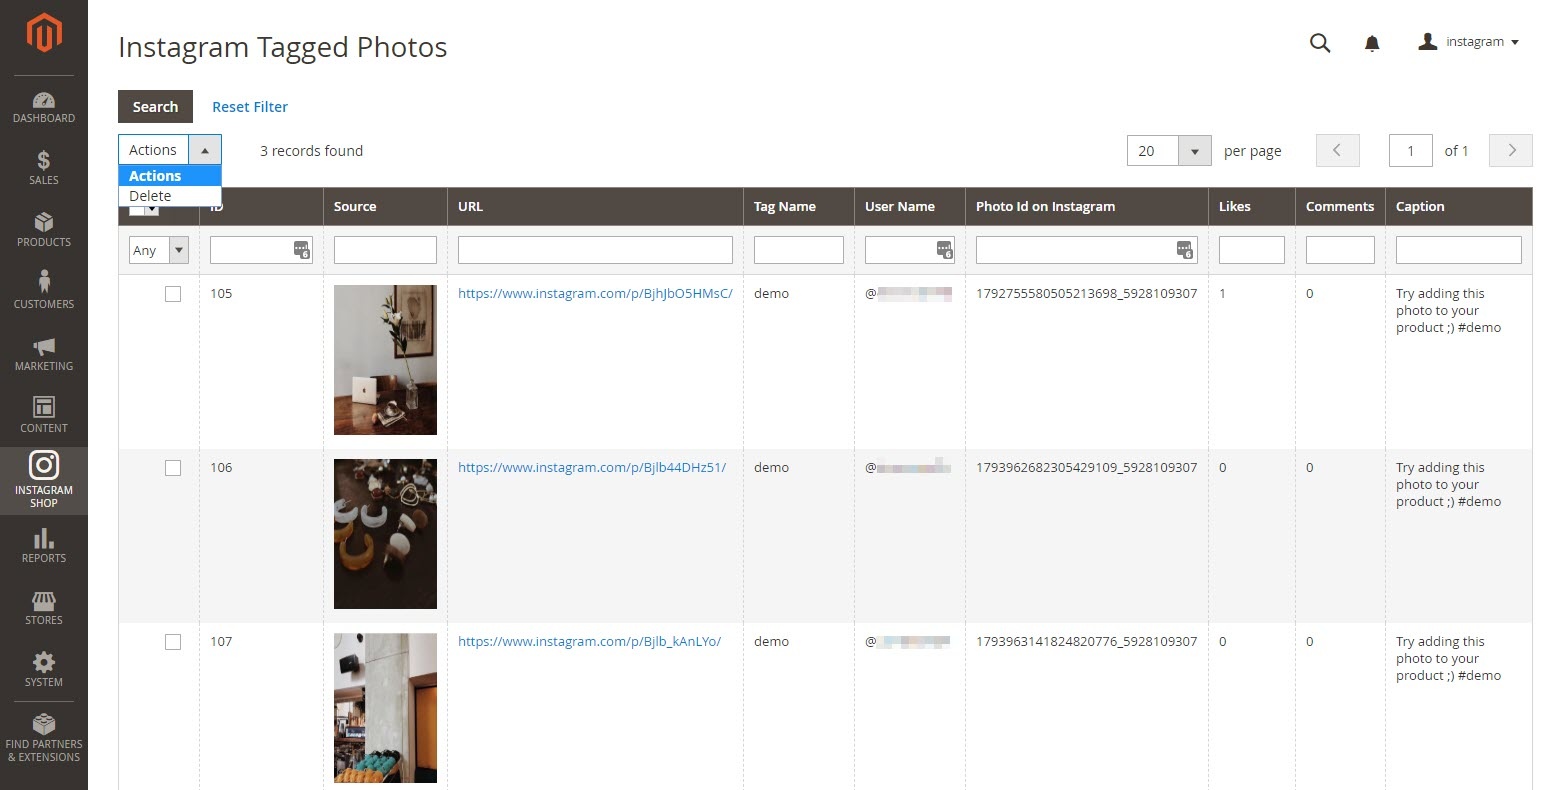
You can also manage Instagram photos by hashtags.
Go to Instagram Shop > Instagram Tagged Photos
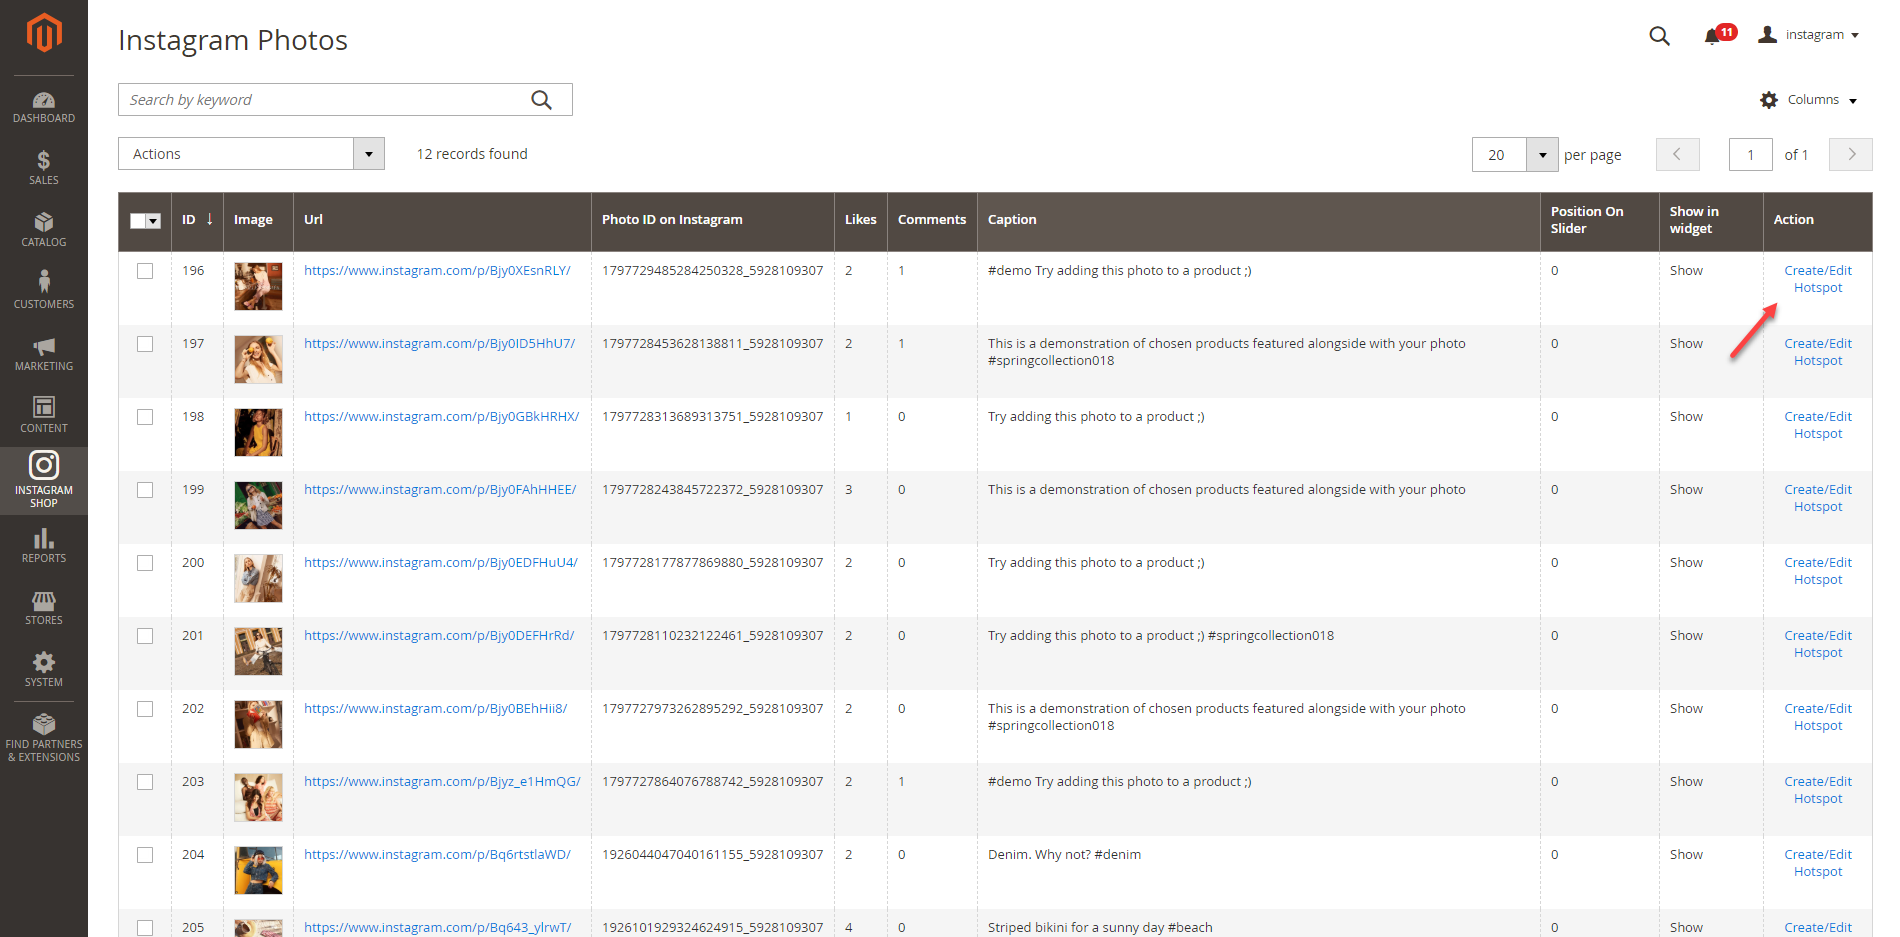
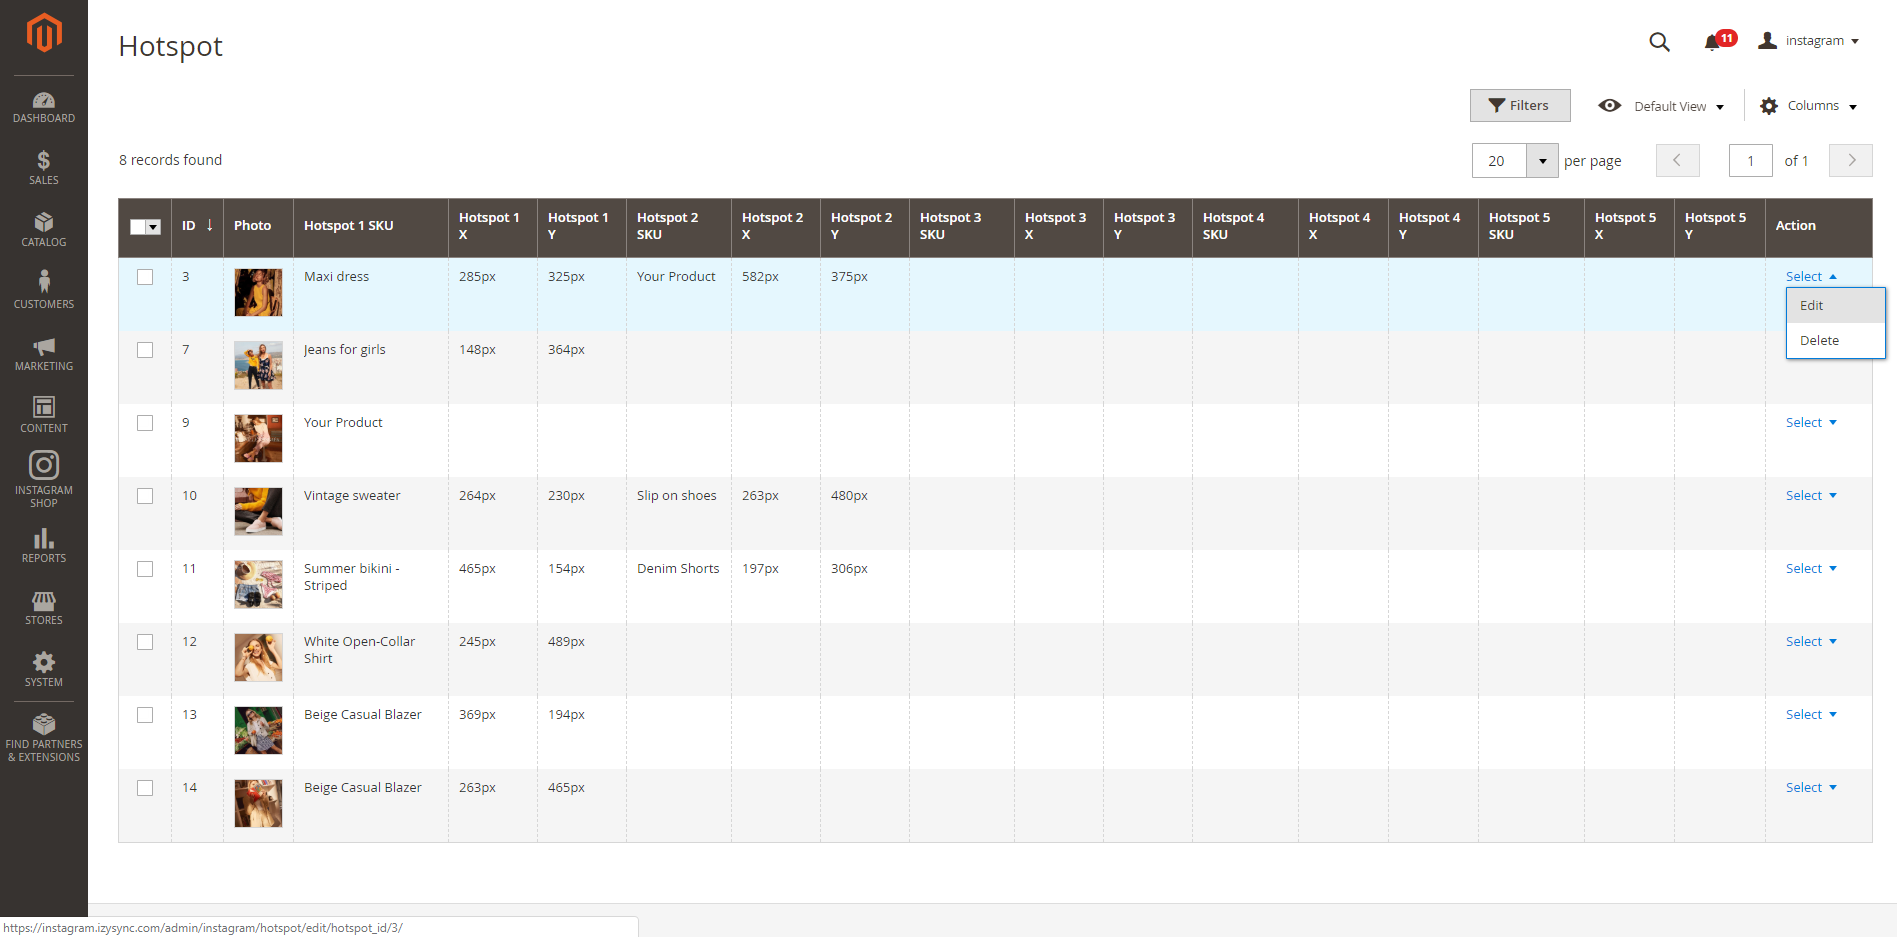
Create hotspot(s) for featured products
In order to create the hotspots to pin the featured products on Instagram photos (of the Instagram widget and gallery), go to Instagram Shop > Instagram Photo. You will see the option to Create/Edit Hotspot for each photo in the grid table.
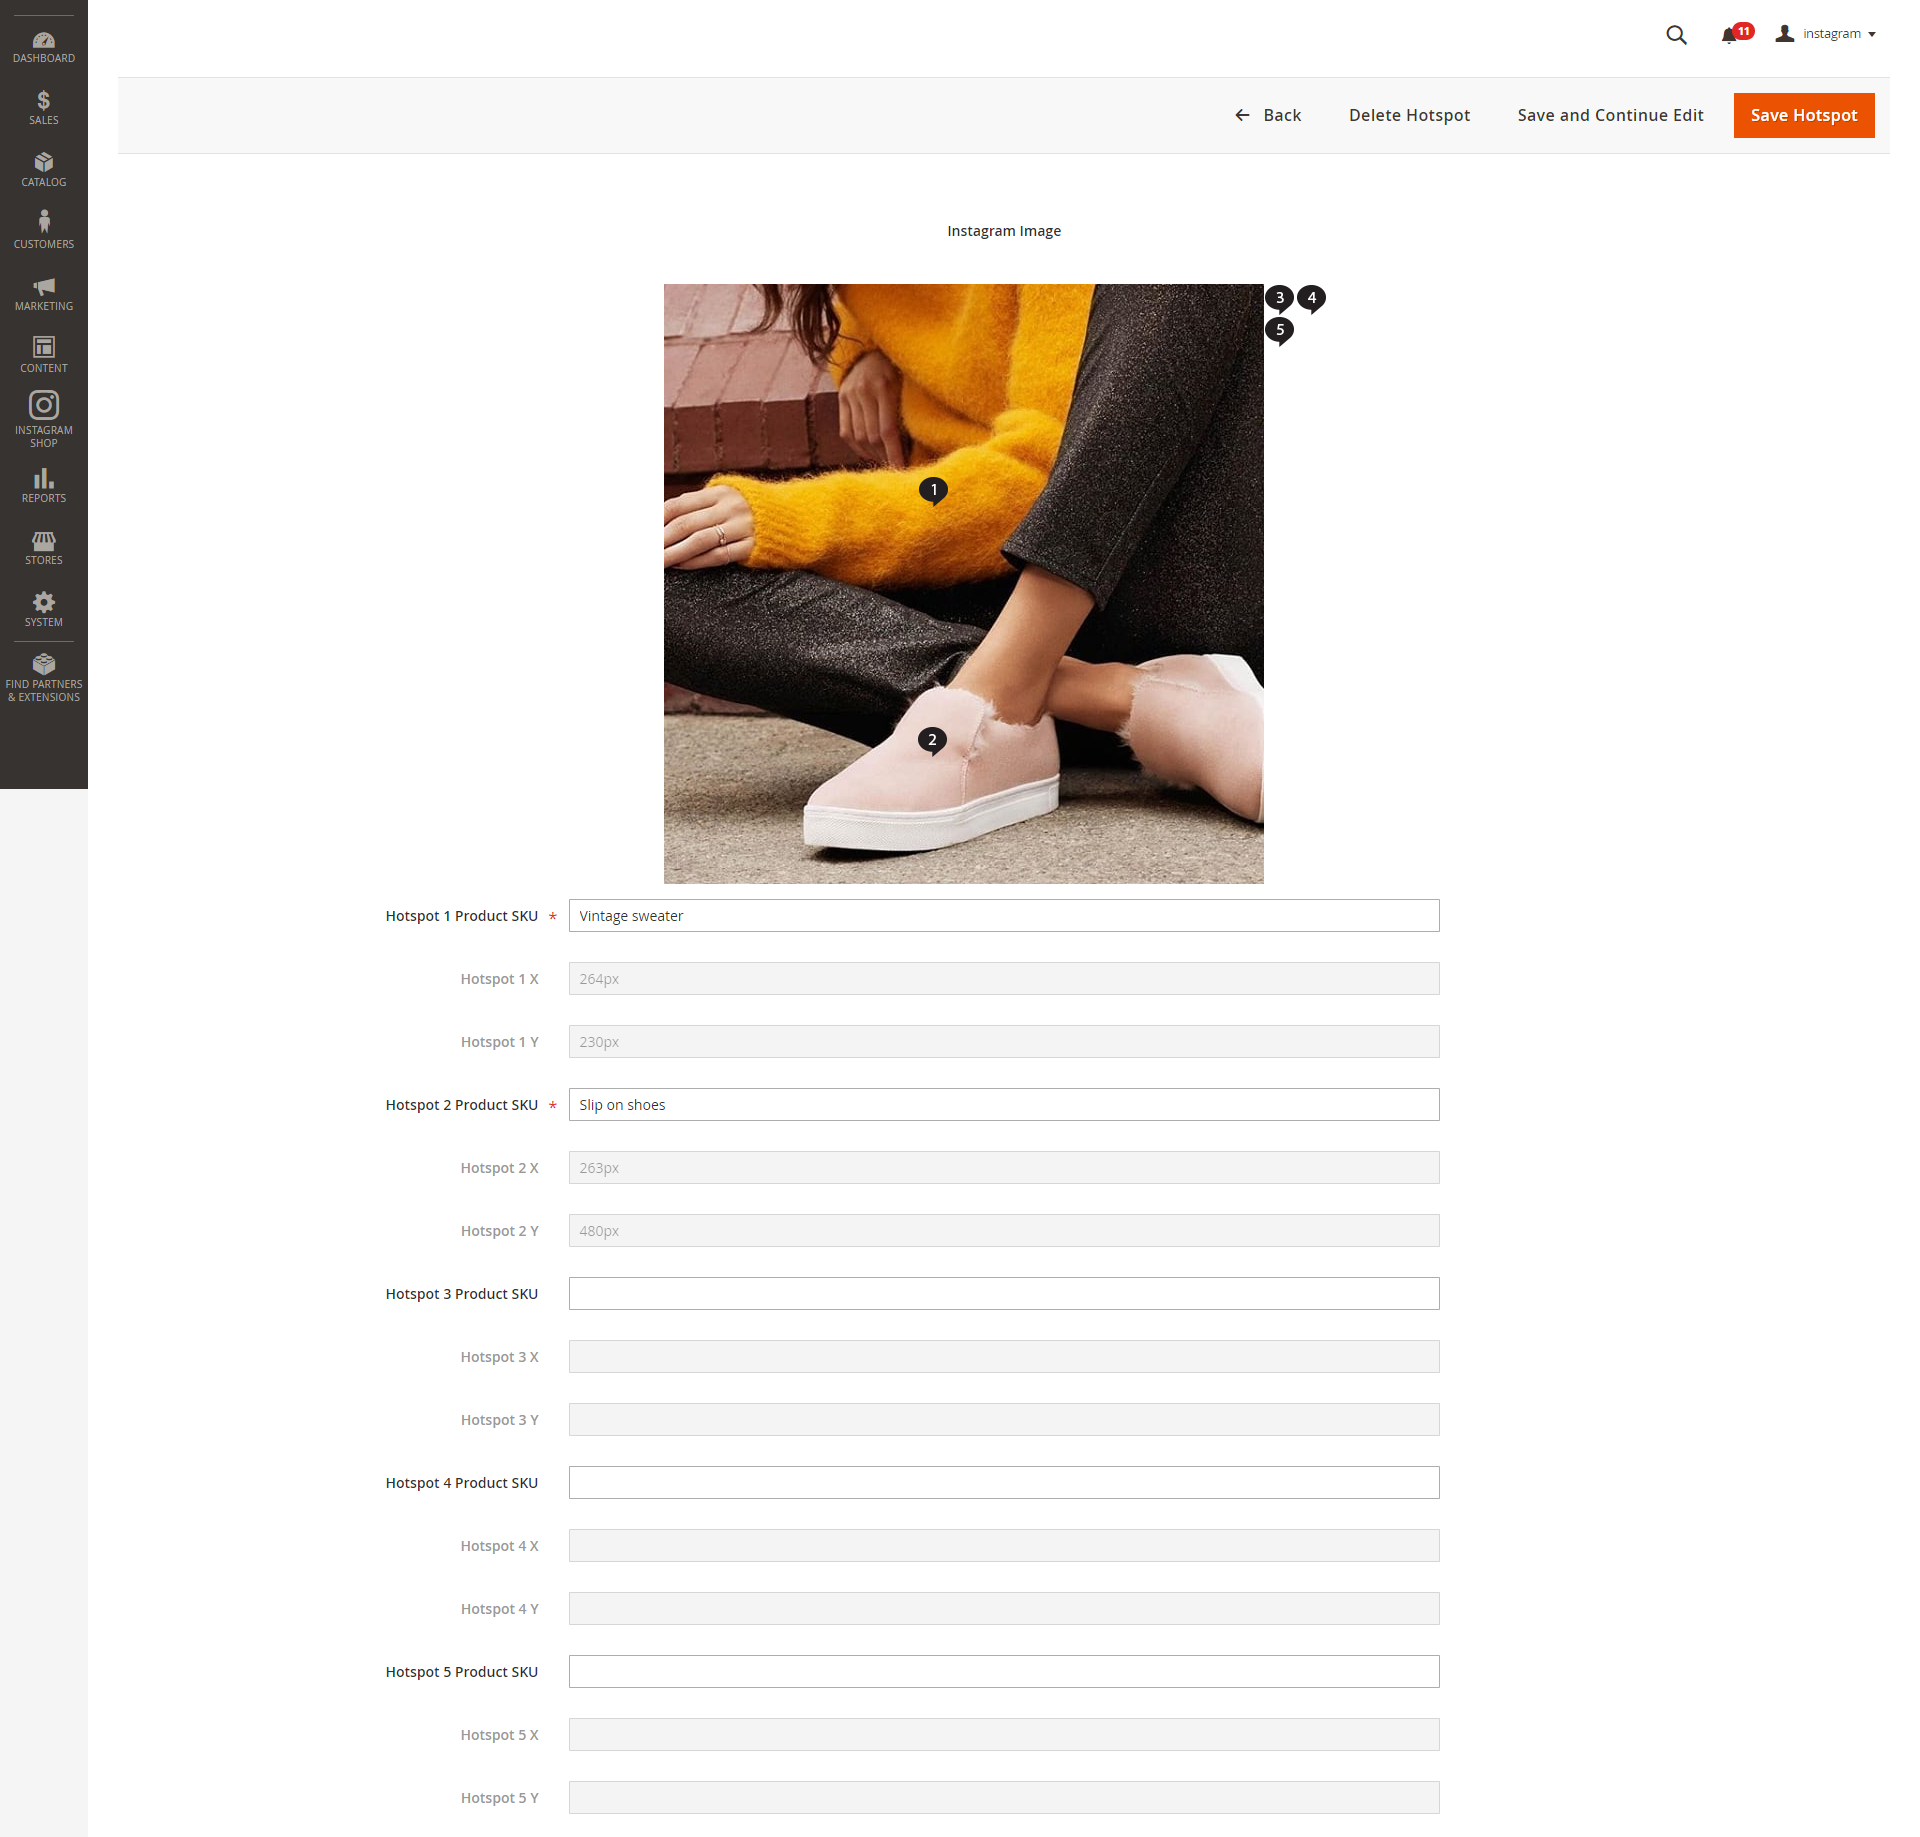
You can add up to 5 hotspots for an Instagram photo by dragging each hotspot outside the photo and drop it inside the photo. Then fill in the product SKU for the corresponding hotspot. For example, for hotspot (1), you have to enter the SKU in the Hotspot 1 Product SKU.
![]() If you want to add the featured products to the photos without hotspots, enter the SKUs in the Hotspot (1/2/3/4/5) Product SKU and do not drag the hotspot into the photo.
If you want to add the featured products to the photos without hotspots, enter the SKUs in the Hotspot (1/2/3/4/5) Product SKU and do not drag the hotspot into the photo.
Remember to flush Magento cache after setting.
Reorder the photos on Instagram slider
You can change the order of the photos on the Instagram slider by going to Instagram Shop > Instagram Photo.
In the grid table, there is a Position on slider column. Click on each item, the field will be displayed as below. Enter the ordinal number (1st, 2nd, 3rd, etc) as 1, 2, 3 in the field, then click Save.
Note that the image with the priority of 1 will be the last one in the slider.
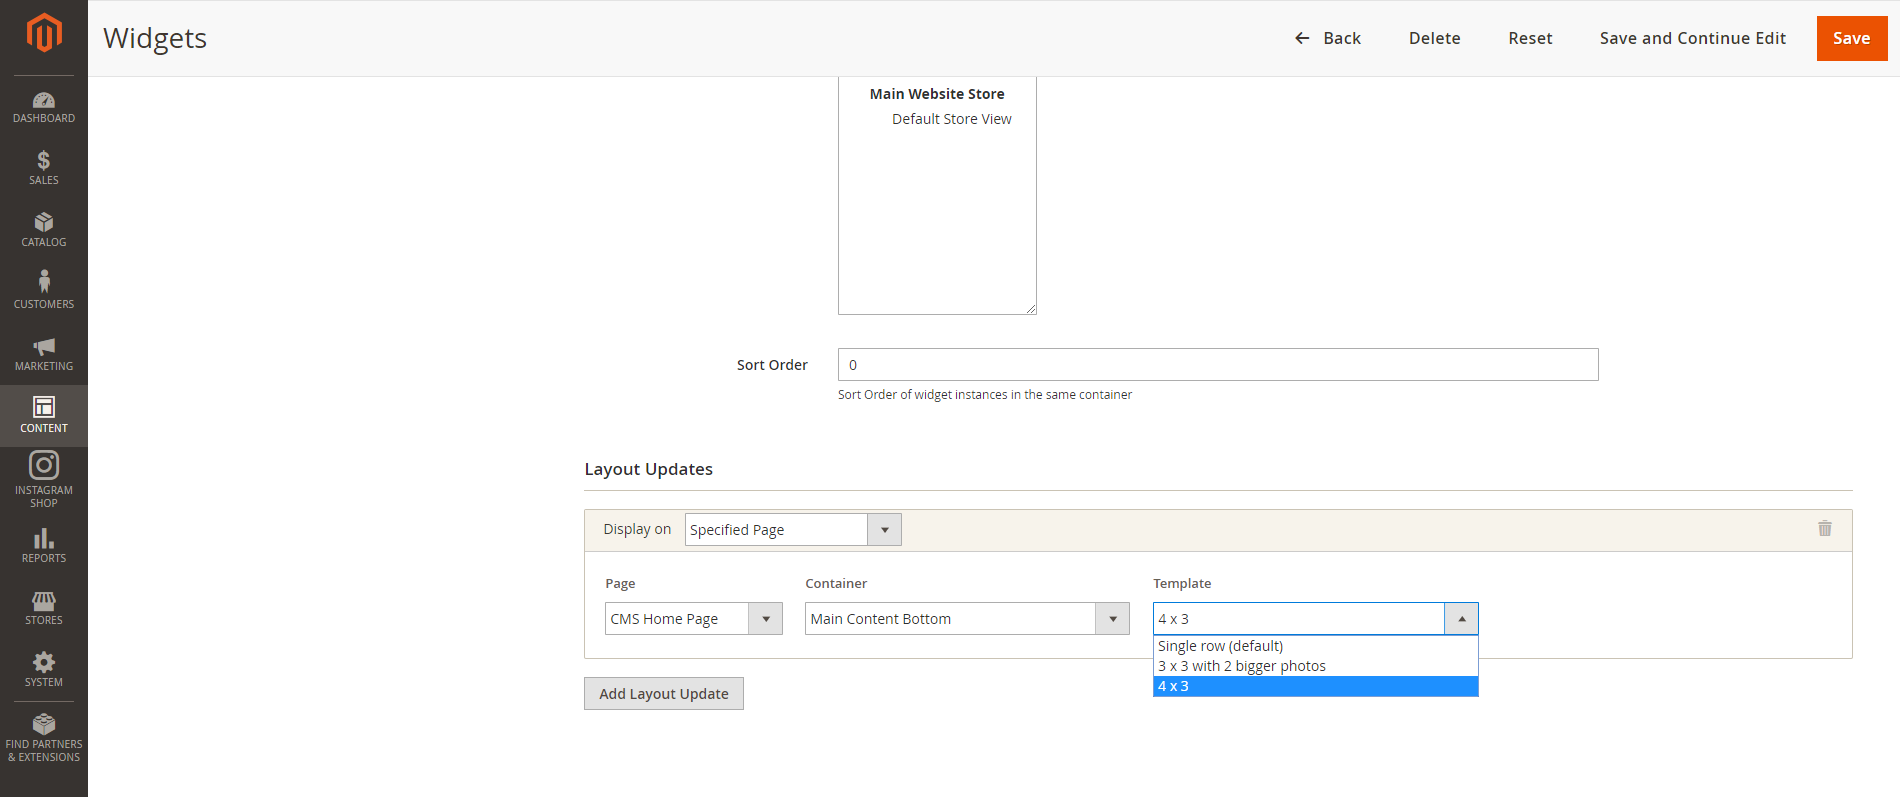
Layout 1
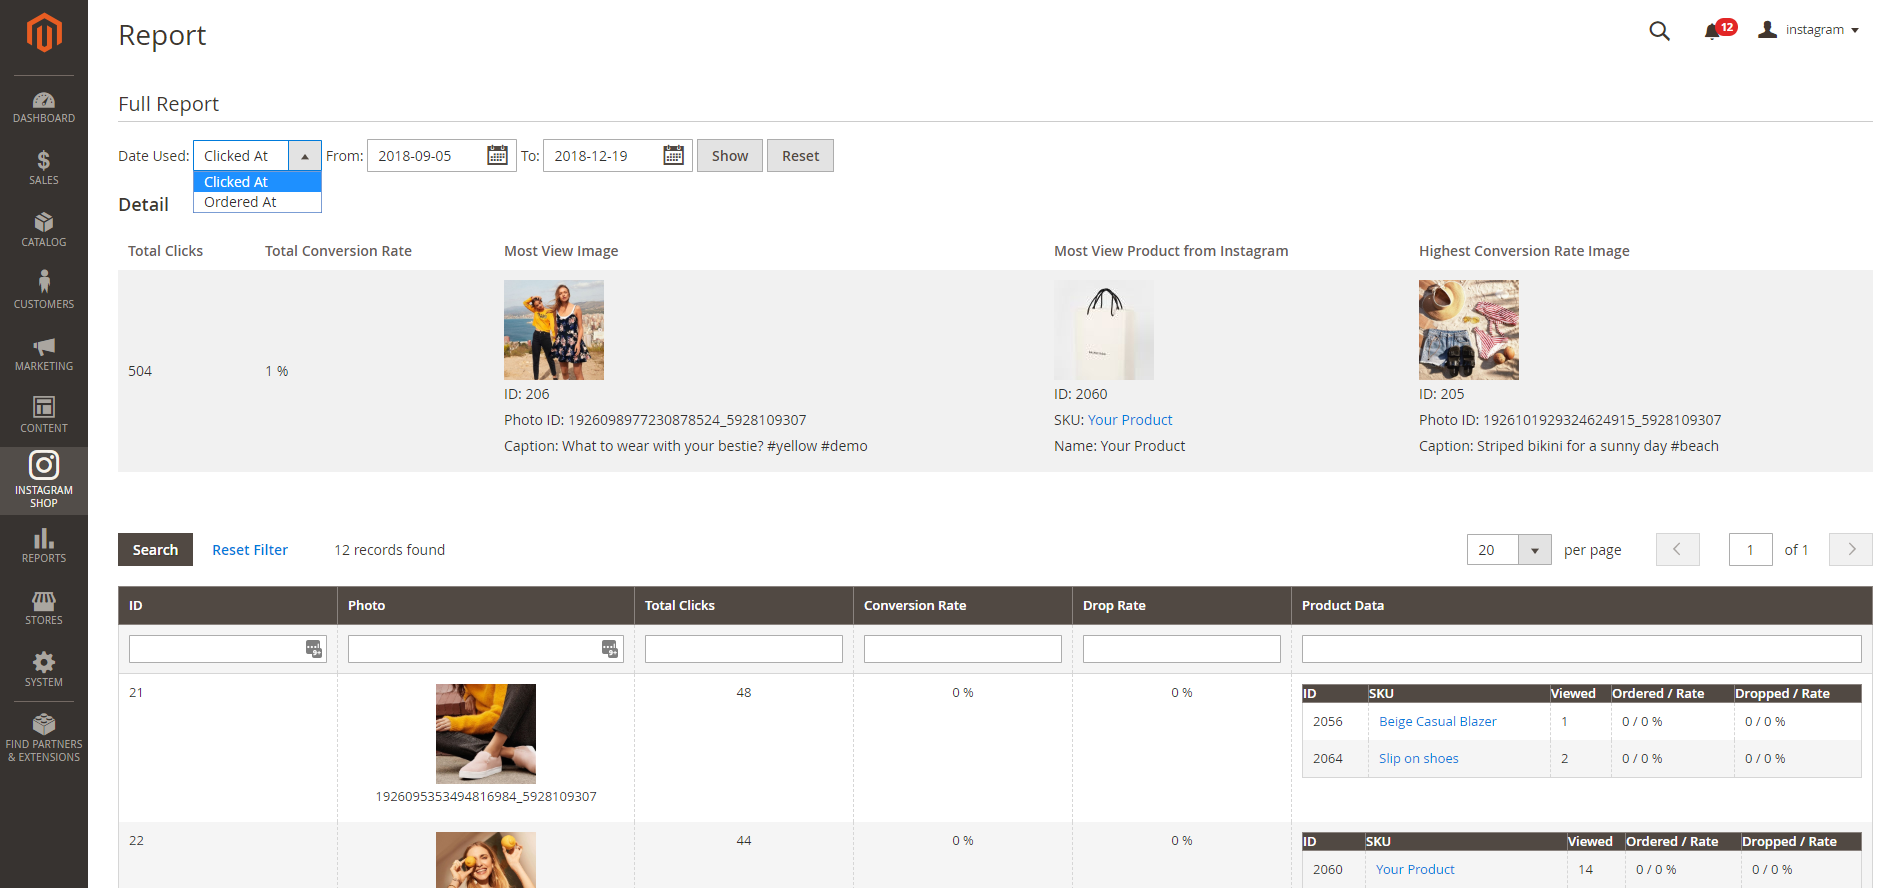
Report
In Magento 2 back end, go to Instagram Shop > Report
In here, you can view the full report of the Instagram Integration performance.
- You can track the Instagram photos that are clicked most or have the most orders, with date picker for From, To.
- You can view the summary with: Total clicks, Total conversion rate, Most View Image, Most View Product from Instagram, Highest Conversion Rate Image.
In the grid table, for each photo, there is a report table for the featured products of that Instagram photo. In addition, you can view other information such as Total number of clicks, Average Conversion rate, Average Drop rate.
Store-front Functions
Photo Slider
In the backend Widget settings, we have set the Instagram slider on the Home Page, it will be displayed as follows
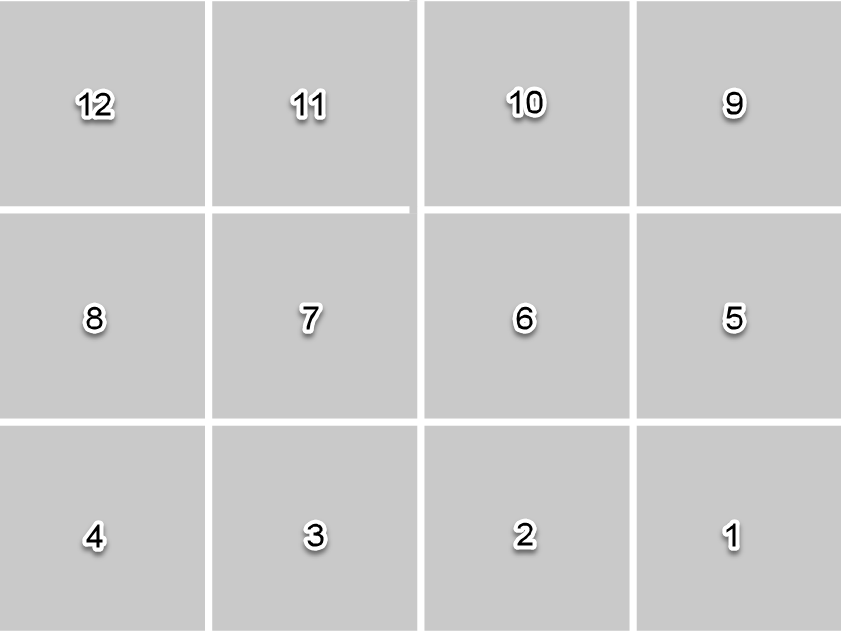
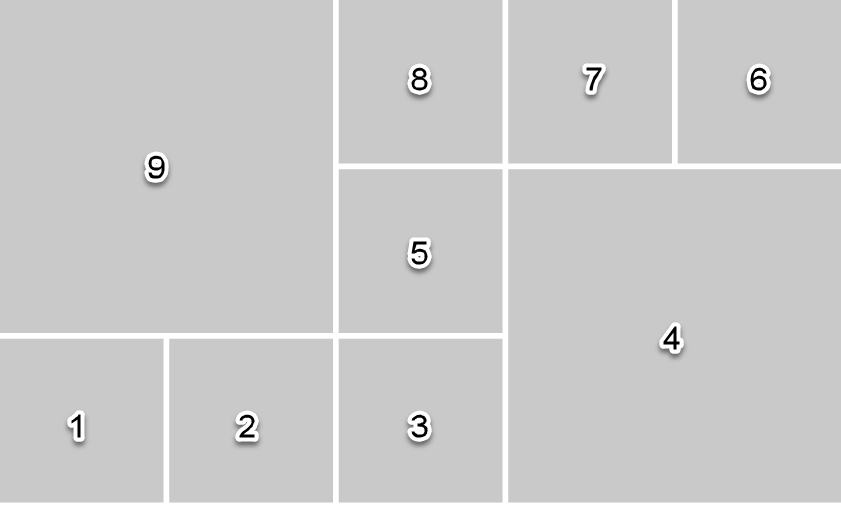
There are 3 layouts available: Single row (default); 3x3 and 4x3
Single row
3x3 with 2 bigger photos
4x3
Featured products shown in each photo
In the product image, it will show the featured products with links redirecting to their product detail pages as the "Add product link to photo" setting.
You can also add up to 5 hotspots per Instagram photo to pin the featured products on the photo.
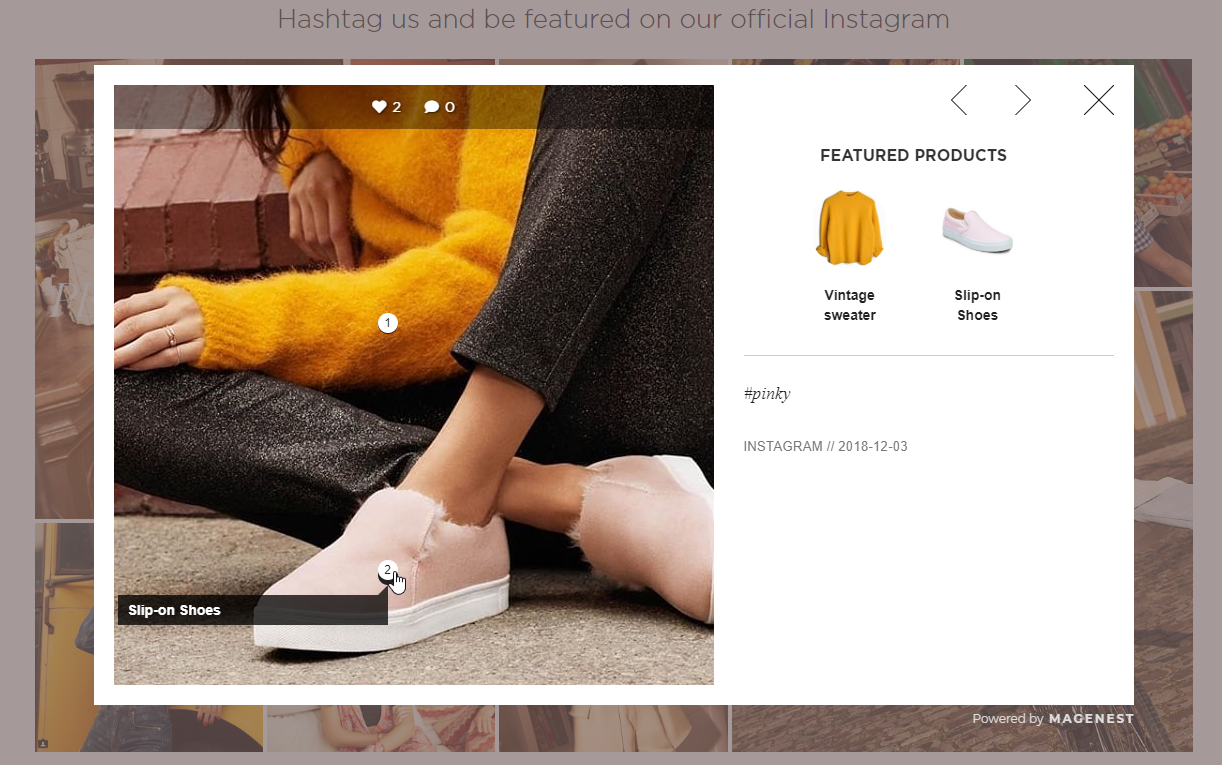
Featured product displayed with product name and image
Featured product displayed with product name
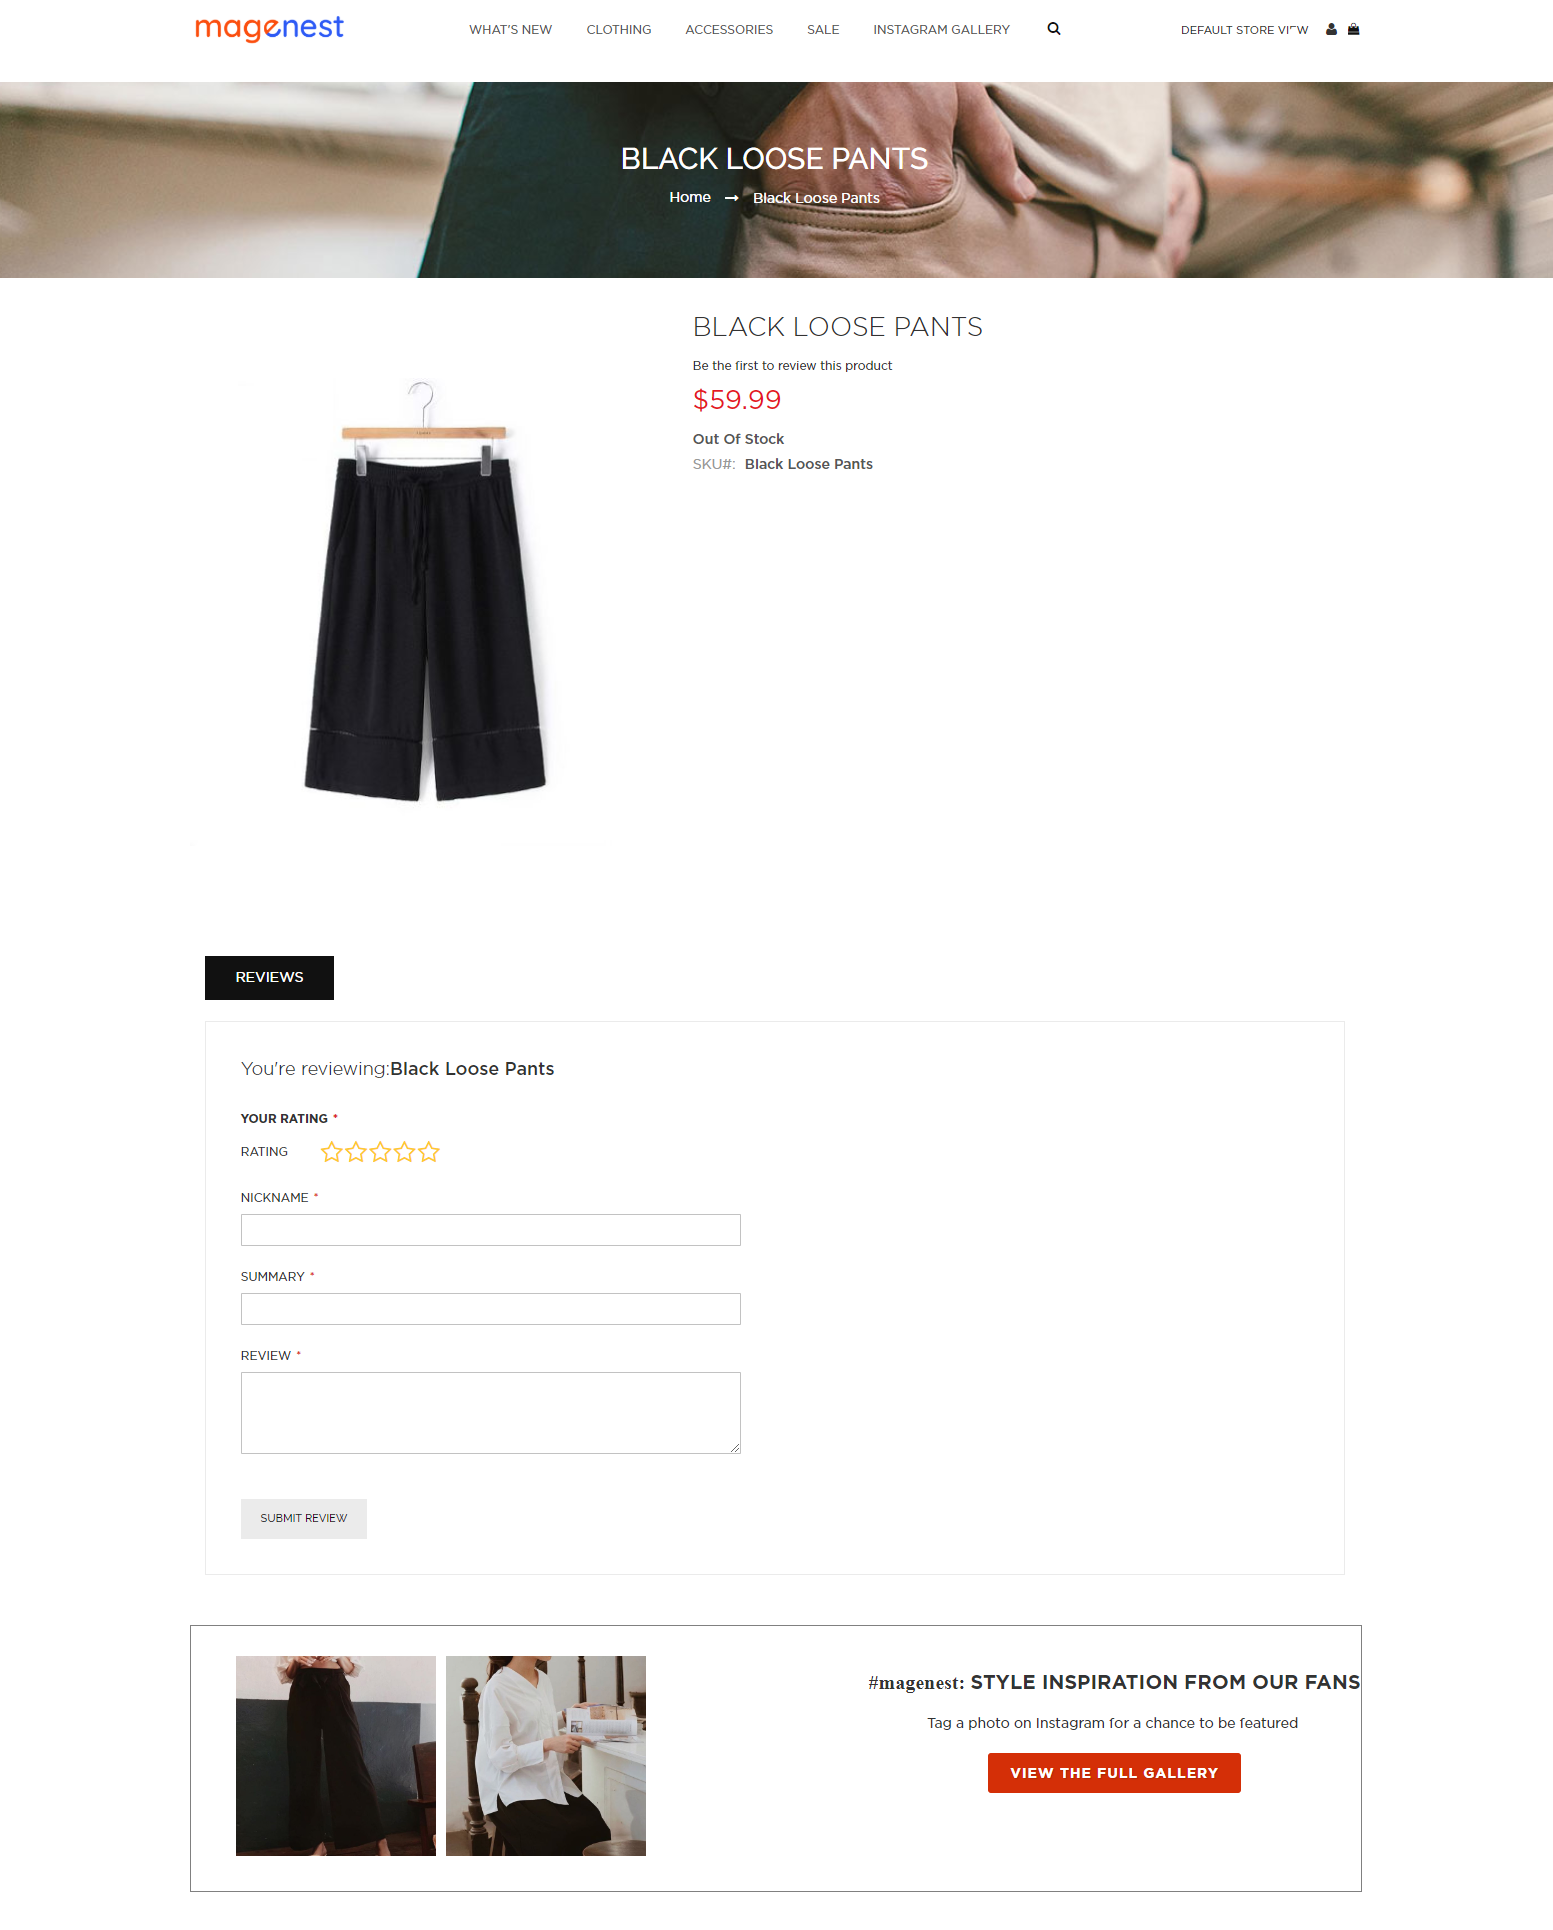
Instagram widget in each product page
The Instagram widget can be shown in each product detail page
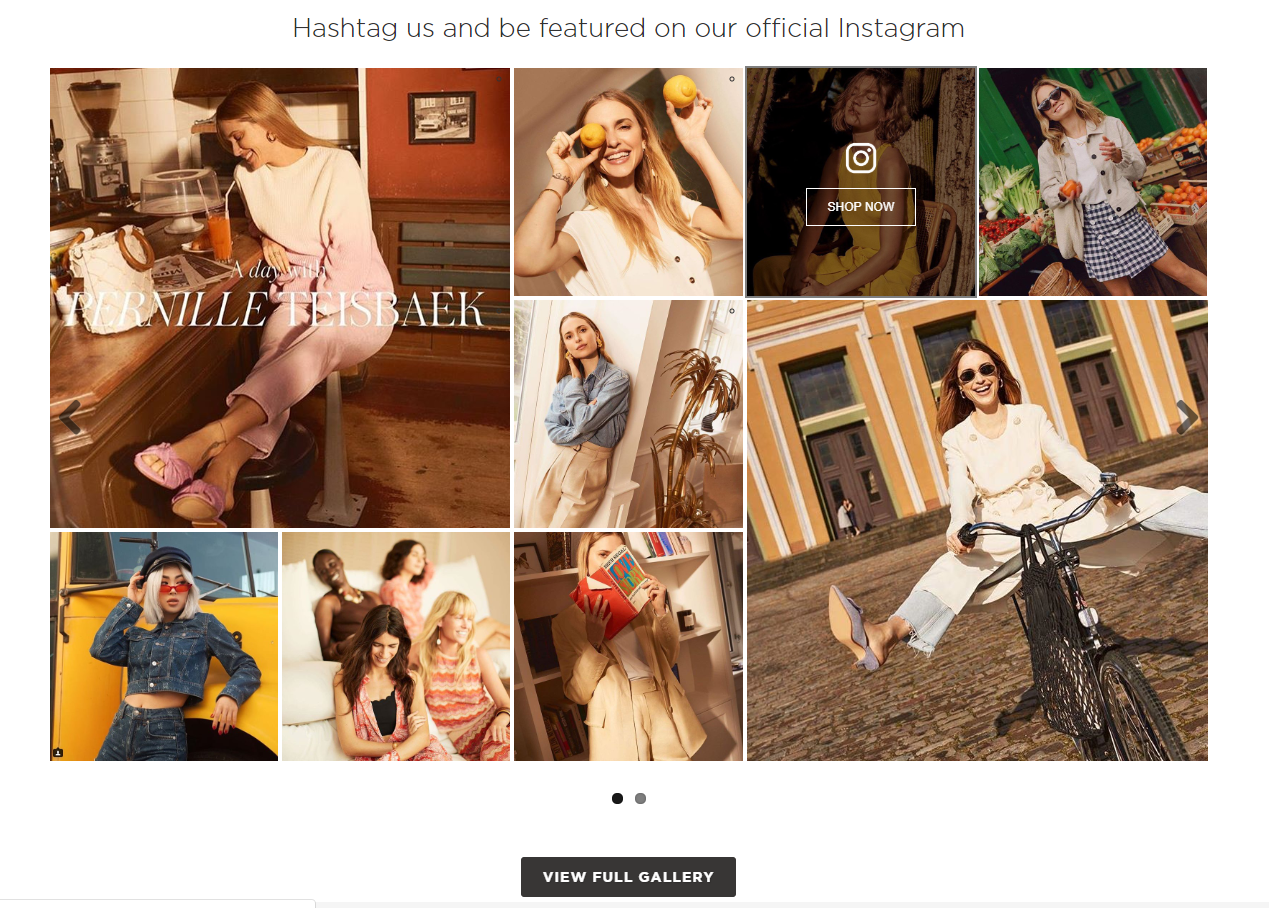
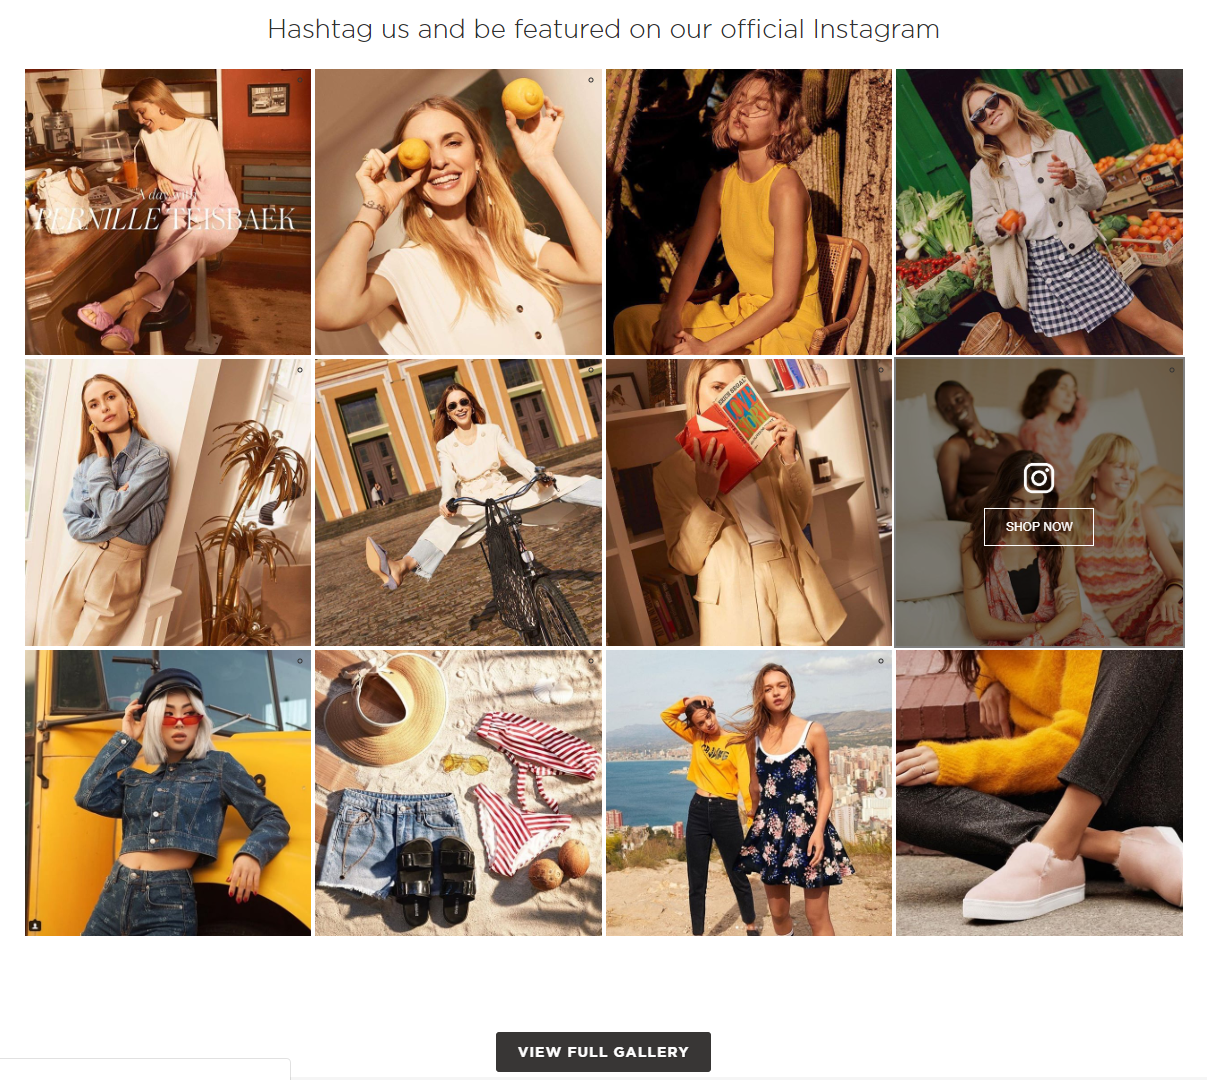
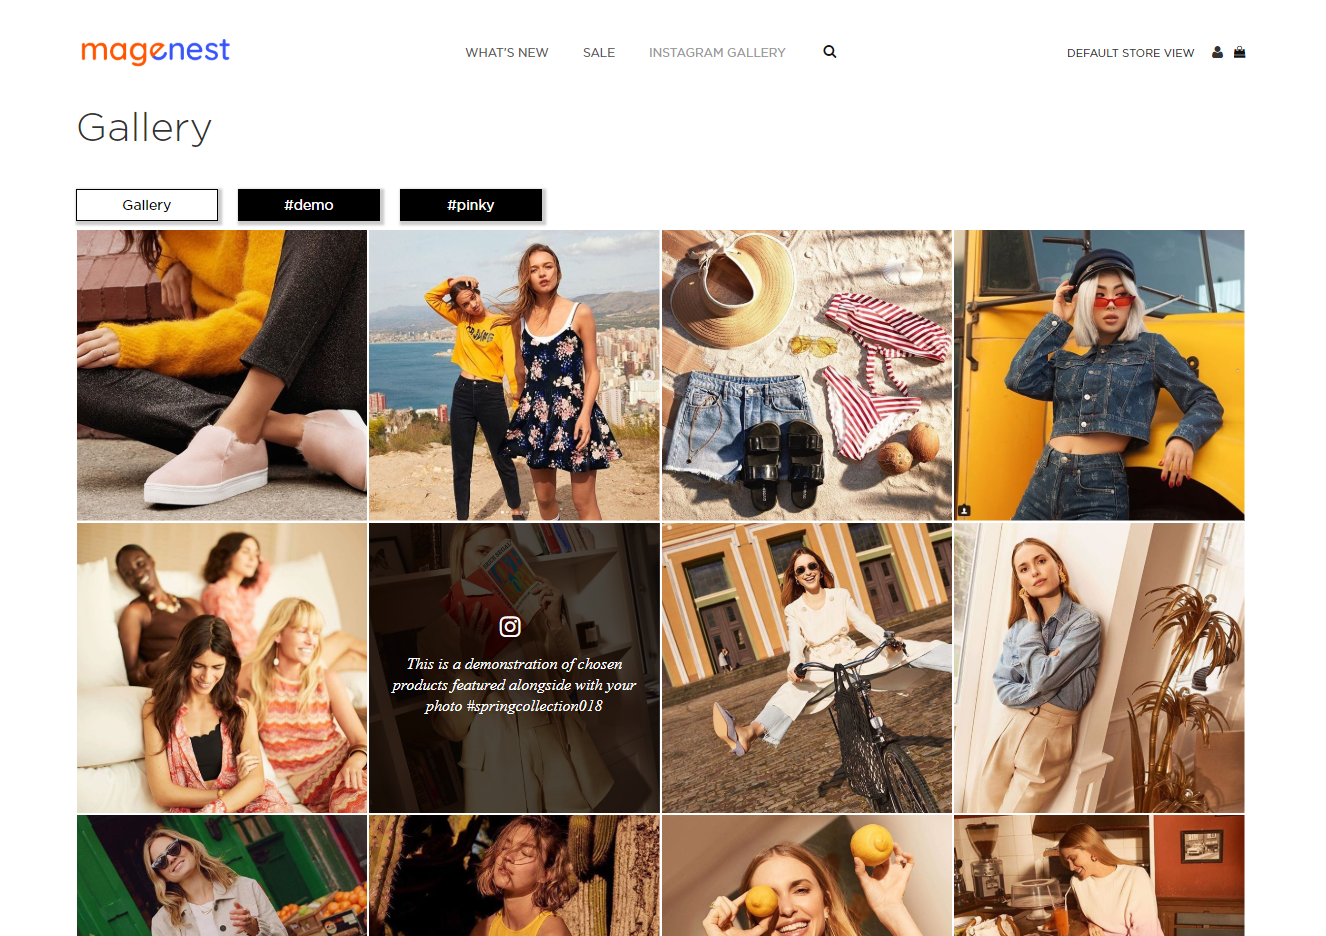
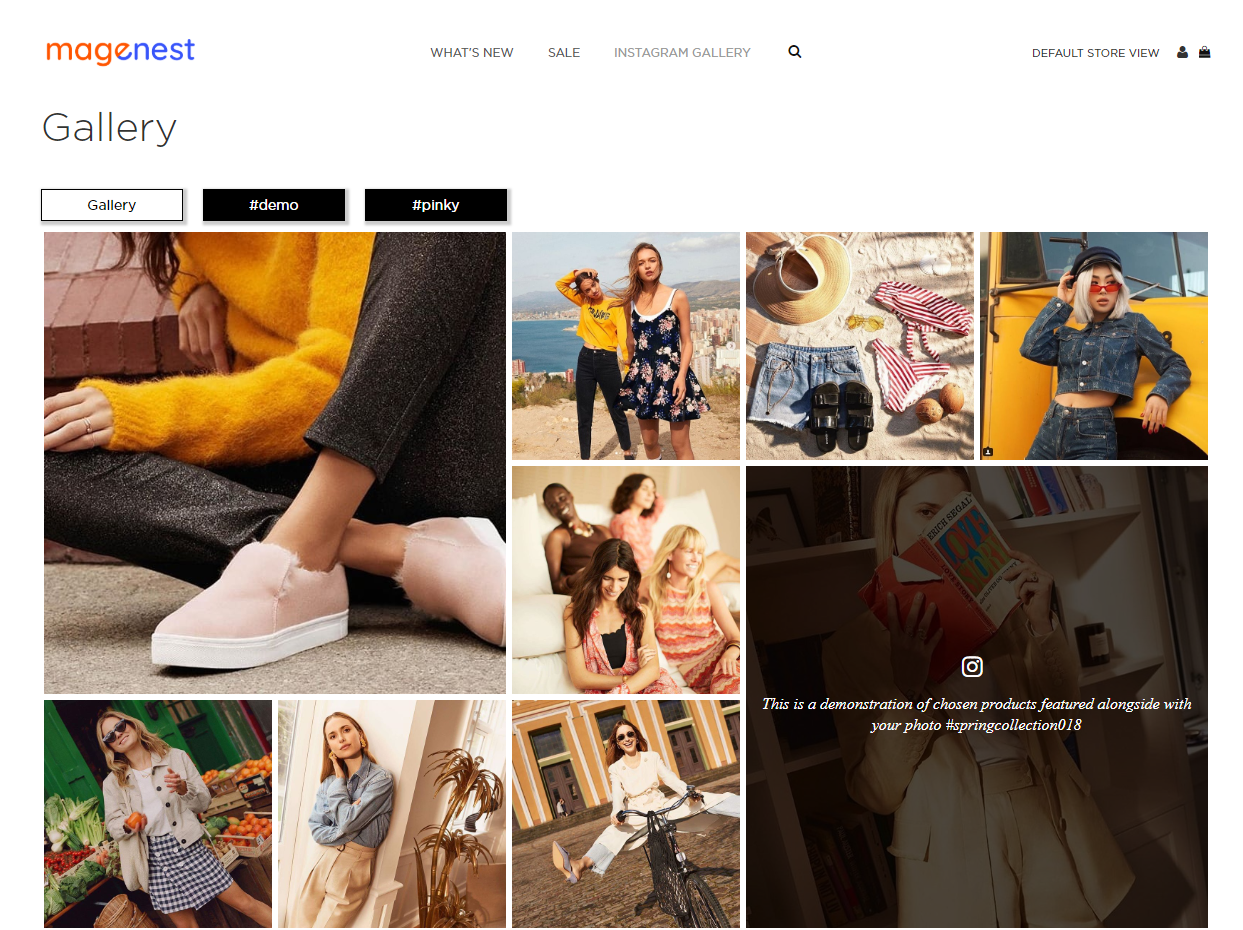
Gallery of your Instagram Photos
On the top menu bar, when you click on Instagram Gallery, it will display a gallery of all your Instagram photos.
When you hover on the photo, a caption window will slide from right to left and show the caption of the photo. Like(s) and comment(s) of the photos will be displayed under each one.
Gallery page with Layout 1
Gallery page with Layout 2
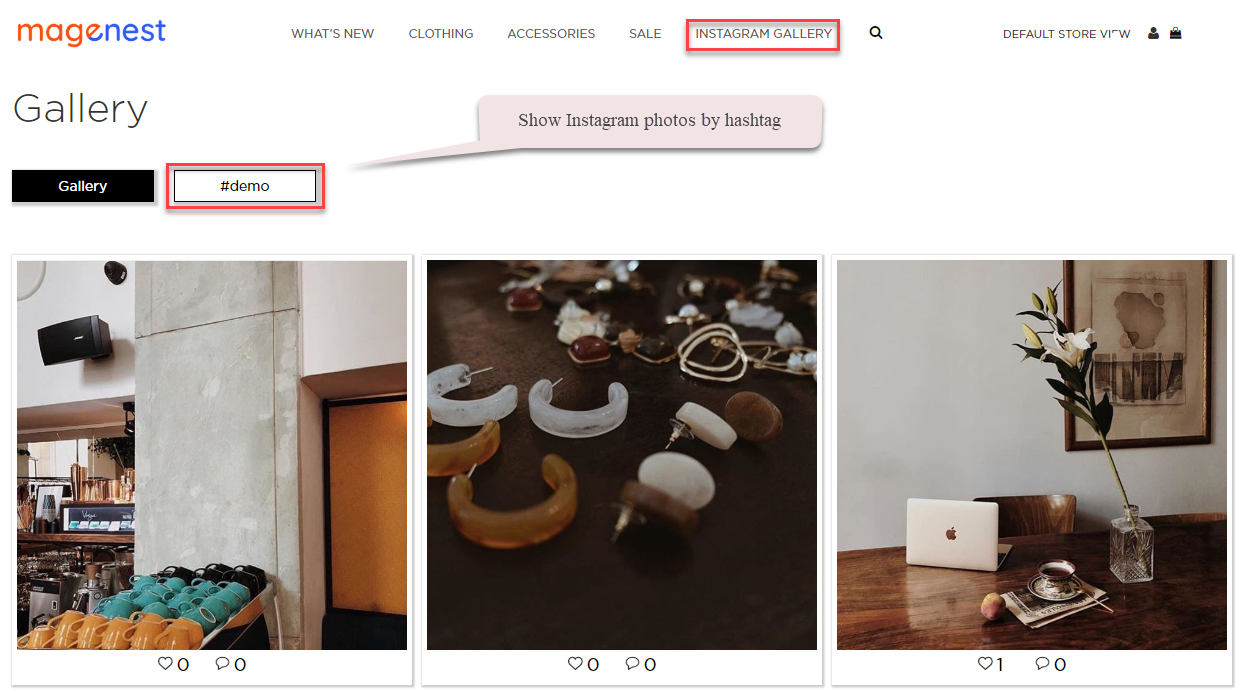
Gallery of Instagram photos by hashtags
When you choose a hashtag, it will display photos with that hashtag (collected from your Instagram's account).
Update
- When a bug fix or new feature is released, we will provide you with the module's new package.
- All you need to do is repeating the above installing steps and uploading the package onto your store. The code will automatically override.
- Flush the configure cache. Your store and newly installed module should be working as expected.
Support
- We will reply to support requests within 2 business days.
- We will offer lifetime free update and 6 months free support for all of our paid products. Support includes answering questions related to our products, bug/error fixing to make sure our products fit well in your site exactly like our demo.
- Support DOES NOT include other series such as customizing our products, installation and uninstallation service