...
When your account is activated, you can login on the page https://worldpay-payment-and-subcriptions.com
.
If you log in the account for the first time, WorldPay will ask you to create an organization. Enter the name of your organization and choose other information.
Now you can create a new consumer key after login your Xero account.
In order to create a new consumer key, you need to have the public key first. There are two ways for you to get the public key:
![]() You can pick up the file content of the public key attached with our extension.
You can pick up the file content of the public key attached with our extension.
![]() Or please follow the steps belows to create a new one:
Or please follow the steps belows to create a new one:
How to create a new public key
Go to http://developer.xero.com/ > Docs > Advanced Docs > Public/private key pair > Using OpenSSL and run 3 commands to create 2 files: public key.cer and private key.pem
+ Copy and paste content file .cer into magenest/xero/etc/certs/magenest.cer
+ Copy and paste content file .pem into magenest/xero/etc/certs/magenest.pem
When you have file Xero/etc/certs/magenest.cer, copy and paste them into X509.
You will see the Xero accounting interface after you've done the last step but now we need to continue our setup, go to this site: https://app.xero.com/Application to create the Application.
Choose the application mode (usually is Private), application name (the name for the application is not very important), choose your organization (this is where the Magento 2 data will be synced into).
Check the information again then choose "I have read and agree to the Xero Developer Platform". After that click Save button.
If everything goes right, you will see the following content. By now we have done everything on the Xero site, now move to your magento 2 backend but don't close this site.
Click on "Show" button to get the Consumer Key.
Configuration
Set up Xero Account Informations
Go to Store > Configuration or Xero Integration > Configuration:
At My Applications tab
Taking Consumer Key that you have just created and paste into Magento 2 backend configuration. Press Save Config after you've done (refresh the cache if needed). Then, click on Connect Now button.
Note that you need to save config before connecting, this will help you avoid making the consumer key error.
Connection Status will be transferred from not connected to connected with all the information like the picture below.
At Configure the Accounts Types in Xero tab
Admins are able to synchronize four account types: Bank account, Sale account, Inventory account, Cost and Good Sold account from Magento 2 to Xero. Enter name for each account then click on Sync All Accounts Now button. The default Xero account value will be used if you do not change it. If there is no account on Xero site, the extension will automatically create a new one.
Admins can check accounts on Xero web.
...
Configuration
Set up WorldPay Account Informations
Go to Worldpay Payment Gateway > Settings > Configuration:
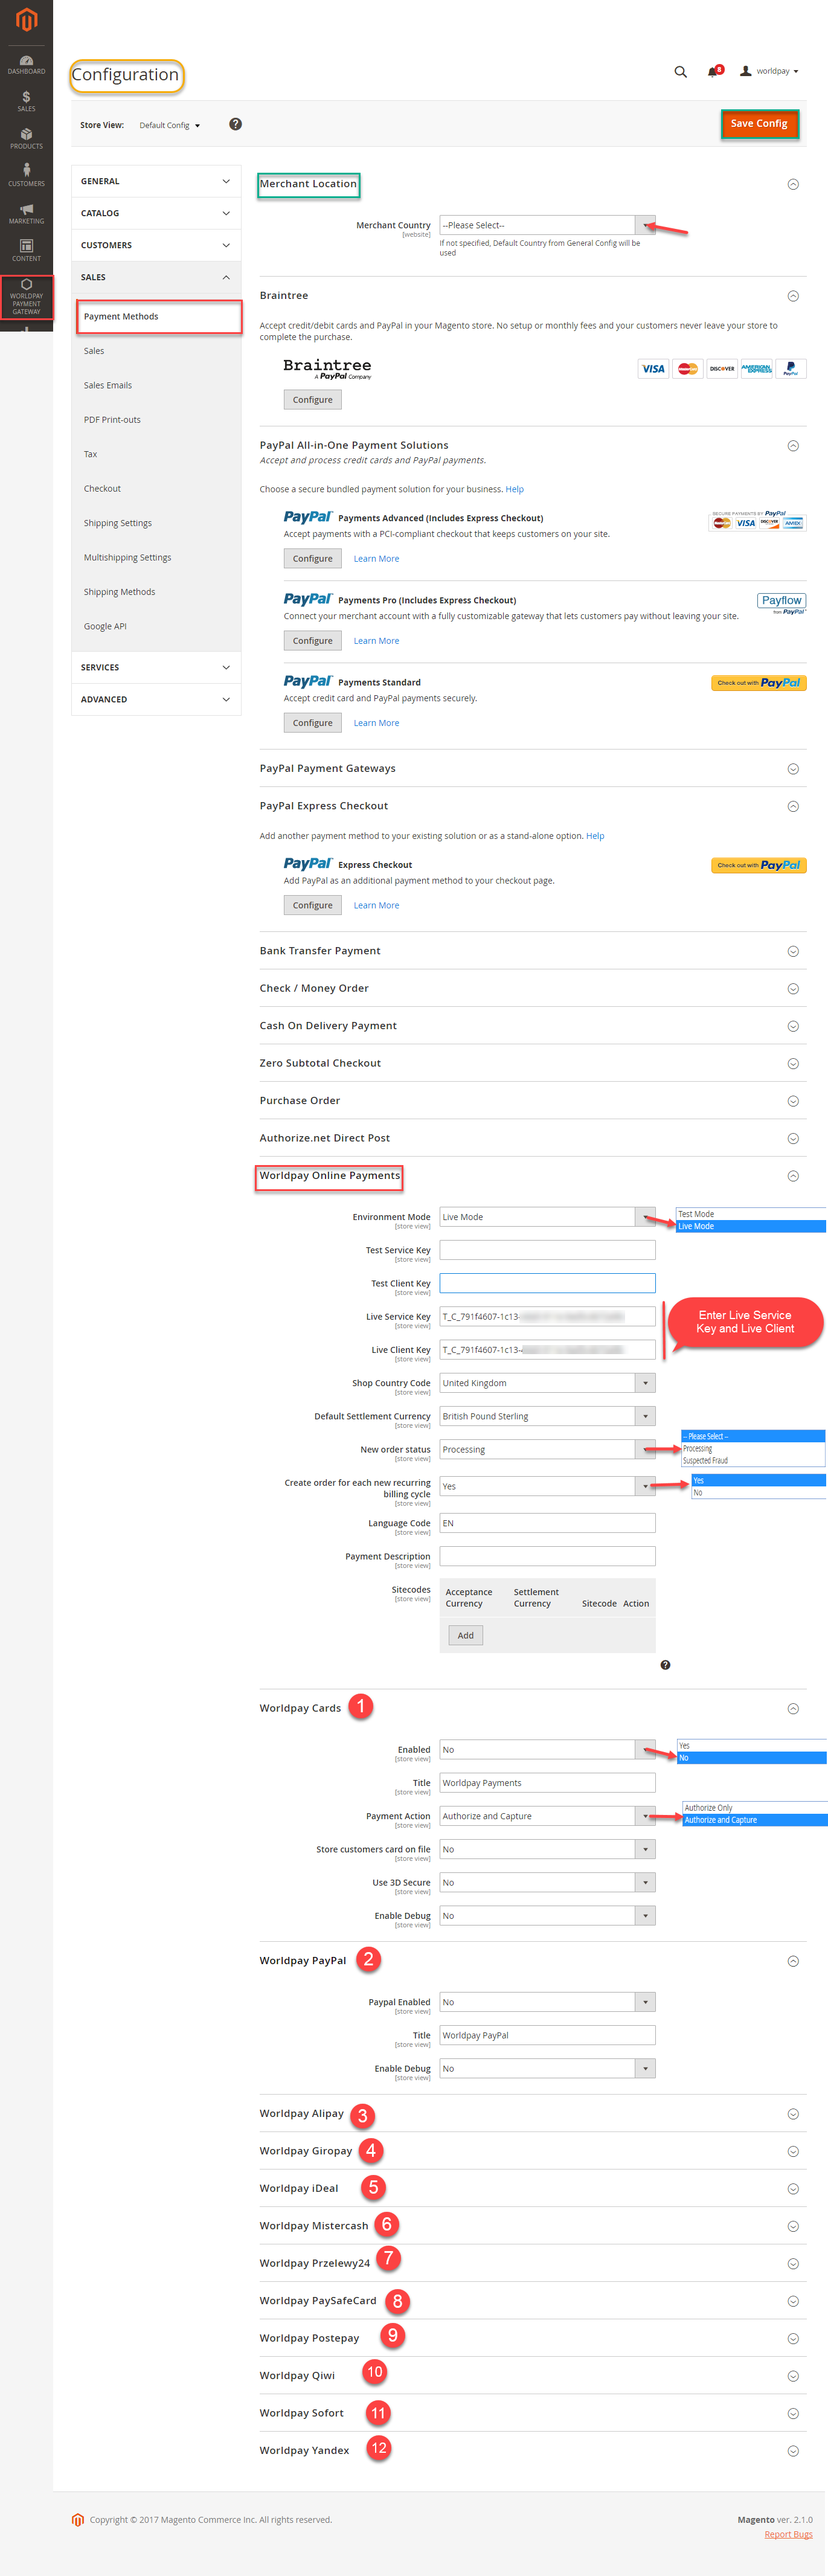
In Configuaration, we click on Payment Methods to install payment. On Merchant Location, we choose Merchant Country where the vendors are
On WorldpayOnline Payments, choose Live Mode and Enter Live Service Key and Live Client Key and then follow the instruction from step from step 1 to step 12 and click on Save Config button to
save install configuaration.
Set up Synchronization
...
How to distinguish between Immediately mode and Cron Job mode.
- Immediately mode: the data will be synced as soon as they're created or updated.
- Cron Job: the data will be queued and will be synced together in some minutes.
Some application mode like private mode only allows 1000 requests a day. Choosing Cron Job will guarantee all data will be synced. We recommend you should use Cron Job mode to make sure that you don't run out of request per day.
...