Thank you for purchasing our extension. If you have any questions that are beyond the scope of this document, please feel free to contact us via [email protected]
By: Magenest | Support Portal:

System Overview
AI Email Management is a web application for managing Gmail more efficiently with AI.
The application uses Gemini 2.0 Flash to automatically classify emails, generate summaries, and extract action items. It also supports team collaboration through internal notes and lets users create Odoo tasks directly from email conversations.
Key Features
- Smart Inbox - display
- AI Classification - Gemini evaluates email importance and urgency and generates a one-line summary.
- Action Items - AI extracts tasks and follow-up actions from email content.
- Team Notes - add internal notes to an email and mention teammates using @.
- Custom Labels - organize emails with labels that match the team's workflow.
- Create Odoo Tasks - turn an email into an Odoo task with a single action.
- Newsletter Filtering - automatically hide unnecessary marketing and digest emails.
- Admin Panel - manage users, access the team's inboxes, and review the Audit Log.
- ys emails by thread and automatically refreshes when new messages arrive.
Login
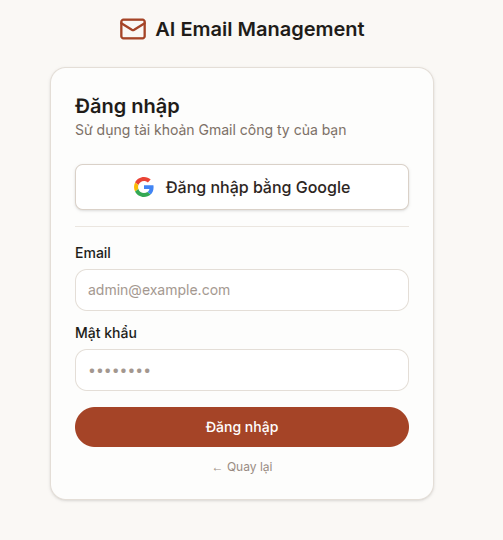
AI Email Management uses an internal account system. An administrator provides each user with an email address and password.
Login Steps
- Open the application in your browser.
- Enter the assigned Email and Password.
- Click Log In.
Note: A login session remains active for 8 hours. Once the session expires, the application automatically redirects you to the login page.
Change Your Password
- Click your avatar/email in the upper-right corner.
- Select Change Password.
- Enter your current password and a new password of at least 6 characters.
- Click Save.
Dashboard
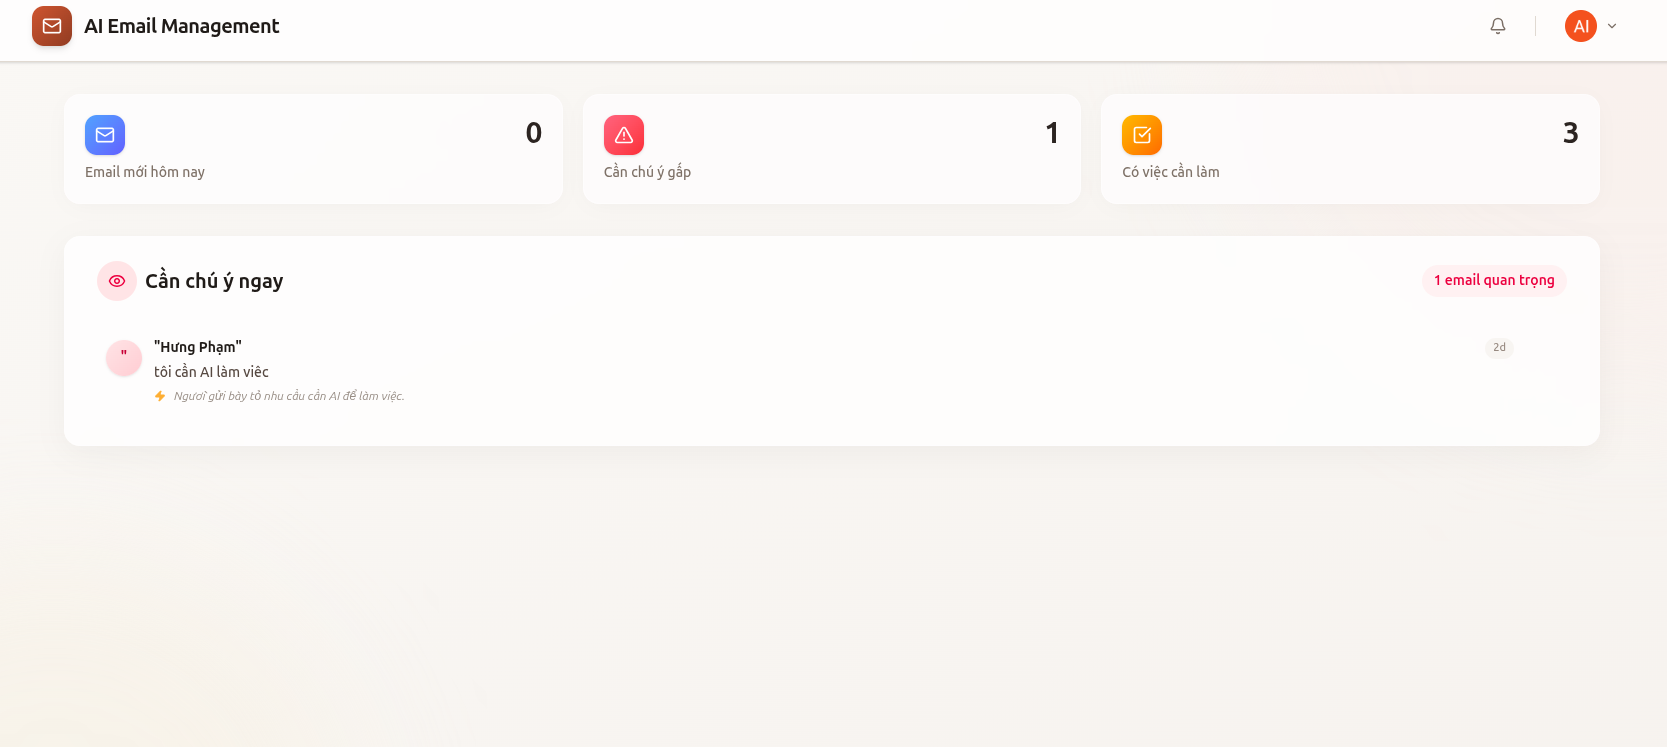
The Dashboard gives you a quick overview of your inbox as soon as you log in.
Dashboard Metrics
Card | Description |
Emails Today | Number of emails/threads received today |
Needs Attention | Number of threads classified by AI with urgency = critical |
Has Action Items | Number of threads with unfinished action items |
Top 5 Critical:
The Top 5 Critical section shows the five most important emails that need immediate attention.
Each item includes:
- Subject and sender
- Time received
- One-line AI summary
- A link to open the thread details
Note: The Dashboard only reflects data that has already been synchronized to the server. If Gmail has not been connected, all metrics will show 0.
Connect Gmail
The application needs permission to read your Gmail messages before it can display them.
Gmail is connected through Google OAuth2, so the application does not store your Gmail password.
First-Time Connection
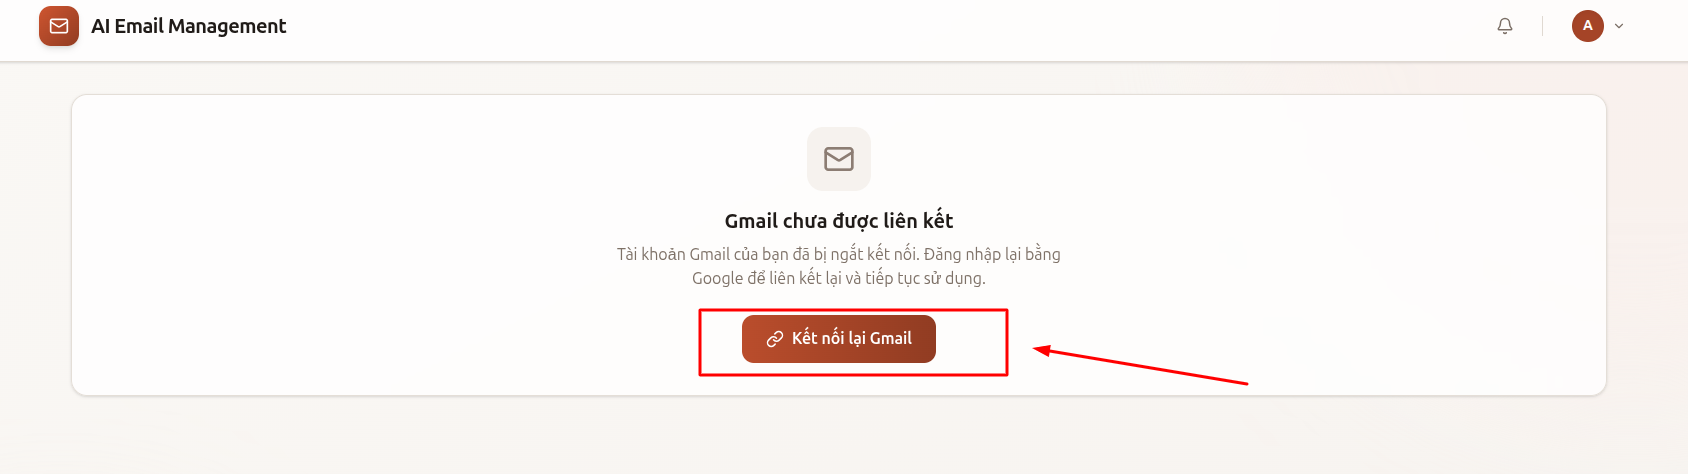
- From the Dashboard or Inbox, click Connect Gmail.
- Your browser opens the Google account selection page.
- Select the Gmail account you want to connect.
- Click Continue to grant permission to read email.
- Google redirects you back to the application, and the Inbox loads automatically.
Disconnect Gmail
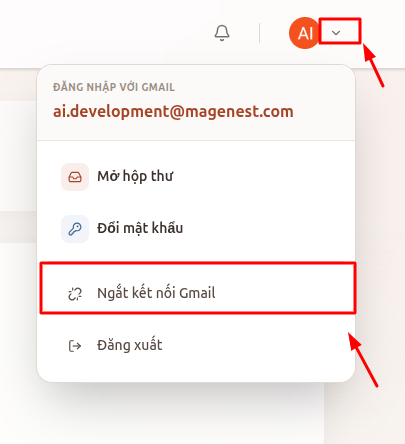
- Click your avatar/email in the upper-right corner.
- Select Disconnect Gmail.
- Confirm the action in the dialog.
Note: Disconnecting Gmail removes the stored OAuth2 token. Email data already cached in the system remains available until an administrator deletes it. To reconnect Gmail, repeat the first-time connection process.
Inbox
View Email Threads
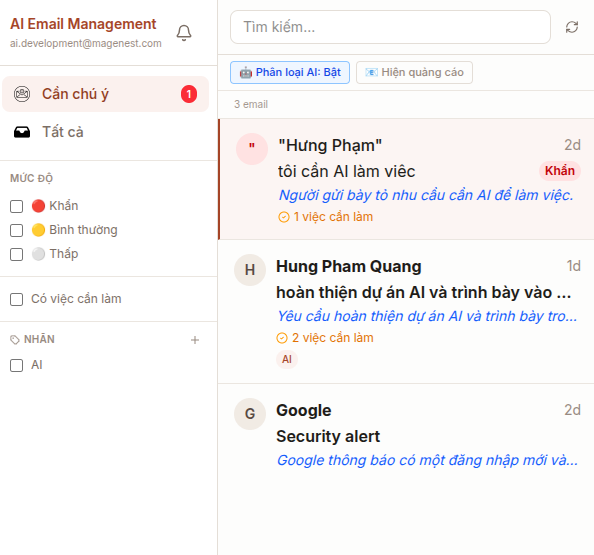
Emails are displayed by thread, so multiple messages with the same conversation topic are grouped into a single row.
The most recent thread appears first.+
Information Shown for Each Thread
Field | Description |
Sender | Name/email of the first and most recent sender |
Subject | Email subject |
Preview | Snippet from the most recent email |
Time | Time the most recent email was received |
Messages | Total number of messages in the thread |
Status Badges | UNREAD, STARRED, IMPORTANT, and custom labels |
AI Urgency | critical, normal, or low, assigned by AI |
AI Summary | One-line Vietnamese summary when LLM is enabled |
Sorting Order
- Threads classified as Critical always appear first.
- Within the same urgency level, the most recent email appears first.
Tip: The application checks for new emails every 60 seconds. When new mail arrives, the list refreshes automatically.
Filter and Search
The following filters are available:
Filter | Description | Example |
Label | Filter by Gmail label | INBOX, SPAM, SENT |
Keyword (q) | Search email subjects and content | quotation, contract |
Sender | Filter by email address or domain | [email protected] |
Date | Show emails from the most recent N days | 7d, 1d |
Tip: When a filter is applied, the application searches directly through the Gmail API for the most accurate results.
AI Classification (LLM)

Click AI: Off to enable automatic AI classification. The LLM analyzes each thread and returns:
- Importance: important / not important
- Urgency: critical / normal / low
- Summary: a short one-line summary in Vietnamese
- Action Items: a list of tasks extracted from the email, described further in Section 6.3
When AI Classifies an Email as Critical
An email may be marked Critical when:
- A customer or partner is waiting for a response.
- A deadline, approval, or meeting requires confirmation.
- A production issue or CI/CD failure affects a live system.
- A contract or document needs immediate review.
- An internal email contains information requiring urgent action.
When AI Classifies an Email as Not Important
Examples include:
- Newsletters, digests, and promotional emails
- Social media notifications such as likes, stars, or follows
- Automated noreply emails that do not require a response
AI Cache
- AI results are stored in the database so the application does not need to call the model again every time the inbox loads.
- The cache is automatically invalidated when a new message is added to the thread.
Note: The first time LLM classification is enabled, processing may take a few seconds depending on the number of emails. Later loads are faster because cached results are reused.
Hide Promotional Emails
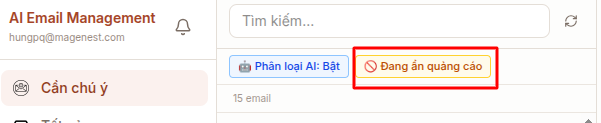
Use the Promotional Emails: Show/Hide button to enable or disable the newsletter filter.
When the filter is enabled, emails from the following addresses are automatically hidden:
- Medium:
- LinkedIn:
- GitHub:
- Substack:
- Alibaba Cloud:
- Addresses matching:
Custom Labels
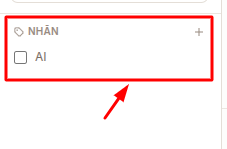
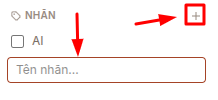
In addition to Gmail system labels such as INBOX and STARRED, you can create your own labels to organize emails around your team's workflow.
Create a Label
- Click Manage Labels in the sidebar.
- Enter the label name.
- Click Add.
Add a Label to an Email
- Open the thread details.
- Click the Label button or tag icon.
- Select one or more labels.
Note: Custom labels are available only inside AI Email Management. They are not synchronized back to Gmail.
View Email Details
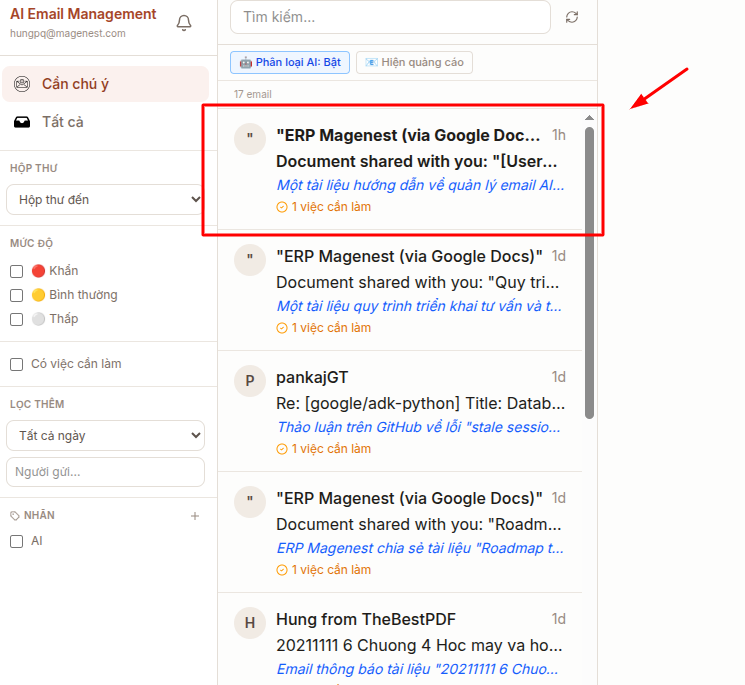
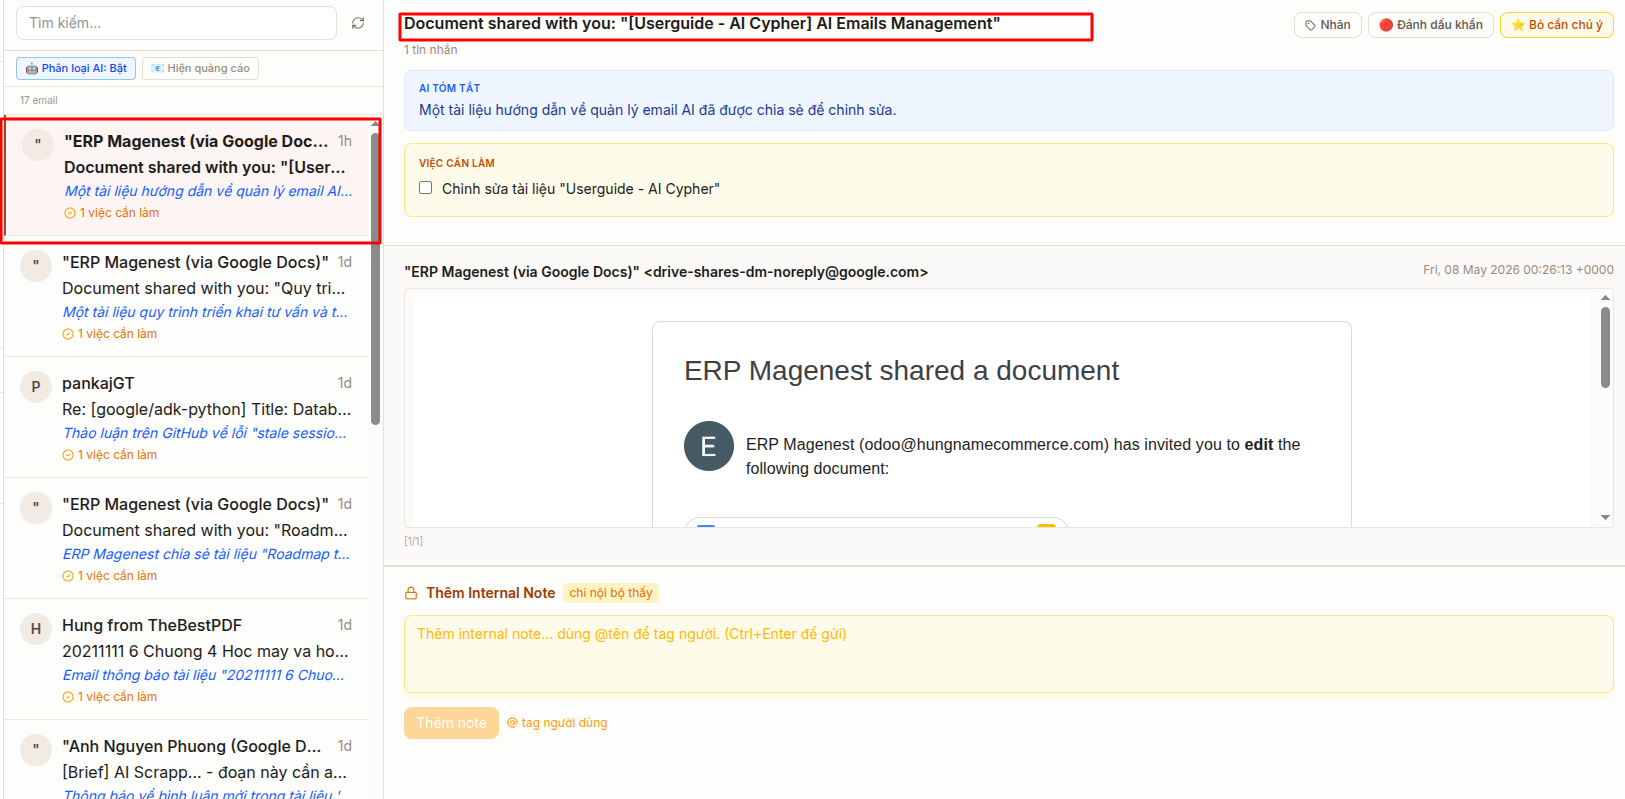
Click any thread in the Inbox to open its details.
Email Content
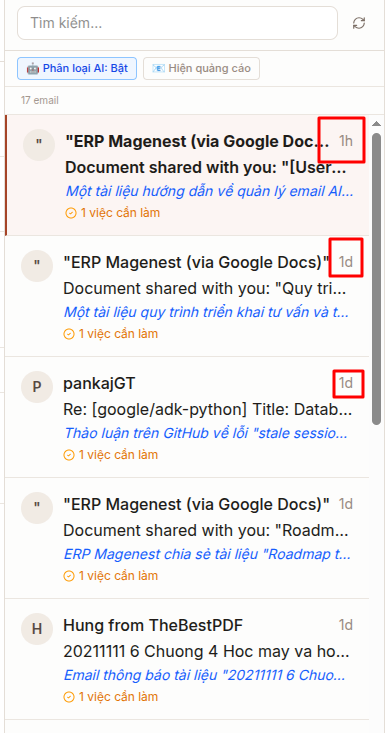
The detail page displays every message in the thread in chronological order.
Each message includes:
- Sender and recipients
- Sent time
- Email content in text or HTML format
- Attachments, when available - click an attachment to download it
AI Analysis
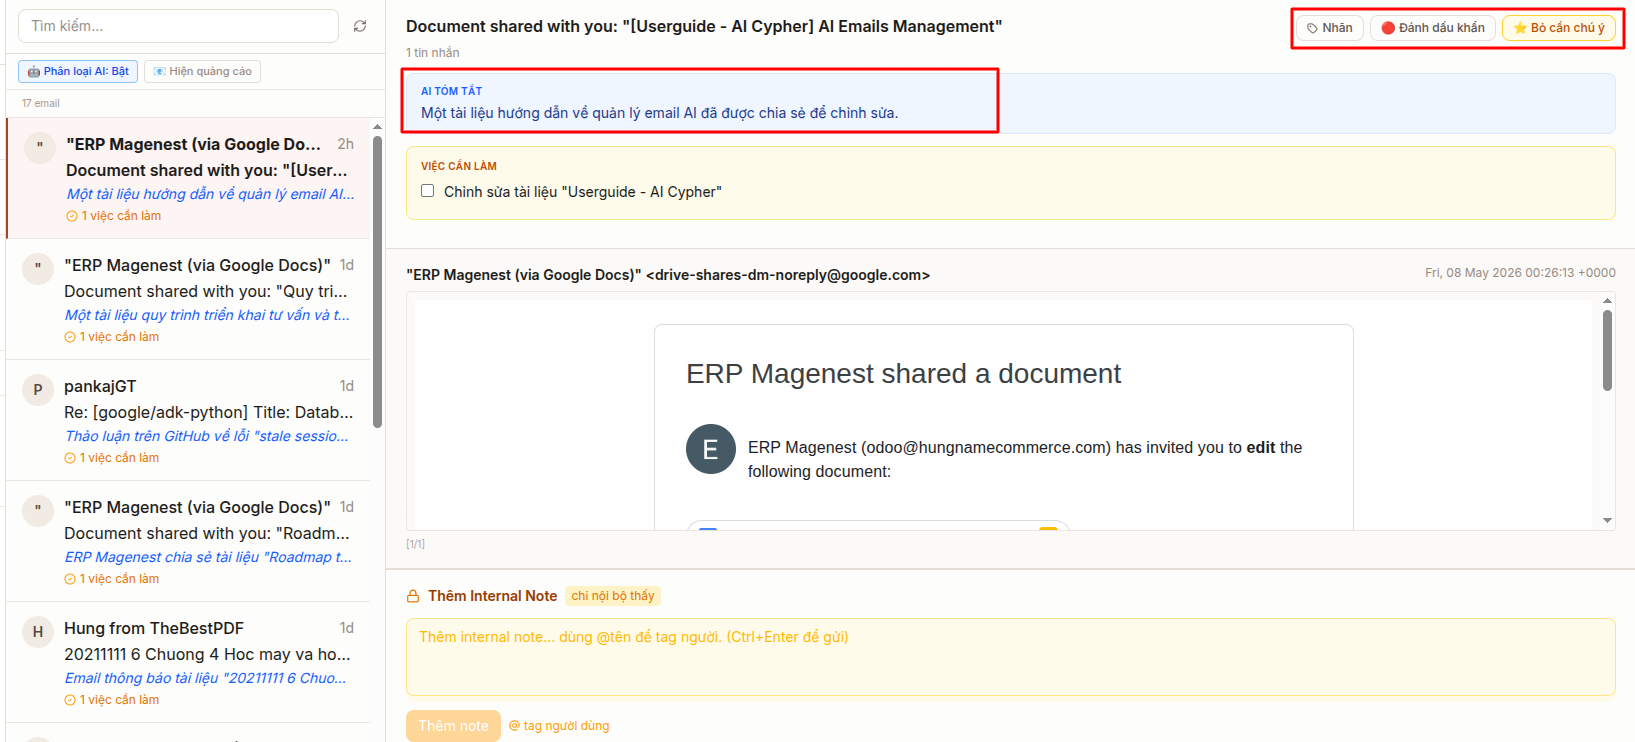
The AI panel appears at the top of the thread detail page.
It shows:
- Summary: the main points of the conversation in 1–2 sentences
- Urgency: critical / normal / low
- Reason: an explanation of why AI assigned that urgency level
Change Urgency Manually
- Click the urgency badge - critical, normal, or low.
- Select a different urgency level.
The manual value overrides the AI result and is saved to the database.
Action Items
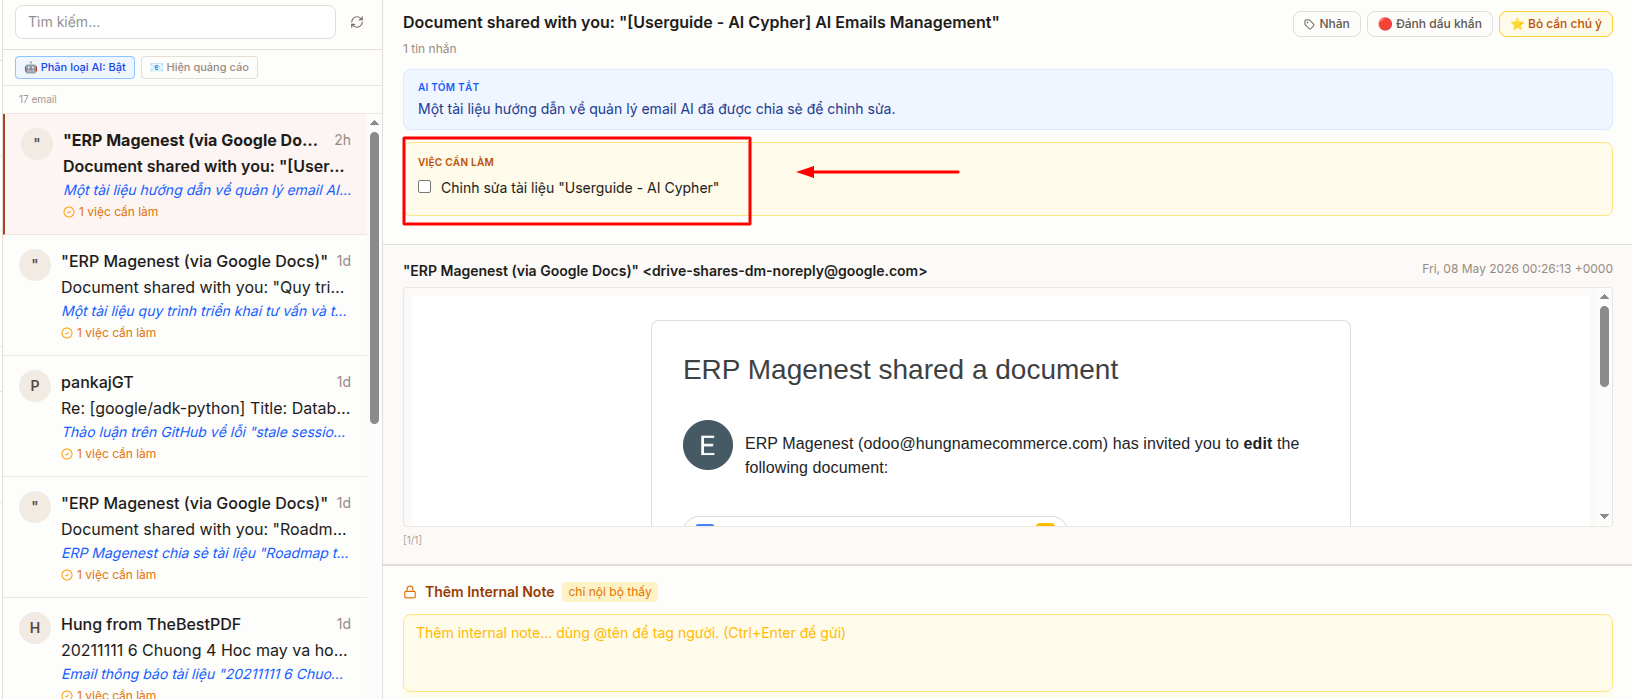
AI automatically extracts tasks and follow-up actions from the email conversation.
Each action item appears as a checkbox.
Using Action Items
- Select the checkbox when an item has been completed.
- Completed status is saved and visible to all team members.
- The Inbox also shows the number of action items for each thread.
Tip: Action Items are especially useful when several people are following the same email. Each team member can mark the tasks they have already handled.
Internal Notes
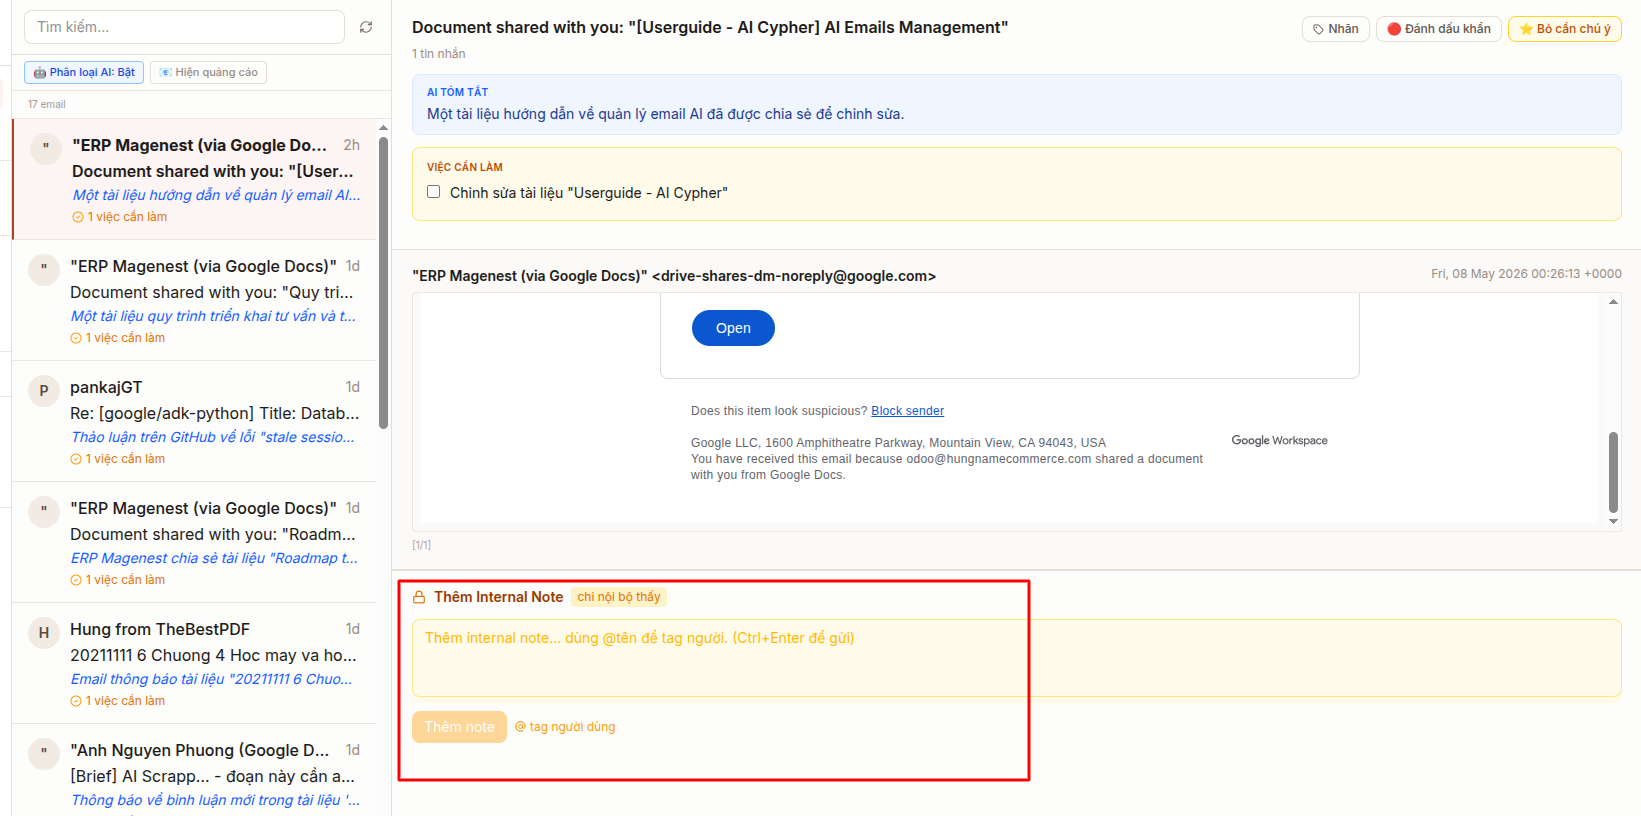
Internal Notes allow team members to discuss an email without sending a reply to the actual mailbox.
Add a Note
- Scroll to the Notes section at the bottom of the detail page.
- Enter your note.
- Click Send or press Ctrl + Enter.
Mention a Teammate
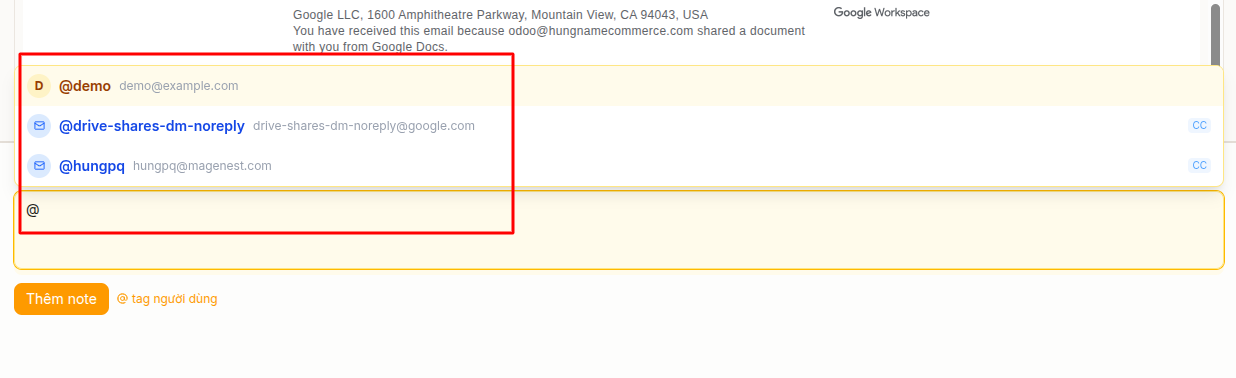
Type @, followed by the user's username - the part before @ in their email address.
Example: @hungpq mentions the user with: [email protected].The mentioned user receives an instant notification.
Edit or Delete a Note
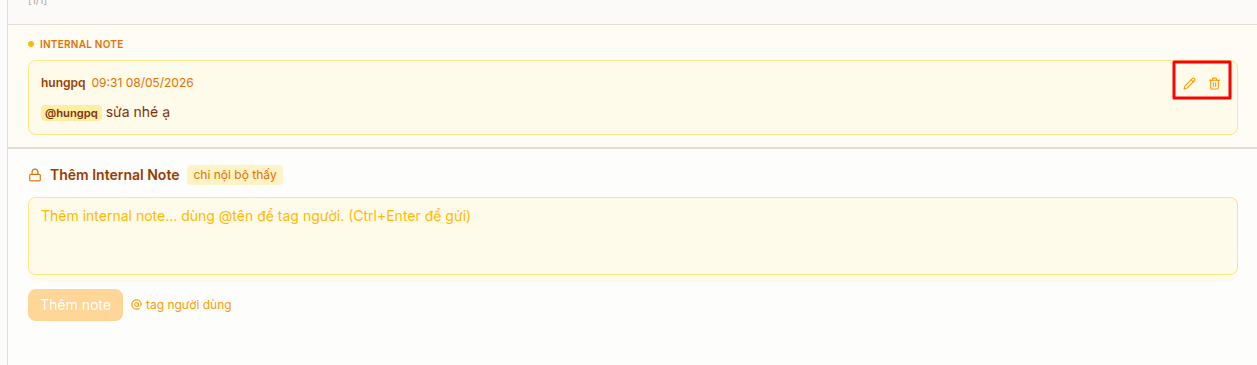
- Click Edit on one of your own notes to update it.
- Click Delete to remove it.
Users can only delete their own notes. Administrators can delete any note.
Shared Notes
If the same email is being followed by multiple team members through different Gmail accounts, the notes are shared and visible to everyone following that email.
Create an Odoo Task from an Email

This feature lets you turn an email into an Odoo task without leaving AI Email Management.
Create a Task
From the thread detail page, click Create Odoo Task.
Complete the following fields in the dialog:
- Project: Select an Odoo project.
- Task Title: Uses the email subject by default.
- Assignee: Select the assignee's email.
- Deadline: Optional.
- Planned Start Date: Optional.
- Estimated Hours: Optional.
- Description: Enter the task details.
- Priority: normal / urgent.
- Click Create Task.
The system automatically attaches files from the email to the Odoo task.
After the task is created successfully, an internal note is automatically added to the thread with a link to the new task.
Notifications (@mentions)
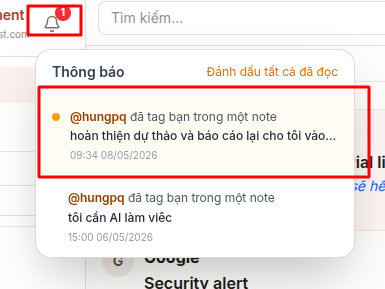
When a teammate mentions you in an internal note, you receive an instant notification.
View Notifications
- Click the bell icon in the top navigation bar.
- The red badge on the bell shows the number of unread notifications.
- Click a notification to go directly to the related thread and note.
Mark Notifications as Read
- Click an individual notification to mark it as read.
- Click Mark All as Read to clear all unread notifications.
Note: Notifications are generated only when you are mentioned directly using @username in a note. The system keeps the most recent 50 notifications.
Administration
The Admin section is available only to users with the Admin or Manager role.
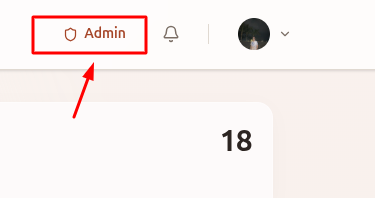
User Management
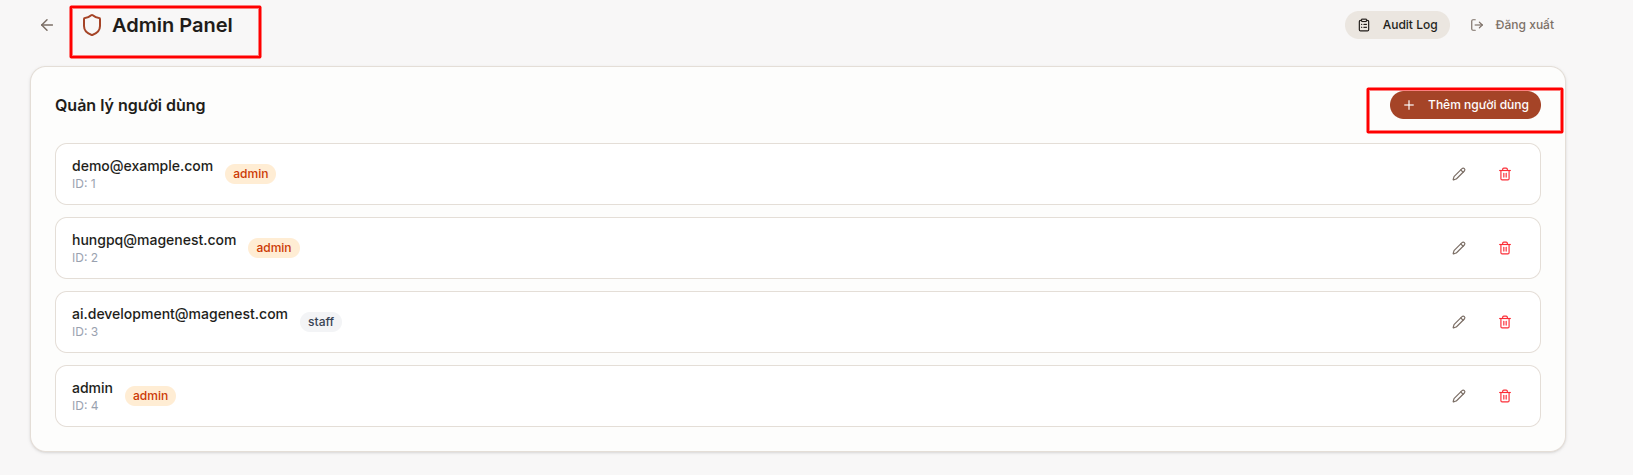
Go to: Admin > User Management
Create a New User
- Click Add User.
- Enter:
- Email
- Password
- Role: staff, manager, or admin
- Click Create.
Edit a User
- Click the edit icon on the relevant user.
- Update the role or password.
Delete a User
- Click the delete icon and confirm the action in the dialog.
- The account currently signed in cannot be deleted.
Roles
Role | Description |
staff | Regular user who can access only their own Inbox |
manager | Can view the entire team's inboxes from the Admin Panel |
admin | Full access, including user management, Audit Log, and all inboxes |
Unified Inbox
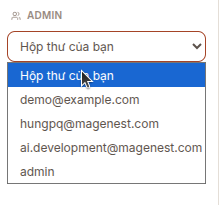
Admins and Managers can view emails from the entire team in one interface.
Go to: Admin > Unified Inbox
Filters
Filter | Description |
User | Show the inbox of a specific team member |
From / To Date | Filter by the date the email was received |
Urgency | critical / normal / low |
Needs Attention | Show only threads marked important by AI |
Search | Full-text search across subject and snippet |
Click any thread to open its details and add internal notes.
Audit Log
The Audit Log records important actions performed in the system.
Go to: Admin > Audit Log
Recorded Actions
- Create, update, or delete a user account
- Add an internal note
Information Stored for Each Entry
- Time
- Actor
- Action
- Target
- Additional details
Note: The Audit Log shows the most recent 200 entries. Contact the system administrator if you need older records.
Role-Based Permissions
Feature | Staff | Manager | Admin |
View own Inbox | Yes | Yes | Yes |
Connect Gmail | Yes | Yes | Yes |
Enable/disable LLM | Yes | Yes | Yes |
Add internal notes | Yes | Yes | Yes |
Create custom labels | Yes | Yes | Yes |
Create Odoo tasks | Yes | Yes | Yes |
View another user's Inbox through Admin Panel | No | Yes | Yes |
Manage users | No | No | Yes |
View Audit Log | No | No | Yes |
Delete another user's notes | No | No | Yes |
Frequently Asked Questions
Q1. Why aren't my emails showing in the Inbox?
- Check whether Gmail is connected. Your Gmail address should appear on the Dashboard.
- Click Refresh, if available, or press F5.
- Check the Label filter. You may be viewing the wrong folder, such as SPAM or SENT.
- If you have just connected Gmail for the first time, wait a few seconds for the initial synchronization to finish.
Q2. Why doesn't AI classification return any results after I turn on "AI: Off"?
- Check your internet connection.
- The Gemini API may be busy. Wait a few seconds and try again.
- If the issue continues, contact your administrator to check the LLM configuration.
Q3. Why isn't my custom label showing up?
- Custom labels exist only inside AI Email Management and are not synchronized with Gmail.
- Refresh the page if a newly created label does not appear immediately.
Q4. Why can't I create an Odoo task?
- Make sure your Gmail connection is still active.
- Make sure a Project has been selected.
- If the Project list is empty, contact your administrator to check the Odoo configuration.
Q5. How can I stop an email address from being hidden by the newsletter filter?
- Turn off the newsletter filter using the Newsletter: Hide button.
- Contact your administrator if you want a specific sender removed from the blocklist.
Q6. Why does my login session keep expiring?
- Sessions remain active for 8 hours from the most recent login.
- Make sure your browser is not blocking cookies, including the httpOnly cookie.
- If you are using private/incognito mode, the session ends when the tab or browser session is closed.
Q7. I already read my notifications. Why is the badge still showing?
- Click Mark All as Read to reset the badge.
- Press F5 to refresh the notification status.