Thank you for purchasing Magenest extension. If you have any query that is beyond the scope of this document, please contact us via the support portal below.
Updated: 25/05/2021 | By: Magenest | Support Portal: http://servicedesk.izysync.com/servicedesk/customer/portal/34
| Table of Contents |
|---|
Introduction
With over 1 billion monthly active users and over 500 million daily active users, Instagram has become one of the most widely used social media in the world. This rapidly growing platform has proven its major role in the business competition. Magenest is now offering you a chance to benefit even more from your Instagram business account with our Instagram Shop extension. What’s better for your sales than integrating all your Instagram photos on your store and attracting your customers to your products at first glance?
Features
For Admin
- Easy to connect with the merchant's Instagram account with just one click.
- Connect separate Instagram accounts to each website in your Magento 2 store. [NEW]
- Fetch all photos or specific photos using hashtags from your Instagram to your Magento 2 store.
- Fetch the latest stories from your Instagram account to Magento 2 store.
- Manage which photos will be shown in the Instagram slider/gallery and which not.
- Change the order/position of the photos displayed on the Instagram widget and gallery
- Add redirect links to pinned products in your Instagram photos (on Magento 2 store)
- Add a Call-to-Action button while hovering on photos.
- Customize your slider to suit your website layout
- Performance report (Plus only)
For Customer
- Have an interesting product display layout for a better shopping experience.
- Purchase the product easily by clicking directly on the photos.
- Get updated with the Store’s latest Instagram posts.
System Requirements
Your store should be running on Magento 2 Community Edition version 2.3.x, 2.4.x
Connect your Instagram account to your Magento store
|
|---|
Tutorial video
![]() Please follow the instruction video below:
Please follow the instruction video below:
| Widget Connector | ||||||
|---|---|---|---|---|---|---|
|
![]() In case you find this video hard to follow, please read our guide steps:
In case you find this video hard to follow, please read our guide steps:
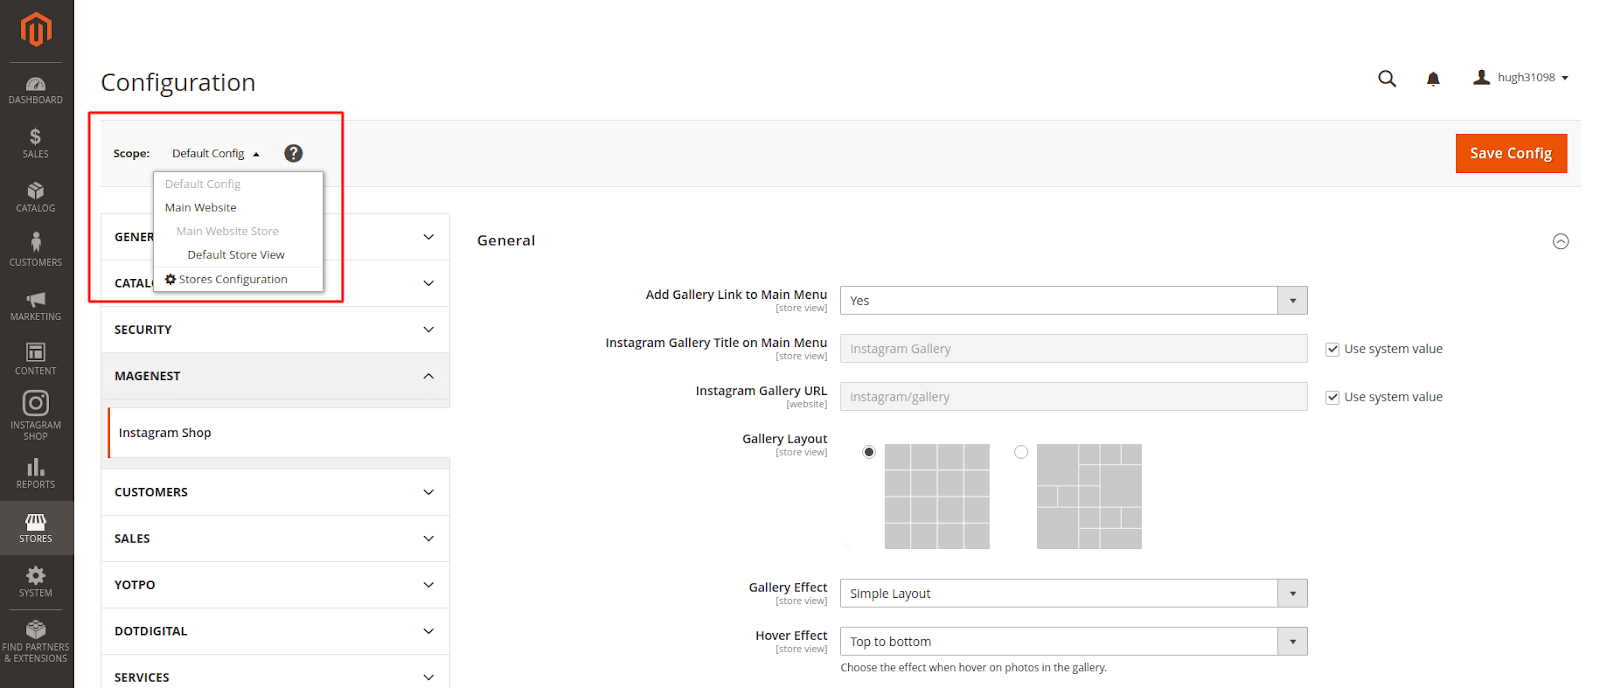
- In order to connect your store to Instagram, on the Admin sidebar, go to Instagram Shop > Configuration.
- Switch the configuration scope to your preferred website. You can connect a separate Instagram account to each website. [NEW]
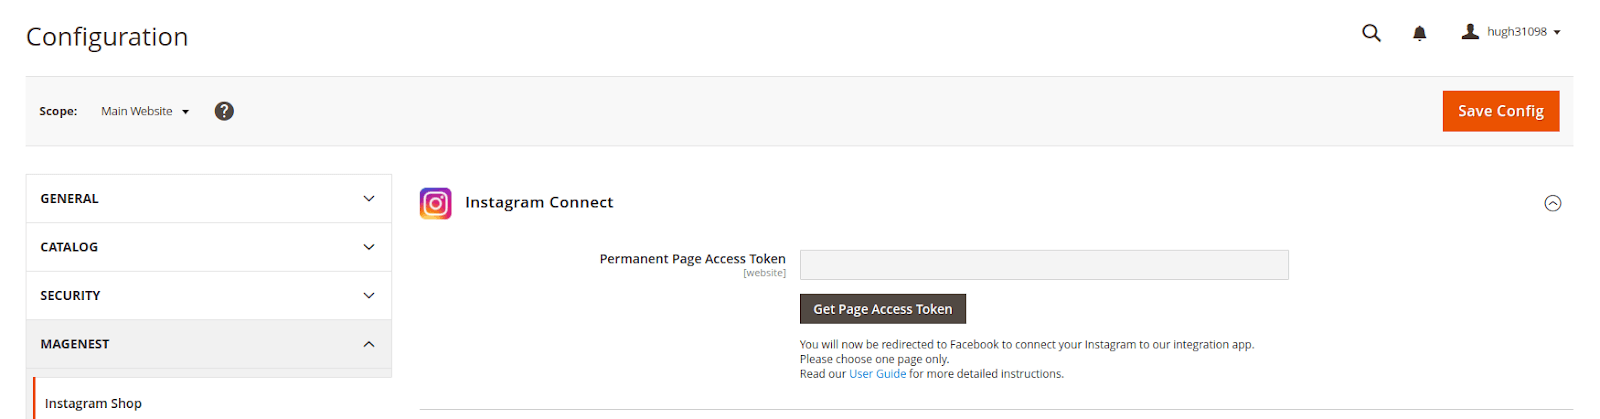
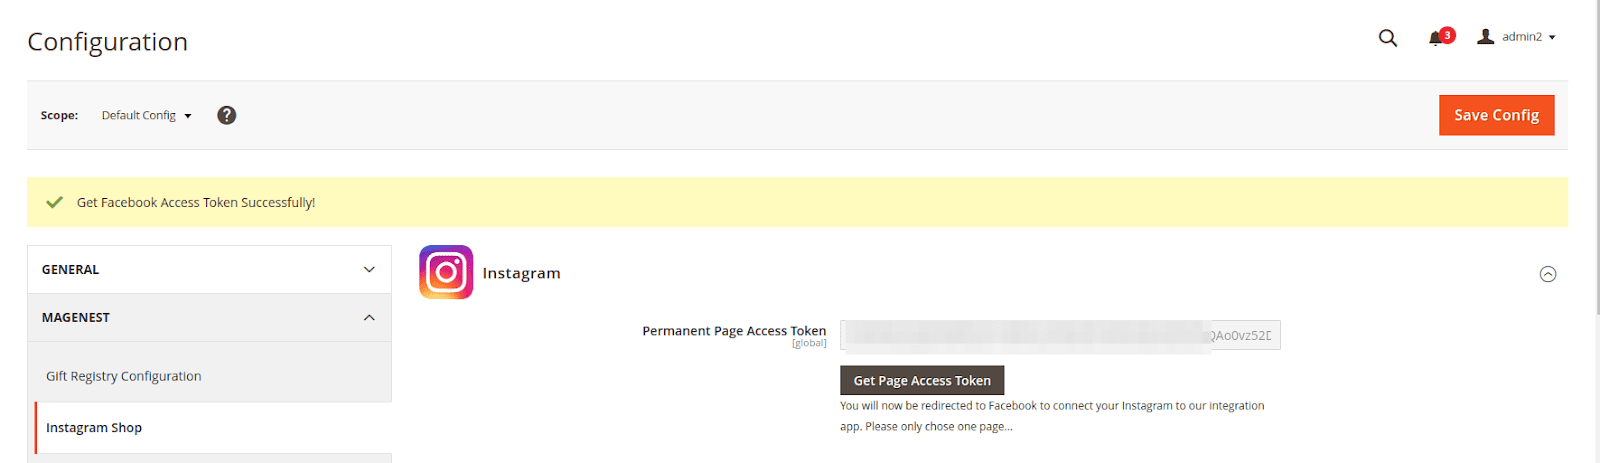
- Under the Instagram section, click on the Get Page Access Token button to connect Instagram with Magento, you will be redirected to an endpoint where the login dialog is shown and you can approve the permissions request here.
![]() Step 1: Click on the Get Page Access Token button
Step 1: Click on the Get Page Access Token button
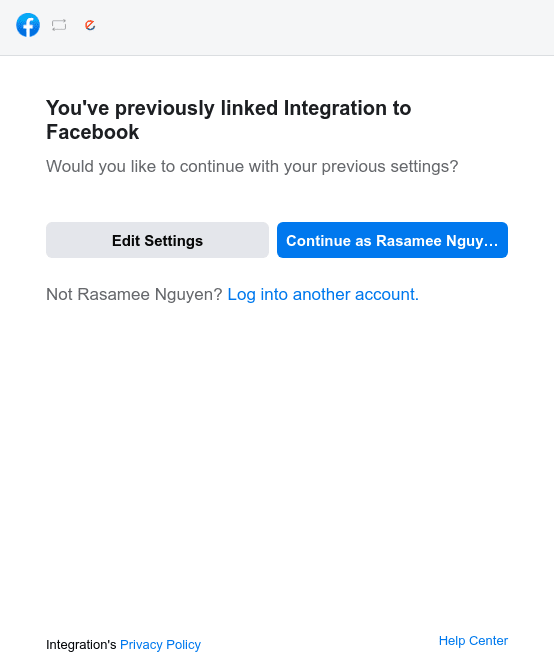
![]() Step 2: Approve the permissions for our application:
Step 2: Approve the permissions for our application:
- Click on the Edit Settings button.
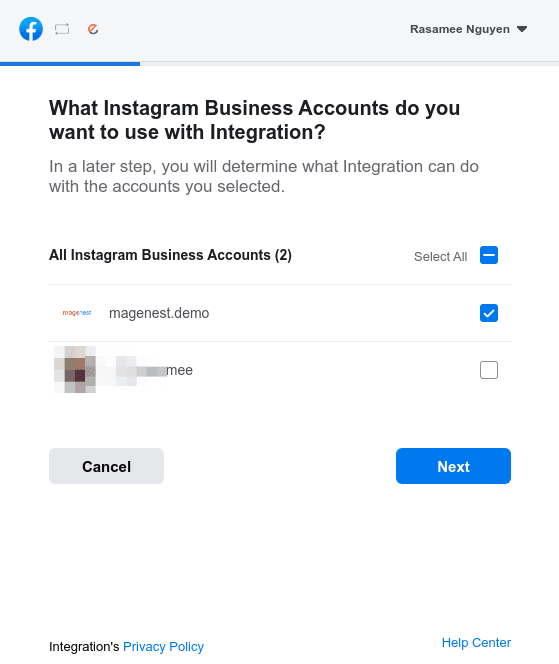
- Choose all Instagram accounts that you want to connect with Magento, then click on the Next button:
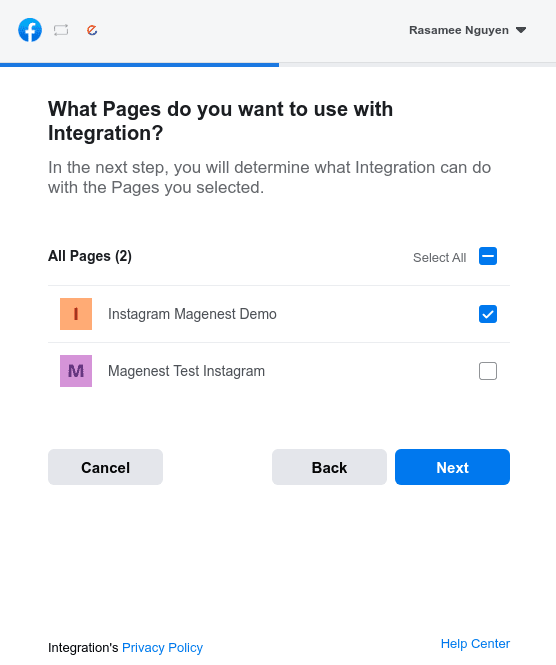
- Choose the all Facebook page connected to the above account and click on the Next button:
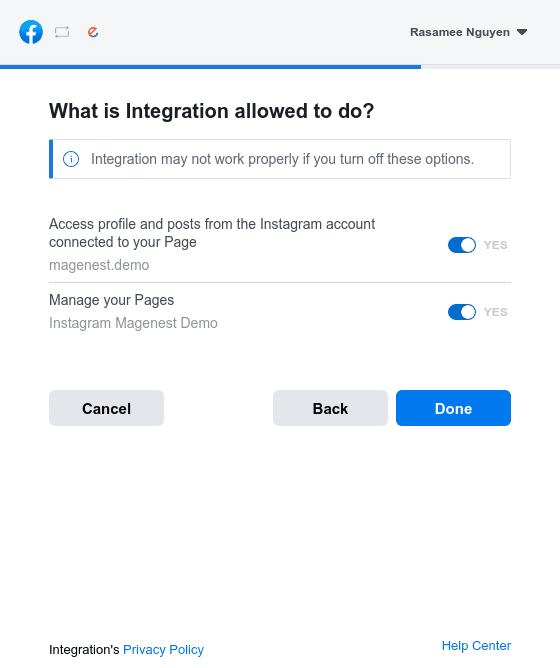
- Approve all the permissions requested for our application and click on the Done button:
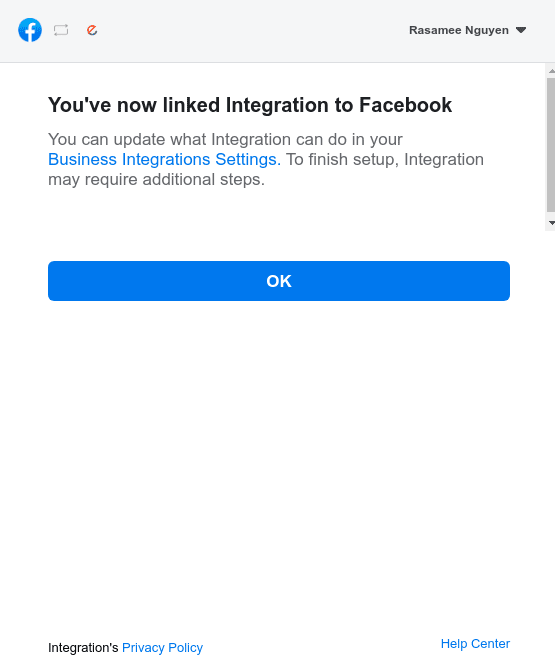
- Click OK to complete the connection and redirect back to your site:
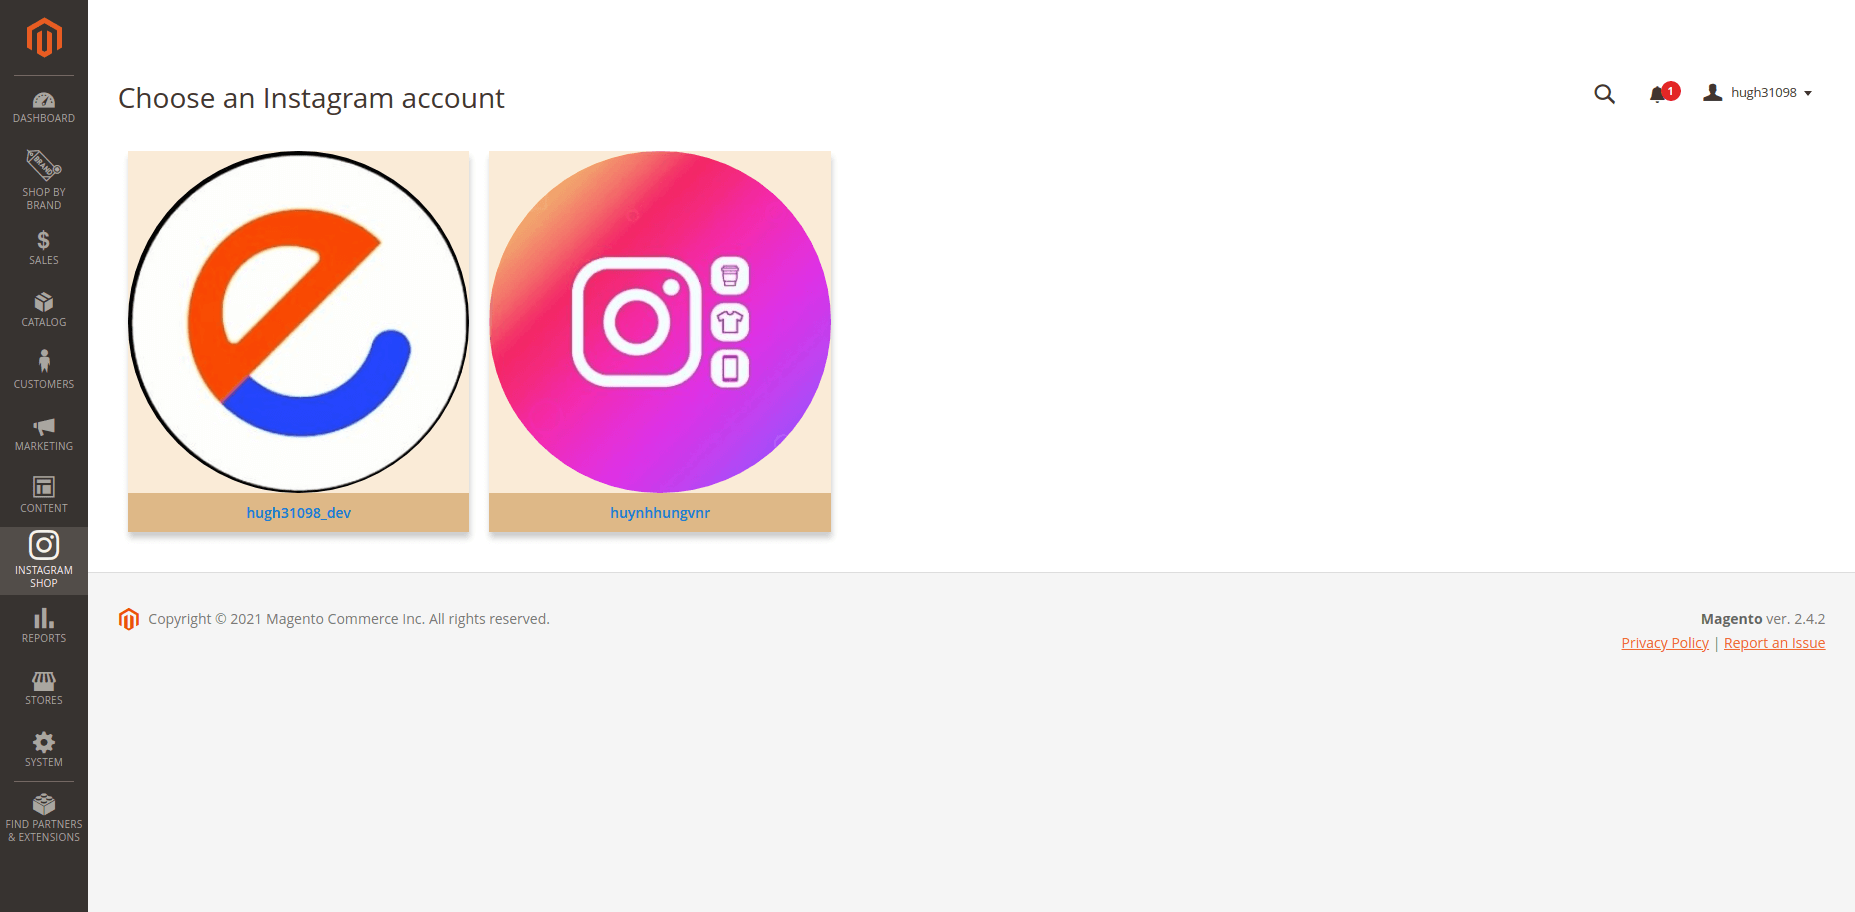
- Choose the Instagram account you want to connect to:
Configuration
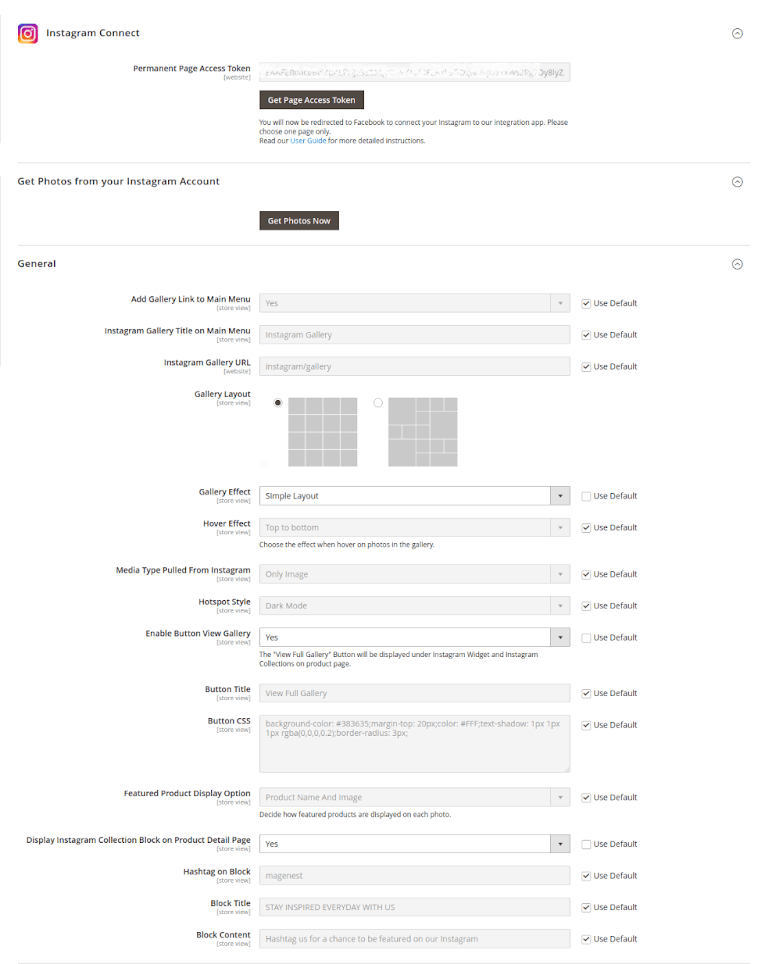
To configure the Instagram Shop, on the Admin sidebar, go to Store > Configuration > Magenest > Instagram Shop
![]() Configurations in General, Instagram Stories and Create Sample Widget sections are editable in Default Scope and can be shared between all scopes. Other configurations are specific to each website and only viewable when switching to a Website Scope.
Configurations in General, Instagram Stories and Create Sample Widget sections are editable in Default Scope and can be shared between all scopes. Other configurations are specific to each website and only viewable when switching to a Website Scope.
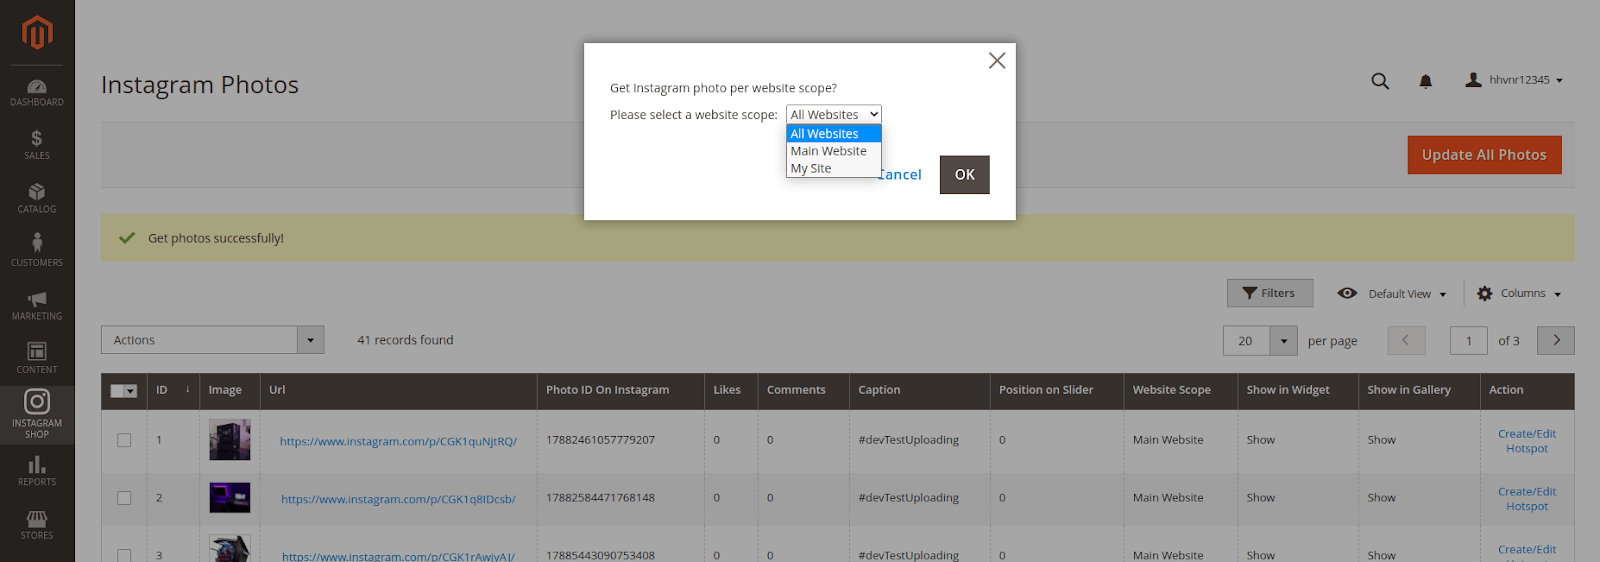
![]() Get Photos on your Instagram Account section:
Get Photos on your Instagram Account section:
Switch scope to your preferred website, then click on the Get Photos Now button to get all photos from the Instagram account connected to that scope.

![]() General
General
- Add Gallery Link to Main Menu: Add the Instagram Gallery category to the top menu bar.
- Gallery Layout: Select the layout to display the Instagram photos on the gallery page.
- Gallery Effect: Select a suitable effect for the gallery page, according to the selected layout above.
- Hover Effect: Choose the effect when hovering on photos in the gallery.
- Media Type Pulled From Instagram: You can choose to pull Only Image or Both Image and Video.
- If you choose to fetch Only Image, note that the video pulled from Instagram will be displayed with only the thumbnail of that video.
- If you choose to fetch Both Image and Video, you should set up and run the Cron Job for your server to update the video links. Otherwise, you’ll have to update the links manually by clicking on the Get Photos Now button above.
- Hotspot Style: Choose the style of hotspots that will be displayed in the popup.
- Enable Button View Gallery: Display a button under the Instagram Slider and Instagram Collection on the Product page.
- Button Title: The title of the button under the Instagram Slider.
- Button CSS: Flexible to change the button style with CSS.
- Featured Product Display Option: There are 2 options for the display: Product Name & Product Name with Image.
- Display Instagram Collection Block on Product Detail Page: Choose Yes to show related Instagram Photos on the product page
- Hashtag on Block: The hashtag linked with an Instagram hashtag, displayed in the Instagram block on the product detail page.
- Block Title: The title of the Instagram block on the product detail page.
- Block Content: The content of the Instagram block on the product detail page.
![]() Remember to save the configuration.
Remember to save the configuration.
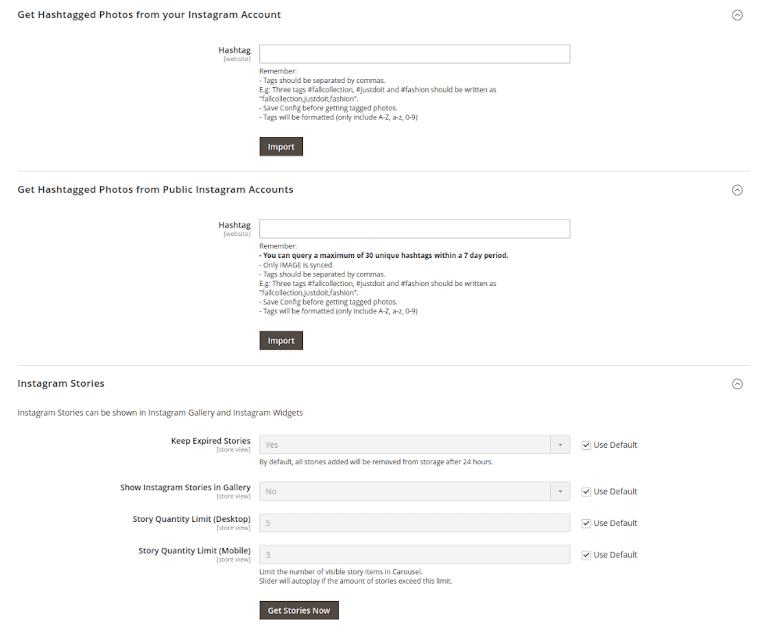
![]() Get Hashtagged Photos from your Instagram Account: Pull specific photos using specified hashtags from your connected Instagram account to Magento 2 store.
Get Hashtagged Photos from your Instagram Account: Pull specific photos using specified hashtags from your connected Instagram account to Magento 2 store.
- Hashtag: Tags should be separated by commas.
Remember to Save Configuration before get tagged photos
![]() Get Hashtagged Photos from Public Instagram Accounts: Pull top photos using specified hashtags from all public Instagram accounts to your Magento 2 store.
Get Hashtagged Photos from Public Instagram Accounts: Pull top photos using specified hashtags from all public Instagram accounts to your Magento 2 store.
- Hashtag: Tags should be separated by commas.
![]() Instagram Stories: Pull the latest photo stories from your personal Instagram account to your Magento 2 store (Video stories not supported currently).
Instagram Stories: Pull the latest photo stories from your personal Instagram account to your Magento 2 store (Video stories not supported currently).
- Keep Expired Stories: Choose “Yes” to keep stories from being deleted after 24 hours. Undeleted stories are saved on your Magento 2 sites and can be viewed regardless of their availability on Instagram.
- Show Instagram Stories in Gallery: Choose to display Instagram Stories on the Gallery page or not.
- Story Quantity Limit: Choose the maximum number of story items displayed in the Stories Carousel at a time. If the number of stories exceeds this amount, the Carousel will scroll automatically to display extra items.
Create an Instagram Widget
![]() Admin can add the Instagram widget by going to Content > Widget > Add Widget
Admin can add the Instagram widget by going to Content > Widget > Add Widget
![]() On the widget page
On the widget page
- Type: Choose an Instagram Slider
- Design Package/Theme: Select the current theme that is activated on your site
- Then click on Save and Continue Edit.
![]() On the Storefront Properties section
On the Storefront Properties section
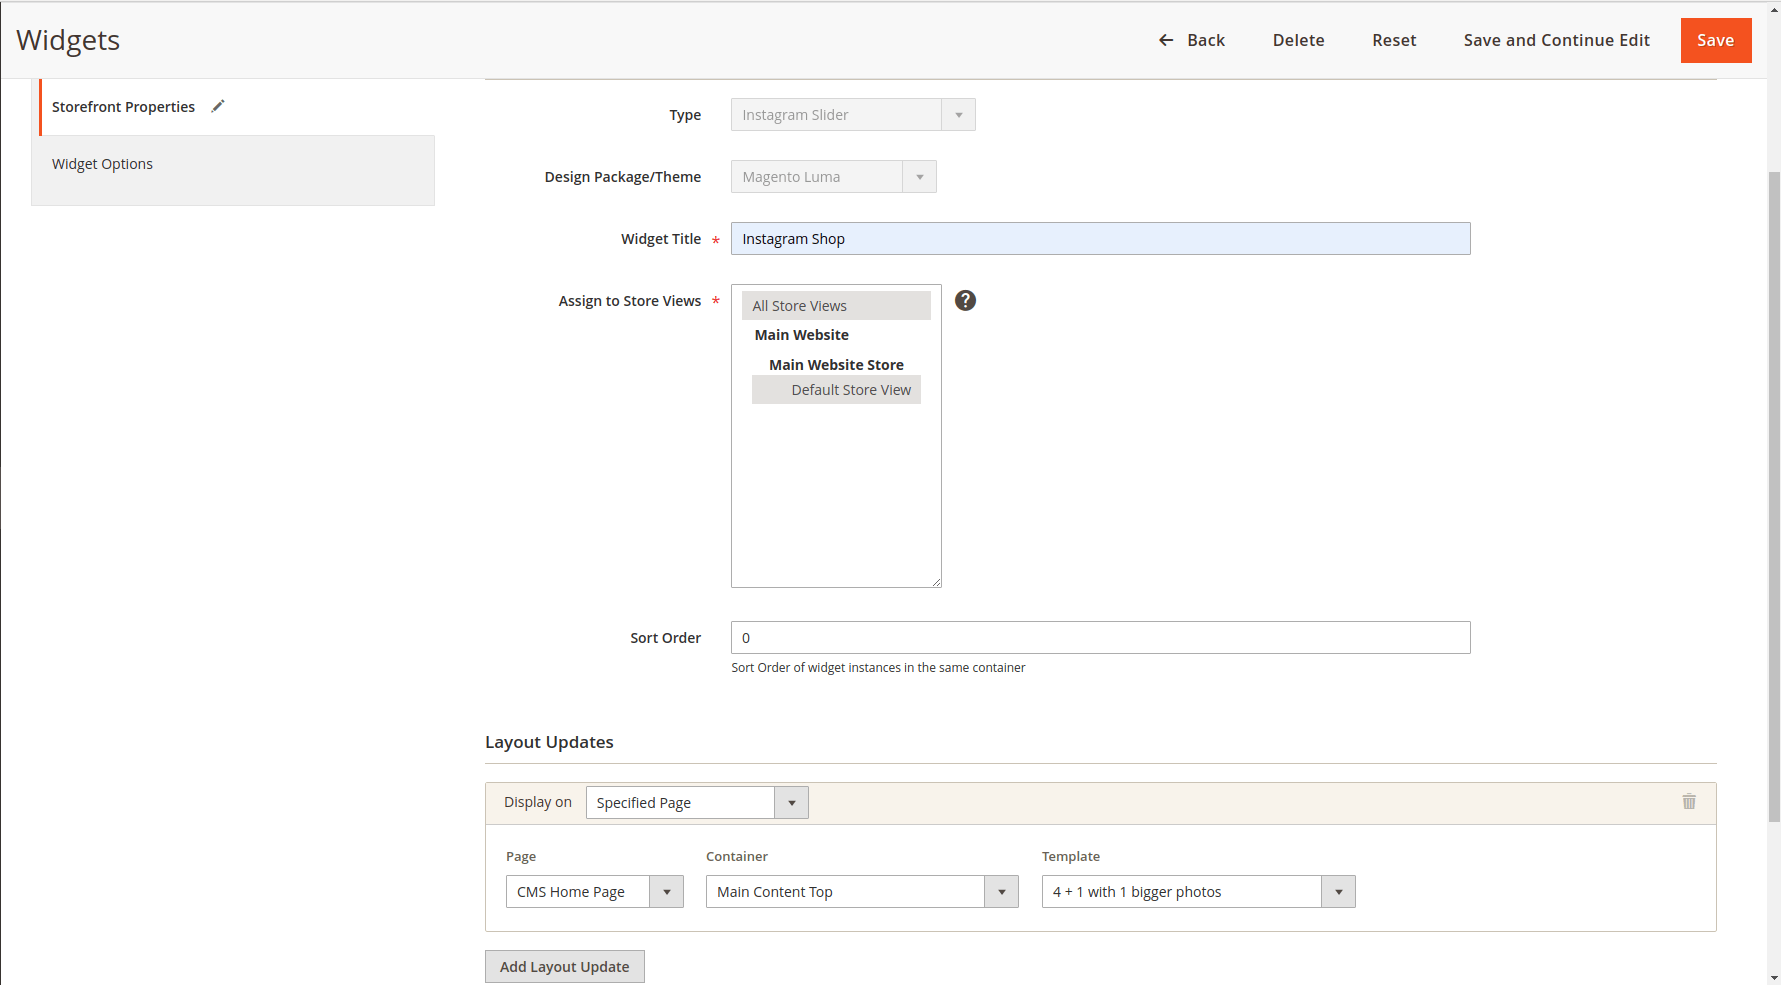
- Widget Title: Enter the title of the Instagram widget that will be shown on the front-end.
- Then assign the widget to the Store view you need
- Sort Order: Set the order of the widget that will appear in the same container
- Layout Updates: Choose the page/position to display the widget as your wish. You can choose 1 of 4 widget layout Templates: Single row, 3x3, 4x3 and 4 + 1 with 1 bigger photo.
![]() On the Widget Options section
On the Widget Options section
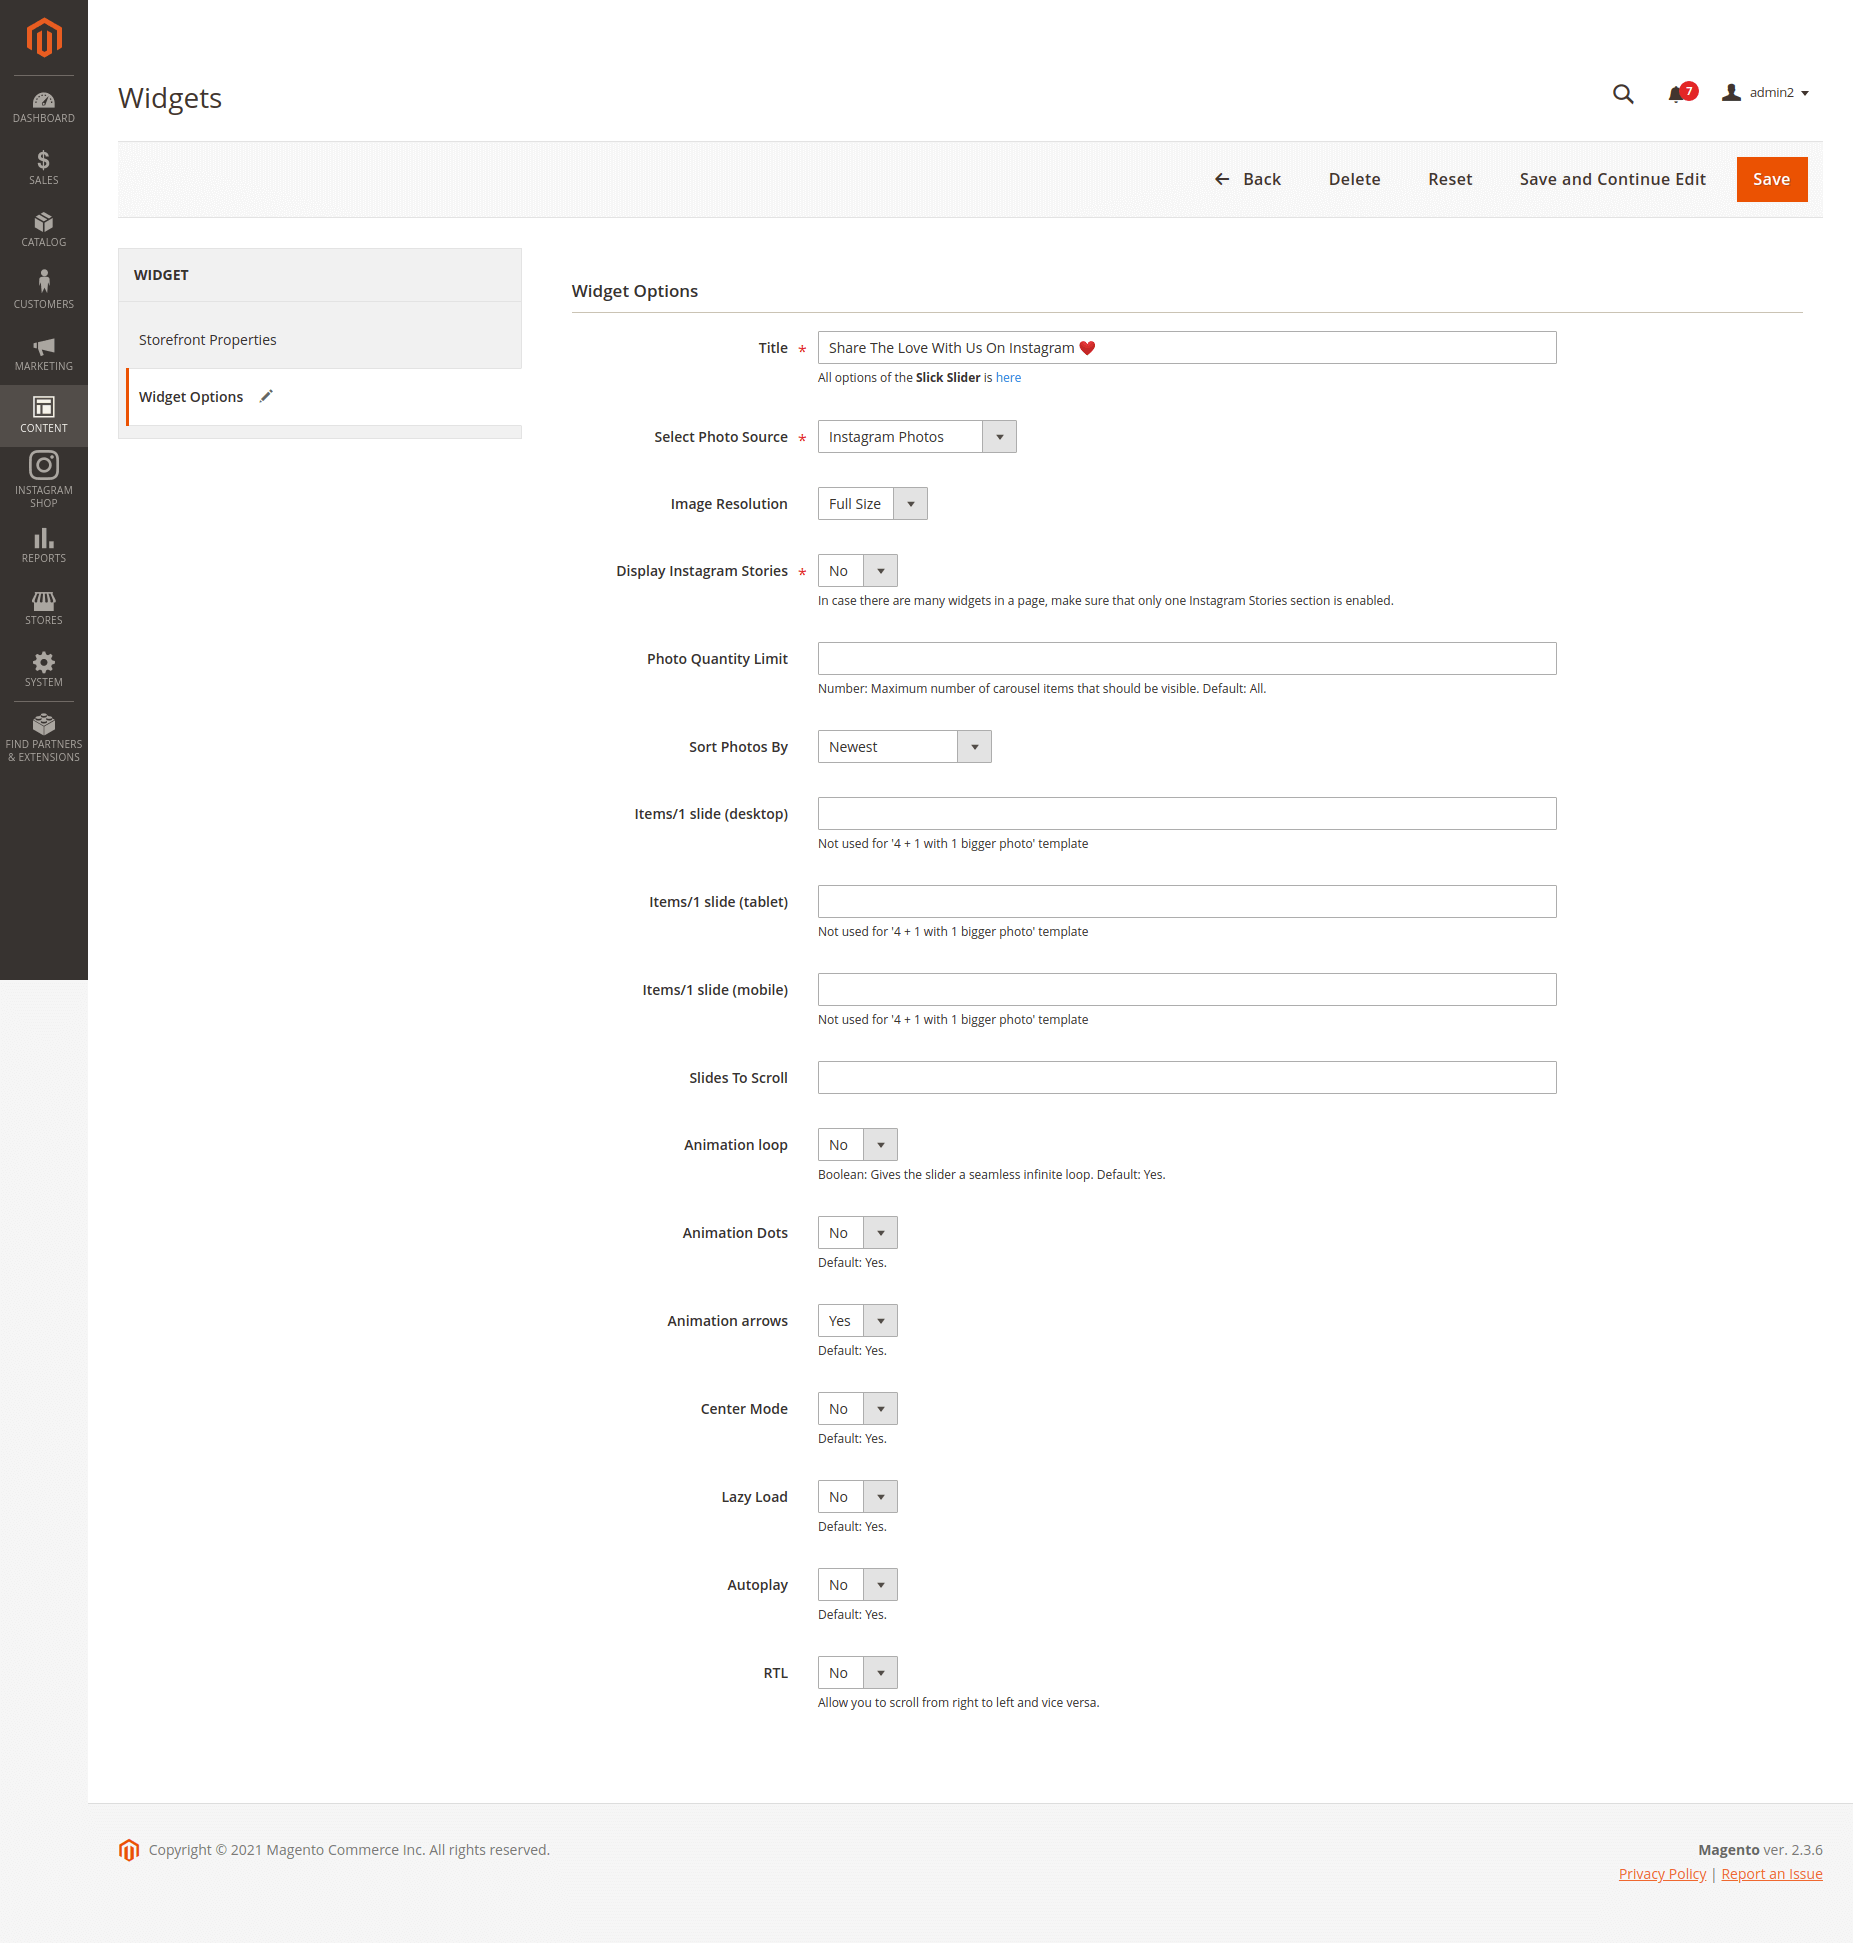
- Title: Enter the title of the Instagram widget to be displayed on the front-end store.
- Select Photo Source: Choose Instagram Photos or Instagram Top Photos.
- Image Resolution: sets the image resolution based on the size of photo.
- Display Instagram Stories: Choose whether to display Instagram stories in this slider or not.
- Photo Quantity Limit: Enter the maximum number of carousel items that could be visible. If this field is left blank, the default setting is All existing carousels.
- Sort Photos By: You can select to sort photos from the Newest, Oldest, Most Liked, and Most Commented.
- Items/1 slide (desktop): Enter the number of items per slide on desktop view
- Items/1 slider (tablet): Enter the number of items per slide on tablet view
- Items/1 slider (mobile): Enter the number of items per slide on mobile view
- Slides to Scroll: Enter the number of slides that will be displayed in one scroll
- Animation loop: Choose Yes to make the slider into an infinitive loop instead of ending at the final image.
- Animation Dots: Choose Yes to turn the slider page using animation dot icon
- Animation Arrows: Choose Yes to turn the slider page using the animation arrow icon
- Center Mode: Choose Yes to display the first image at the center of the slider
- Center Padding: If you choose Yes in Center Mode, you’ll be able to set the distance between the center image and the rest of the same slide.
- Lazy Load: Choose Yes if you want to enable the lazy load and optimize the slider speed
- Autoplay: Choose Yes if you want the slider to scroll automatically
- Autoplay Speed: Set the speed for the slider display automatically
- RTL: Choose Yes if you want the slider to scroll from right to left and vice versa
Manage Photos
![]() All Photos pulled from Instagram are accessible in separate Photos Grid for each type:
All Photos pulled from Instagram are accessible in separate Photos Grid for each type:
Instagram Photos
Instagram Hashtagged Photos
Instagram Top Photos
![]() Each Grid can manage photos from all Scopes, and allow updating photos on all websites or specific ones.
Each Grid can manage photos from all Scopes, and allow updating photos on all websites or specific ones.
Manage (Personal) Photos
![]() On Magento backend, go to Instagram Shop > Instagram Photo to see all personal photos pulled from connected Instagram accounts.
On Magento backend, go to Instagram Shop > Instagram Photo to see all personal photos pulled from connected Instagram accounts.
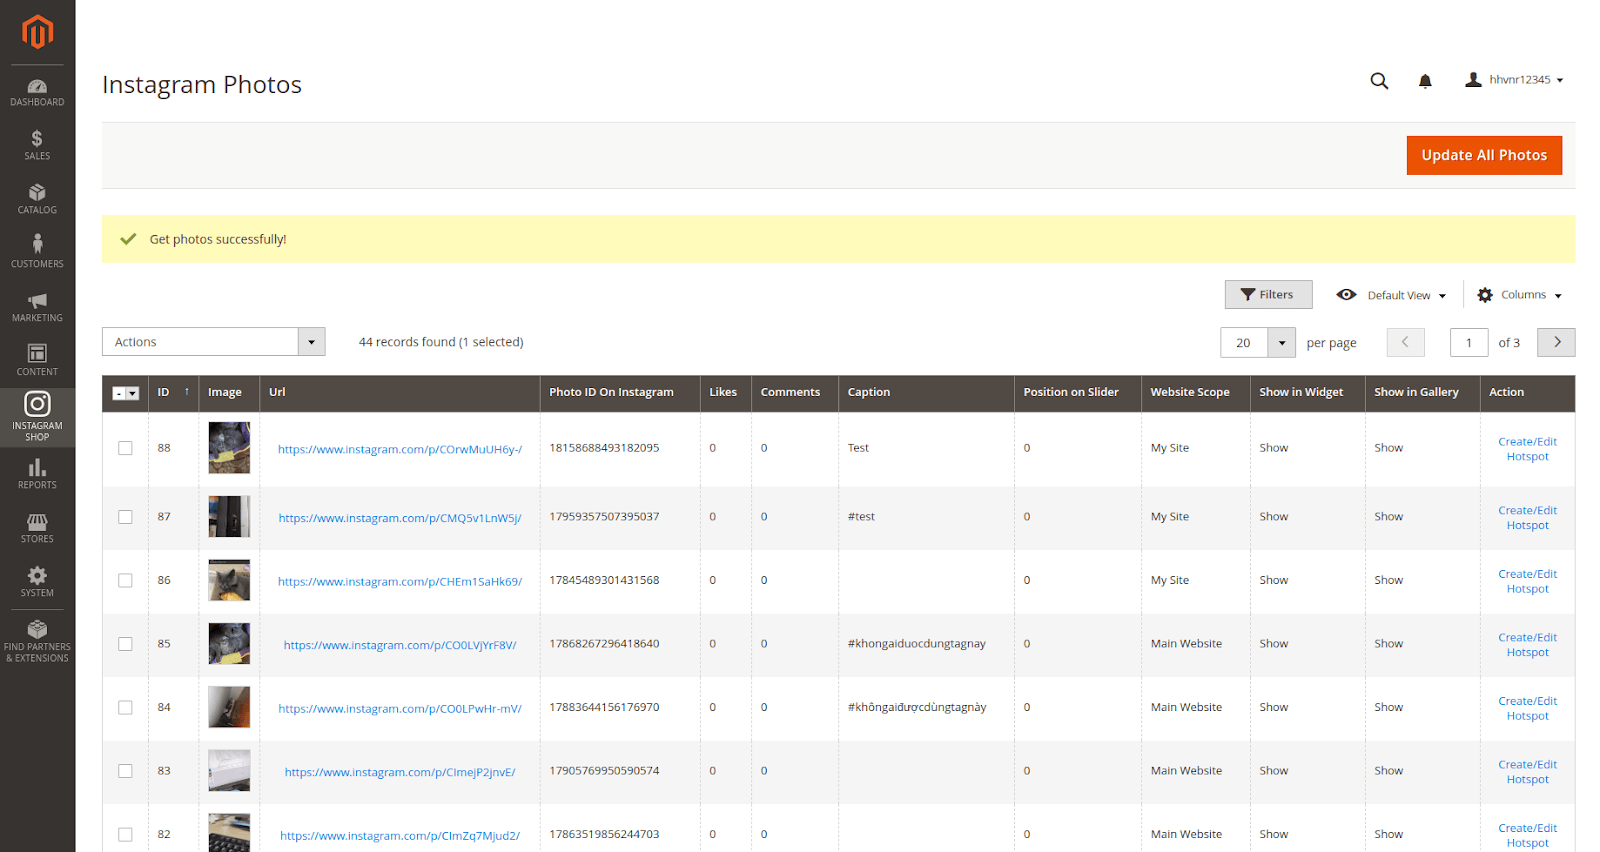
![]() You can choose Actions to delete image(s); show or hide the selected image(s) in the Instagram Widget/Gallery page.
You can choose Actions to delete image(s); show or hide the selected image(s) in the Instagram Widget/Gallery page.
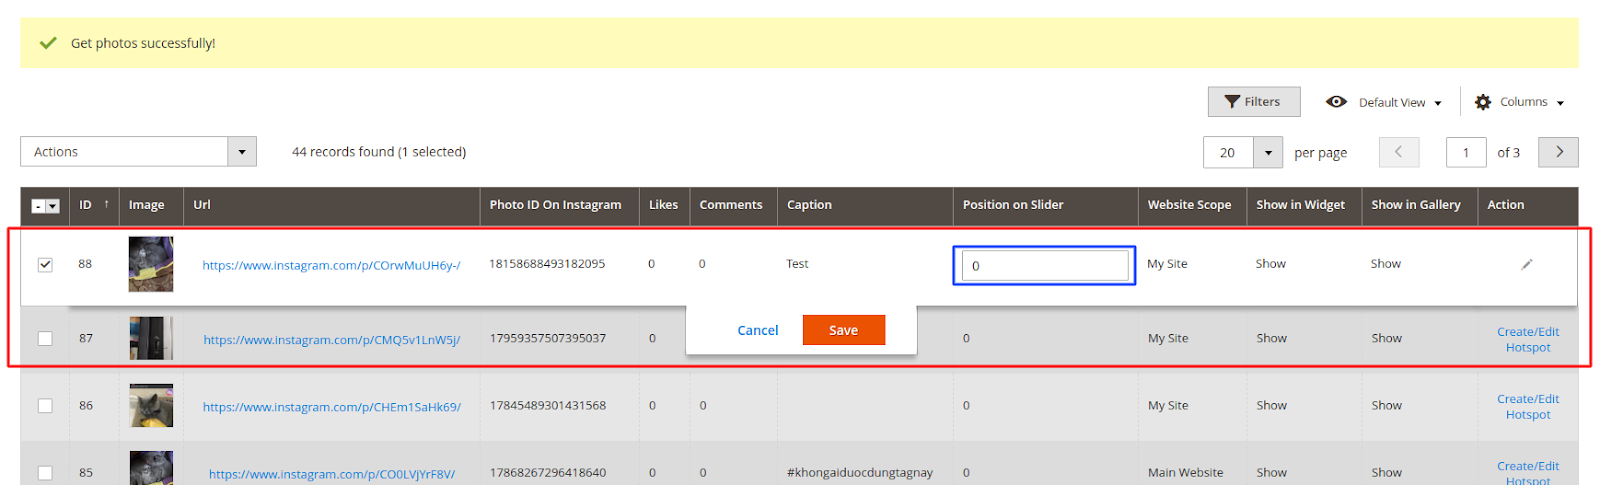
![]() To prioritize a photo in sliders, click on its entry in the grid, and modify the Position on Slider column. Photos with a higher position number will be displayed first.
To prioritize a photo in sliders, click on its entry in the grid, and modify the Position on Slider column. Photos with a higher position number will be displayed first.
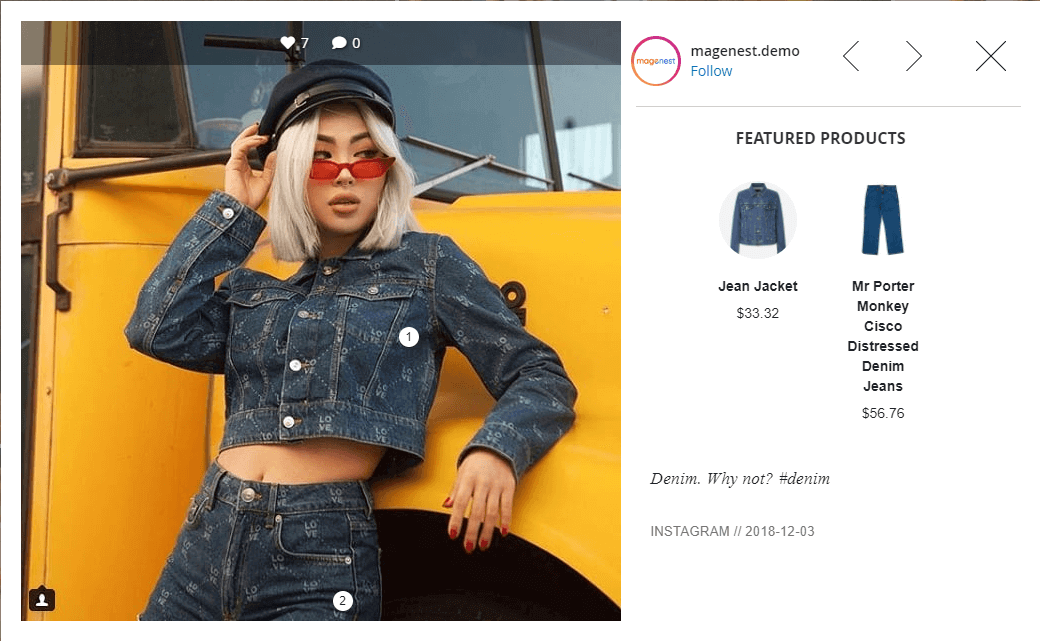
Add featured product hotspots to a photo
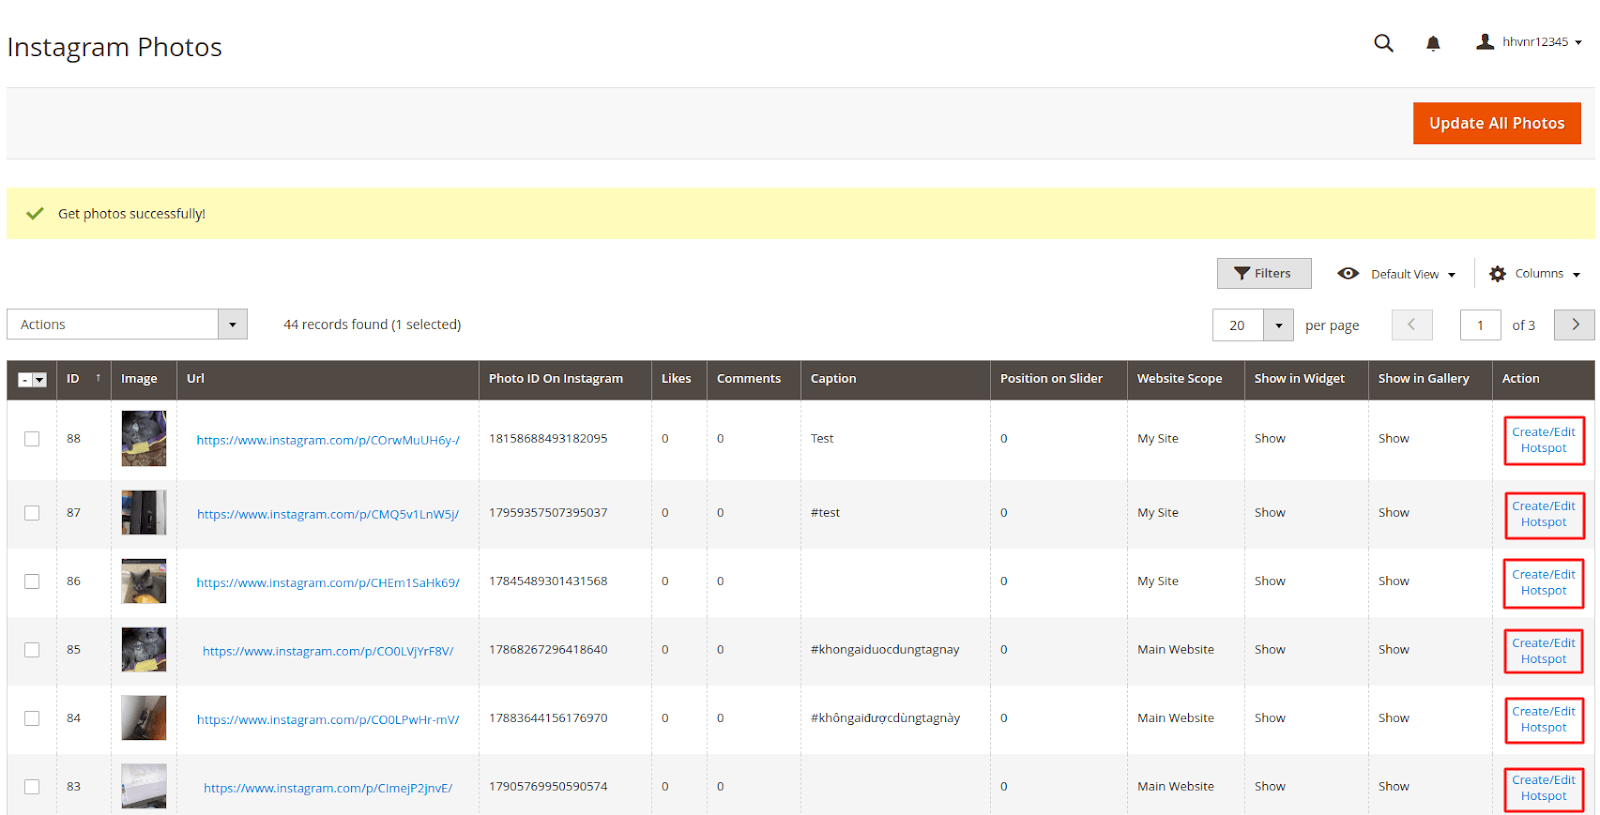
![]() To create the hotspots to pin on the featured products on Instagram photos (which is displayed in the Instagram Gallery on Magento Store), go to Instagram Shop > Instagram Photo. You will see the option to Create/Edit Hotspot for each photo in the grid table.
To create the hotspots to pin on the featured products on Instagram photos (which is displayed in the Instagram Gallery on Magento Store), go to Instagram Shop > Instagram Photo. You will see the option to Create/Edit Hotspot for each photo in the grid table.
![]() On the Hotspot page
On the Hotspot page
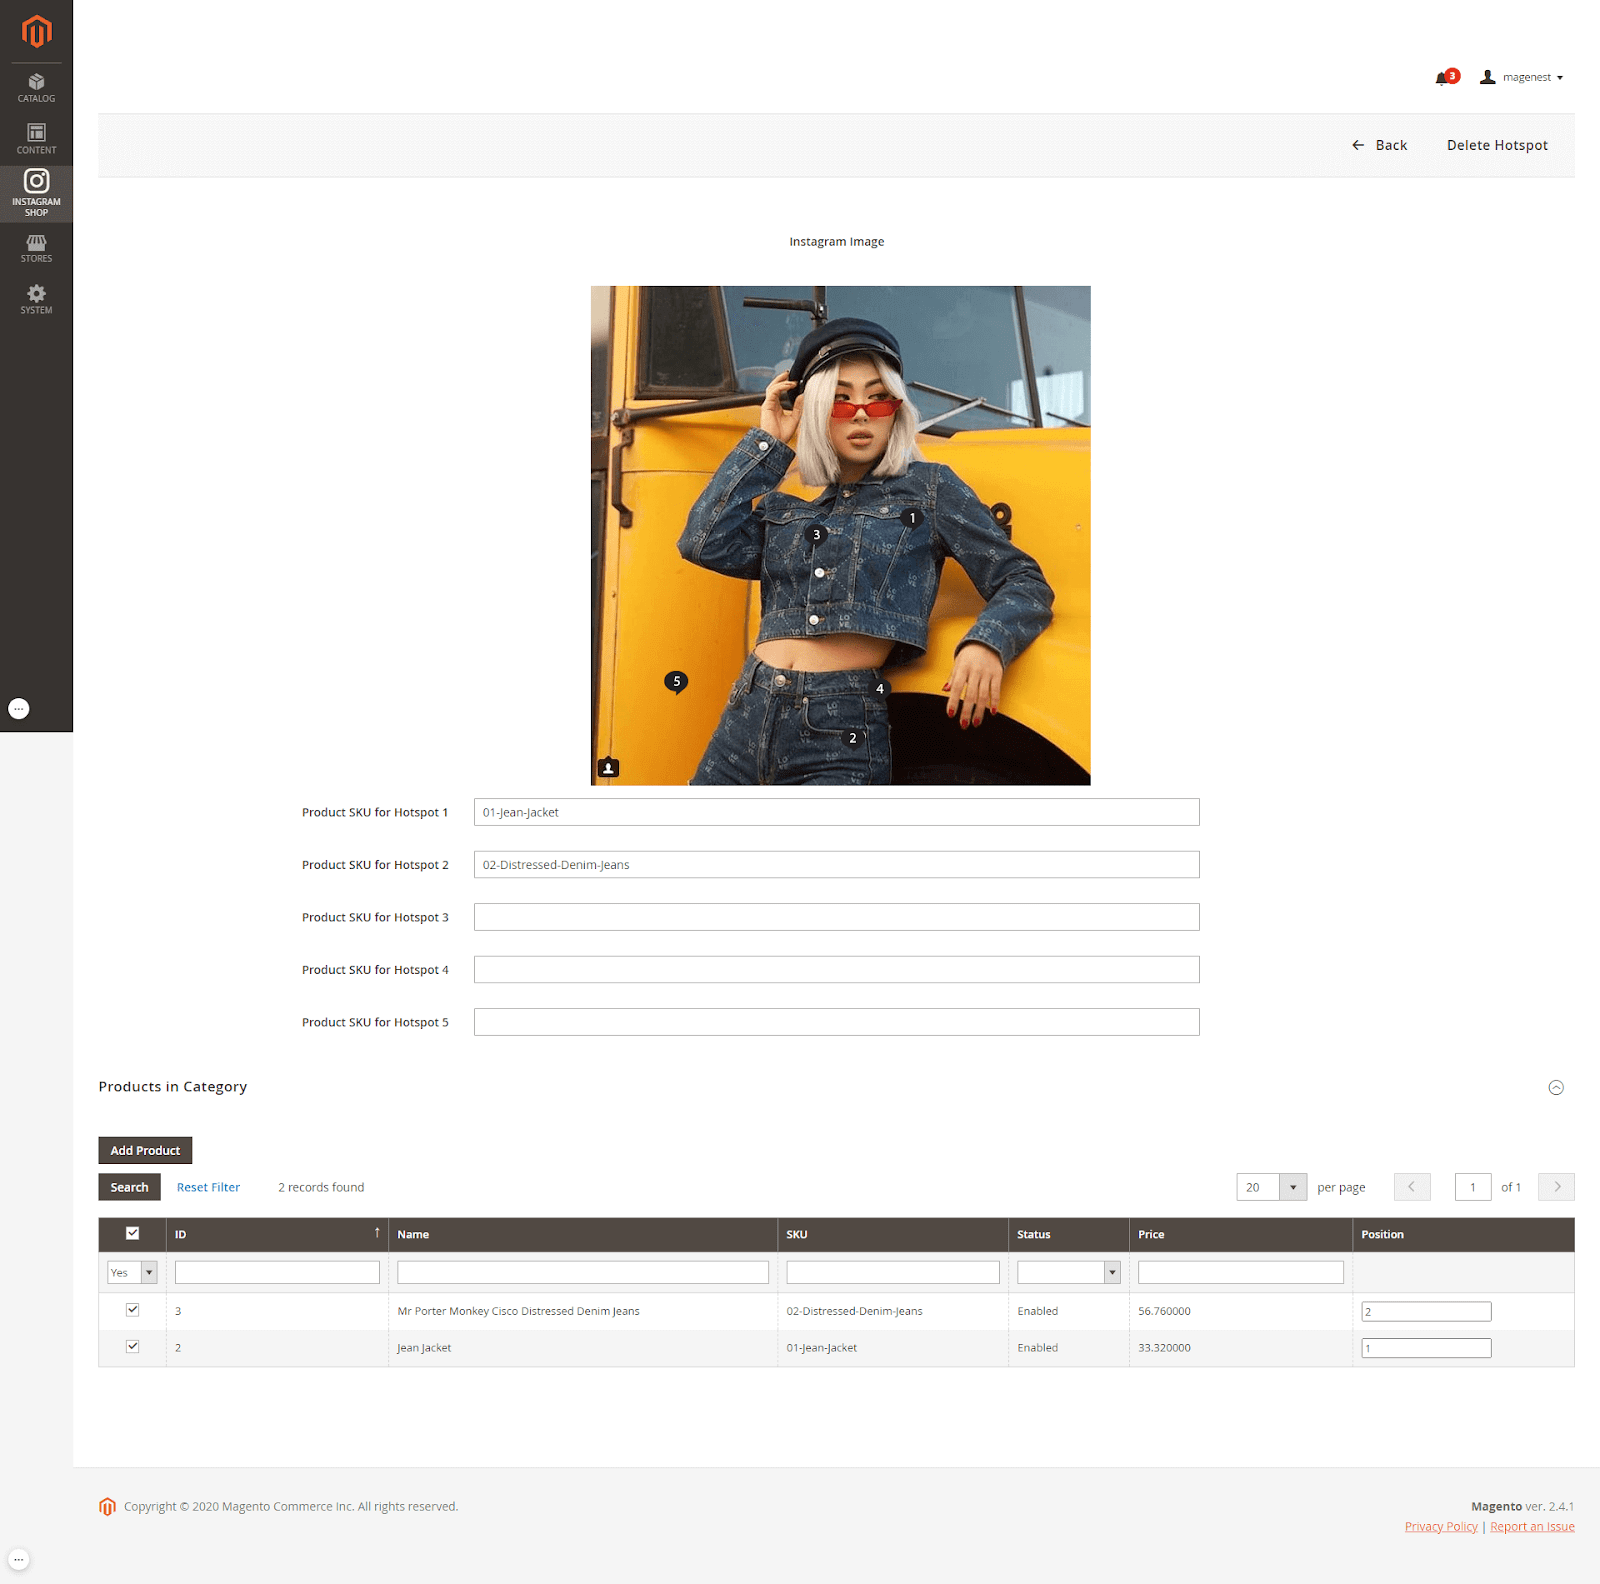
- You can add up to 5 hotspots to an Instagram photo by drag and drop each hotspot to the item in the photo.
- Use the Product in Category section to search and attach Products to the Photo:
- To enable a product, tick the checkbox at the leftmost of the table, and set position at the rightmost column from 1 to 5.
- Click on Add Product button to confirm and save the hotspot configuration.
- If you want to add the featured products to the photos without hotspots, only add Product SKU and DO NOT drag the hotspot into the photo.
Manage Hashtagged Photos
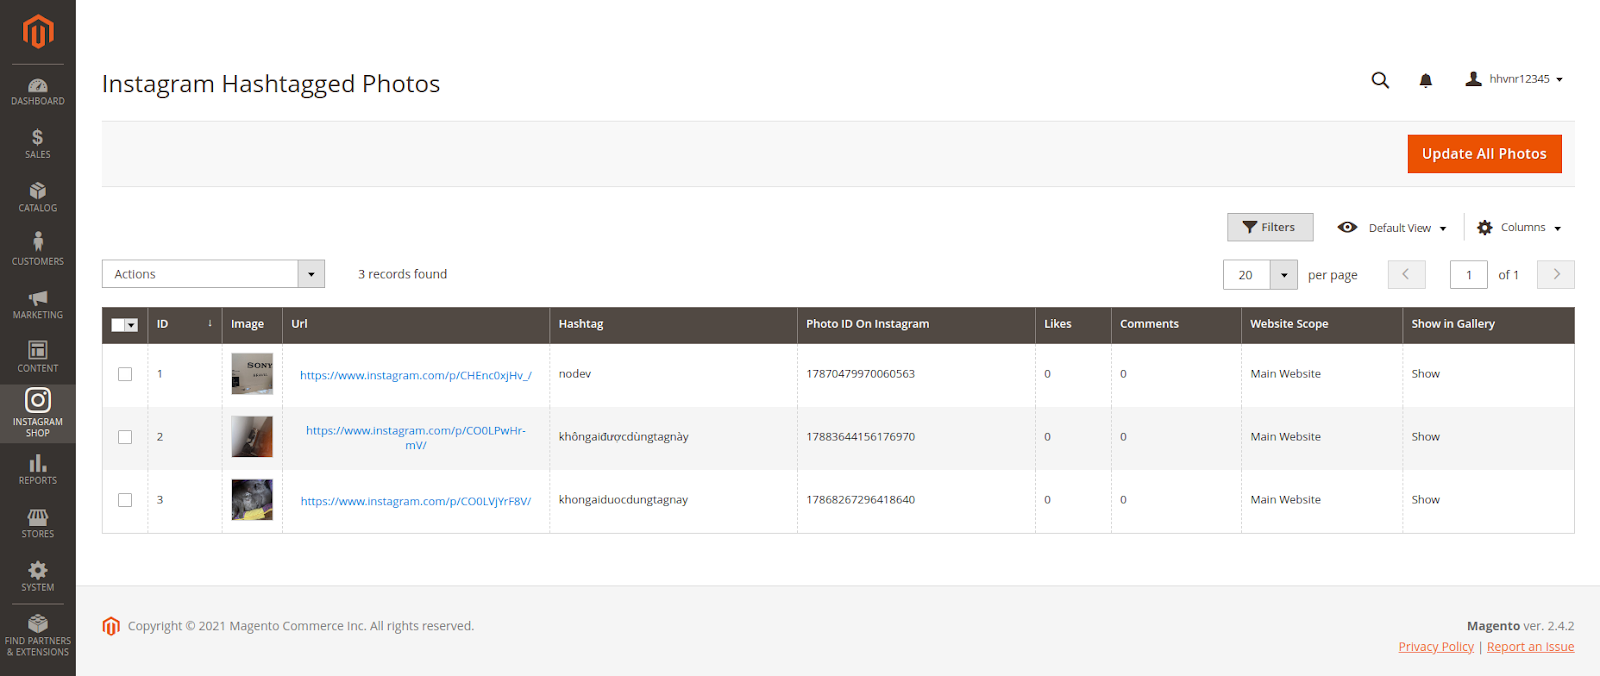
- To manage your personal photos with matched hashtags, go to Instagram Shop > Instagram Hashtagged Photo
- On the hashtagged grid, you can use mass Actions to delete the selected image(s) or toggle its visibility in the Instagram Gallery page.
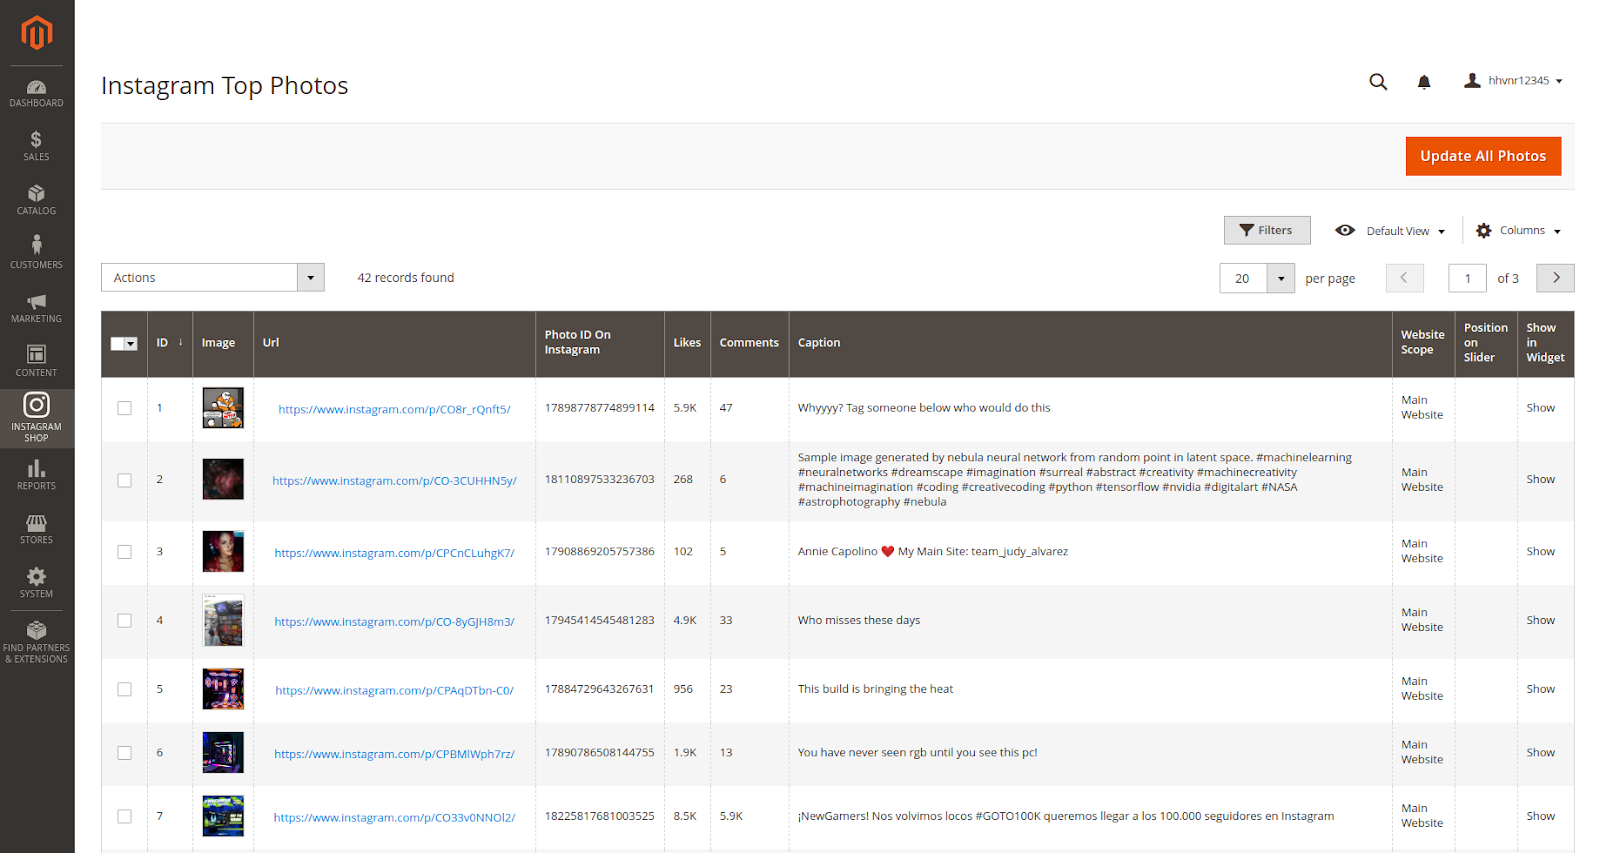
Manage Top Photos
- Instagram Shop > Instagram Top Photo to manage top public photos from Instagram that matched the hashtags you’ve specified.
- With the Top Photos grid, you can use mass actions to delete the selected image(s) or toggle its visibility in all Instagram Widgets.
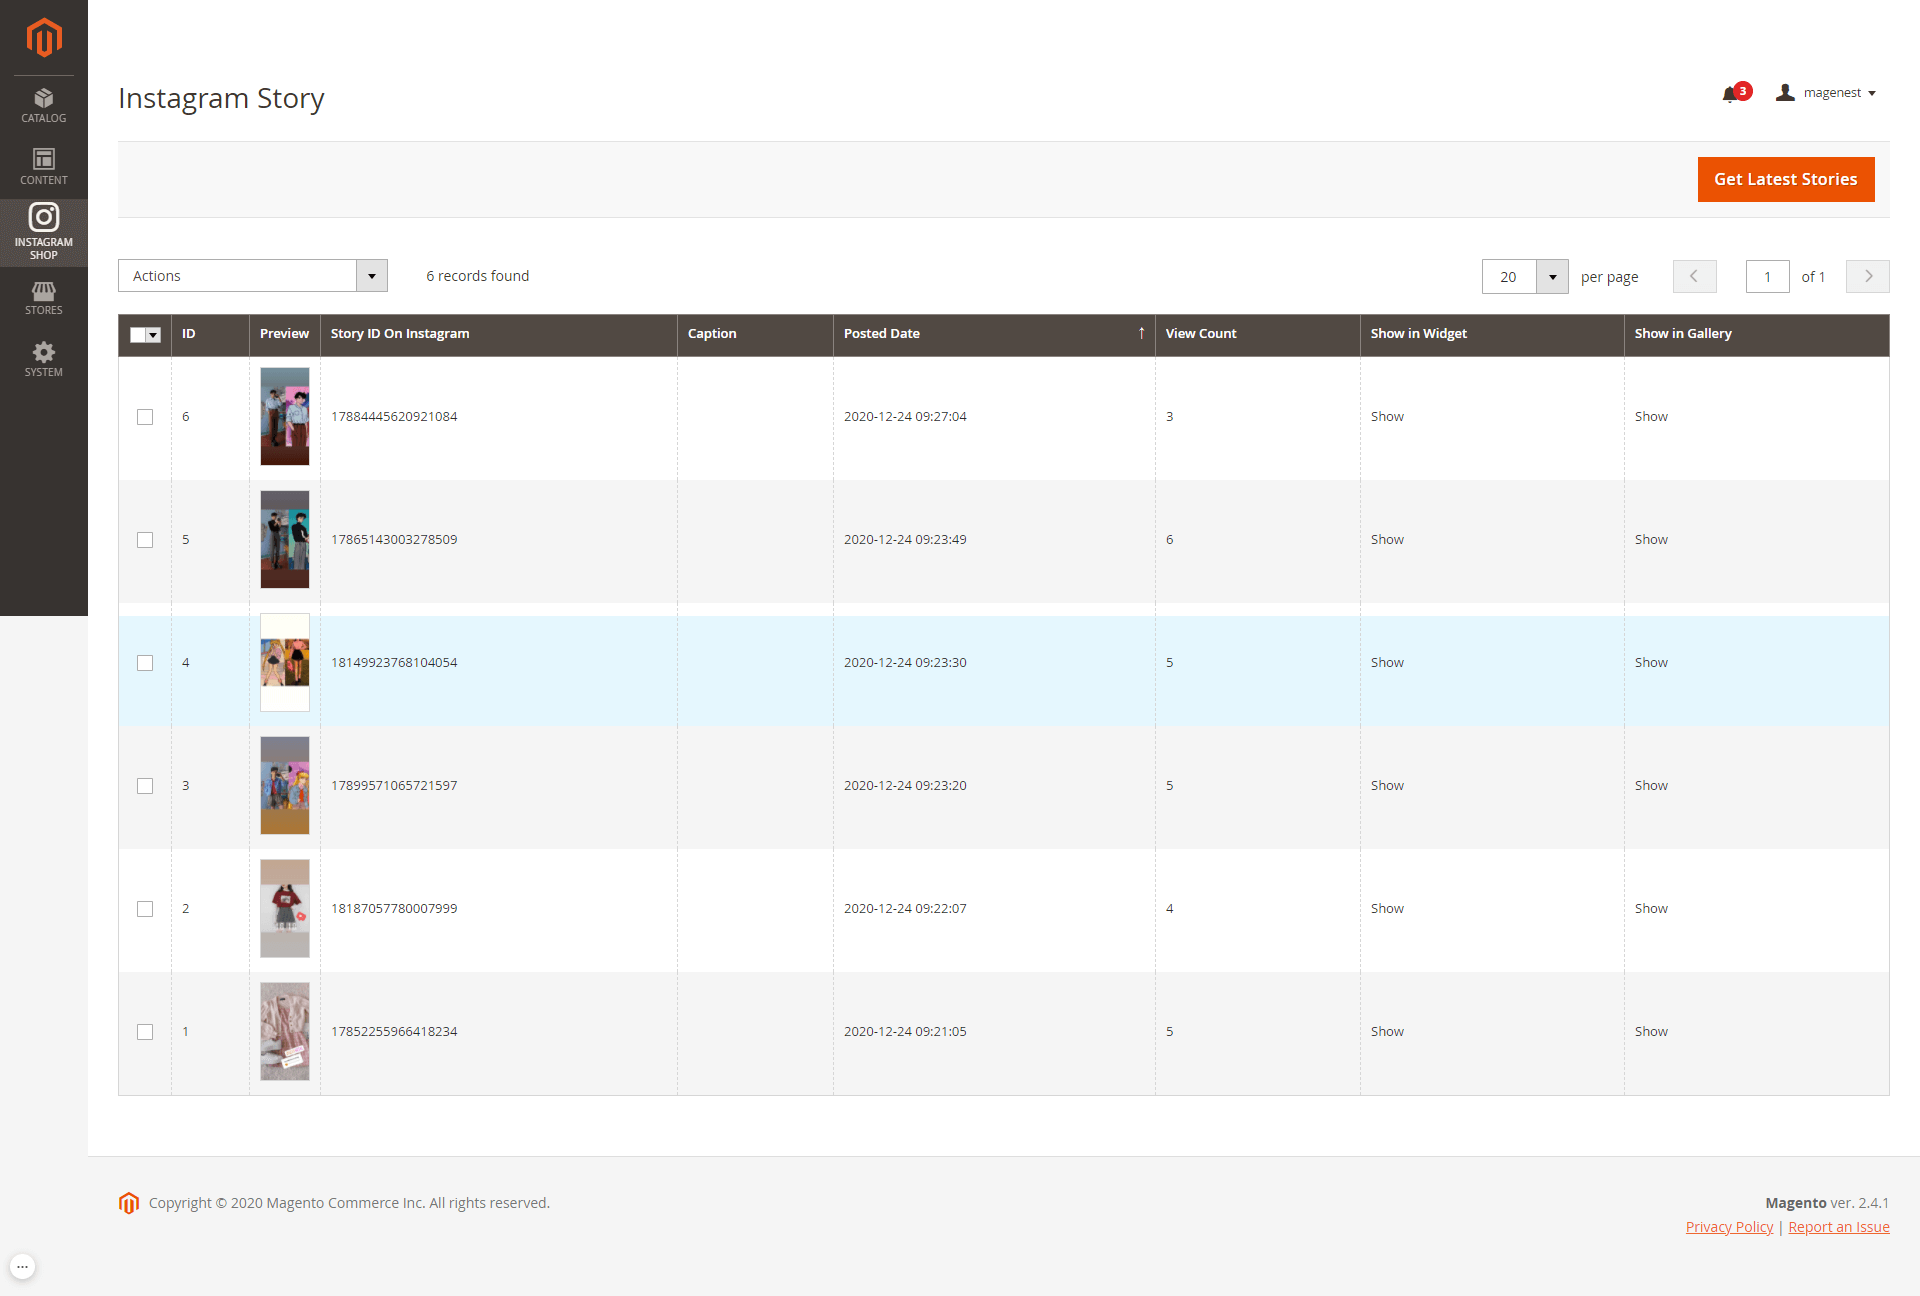
Manage Stories
- Go to Instagram Shop > Instagram Story to see all the stories pulled from your Instagram account.
- Similar to Photos Grid, Story grid displays stories from all scope and can pull the latest stories from all scopes/specific scope.
- You can choose Actions to delete, show, or hide the selected image(s) displayed in the Instagram widget/gallery page.
Photos Indexer
![]() All Photos pulled from Instagram are scheduled to be downloaded and resized locally using Indexer. Photos that haven't been downloaded are full-size and accessible using Facebook URL instead.
All Photos pulled from Instagram are scheduled to be downloaded and resized locally using Indexer. Photos that haven't been downloaded are full-size and accessible using Facebook URL instead.
By default, Indexer will periodically process fetched Photos in the background. If you require downloading and resizing Photos right after it was fetched, visit System > Index Management and set our Indexer mode to Update On Save instead of Update By Schedule.

- Update By Schedule mode requires Magento crontab installed on the system. |
|---|
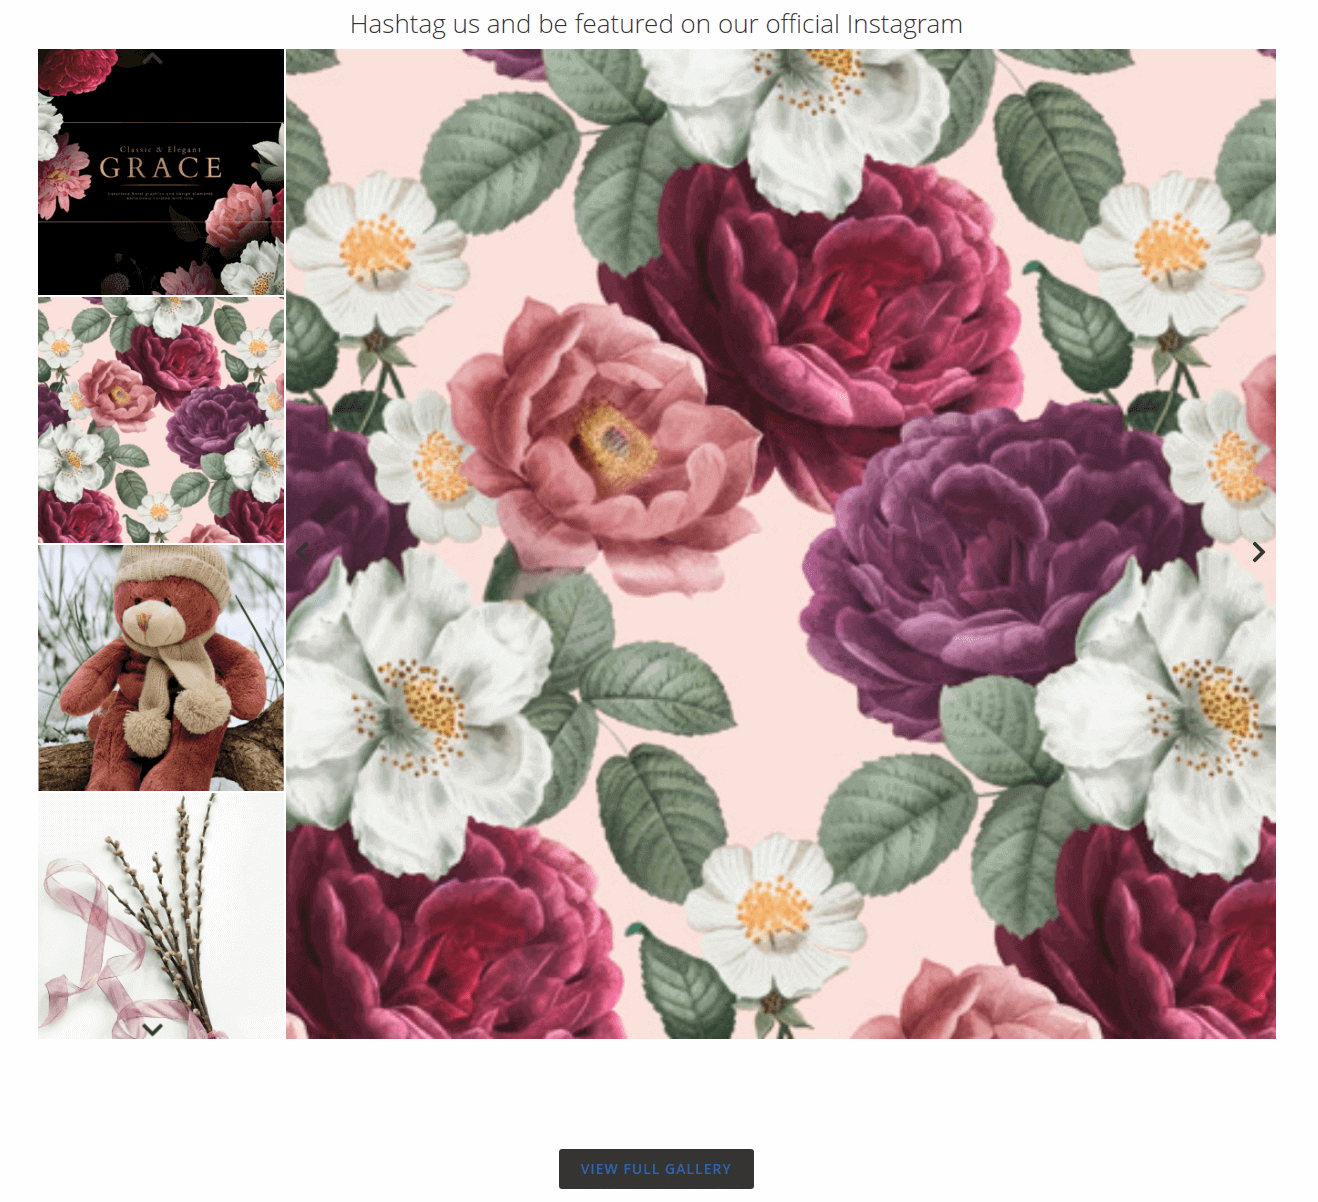
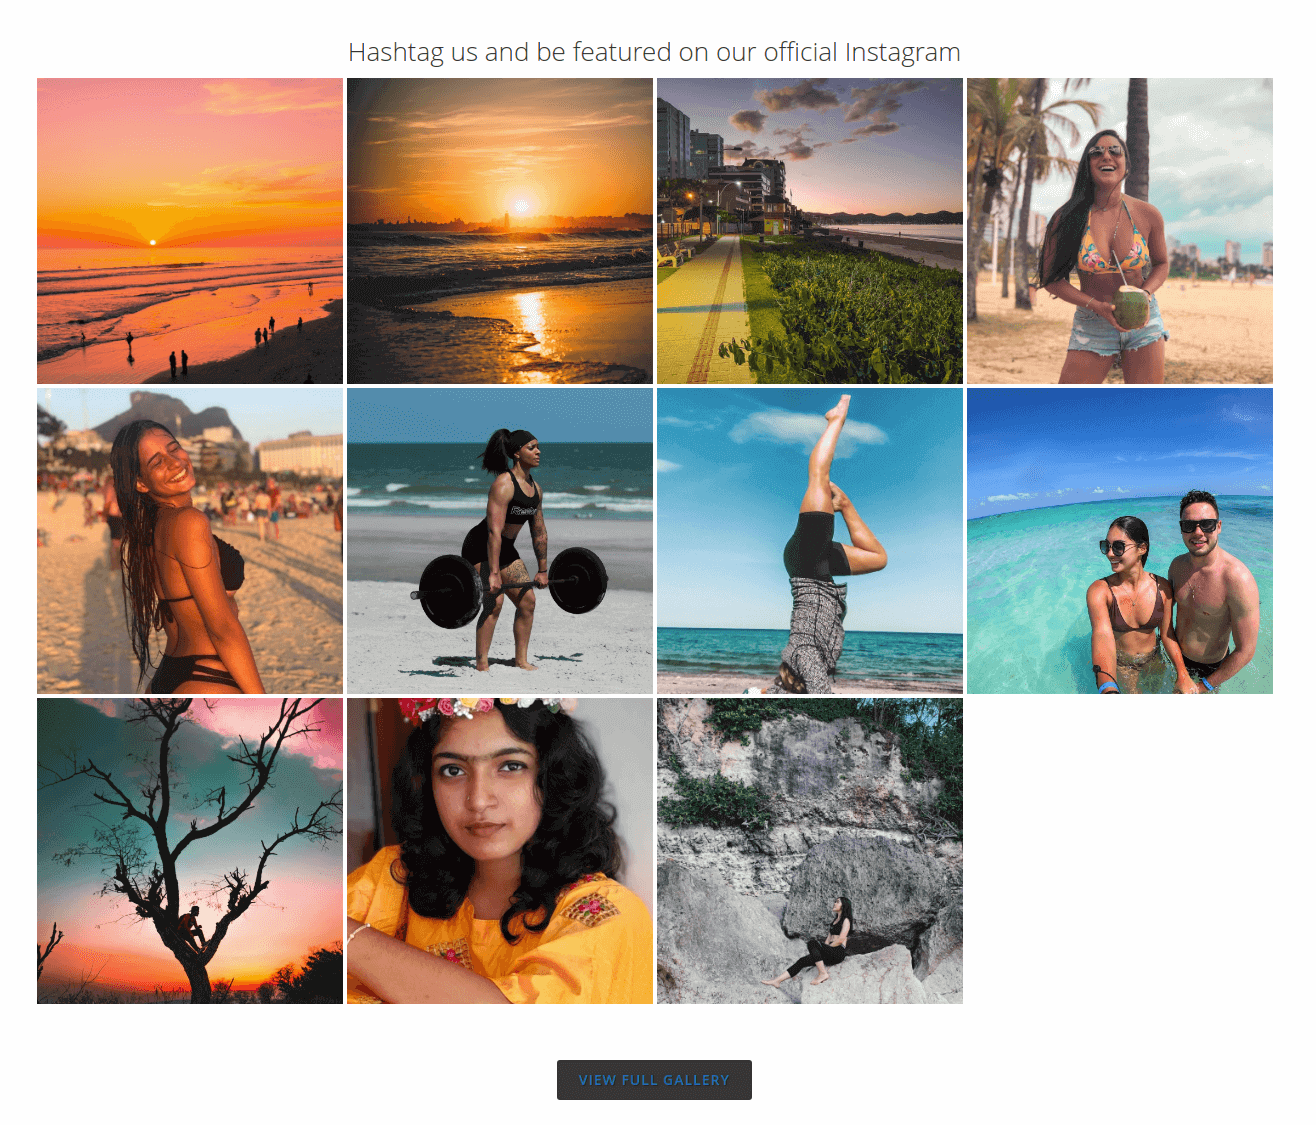
Storefront
Widget Slider
![]() Example Configuration
Example Configuration
![]() Configuration 1
Configuration 1
- Template: 4 + 1 with 1 bigger photos
- Select Photo Source: Instagram Photos
- Sort Photos By: Newest
![]() Configuration 2
Configuration 2
- Template: 4 x 3
- Select Photo Source: Instagram Top Photos
- Sort Photos By: Most Liked
![]() Configuration 3
Configuration 3
- Template: 4 + 1 with 1 bigger photo
- Select Photo Source: Instagram Top Photos
- Display Instagram Stories: Yes
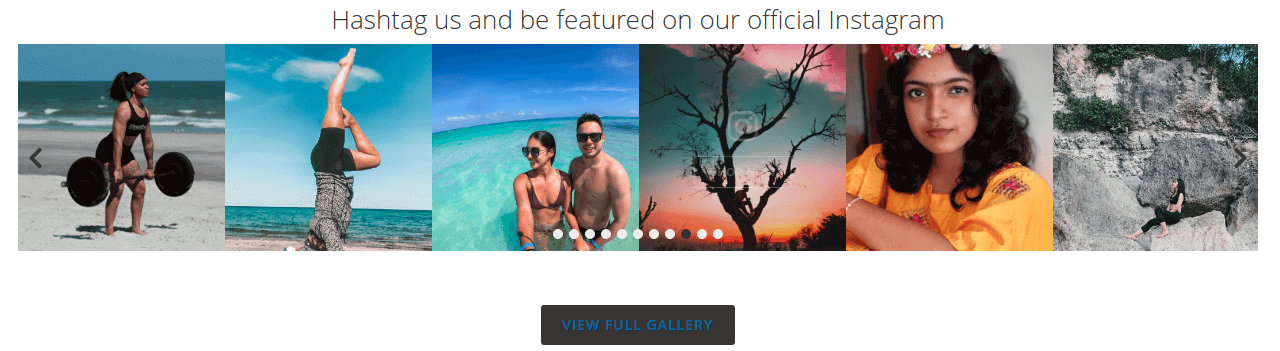
![]() Template: Single row (default)
Template: Single row (default)
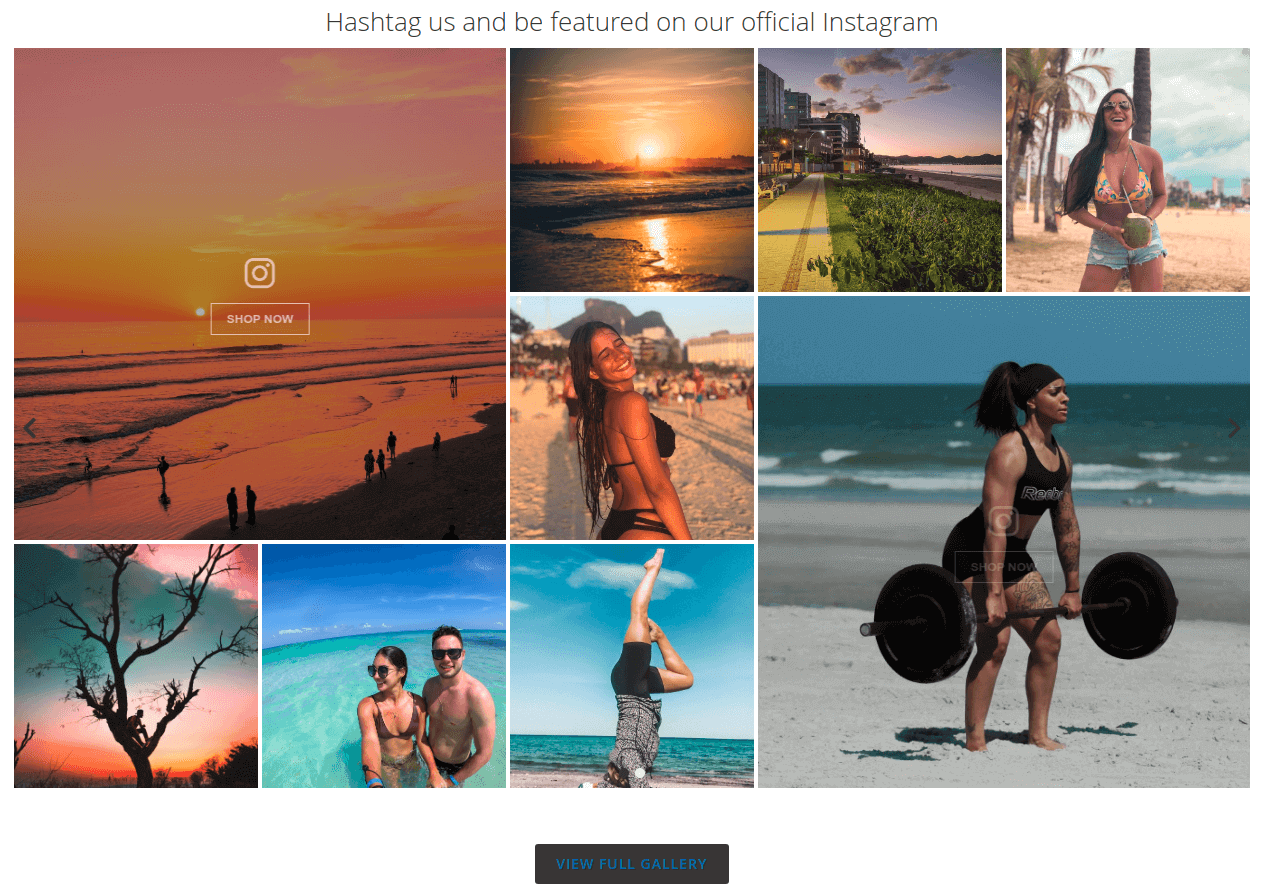
![]() Template: 3 x 3 with 2 bigger photos
Template: 3 x 3 with 2 bigger photos
Product detail page
Hotspot on Photo
Report
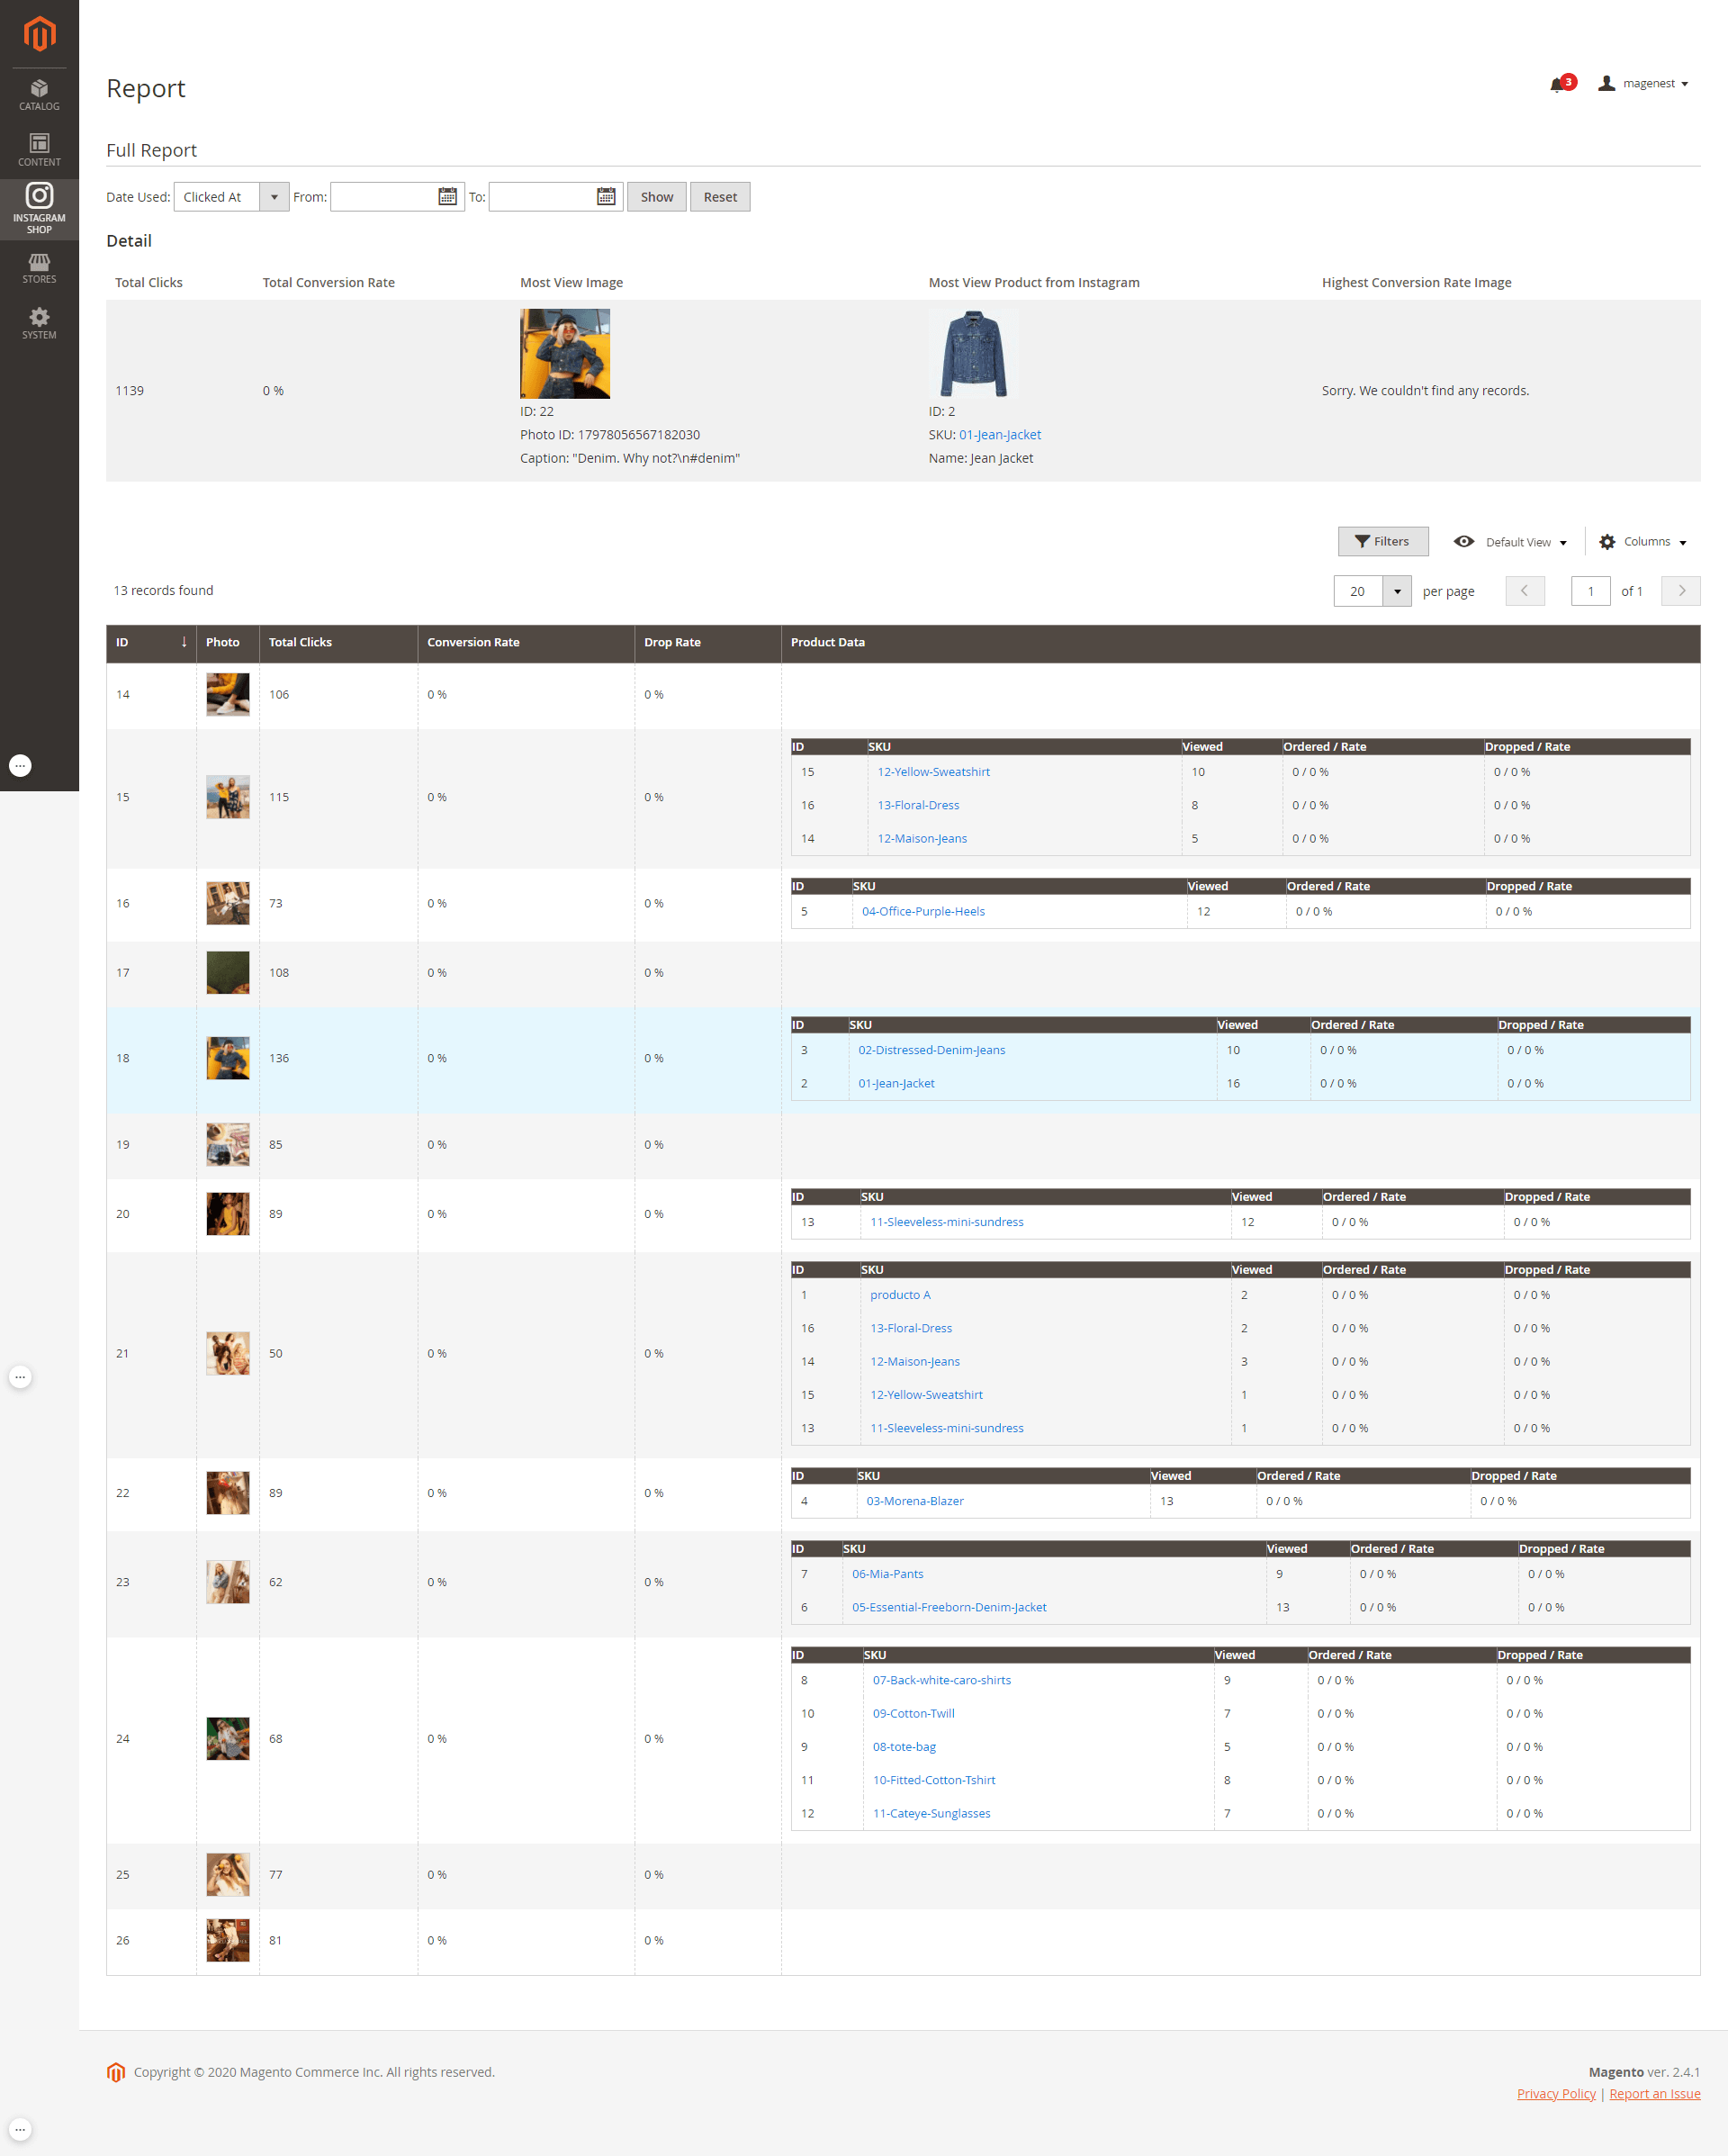
![]() On Magento backend, Admin can have a report on the Instagram Widget efficiency, so they will have a complete view and know where to improve the business’s image
On Magento backend, Admin can have a report on the Instagram Widget efficiency, so they will have a complete view and know where to improve the business’s image
Update
- When a bug fix or new feature is released, we will provide you with the module's new package.
- All you need to do is repeating the above installing steps and uploading the package onto your store. The code will automatically override.
- Flush the configure cache. Your store and newly installed module should be working as expected.
Support
- We will reply to support requests within 2 business days.
- We will offer a lifetime free update and 6 months of free support for all of our paid products. Support includes answering questions related to our products, bug/error fixing to make sure our products fit well in your site exactly like our demo.
- Support DOES NOT include other series such as customizing our products, installation and uninstallation service