...
Extension's page: Xero Integration
Features
- Allows synchronizing and updating a specific or all Customers Sync customer data from Magento 2 store to Xero both manually and automatically. Allows synchronizing and updating a specific or all Products
- Sync product data from Magento 2 store to Xero both manually and automatically.
- Allows synchronizing a specific or all Orders Sync order data from Magento 2 store to Xero both manually and automatically.Allows synchronizing a specific or all Invoices
- Sync invoice data from Magento 2 store to Xero both manually and automatically.
- Allows synchronizing Sync Credit Memos from Magento 2 store to Xero both manually and automatically.
- Allow admin to view the sync history log to see what is synchronized between two apps.
- Allow admin to manage the sync queue to see what will be synchronized next.
- Allow admins to follow the request report on Backend of Magento 2.
...
| Widget Connector | ||||||
|---|---|---|---|---|---|---|
|
It is necessary First, you need to create a new Xero consumer key for the connection between to connect from Magento 2 and Xero. First of all, go to Xero if you haven't got one. Go to https://www.xero.com/ and register an Xero accounts (click on "Try xero for free" or "Free Trial"). If you already have an account, you can skip this step.
Fill in the form the information of your Organization and press required information click on "Get started". If everything is goes right, Xero will inform you to check your email and activate your accountsend you an account activation email.

When your account is activated, you can login on the page https://login.xero.com/.
...
If you log in the account for the first time, Xero will ask you to create an organization. Enter the name details of your organization and choose other information. Press on Start Trial, or Buy Now to continue.
...
Now you can create a new consumer key after login your of Xero account.
In order to create a new consumer key, you need to have the public key first. There are two ways for you to get the public key:
![]() You can pick up the file content of the use key and fileof uyouthe public key attached with our extension.
You can pick up the file content of the use key and fileof uyouthe public key attached with our extension.
...
At My Applications tab
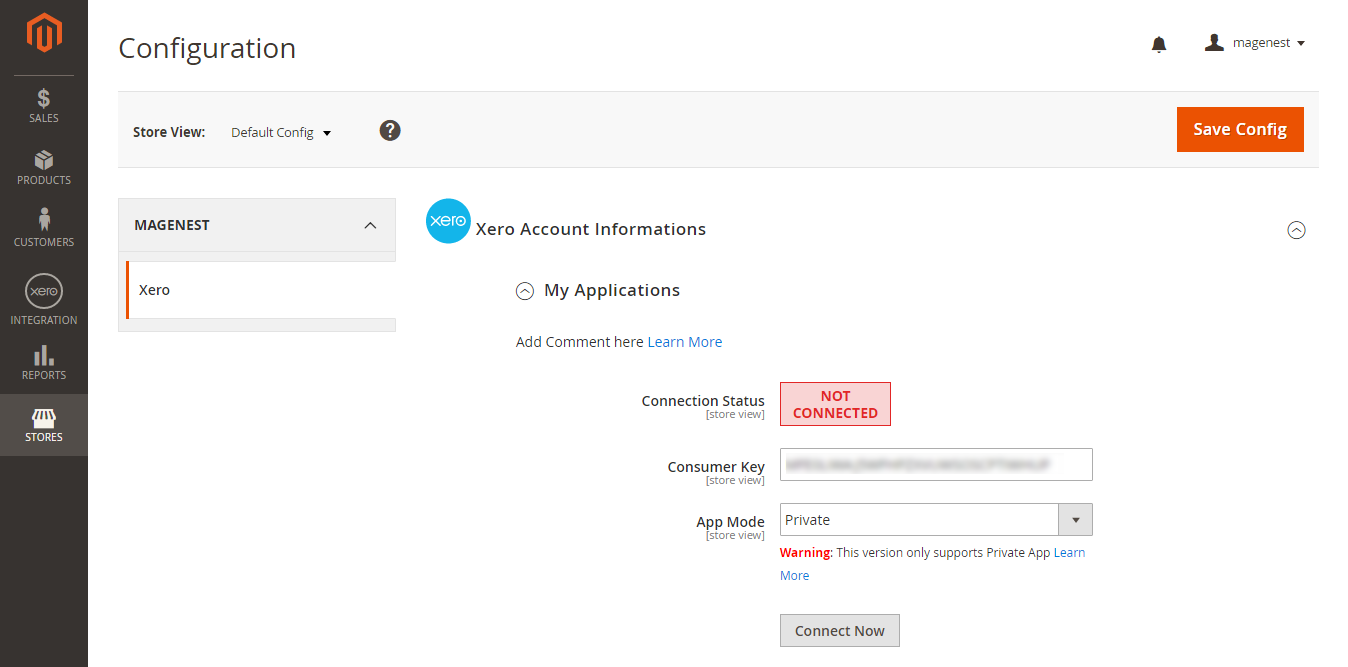
Taking Consumer Key that you have just created and paste into Magento 2 backend configuration. Press Save Config after you've done (refresh the cache if needed). Then, click on Connect Now button.
Note that you need to save config before connecting, this will help you avoid making the consumer key error.
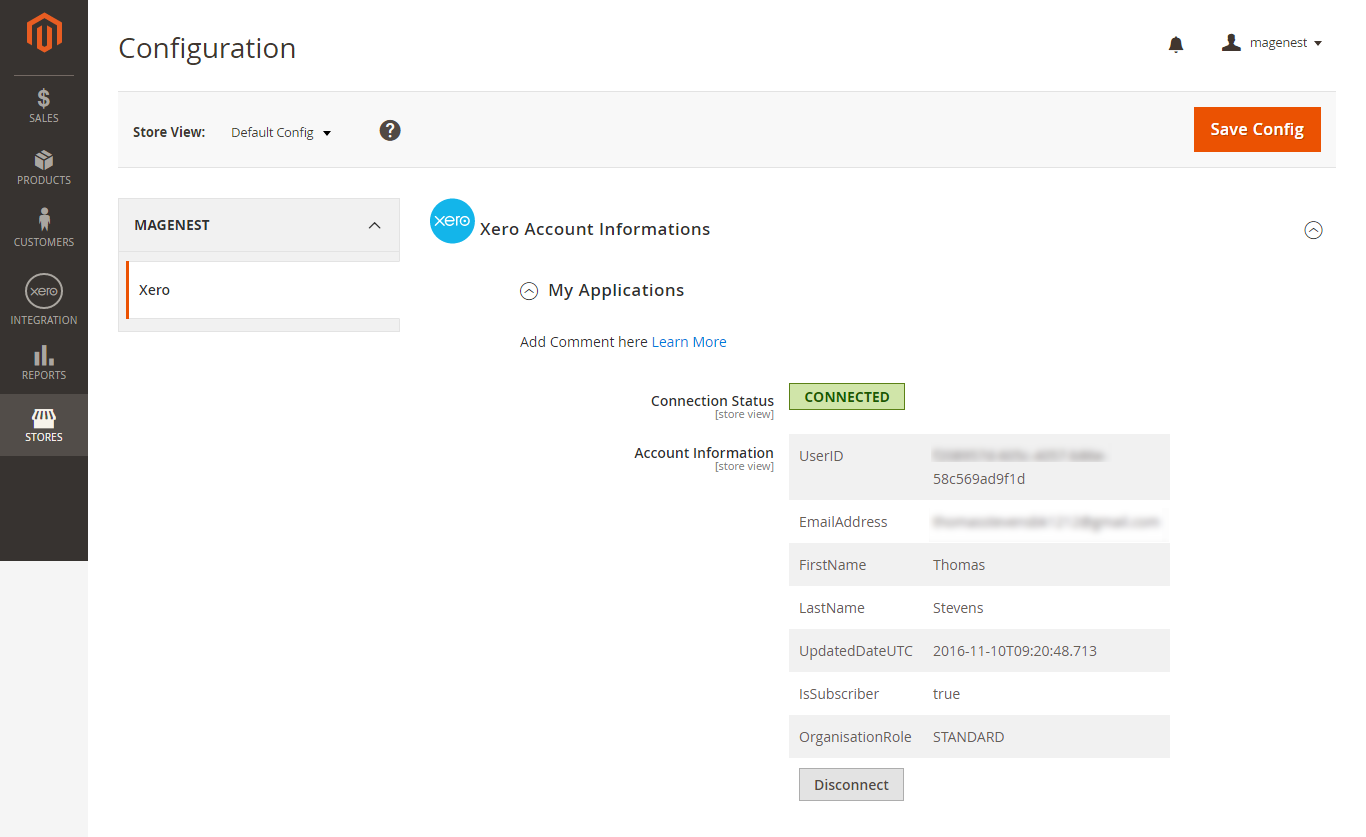
Connection Status will be transferred from not connected to connected with all the information like the picture below.
At Configure the Accounts Types in Xero tab
Admins are able to synchronize four account types in the chart of account: Bank account, Sale account, Inventory account, Cost and Good Sold account from Magento 2 to Xero. Enter the name you would like to use for each account then click on Sync All Accounts Now buttonon Add all Data to Queue. The default Xero account value name will be used if you do not change it. If there is no account on Xero site, the extension will automatically create a new one.
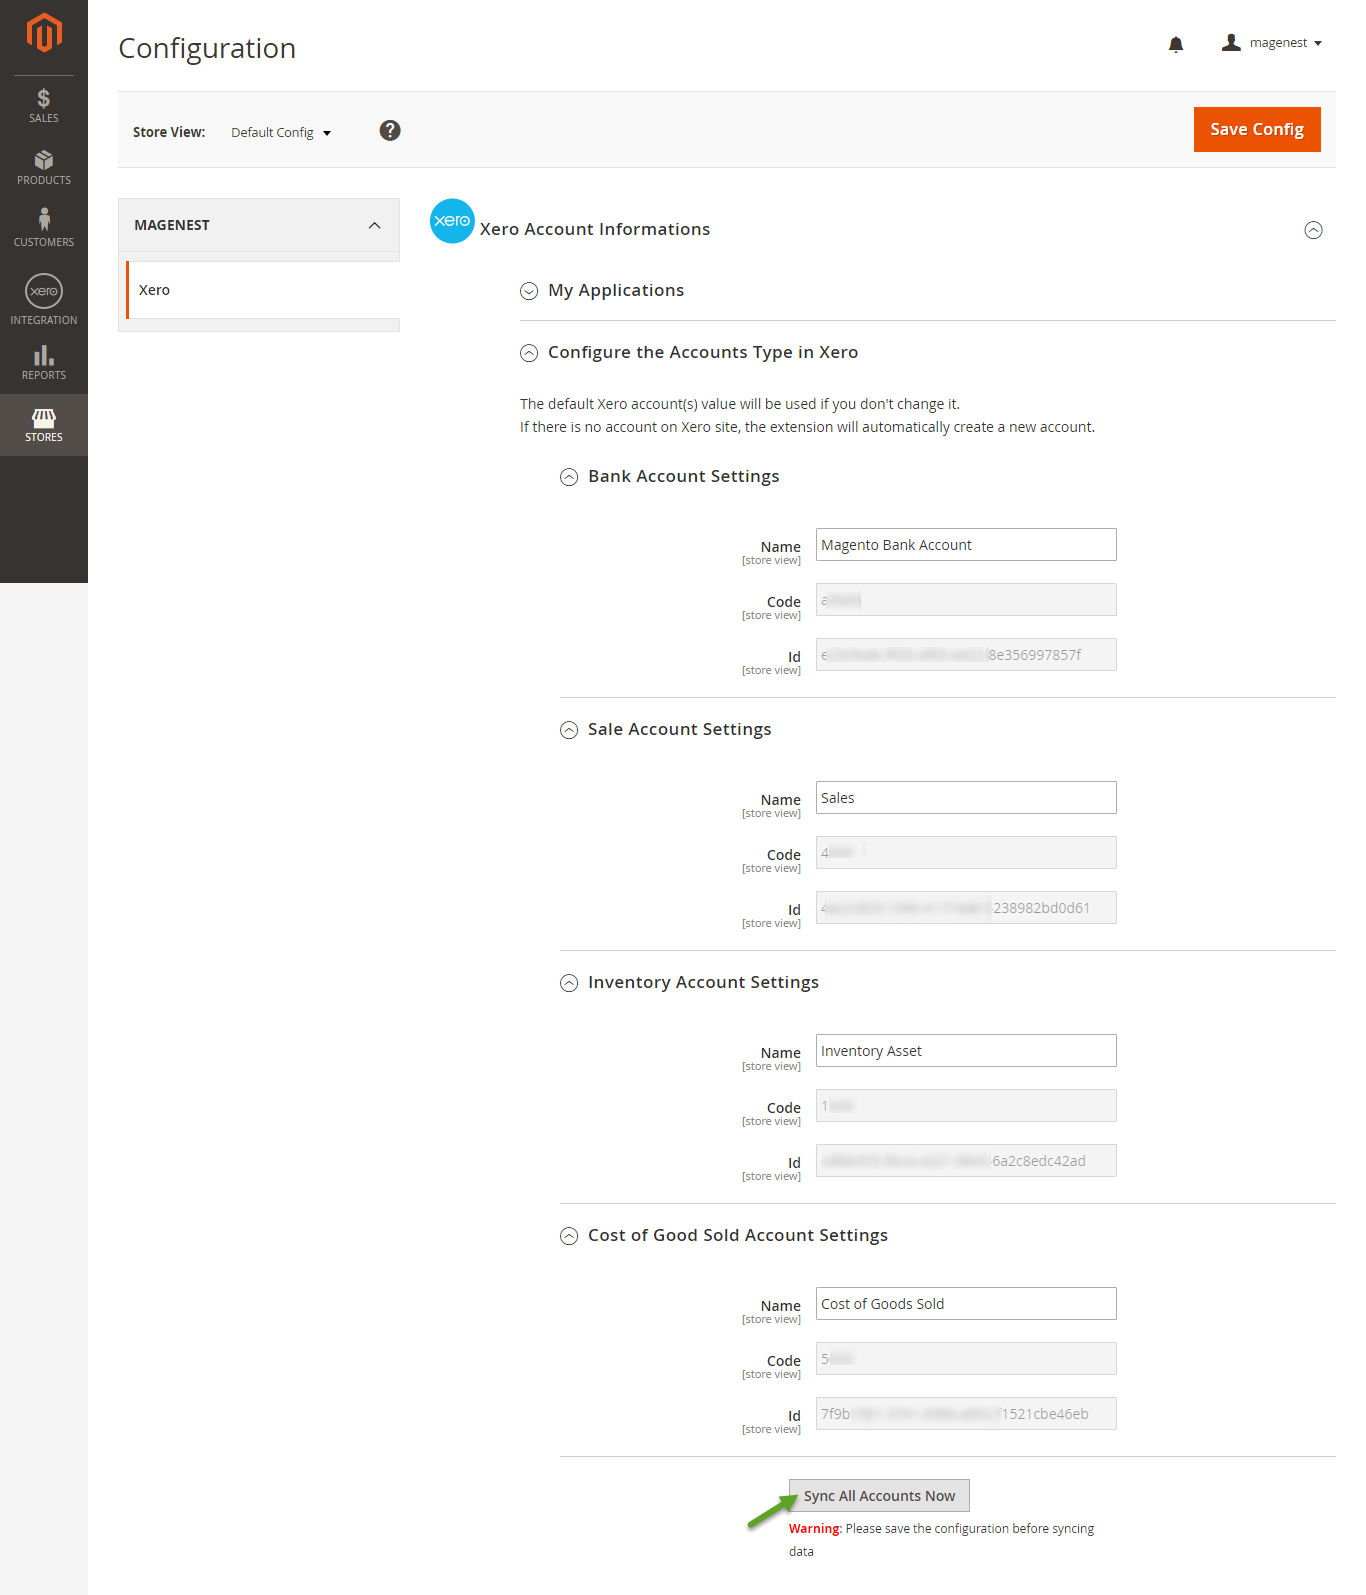

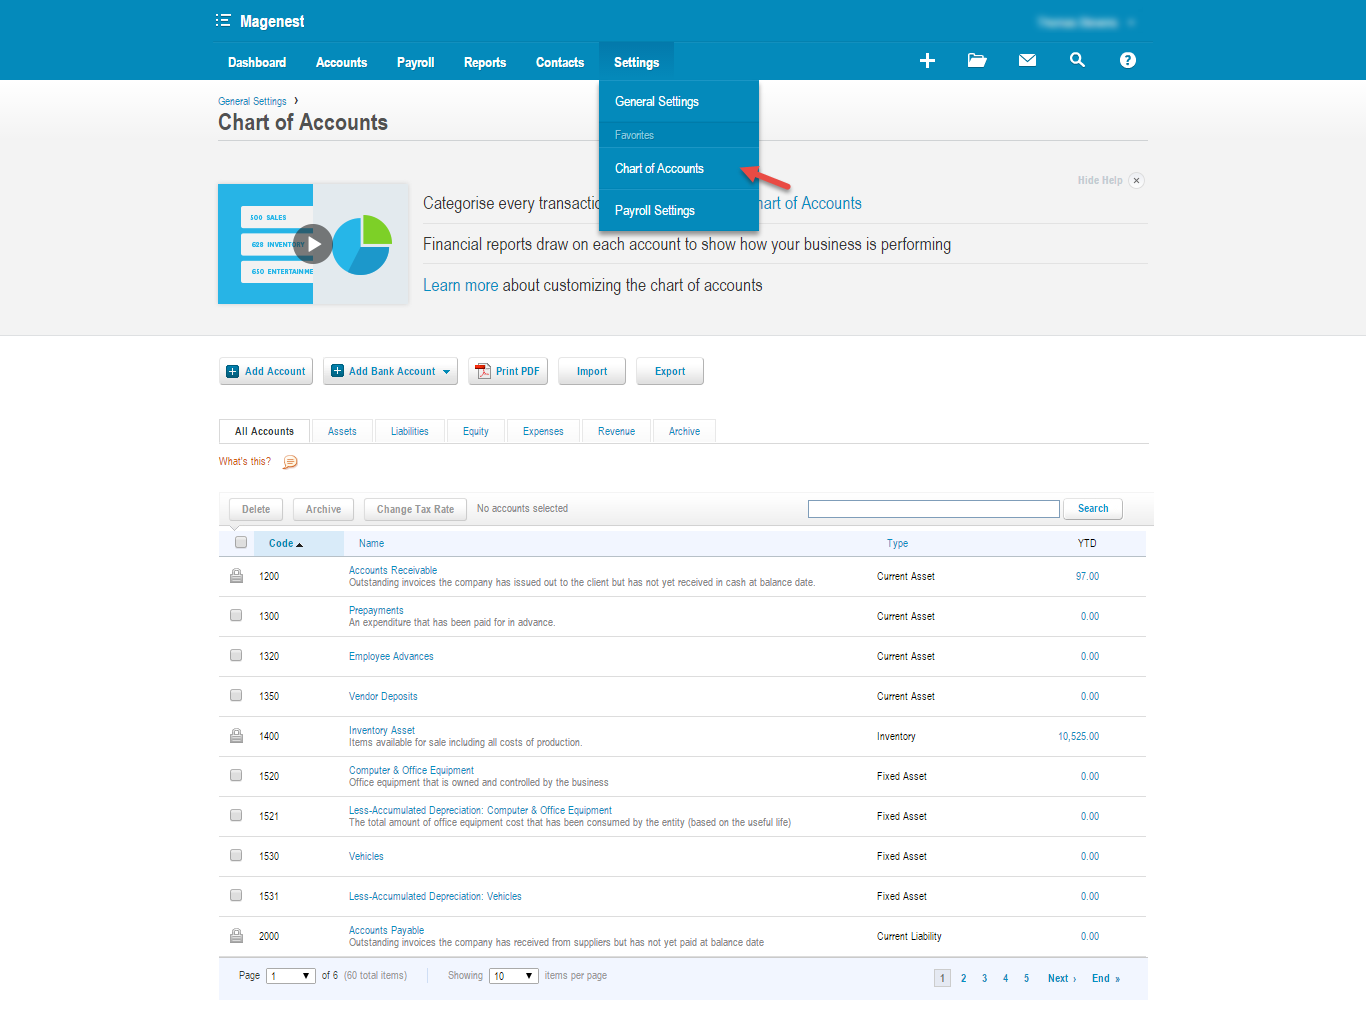
Admins can check changes to accounts on Xero web's website.
Set up Synchronization
Admins are able to decide whether to synchronize data in Synchronization Settings tab: to choose which type of data to sync from Magento 2 to Xero: Customers, Products(Items in Xero), Orders, Invoices, Credit Memos. In addition, admins can choose the way to synchronize data between Immediately mode and use Cron Job mode. Admins Admins can click on also Add All Customers data To Queue button to add all existed customer data to queue. It is the same with Products(Item in Xero), Orders, Invoices, Credit Memos tab.
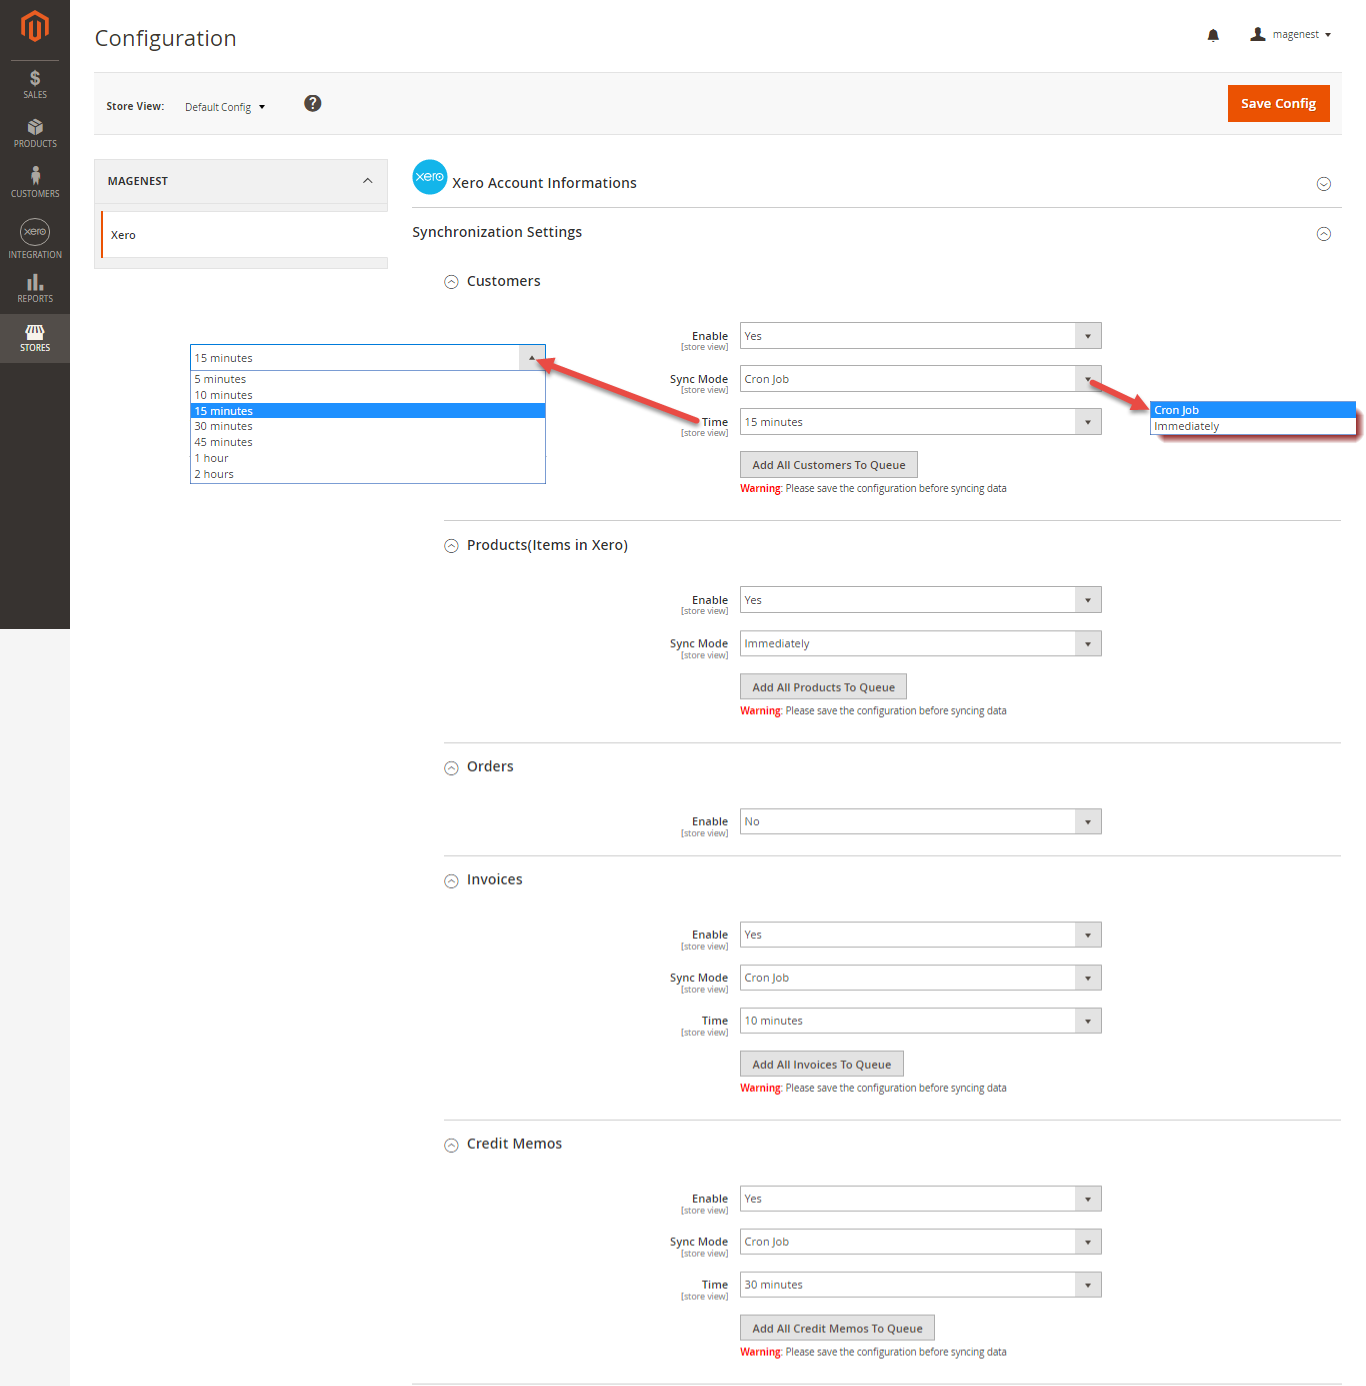 or add invididual data group queue for syncing.
| Tip | ||
|---|---|---|
| ||
|
At the end of Configuration, admins can use "Add All Data To Queue" button to add all existed data to Queue, including Customers, Products, Orders, Invoices, Credit Memos.
...
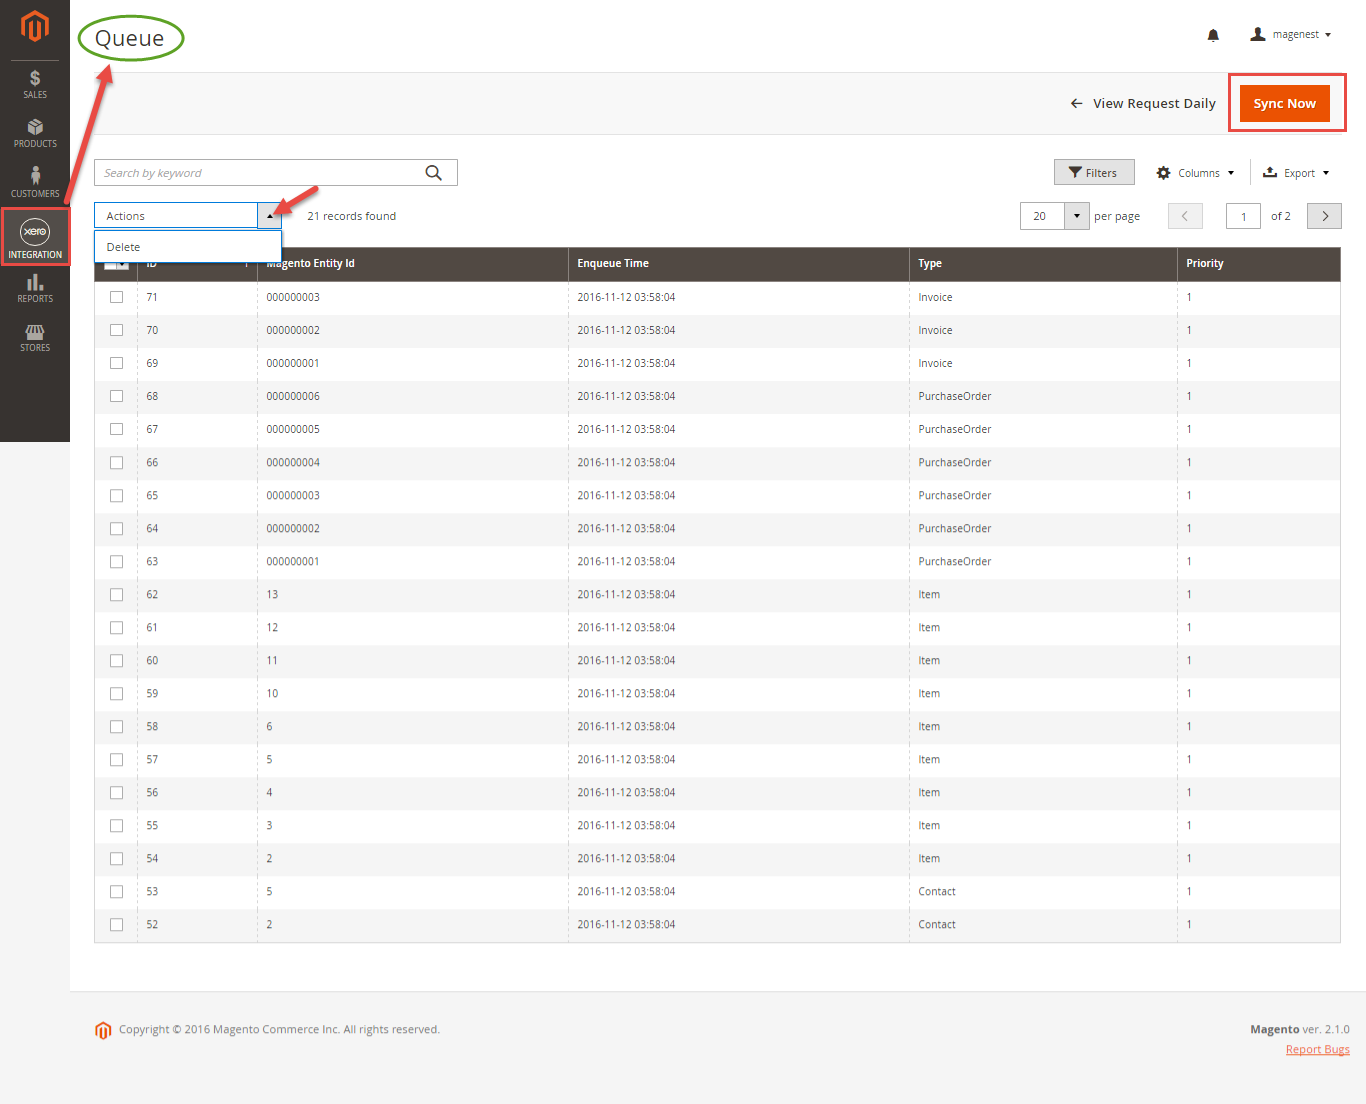
If the App mode is Cron Job, Queue page is the place which the created, updated data is stored in and are waiting to be synced. In Queue page, admin can cancel synchronization any data by removing them from Queue page. Admin can also use Sync Now button to synchronize all data in Queue page data will be added to the Queue List to be sync after a specific interval. On the Queue List tab, admin can preven any data from being synced by removing them from the Queue list. Admin can also use click on Sync Now to syncall data on the queue list immediately.
Note that synchronizing will take some time, the length of time depends syncing time will vary, depending on the size of database.
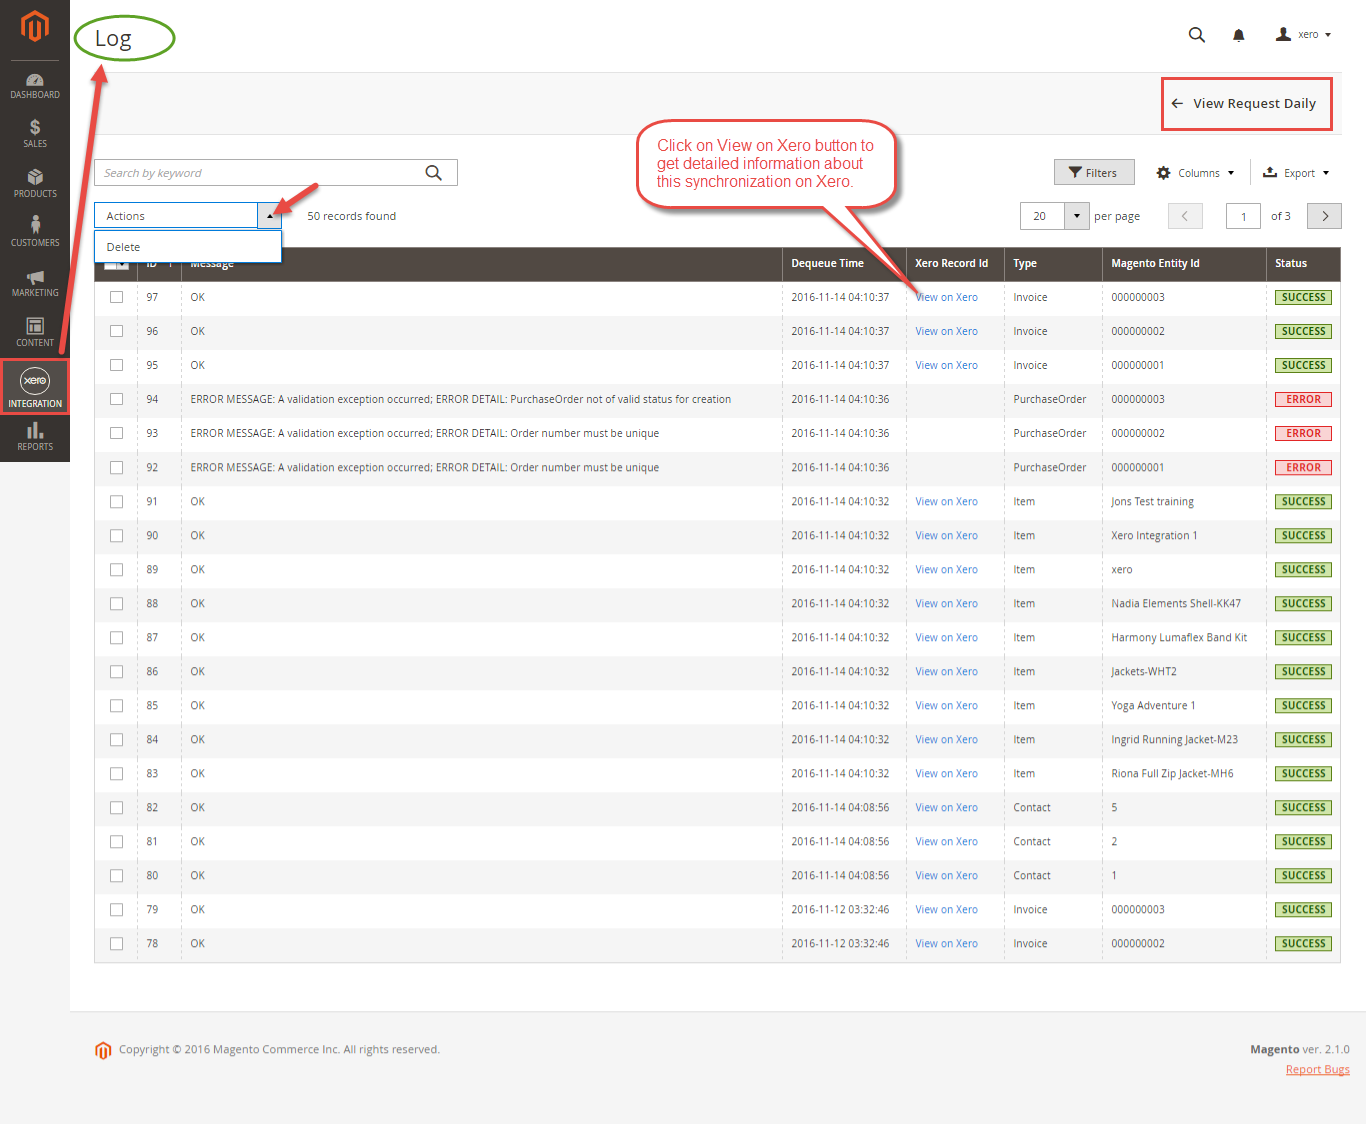
When the process is donecompleted, go to Xero Integration > View Log check to check what is has been synced in the grid.
- If the data is has been synced rightsuccessfully, the Status will be success and the Message will be "OK"
- If there's a problem during the syncing process, the Status will be error and the Message tab will show the error message like the record below. message
Admin Moreover, admin can easily check the synchronization with log for the day by clicking on View Request Daily button and View On Xero button.
or view individual sync log by clicking on View on Xero
Navigate to Xero Integration > Request Daily Report, admins can easily follow see their sychronization status.
...
Main Functions
Video Demonstration
| Widget Connector | ||||||
|---|---|---|---|---|---|---|
|
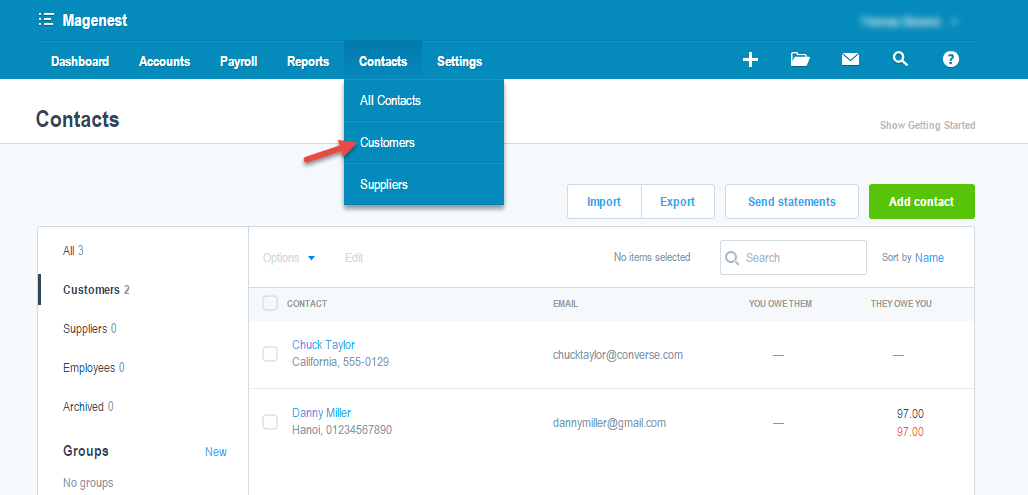
- When a new account is registered in on the frontend of Magento 2, Xero Integration extension will automatically add a new record on Xero site.

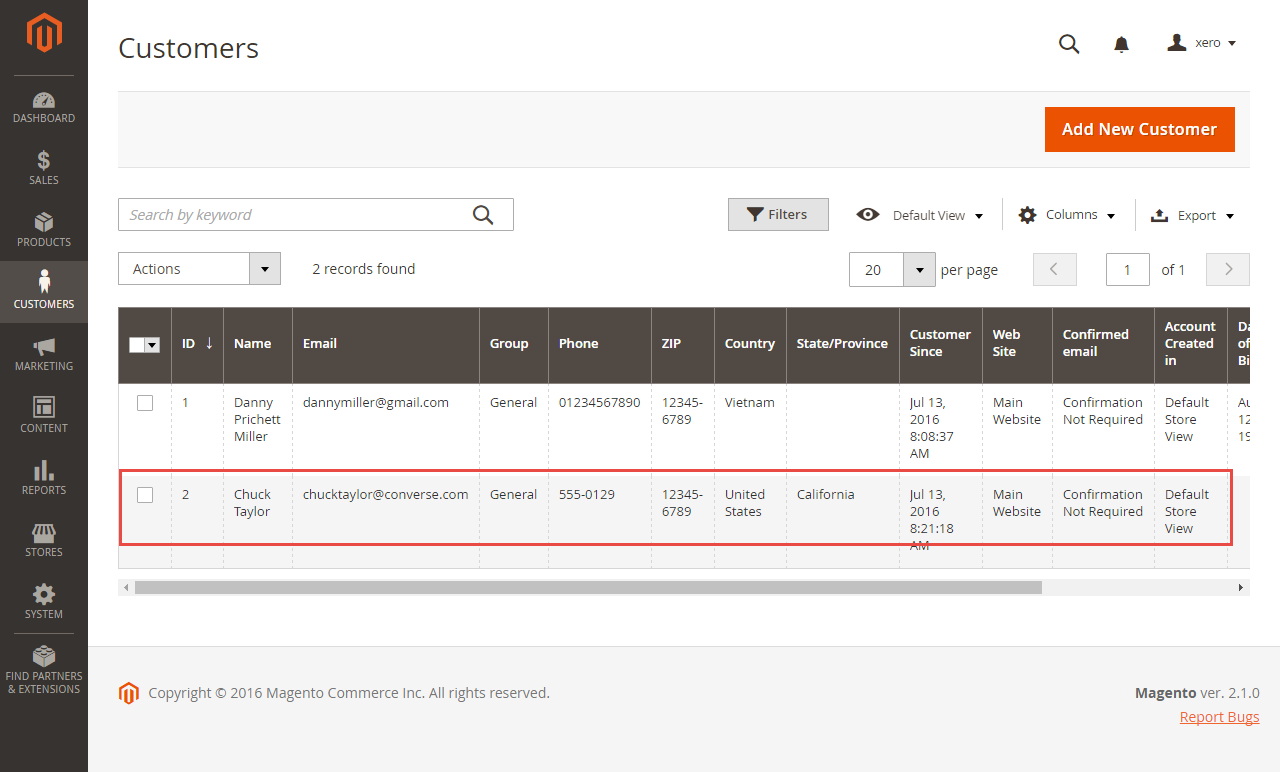
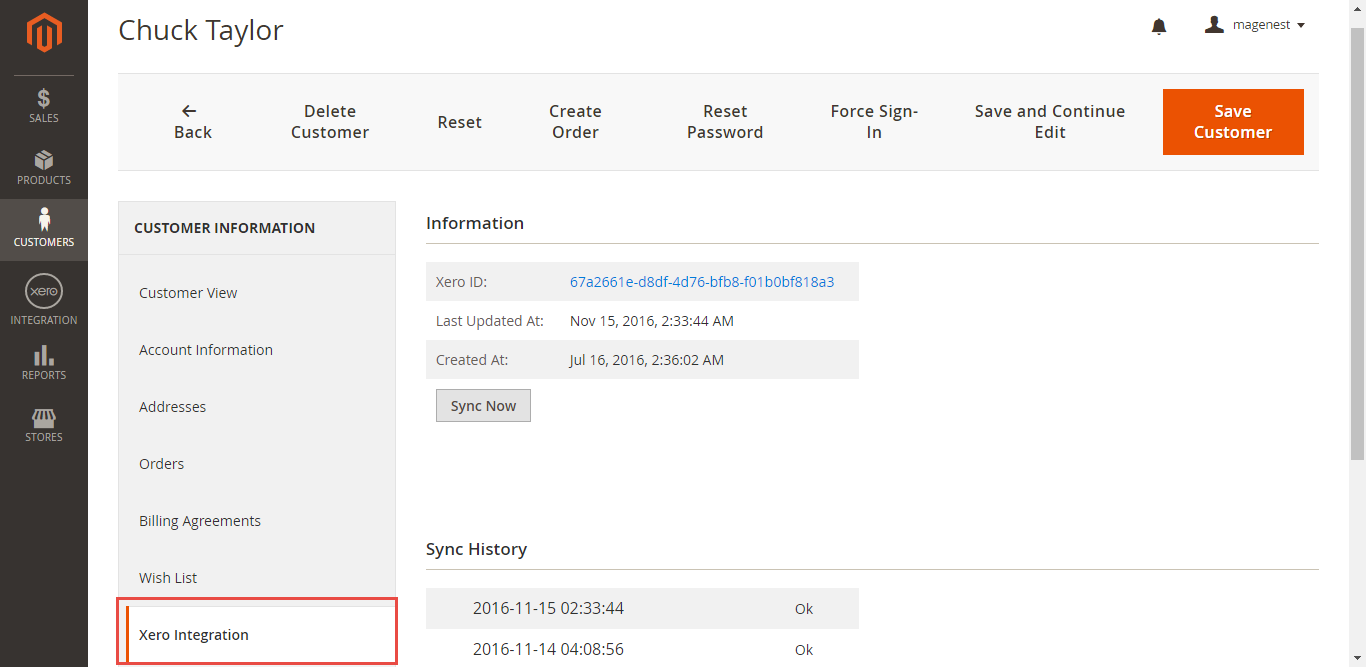
Or you can click on Sync Now button of within each customer info dashboard to synchronize a specific customer data manually.
- Whenever admin creat admins create a new order, invoice, and product or edit them on Magento 2 store successfully. , The data will be synced to Xero automatically.
- Orders
...
Admins can synchronize a specific order by manually , click by clicking on Sync Now button on each order.
...