Thank you for purchasing our extension. If you have any question that is beyond the scope of this document, do not hesitate to leave us an email.
Created: 21/01/2016 | By:Magenest| Email: [email protected]
| Table of Contents |
|---|
Introduction
Appointment Booking extension by Magenest is a solution for hotel service providers, healthcare service providers, travel agency,... to efficiently manage bookings and reservations made on Magento 2-powered store
For more information, please visit: Support Portal: http://storeservicedesk.magenestizysync.com/magento-2-appointment-booking.html
Features
Version 2.1 (updated 11/7/2016)
WHAT'S NEW
- Admin can easily create Recurring Price Rule products.
- Upgrade front end.
- Customer now can add many staffs in many time intervals in front end
- Customer can steal booking product from the other customer cart
Upgrade all rules in more details.
Upgrade special date in more details.
Version 2.0.x
The extension is packed with the following features:
/servicedesk/customer/portal/3
| Table of Contents | ||||
|---|---|---|---|---|
|
Introduction
Magento 2 Booking and Reservation not only make it easy for your customers to schedule but also help you manage booking orders, customers, staffs and products on both larger screens and mobile devices.

- A new, separate product type for Booking & Reservation.
- Define booking time by hours or days.
- Define a specific time range for Booking products, with multiple exclusion filters.
- Allow limiting Booking Orders with offline payment methods
- Declare and Display Terms & Conditions for your Booking Products.
- Display notification when there’re cancellation requests for Booking Product, allows admin to decline or approve the request.
Features For Customers
- Responsive User Interface
- View all booking orders placed on the customer’s account, easily accessible in the menu bar.
- Request cancellations for placed orders, with the ability to specify the amount and message to the store owner
.
System Requirements
Your store should be running on Magento Community Edition version 2.3.0.0 or newer.
Installation
Here we will guide you through the installation process of our extension. You can upload your extension via FileZilla or using SSH. In the first method, log in to your host as follows:
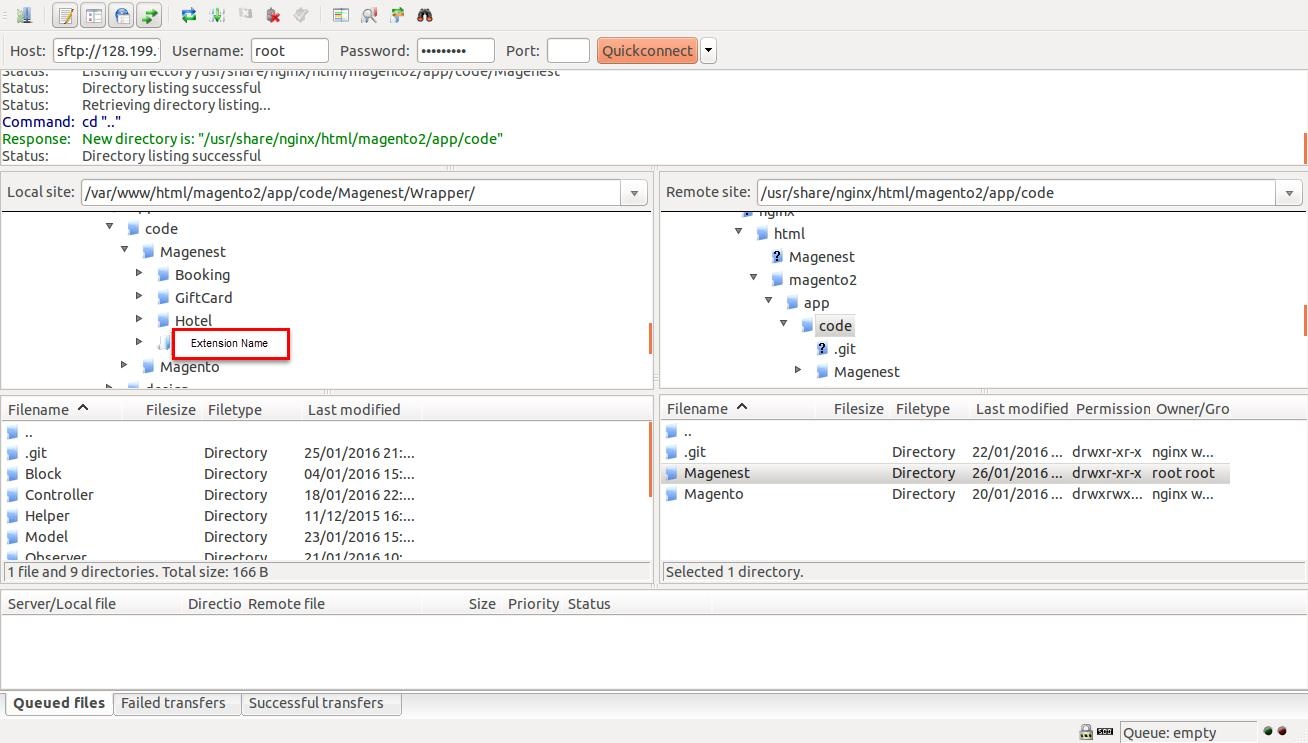
In the above example we switched the local site to the extension directory, and the remote site to the code directory. Now on the remote site window, inside app/code directory, create a folder named Magenest and go inside it. Now on your local site window, right click on Extension Name and click Upload. The extension will be uploaded onto your host in a few minutes.
The second method will require you to compress the extension into .zip or .tar.gz format, then execute the following command in your Command Line/Terminal:
scp <path to your extension> <ssh server>:<path to Magenest directory>Then log into your ssh server, go to Magenest directory and execute the following command to decompress the module:
unzip <.zip compressed extension> Or
tar -xzvf <.tar.gz compressed extension> Now go to your Magento root directory, say it's named magento2, and execute the following commands:
php bin/magento setup:upgrade php bin/magento setup:static-content:deployAfter running all these, your Command line/Terminal window might look like this:
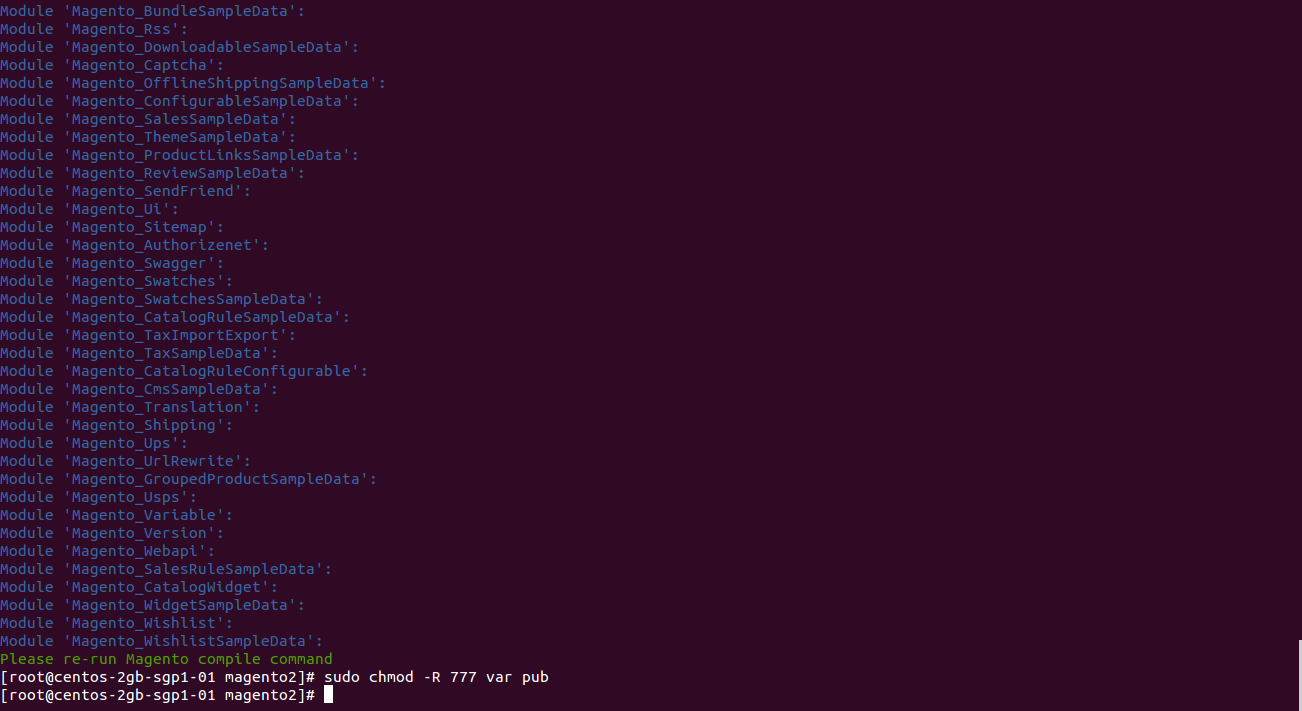
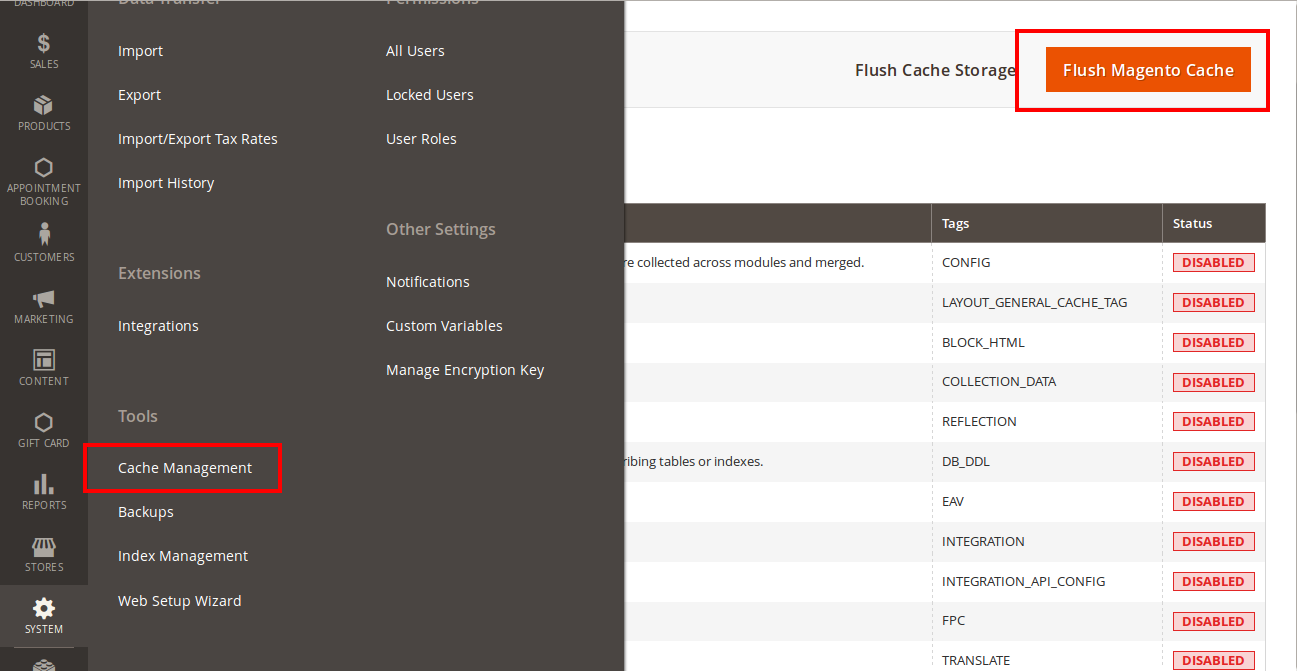
Finally, you need to flush the cache by either type this into the Command Line/Terminal:
php bin/magento cache:flushOr go to System > Cache Management and click Flush Magento Cache
Now you can go to your store and check if the extension is working as expected.
Initial Configuration
In order to get your extension up and running properly, we highly recommend that you make some configurations right from the beginning
Order Status Settings
Firstly, go to Order Settings tab on the Appointment Booking menu, this is the place where you define the email template and sender identification of the email sent each time the booking status of a booking order is changed.
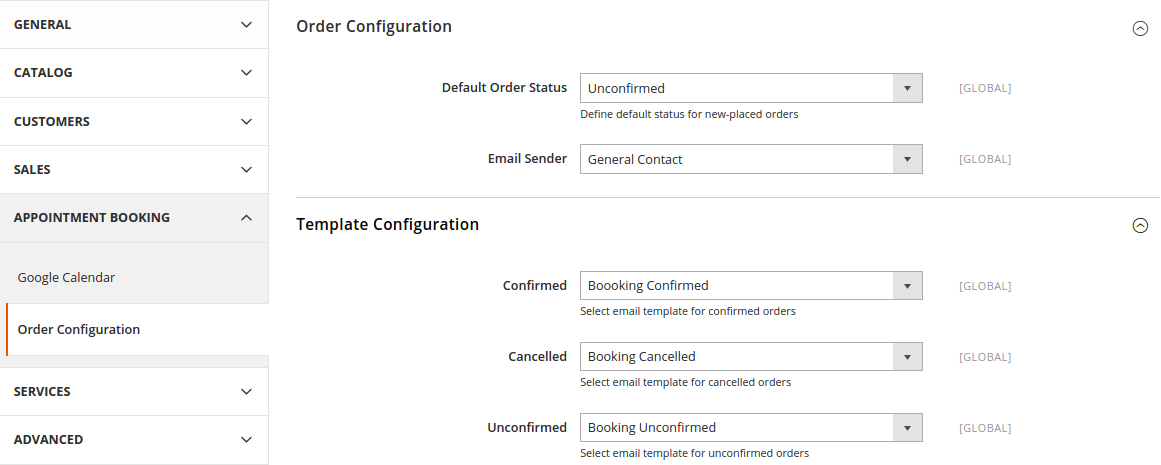
- Default Order Status: specify the default status of newly placed booking orders.
- Email Sender: specify the identification of the sender. You can define this in tab General > Store Email Addresses.
- Template Configuration: these are email templates for each booking status of an order.
Here are some template variables that you can embeed in your template:
- customer: customer email
- customerName: customer name
- store: store name
- itemName: name of the ordered item
- bookingStatus: new booking status of the item
- specialDate: will be available if there is any special date
- bookedDate: booked date
- start: start time
- end: end time
- staffName: staff name
Google Calendar Sync Settings
If you want to sync booking orders onto your Google Calendar account, then you should go to Google Calendar Settings tab on Appointment Booking menu.

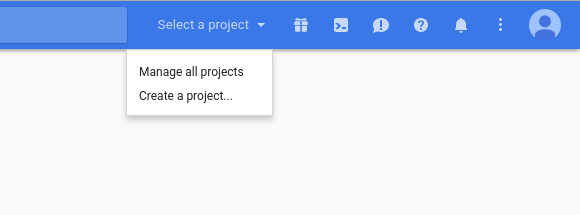
When it comes to getting these parameters, things get a bit tricky. First off, in order to get Client ID and Client Secret, go to Google Developer Console and create a new project by clicking on Select a project > Create a project
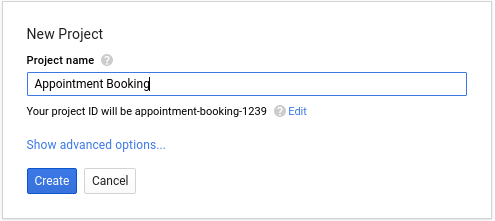
Enter your project title and click on Create
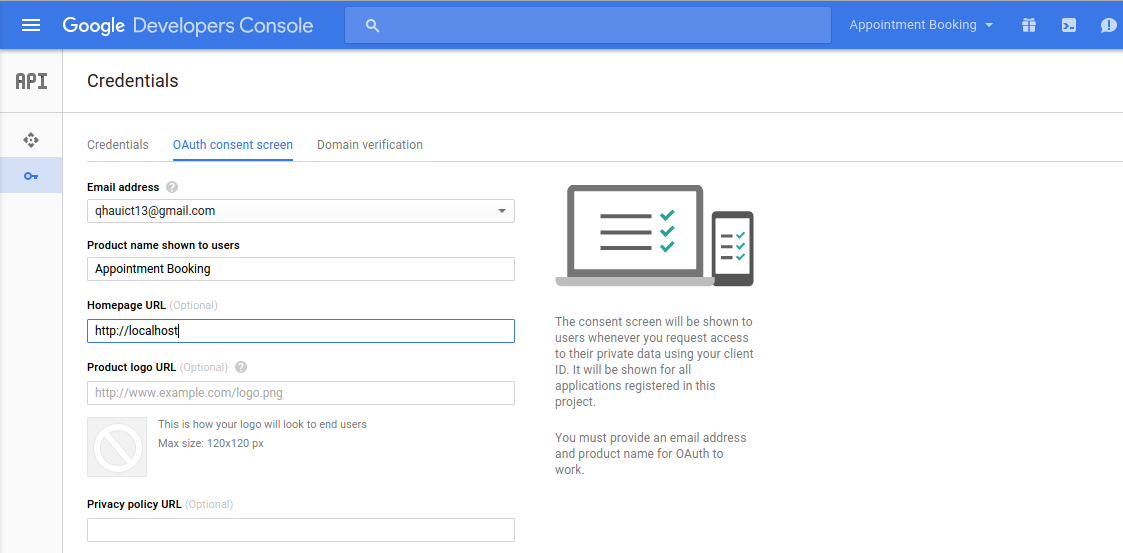
Next up, click on Enable and Manage APIs, you will be taken to the API Manager page. Click on Credential tab of the page and select OAuth Consent Screen and enter Product Name.
Click on Save, now you will be able to create Credentials for your project. Select Credentials, click on Create credentials > OAuth client ID
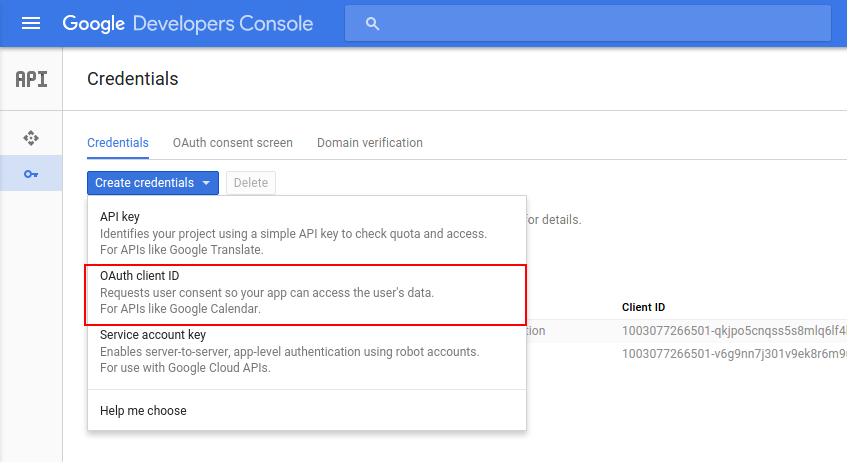
Remember to check on Other in Application type and enter an appropriate name for your project, then click Create. You will be immediately informed of your Client ID and Client secret keys.
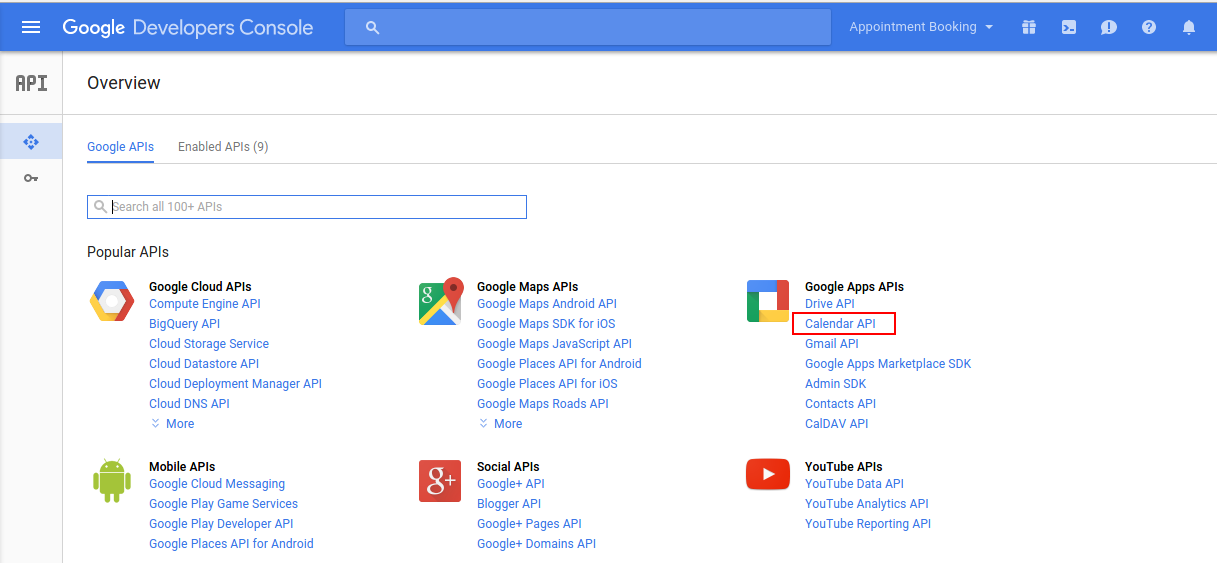
Now go to Overview tab, select Calendar API and enable the API.
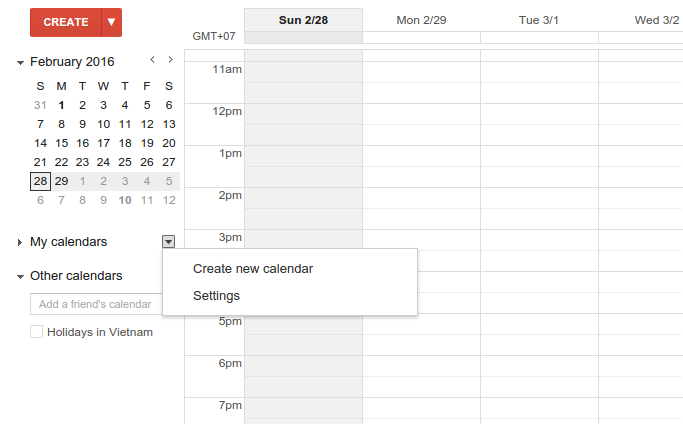
Go to your Google Calendar and create a new calendar.
Fill in the inputs with your desired information for the calendar and click on Save Calendar. Then go to the settings page of your calendar.
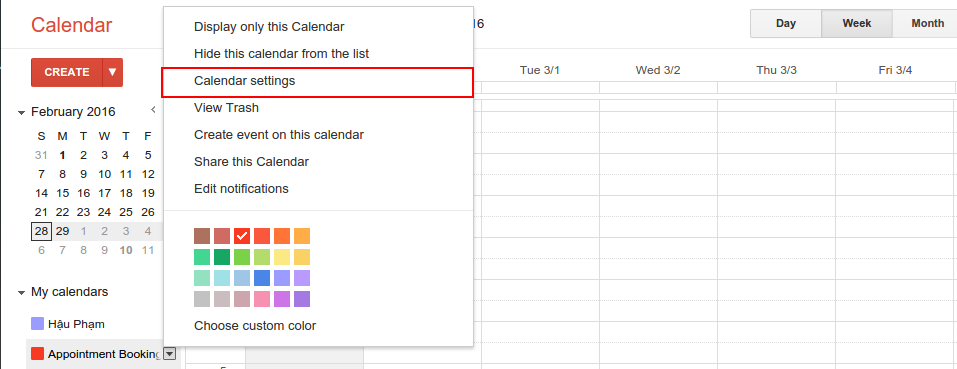
Scroll to the bottom of the page, you should be able to see the Calendar Address section and get the Calendar ID.
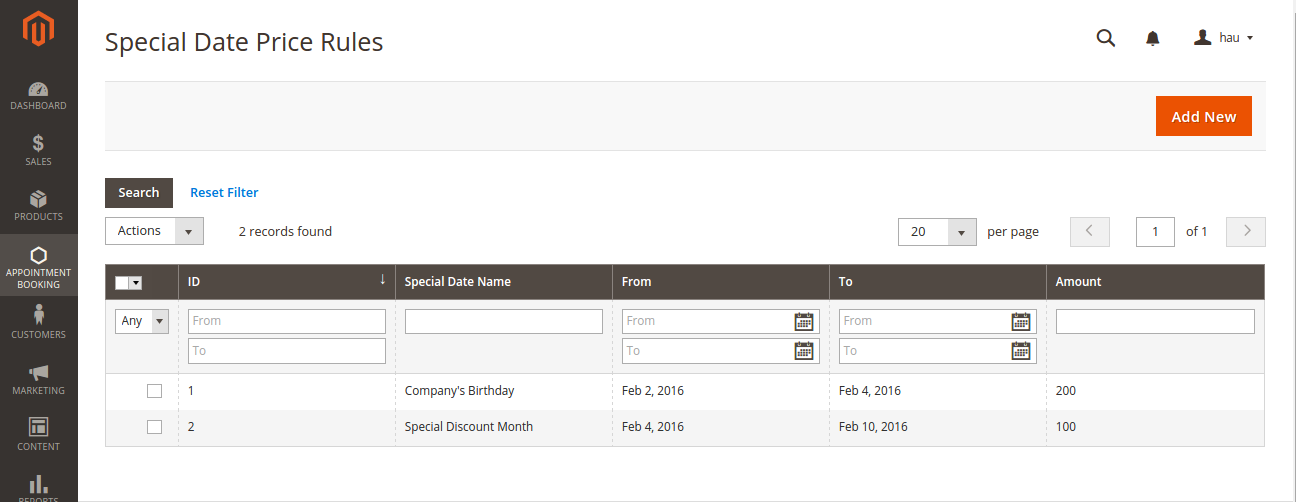
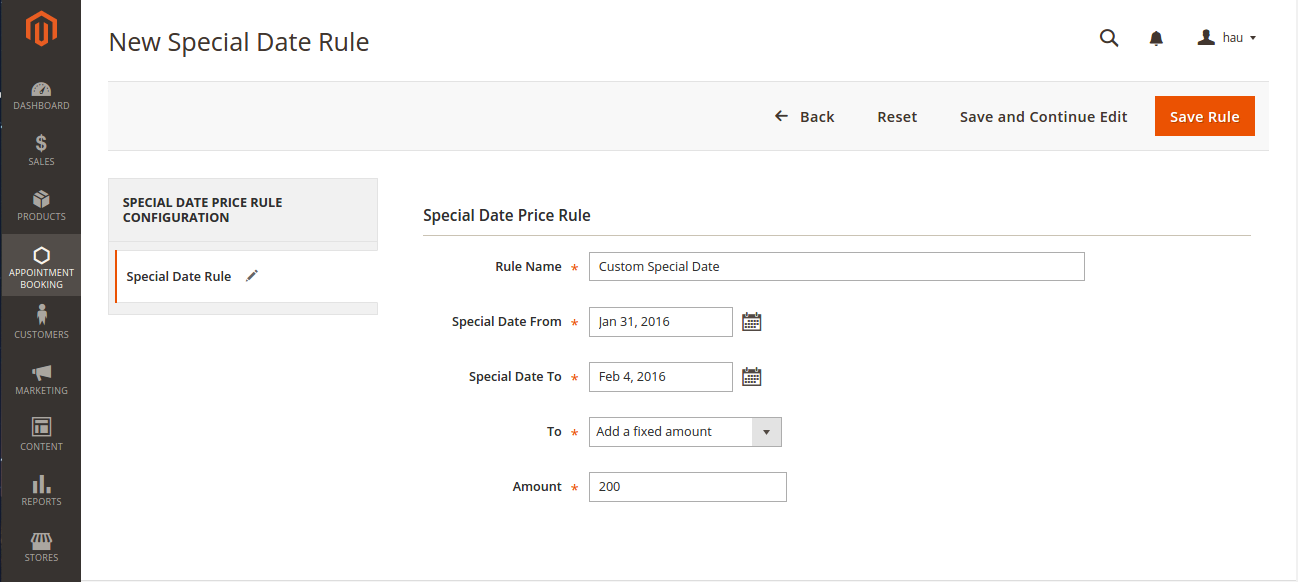
Price Rules
We have implemented 3 kinds of price rules: Staff Price Rules, Special Date Price Rules and Recurring Price Rules. These rules will add some versatility into the effort of better evaluating price of bookings. With Staff Price Rules, go to Staff Price Rules tab in Appointment Booking menu.
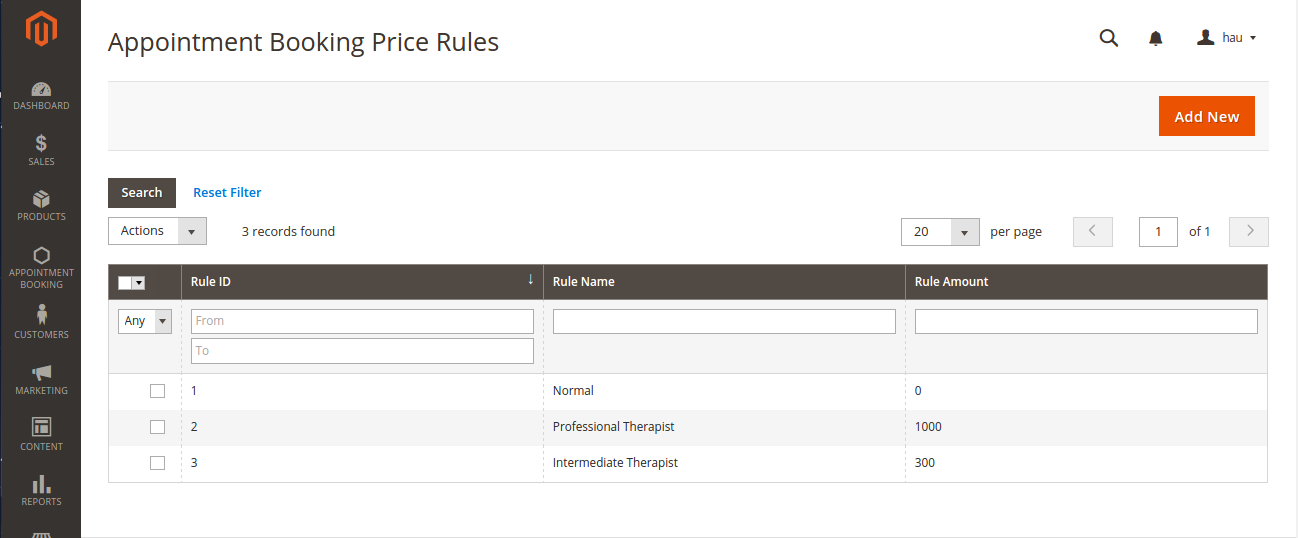
Rule Amount is defined so that if a staff of one type is selected on frontend by the customer, a corresponding amount will be added to the total (we will illustrate this in a later section). We recommend you to add a default type with Rule Amount set to 0 to prevent any abnormal functionality of the extension.
Then we have Special Date Amount, which will add or subtract a certain amount of money when a certain date is selected.
Another price rules - Recurring Price Rules allows admins to create recurring price rules for Time Activity such as every day, every week, every month, every year.


Main Features
Define Product Schedule
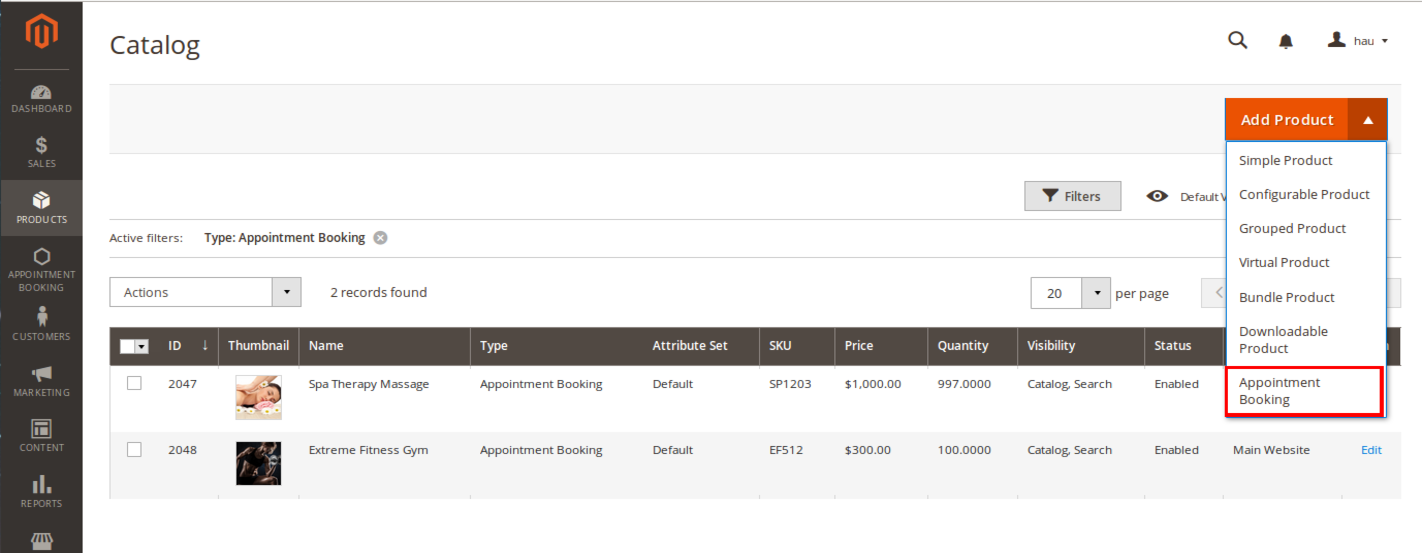
The extension added a new product type called Appointment Booking into the system, so you need to add a new product of type Appointment Booking to get started.
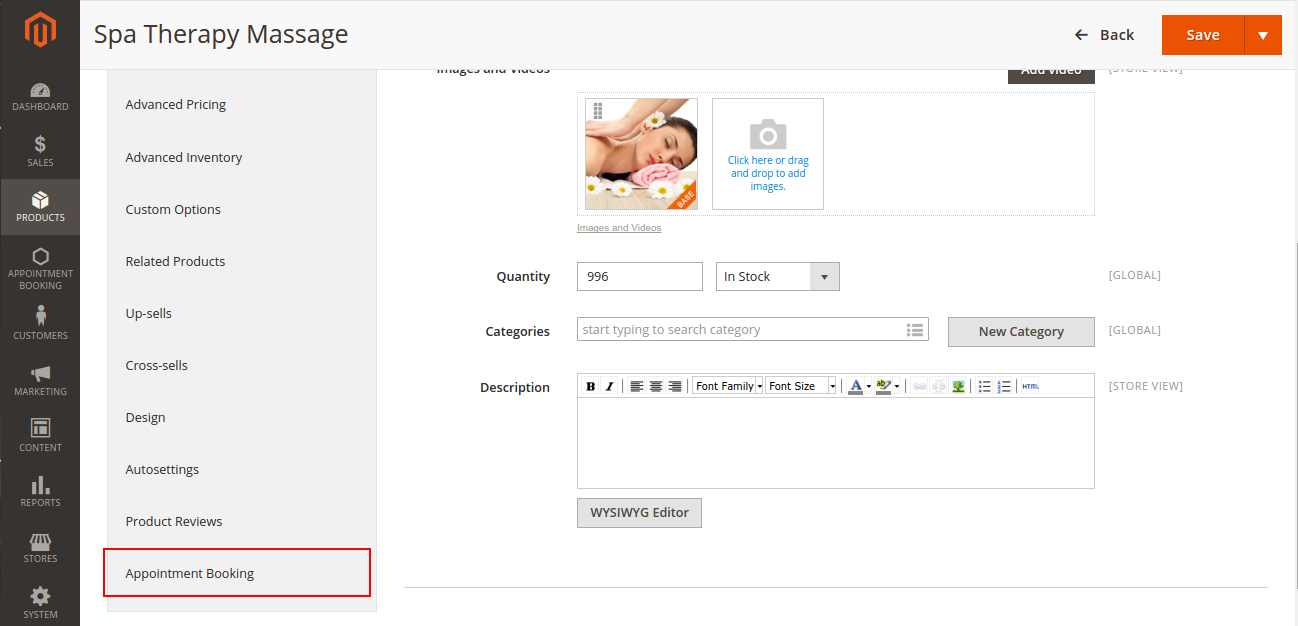
In the product detail page, go to Advanced Settings > Appointment Booking.
You will see a row of inputs which defines a schedule for the current product. You can click on Add Schedule to add a new schedule row. All saved schedules will be sorted by weekday, in ascending order.
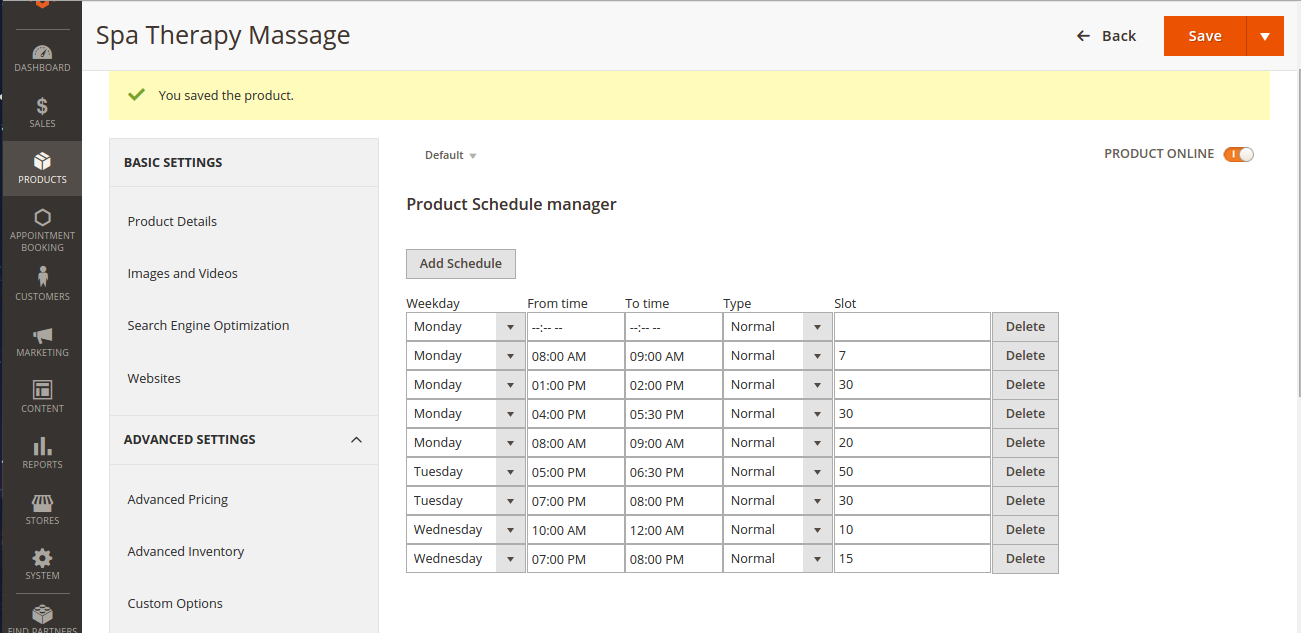
Click on Save and your newly filled schedules will be saved. You can also delete an existing schedule by clicking on the Delete button. One remind here, the schedule will not be saved if one input is not properly filled.
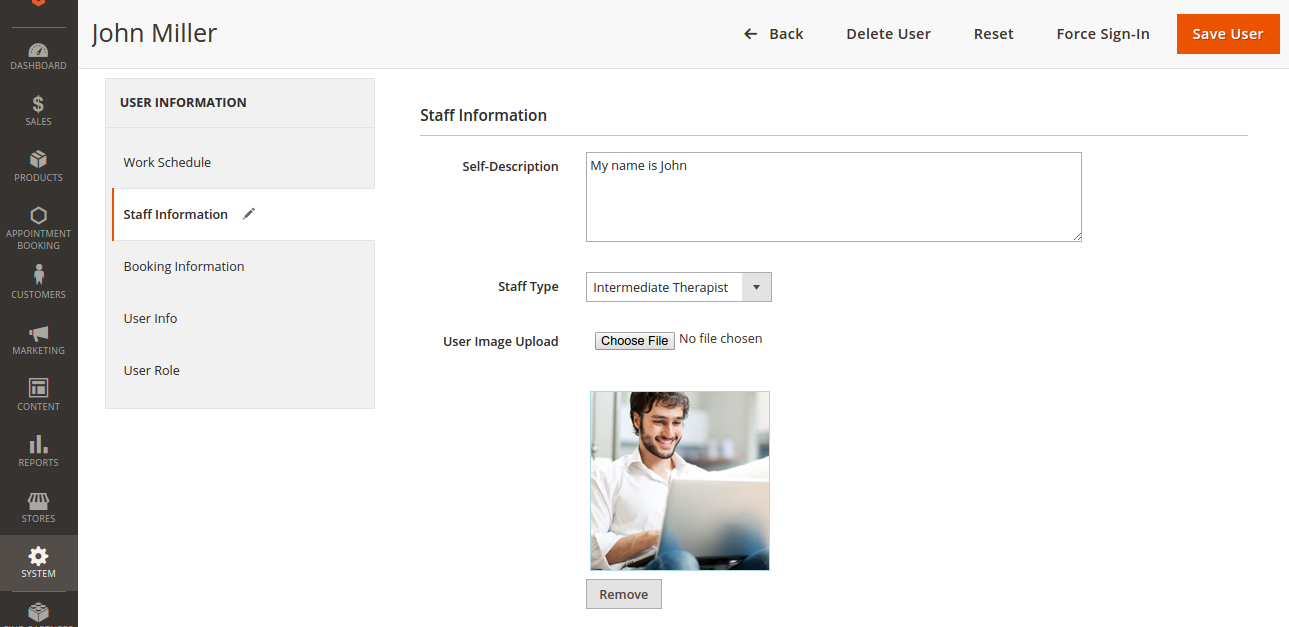
Define Staff Information
Go to Backend of Magento 2 store > System > All Users > Add New User button to add staff into stores.
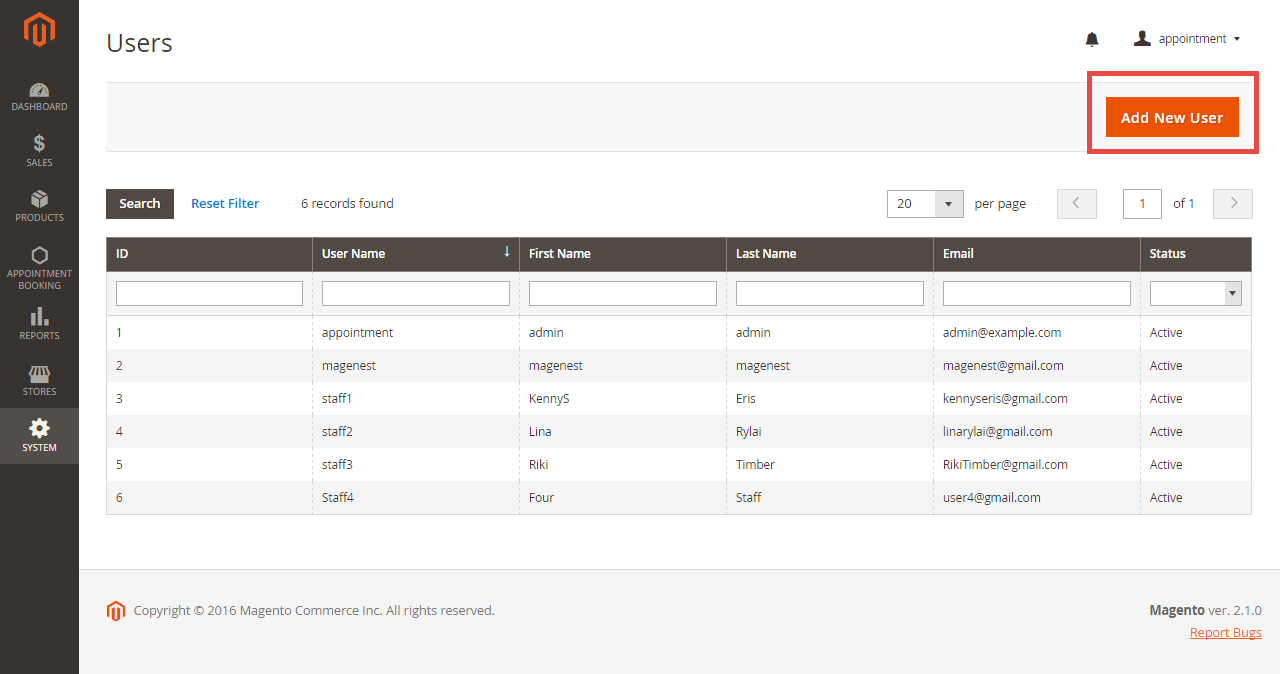
At Staff Management tab, you will be taken to the users list. From now on, you will be able to make an admin user a staff. In detail, you can add some information of the staff as below.
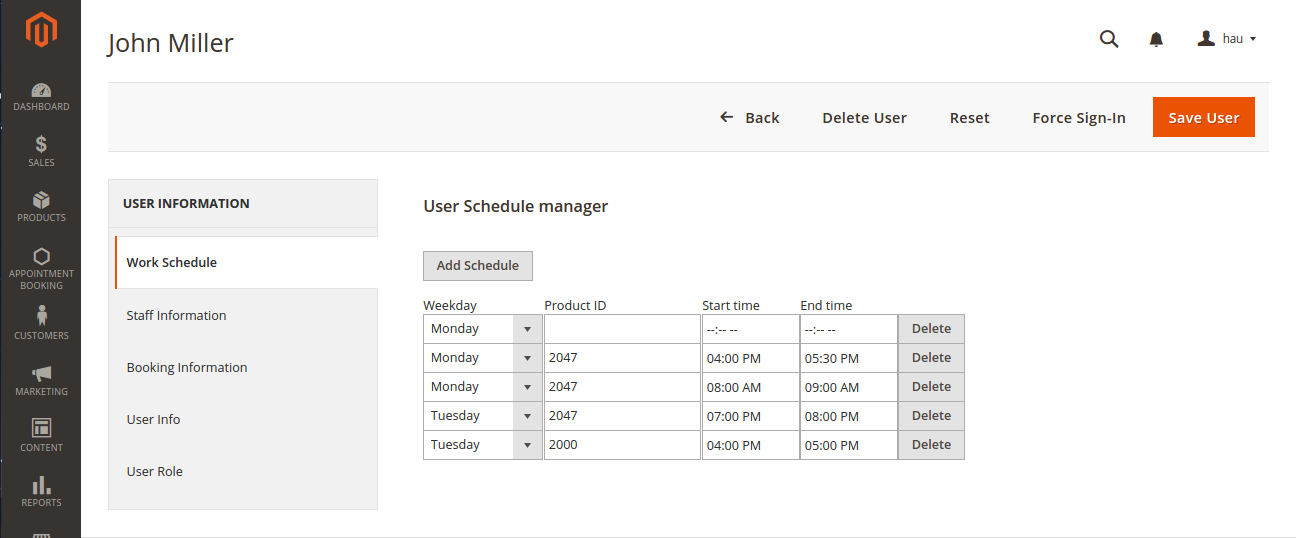
You can also add working schedule for the staff. This is nearly identical to the discussed product schedule.
Note that, go to User info tab to reconfirm password when you make any changes.
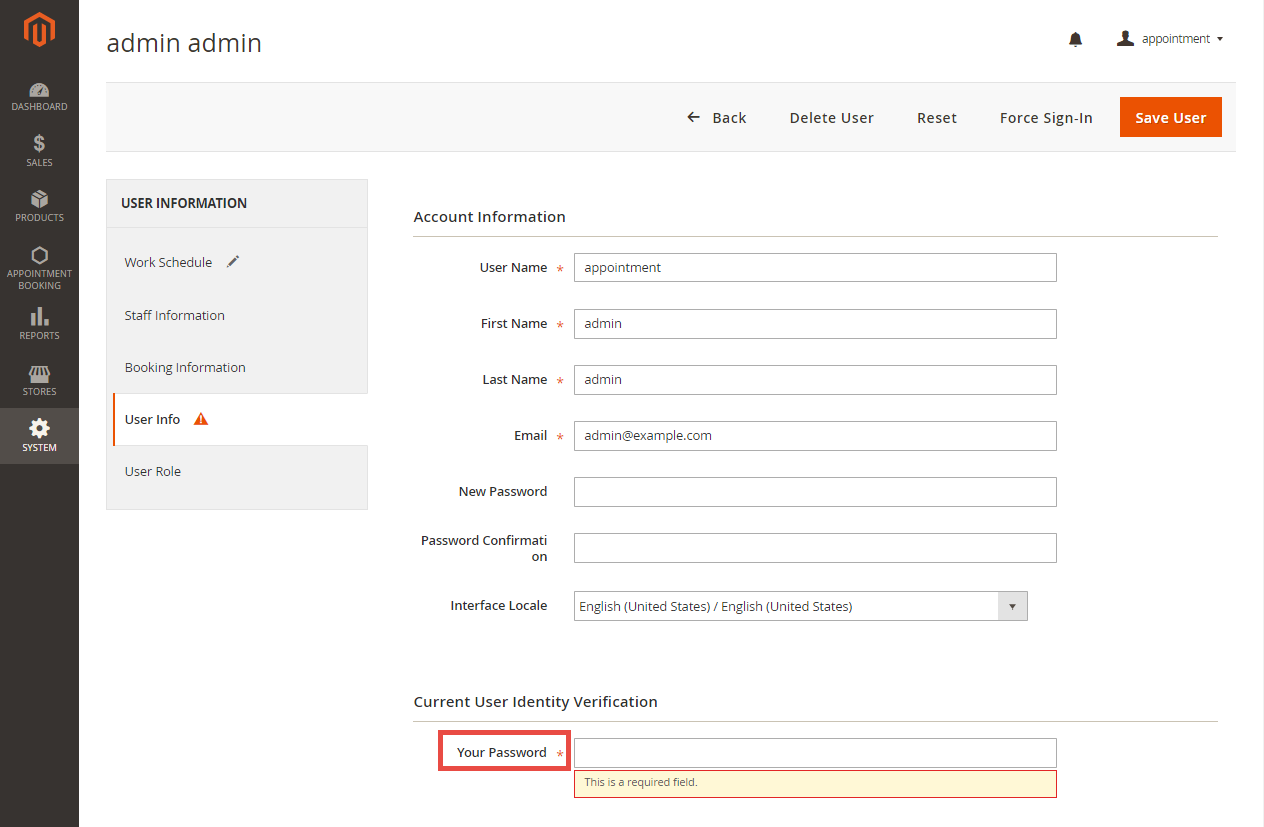
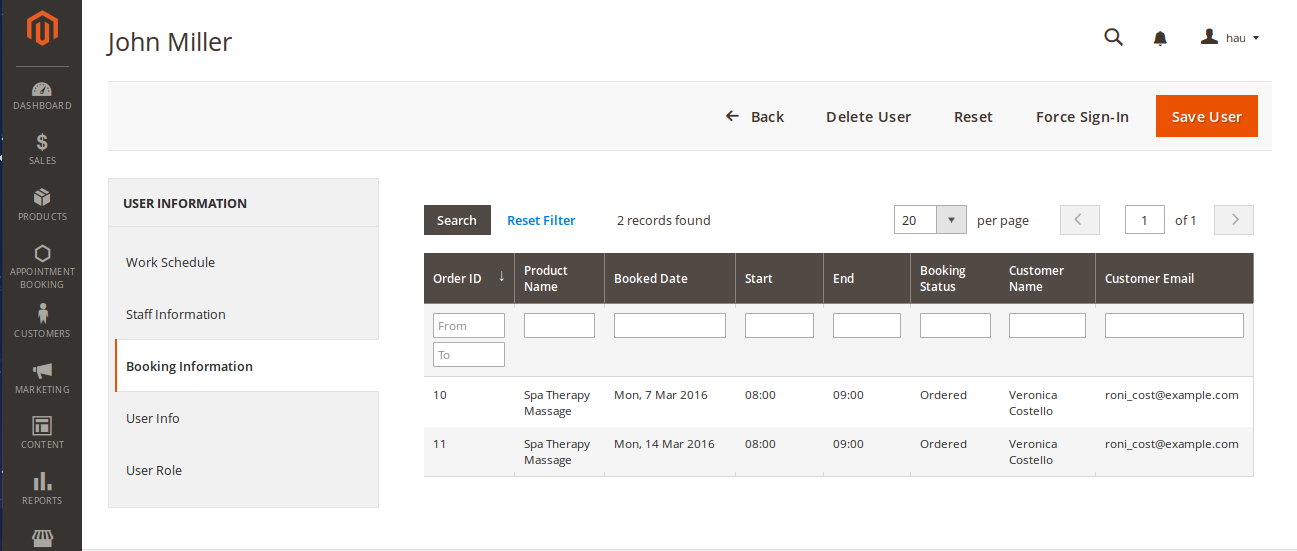
Lastly, the user can view booked orders in which the staff has been chosen.
Usage Procedure
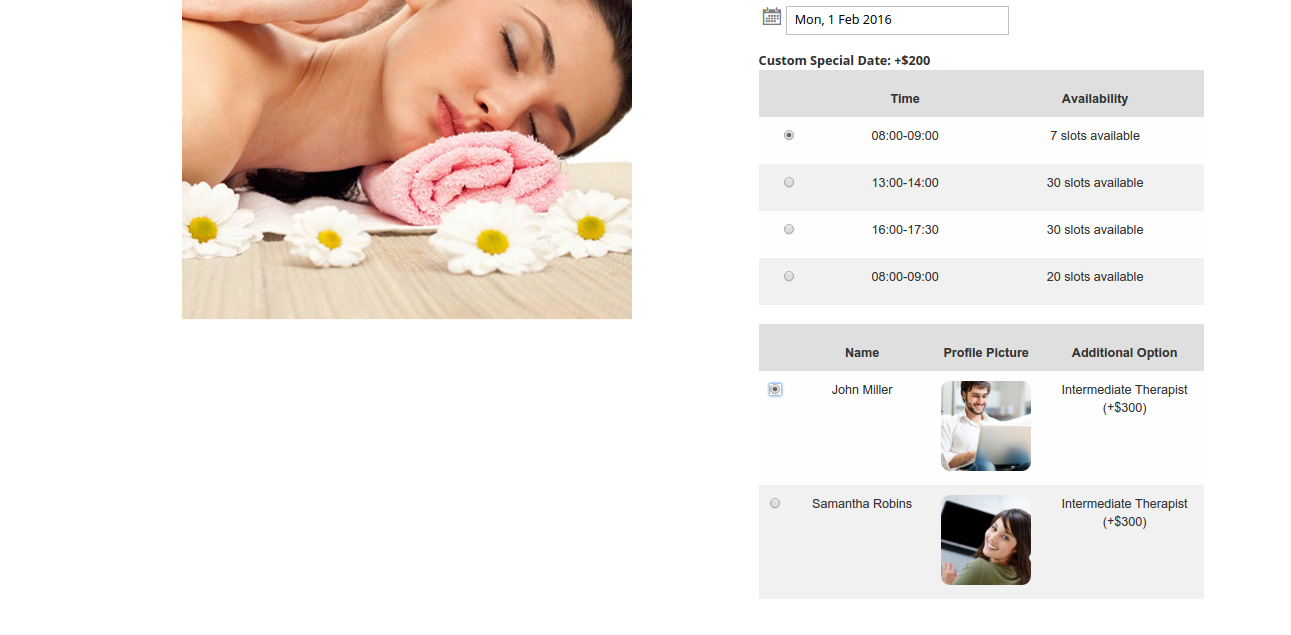
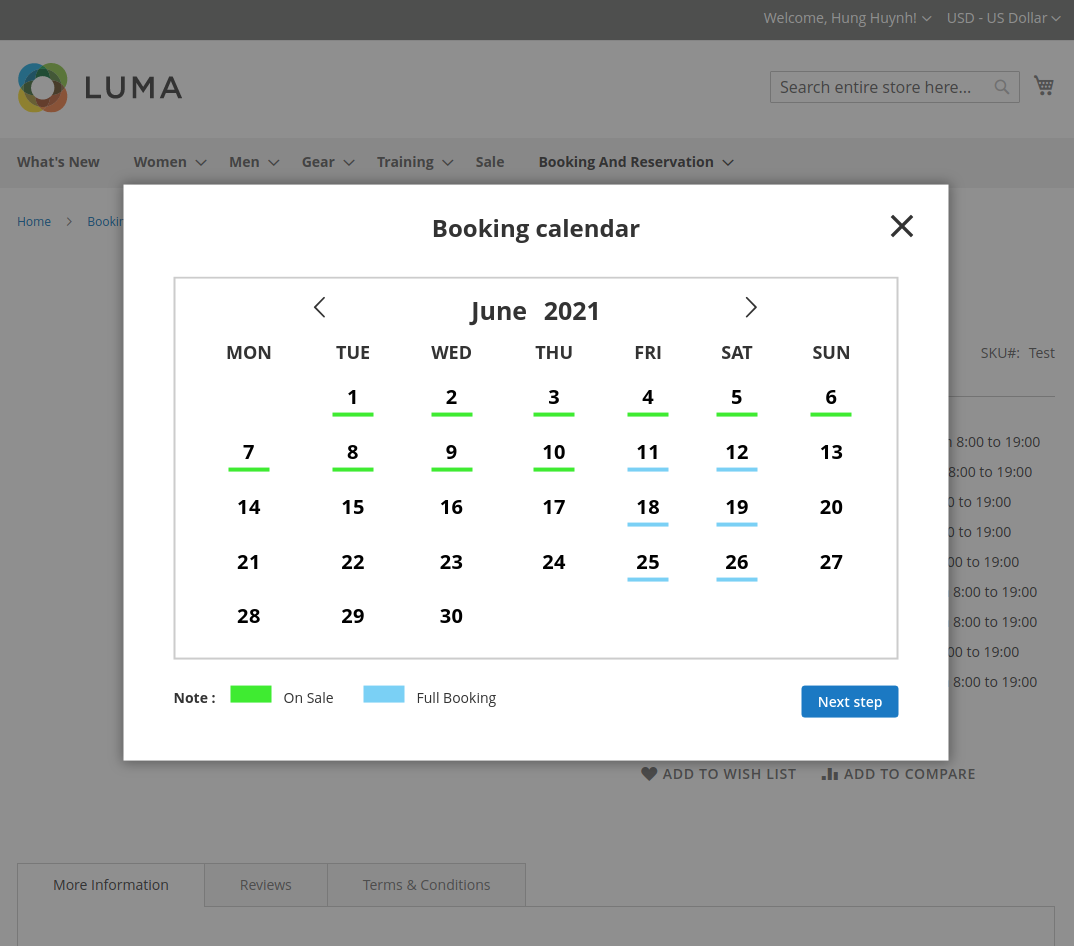
When a customer is on a frontend detail page of a product of type Appointment Booking, he will be able to select a date with a date picker input field as shown.
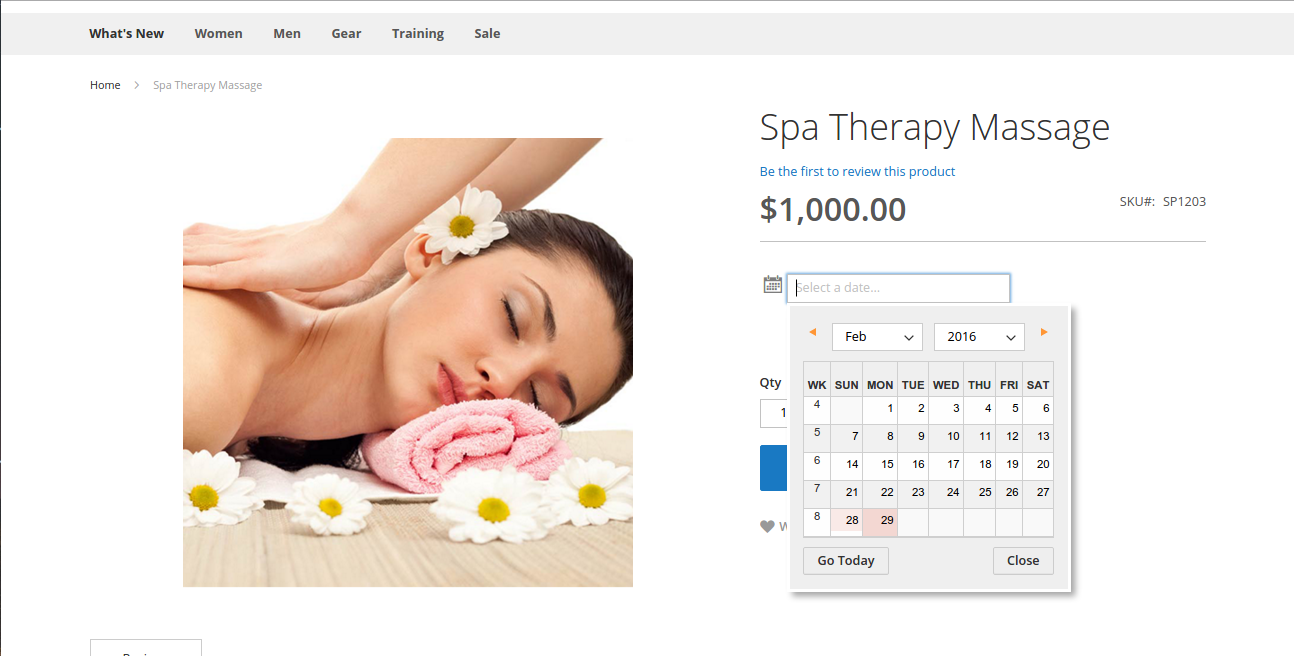
When a day is selected, the system will check if there is any product schedules available that day and display them. It will also check if the selected day is within a special date range as formerly specified.
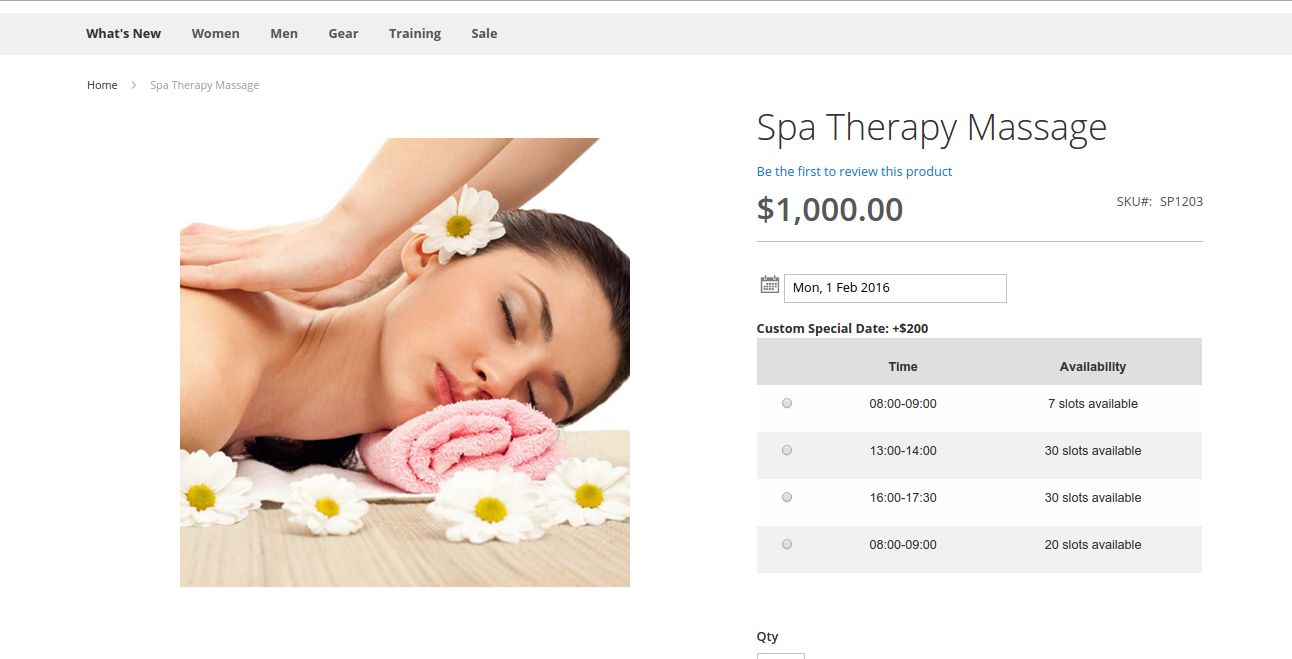
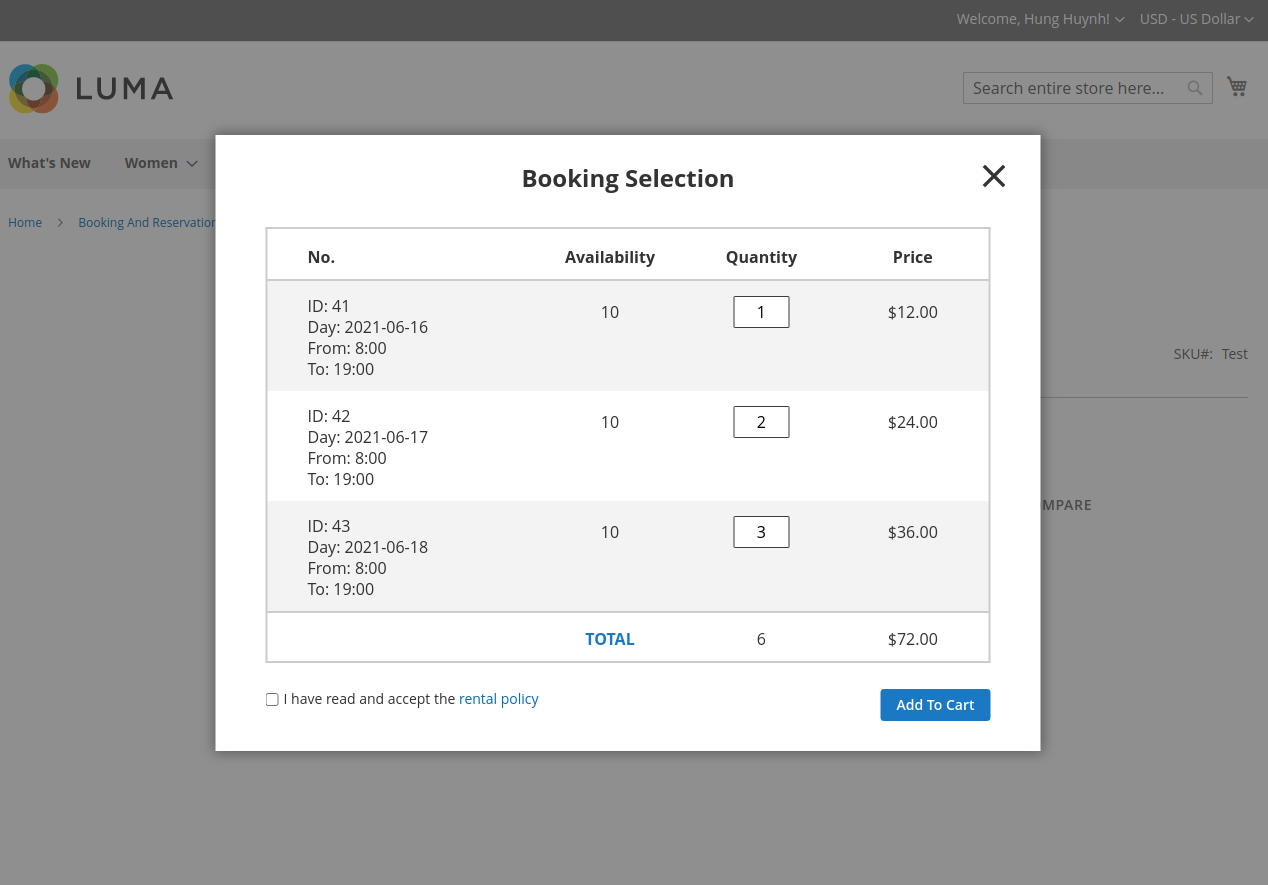
Then if a schedule is selected, the system will now check the staff with the corresponding schedule. Some information about the staff will also be displayed.
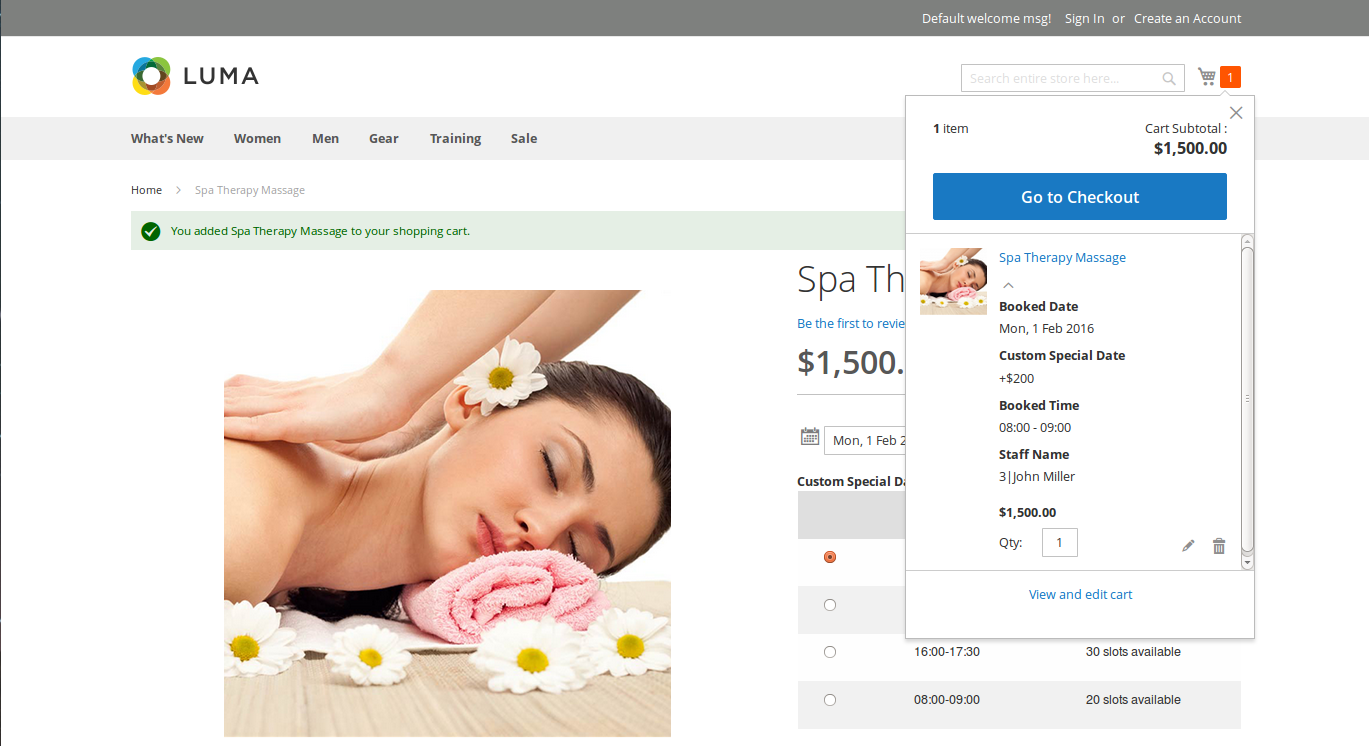
Then when the customer add the product to cart, he will be able to view the product options which are also booking options.
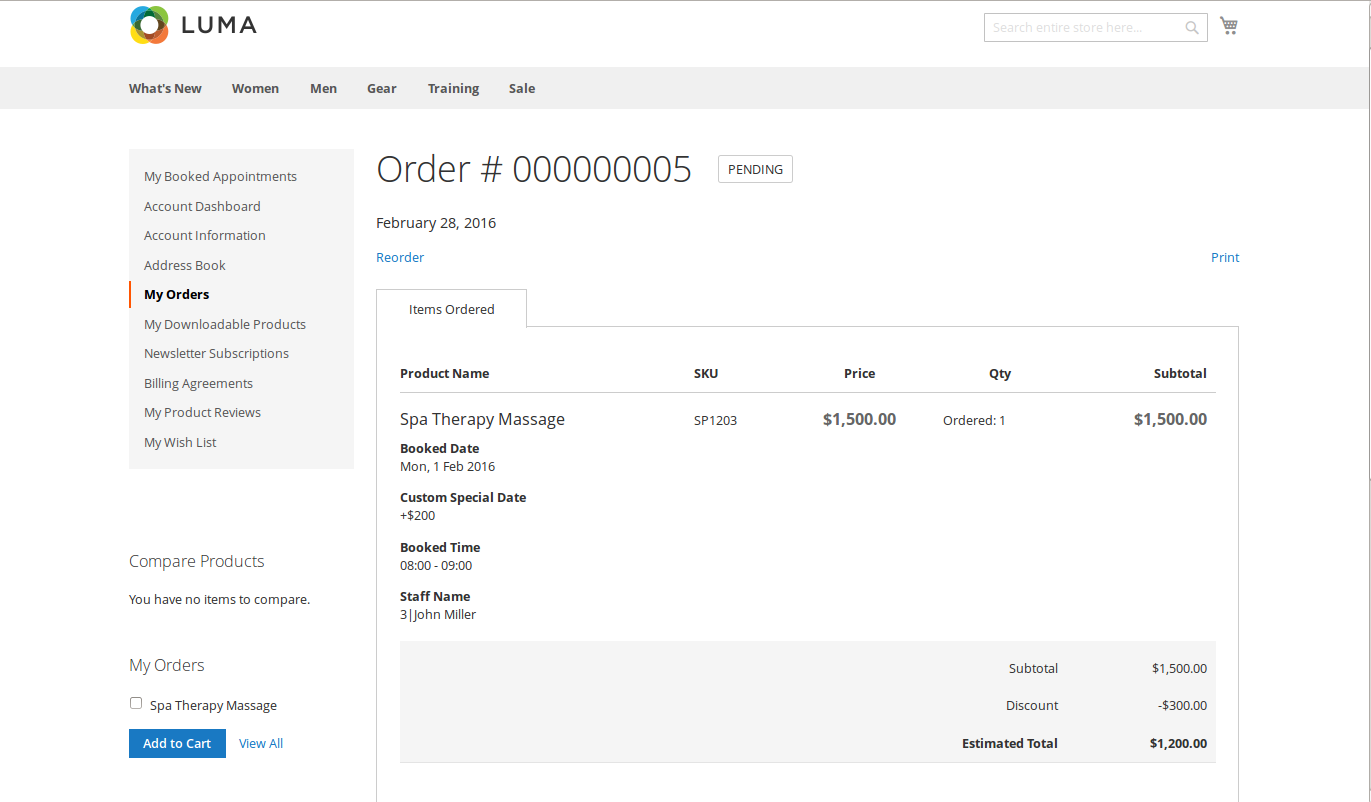
When the order is successfully placed, this is what it will looks like on My Orders page in customer's My Account.
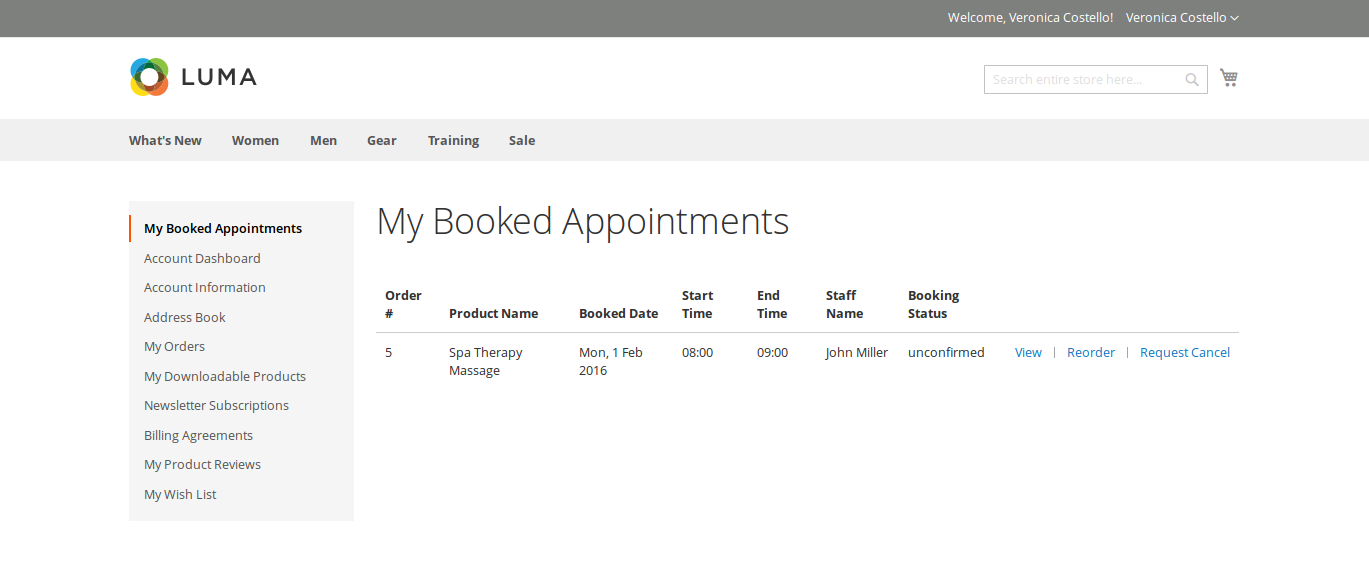
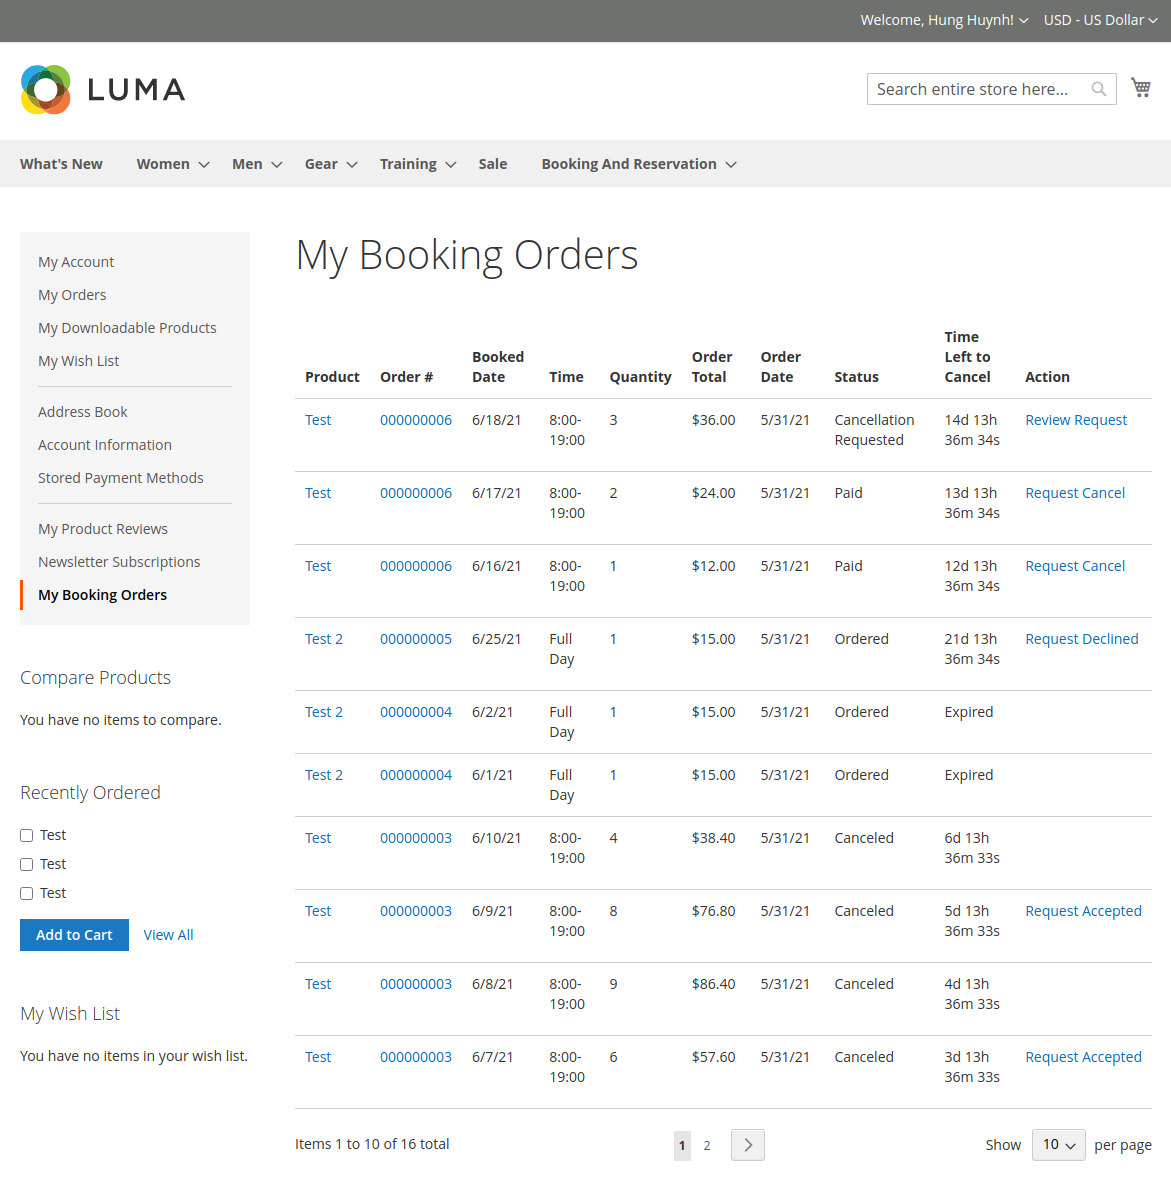
For easier management over booked appointments, the customer can also check the My Booked Appointments tab.
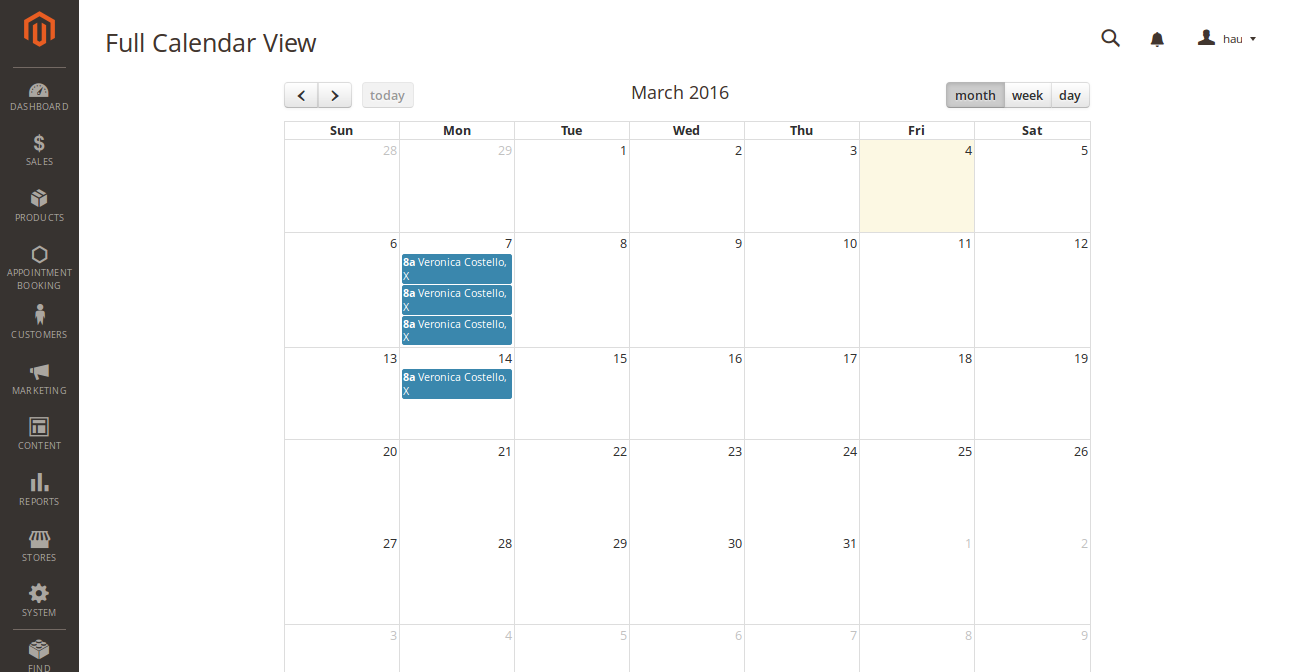
From admin's perspective, he can view all booked appointments in Booking Orders tab in Appointment Booking menu.

Now the admin can view all booked appointments in Full Calendar mode, just by pressing the View in Full Calendar button above.
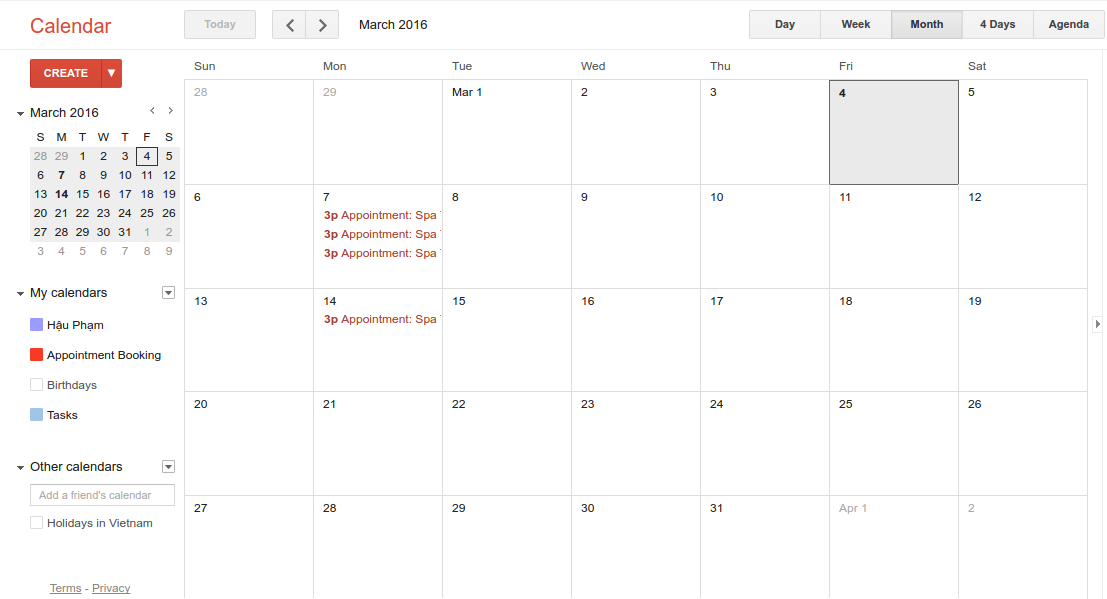
He can also sync and view booked appointments on his Google Calendar account by clicking Sync and View in Google Calendar button. One small reminder here, if your browser is already logged in with your Google account, you will probably encounter a cookie error. You can avoid this error by erasing cookie and cache in the browser, re-login and the extension will function as normal.
Sign in with your account and authorize connection to your created project on Google Developer Console, then your appointments will appear on your calendar as shown.
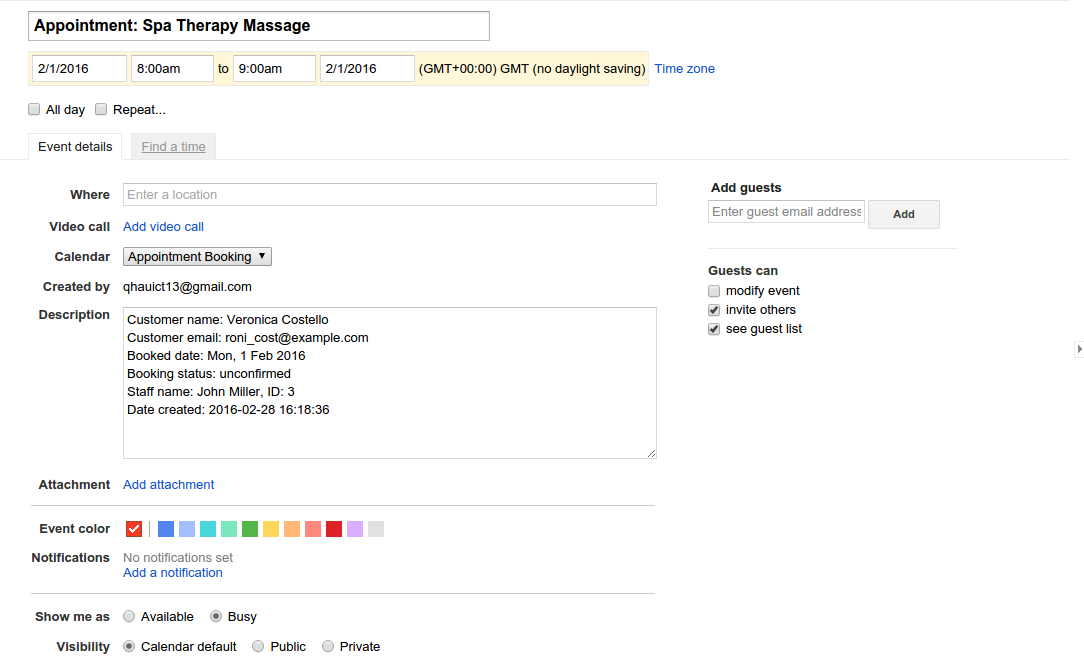
If you take a closer look into an event's details in Google Calendar, some necessary information will be displayed in the event's description.
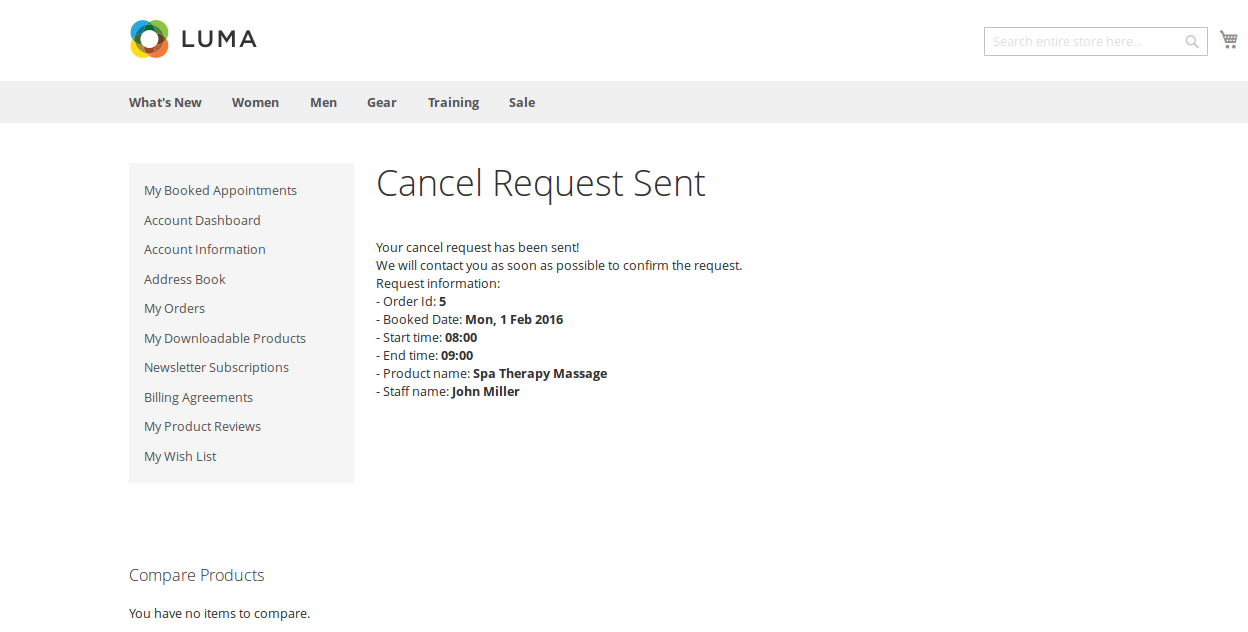
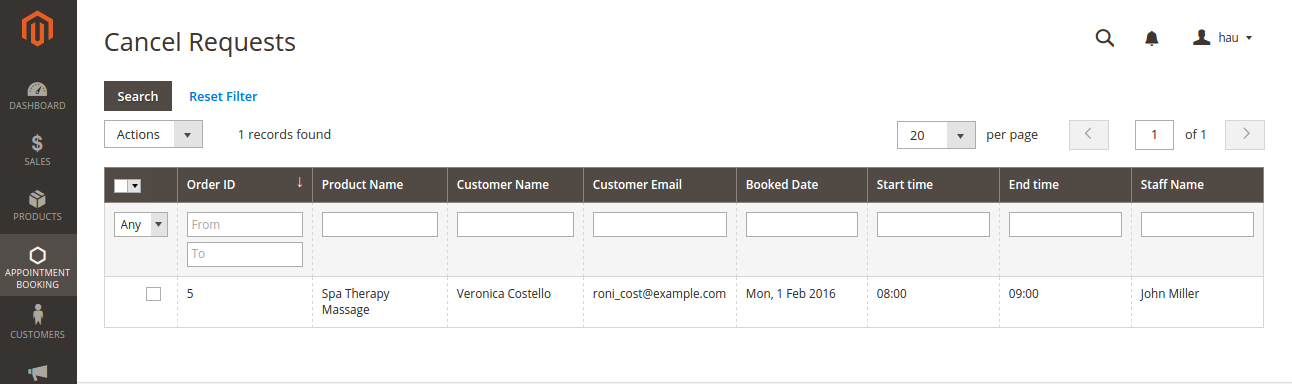
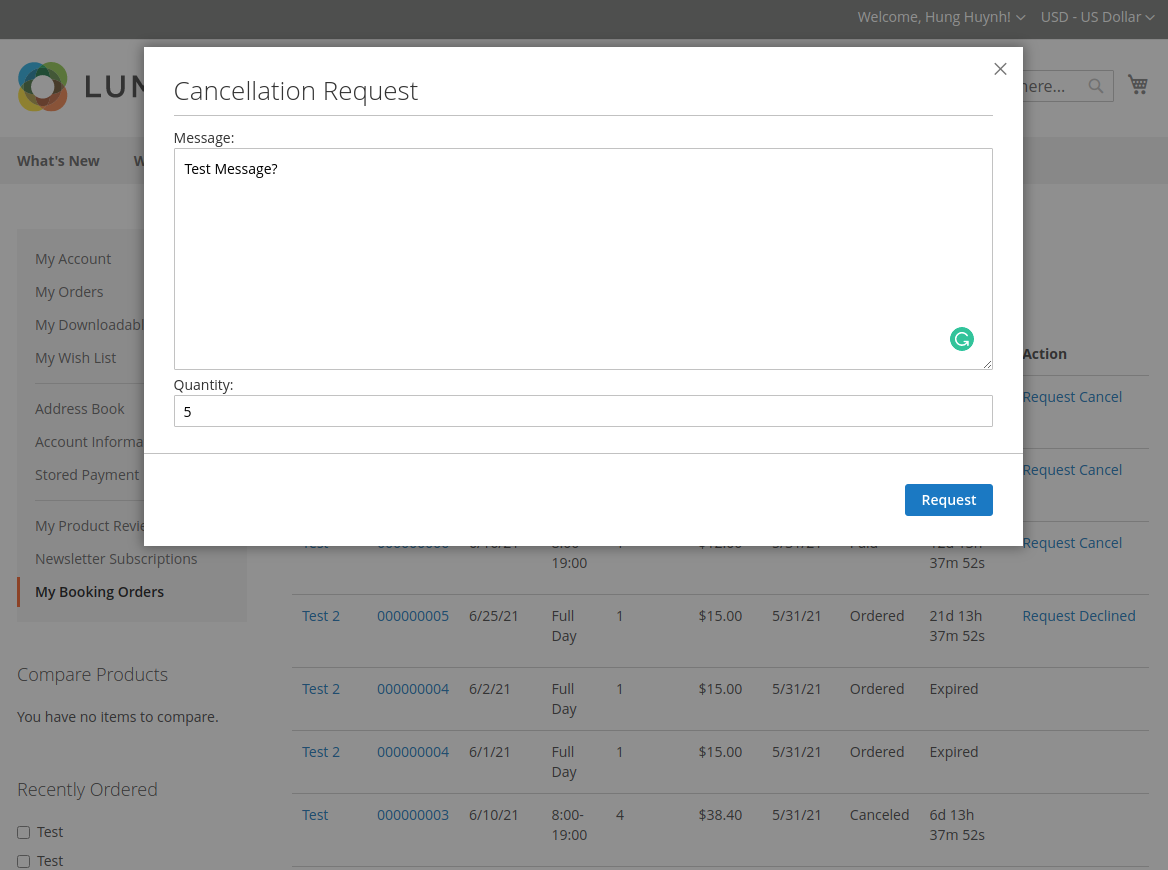
Cancel Requests
Once the appointment has been booked but the customer changed his mind, he can send a cancel request to the admin. He need to go to My Booked Appointments tab in My Account. Besides View and Reorder button, there will be Request Cancel buttons that once clicked, a request will be sent to the admin.
On backend side, go to Cancel Requests tab, the admin can see the cancel requests.
x and 2.4.x
Configuration
Create a Booking Product
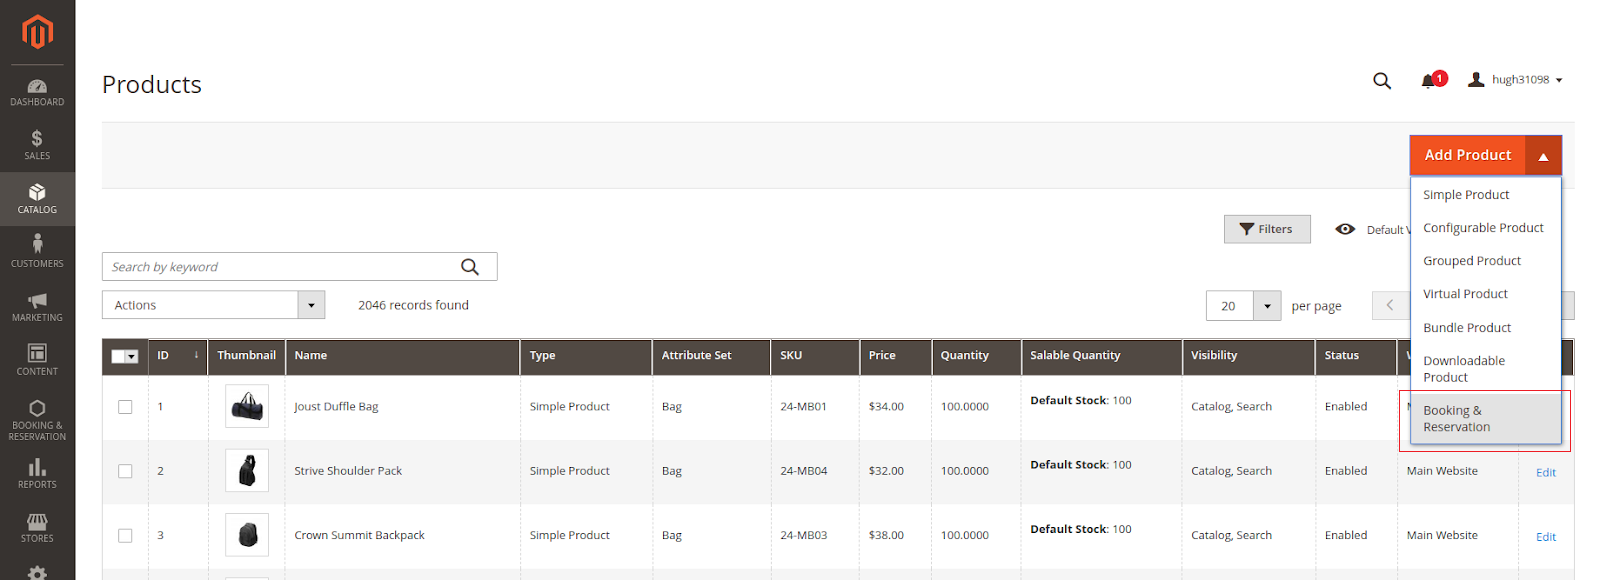
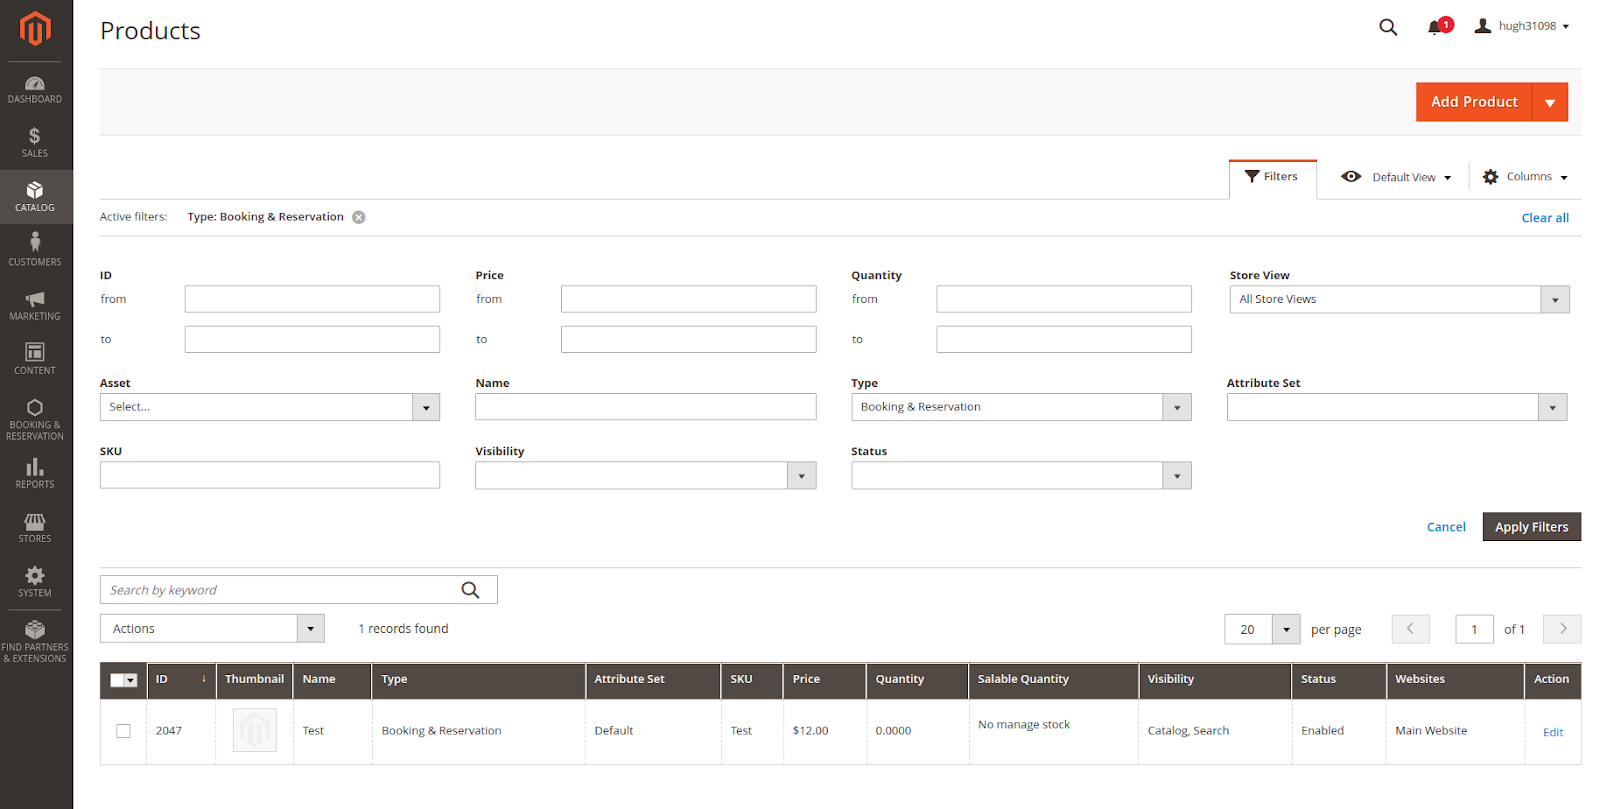
![]() On the admin sidebar, choose Catalog > Products >Add Product >Booking & Reservation
On the admin sidebar, choose Catalog > Products >Add Product >Booking & Reservation
- Booking Products are virtual products, which have no weight and shipping costs.
- All new Booking products will be added to Booking Category by default. After installation, our module will generate the “Booking And Reservation” category and set this as the Booking Category. You can remove this selection and choose the Categories you want, or set a different Booking Category in module configuration.
- Hold Quantity: By default, booking products can be ordered with all payment methods (including free) and no restrictions. Hold Quantity allows limiting the concurrent number of Booking orders that can be placed with an offline payment method, like free or cash.
- After a booking slot reached its Hold Quantity limitation, that slot (along with other products in the cart) can only be purchased with an online payment method. The Hold Quantity will be refilled once offline orders of that slot are considered “Paid”.
Check/Uncheck Enable Unpaid Order to utilize this feature.
Choose the available Hold Quantity in the input below. If zero (0) is chosen, the module will use the Hold Quantity in module configuration instead.
- Booking Available: Choose the date range in which booking slots will be generated. Only the “From” date is required, the “To” date is optional.
- Excluded Dates: Specify multiple Date Ranges in which you want to prevent booking orders. Booking Slots won’t be generated for dates in these ranges.
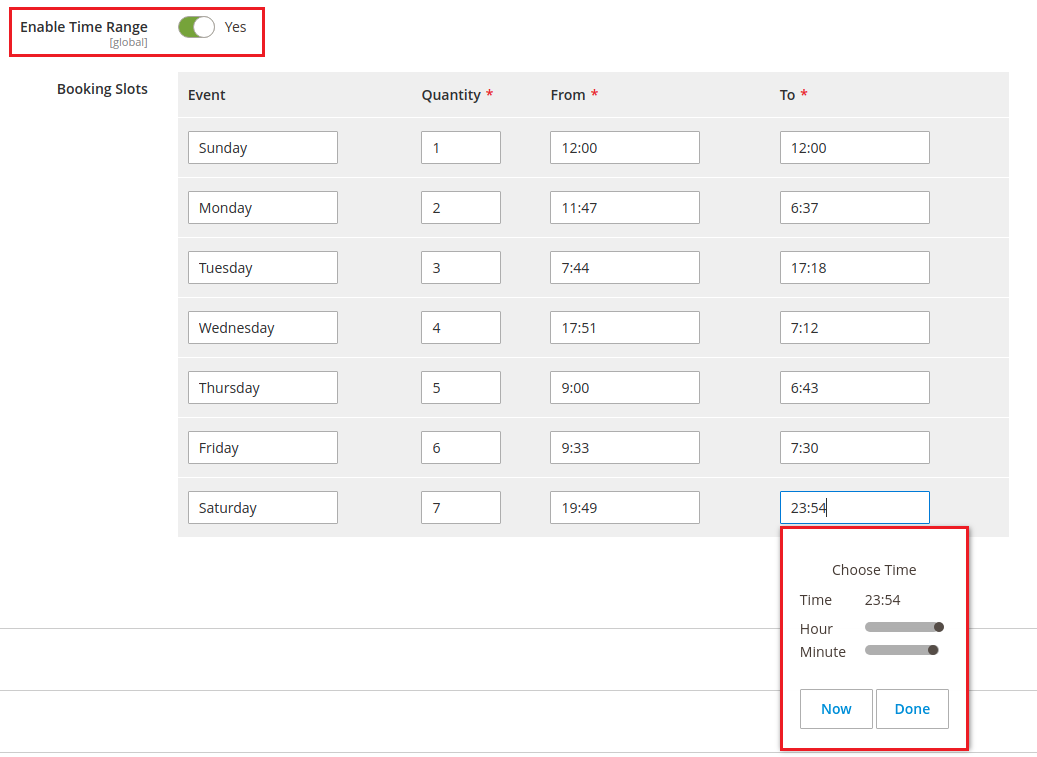
- Booking Type: Choose a booking type to decide how Booking Slots going to be generated:
Booking by Hours: Choose multiple time slots for each available booking date. Specify the time range and quantity for each slot.
Booking by Days: Choose available quantities for each weekday that can be booked. The time range for each weekday can be specified by toggle “Enable Time Range”

Edit an available Booking Product
![]() You can also edit available Booking products.
You can also edit available Booking products.
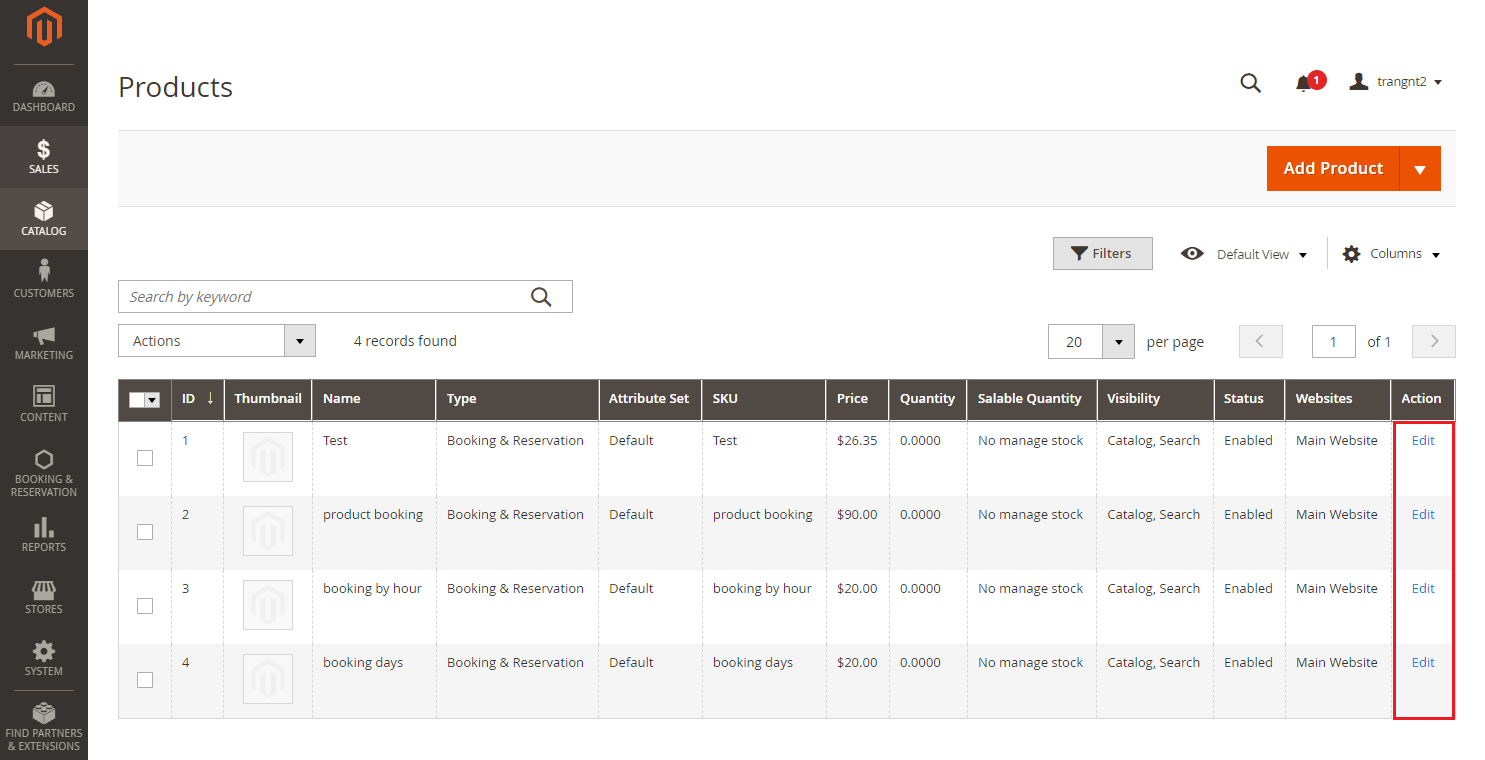
![]() Magento’s Product Grid allows filtering Product by Type, and you can also save filters as custom views for easy access.
Magento’s Product Grid allows filtering Product by Type, and you can also save filters as custom views for easy access.
![]() Note: Attribute specified for Booking products can not be modified once created.
Note: Attribute specified for Booking products can not be modified once created.
Configuration
On the admin sidebar, choose Booking & Reservation > Configurations:
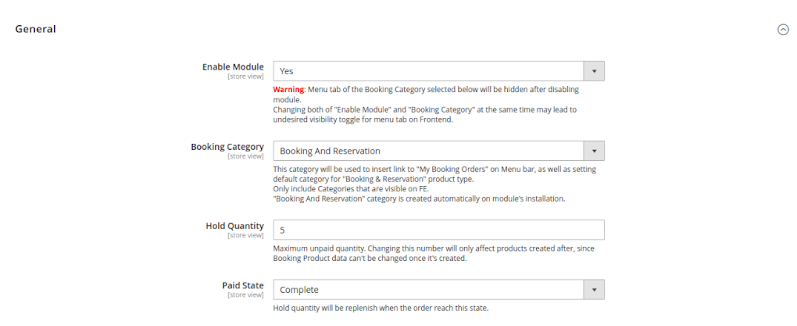
 General
- Enable Module: Allow customers to access booking features. When disable, customers won’t be able to place orders on Booking Products. The chosen Booking category will also be hidden and can be view until the module is re-enabled.
- Booking Category: Define the Booking Category, including:
Default category for new booking products.
Insert direct links to “My Booking Orders” in the menu bar entry of that category
Toggle category visibility on Frontend when enable/disable the module.
- Hold Quantity: The global Hold Quantity settings. Will be used when Hold Quantity for a product is enabled and set as 0.
Tip: Enable a product’s Hold Quantity and setting its + global hold quantity to 0 will prevent placing orders with any offline payment methods.
- Paid State: If an order with offline payment methods reached this state, the amount of Hold Quantity it has taken from the booking slot will be replenished.
An order might skip the state defined in this configuration. In that case, that order will be considered “Paid” once it has been invoiced.
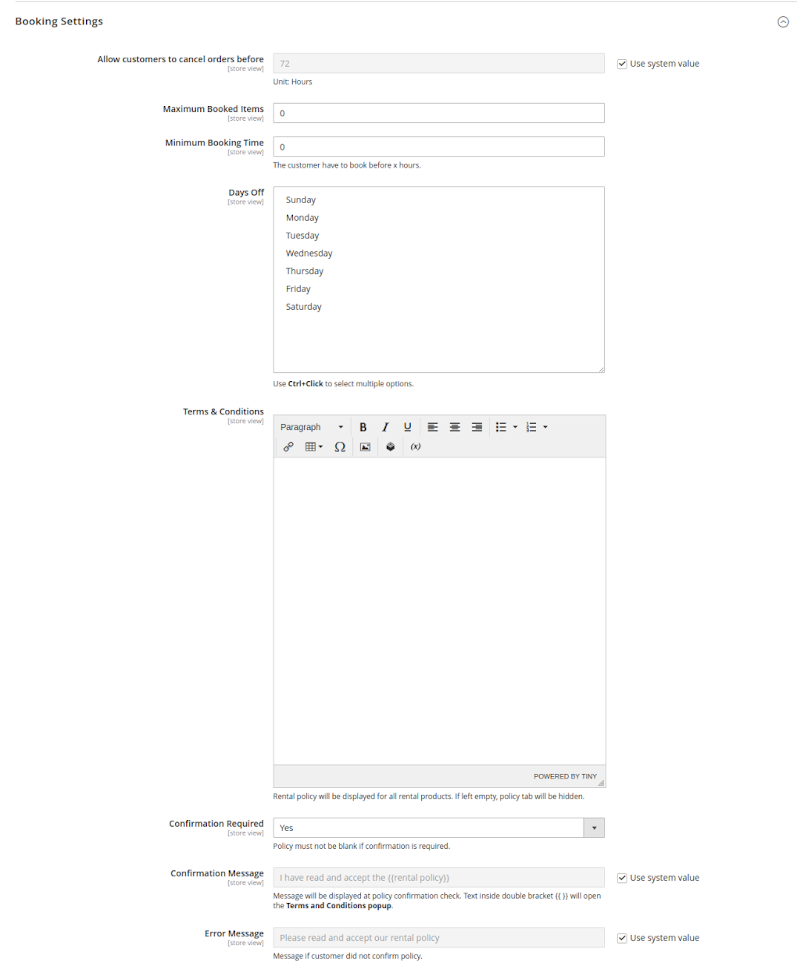
Booking Settings
All timing calculations are done in the UTC timezone.
- Allow customers to cancel orders before: Customer won’t be able to request cancellation if the amount of time left before Booked Date is below this value. Only calculate by Booking Date, not the Time Range (if specified) of that slot.
- Maximum Booked Items: Limit the number of unpaid orders a customer can have, which include:
Placed Orders that haven’t reached “Paid” status.
Booking Products in customer’s cart.
Leave as 0 to disable orders limit.
- Minimum Booking Time: A slot can only be booked if the amount of time before its date is above this value. Only calculate by date, not the Time Range (if specified) of that slot.
- Days Off: A global limit applied to all Booking Products. Prevent customers from booking the chosen weekdays, even if there’re slots available on that date.
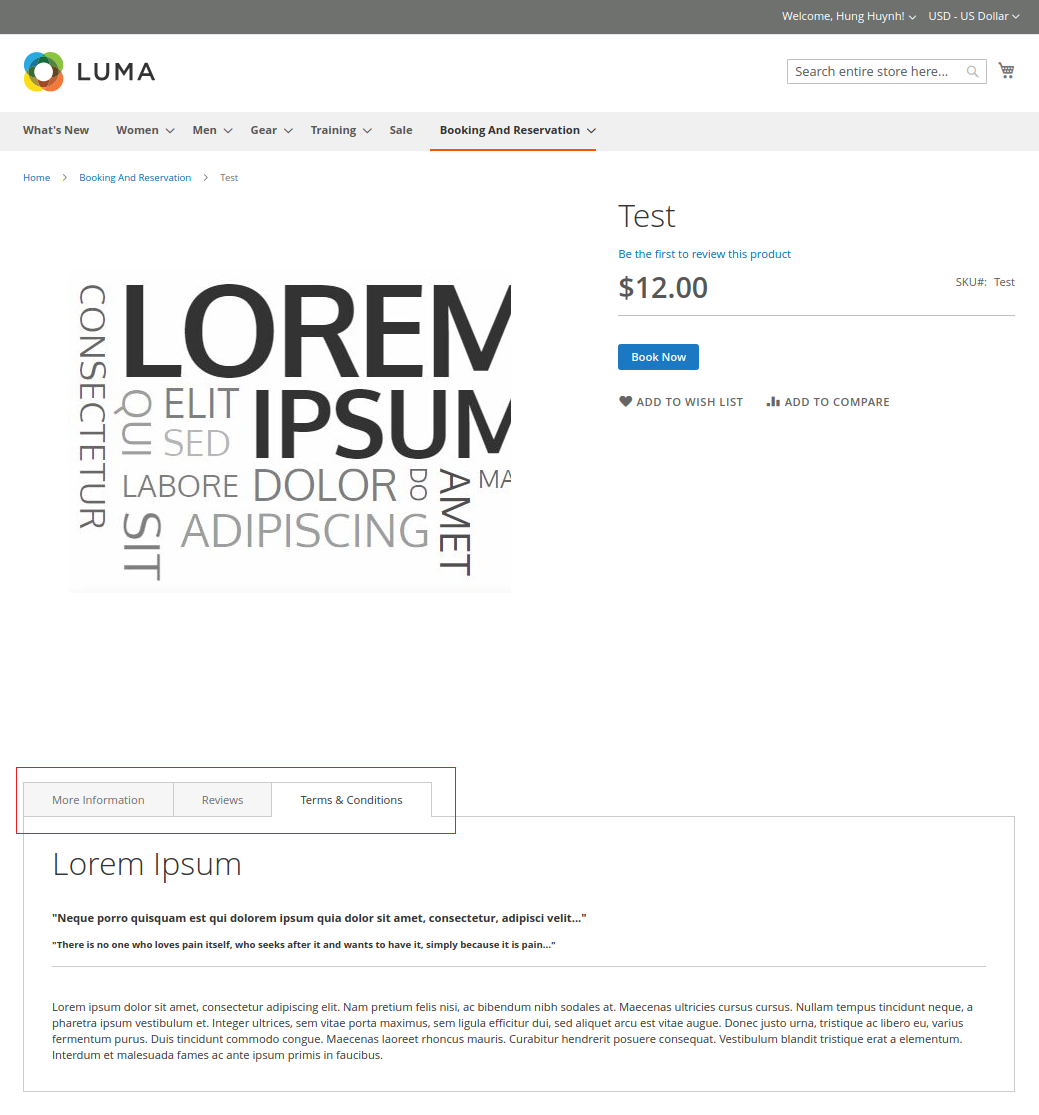
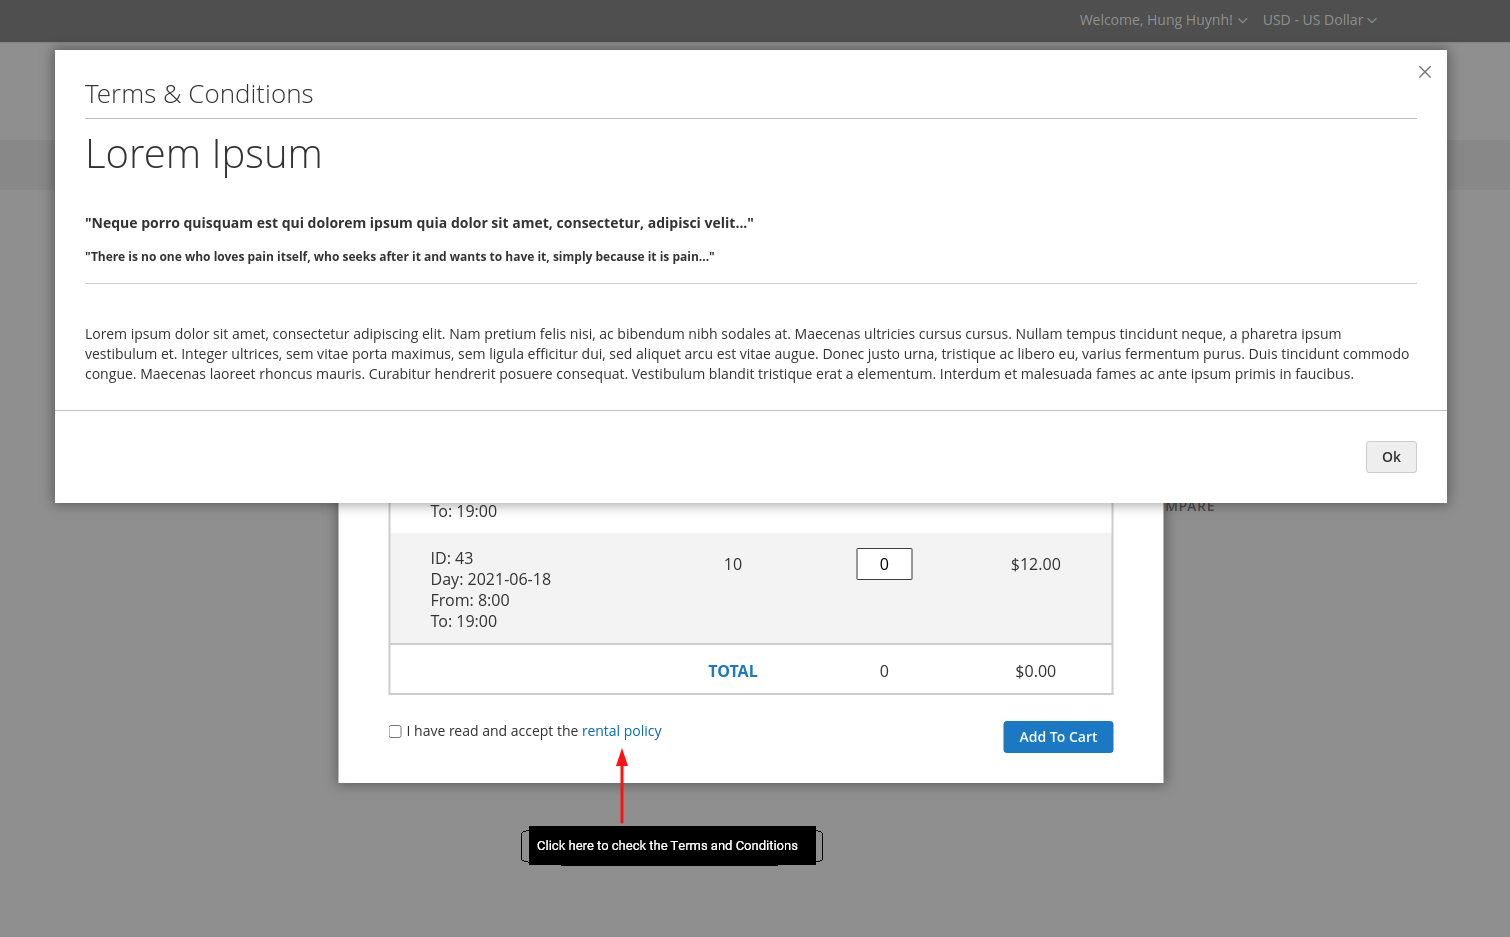
- Terms & Conditions: Enter unique Terms & Conditions for Booking Products. If available, the Terms & Conditions will be displayed as a tab in Booking Product pages, as well as a viewable popup when selecting Booking Slots.
- Confirmation Required: Require customers to agree to your Terms & Conditions before adding Booking products to the cart.
- Confirmation Message: Display on Product Booking Select popup, if Confirmation Required is enabled.
- Error Message: Display as a popup, if confirmation tickbox has not been checked.
Label Settings
- Color For Full Booking Days: Customize Full Booking Days (booking days with 0 quantity left) color on Booking Calendar popup in FE.
- Color For Booking On Sale: Customize Booking On Sale (booking days with custom pricing thanks to Reservation Rule) color on Booking Calendar popup in FE.

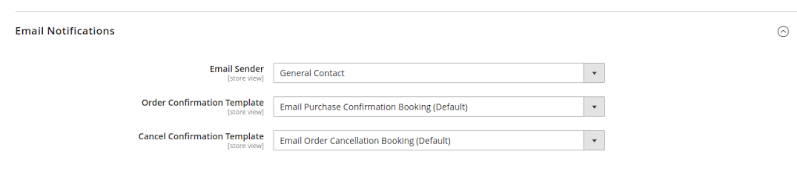
Email Notifications
- Email Sender: Select sender for Booking Orders’ emails.
- Order Confirmation Template: Select Template sent to the customer after a Booking Order is placed.
- Cancel Confirmation Template: Select Template sent to the customer after a Booking Order is canceled.
![]() Note: Custom Email Template can be created in Marketing >Communications >Email Templates
Note: Custom Email Template can be created in Marketing >Communications >Email Templates
Booking Orders Management:
All Booking orders placed can be viewed in our module’s Order Management grid, which can be accessed by clicking on Booking & Reservation >Order Management.
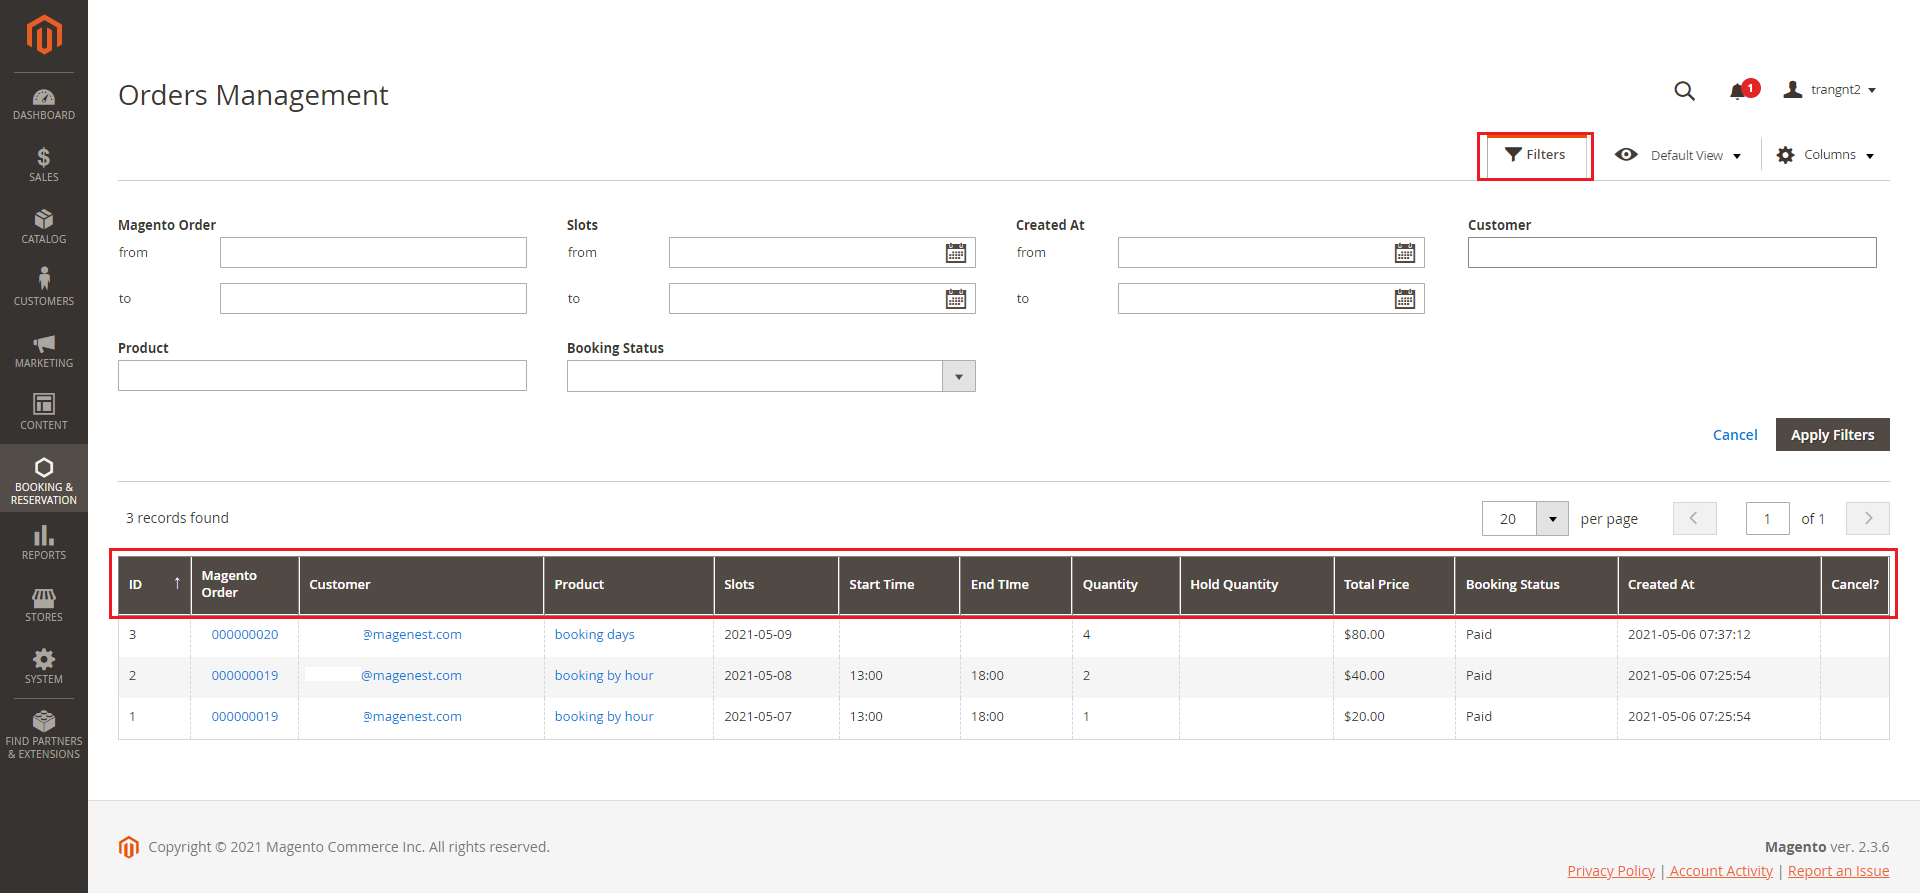
The Grid allows you to:
- Quickly view all booked slots, or navigate to the slots you need by filtering. You can filter Booking Orders by its Magento Orders, Booked Date, Created Datel; as well as the Customer, Product, and current status of that orders.
- Checking out an Order with a special Booking Status system, allowing you to quickly determine the best course of action:
Ordered status is assigned when an order is placed with qty within hold limit but hasn't reached the defined Paid Status, and hasn't been invoiced or only partially invoiced. Only applied for the product with Unpaid Order enabled.
An order is considered Paid if it has reached the defined Paid Status, or it was fully invoiced, or the associated product "Unpaid Order" attribute is disabled, or the order quantity exceeded Hold Quantity.
An order is Complete if it has gotten past the Booked Date without being Canceled.
When Customers request cancellation, Cancellation Requested status will be assigned to the order.
An order is considered Canceled if its Ordered Quantity = Canceled Quantity + Refunded Quantity.
- Quickly respond to a cancellation request:
Review the request’s message and quantity
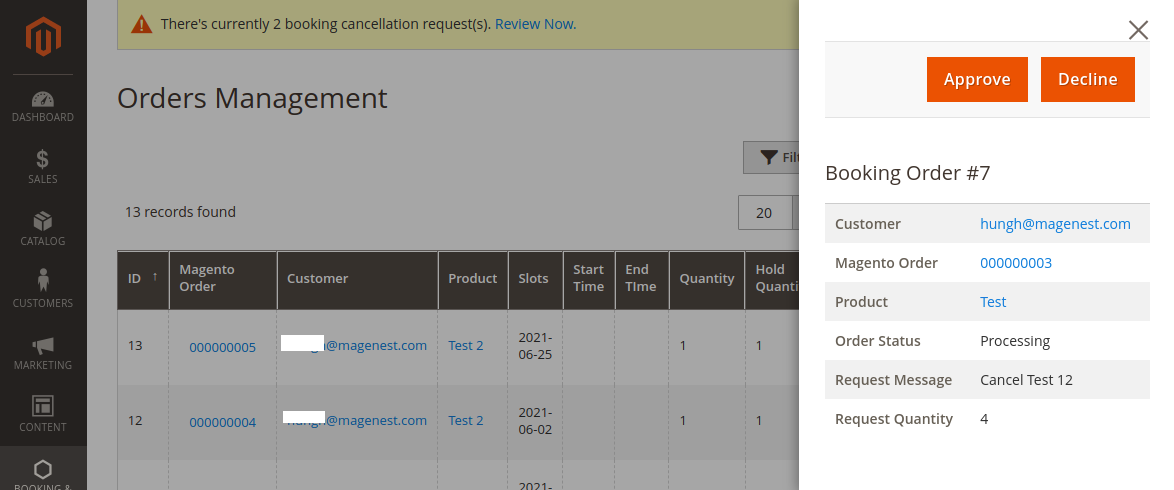
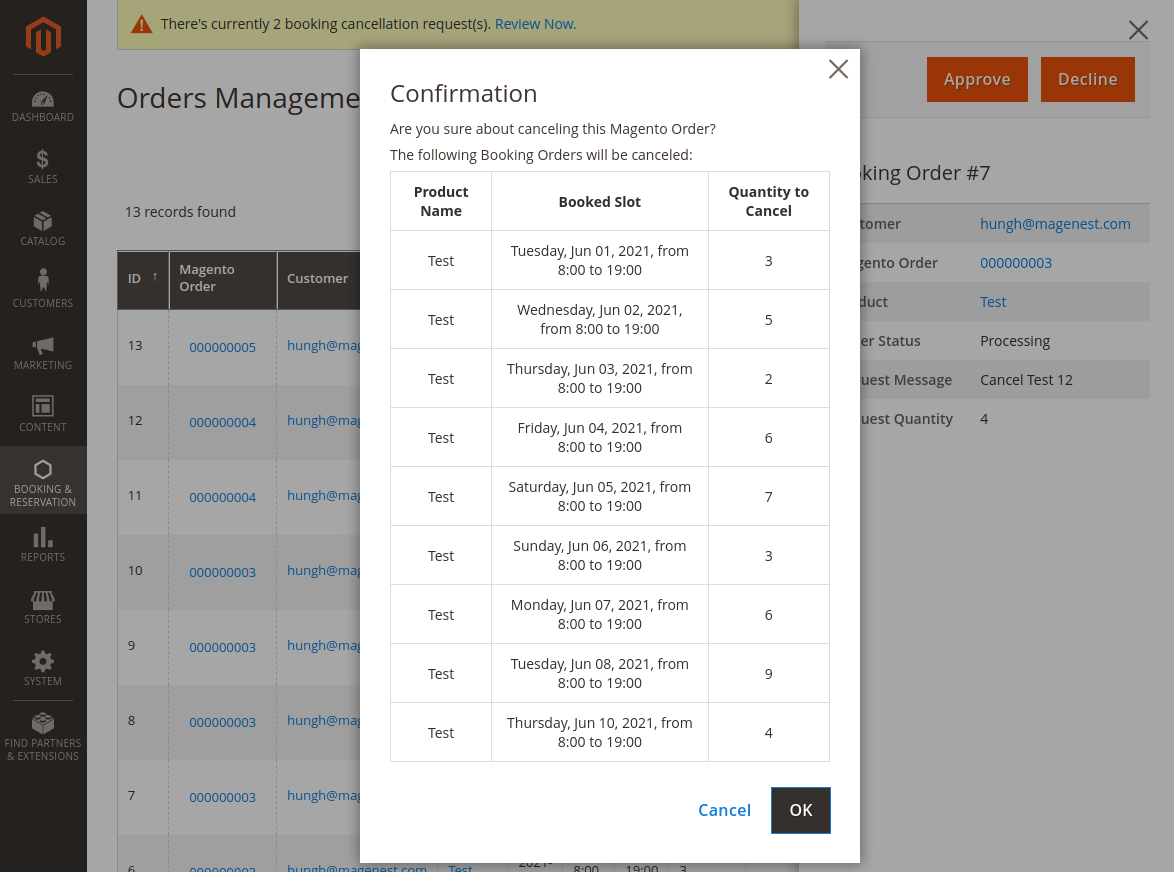
- Quickly cancel the order if possible, otherwise redirect you to the order’s credit memo page:
|
|---|
Storefront
Product Page
|
|---|
- Select Booking Date:
Color for Full Booking Days: #7ad0f5
Color for Booking On Sale: #3beb31
- Select Booking Slots:
The price and quantity are binding and will adjust accordingly to each other.
My Booking Orders
- Customers can view details about orders they’ve placed, the amount of time left to cancel, and request/review cancellation requests.
- A request that hasn’t been responded to can be edited, both the message and quantity.
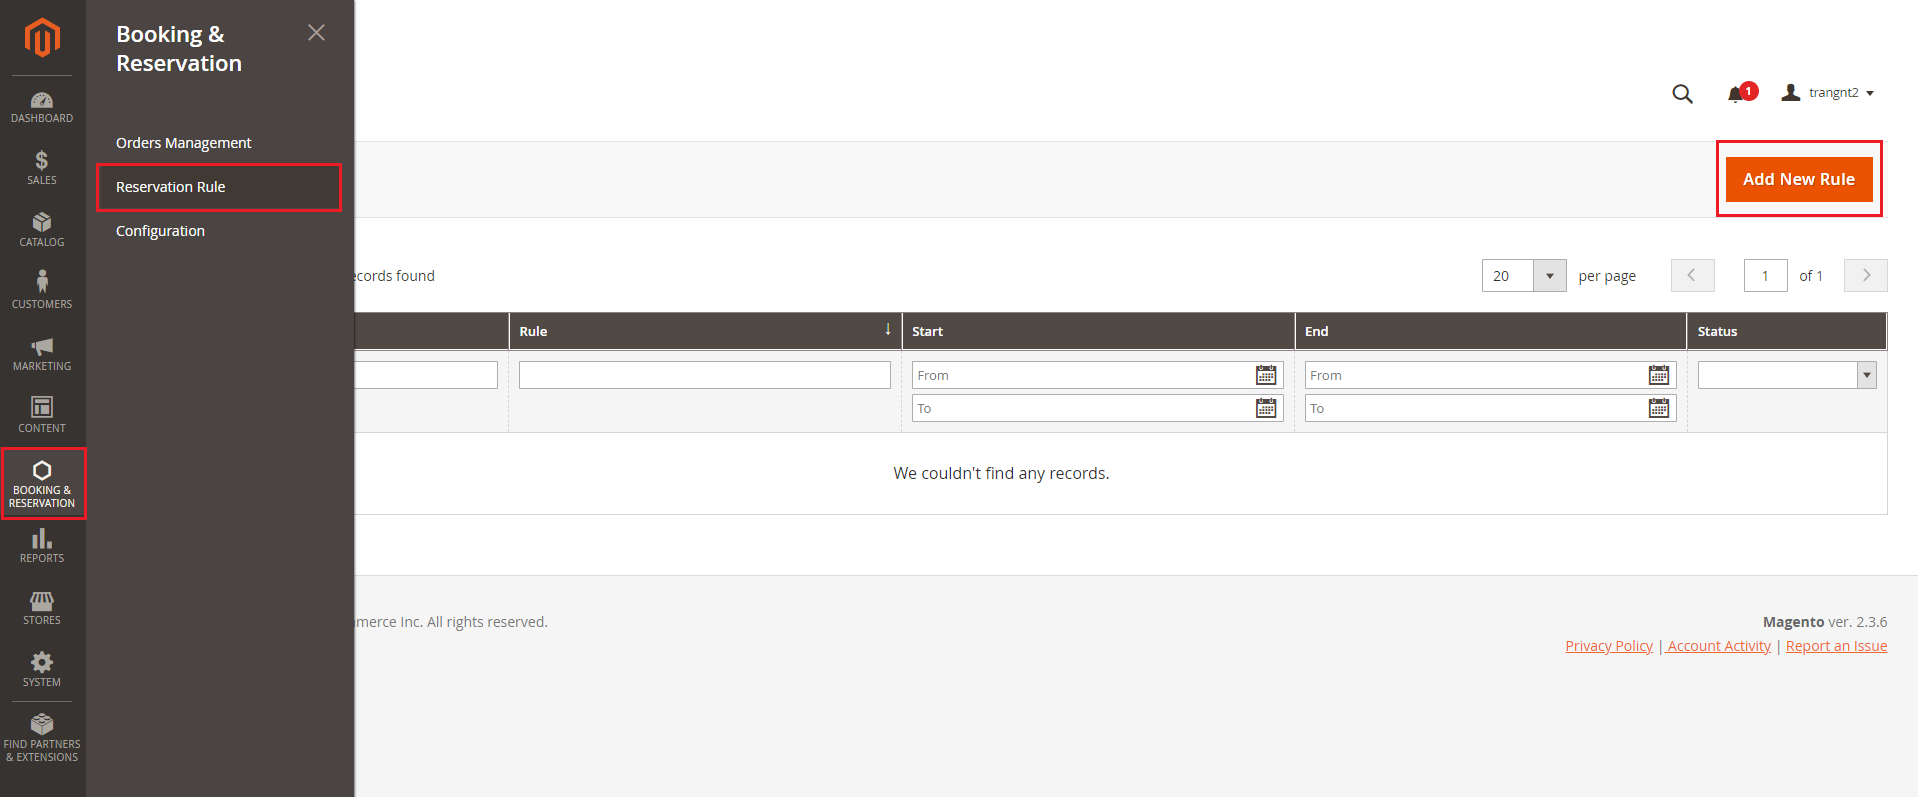
Create Reservation Rule
Reservation rules will be used to create promotion programs for Booking products. To create a new Reservation rule, follow these steps:
![]() Step 1: On the Admin sidebar, go to Booking & Reservation> Reservation Rule > Add New Rule
Step 1: On the Admin sidebar, go to Booking & Reservation> Reservation Rule > Add New Rule
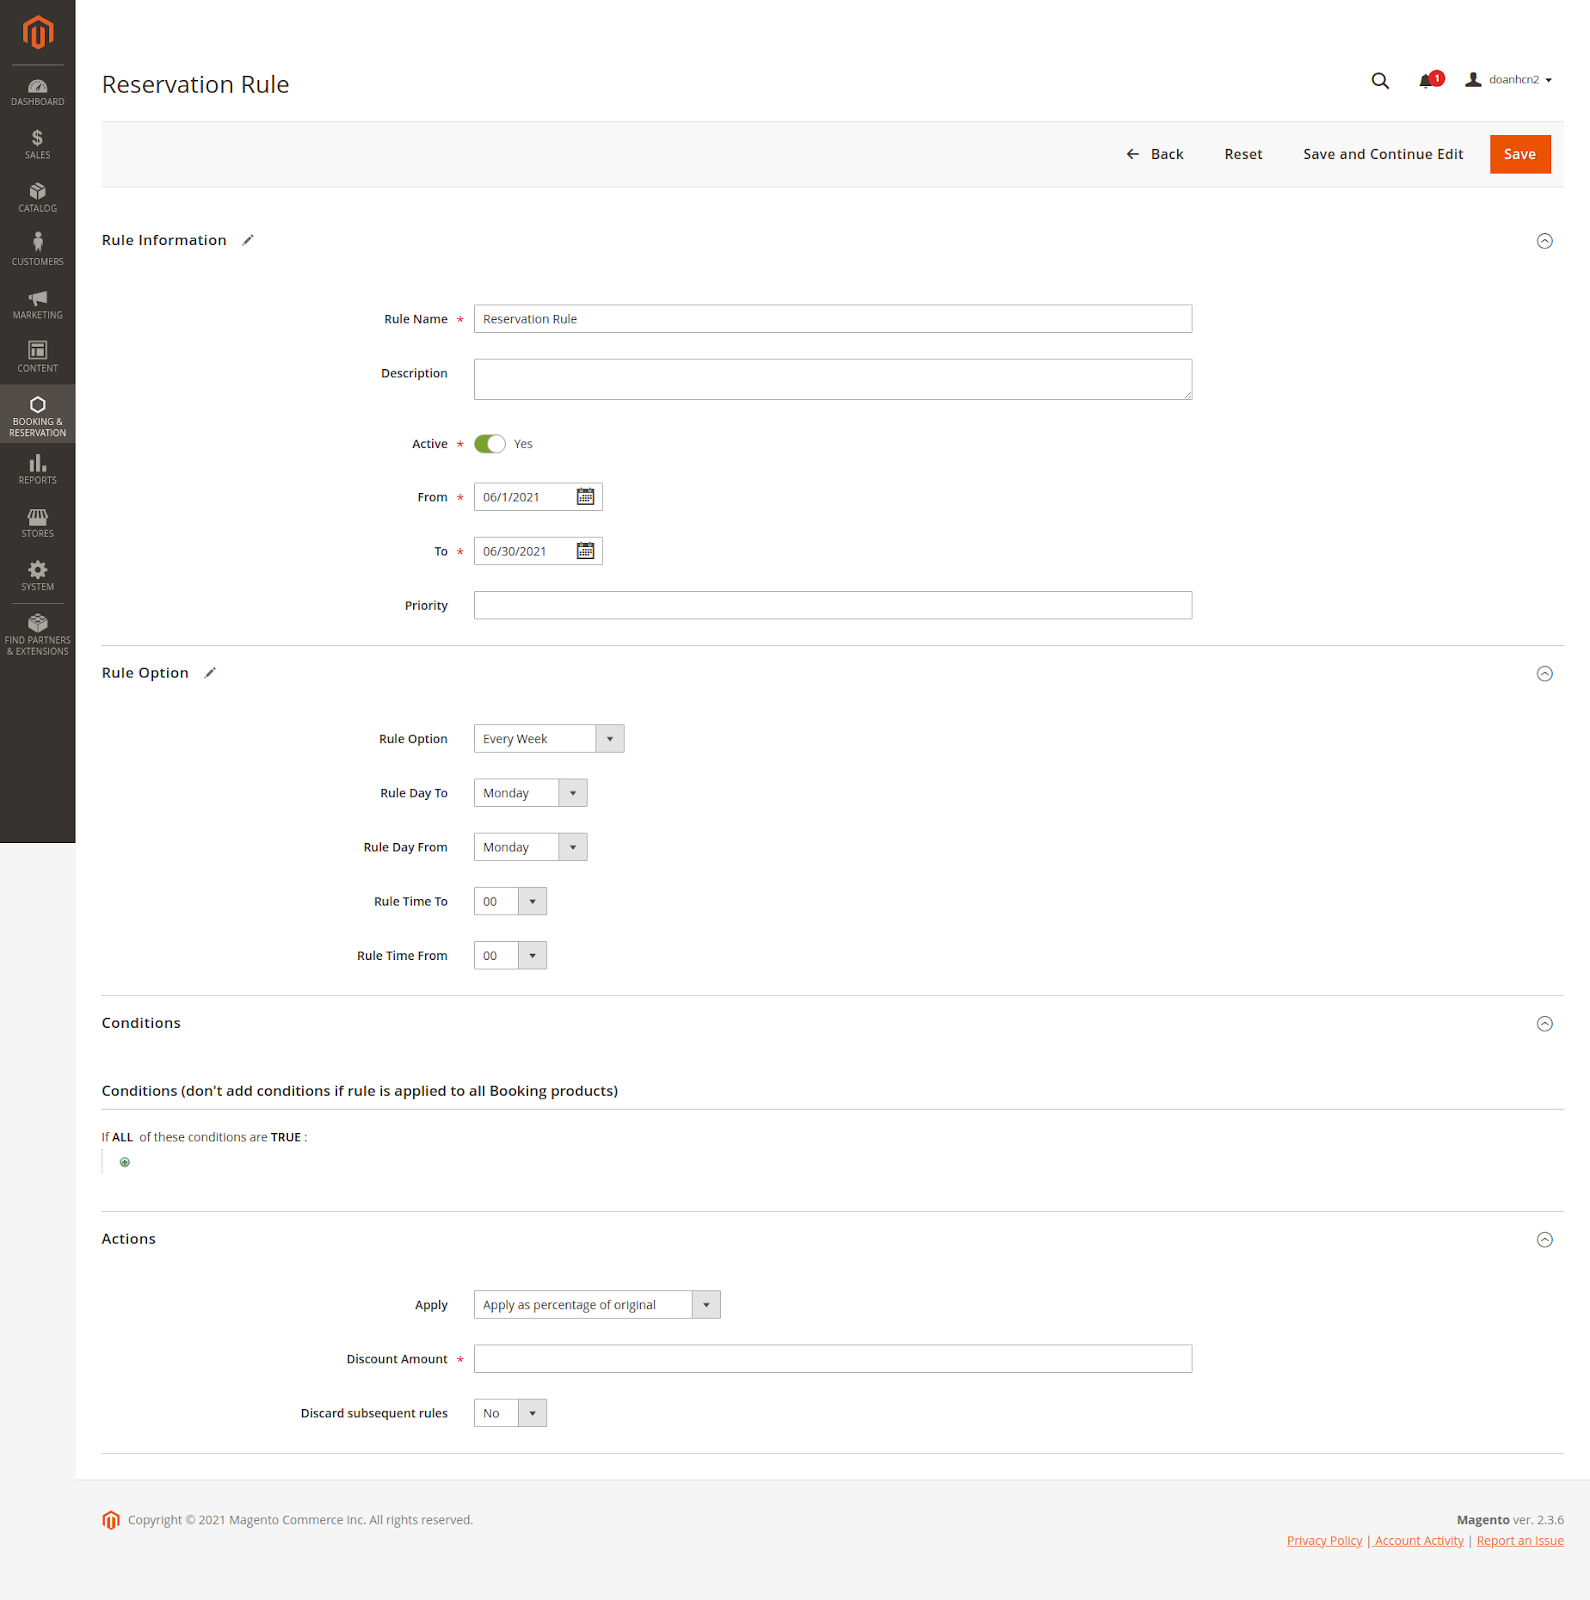
![]() Step 2: Complete Rule Information
Step 2: Complete Rule Information
| Section | Filed name | Content |
|---|---|---|
| Rule Information | Rule Name | Name of rule |
| Description | Description of the rule | |
| Active | Status of the rule. Active or Inactive | |
| From … To (*) | The time period which the rule applies. This time and rule option will make you fully qualified to apply the rules. Note: If the Rule option is not set, all days in this period will be applied. | |
| Priority | Enter a number to establish the Priority of this rule in relation to other rules. The Priority setting is important when the same catalog product meets the conditions set for more than one price rule. The rule with the highest priority setting (1 being the highest) will become active for the product. |
![]() Step 3: Setup Rule Options
Step 3: Setup Rule Options
All options in this section will be applied in the above period of time (*). With this setting, you can set a recurring time to apply the rule such as Every day, Every week, Every month, and Every Year.
| Section | Filed name | Content |
|---|---|---|
Rule Option All options in this section will be applied in the above period of time (*) | Rule option | You can set Recurring time: Every Day, Every Week, Every Month, Every Year |
| Rule Day From … Rule Day To | Days of the week or month that will apply the rule | |
| Rule Date From … Rule Date To | Days of the year that will apply the rule | |
| Rule Time From … Rule Time To | Period times of a day which will apply the rule |
![]() Step 4: Define the Conditions
Step 4: Define the Conditions
Reservation rules support 2 conditions, that is, apply to all booking products in a specific category or SKU product
This section works like the Conditions section of Catalog Price Rule, please navigate here to know how to define conditions.
![]() Step 5: Define the Actions
Step 5: Define the Actions
This section is similar to the configuration in Catalog Price Rule, please navigate here to check the instruction
Update
Update
- When a bug fix or new feature is released, we will provide you with the extension's new package.
- All you need to do is repeating the above installing steps and uploading the package onto your store. The code will automatically override.
- Flush the config cache. Your store and newly installed extension should be working as expected.
Support
- We will
- reply to
- support requests after 2 business days.
- We
- will offer lifetime free update and 6 months free support for all of our
- paid products. Support includes answering questions related to our products, bug/error fixing to make sure our products
- fit well in your site exactly like our demo.
- Support DOES NOT include other
- series such as customizing our
- products, installation and uninstallation service.
Once again, thank you for purchasing our extension. If you have any questions relating to this extension, please do not hesitate to contact us for support.Magenest