Thank you for purchasing our extension. If you have any questions that are beyond the scope of this document, do not hesitate to leave us an email via our email address below.at [email protected]
Created: 05/05/2017 | By: Magenest | Support Portal: http://servicedesk.izysync.com/servicedesk/customer/portal/20
| Table of Contents |
|---|
...
Introduction
![]()
This extension provides a flexible tool for integrating database between Magento 2 Salesforce Integration allows the store owner to sync all data from Magento 2 store and Salesforce in two-way.
The extension page: https://store.magenest.com/magento-2/salesforce-crm-integration.html
Features
to the Salesforce CRM system.

Features
- Synchronizing Allow synchronizing and updating a specific or all Products from Magento 2 store into Salesforce CRM Products both manually and automatically.
- Allow synchronizing Products from Salesforce to Magento 2 store.
- Allow synchronizing Synchronizing and updating a specific or all Customers from Magento 2 store into Salesforce CRM Leads, Contacts, Accounts both manually and automatically.
- Allow synchronizing Customers from Salesforce to Magento 2 store.
- Allow synchronizing Synchronizing a specific or all Orders from Magento 2 store into Salesforce CRM Orders and Opportunity both manually and automatically. Allow synchronizing and updating
- Promotions Synchronizing a specific or all Campaigns and Subscribers from Magento 2 store into Salesforce CRM Campaignsboth manually and automatically.
- Mapping Support mapping smartly manually between Magento 2 attributes and Salesforce fields
- Admin can view Viewing the log to see what is synchronized between two apps
- Allow admin to manage Managing the sync queue to see what will be synchronized next.
- Allow admins to follow Following the request report on Backend of Magento 2
- Linking Contact with Account on Salesforce,
- Supporting Personal Account
Requirements
Your store should be running on Magento Community Edition version 2.0.x or , 2.1.x., 2.2.x, 2.3.x, and 2.4.x
Magenest Salesforce CRM Version 3.4.1
Compatibility: Magento 2.3.x. , 2.4.x (Open source, Commerce)
Compatible with Magento 2.4.6
| Warning | ||
|---|---|---|
| ||
The module works base on using API, so make sure your salesforce Salesforce edition had API by checking the using version:
The API package is not available if you use any other edition that's not listed above. |
Video Tutorial Playlist
...
(Go to the playlist to view more: https://www.youtube.com/playlist?list=PLOgckfH7zlZvSenZklrdkKlmO-qTFGxDm)
...
800Widget Connector width
tmNxnhUZpa0&list=PLOgckfH7zlZvSenZklrdkKlmO-qTFGxDm&index=11024 url https://www.youtube.com/watch?v=
600E-mAPJHvCuA height 576
...
How to create a new app
It is necessary to create a new app for the connection between Magento 2 and Salesforce CRM. First First of all, you need to have a developer account in Salesforce, go to https://developer.salesforce.com/.

- Login if you already have an account.
- Or Sign up to create a new one
...
Get consumer key and consumer secret by the connected app
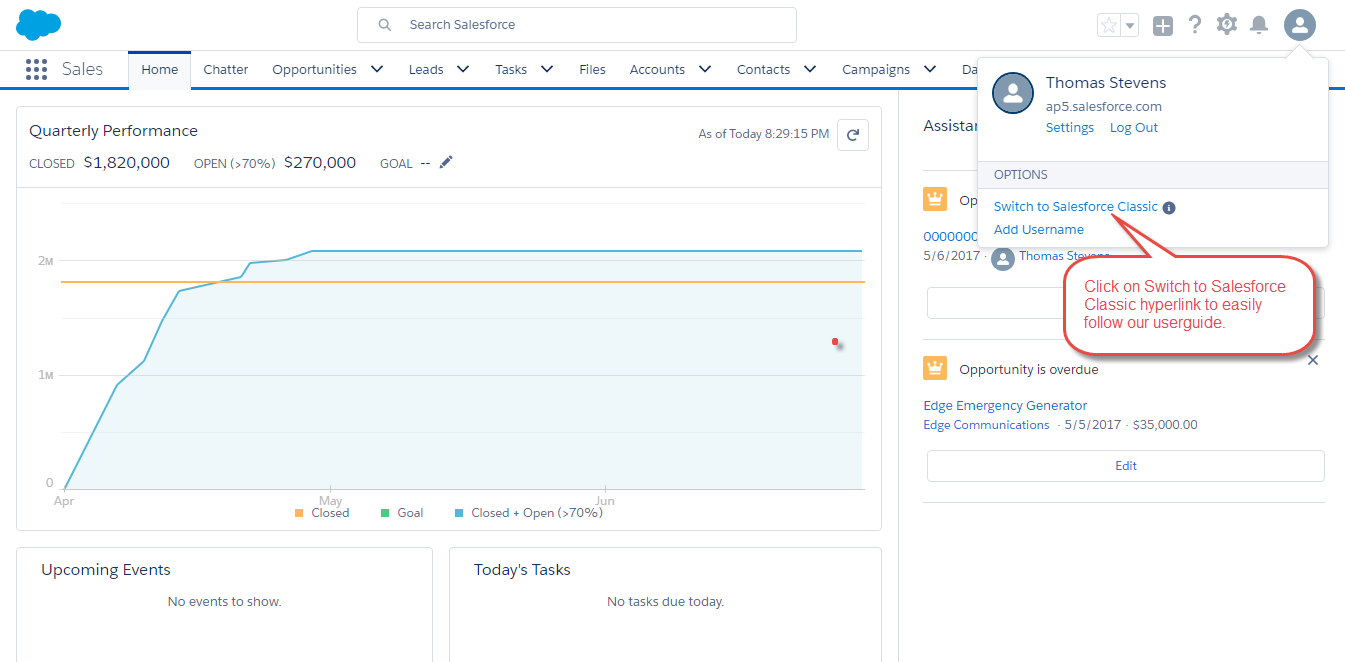
Go to https://ap2.salesforce.com/ and sign in your Salesforce CRM account above.
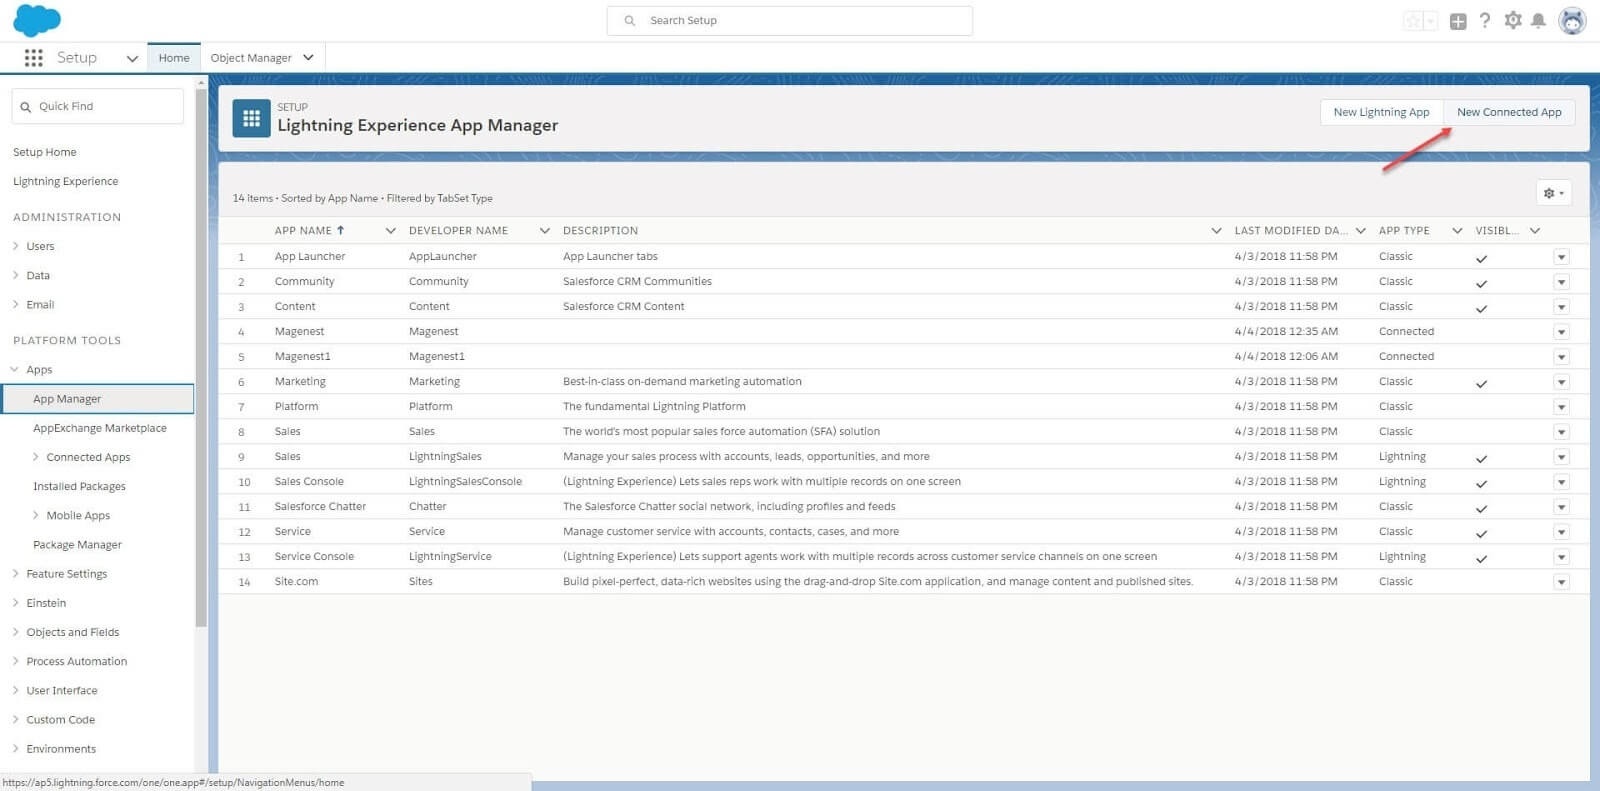
If you are in Lightning Experience, please switch it to Salesforce Classic to easily follow our user guide. Please refer to image below:
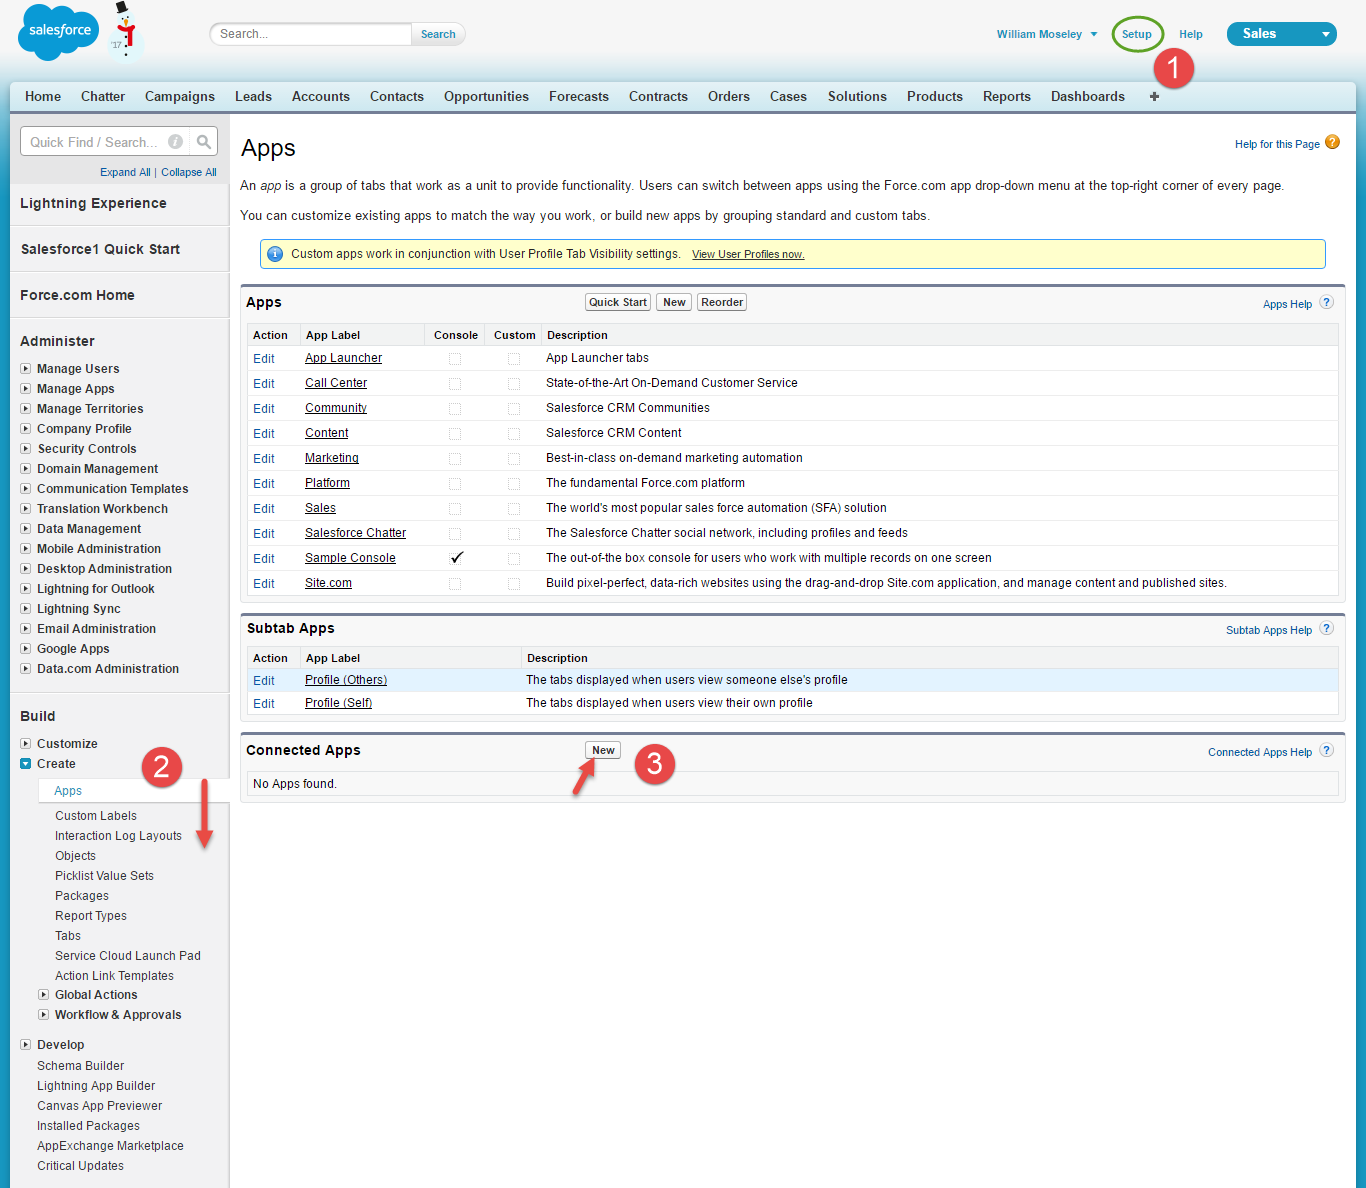
Your Salesforce CRM account will appear as below. Click on Setup > Built > Create > Apps. In connected apps section, click New to add a new app.
- Entering information needed:
- Admin must log in the account of Salesforce system > Setup > Apps > App Manager > Create new connected app (click on New Connected App on the top right to create a new app):
- Entering the information needed:
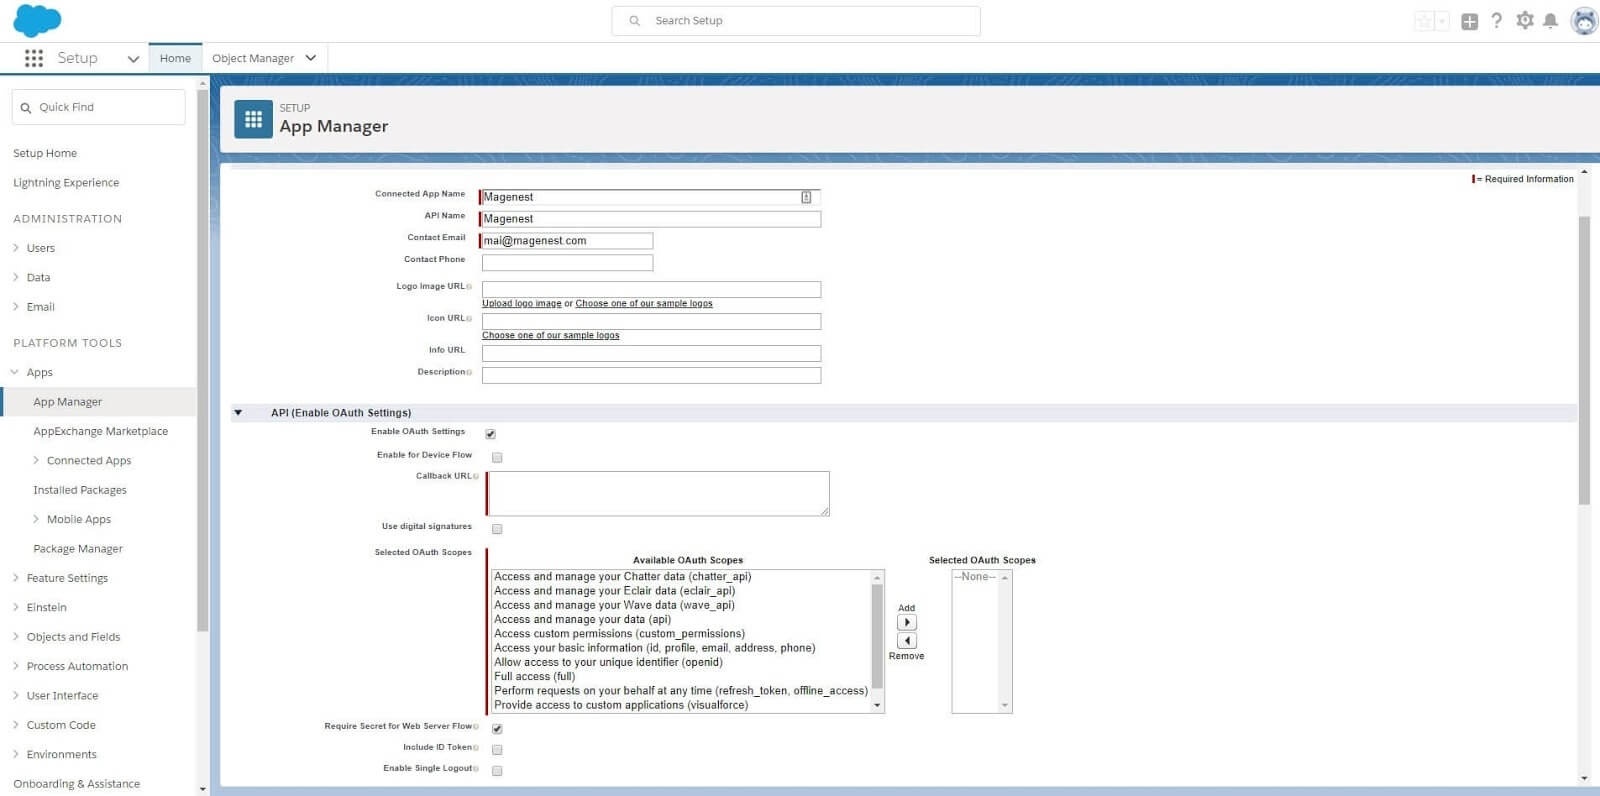
- Connected App Name: name for your connected app
- app
- API Name: data from this field will be auto-synced from the Connected App Name
- Contact Email: your Salesforce email Check
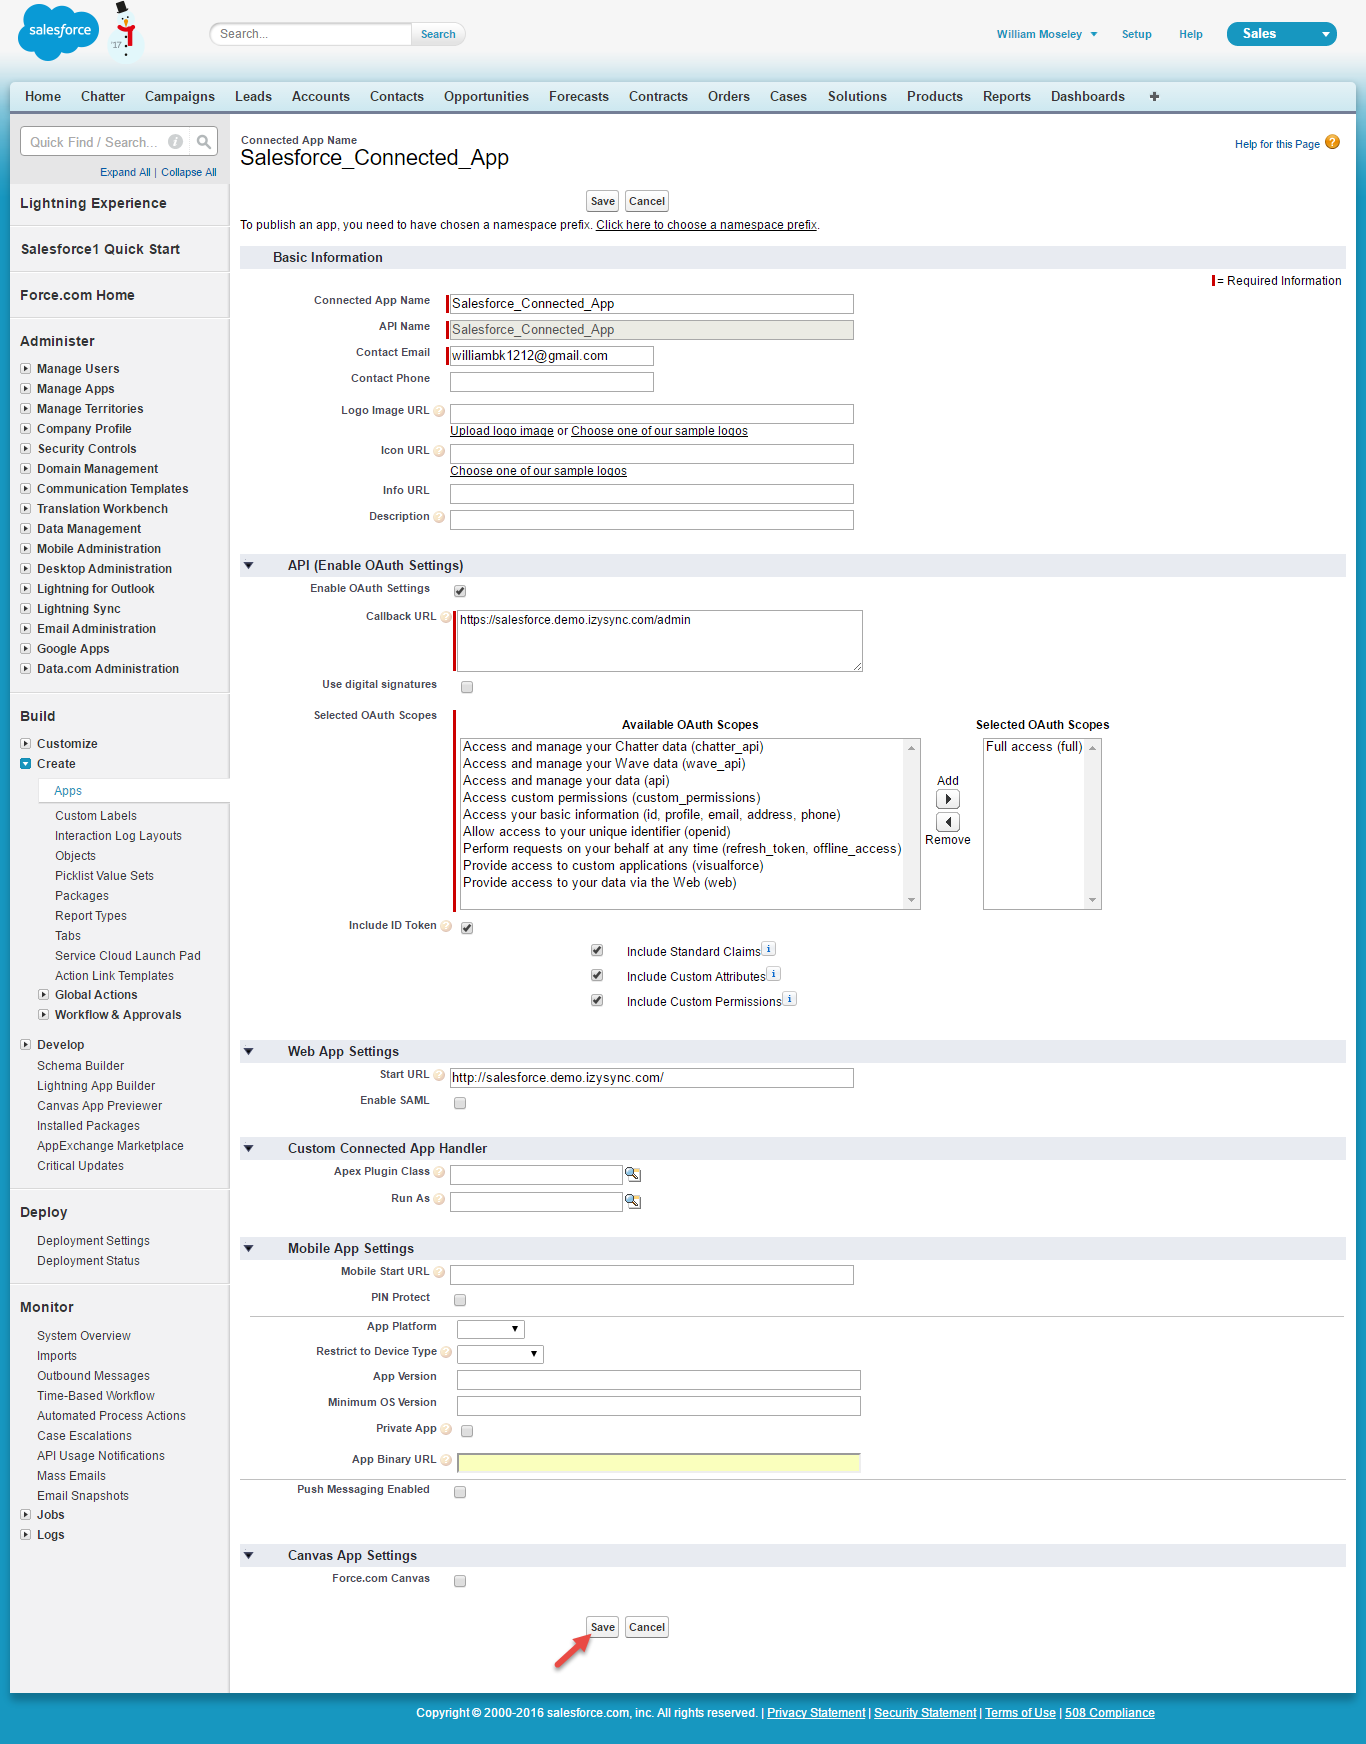
- Enable OAuth Settings box
- box Fill Callback URL
- Callback URL: Callback URL fill https://your_domain_site/salesforce/oauth/callback
- Selected OAuth Scopes: select
- select the Full Access option and click Add button.
...
- option and Perform requests on your behalf at any time (refresh_token, offline_access)” permission
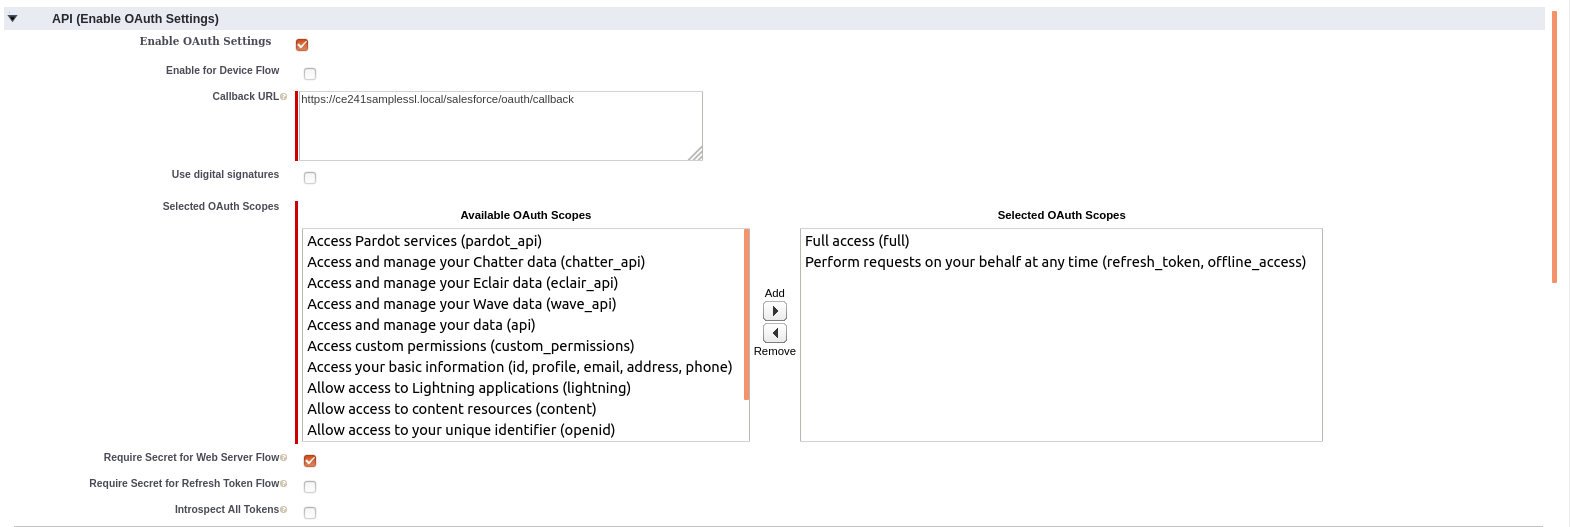
- Choose Require Secret for Web Server Flow
- Choose Include ID Token: Include Standard Claims, Include Custom Attributes, Include Custom Permissions.
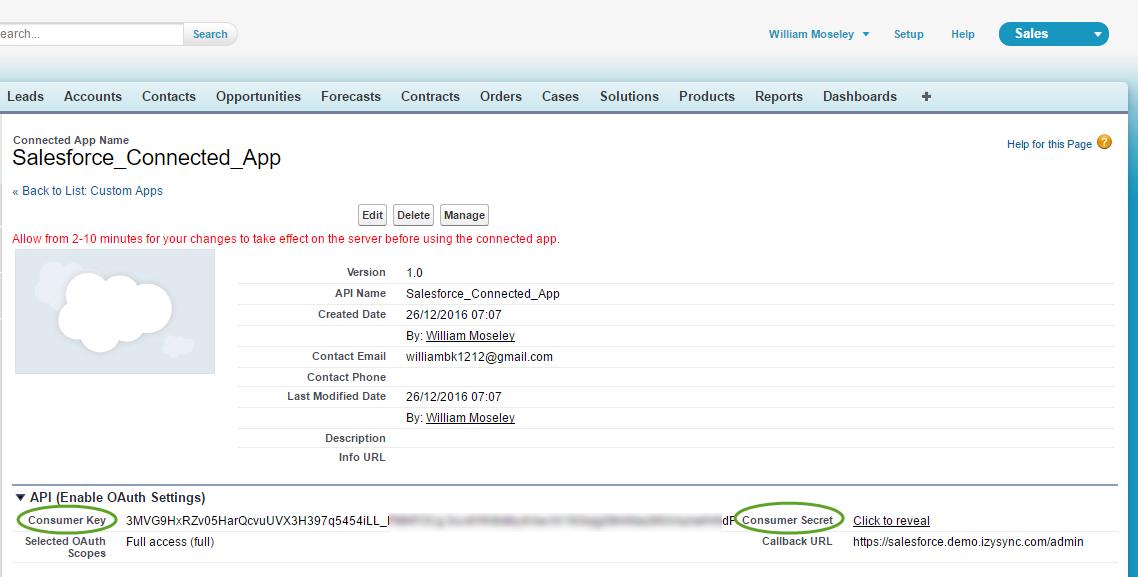
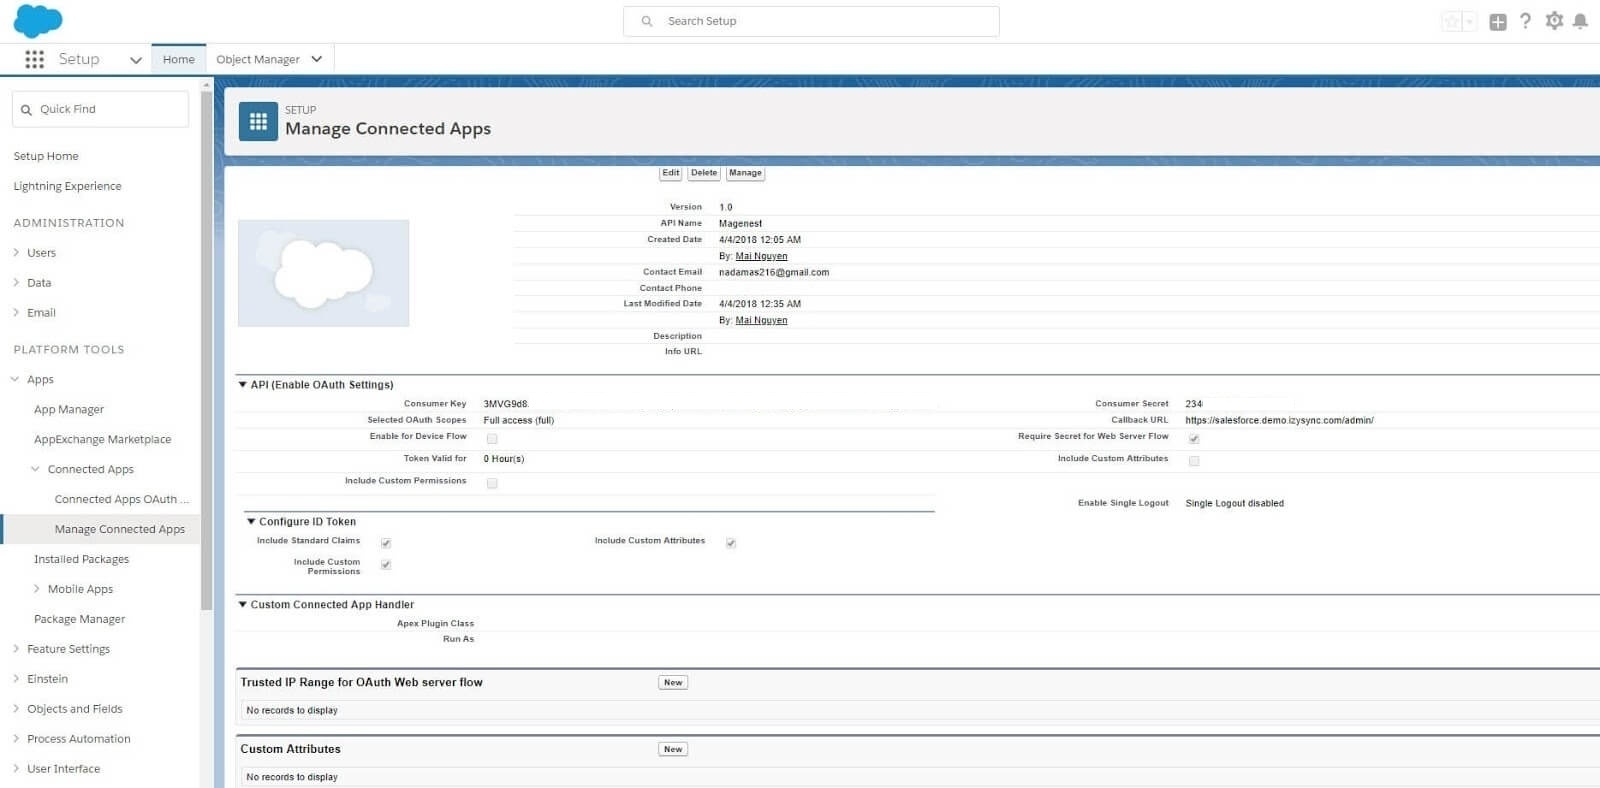
- Click the Save button, then Continue to see the newly created app.
The output will look like the below, it you will present use the Consumer Key and Consumer Secret :for the configuration.
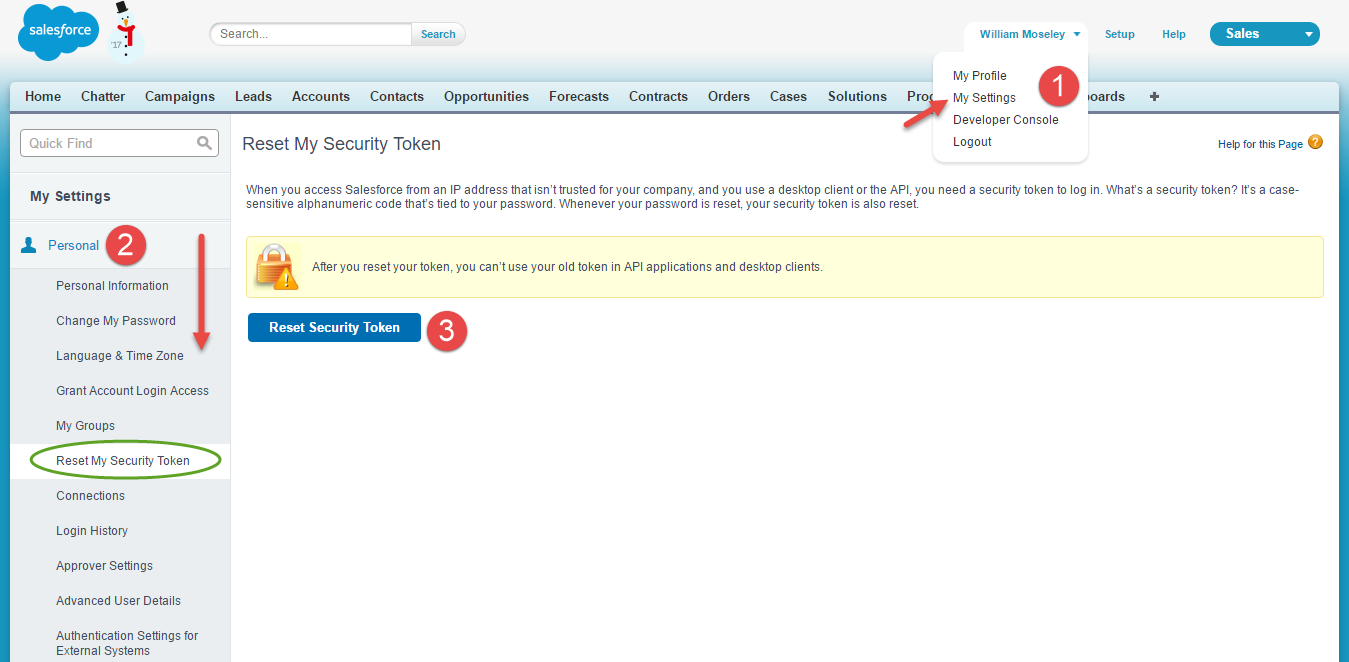
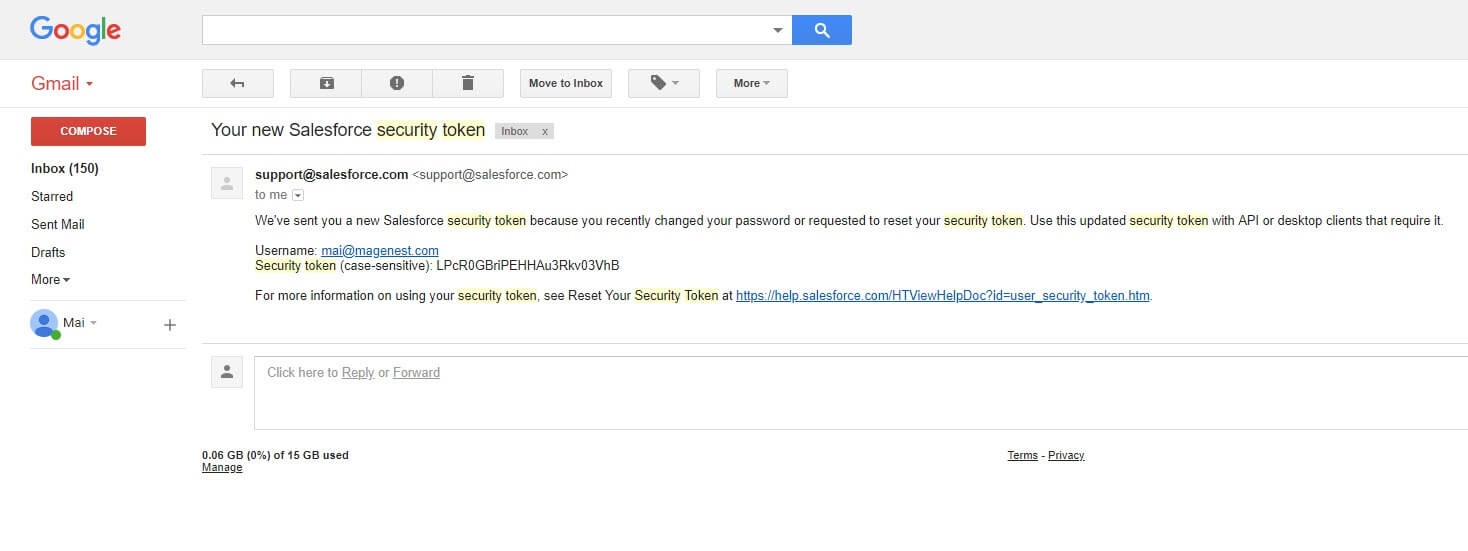
Reset security token
To have a new security token, follow: My settings > Personal > Reset my new token
...
- Click on the user icon on the top right, choose Settings. Then on the left menu bar, choose Personal Information > Reset My Security Token.
- Click on Reset Security Token button to get a new one.
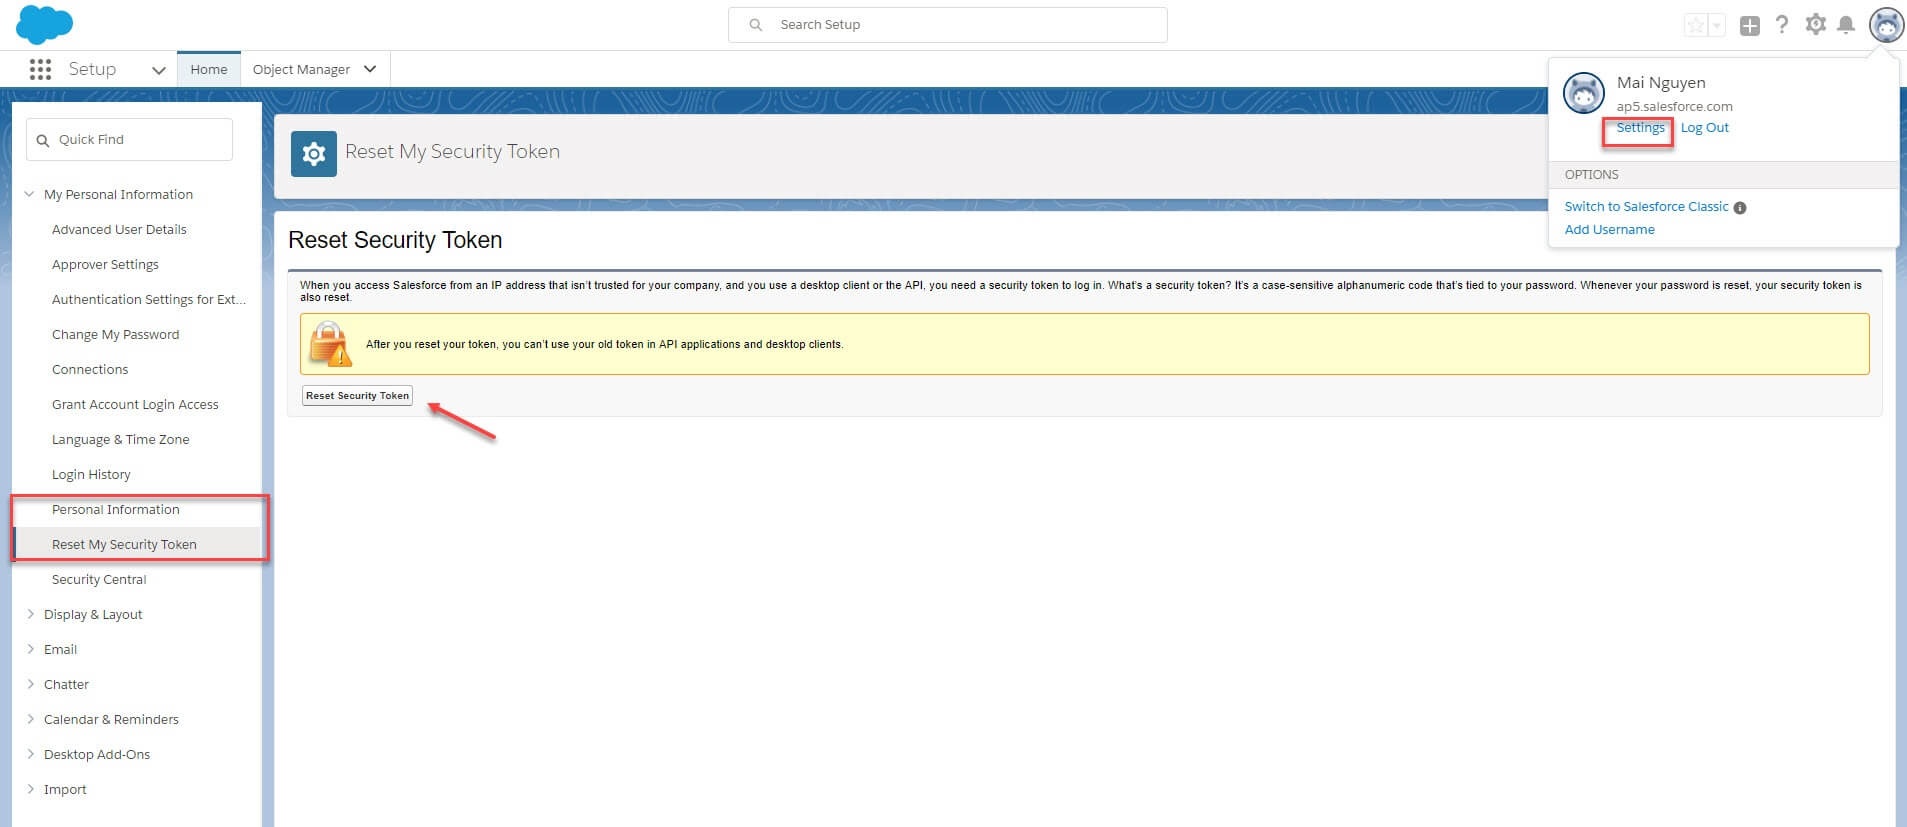
- A new security token will be sent to your registered email.
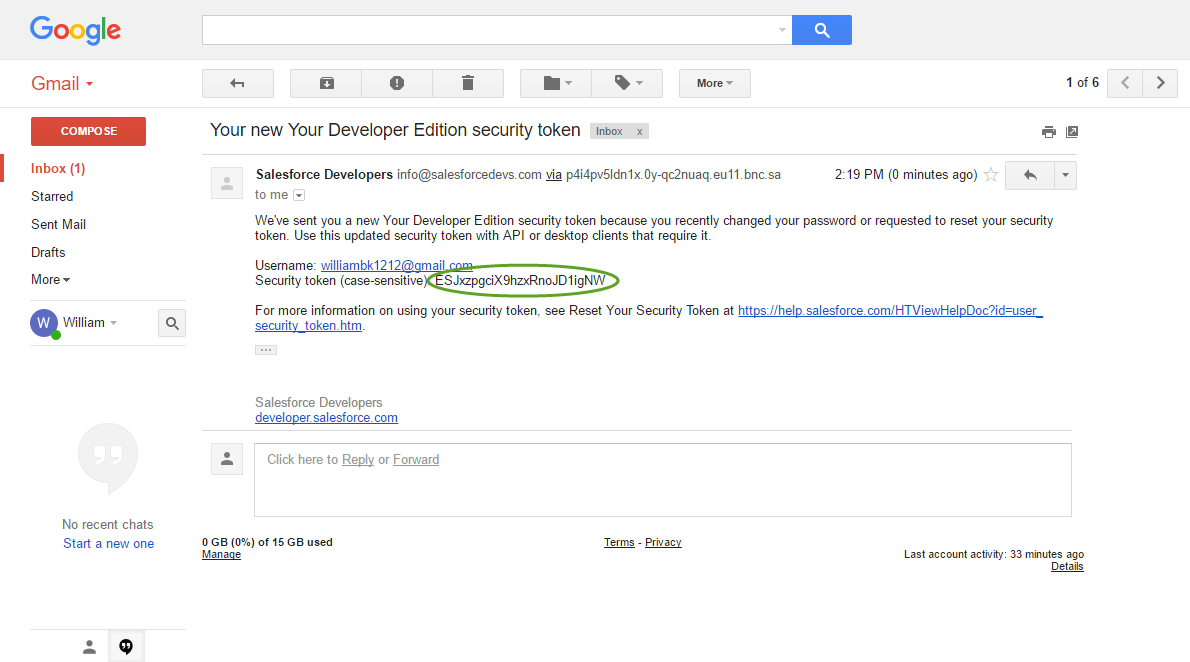
- Note that you will need this security token for configuration.
...
Setup and Authentication
...
Salesforce CRM account
Setup ![]() Setup and Authentication Salesforce CRM account will allow integrating Magento 2 store with your Salesforce CRM account.
Setup and Authentication Salesforce CRM account will allow integrating Magento 2 store with your Salesforce CRM account.
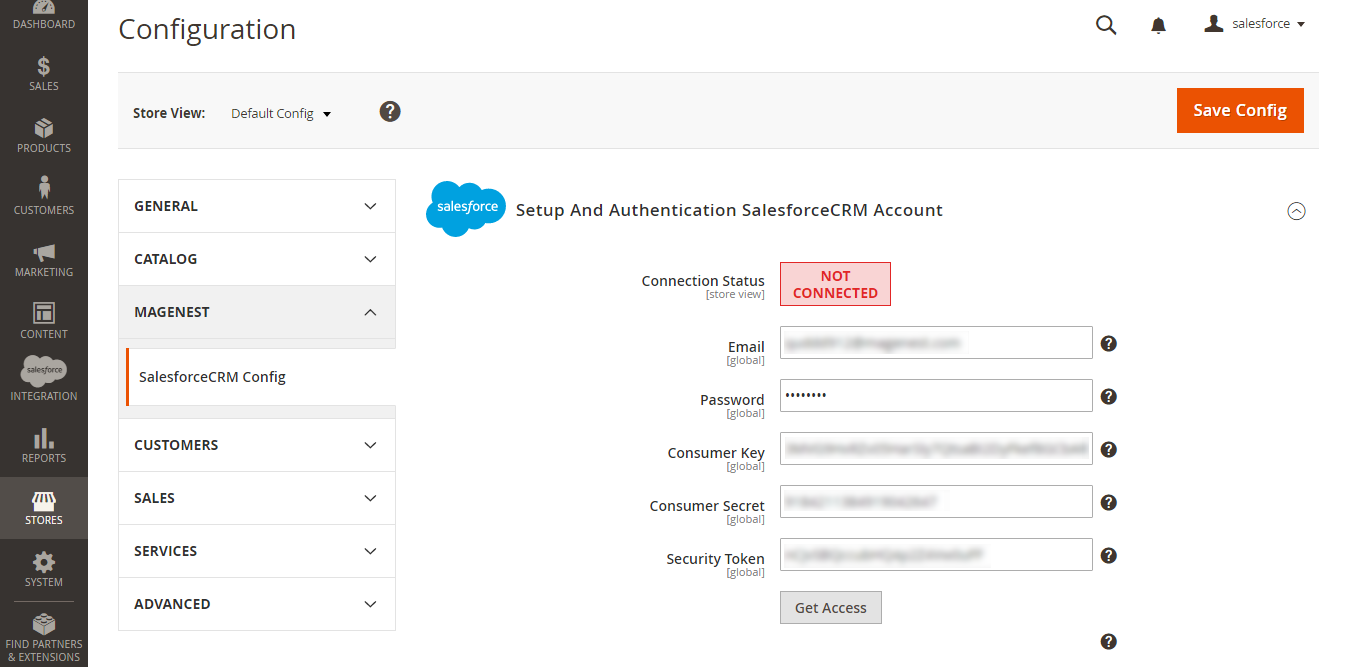
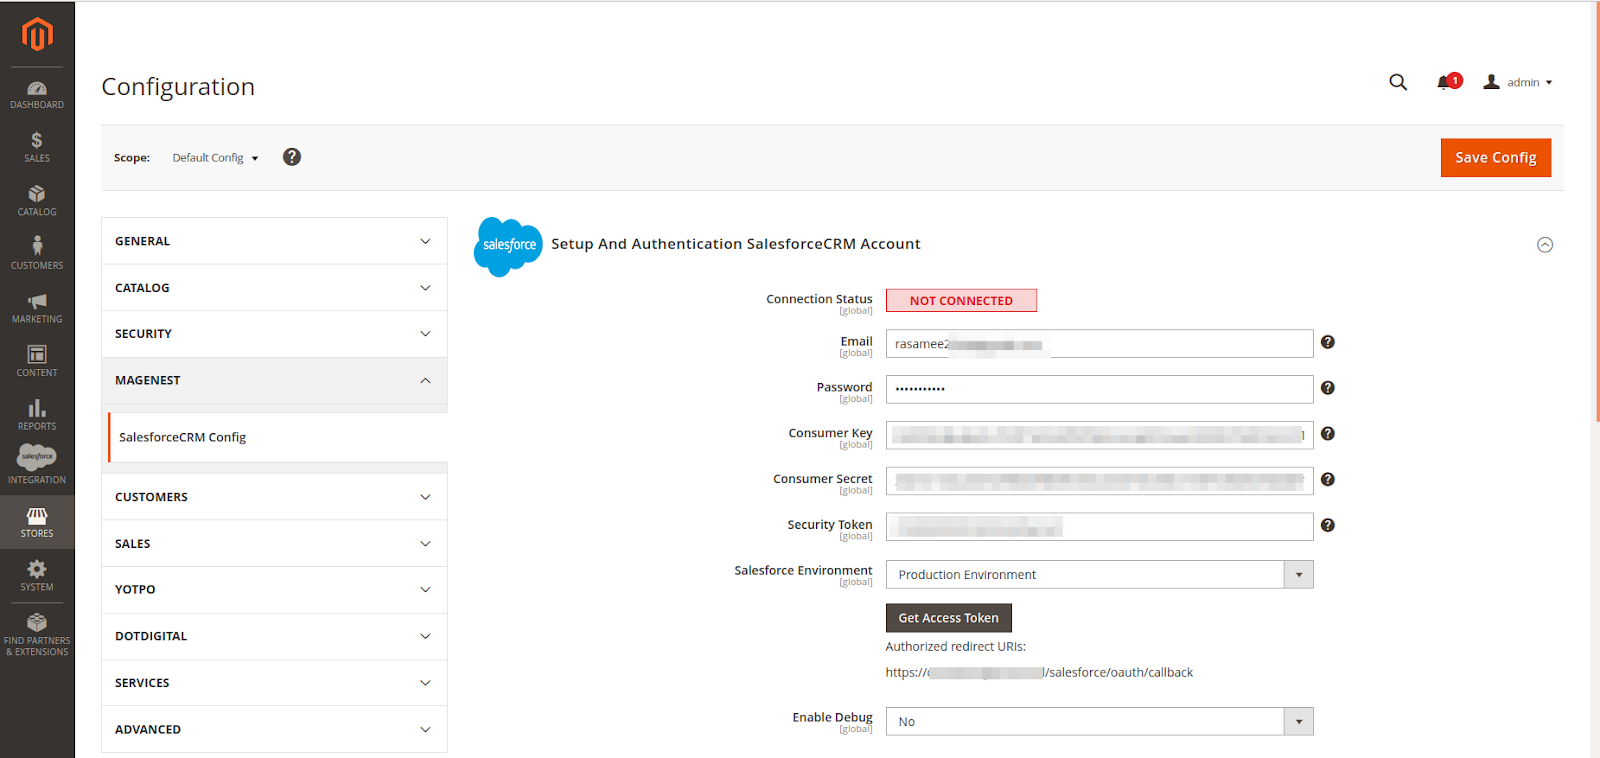
Log in to back end Magento 2: Store > Configuration > Magenest > SalesforceCRM Config ![]() On the Admin sidebar, go to Salesforce Integration > Configuration
On the Admin sidebar, go to Salesforce Integration > Configuration
- Email: Your Salesforce login email
- Password: Your Salesforce password
- Consumer Key: search in Setup > Create Home > Platform Tools > Apps > App > Connected Apps in Salesforce.Manager > "Your app name" (in this demo it is "Magenest") in Salesforce. Check out the above guide "Get consumer key and consumer secret by connected app"
- Consumer Secret: search in Setup > Create search in Home > Platform Tools > Apps > App > Connected Apps in Salesforce.
- Security Token: Receive via email register. Get from My Settings > Personal > Reset My Security Token
- Get Access: click this button to connect Magento 2 to your Salesforce account.
...
- Manager > "Your app name" (in this demo it is "Magenest") in Salesforce. Check out the above guide "Get consumer key and consumer secret by connected app"
- Security Token: Check out the above guide "Reset Security Token"
- Salesforce environment: You can choose the sandbox environment or production environment
- Enable Debug: the module will log data response to the salesforce.log file into your system
- Click Save Config after you've done (refresh the cache if needed)
...
- > Get Access.
![]() Please Save the config before clicking on the Get Access button to avoid getting a consumer key error.
Please Save the config before clicking on the Get Access button to avoid getting a consumer key error.
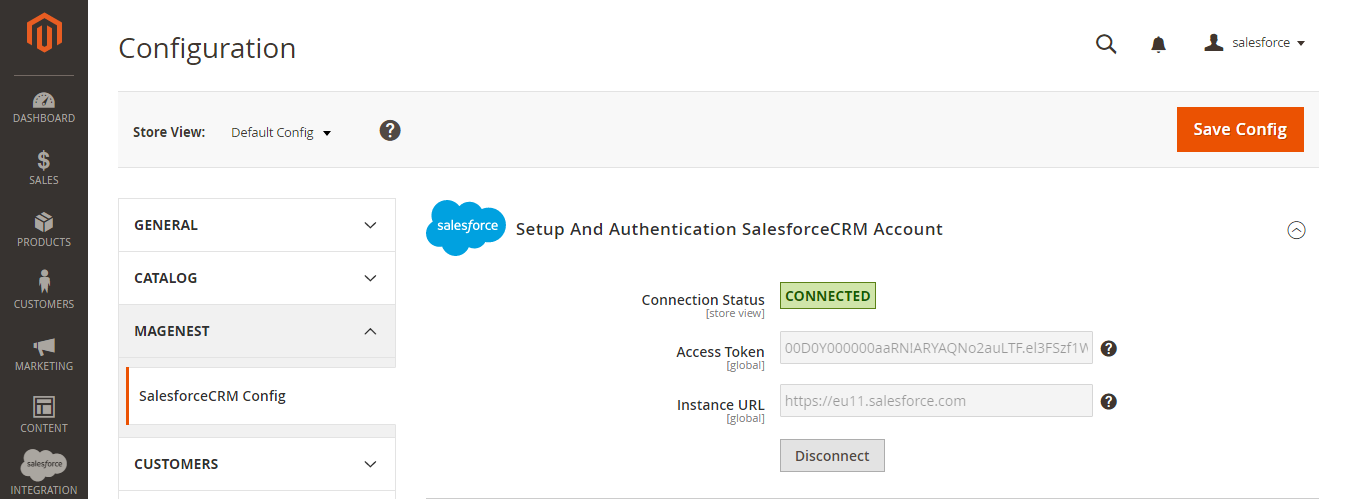
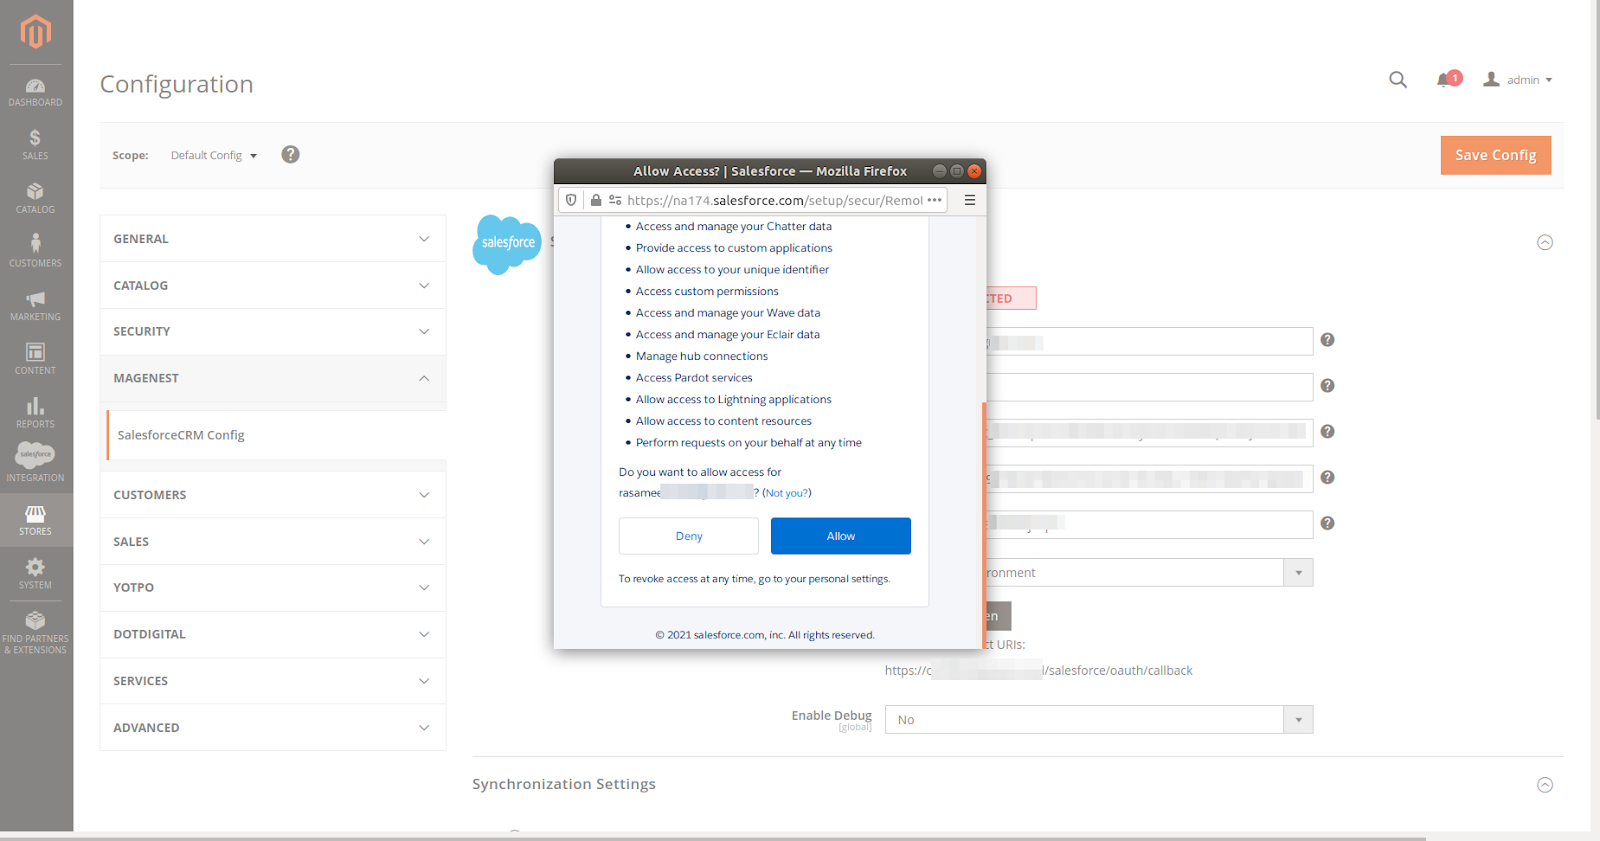
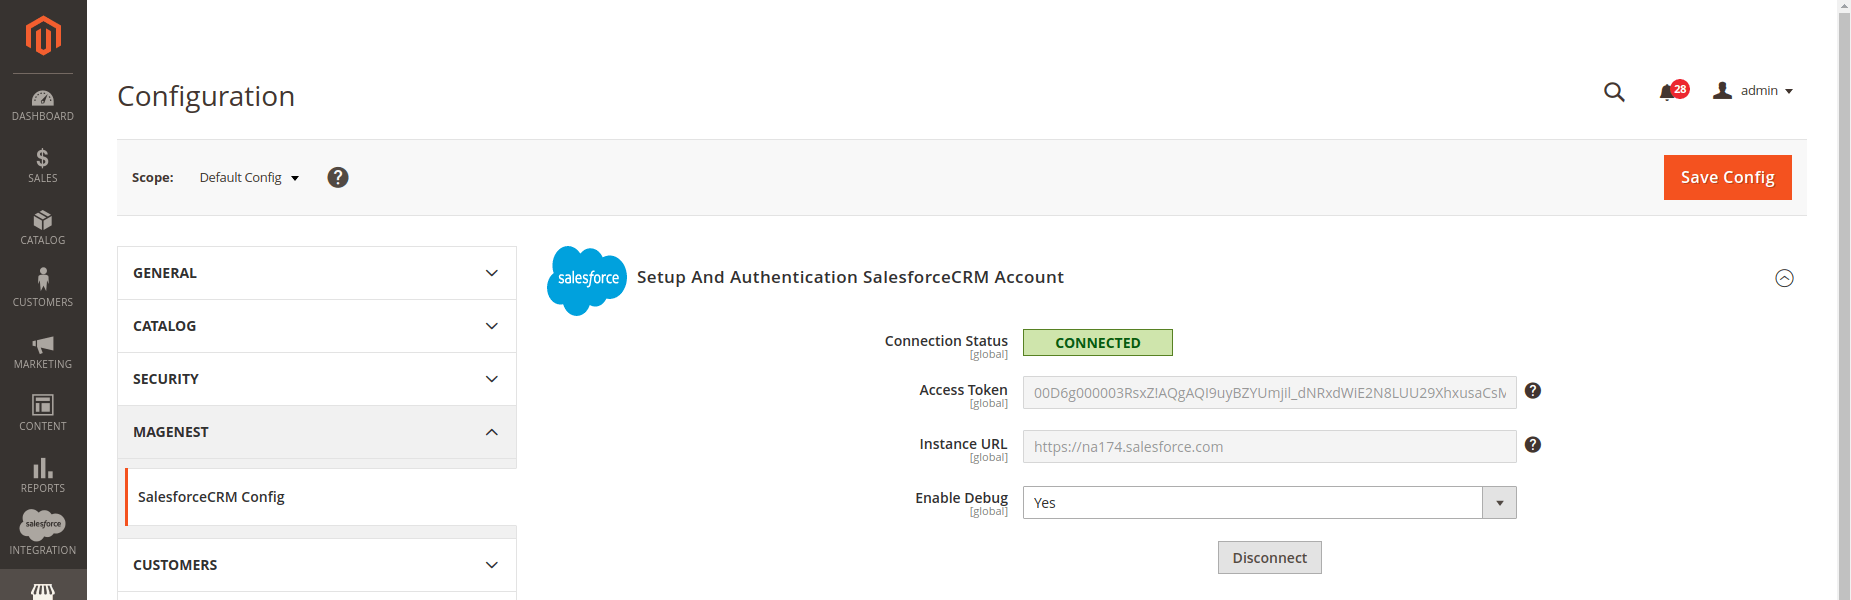
Connection Status will be transferred from not connected to connected with all the information like the picture below. The integration is successful. Admins can set up bi-directional database synchronization between Magento 2 store and Salesforce CRM account now.
Admin will be redirected to the verification page:
- Click the “Allow” button
Waitting some minutes to complete the process and recheck all features of our module.
- Connection Status will be updated from Not Connected to Connected with all the information as in the image below. Once the integration is successful, the admin can mapping field from Salesforce to Magento and synchronize data from Magento to Salesforce.
...
How to synchronize data from Magento 2 store to Salesforce CRM account
...
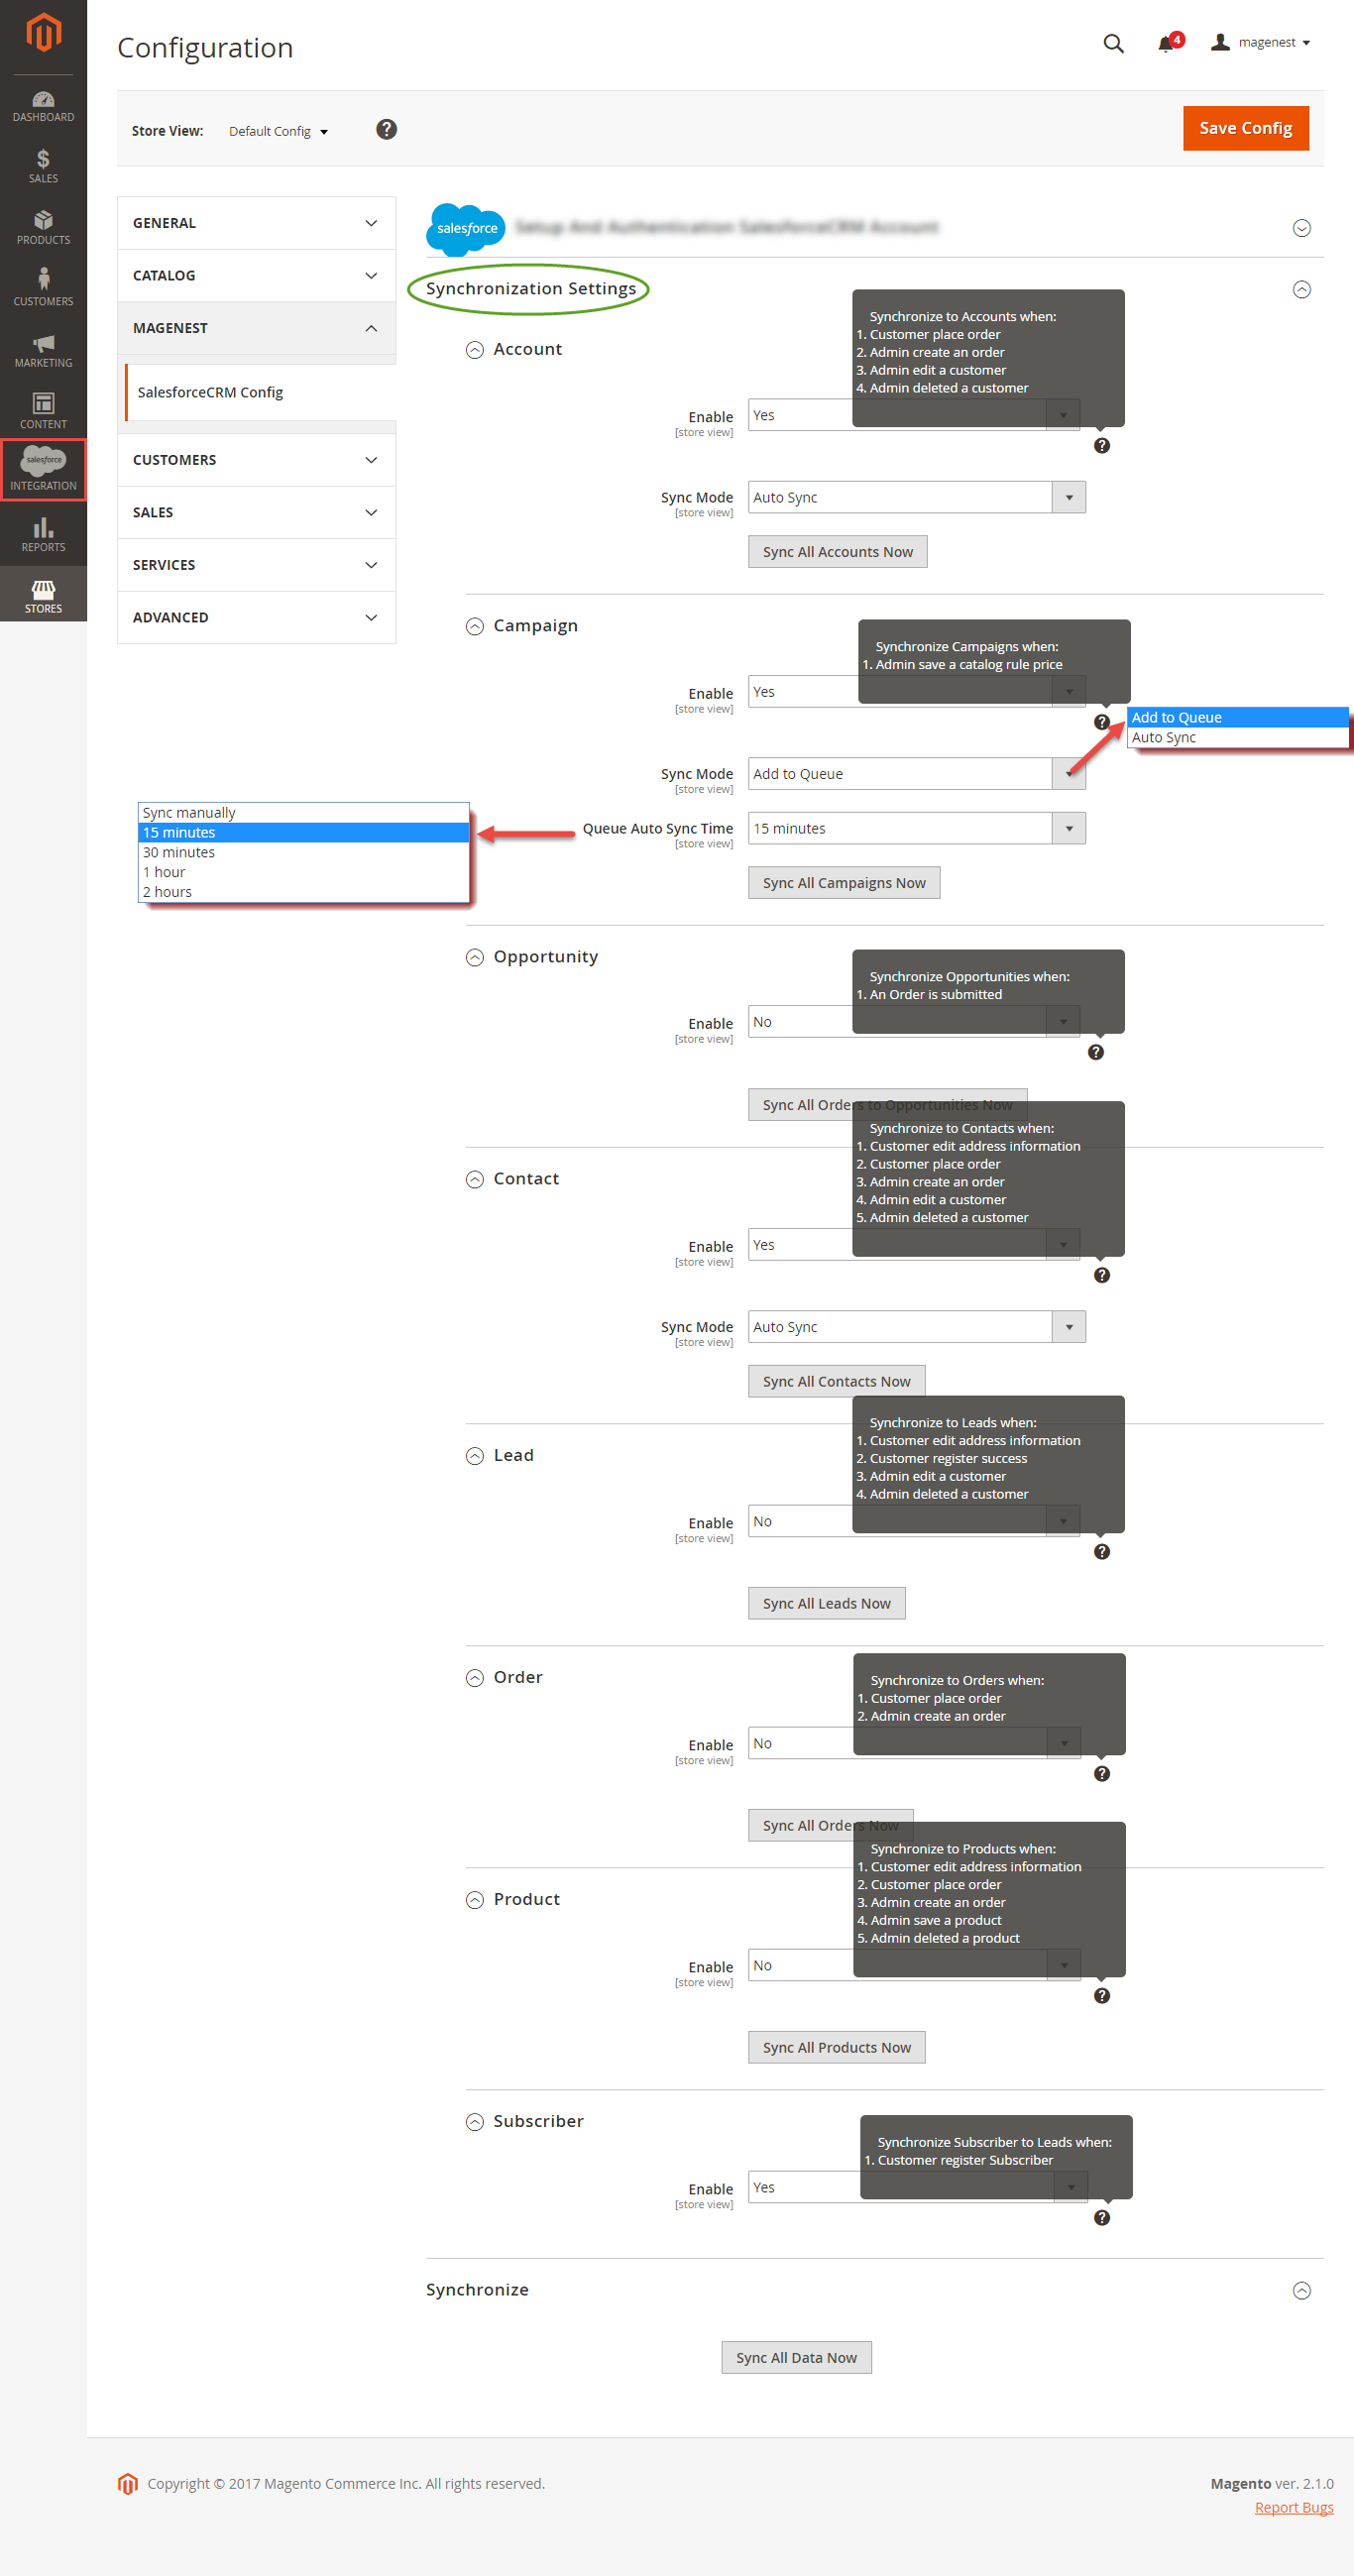
Synchronization Settings
Admins are able to decide whether to synchronize data in Synchronization Settings tab: Account, Campaign, Contact, Lead, Product, Order. In addition, admins can choose the way to synchronize data either Real-time or Cron Job. Admins can click on Sync All Data Now button to add all data to Queue.
...
Setting Up Field Mapping
In ![]() In order to synchronize data fields from the Magento 2 store to your Salesforce CRM account correctly accurately, you need to create the mapping for these fields first.
In order to synchronize data fields from the Magento 2 store to your Salesforce CRM account correctly accurately, you need to create the mapping for these fields first.
- Go to
...
- Salesforce Integration > Setup Field Mapping
The module enables a grid table to manage mapping fields between Magento 2 and Salesforce CRM. You can choose which data fields you want to sync from Magento 2 to Salesforce CRM account.
From the manage mapping, you can export, change the status with enable and disable options, edit or delete a mapping.
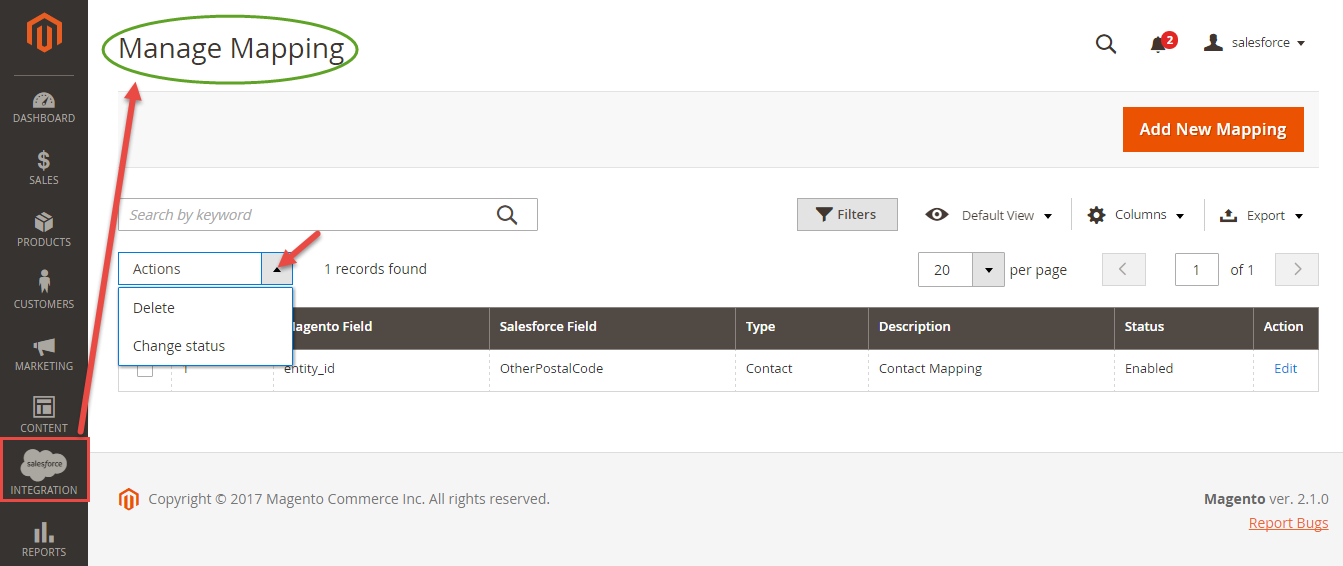
To add mapping, following Store > Field mapping > Add mapping
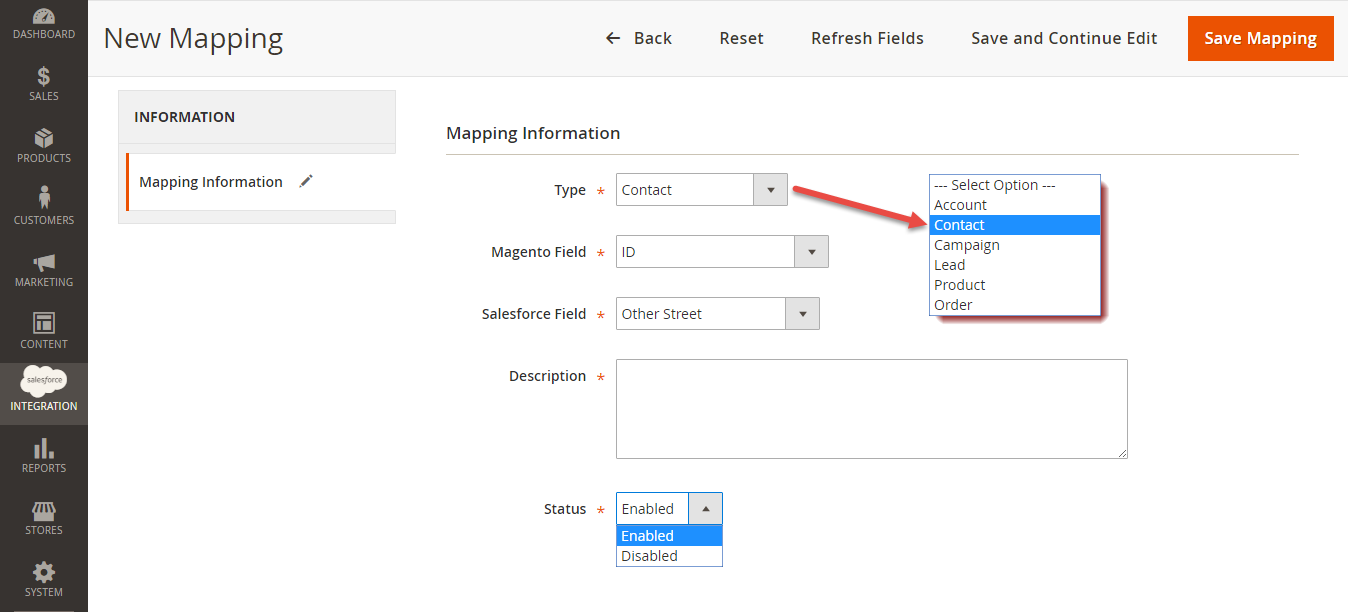
Fill in mapping information:
- Type: select data type: Leads, Contacts, Accounts, SalesOrders, Invoices, Products, Campaigns.
- Description: describe data information
- Magento field: select Magento data field from dropdown list which you want to synchronize.
- Salesforce field: select Salesforce field from dropdown list which you want to store data in.
- Status: select Enabled/Disabled
Remember to click Save Mapping to store information.
Process Synchronization
If the App mode is Cron Job, Queue page is the place which the created, updated data is stored in and are waiting to be synced. If you wish to sync data right away, you can press Sync Now button.
Note that synchronizing will take some time, the length of time depends on the size of data.
When the process is done, go to Salesforce Integration > View Report to check what is synced in the grid.
- In Mapping Management, choose the type of data you want to create a field map among Account, Contact, Campaign, Lead, Product, Order, Opportunity.
![]() Note: For Subscriber data, you don't need to create field mapping.
Note: For Subscriber data, you don't need to create field mapping.
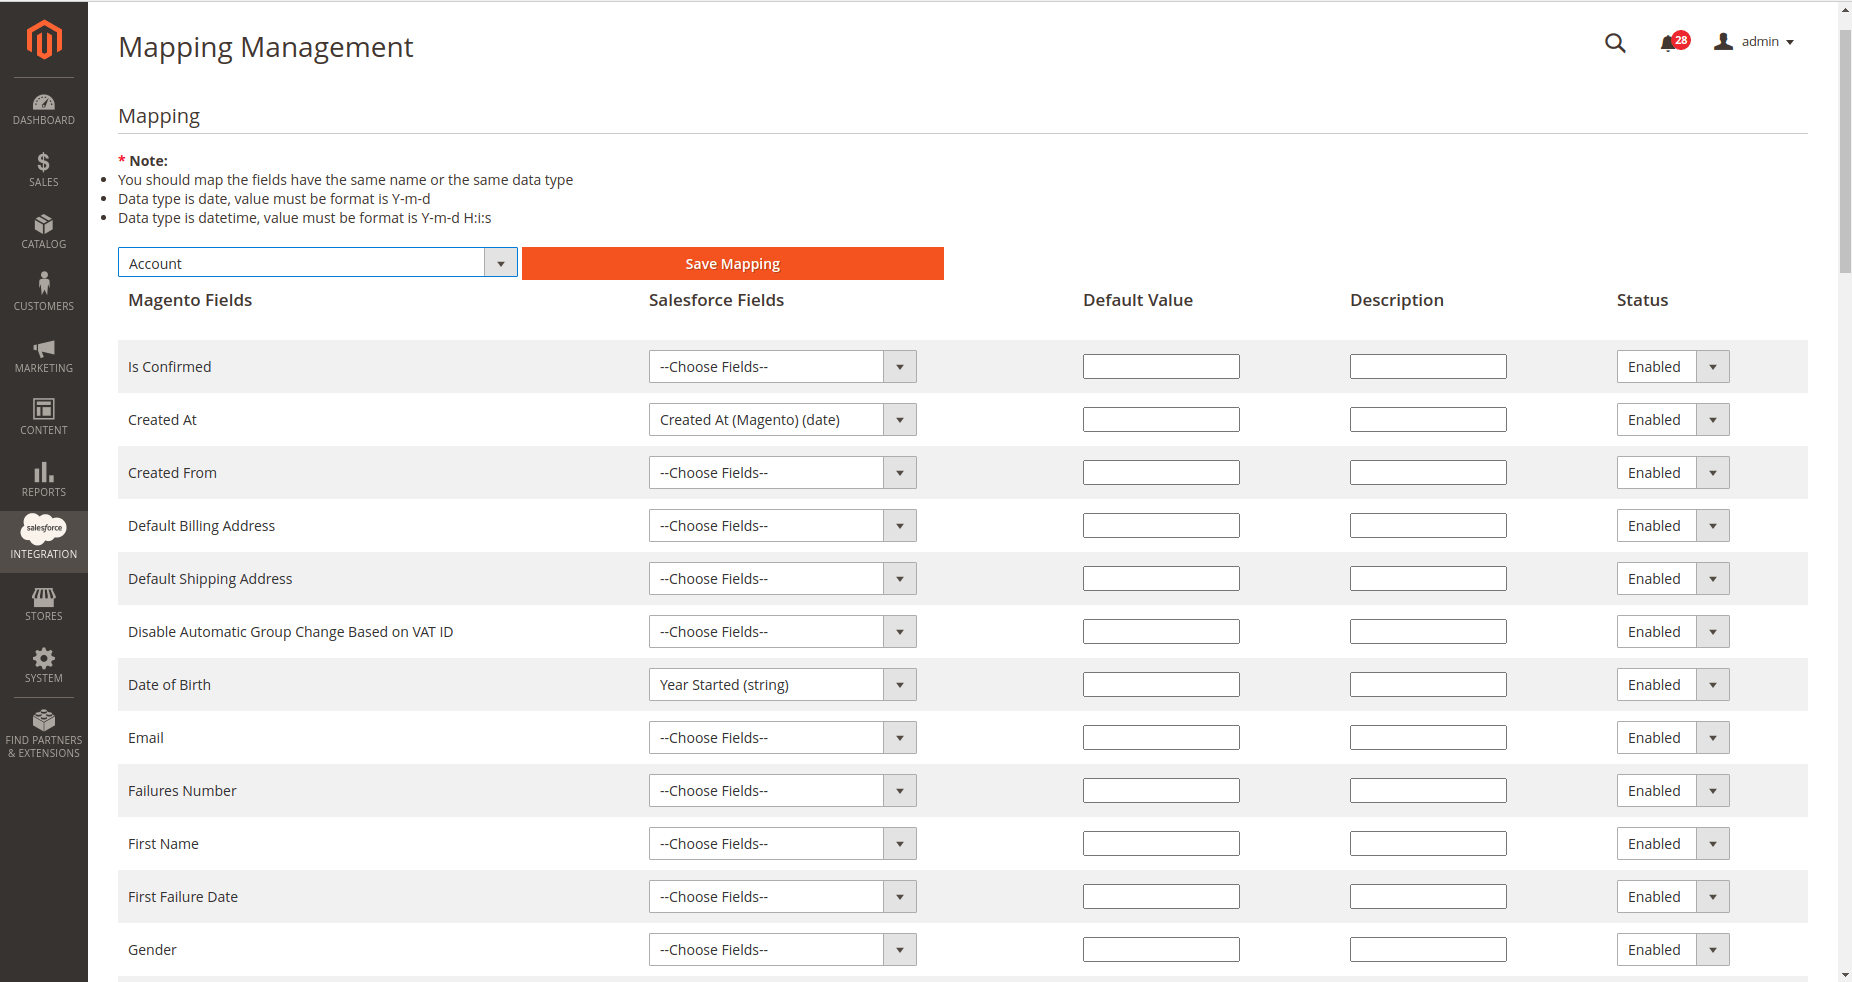
- For each field in Magento Fields, choose the matching field in Salesforce Fields to sync data.
![]() Salesforce has field-level security that allows admin to restrict field access to certain users. You can click here for more info. Therefore, when you create field mapping, there would be some fields in Salesforce that don't show up in the backend. In this case, you have to go to Salesforce to invoke permission for these fields.
Salesforce has field-level security that allows admin to restrict field access to certain users. You can click here for more info. Therefore, when you create field mapping, there would be some fields in Salesforce that don't show up in the backend. In this case, you have to go to Salesforce to invoke permission for these fields.
- Description: Describe the mapping fields
- Default Value: If one object does not have data to sync, it will get the default value as defined here. If the admin does not set the default value, it will be empty.
- Status: You could enable or disable the field map.
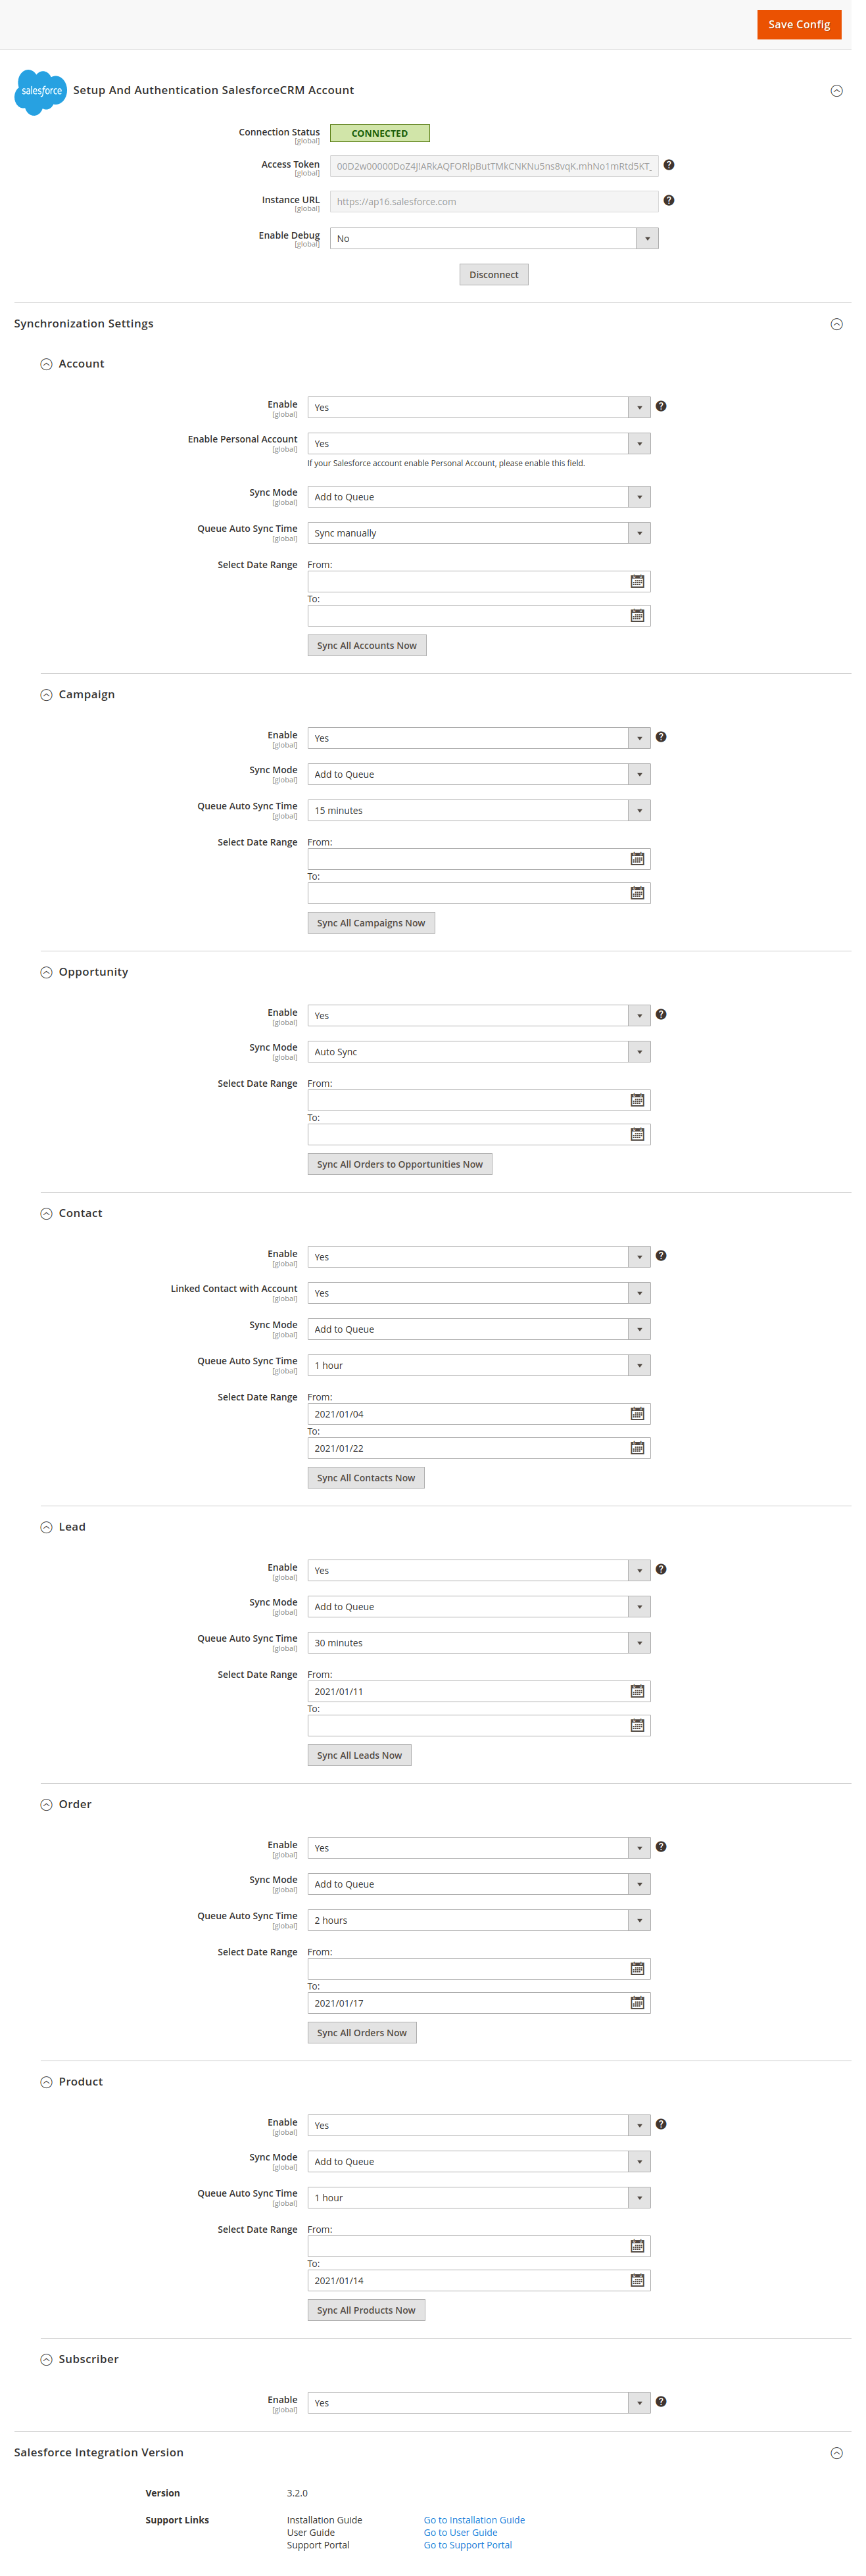
Synchronization Settings
![]() You are able to synchronize data in the Synchronization Settings tab: Account, Campaign, Opportunity, Contact, Lead, Product, Order, Subscriber.
You are able to synchronize data in the Synchronization Settings tab: Account, Campaign, Opportunity, Contact, Lead, Product, Order, Subscriber.
In each tab, when you Enable (Yes), the Sync Mode will show up, you can choose the way to synchronize data either Auto-Sync (Real-time) or Add to Queue (Cron Job).
- Auto Sync: The data will be automatically synchronized to Salesforce if there is any change.
- Add to Queue: The data will be added to the queue before synchronizing to Salesforce. If you choose this option, Queue Auto Sync Time shows up with 4 options: Sync manually, 15 minutes, 1 hour, 2 hours. These options are the waiting time in the queue of the data before it is automatically synchronized to Salesforce.
̣![]() Click Sync All <Data> Now to add all records of the selected data type to the queue.
Click Sync All <Data> Now to add all records of the selected data type to the queue.
- Select Date Range: You can use the Data Filter to limit the number of records based on their Created Date (Except for Campaign, which is based on Start Date and End Date of the campaign).
- If the process is completed successfully, a widget will inform and allow you to check out the Sync Queue.
Unique Field:
- Enable Personal Account: If your Salesforce account enabled Person Account, please select enable this option.
- Linked Contact with Account: If enabled, when syncing a record to Salesforce Contact, the module will attempt to sync that record to Salesforce Account beforehand.
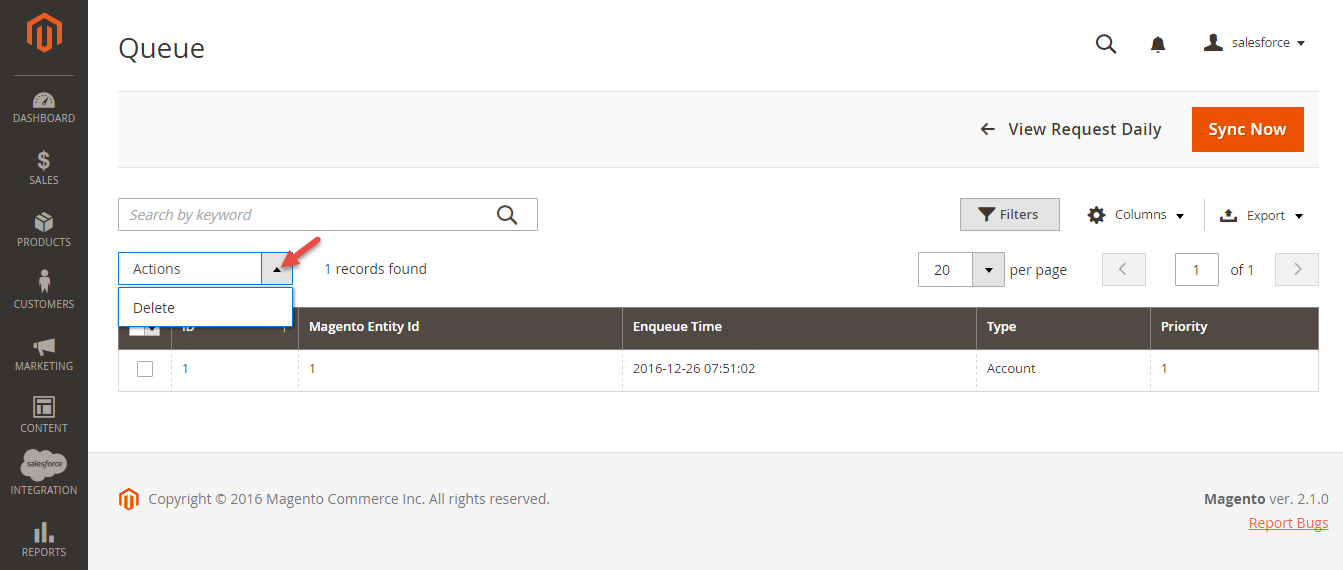
![]() In Queue Page, you can choose the Actions > Delete to delete the data you don't want to sync. Then click on the Sync Now button to sync the data immediately to Salesforce.
In Queue Page, you can choose the Actions > Delete to delete the data you don't want to sync. Then click on the Sync Now button to sync the data immediately to Salesforce.
![]() Note that synchronizing will take time, which depends on the size of the data.
Note that synchronizing will take time, which depends on the size of the data.

When the synchronization process finished, you can go to Salesforce Integration > View Report to see the synchronized list.
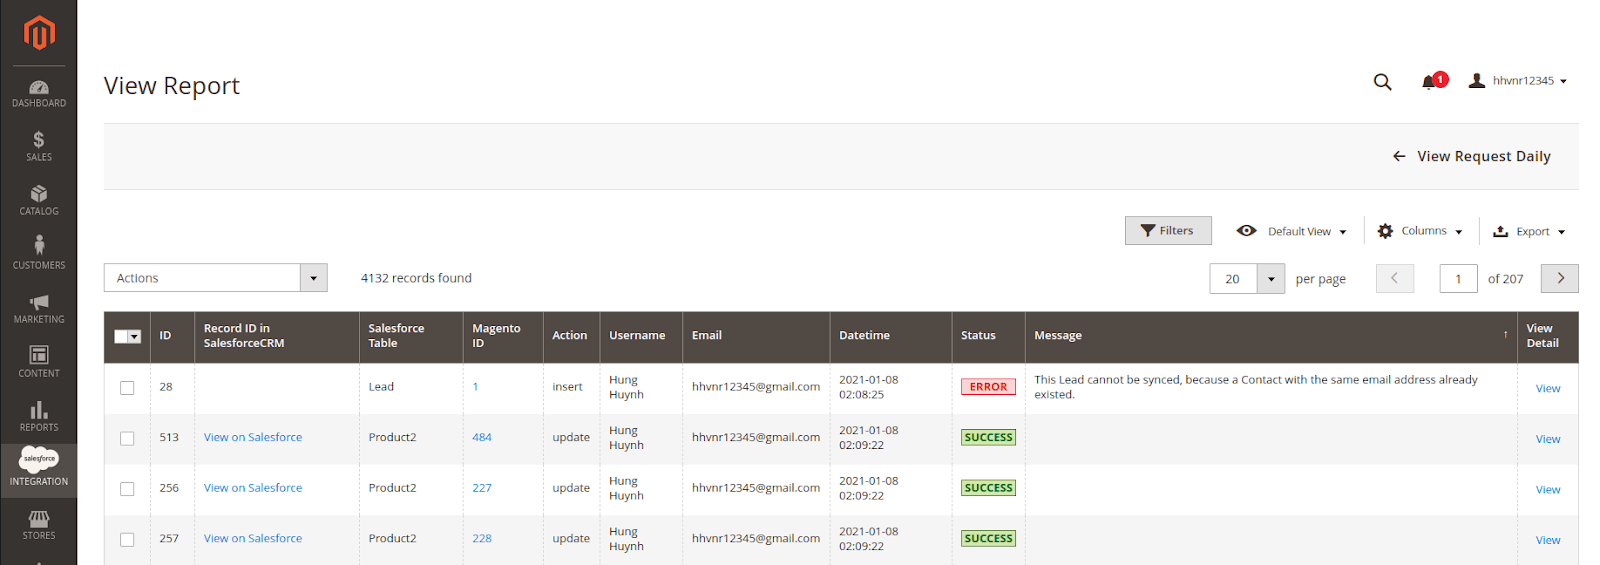
- If the data is synced right, the Status will be success and the Message will be "OK"be Success.
- If there's a problem during the syncing process, the Status will be error and the Message tab will show the error message like the record below. be Error. The Message column will display the error message.
- You can view the detailed response of the report by clicking on the “View” button.

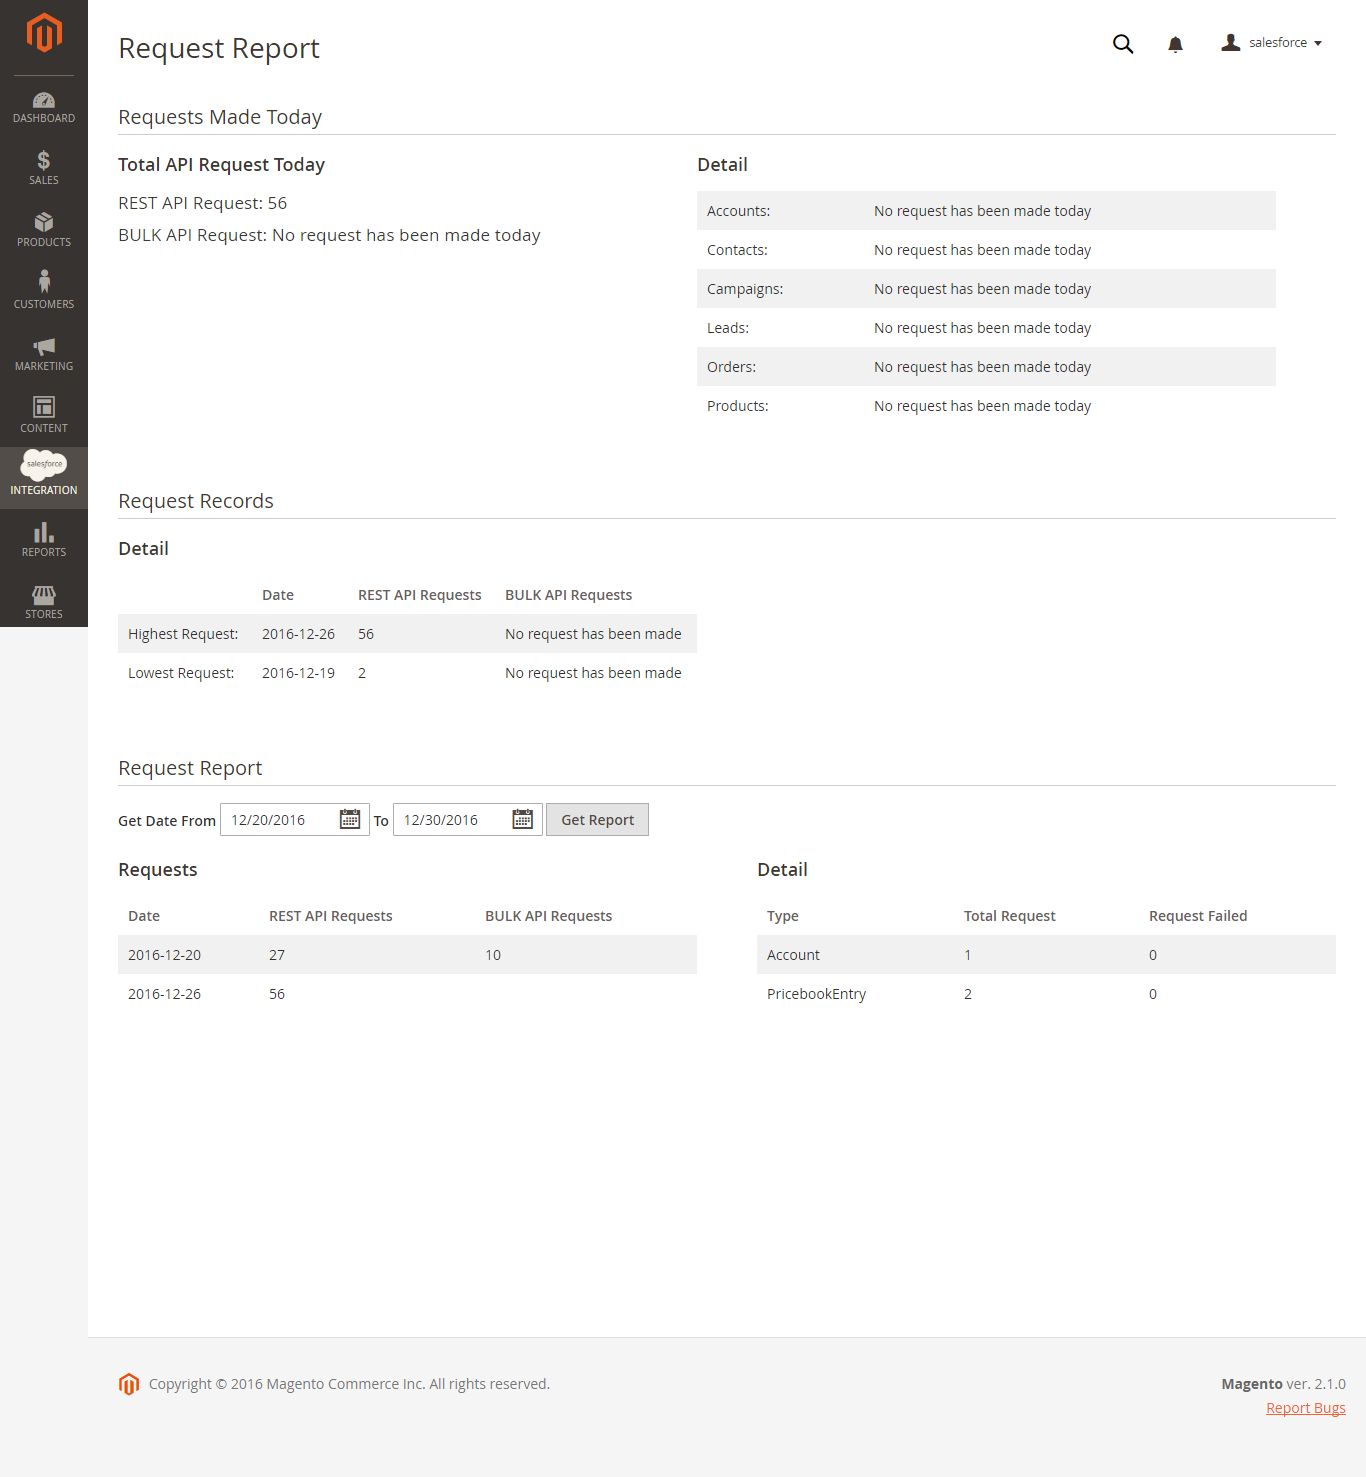
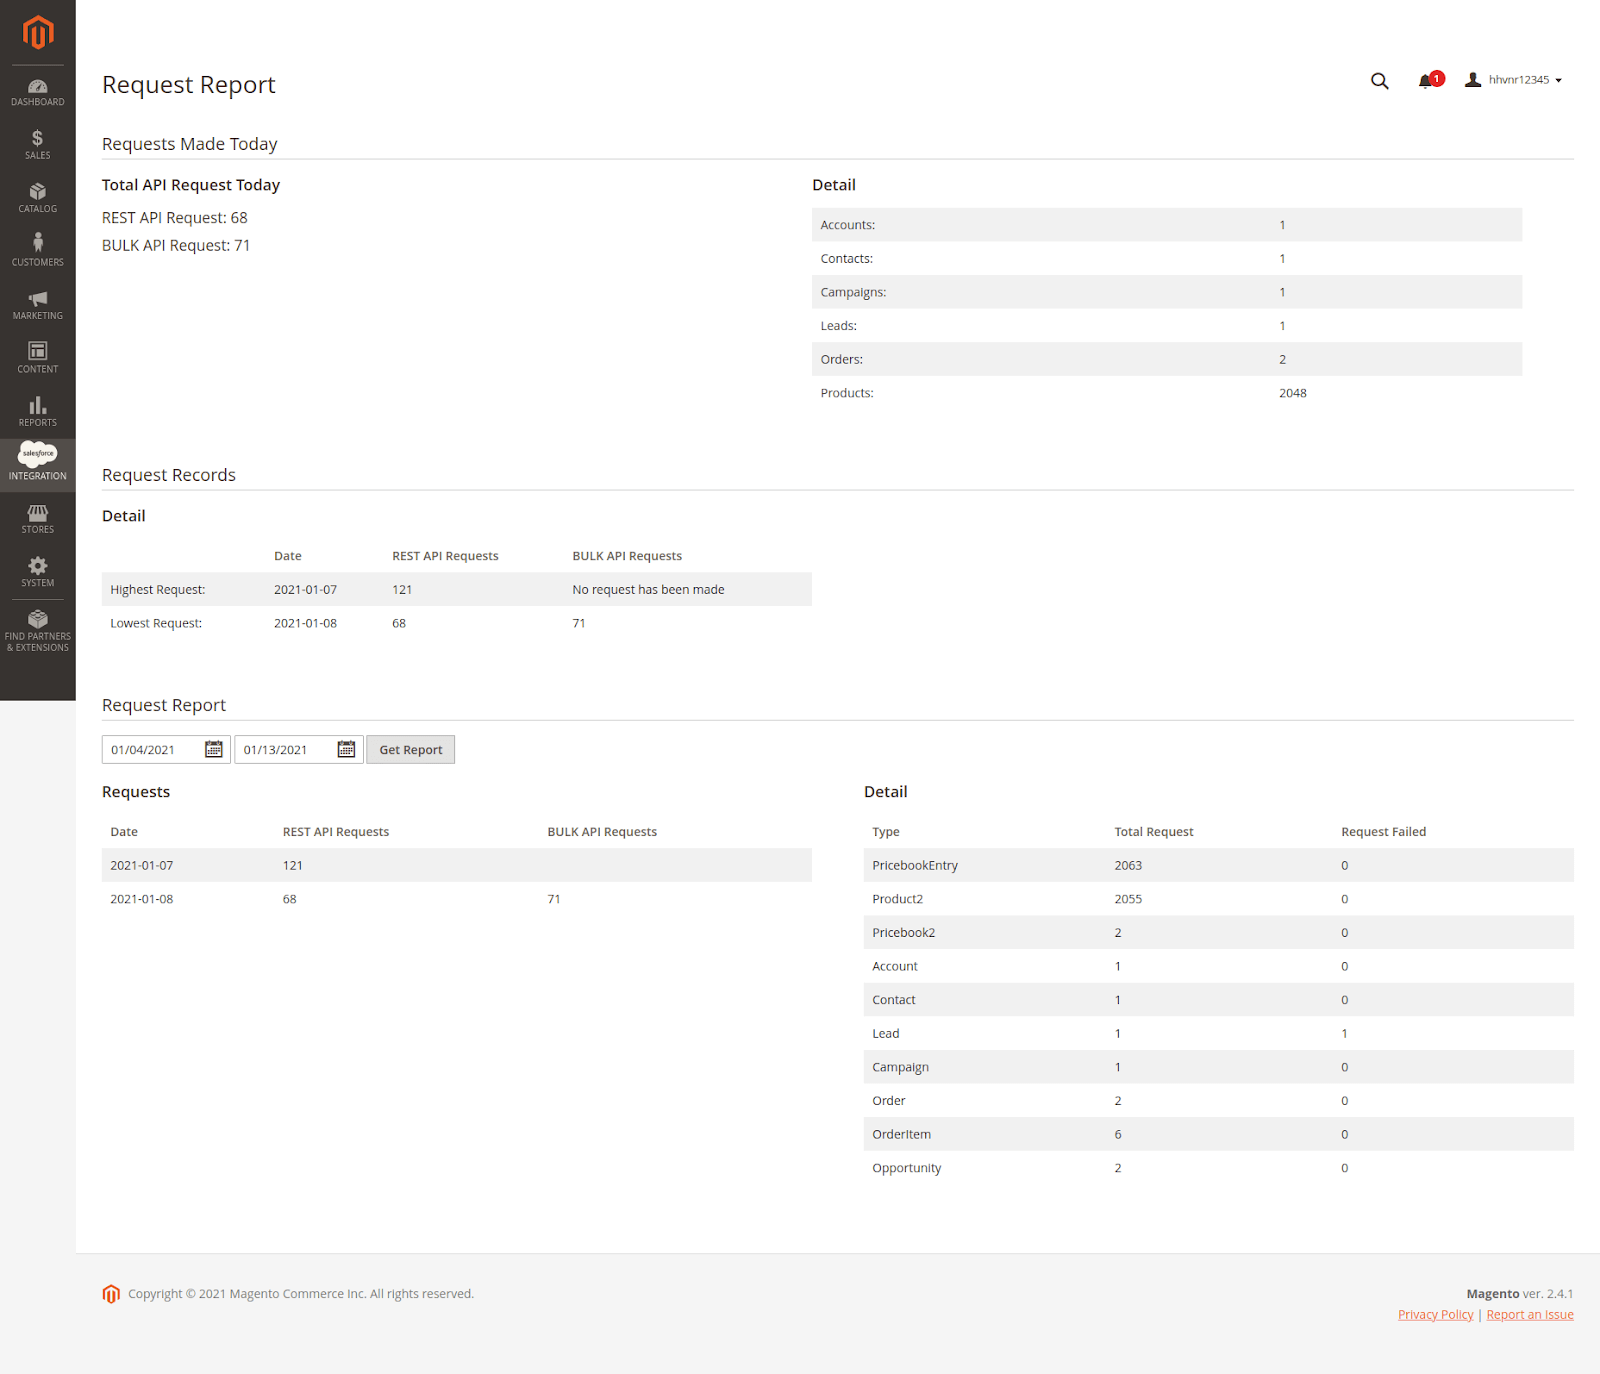
In addition, you Moreover, admin can easily check the synchronization with the View Request Daily button and View On Salesforce button.
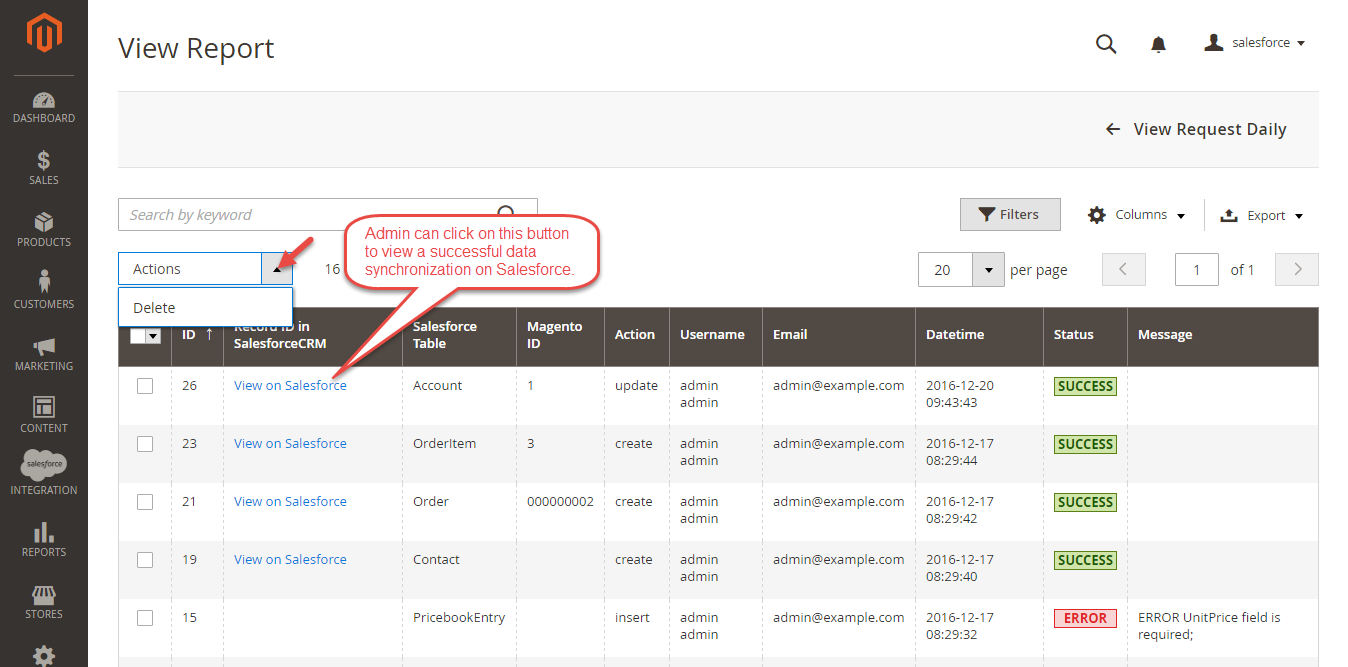
Navigate to Salesforce Salesforce Integration > Request Daily Report, admins you can easily follow their synchronization status.
How to synchronize data from Salesforce CRM account to Magento 2 store
Go to Salesforce Integration > Sync Salesforce Data to Magento, the system has created a new tab that manages synchronization from Salesforce to Magento 2 store. Admins need to follow the step in Guideline as below:

Setup Field Mapping
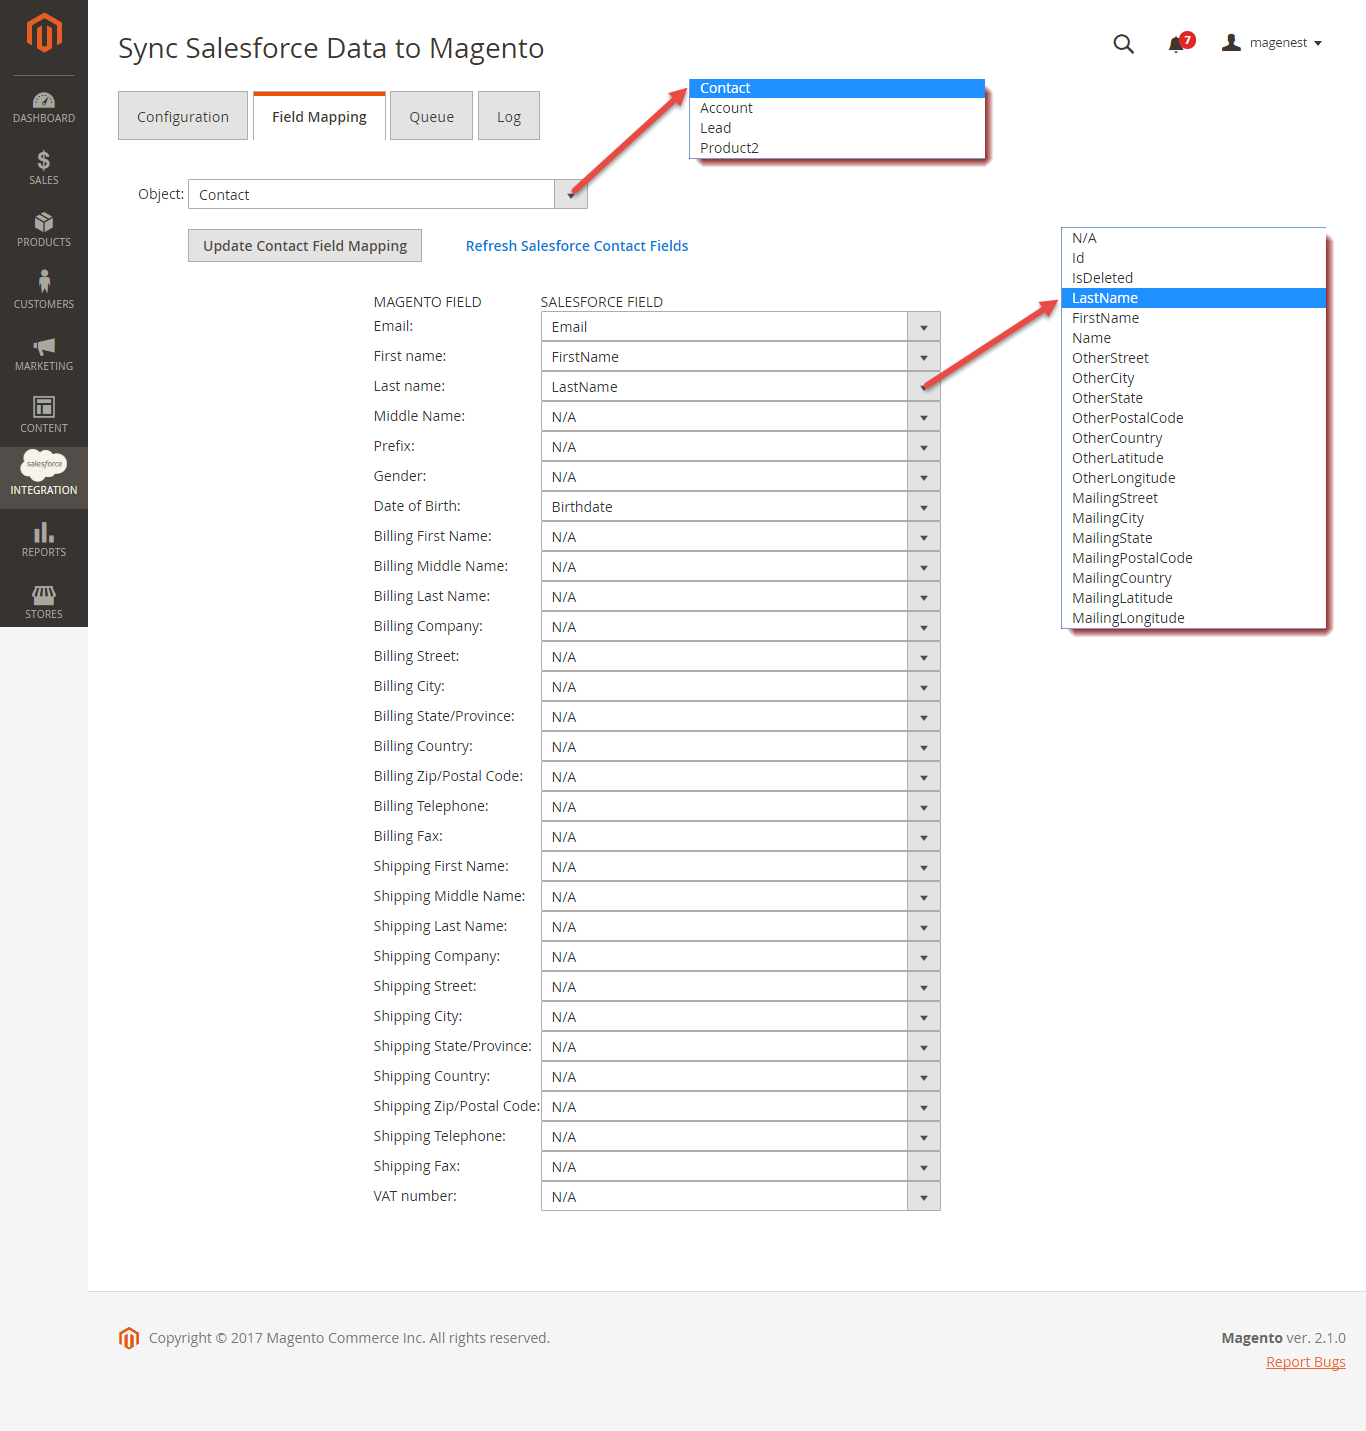
First, admins need to create field mapping for synchronizing Salesforce Data to Magento 2 store. There are 4 objects that can be synchronized: Contact, Account, Lead, and Product. Click on Update Object X Field Mapping button to save setting mapping for each object.
Sync Data
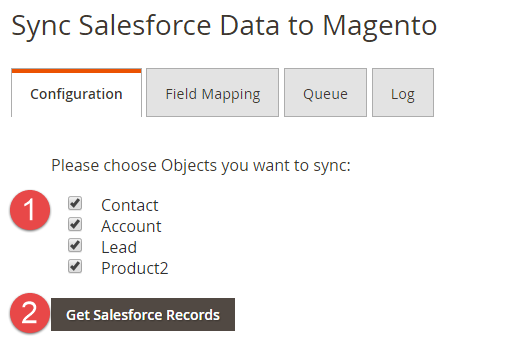
After setting up field mapping successfully, admins can select objects you want to sync from checkbox list in Configuration tab. Then click on Get Salesforce Records button to add Salesforce data to Queue tab.
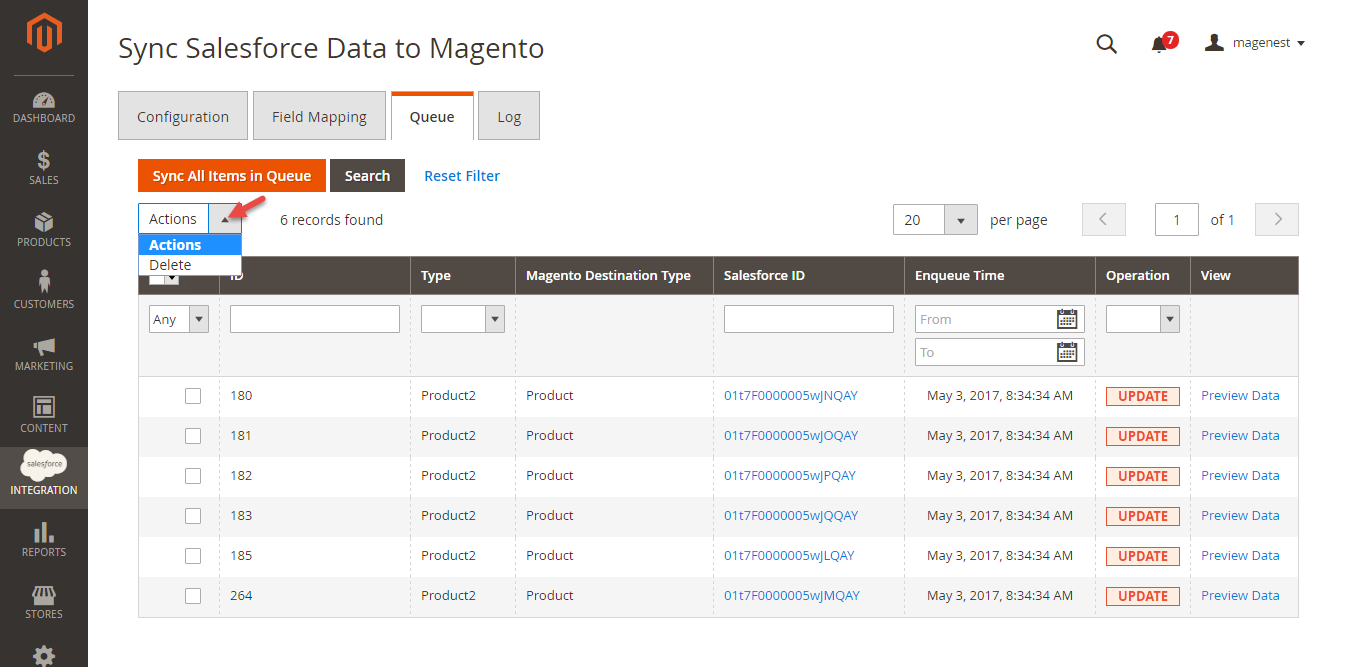
In Queue tab, admins can preview, delete any items from the grid. This allows admins can choose whether to synchronize a data in Queue tab. After that click on Sync All Items In Queue button to finish synchronizing from Salesforce to Magento 2 store.
Log
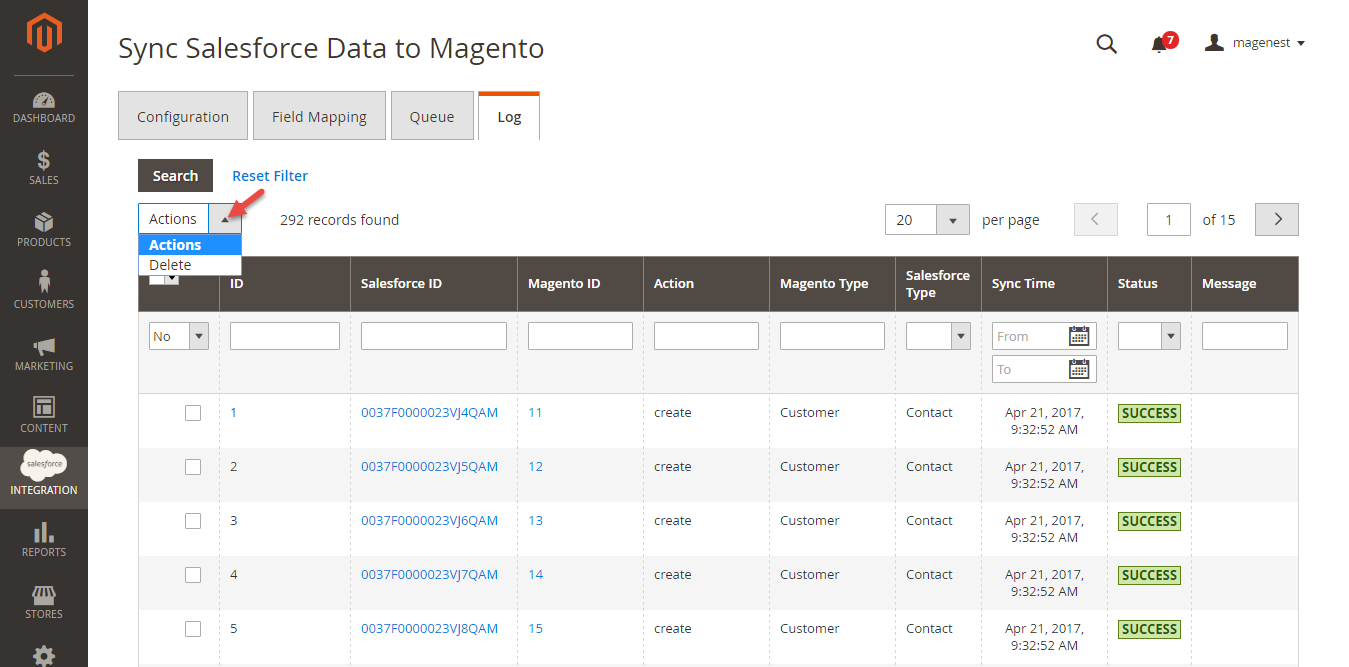
Admins can check the result of process synchronization in Log tab. Admins can use Salesforce ID and Magento ID hyperlink to navigate quickly for a specific item.
the synchronization status.
...
Main functions
Allow synchronizing and updating a specific or all Products from Magento 2 store into Salesforce CRM Products and vice versa allow synchronizing Products from Salesforce CRM account to Magento 2 store.
When a new product is added or an existing one is edited, a record with their its price will be added into Salesforce's Products. In addition, when a new product is created in Salesforce CRM account, it can be synchronized to Magento 2 store.
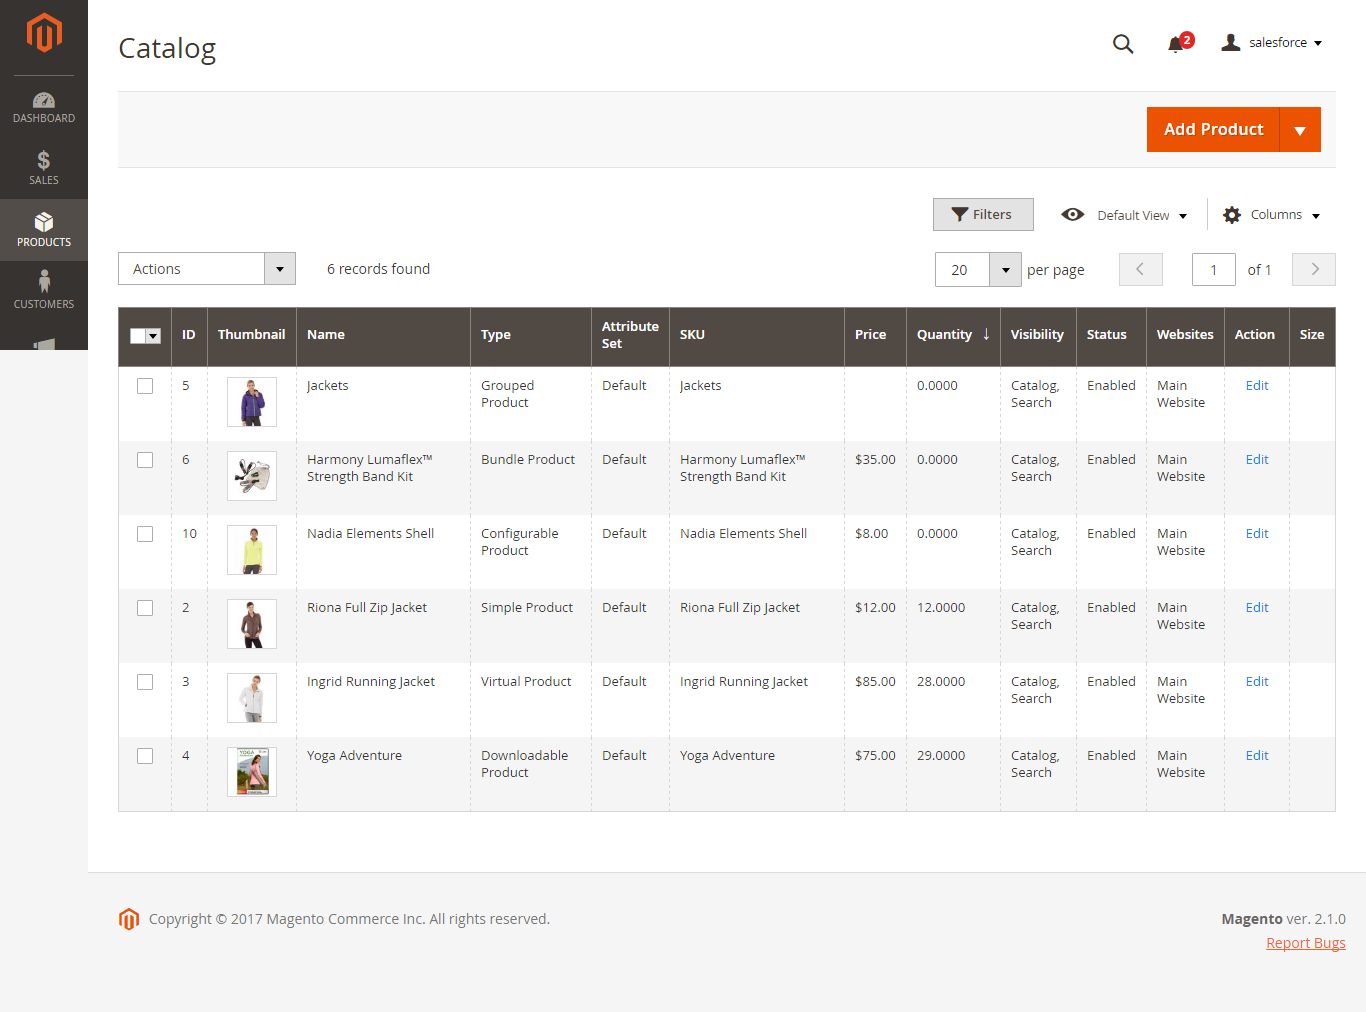
Magento Catalog:
Magento Catalog

...
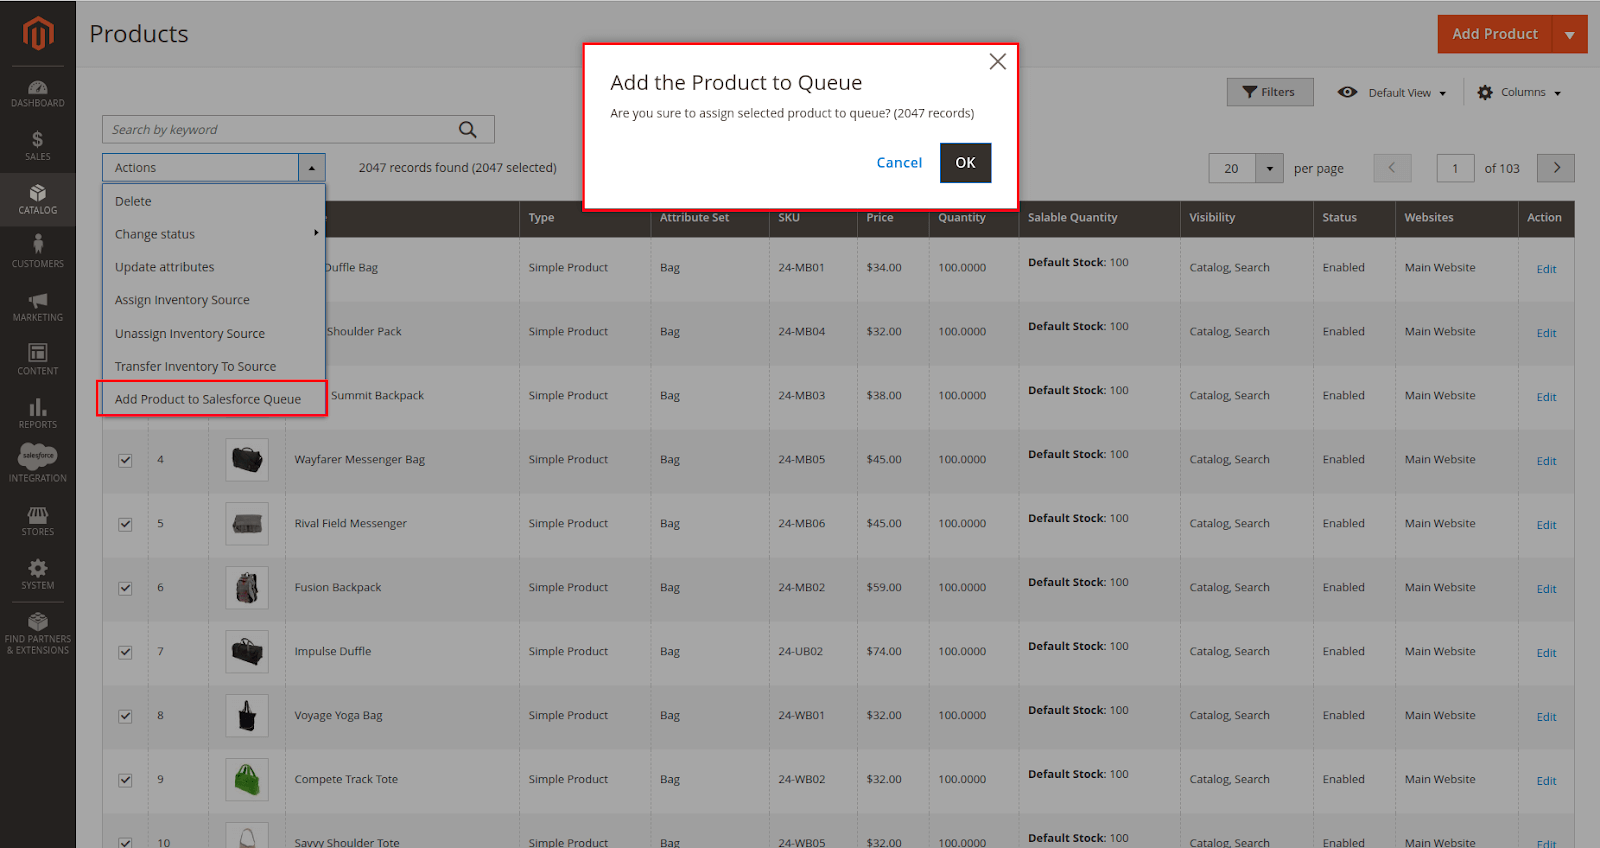
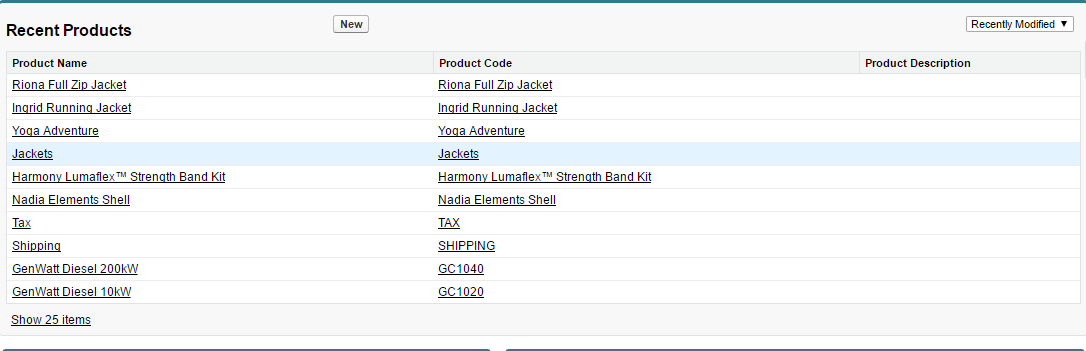
Add mass action Add products to Salesforce Queue on Product Listing page:
Salesforce Products:
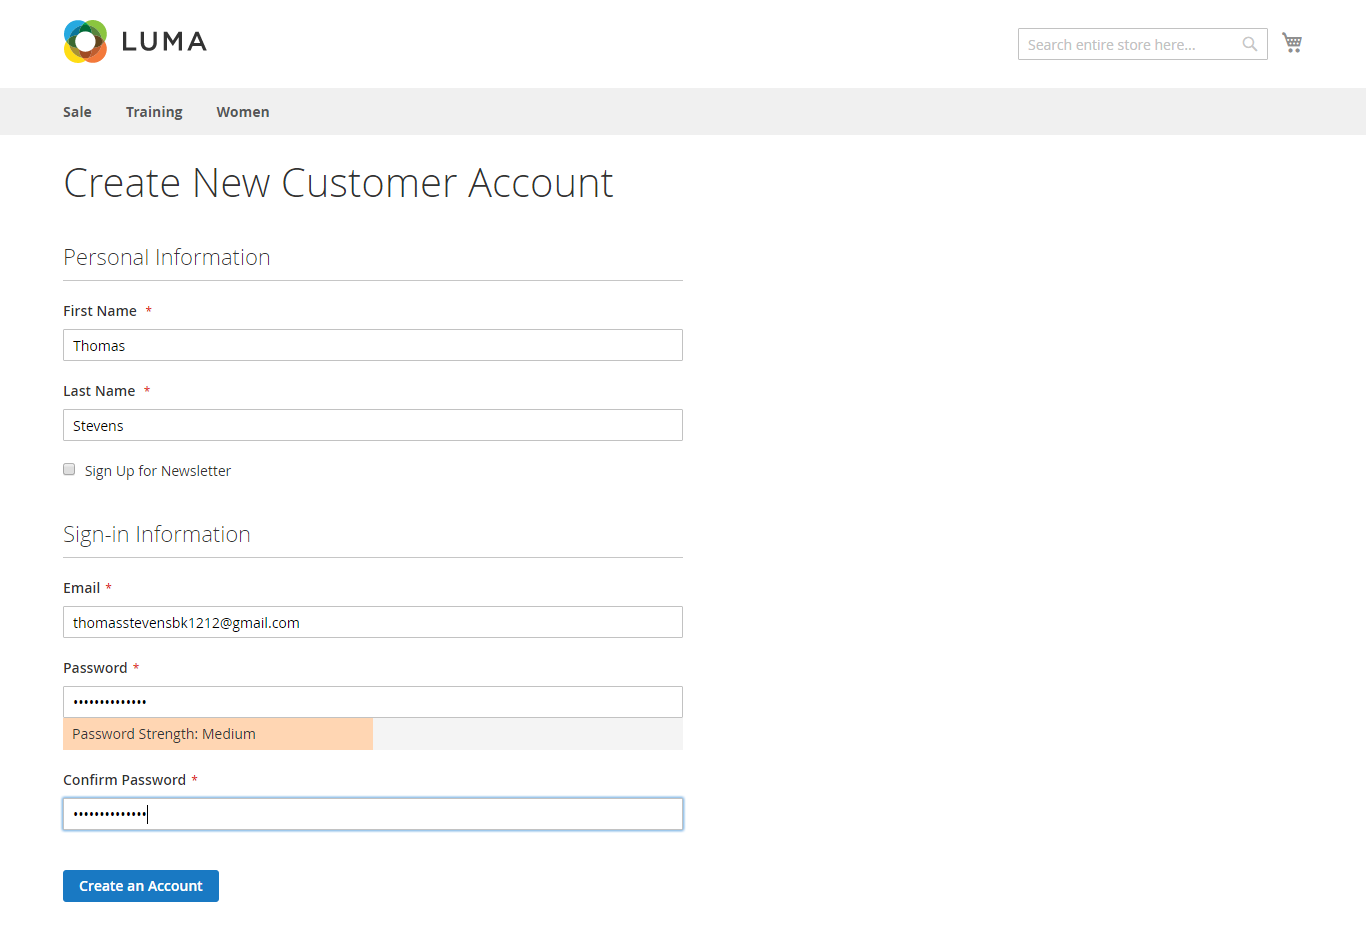
- Allow synchronizing and updating a specific or all Customers from Magento 2 store into Salesforce CRM Leads, Contacts, Accounts and vice versa allow synchronizing Customers from Salesforce CRM account to Magento 2 store.
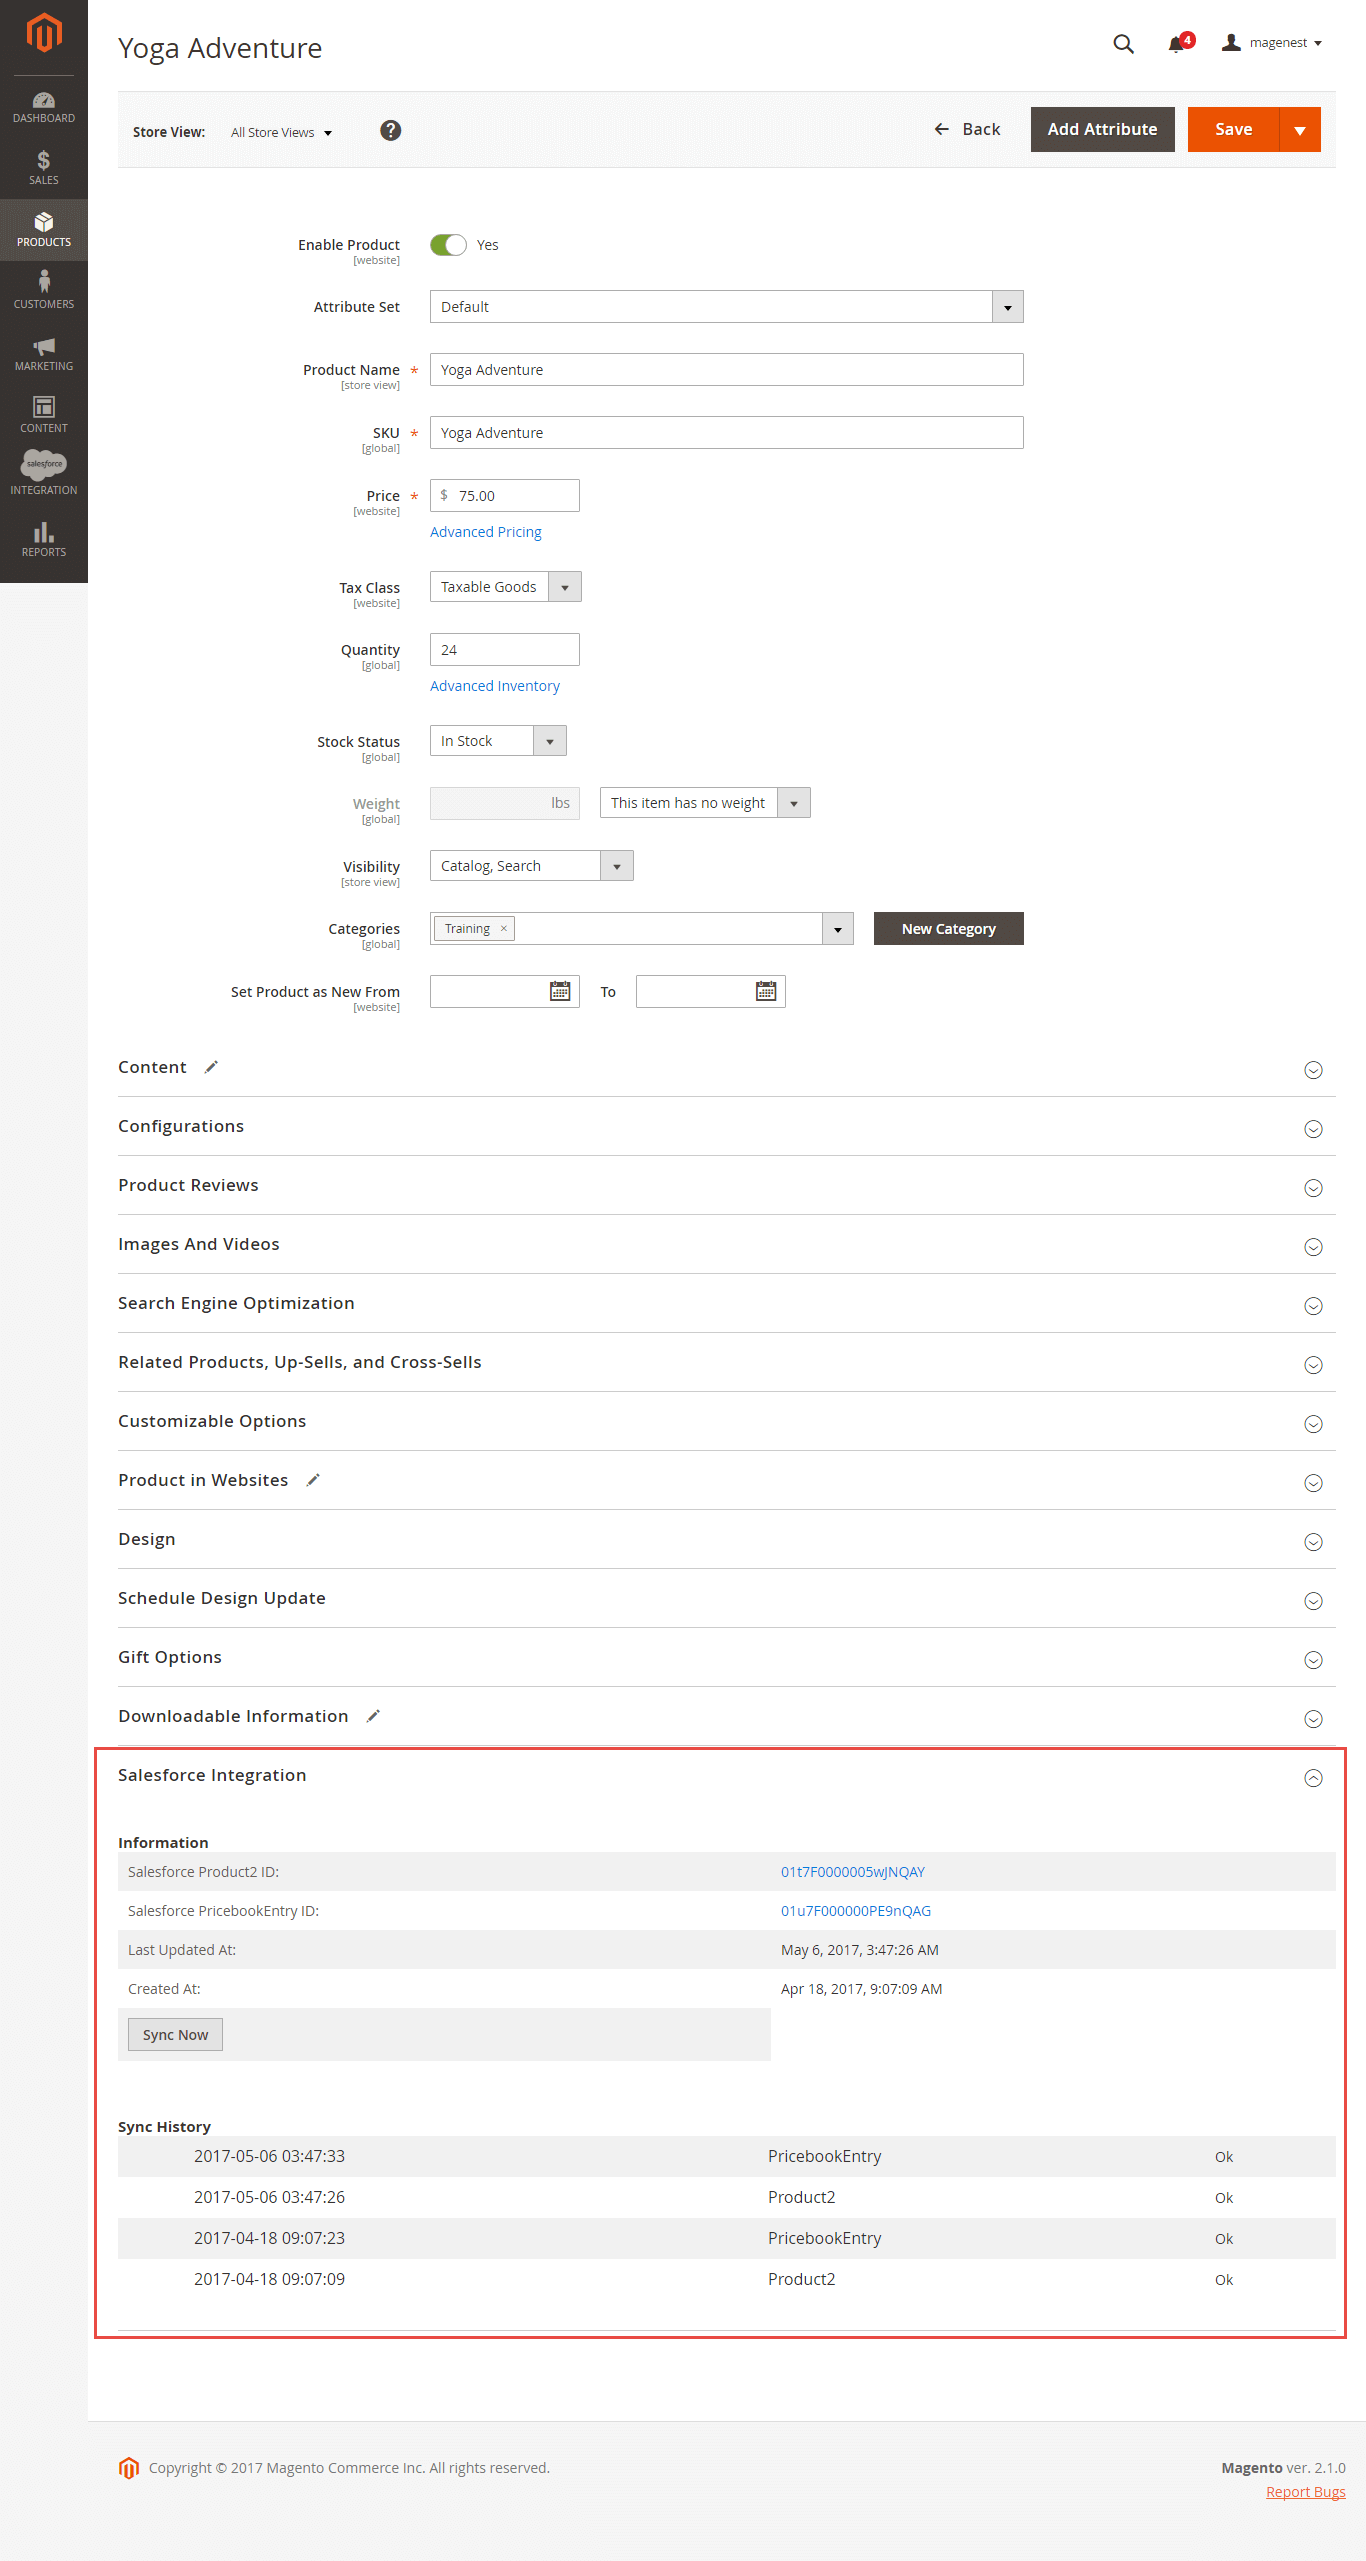
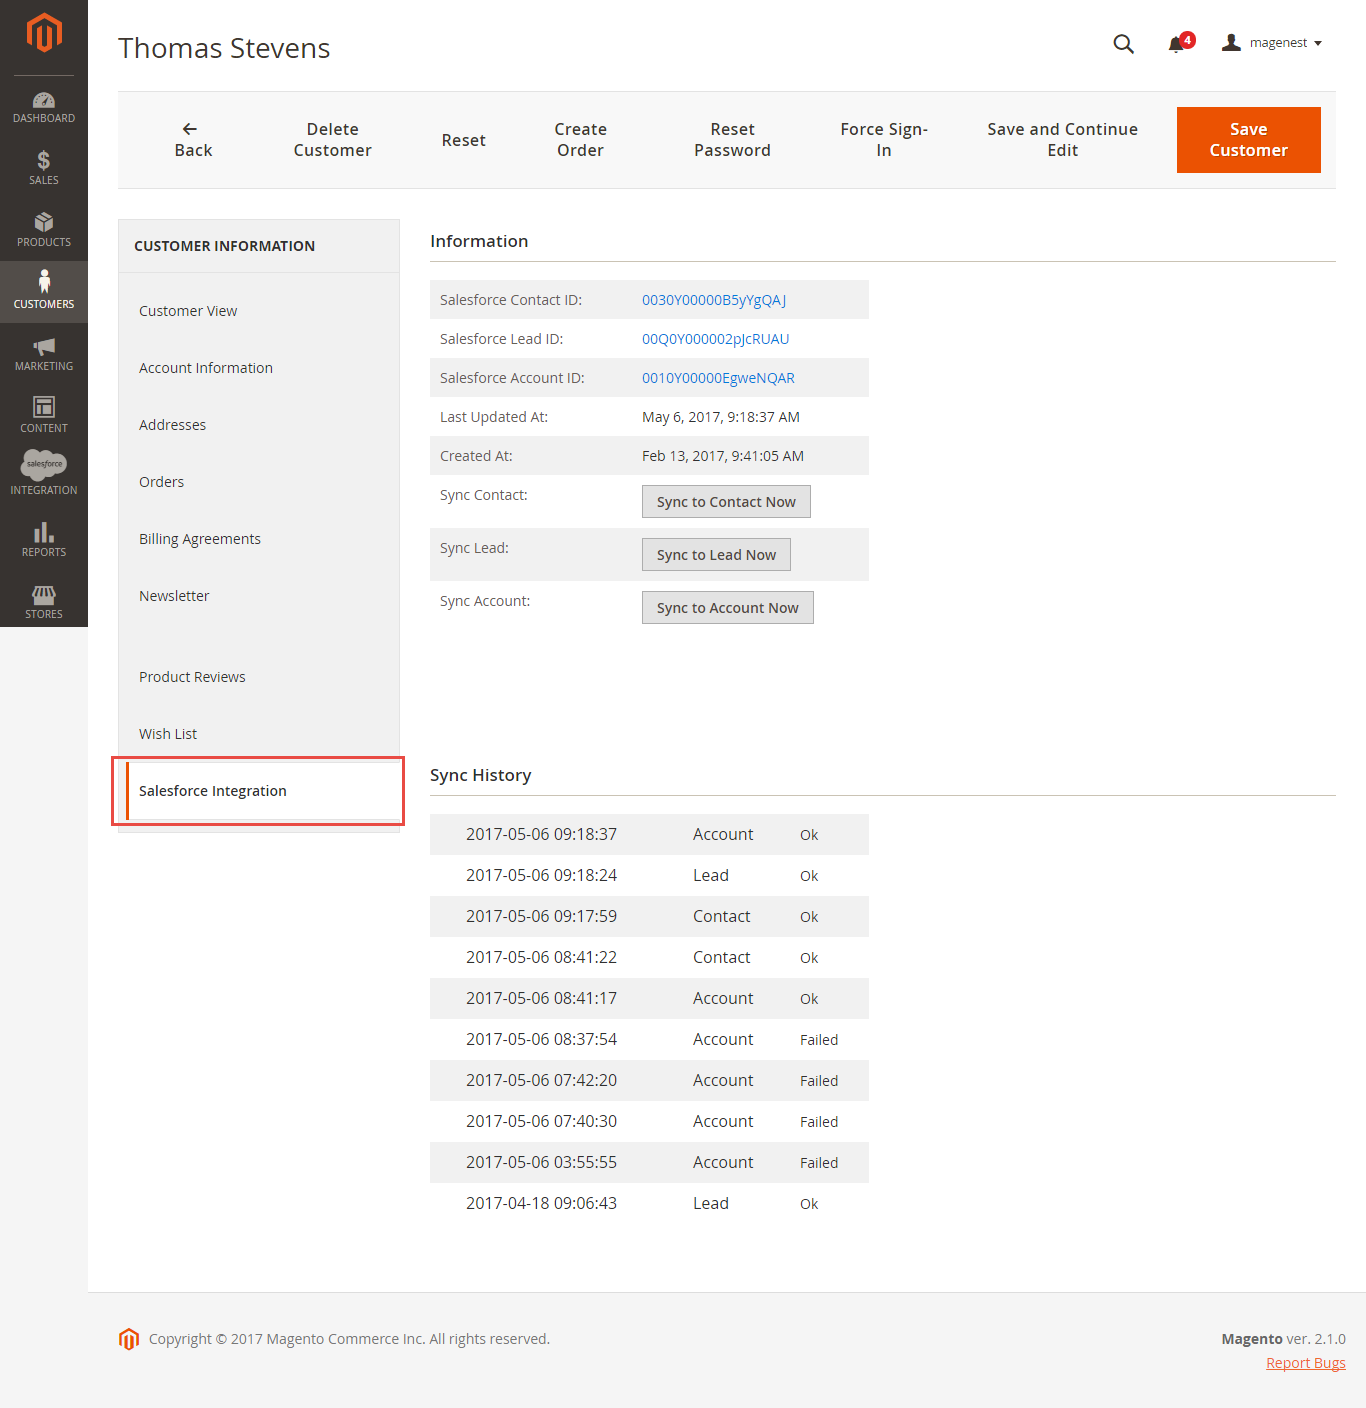
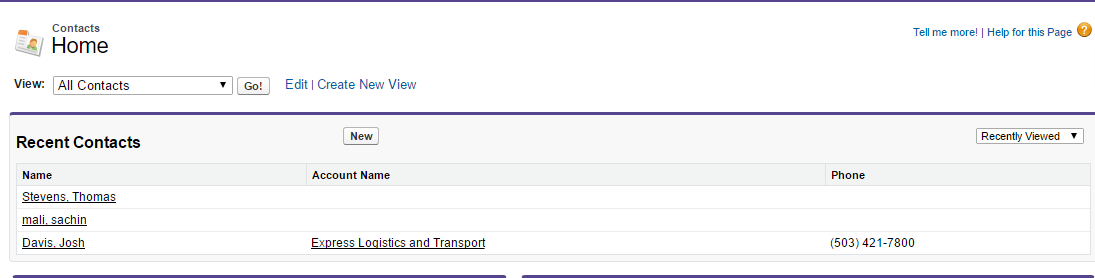
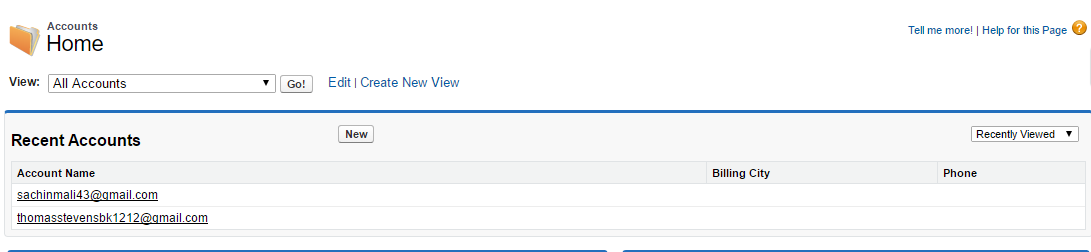
Whenever a customer account is created or updated in Magento 2 store, his/her information will be synchronized to Salesforce CRM in Leads, Accounts, and Contacts and vice versa. Especially, this extension creates a Salesforce Integration tab for each customer information that allows admins you to easily synchronize a specific customer.
In addition, when a new customer account is created in Salesforce CRM account, it can also be synchronized to Magento 2 store.
Magento 2 Dashboard
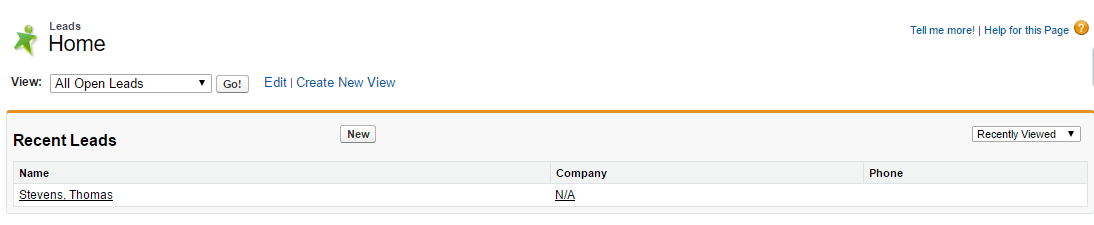
Salesforce Leads
Salesforce Contacts
Salesforce Accounts
Magento 2 Dashboard:
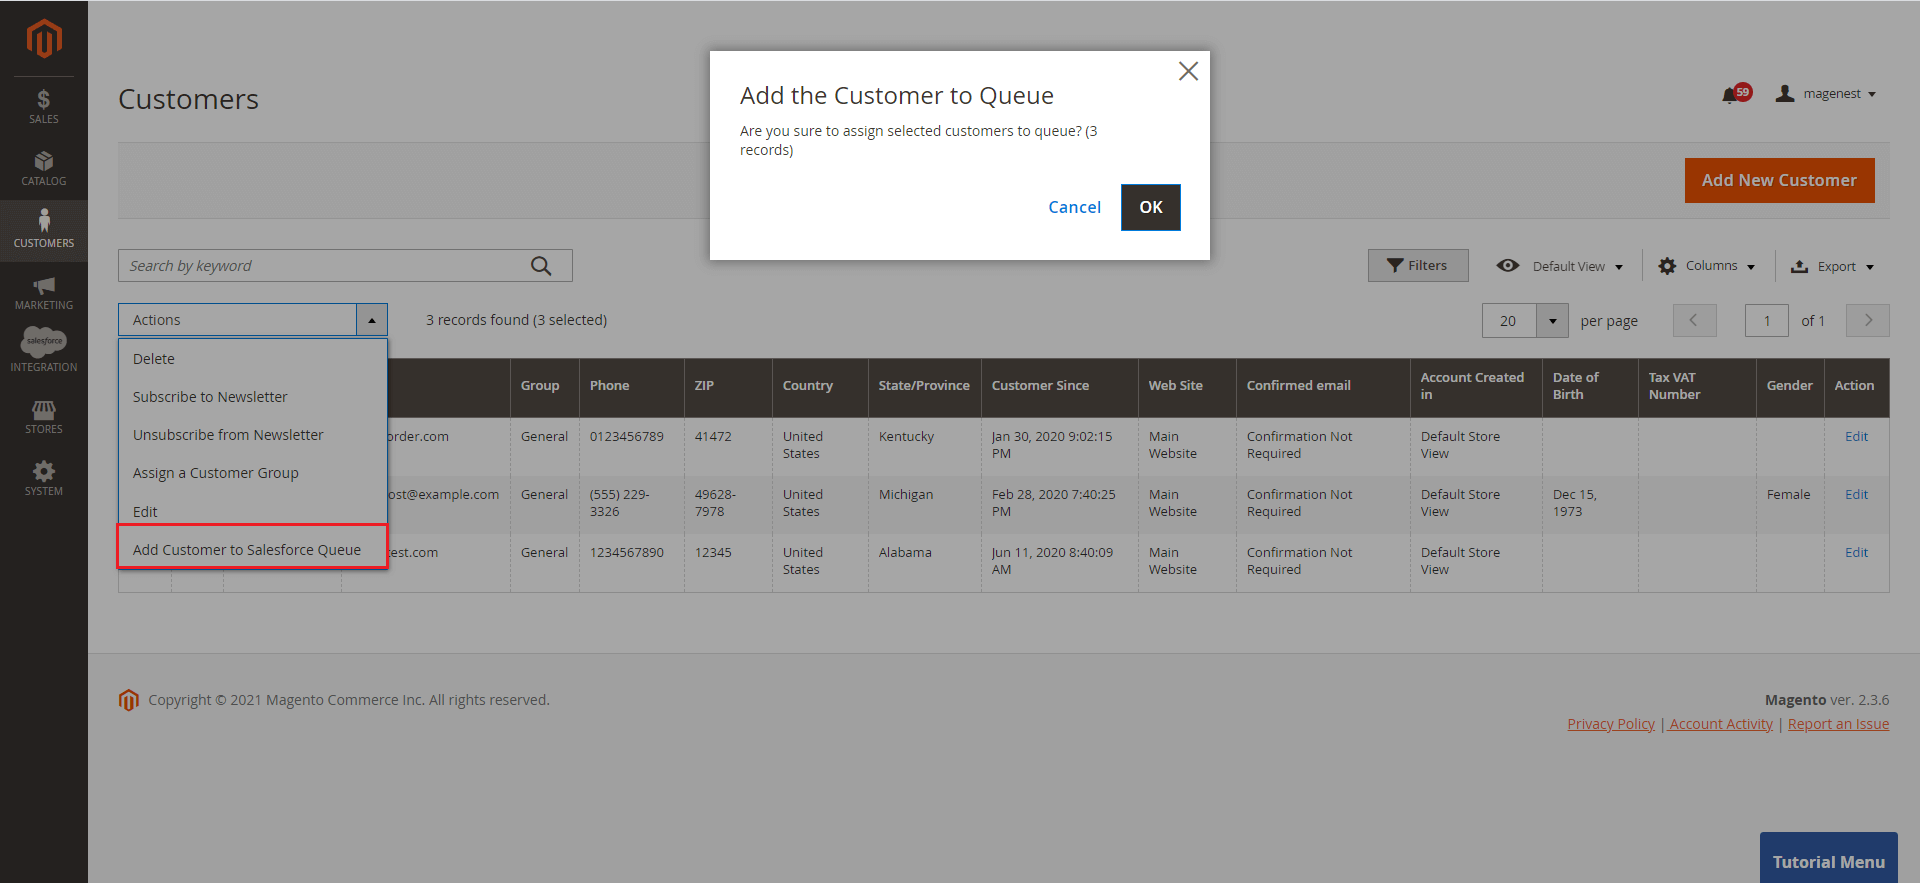
Mass action Add customer Salesforce Queue on the Customers Listing page
Salesforce Leads:
Salesforce Contacts:
Salesforce Accounts:
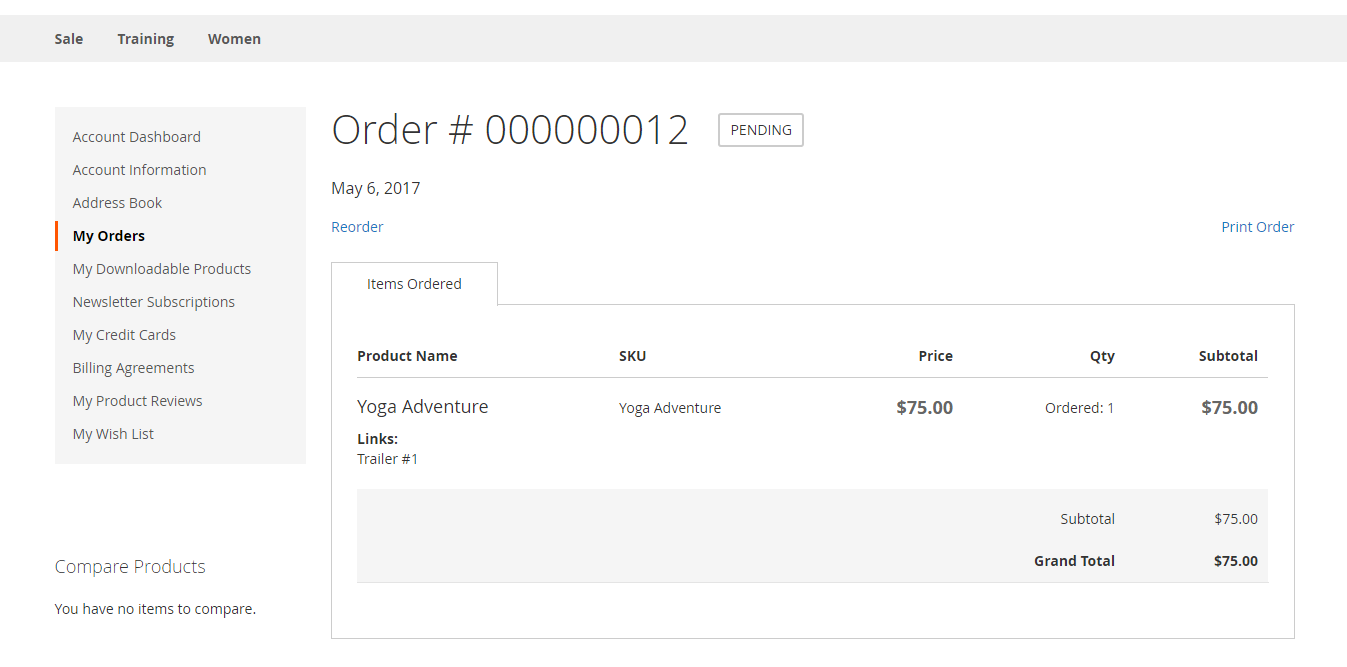
- Allow synchronizing a specific or all Orders from Magento 2 store into Salesforce CRM Orders and Salesforce Opportunity both manually and automatically
Whenever a customer places an order, the information will be synced in Salesforce's Orders and Opportunities.
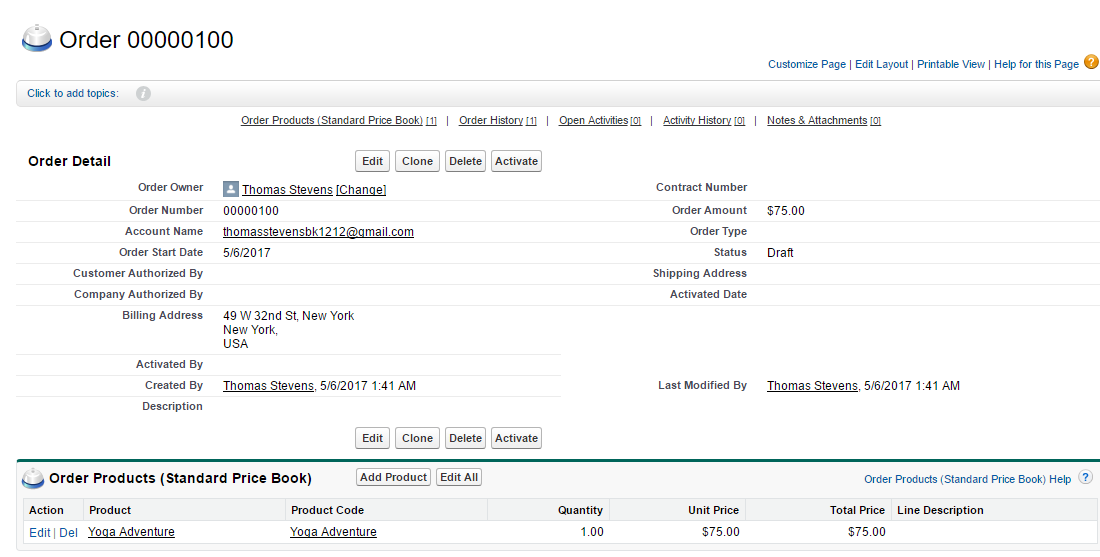
Magento 2 Orders Data:
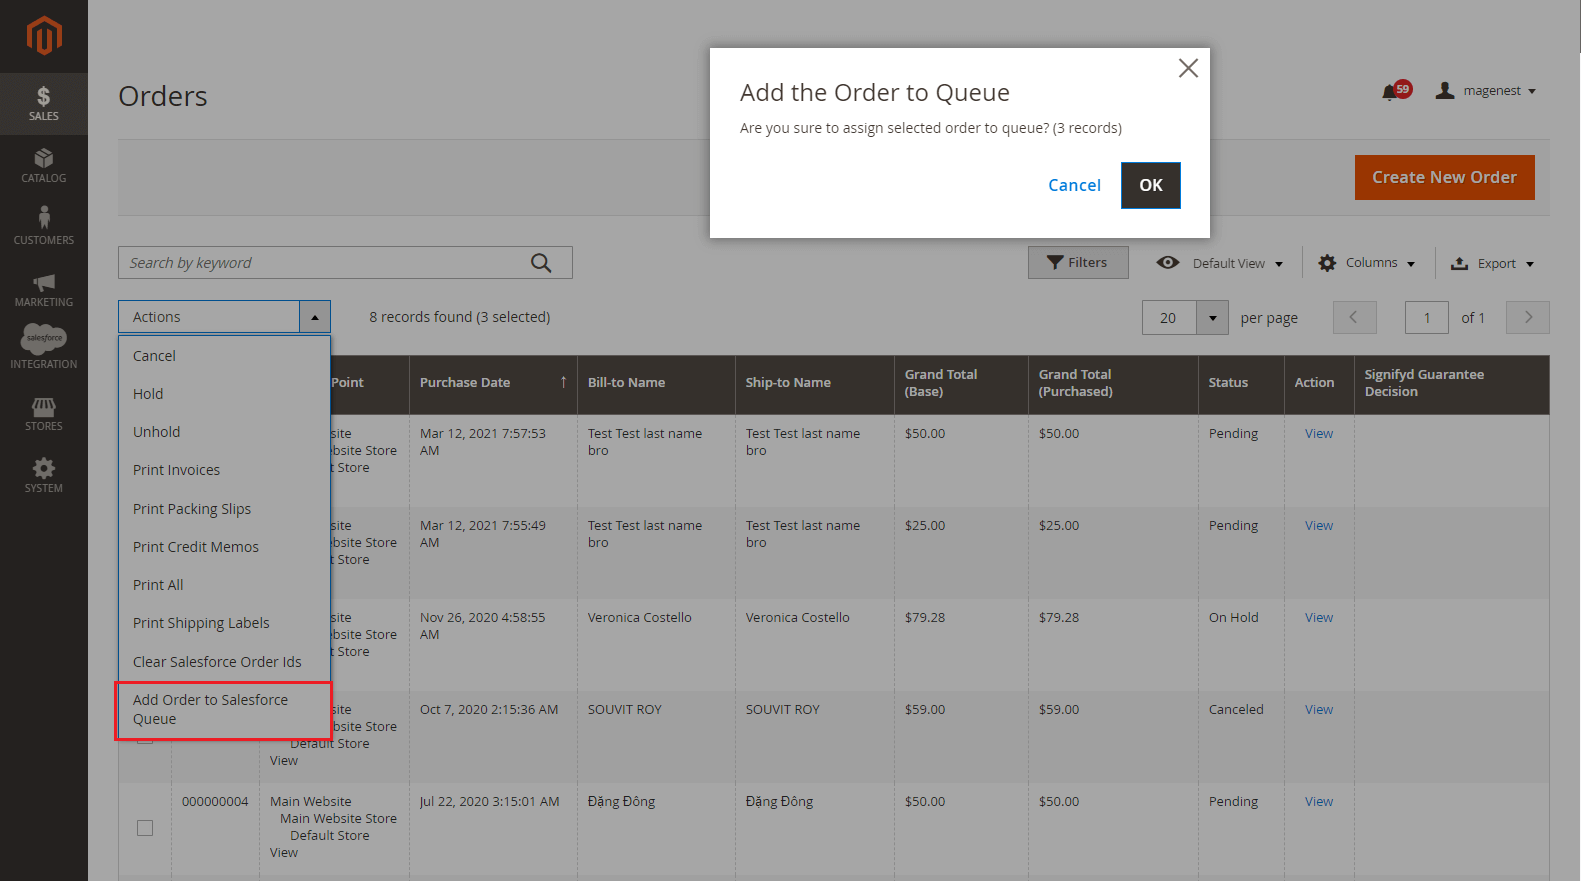
Mass action Add Order to Salesforce Queue on the Order Listing page:
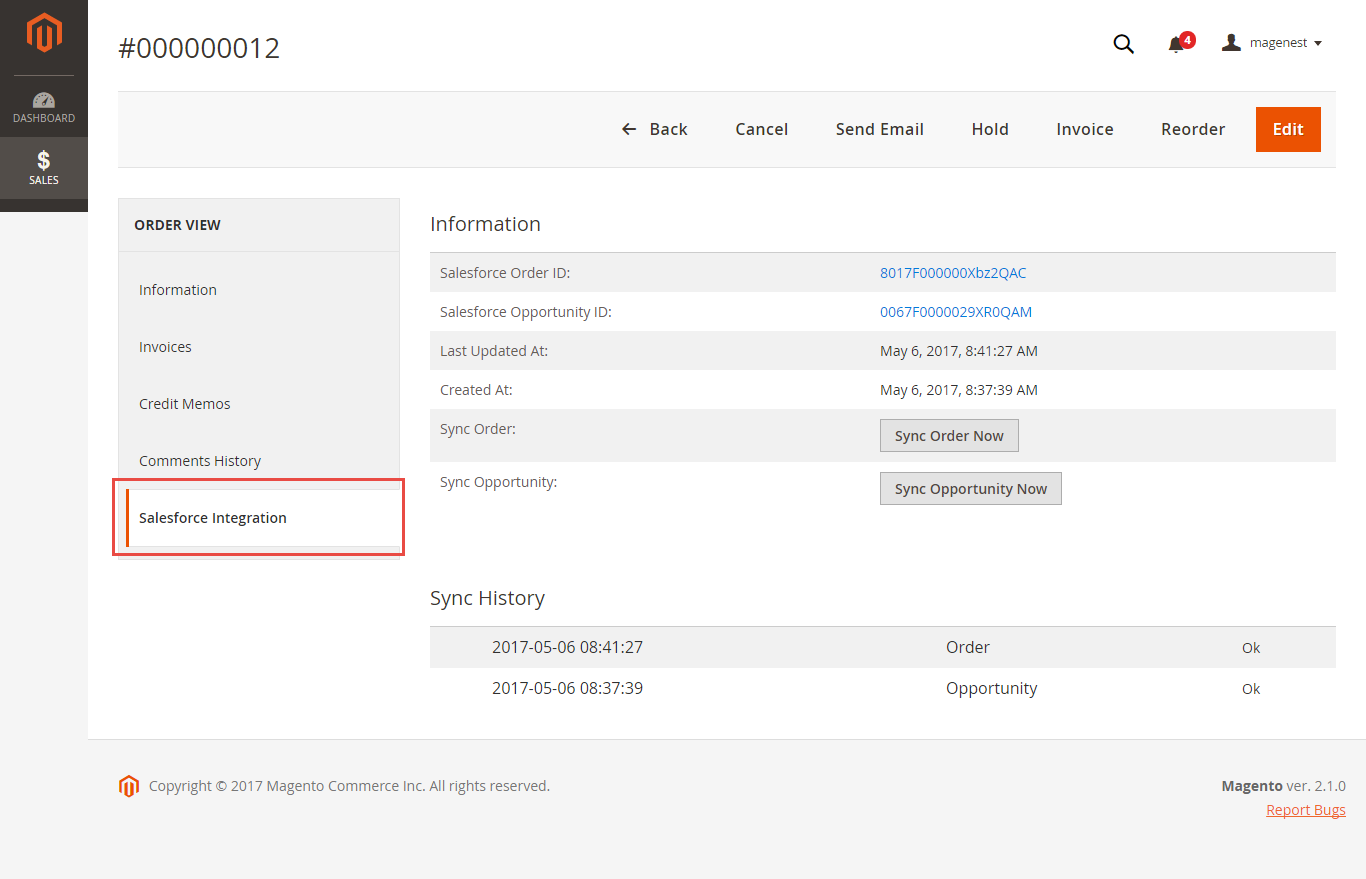
Salesforce Order Information:
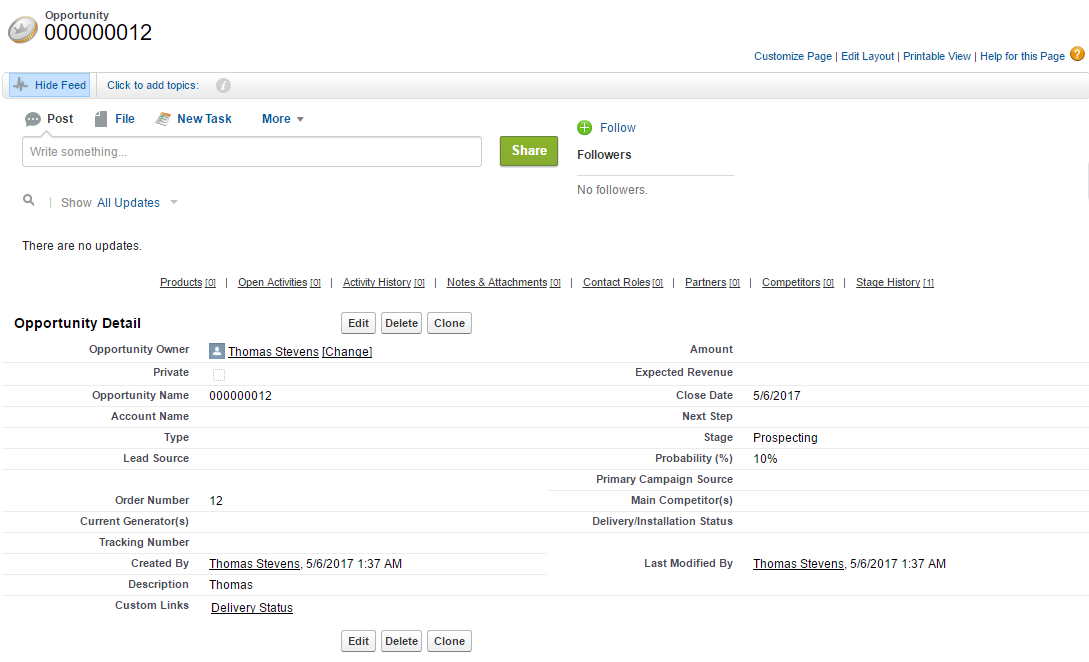
Opportunity:
Opportunity
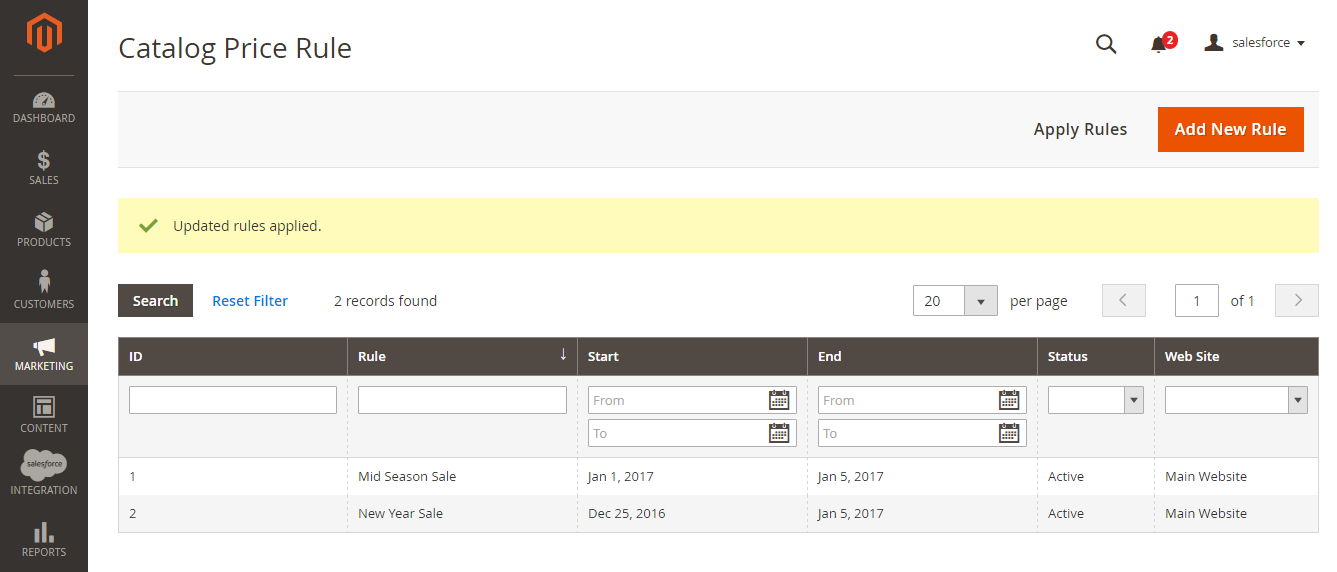
- Allow synchronizing and updating Promotions from Magento 2 store into Salesforce CRM Campaigns both manually and automatically
When store owners launch a new promotion or update an existing one, the corresponding campaign will be added into Salesforce.
Note ![]() Note that if you change the rule name when updating the campaign, it will create another one in Salesforce.
Note that if you change the rule name when updating the campaign, it will create another one in Salesforce.
Magento 2 Catalog Price Rule:
Salesforce Campaigns:
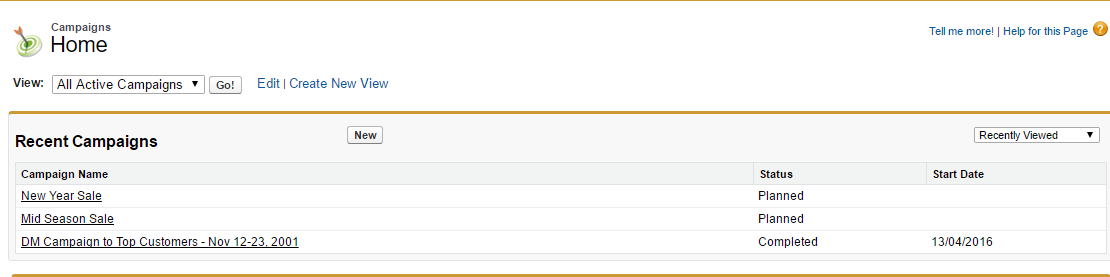
Salesforce Campaigns
Salesforce Default Synchronization Fields
![]() The fields in Red are hard-code.
The fields in Red are hard-code.
The other fields can be defined in field mapping.
Contact
Magento Customer | SalesForce Contact |
ID | |
Created At | |
Updated At | |
is Active | |
Created in | |
Prefix | |
First name | First name |
Last name | Last name |
Middle name | |
Tax/VAT number | |
Gender | |
Date of Birth | |
Billing First Name | |
Billing Middle Name | |
Billing Last Name | |
Billing Company | |
Billing City | |
Billing State/Province | |
Billing Country | |
Billing Zip/Postal Code | |
Billing Telephone | |
Billing Fax | |
Shipping First Name | |
Shipping Middle Name | |
Shipping Last Name | |
Shipping Company | |
Shipping Street | |
Shipping City | |
Shipping State/Province | |
Shipping Country | |
Shipping Zip/Postal Code | |
Shipping Telephone | |
Shipping Fax | |
VAT number |
Account
Magento Customer | SalesForce Account |
ID | |
Name | |
Created At | |
Updated At | |
is Active | |
Created in | |
Prefix | |
First name | |
Last name | |
Middle name | |
Tax/VAT number | |
Gender | |
Date of Birth | |
Billing First Name | |
Billing Middle Name | |
Billing Last Name | |
Billing Company | |
Billing City | |
Billing State/Province | |
Billing Country | |
Billing Zip/Postal Code | |
Billing Telephone | |
Billing Fax | |
Shipping First Name | |
Shipping Middle Name | |
Shipping Last Name | |
Shipping Company | |
Shipping Street | |
Shipping City | |
Shipping State/Province | |
Shipping Country | |
Shipping Zip/Postal Code | |
Shipping Telephone | |
Shipping Fax | |
VAT number |
Lead
Magento Customer | SalesForce Lead |
ID | |
Created At | |
Updated At | |
is Active | |
Created in | |
Prefix | |
First name | First name |
Last name | Last name |
Middle name | |
Tax/VAT number | |
Gender | |
Date of Birth | |
Billing First Name | |
Billing Middle Name | |
Billing Last Name | |
Billing Company | "N/A" |
Billing City | |
Billing State/Province | |
Billing Country | |
Billing Zip/Postal Code | |
Billing Telephone | |
Billing Fax | |
Shipping First Name | |
Shipping Middle Name | |
Shipping Last Name | |
Shipping Company | "N/A" |
Shipping Street | |
Shipping City | |
Shipping State/Province | |
Shipping Country | |
Shipping Zip/Postal Code | |
Shipping Telephone | |
Shipping Fax | |
VAT number |
Product
Magento Product | SalesForce Product2 |
Name | Name |
Description | |
is Active | isActive |
Short Description | |
SKU | ProductCode |
Weight | |
Set Product as New from Date | |
Set Product as New to Date | |
Status | |
Country of Manufacture | |
URL Key | |
Price | |
Special Price | |
Special From Date | |
Special To Date | |
Stock Id | |
Qty | |
Min Qty | |
Meta Title | |
Meta Keywords | |
Meta Description | |
Tax Class | |
Base Image | |
Small Image | |
Thumbnail | |
Min Qty | |
Meta Keywords | |
Meta Description |
Campaign
Magento Campaign | SalesForce Campaign |
Rule ID | |
Name | Name |
Description | |
From Date | |
To Date | |
Active | |
Simple Action(Apply) | |
Discount Amount | |
Enable Discount to Subproducts | |
Subproducts Simple Action(Apply) | |
Subproducts Discount Amount |
Order
Magento | SalesForce Order |
ID | |
State | |
Status | Status |
Coupon Code | |
Coupon Rule Name | |
Increment ID | |
Created At | EffectiveDate |
Company | |
Customer First Name | |
Customer Middle Name | |
Customer Last Name | |
Billing First Name | |
Billing Middle Name | |
Billing Last Name | |
Billing Company | |
Billing Street | |
Billing City | |
Billing State/Province | |
Billing Zip/Postal Code | |
Billing Telephone | |
Billing Country | |
Shipping First Name | |
Shipping Middle Name | |
Shipping Last Name | |
Shipping Company | |
Shipping Street | |
Shipping City | |
Shipping State/Province | |
Shipping Zip/Postal Code | |
Shipping Country | |
Shipping Amount | |
Shipping Description | |
Currency Code | |
Total Item Count | |
Store Currency Code | |
Shipping Discount Amount | |
Discount Description | |
Shipping Method | |
Store Name | |
Discount Amount | |
Tax Amount | |
Sub Total | |
Grand Total | |
Remote IP |
Order Item
Magento Order Item | SalesForce Order Item |
Parent ID | OrderID |
Qty | Quantity |
Price | UnitPrice |
Opportunity
Magento | SalesForce Opportunity |
ID | |
State | |
Status | Prospecting |
Coupon Code | |
Coupon Rule Name | |
Increment ID | Name |
Created At | CloseDate |
Company | |
Customer First Name | |
Customer Middle Name | |
Customer Last Name | |
Billing First Name | |
Billing Middle Name | |
Billing Last Name | |
Billing Company | |
Billing Street | |
Billing City | |
Billing State/Province | |
Billing Zip/Postal Code | |
Billing Telephone | |
Billing Country | |
Shipping First Name | |
Shipping Middle Name | |
Shipping Last Name | |
Shipping Company | |
Shipping Street | |
Shipping City | |
Shipping State/Province | |
Shipping Zip/Postal Code | |
Shipping Country | |
Shipping Amount | |
Shipping Description | |
Currency Code | |
Total Item Count | |
Store Currency Code | |
Shipping Discount Amount | |
Discount Description | |
Shipping Method | |
Store Name | |
Discount Amount | |
Tax Amount | |
Sub Total | |
Grand Total | |
Remote IP |
Opportunity Item
Magento Opportunity Item | SalesForce Opportunity Item |
Parent ID | OrderID |
Qty | Quantity |
Price | UnitPrice |
| Table of Contents | ||||
|---|---|---|---|---|
|
...
Updates
- When a bug fix or new feature is released, we will provide you with the module's new package.
- All you need to do is repeating the above installing steps and uploading the package onto your store. The code will automatically override.
- Flush the config cache. Your store and newly installed module should be working as expected
...
Support
...
- We will reply to support requests after within 2 business days.
- We will offer life time free lifetime free update and 6 months -month free support for all of our paid products. Support includes answering questions related to our products, bug/error fixing to make sure our products fit well in your site exactly like our demo.
- Support DOES NOT include other series services such as customizing our products, installation, and uninstallation service.
...
Once again, thank you for purchasing our extension. If you have any questions relating to this extension, please do not hesitate to contact us for support.
| Table of Contents | |
|---|---|
|
|
|
|