Introduction
![]()
Worldpay Payment and Subcriptions Subscriptions extension for Magento 2 is a useful tool which allows you to subscribe and pay automatically from Magento 2 store to Payment Website.
Extension's page: Worldpay Payment and Subcriptions
Features
by Magenest is a smart extension that helps customers to make payments online without wasting time.
It is wonderful when you are just at home but that you can purchase everywhere in the world only by clicking. Our product provides great utilities like.
Table of Contents outline true style none
| outline | true |
|---|---|
| style | none |

Hightlight Features
- Checkout Allow customers to checkout using their payment cards, including debit cards and credit cards.
- Allow store managers to add their Add Worldpay account to the Magento store.
- Protect merchants better with 3D Secure Checkout, checking for fake card information.
- Support for various types of payment cards, including Visa, MasterCard, Paypal, and American Express.
- Payment gateway customization, giving customer a better checkout experience.
- Reporting of transactions, keeping control of all orders and invoices.
- Various tools for theft and fraud protection.
...
Your store should be running on Magento 2 Community Edition version 2.0.x or 2 2.1.x.
...
How to create a new
...
customer account
It is necessary to create a new consumer key customer account for the connection between Magento 2 and WorldPay.
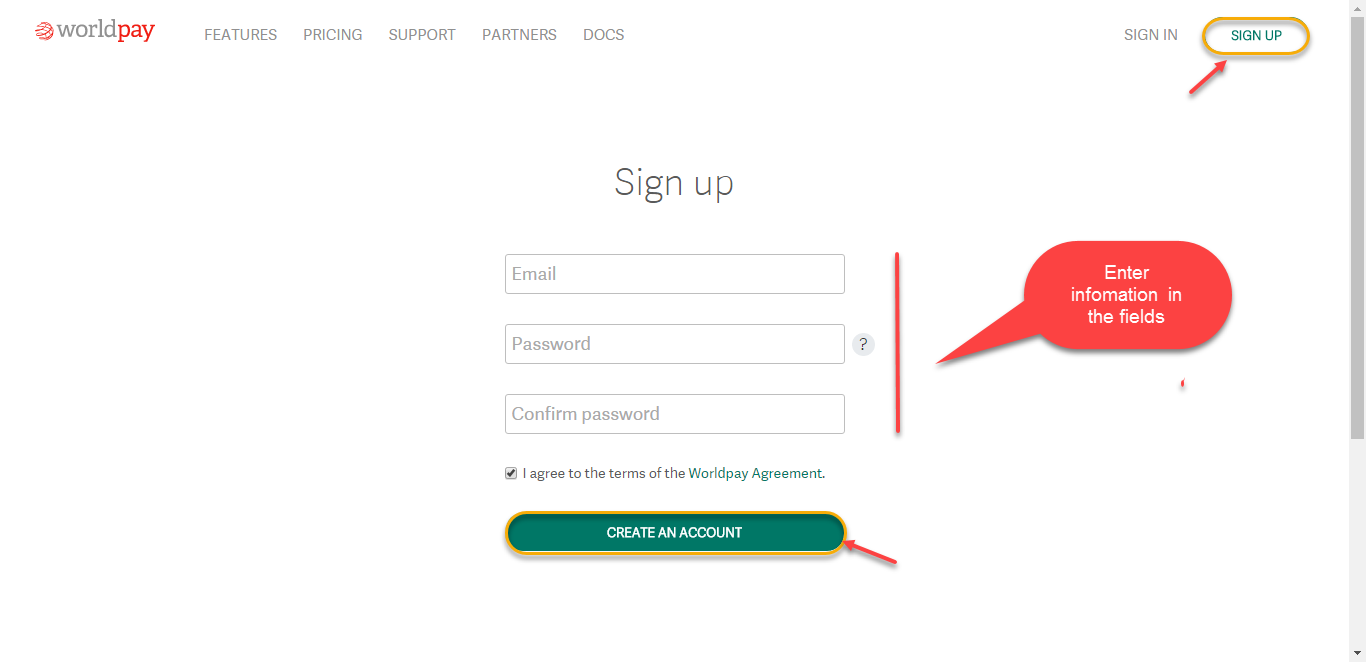
First of all, go to https://worldpay-payment-and-subcriptionsonline.worldpay.com/ and register an WorldPay accounts (click on "Try worldpay for free" or "Free Trial"Create an account"). If you already have an account, you can skip this step.
Fill in the form the information of your Organization and press "Get startedCreate an Account". If everything is right, WorldPay will inform you to check your email and activate your account.

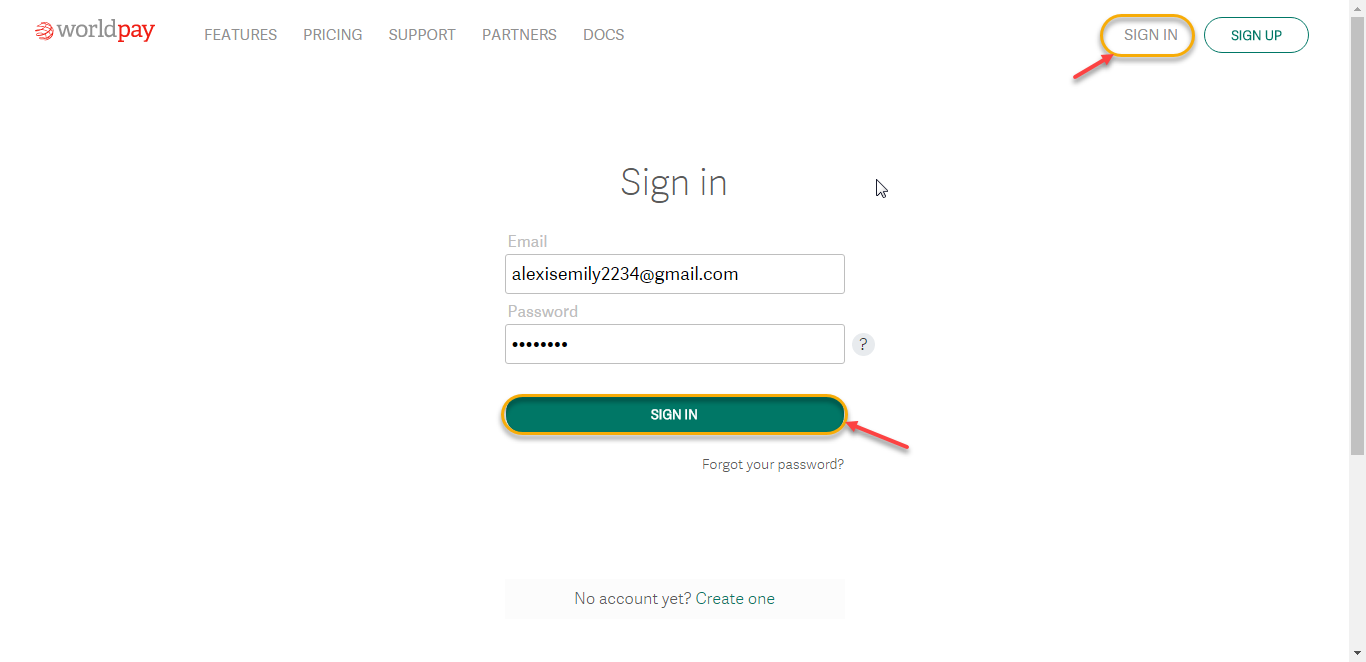
When your account is activated, you can login on the page https://loginonline.xeroworldpay.com/
.
.
...
Configuration
If you log in the account for the first time, Xero will ask you to create an organization. Enter the name of your organization and choose other information. Press on Start Trial, or Buy Now to continue.
Now you can create a new consumer key after login your Xero account.
In order to create a new consumer key, you need to have the public key first. There are two ways for you to get the public key:
![]() You can pick up the file content of the public key attached with our extension.
You can pick up the file content of the public key attached with our extension.
![]() Or please follow the steps belows to create a new one:
Or please follow the steps belows to create a new one:
How to create a new public key
Go to http://developer.xero.com/ > Docs > Advanced Docs > Public/private key pair > Using OpenSSL and run 3 commands to create 2 files: public key.cer and private key.pem
+ Copy and paste content file .cer into magenest/xero/etc/certs/magenest.cer
+ Copy and paste content file .pem into magenest/xero/etc/certs/magenest.pem
When you have file Xero/etc/certs/magenest.cer, copy and paste them into X509.
You will see the Xero accounting interface after you've done the last step but now we need to continue our setup, go to this site: https://app.xero.com/Application to create the Application.
Choose the application mode (usually is Private), application name (the name for the application is not very important), choose your organization (this is where the Magento 2 data will be synced into).
Check the information again then choose "I have read and agree to the Xero Developer Platform". After that click Save button.
If everything goes right, you will see the following content. By now we have done everything on the Xero site, now move to your magento 2 backend but don't close this site.
Click on "Show" button to get the Consumer Key.
Configuration
Set up Xero Account Informations
Go to Store > Configuration or Xero Integration > Configuration:
At My Applications tab
Taking Consumer Key that you have just created and paste into Magento 2 backend configuration. Press Save Config after you've done (refresh the cache if needed). Then, click on Connect Now button.
Note that you need to save config before connecting, this will help you avoid making the consumer key error.
Connection Status will be transferred from not connected to connected with all the information like the picture below.
At Configure the Accounts Types in Xero tab
Admins are able to synchronize four account types: Bank account, Sale account, Inventory account, Cost and Good Sold account from Magento 2 to Xero. Enter name for each account then click on Sync All Accounts Now button. The default Xero account value will be used if you do not change it. If there is no account on Xero site, the extension will automatically create a new one.
Admins can check accounts on Xero web.
General Configuaration
![]() In order to get your extension up and running properly, we highly recommend that you make some configurations right from the beginning.
In order to get your extension up and running properly, we highly recommend that you make some configurations right from the beginning.
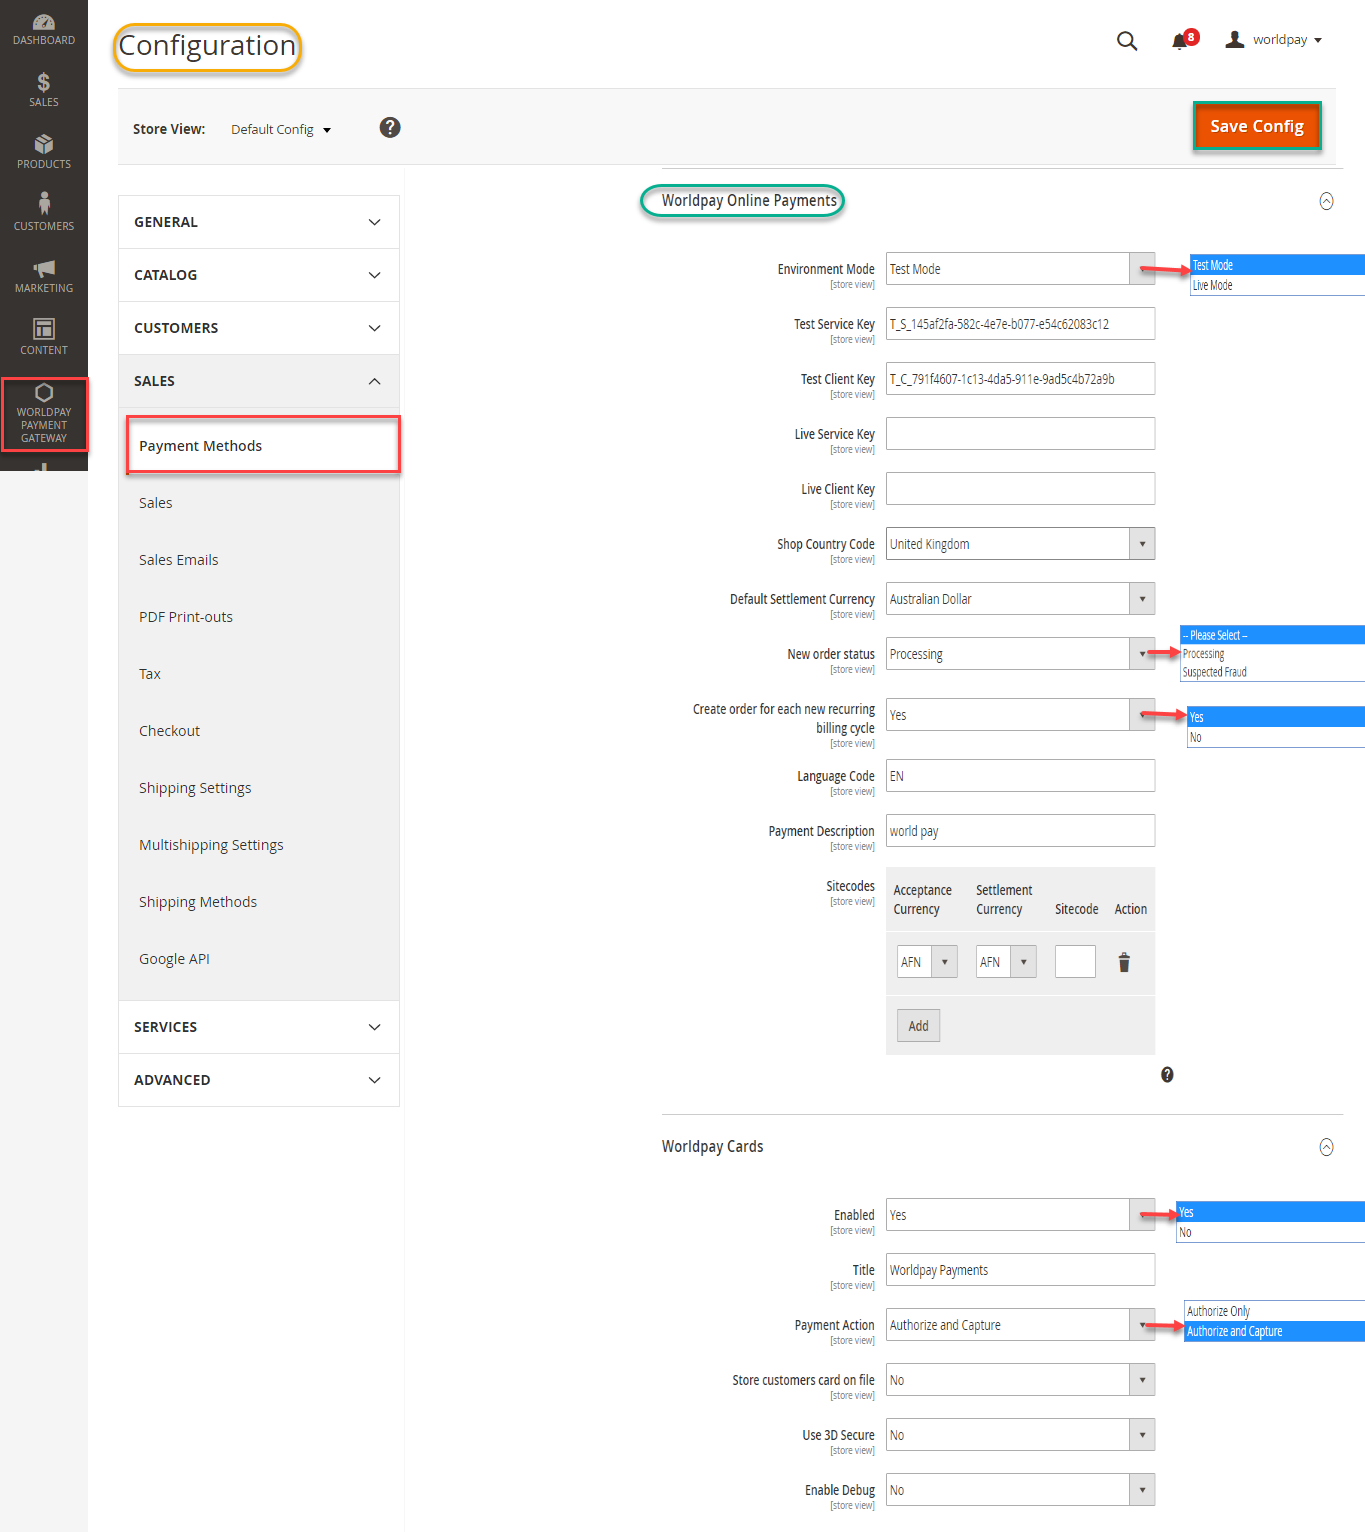
First of all, go to Backend of Magento 2 stores-> Worldpay Payment Gateway-> Settings
Then navigate to Worldpay Payment Gateway-> Settings->Payment Methods to install your payment methods
Merchant Country: you choose the country where the vendor lives
Default Settlement Currency: to make your payment successful, you must choose currency suitable with both merchant and customer. It is called as the default settlement currency
Sitecodes: a sitecode is a value that can be passed in the order request to differentiate between different sites you have. A “site” could be different websites you have or it could be the same website but different internal suppliers of the service
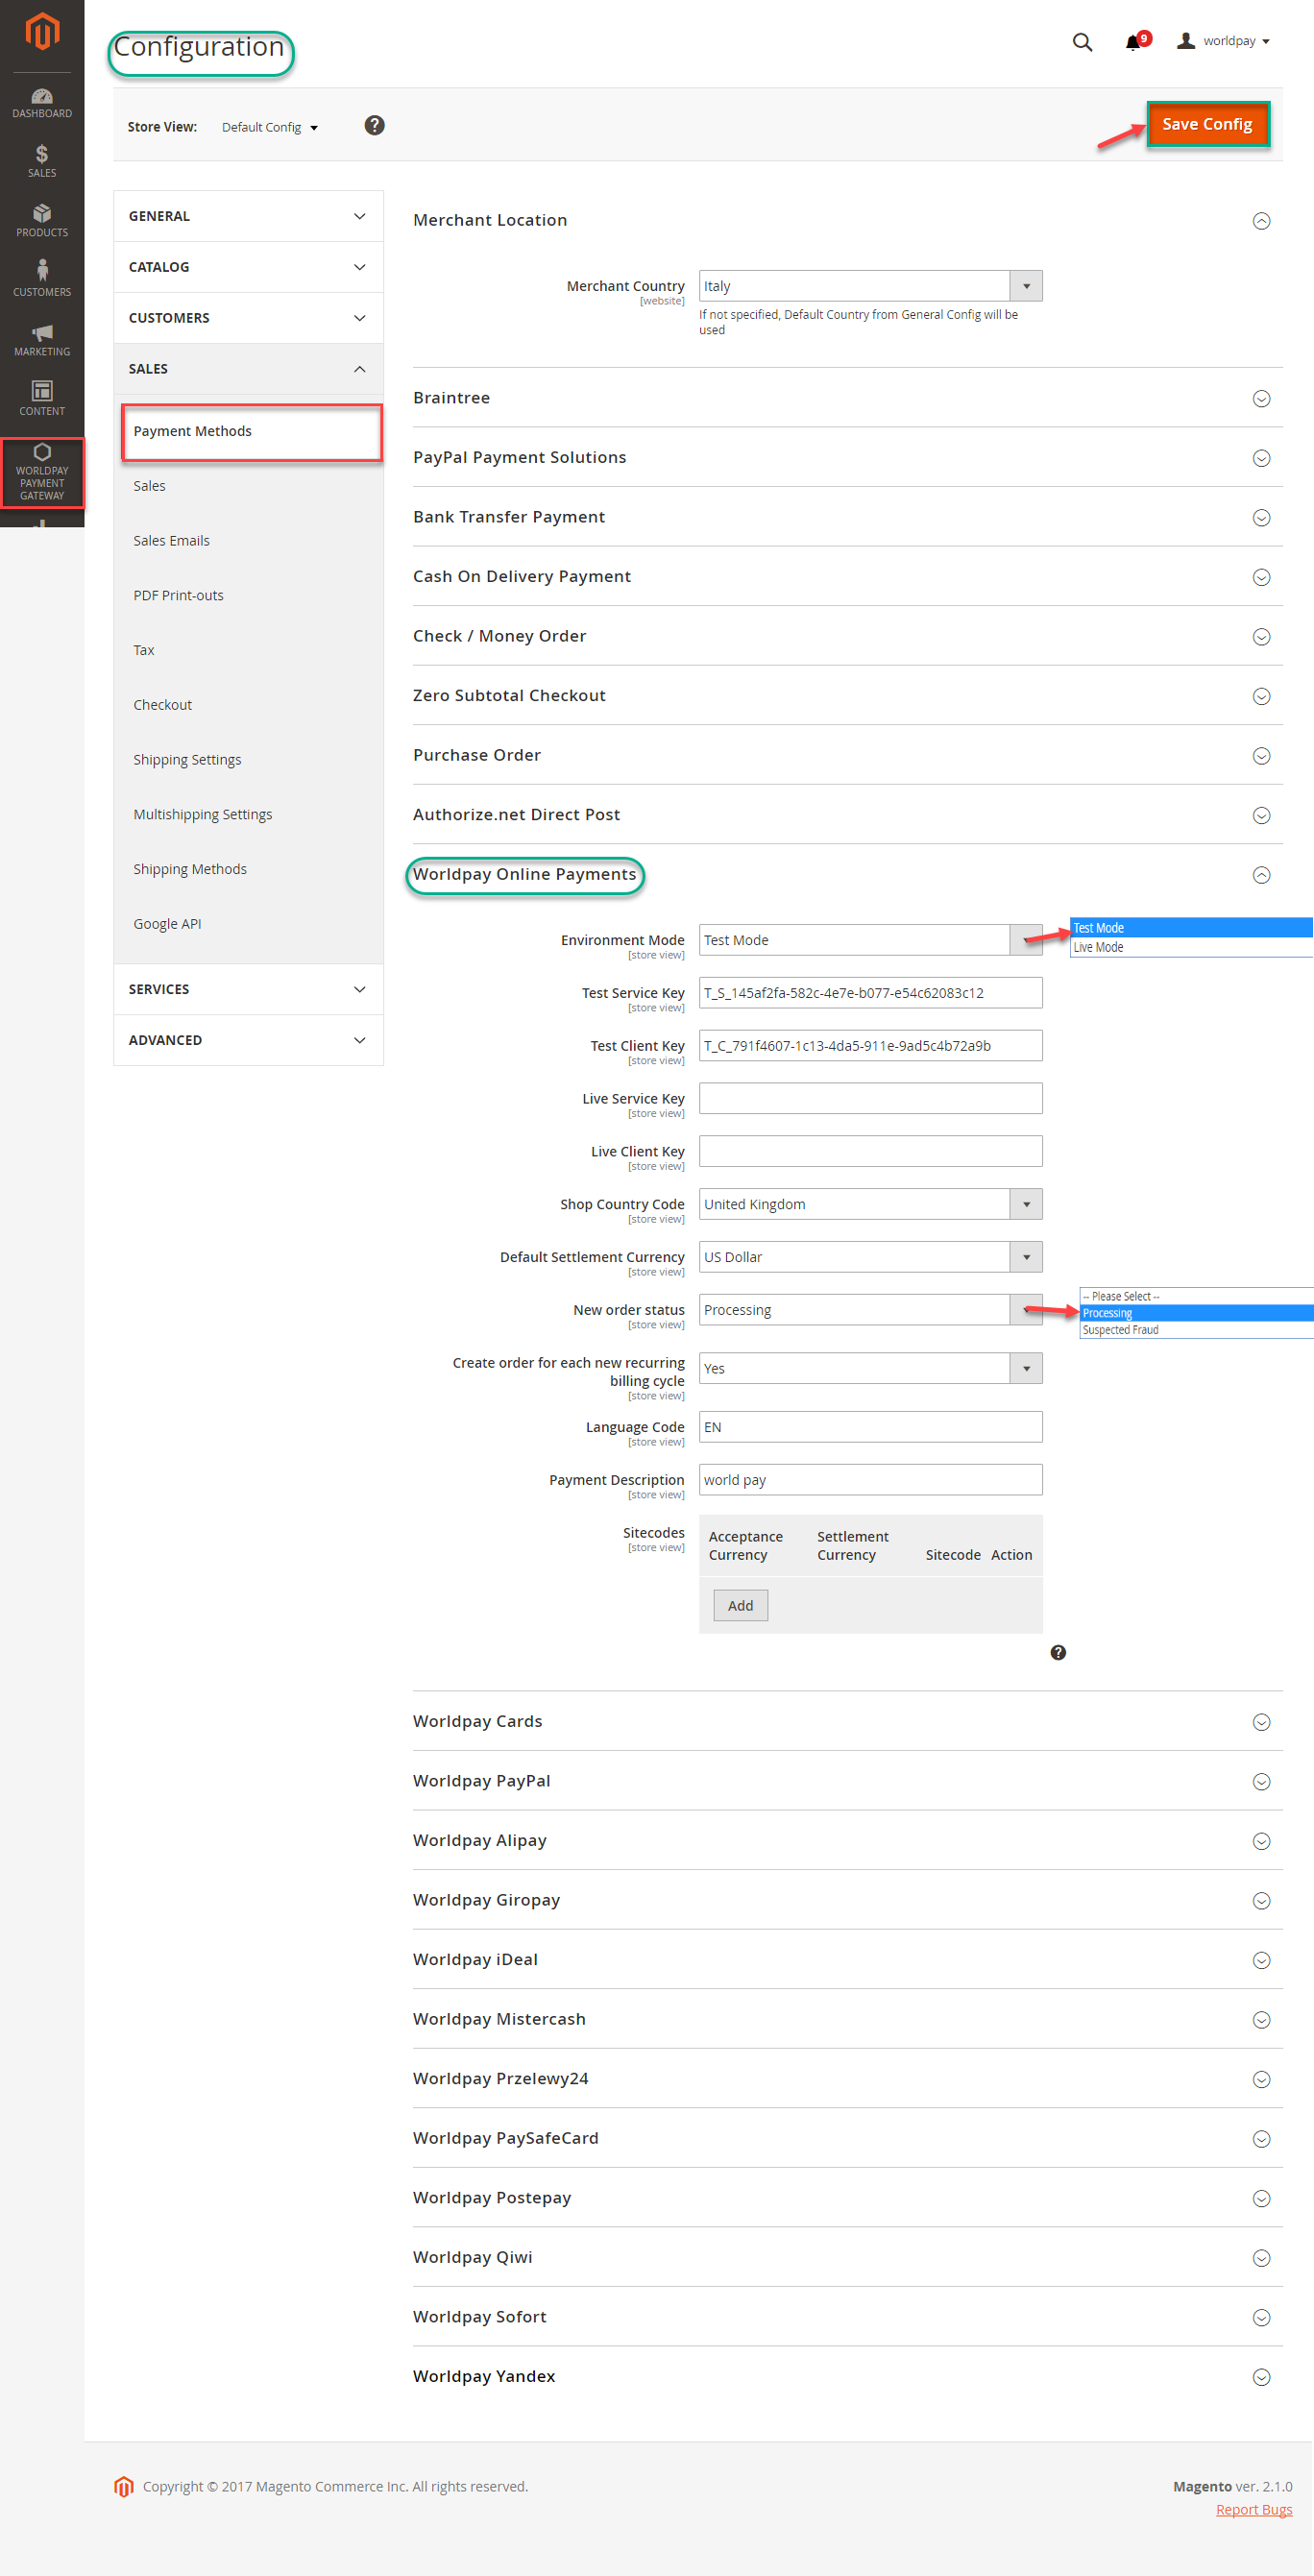
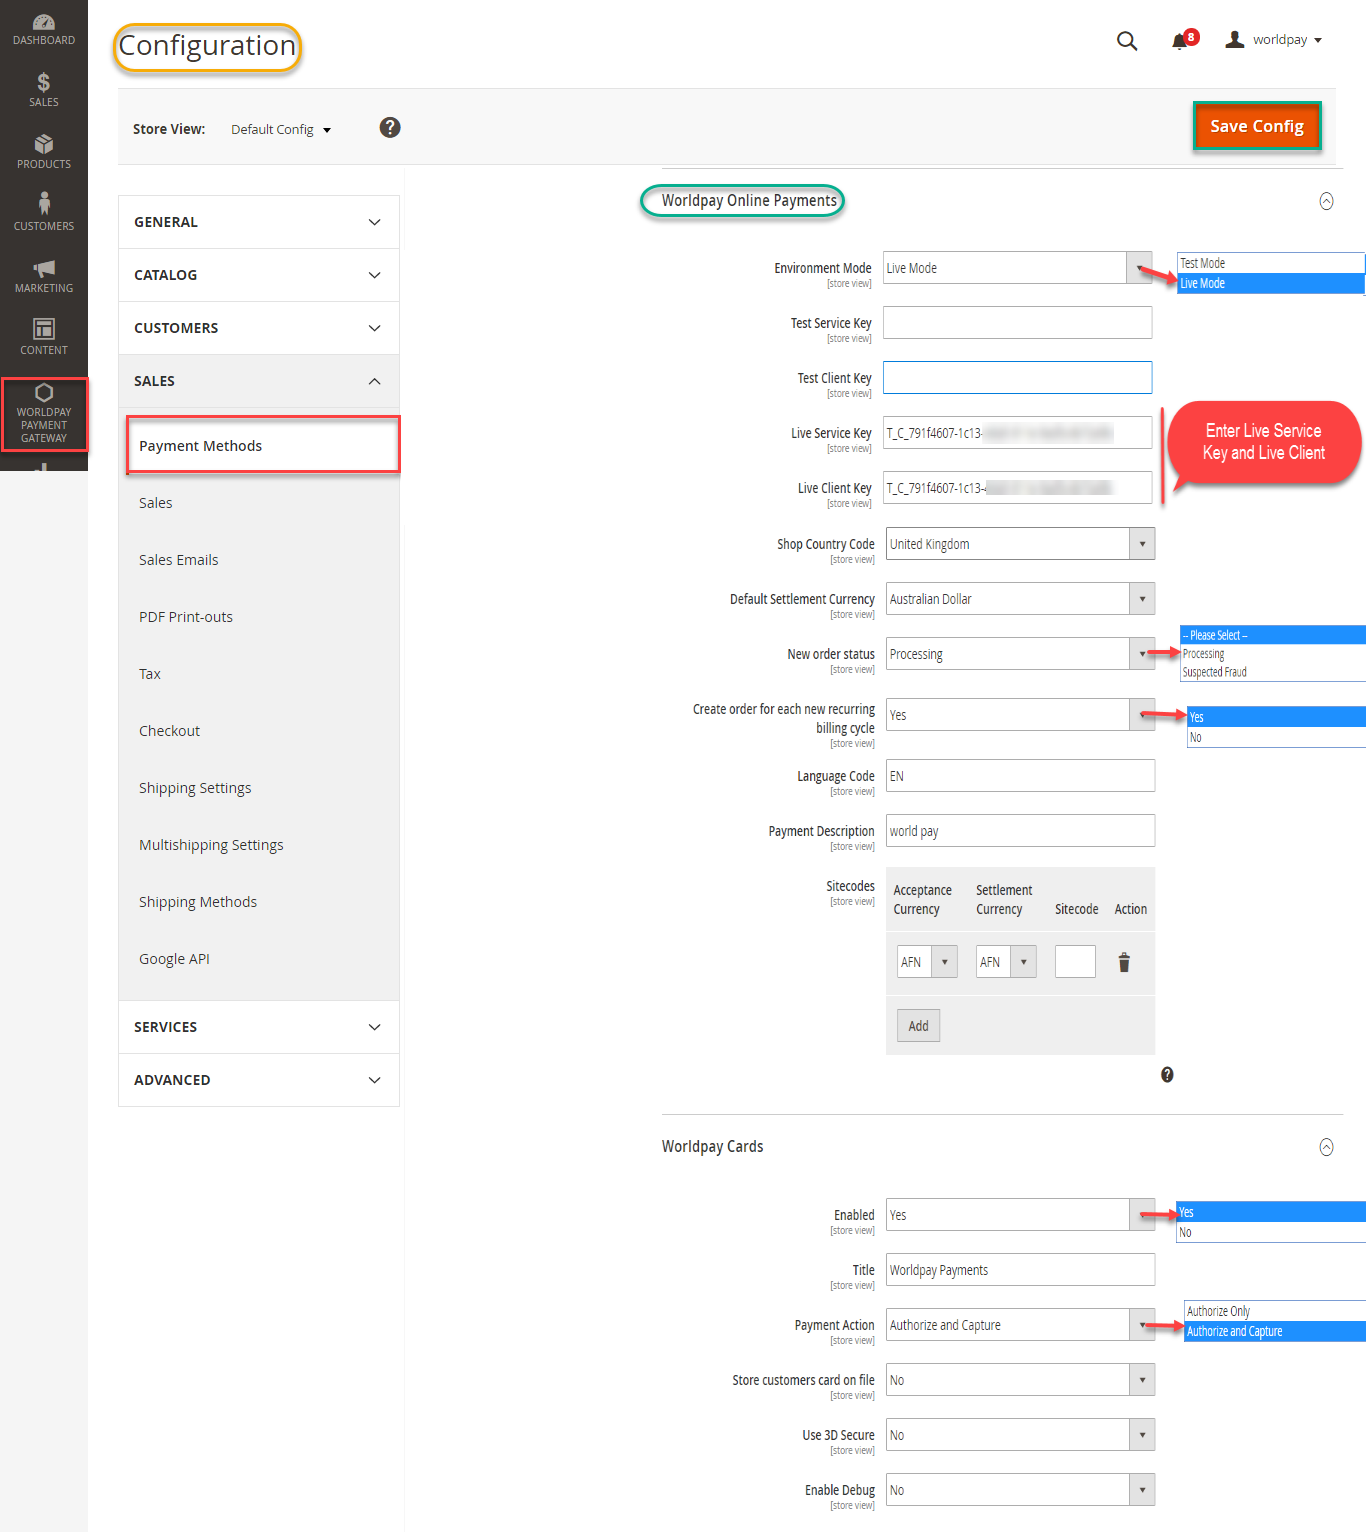
Worldpay Online Payments: you can set Test Mode or Live Mode dependent on environment that you consider.
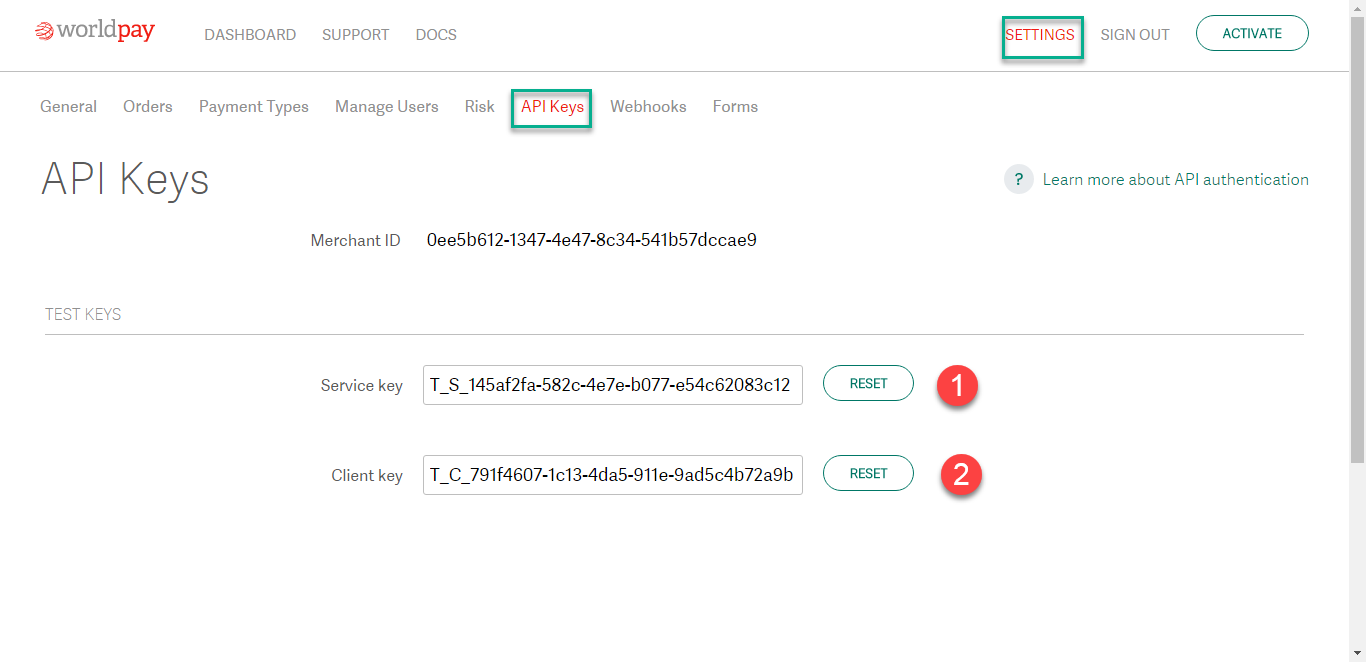
Next, enter Service Key and Client Key and update New order status and Create Order for each recurring billing code
and continue to install. Click Save Config button to finish.

In case, your environment is Test Mode:
In case, your environment is Live Mode:
Distinguishing between Authorize Only and Authorize Capture:
- Authorize only will check the card for validity but not charge the account until the order is approved and invoiced.
- Authorize and capture will charge the debit/credit card at the time of the order submission.
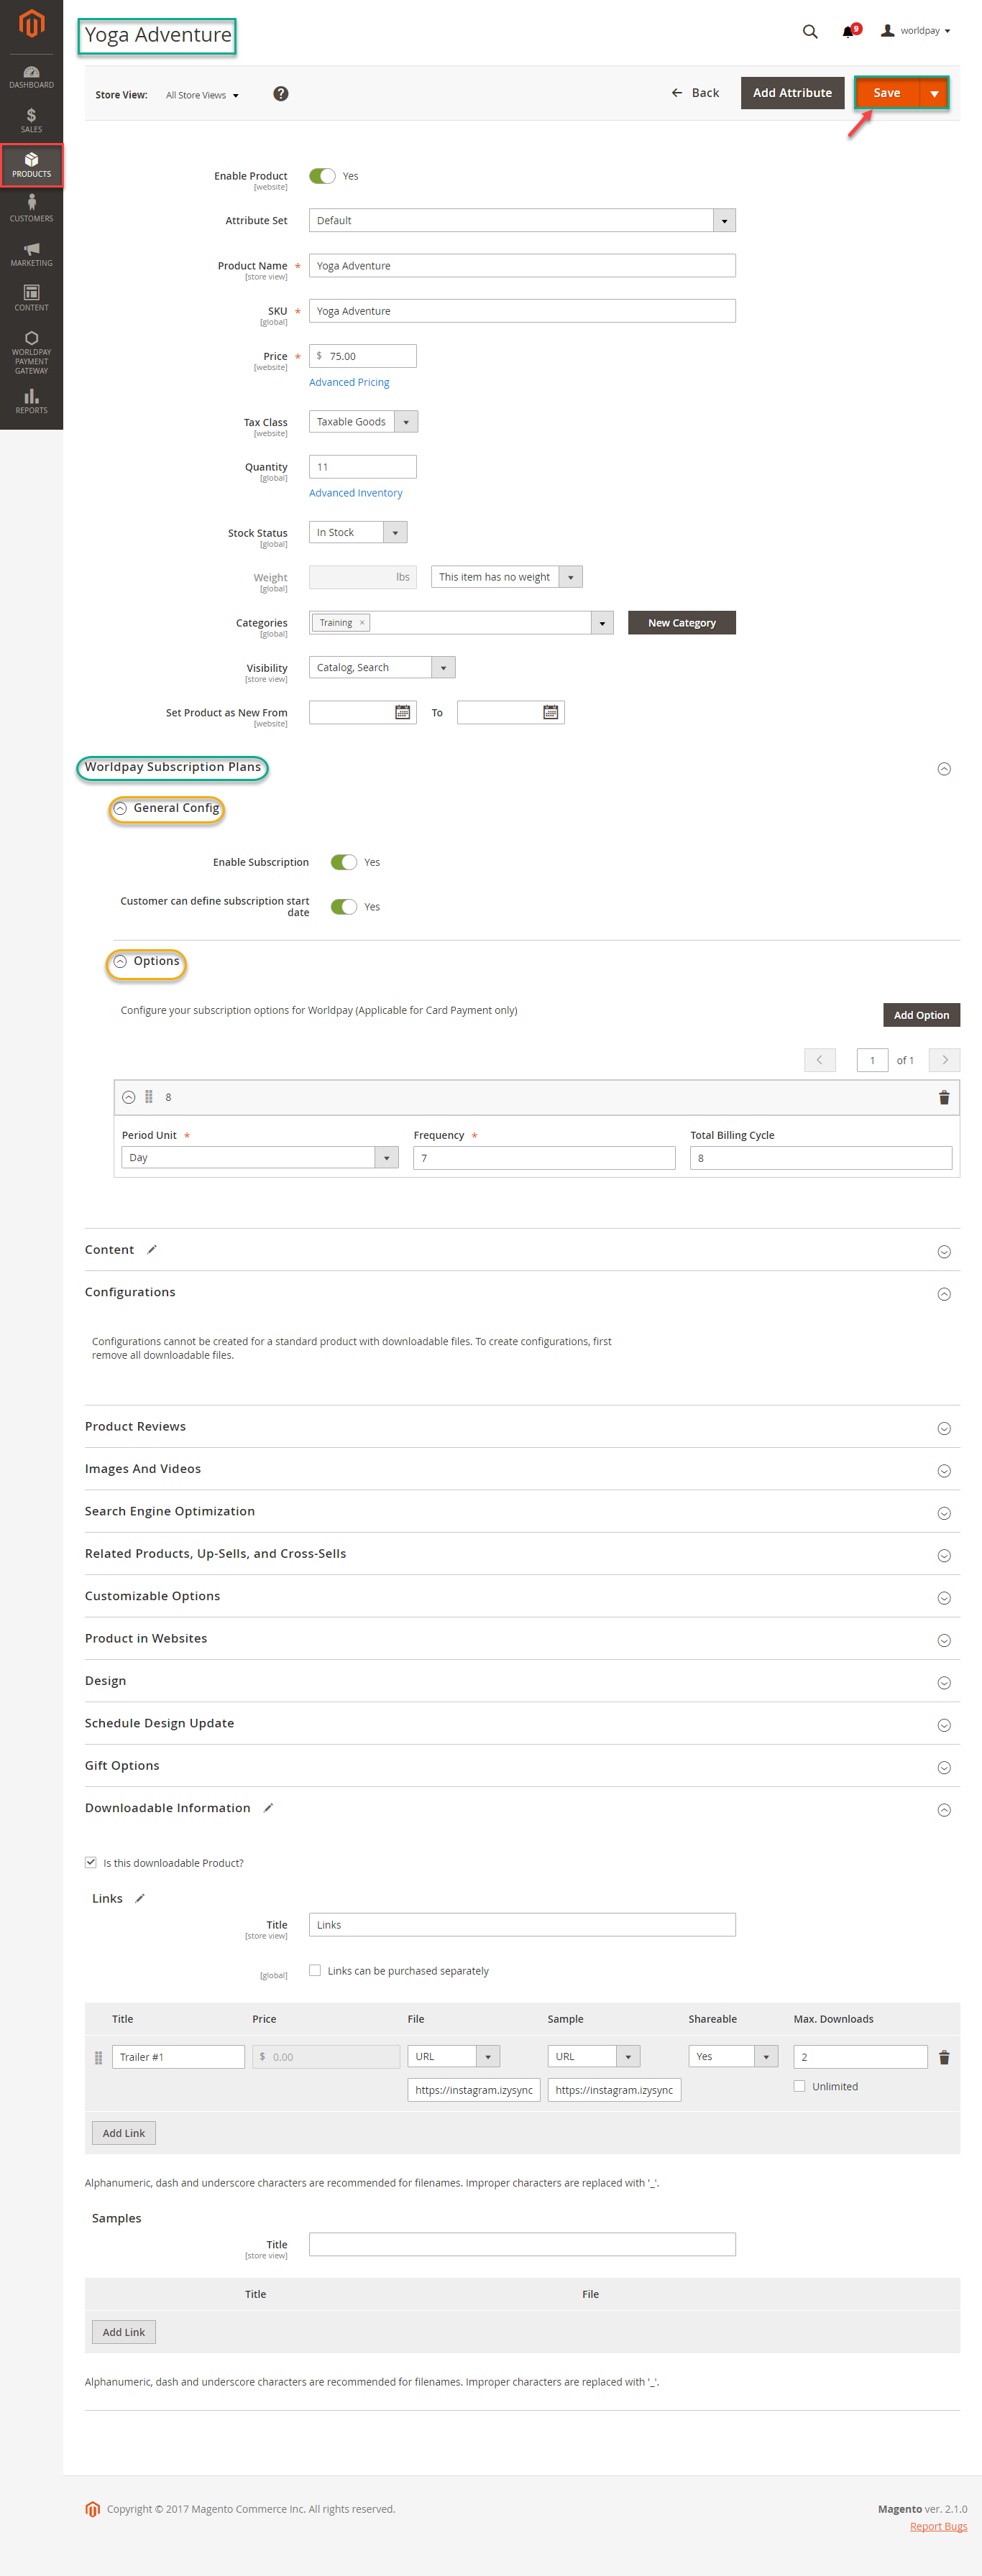
![]() To create Subscription for your product. You can log in backend of Worldpay Payment and Subscriptions and start some settings such as:
To create Subscription for your product. You can log in backend of Worldpay Payment and Subscriptions and start some settings such as:
Click on Products menu, choose product and enter information into compulsory fields.
Then click Worldpay Subscription Plans-> General Config: set Enable Subscription, Customer can define subscription start date in default mode: Yes
In Options menu, fill necessary information about period unit, frequency, total billing cycle for Subscription duration.
Period unit: is the duration of one cycle in a repeating product event
Frequency: the number of buying product cycles per unit time.
Total Billing Cycle: total the number of billings repeating in one cycle.
Finally, click on Save button to finish.
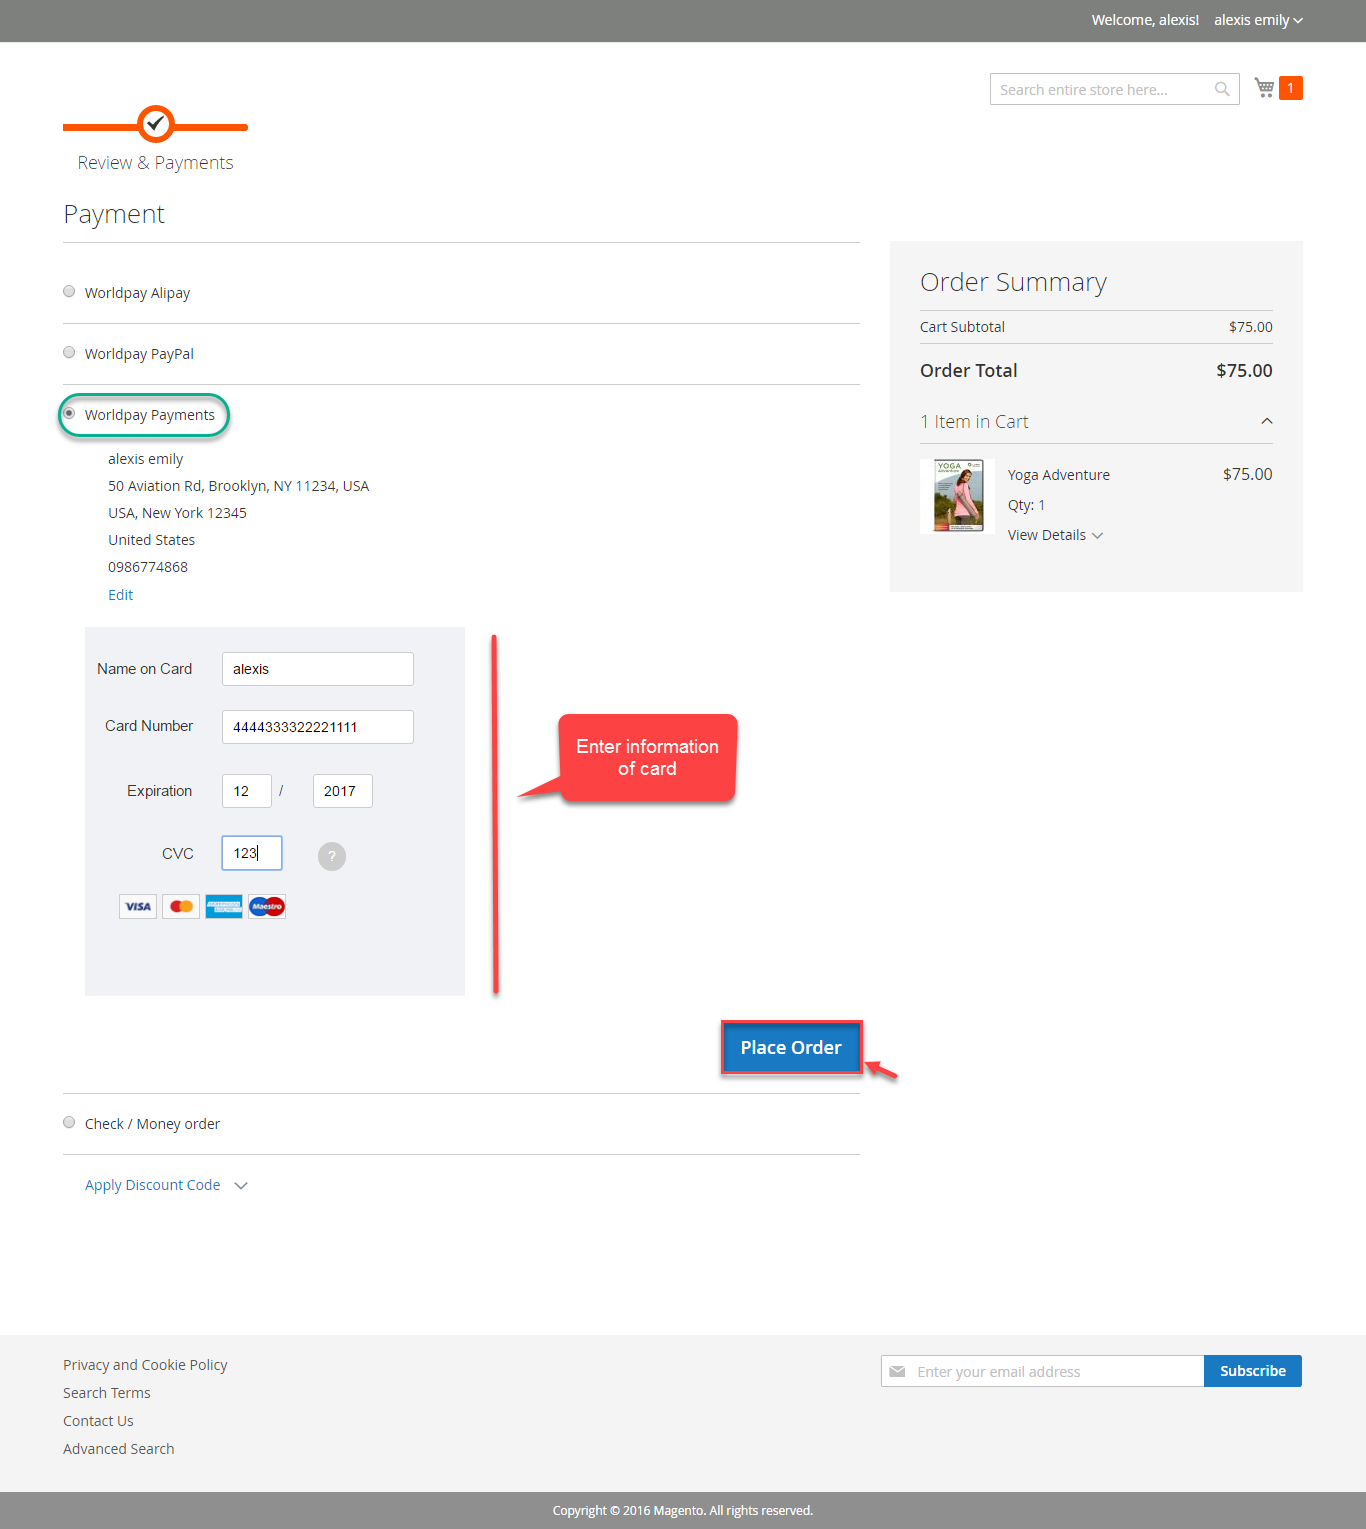
When you buy the product having subscriptions. Please remember choose Subscriptions duration in below after that product is added to cart.
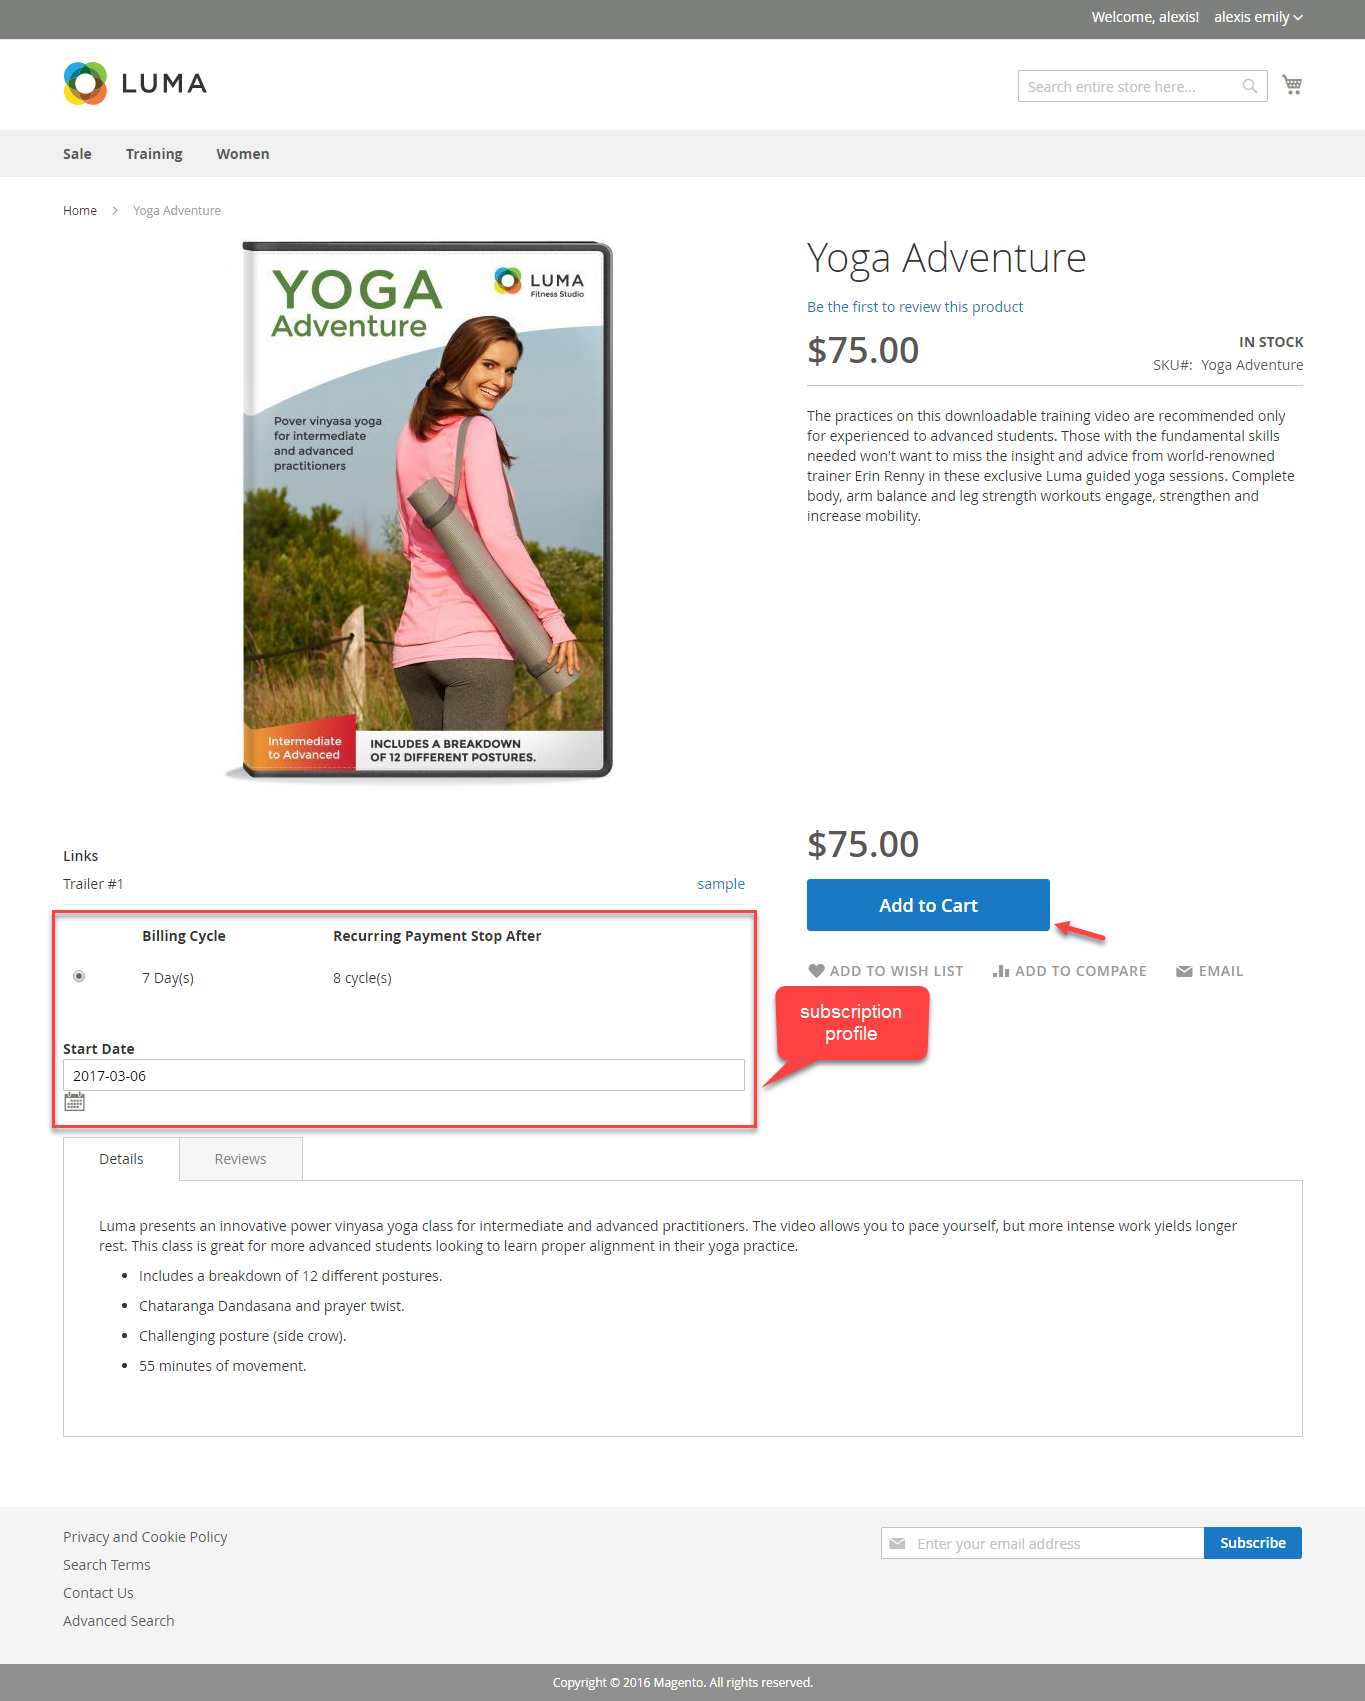
Then, go to checkout and select Worldpay Payments instead of Check/Money Order. Some steps are continued to complete transaction.
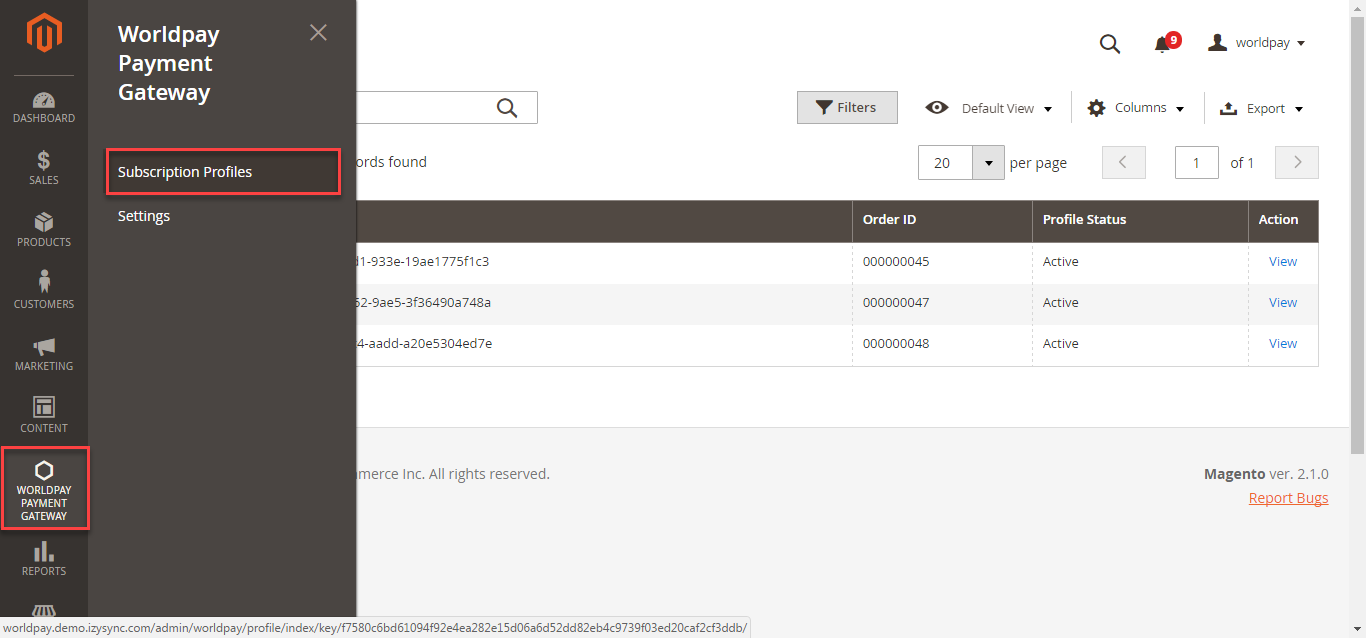
To review your Subscriptions. You click Worldpay Payment Gateway-> Subscription Profiles:
Tick on Token and click View to see detail information about Token and Subscriptions: 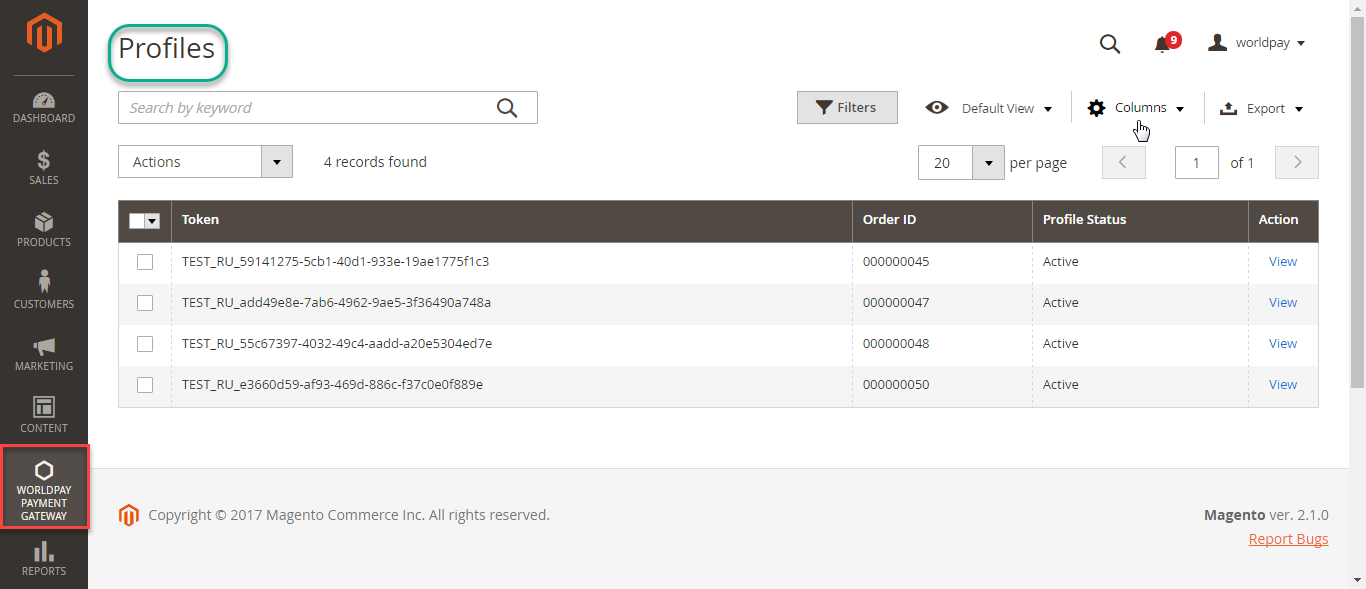
![]() If you want to refund, you should do below step:
If you want to refund, you should do below step:
On the Dashboard menu, click Sales->Orders. Choose one order and click View 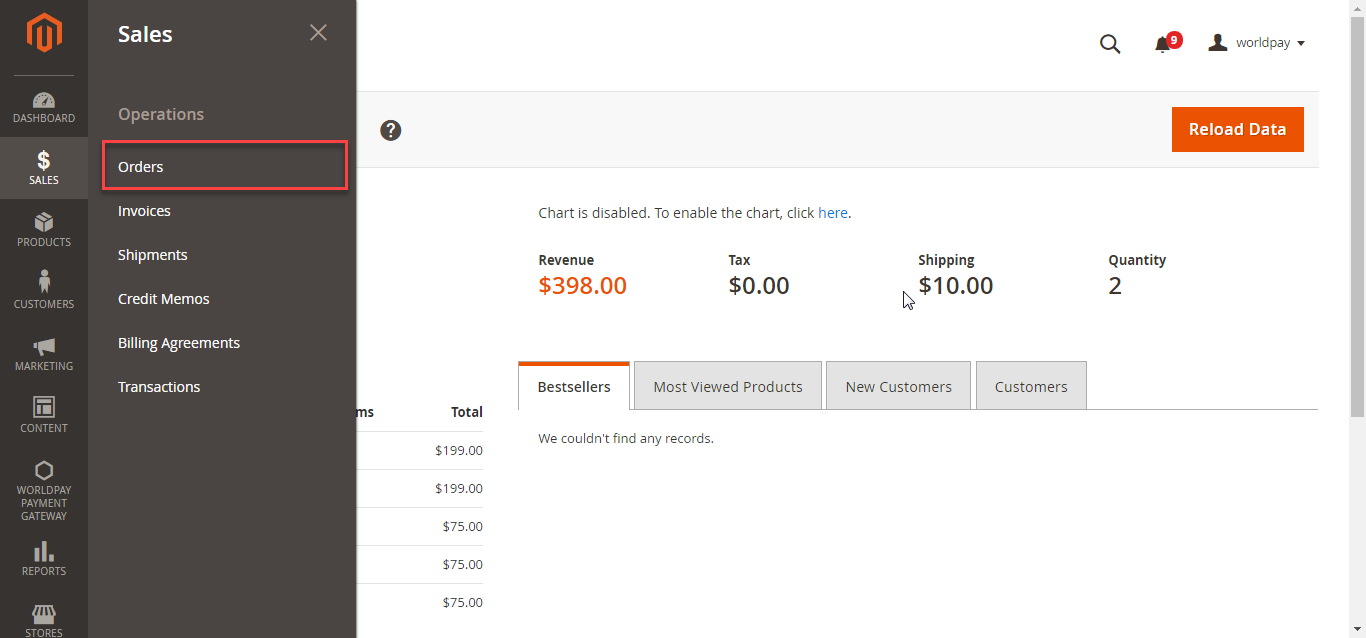 In Order View, click Invoices and choose Credit Memo
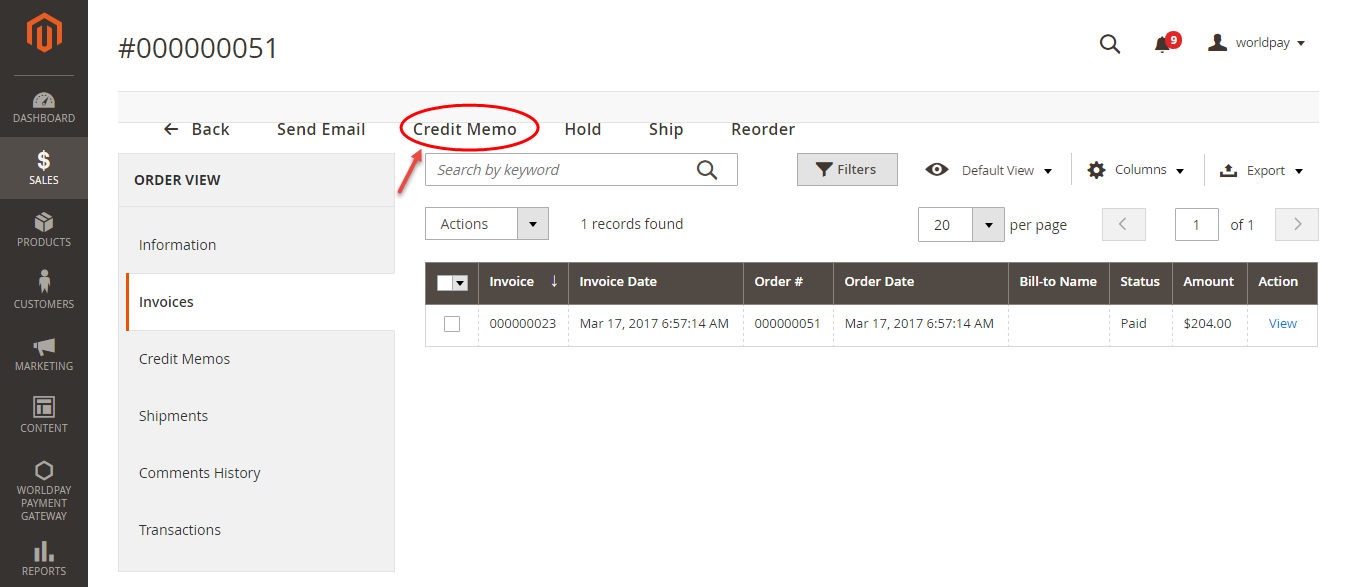
Appearing New Memo page:
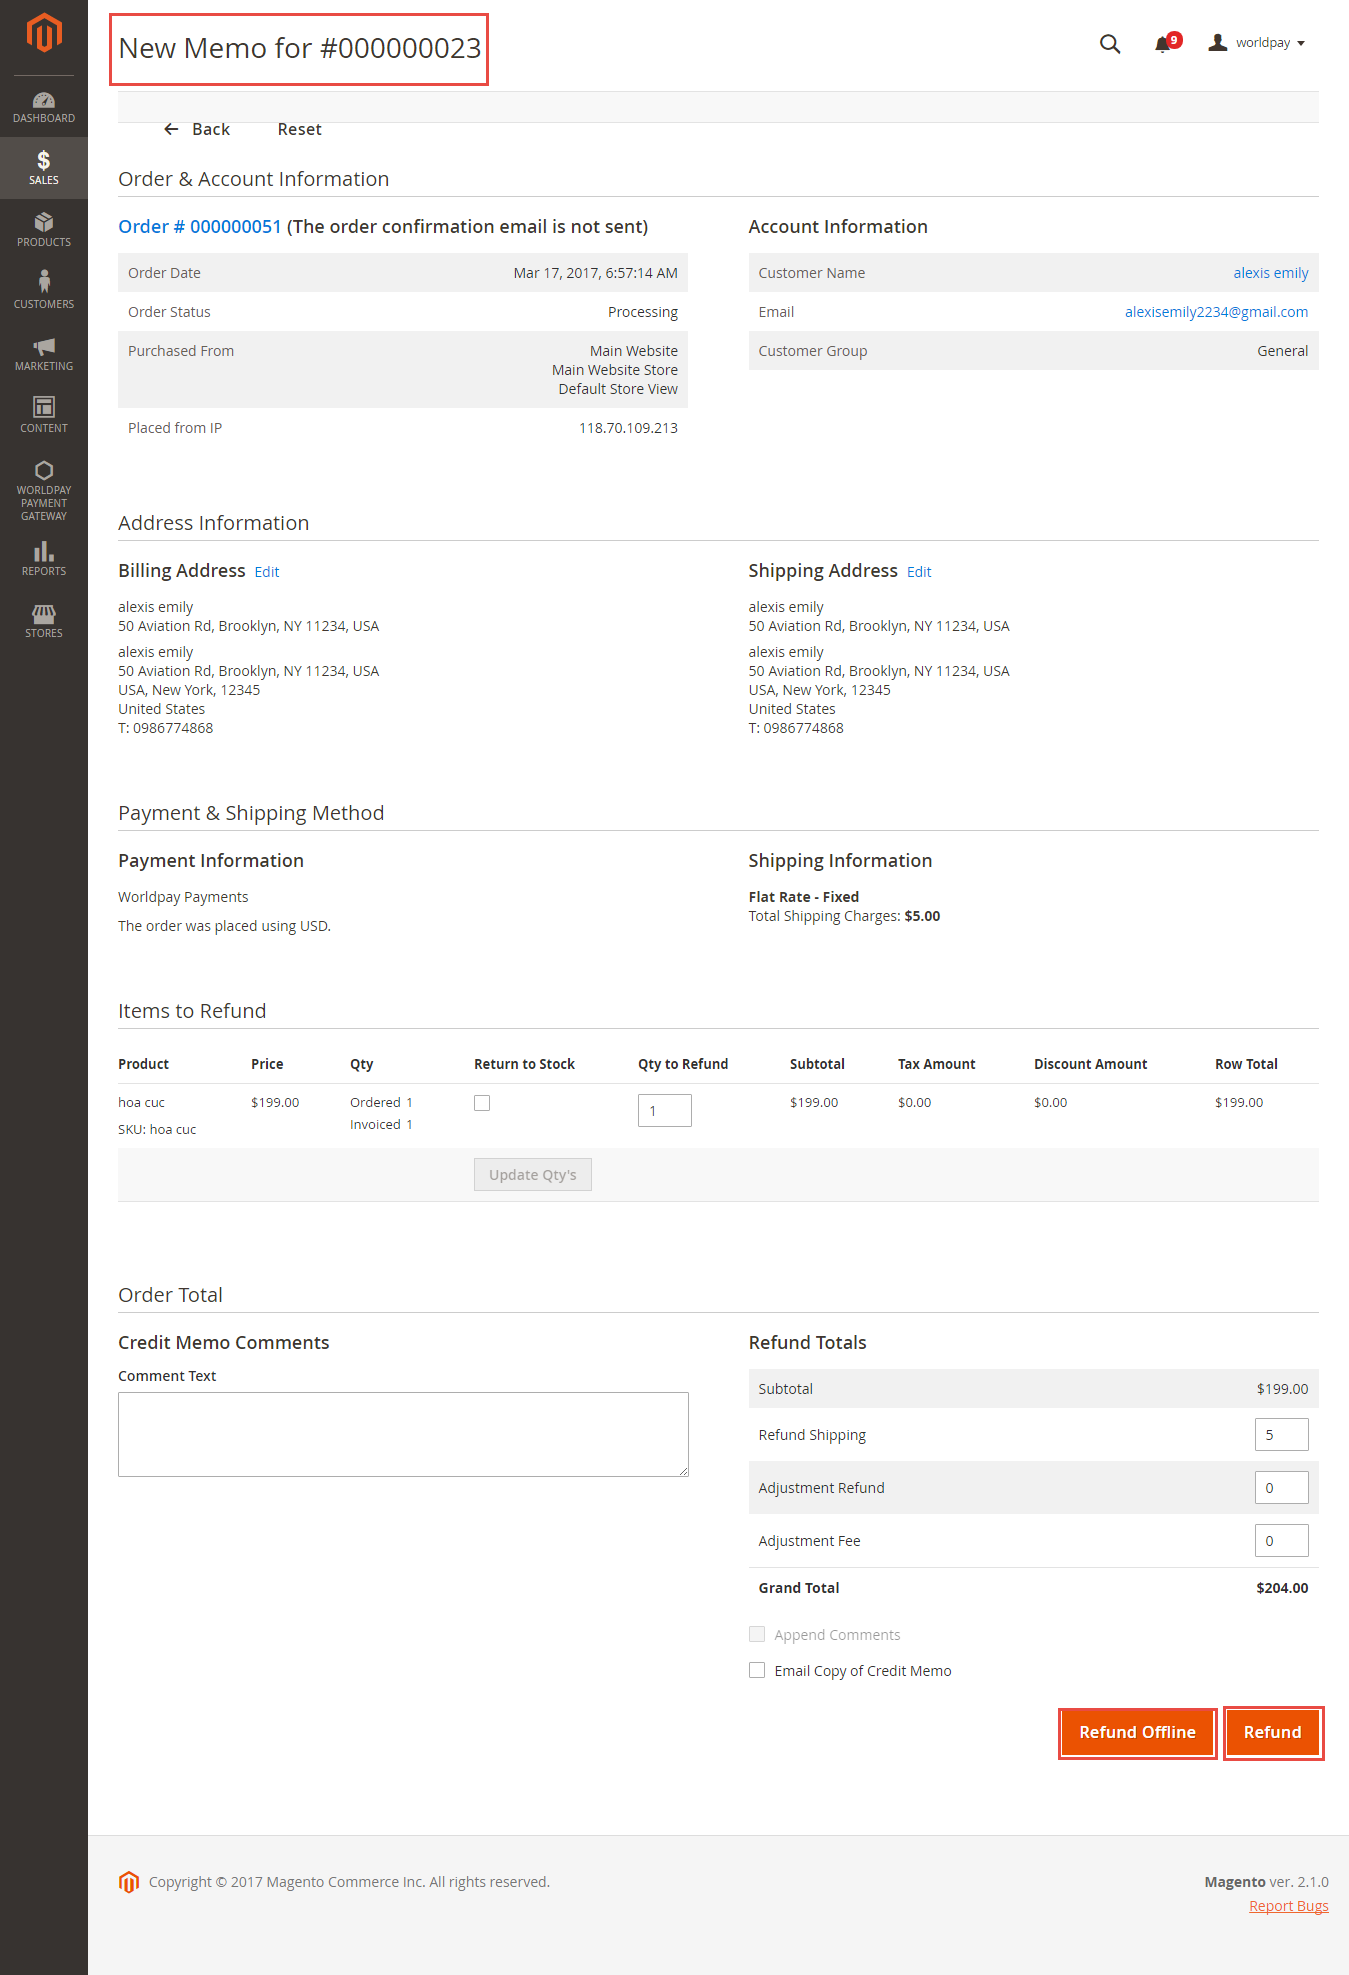
You can click Refund Offline or Refund dependent on your request. Refund successfully!
Note:
All of the payment's process operate in Worldpay 's payment site, not in Magento.
Set up Synchronization
Admins are able to decide whether to synchronize data in Synchronization Settings tab: Customers, Products(Items in Xero), Orders, Invoices, Credit Memos. In addition, admins can choose the way to synchronize data between Immediately mode and Cron Job mode. Admins can click on Add All Customers To Queue button to add all existed customer data to queue. It is the same with Products(Item in Xero), Orders, Invoices, Credit Memos tab.
How to distinguish between Immediately mode and Cron Job mode.
- Immediately mode: the data will be synced as soon as they're created or updated.
- Cron Job: the data will be queued and will be synced together in some minutes.
Some application mode like private mode only allows 1000 requests a day. Choosing Cron Job will guarantee all data will be synced. We recommend you should use Cron Job mode to make sure that you don't run out of request per day.
At the end of Configuration, admins can use "Add All Data To Queue" button to add all existed data to Queue, including Customers, Products, Orders, Invoices, Credit Memos.
Process Synchronization
If the App mode is Cron Job, Queue page is the place which the created, updated data is stored in and are waiting to be synced. If you wish to sync data right away, you can press Sync Now button.
Note that synchronizing will take some time, the length of time depends on the size of database.
When the process is done, go to Xero Integration > View Log check what is synced in the grid.
- If the data is synced right, the Status will be success and the Message will be "OK"
- If there's a problem during syncing process, the Status will be error and the Message tab will show the error message like the record below.
Moreover, admin can easily check the synchronization with View Request Daily button and View On Xero button.
Navigate to Xero Integration > Request Daily Report, admins can easily follow their sychronization status.
Main Functions
...
Or you can click on Sync Now button of each customer to synchronize a specific customer data manually.
...
- Orders
Admins can synchronize a specific order by manually, click on Sync Now button on each order.
- Products
For each product, this extension created Xero Integration tab that allows admins to synchronize a specific product to Xero.
- Invoices + Credit Memos:
Synchronizing a specific data is the same with Invoice.
...
...
Update
- When a new update is available, we will provide you with a new package containing our updated extension.
- You will have to delete the module directory and repeat the installing steps above.
- Flush the config cache. Your store and newly installed module should be working as expected.
...
Support
- We will reply to support requests after 2 business days.
- We will offer lifetime free update and 6 months free support for all of our paid products. Support includes answering questions related to our products, bug/error fixing to make sure our products fit well in your site exactly like our demo.
- Support DOES NOT include other series such as customizing our products, installation and uninstallation service.
...
...
Once again, thank you for purchasing our extension. If you have any questions relating to this extension, please do not hesitate to contact us for support.Magenest