| Table of Contents |
|---|
...
Introduction
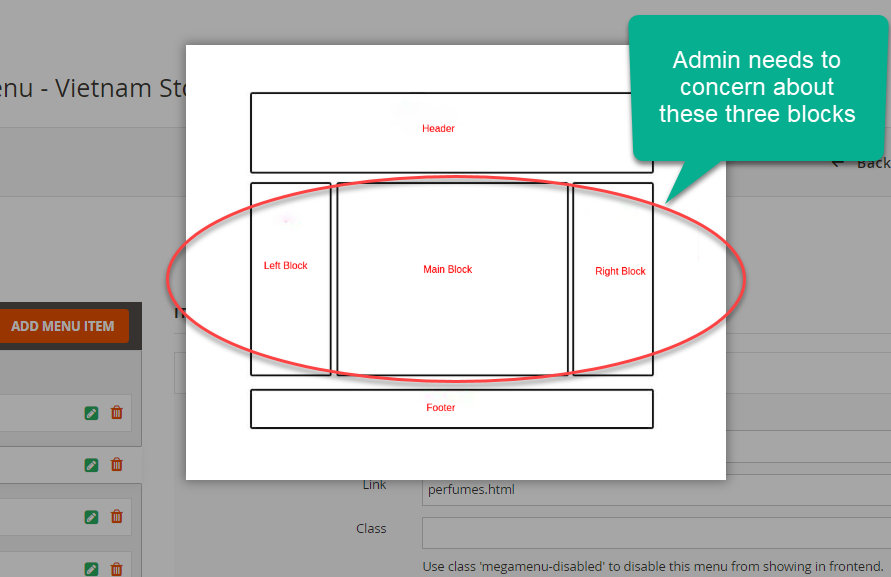
This is the default menu structure. Admin needs to concerns about the three blocks in the middle. In a menu section, if the right block is disabled, the left block and main block will display on the menu section as normal. In this case, the main block will display on the right side.
Navigation
Menu
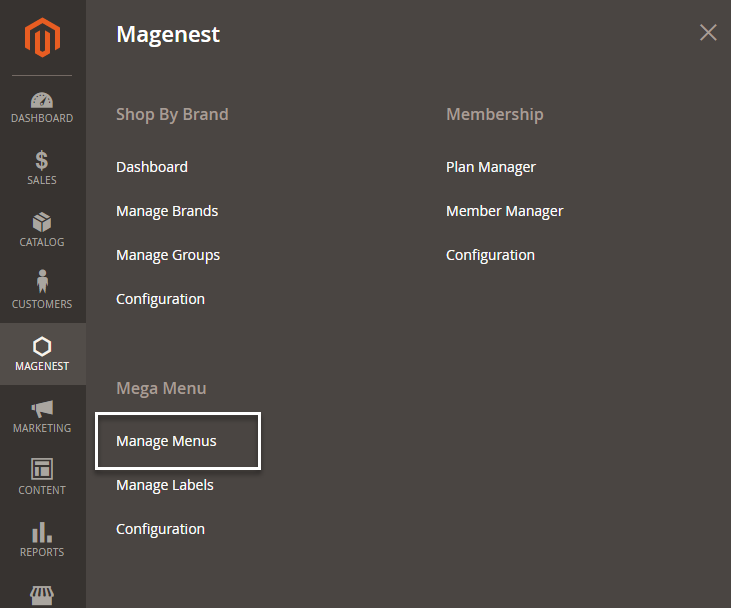
![]() On the admin sidebar, go to Magenest > Mega Menu > Manage Menus.
On the admin sidebar, go to Magenest > Mega Menu > Manage Menus.
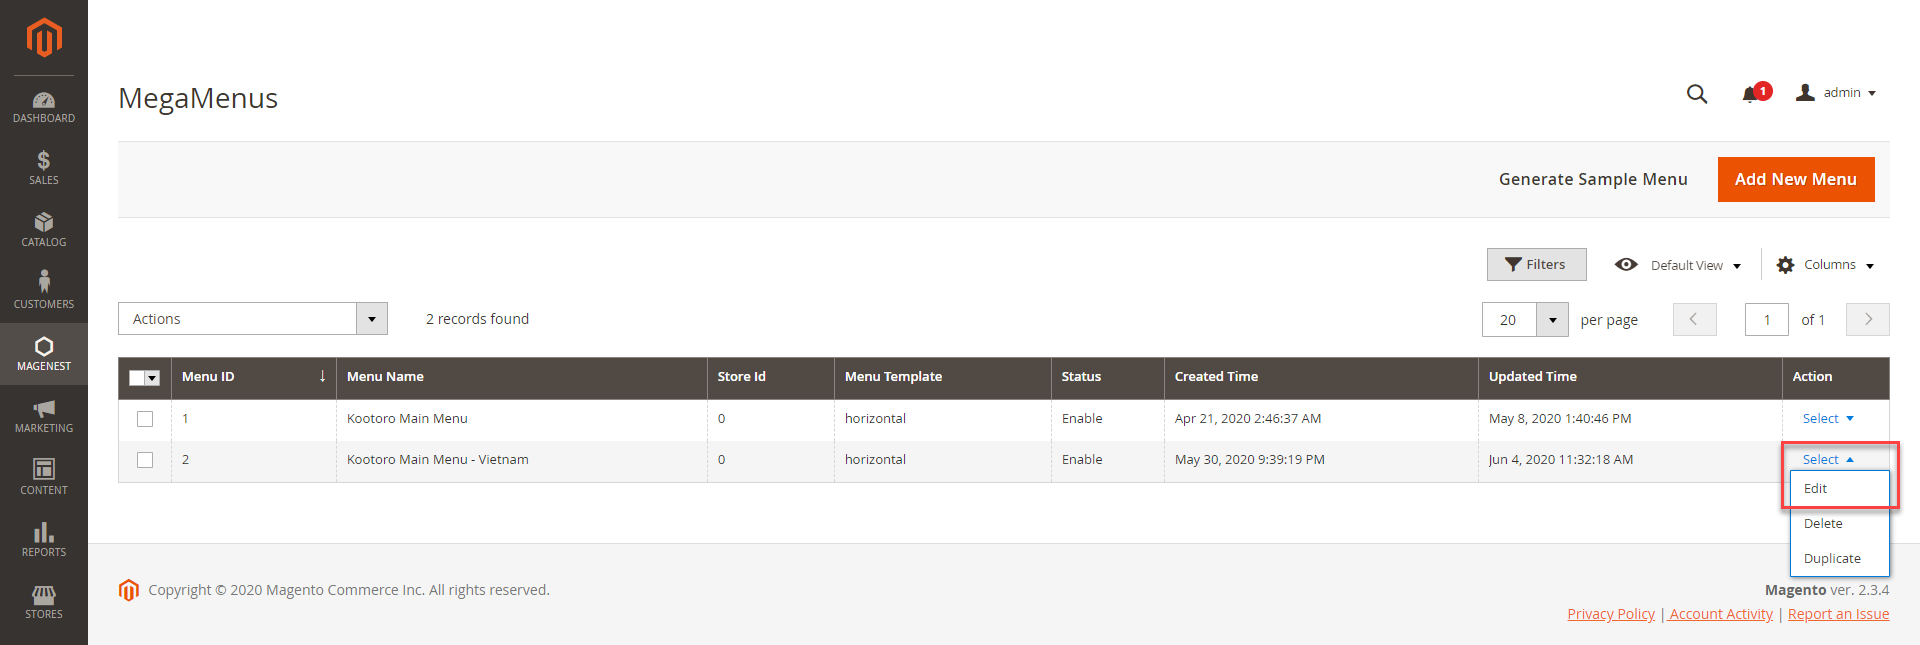
![]() On the MegaMenus page, select the menu to edit. On the Action column, click on Select > Edit.
On the MegaMenus page, select the menu to edit. On the Action column, click on Select > Edit.
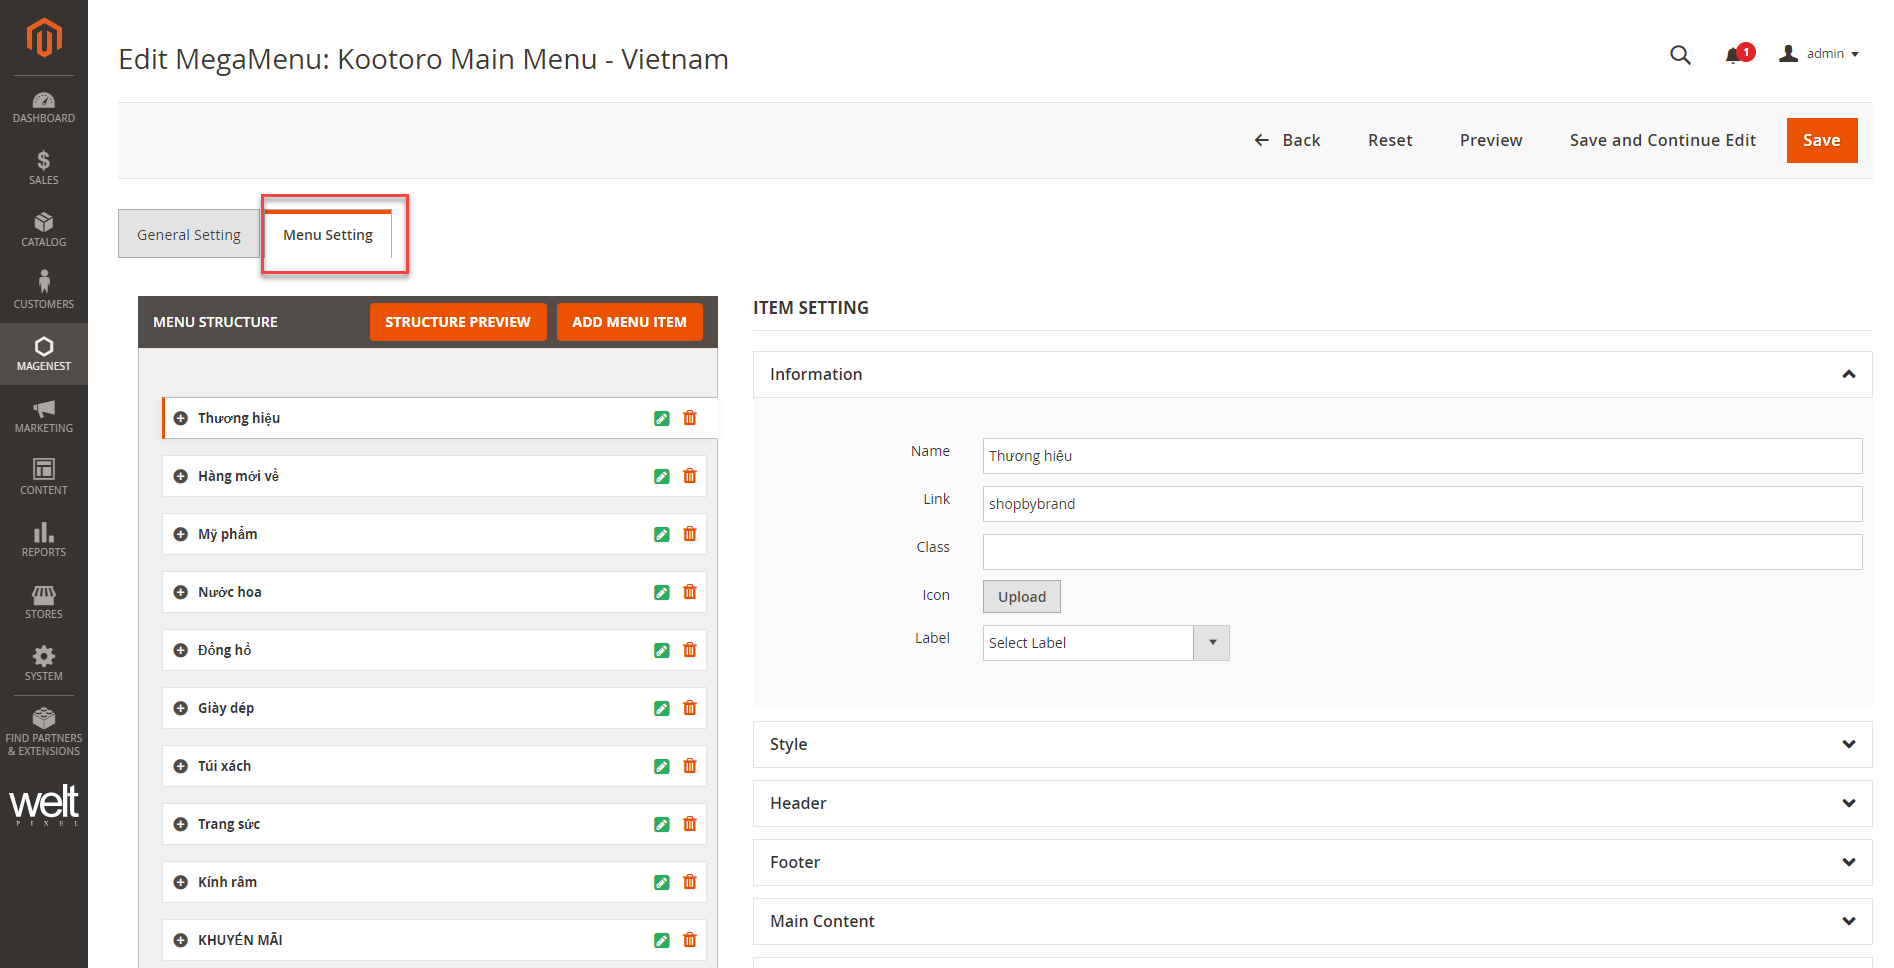
![]() On the menu details page, open Menu Setting section to edit.
On the menu details page, open Menu Setting section to edit.
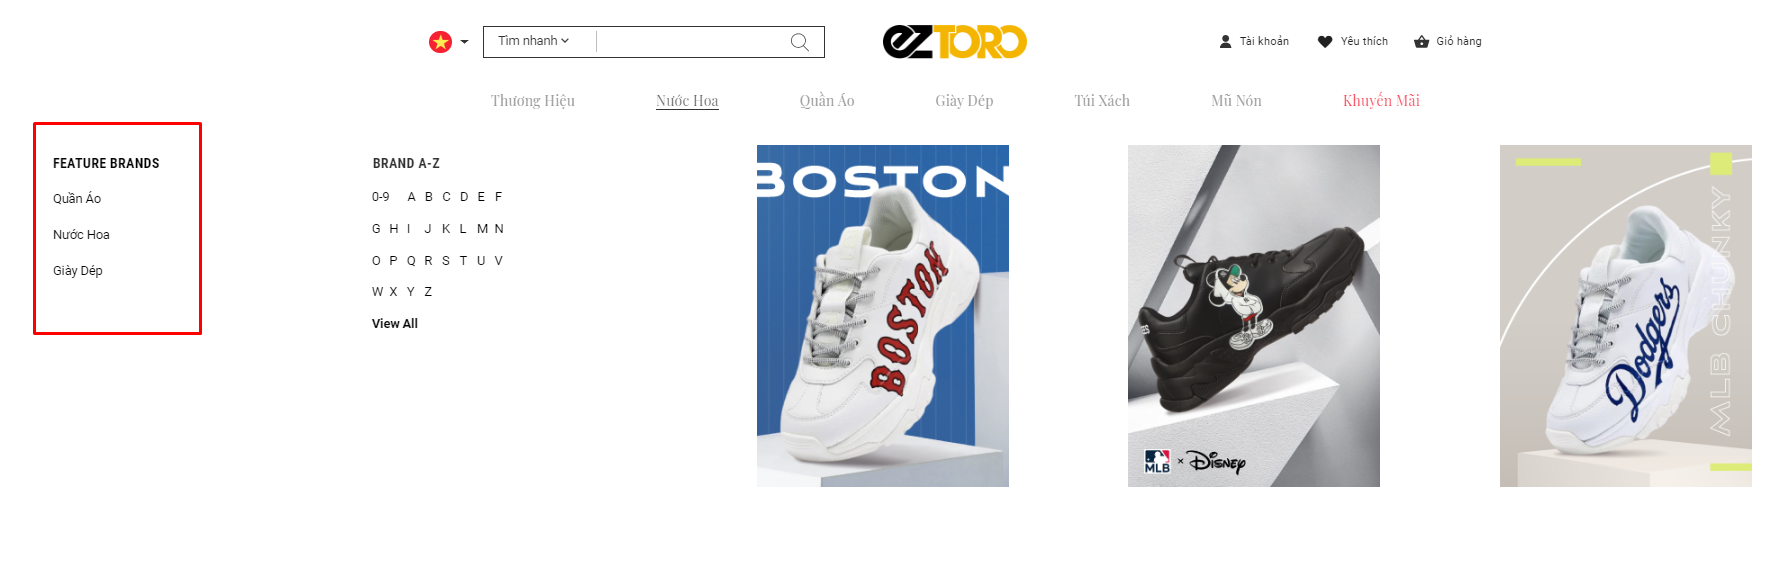
Inset link in Brand A-Z section
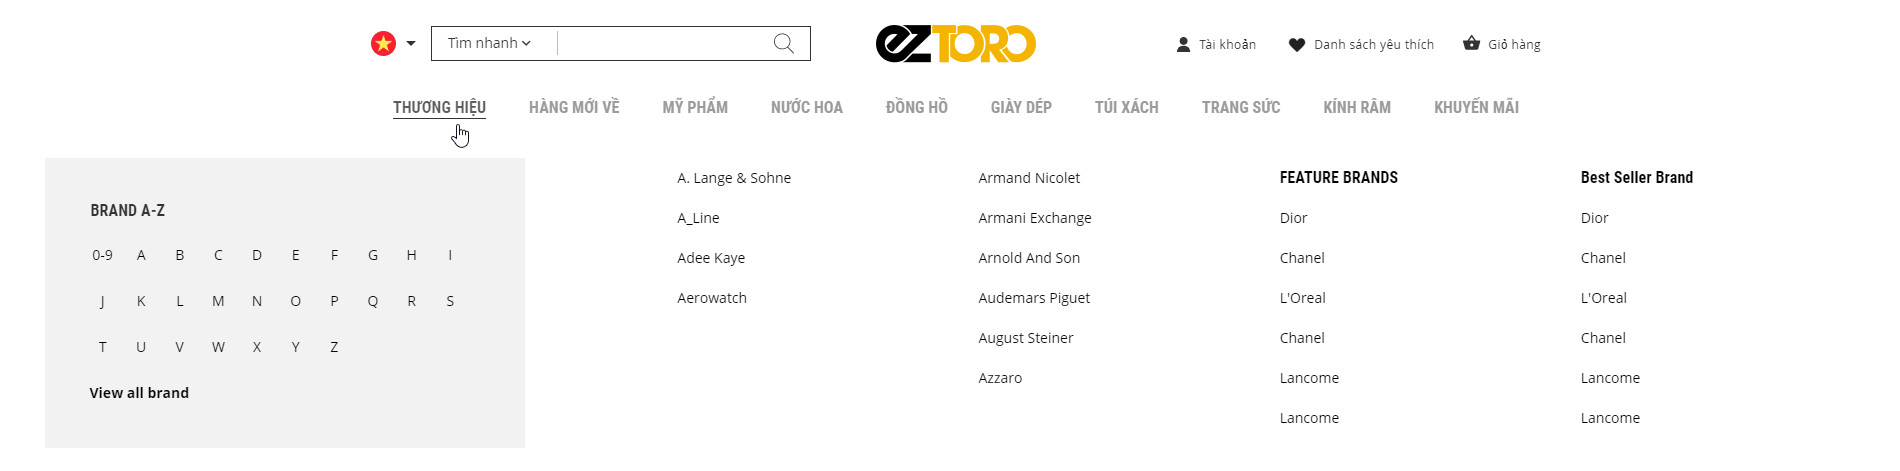
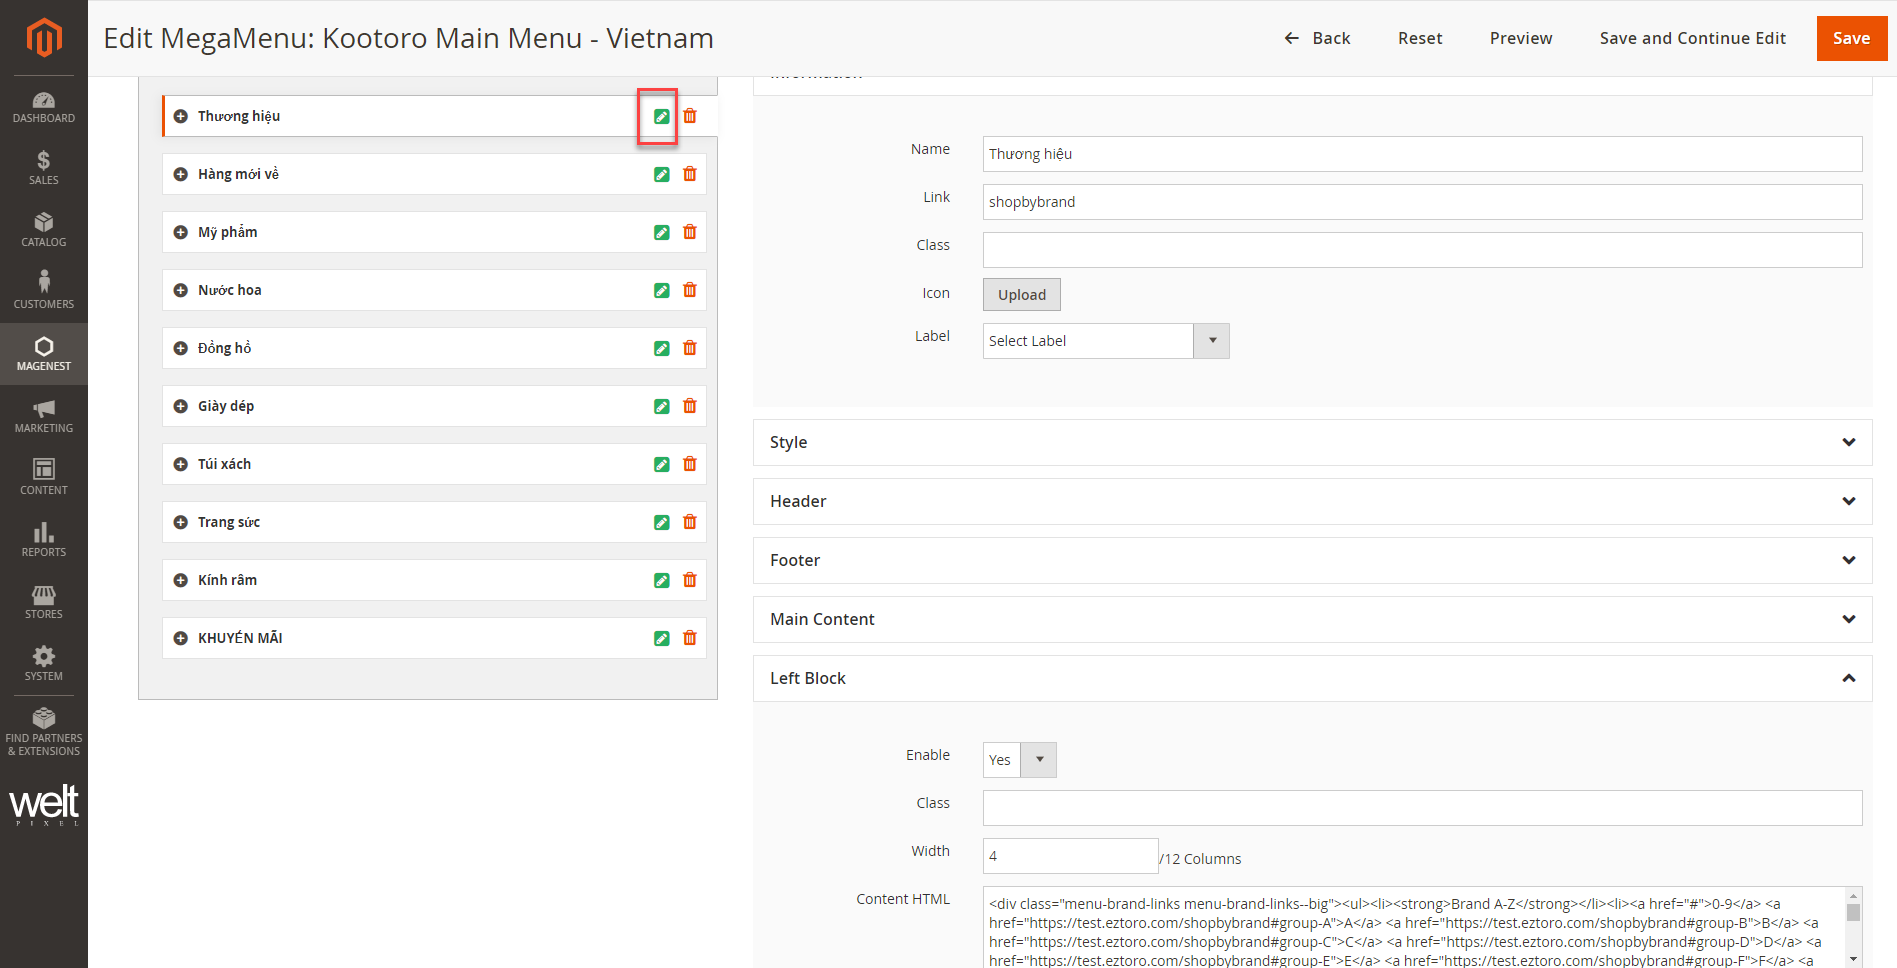
- On the menu items list, find brand menu, then click on Edit icon.
- Expand Left Block section, double click on HTML Content, open the content-edit pop-up.
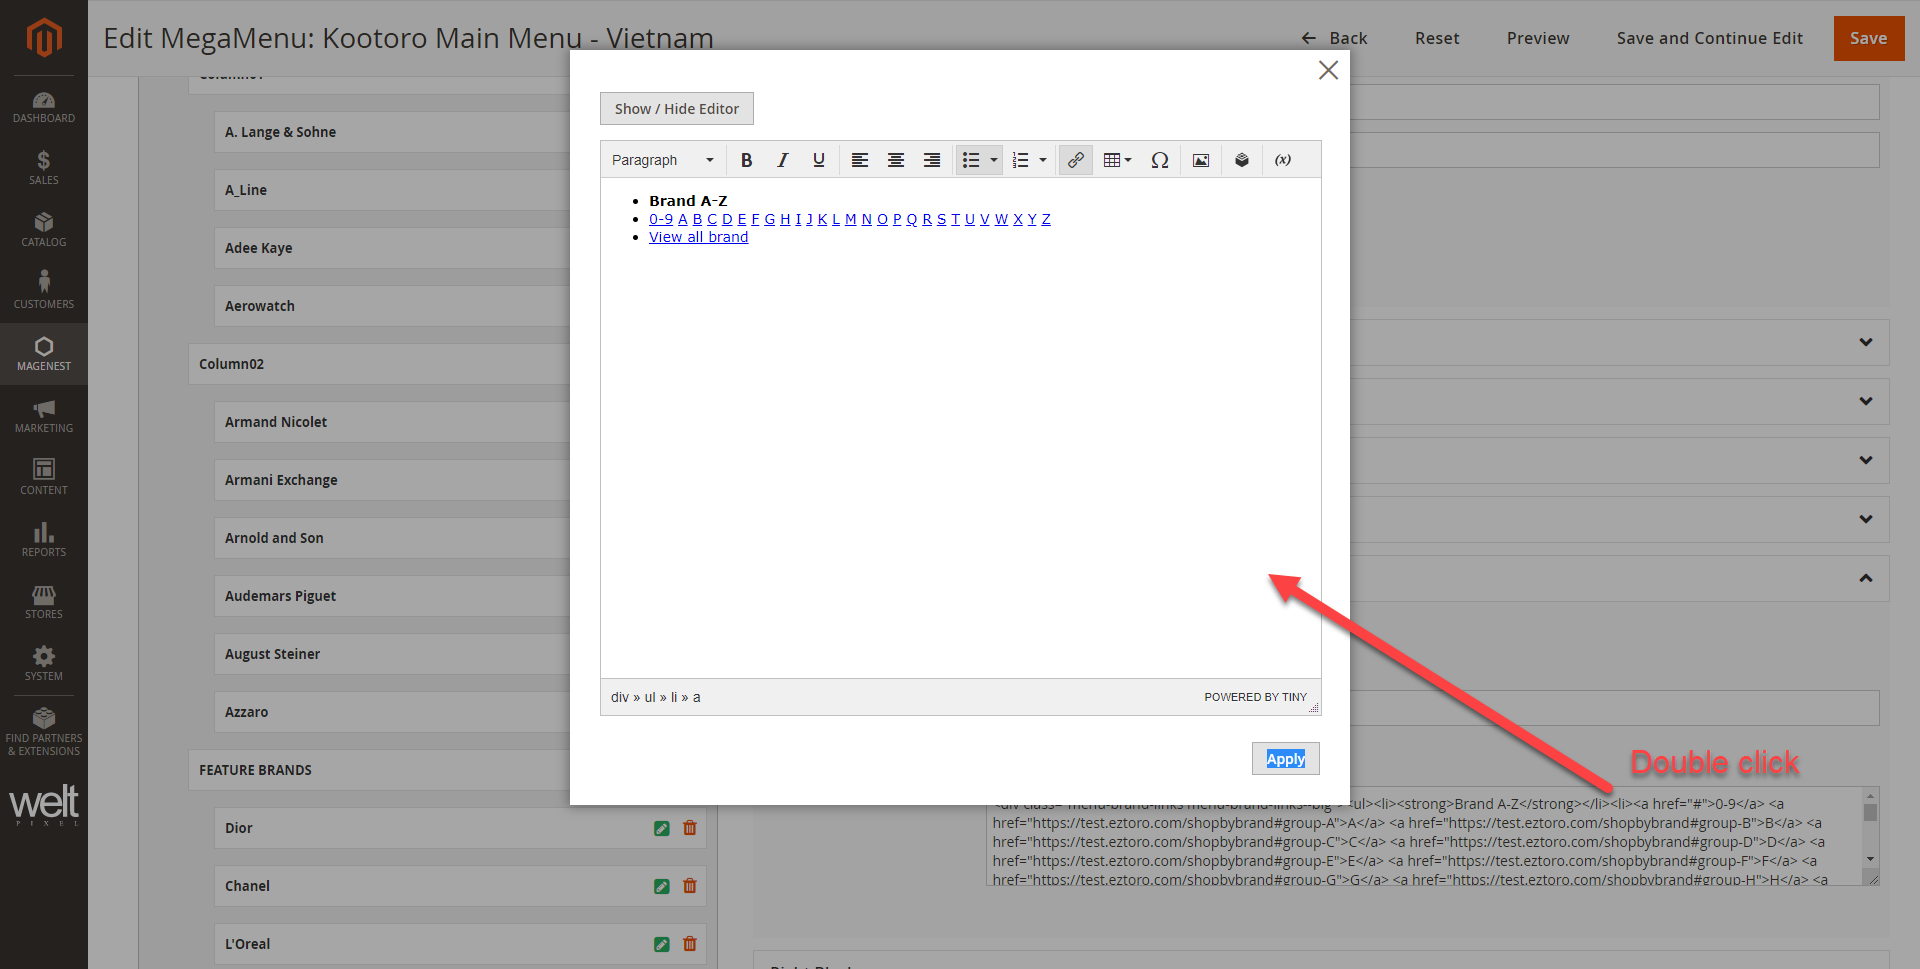
- Click on a character > then click on Link icon > enter the URL > OK > Apply.
- Do the same for the other characters.
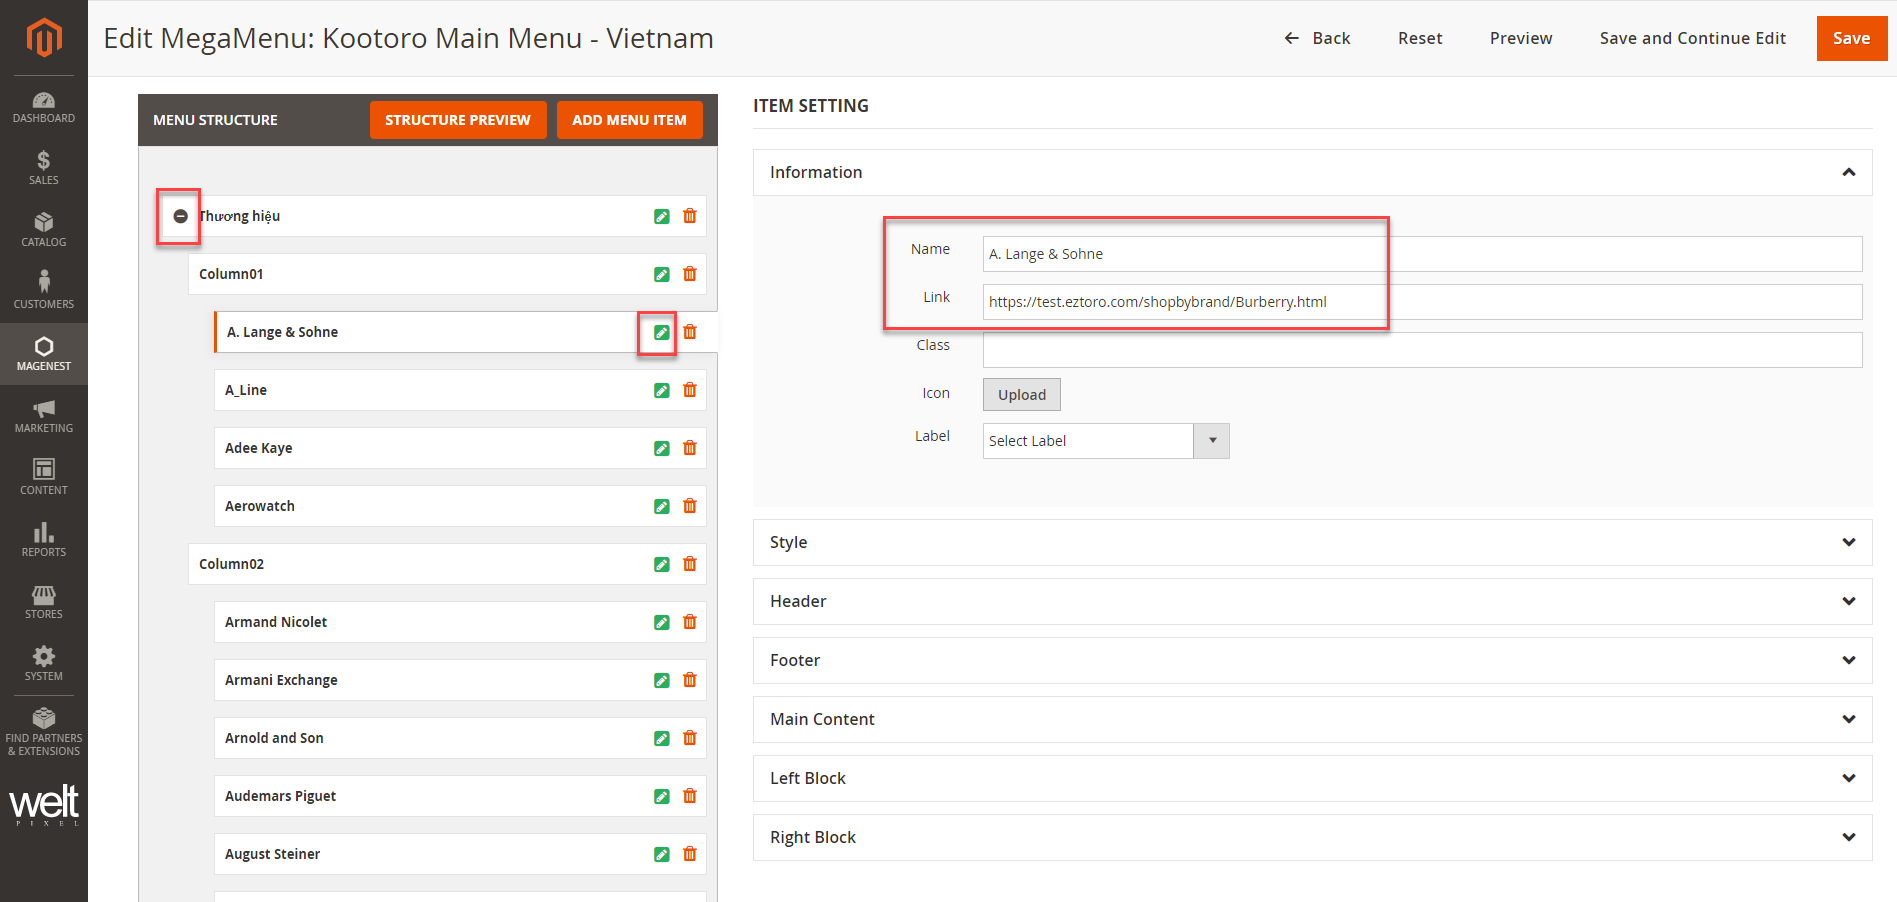
Edit menu items
- Click on
 to show the menu items.
 - To edit an item, click on Edit icon.
- Admin can edit display name and insert link for the text menu item.
![]() After finish, click Save to save the changes.
After finish, click Save to save the changes.
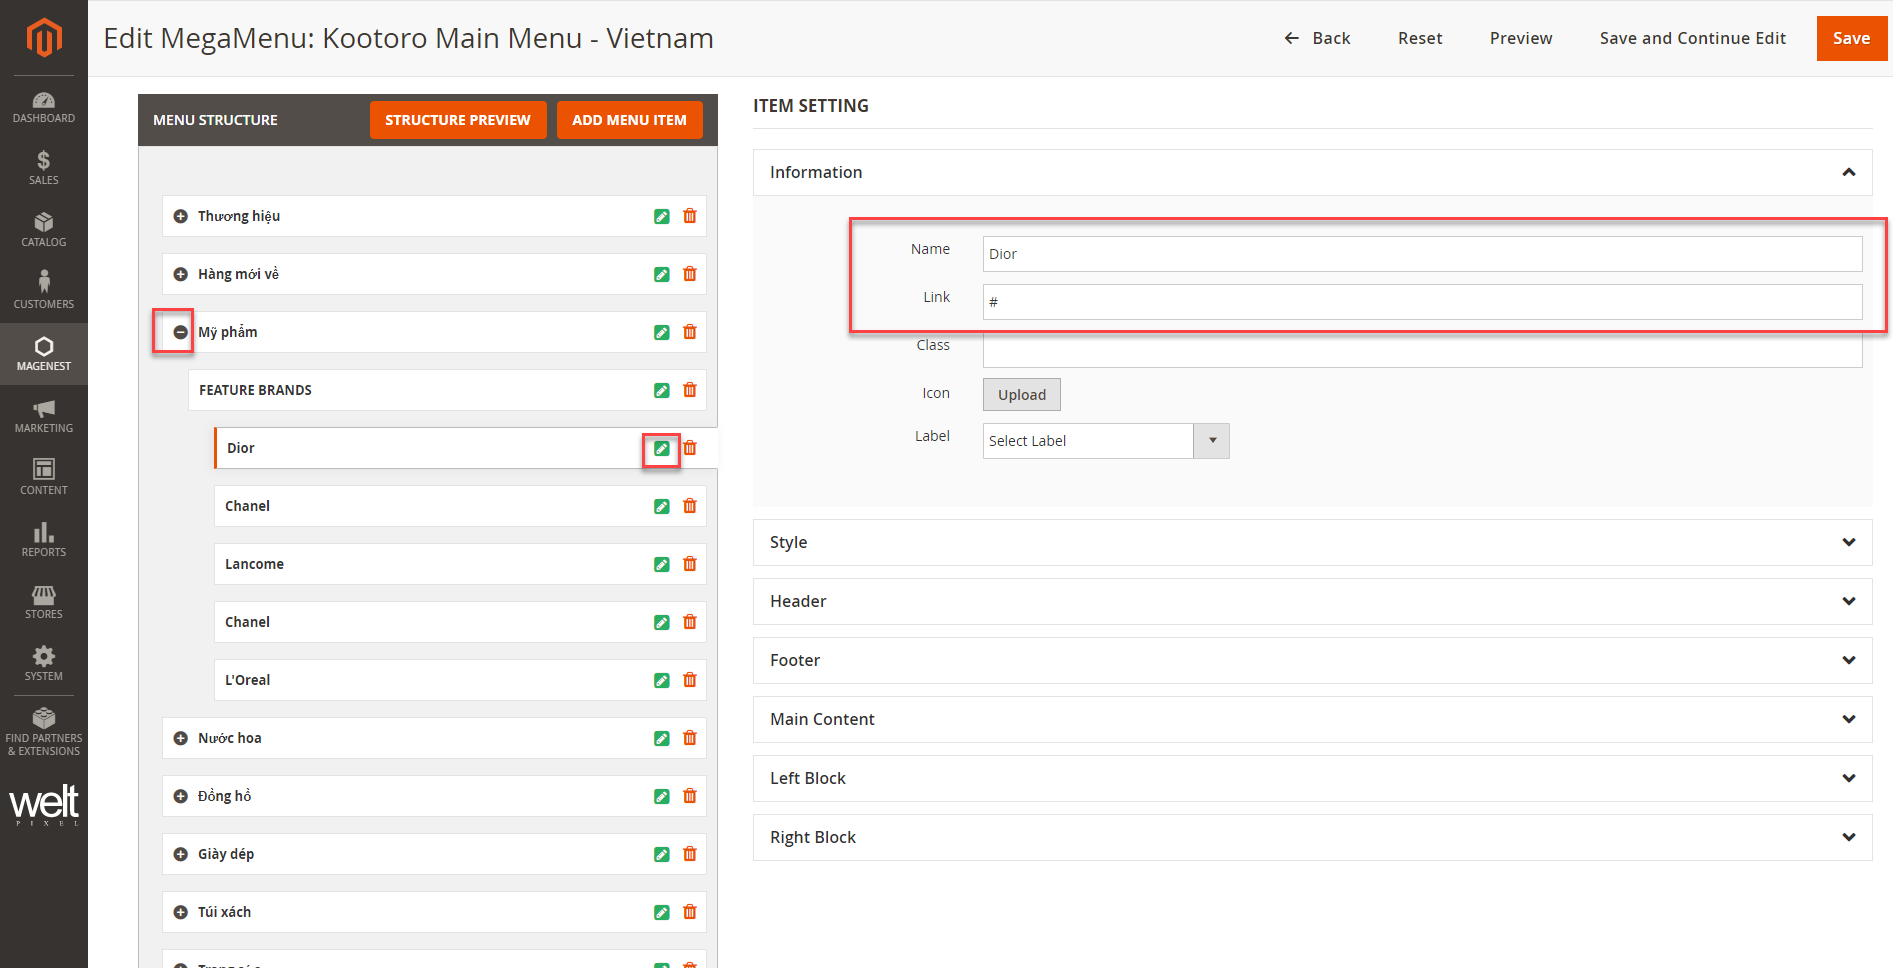
Edit Featured Brand section
- Click on to show the menu items.
- To edit an item, click on Edit icon.
- Admin can edit display name and insert link for the text menu item.
Edit image items
Image size: 280x380
 Image size: 440x185
- On the menu section setting, open Right Block tab.
- Right Block: double click on this content to open editing pop-up.
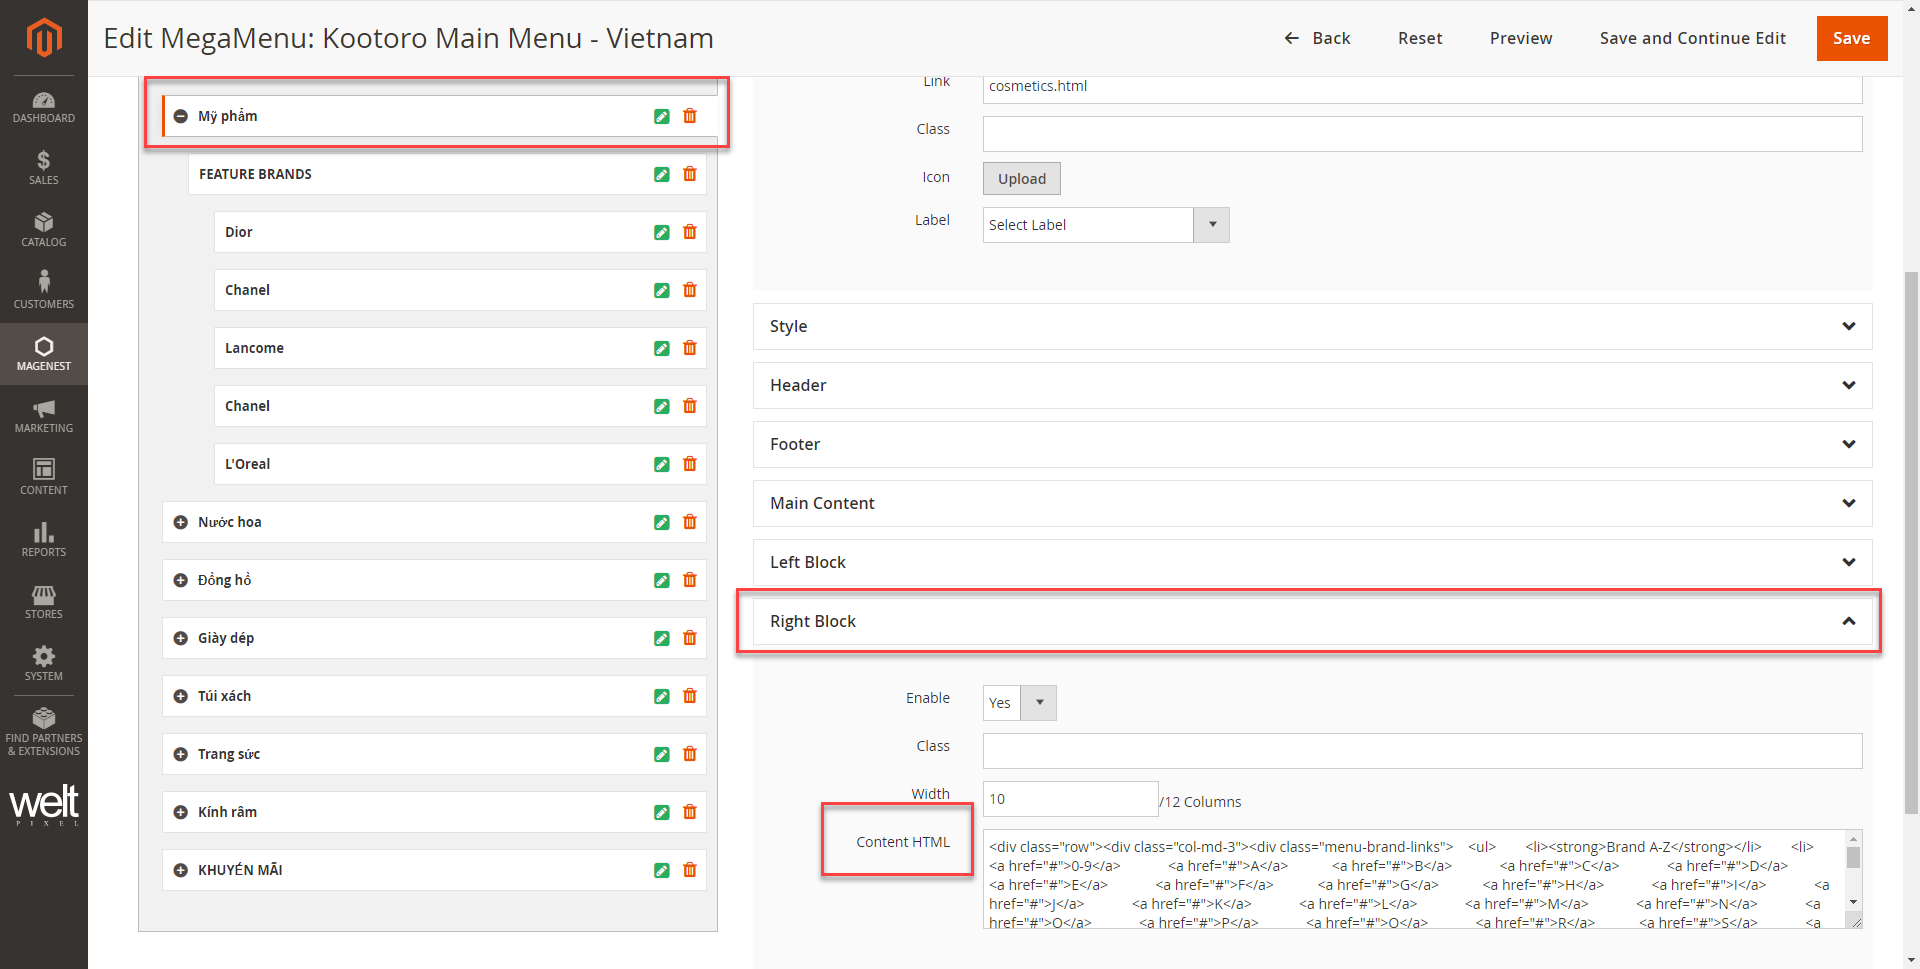
- Click Show/Hide Editor to show the content in code to edit. This is to remain the designed layout.
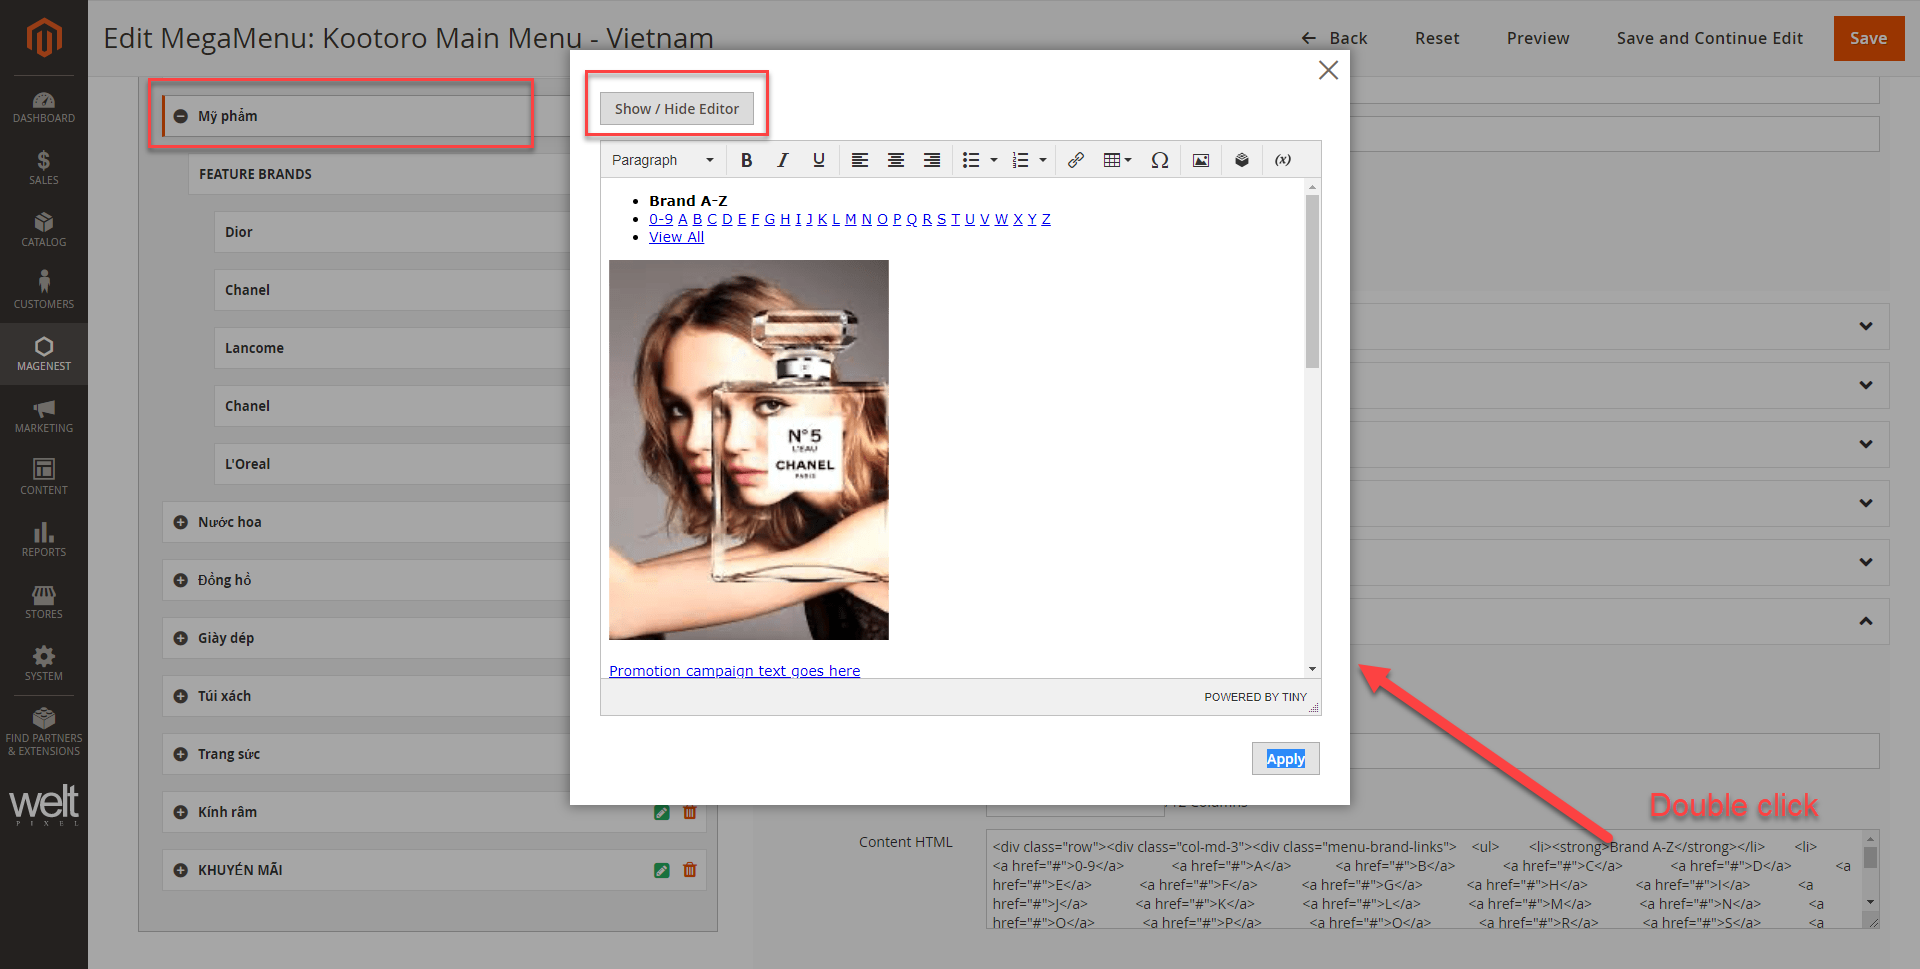
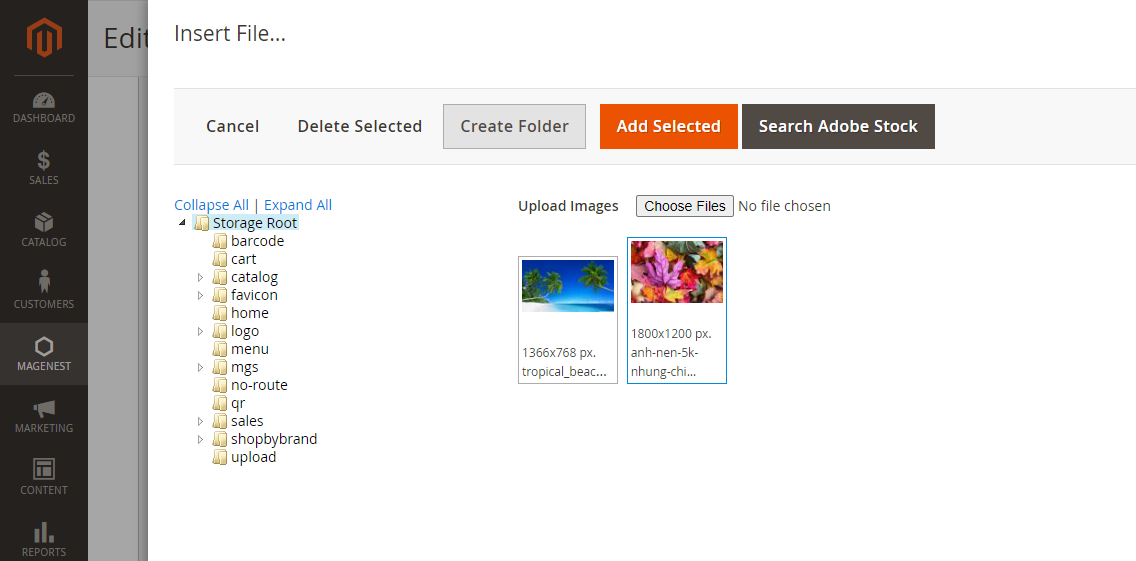
- Find the image need replacing, delete the image html as instruction, then click on Insert Image to add another image to that position.

![]() After finish, click Save to save the changes.
After finish, click Save to save the changes.
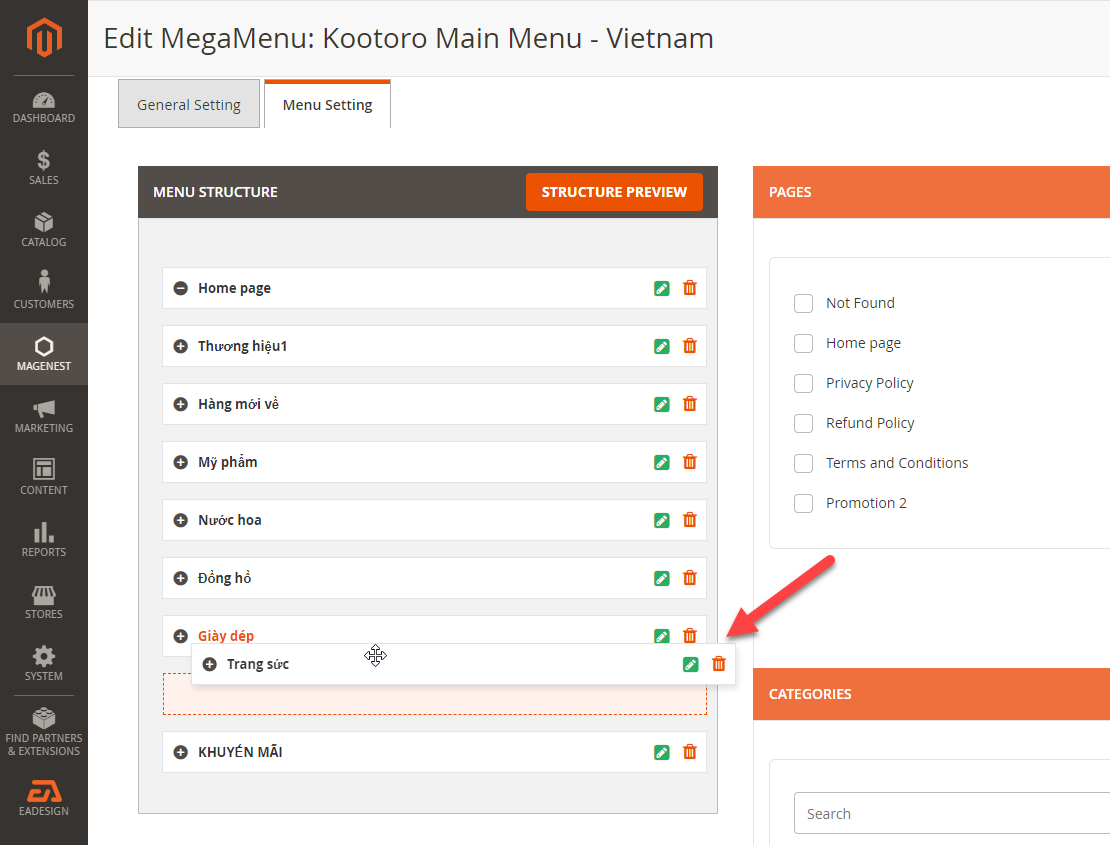
Create new menu section
 Add new menu section
- On the menu setting page, click on Add Menu Item button.
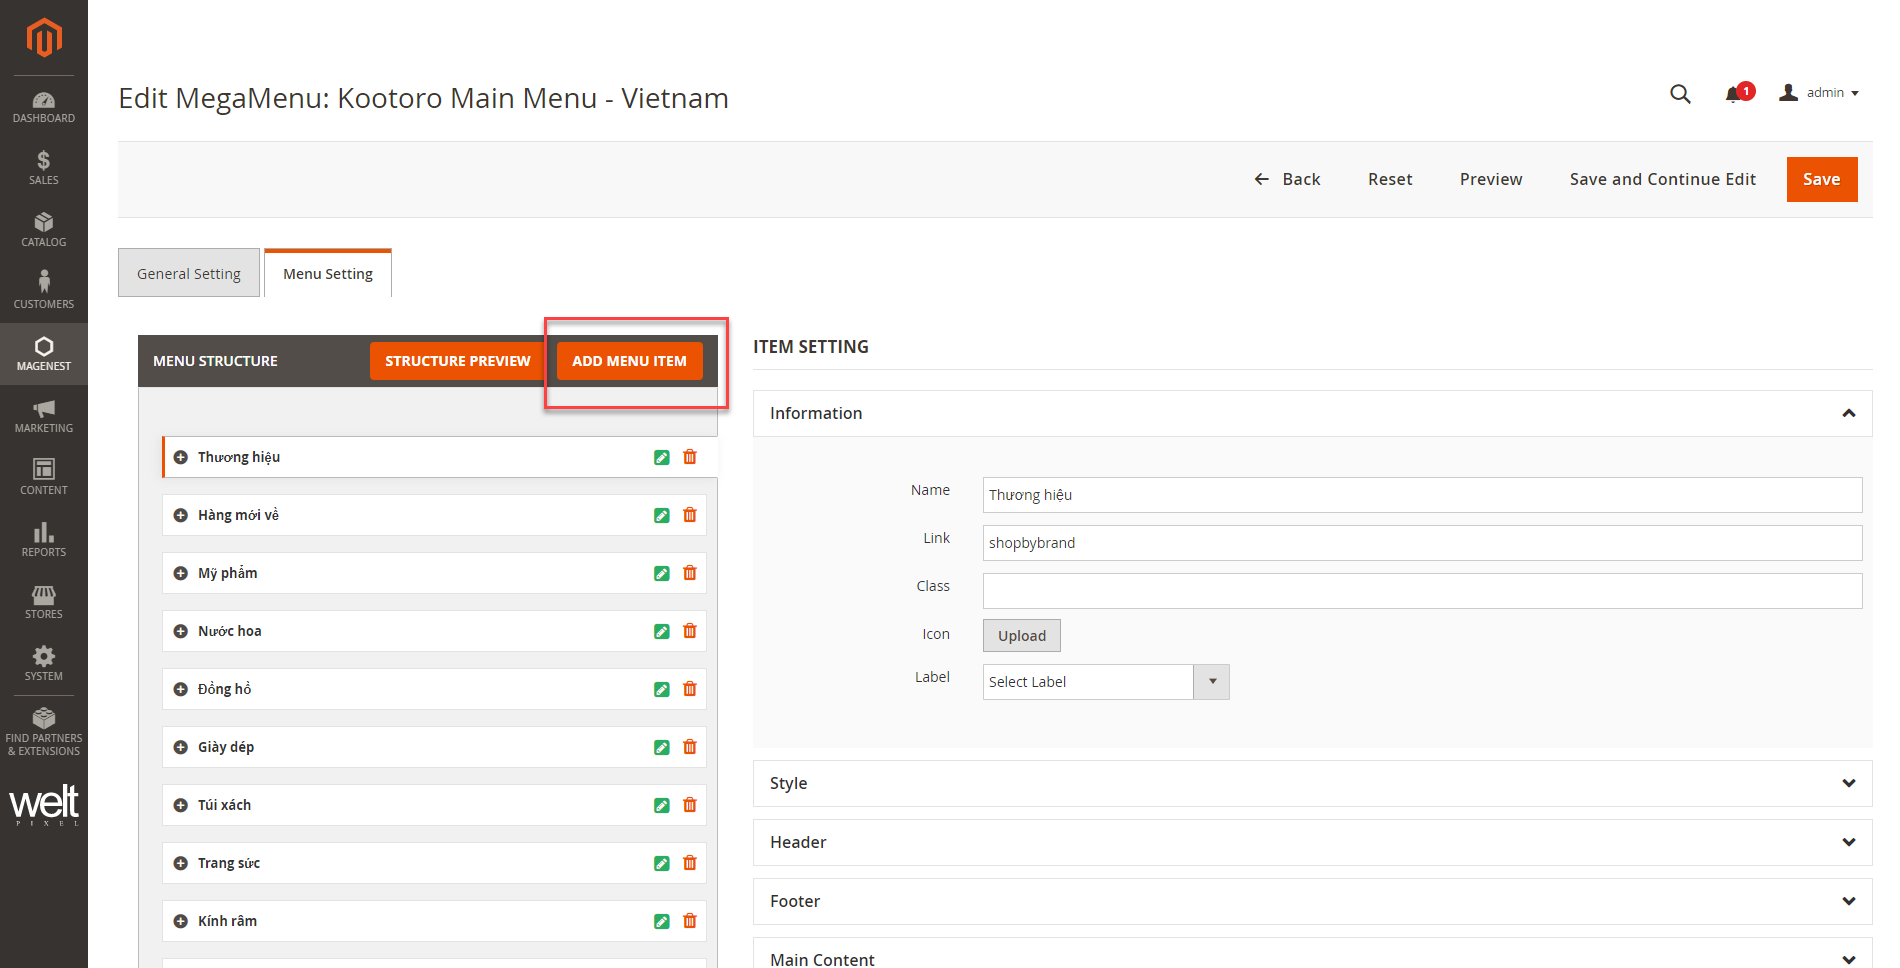
- Select a page, a category for the new menu item. Admin can create a custom menu item. Then click on Add To Menu.
Arrange the new item
The new item will appear at the end of the items list. Admin can drag and drop the item to a proper position.
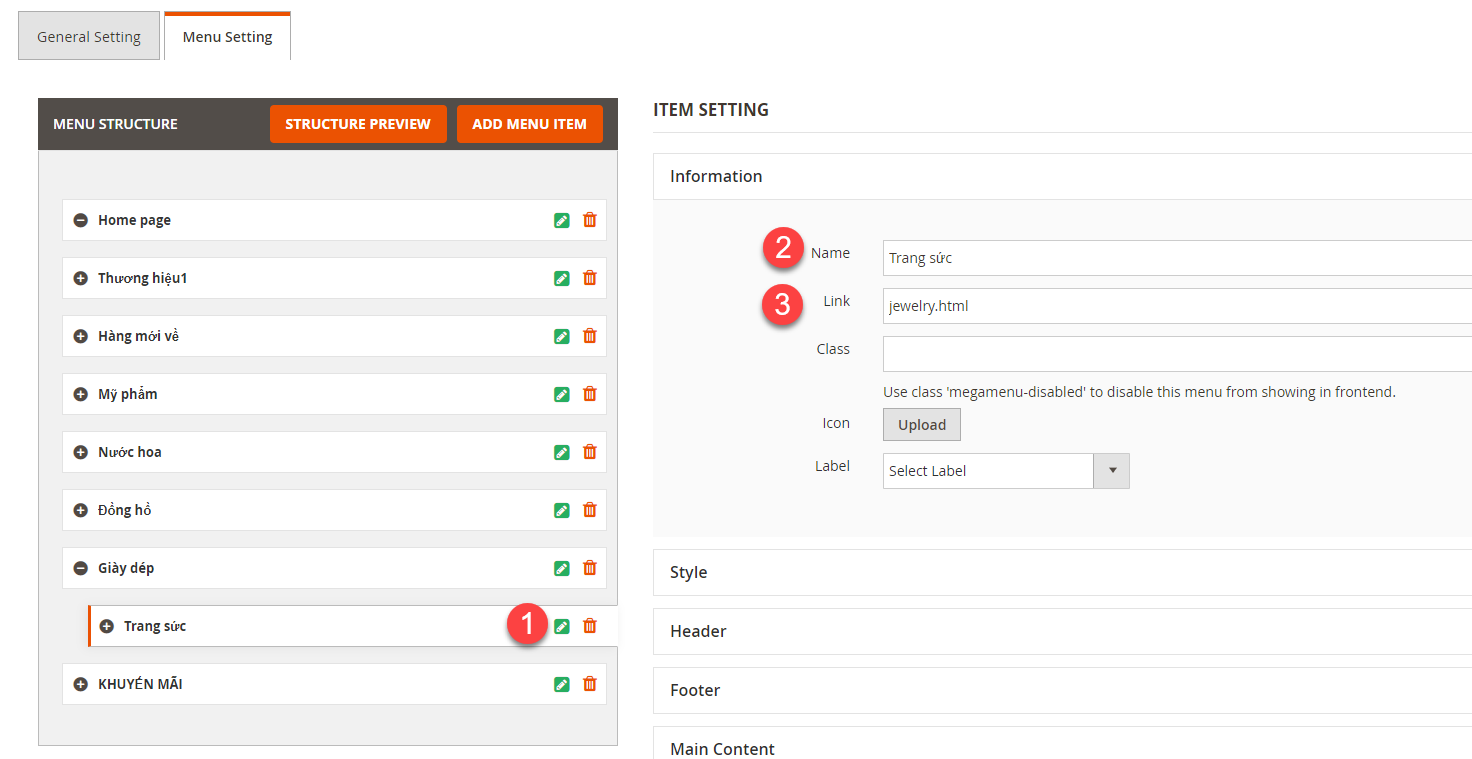
General information
- Click on the edit item to setup the new menu item.
- Name: Enter the name of the new item.
- Link: enter the URL key of a page that the item redirects to.
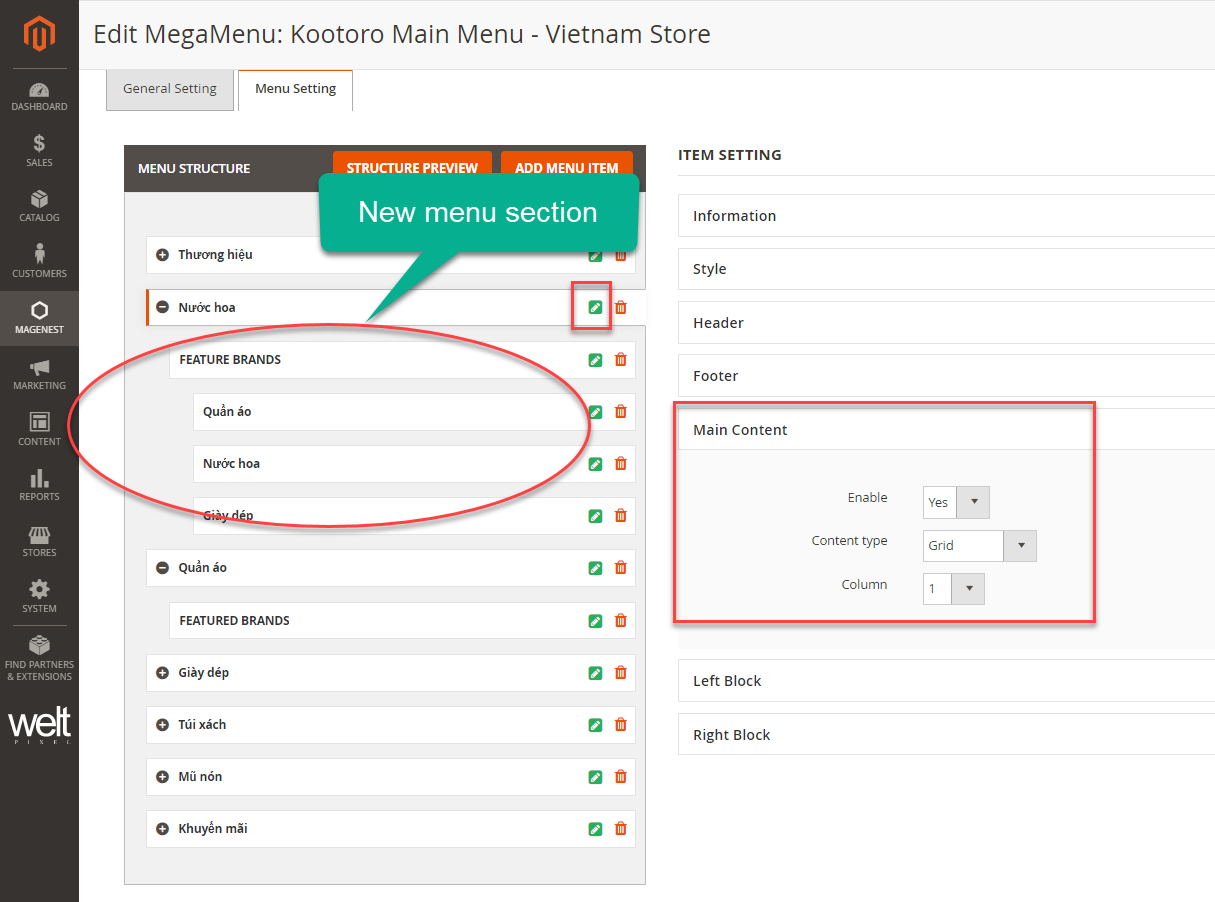
Menu item content
- Click on the green edit icon on the parent menu of the new menu section.
- Configure for that new menu section on Main Content.
Save
After finish, click Save to save the changes.
...
- Flexible Mega Menu configurations
- Create multi-level menu using drag & drop or hyperlink
- Add pages, categories or custom item(s) to the menu
- Generate menu according to existing categories automatically
- Create label(s) for the menu
- Assign label to each menu item
1. Configuration

1.1 General configuration
- Enable Mega Menu: to enable/disable the module
- Select Mega Menu: Set up the menu to be used for the site here. You can create the menu in Mega Menu > Manage Menus
- Effect: The effect to show menu and submenu on the store front
1.2 Default Menu Configuration
- In this settings, you can customize the default menu text color, hover text color, hover button background color and drop-down background color.
- Note that the default menu will only be used if there is no mega menu selected.
2. Create a label

- Go to Mega Menu > Manage Labels, you can manage all the available labels in the grid table.
- You can edit or delete the label by clicking on the Select in Action column.
- Or you can create a label by clicking on the Add New Label button.
...
- Title: The label name displayed in the back end
- Text: The content of the label
- Position: Set the position of the label on the item name (Top, Left, Right, Top Left, Top Right)
- You can change the font size of the text, the label width and height, the text alignment and text color.
- You can also add a border to the label with 5 types of border styles: Dashed, Dotted, Double, Solid or No style/None.
- Border radius: The rounded corners of the label
- You can add the arrow to point the label to the menu item. With the arrow, you can edit the width and color.
3. Create a new menu
Go to Magento 2 backend > Mega Menu > Manage Menus
- You can click on the Generate Sample Menu button to generate menus according to your categories with Grid type and default colors.
- Or click on Add New Menu to create a custom menu.
On add new menu page:
3.1 General Settings

- Menu Name: The menu name will be displayed in Magento 2 backend for management.
- Menu Template: You can select the menu direction as horizontal or vertical left.
- Custom Css: You can customize/style the menu using CSS.
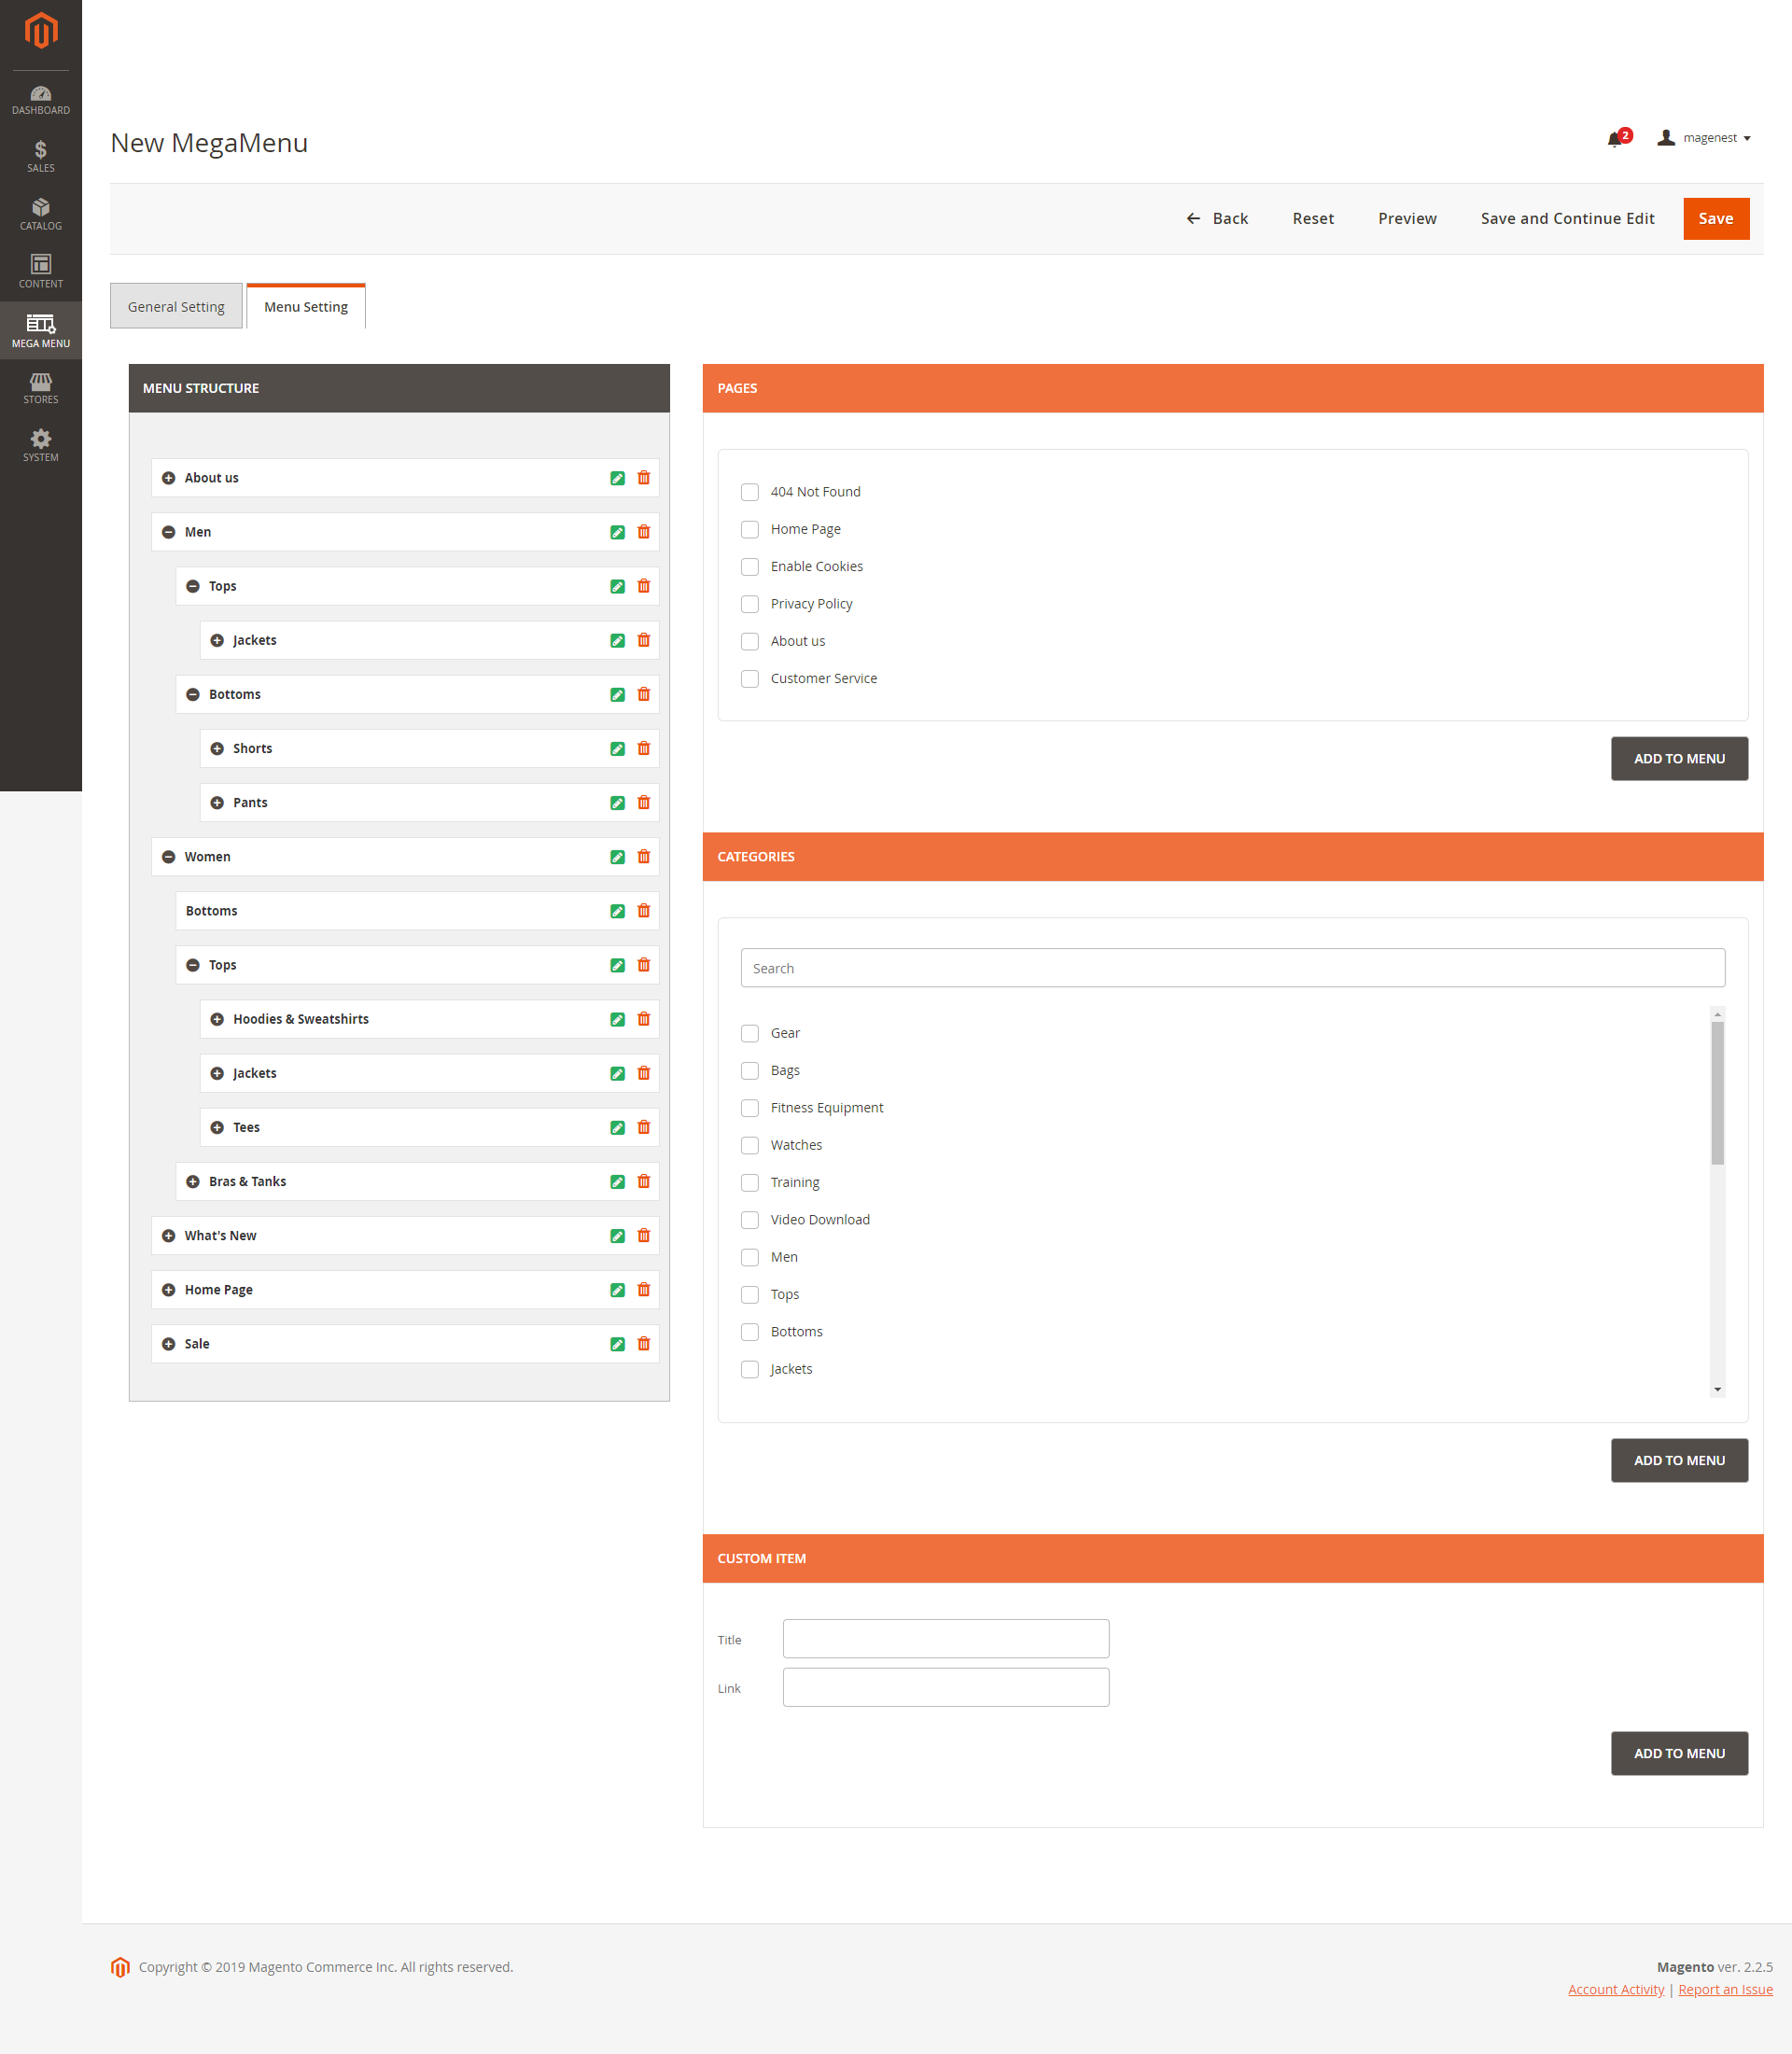
3.2 Menu Settings:

- In the Menu Structure, users can use drag & drop to configure the menu's level.
- On the right column, there are 3 tabs: Pages, Categories, Custom Item that allow you to add pages, categories or custom page to the menu.
- You can add one or more items to the menu by selecting the item(s) then click on the Add to menu button.
- Then you can drag and drop the item in the menu structure to create the submenu(s).
- You can edit each item with the green icon of each one or remove them from the menu list with the delete (red) icon.
...
3.3 Customize menu item
Information:
- Name: The menu name that will be displayed on front end.
- Link: The menu url or url key.
- Class: You can add a class to customize the item with CSS.
- Icon: You can upload the icon for each item. It will be displayed on the left of the item on the main menu bar.
- Label: You can create the label in Mega Menu > Manage Labels.
Style:
- Admin can:
- Choose the Text Color, Hover Text Color, Hover Button Background Color from RGB color picker.
- Add the content in Header, Footer, Left Block and/or Right Block.
- Enable/disable each one and edit with HTML and CSS.
- You can preview the mega menu before saving by clicking on the Preview button.
- Main Content: You can use content editor or use different types of content: default list, grid or tab.

...