Thank you for purchasing our extension. If you have any question that is beyond the scope of this document, do not hesitate to leave us an email.
Created: 2119/0105/2016 2017 | By:Magenest| Email: [email protected]Support Portal: http://servicedesk.izysync.com/servicedesk/customer/portal/5
| Table of Contents |
|---|
Introduction
Appointment Booking extension Magento 2 Hotel Booking by Magenest is a solution for hotel service providers, healthcare service providers, travel agency,an extension that allows owners to manage everything related to their hotel bookings as features, included services, extra services, promotions, price rules... to efficiently manage bookings and reservations made on Magento 2-powered store
For more information, please visit: http://store.magenest.com/magento-2-appointment-booking.html
Features
Version 2.1 (updated 11/7/2016)
WHAT'S NEW
- Admin can easily create Recurring Price Rule products.
- Upgrade front end.
- Customer now can add many staffs in many time intervals in front end
- Customer can steal booking product from the other customer cart
Upgrade all rules in more details.
Upgrade special date in more details.
Version 2.0.x
The extension is packed with the following features:
 Features For Admins
- Admin can view hotel booking orders.
- Admin can quick create new orders for the customers paid at hotel directly.
- Admin can create hotel services (hotel features, included services, cancel policy, important policy).
- Admin can create hotel room types and packet for each one of them. Each packet contains features, included services, cancellation policy, important policy, capacity, price per night, number of available rooms, extra services, enable/disable from to.
- Admin can modify front end UI (wallpaper).
- Admin can customize hotel homepage
- Admin can create price rules for all packets (special dates, recurring time).
- Admin can setup new booking orders status, email templates (sent to admin, customers when new hotel booking orders placed).
- Multiple Locations
Features For Customers
- Customers can view hotel booking orders (order status, packet name, ...)
- Customers can customize search options for hotel booking with guests, check in date, checkout date, filter search options (price, features, rating)
- Admin can easily create working schedule for staffs, including working weekdays, start and end time, and product id.
- Admin can also create schedule for individual product, including working weekdays, start and end time, and number of available slots.
- Admin can define a staff's category and assign a plus of price when the staff is chosen.
- Admin can define special dates to better evaluate products during unique occasions.
- Customer can send a cancel request to their booked appointments within a click.
- Customer can easily choose available time range within his chosen day and a available staff.
- Admin can view booked appointments in Grid mode, Full Calendar mode or sync to their Google Calendar.
- A booking status system is implemented, the system will automatically send an email to customers according to the status.
- Admin can define default booking status for newly ordered products.
- Admin can assign a template email for a booking status.
- The extension will send an email with a custom template to the customer if the admin change the booking status of an order.
System Requirements
Your store should be running on Magento Community Edition version 2.01.0 or newerx.
Installation

Configuration
In the above example we switched the local site to the extension directory, and the remote site to the code directory. Now on the remote site window, inside app/code directory, create a folder named Magenest and go inside it. Now on your local site window, right click on Extension Name and click Upload. The extension will be uploaded onto your host in a few minutes.
The second method will require you to compress the extension into .zip or .tar.gz format, then execute the following command in your Command Line/Terminal:
scp <path to your extension> <ssh server>:<path to Magenest directory>Then log into your ssh server, go to Magenest directory and execute the following command to decompress the module:
unzip <.zip compressed extension> Or
tar -xzvf <.tar.gz compressed extension> Now go to your Magento root directory, say it's named magento2, and execute the following commands:
php bin/magento setup:upgrade php bin/magento setup:static-content:deployAfter running all these, your Command line/Terminal window might look like this:

Finally, you need to flush the cache by either type this into the Command Line/Terminal:
php bin/magento cache:flushOr go to System > Cache Management and click Flush Magento Cache

Now you can go to your store and check if the extension is working as expected.
Initial Configuration
In order to get your extension up and running properly, we highly recommend that you make some configurations right from the beginning
Order Status Settings
General Configuration
After the extension is installed successfully, admins need to make some configurations before using the Hotel Booking extension.
Navigate to Magento 2 > Stores > Configuration > Magenest > Hotel Configuration.
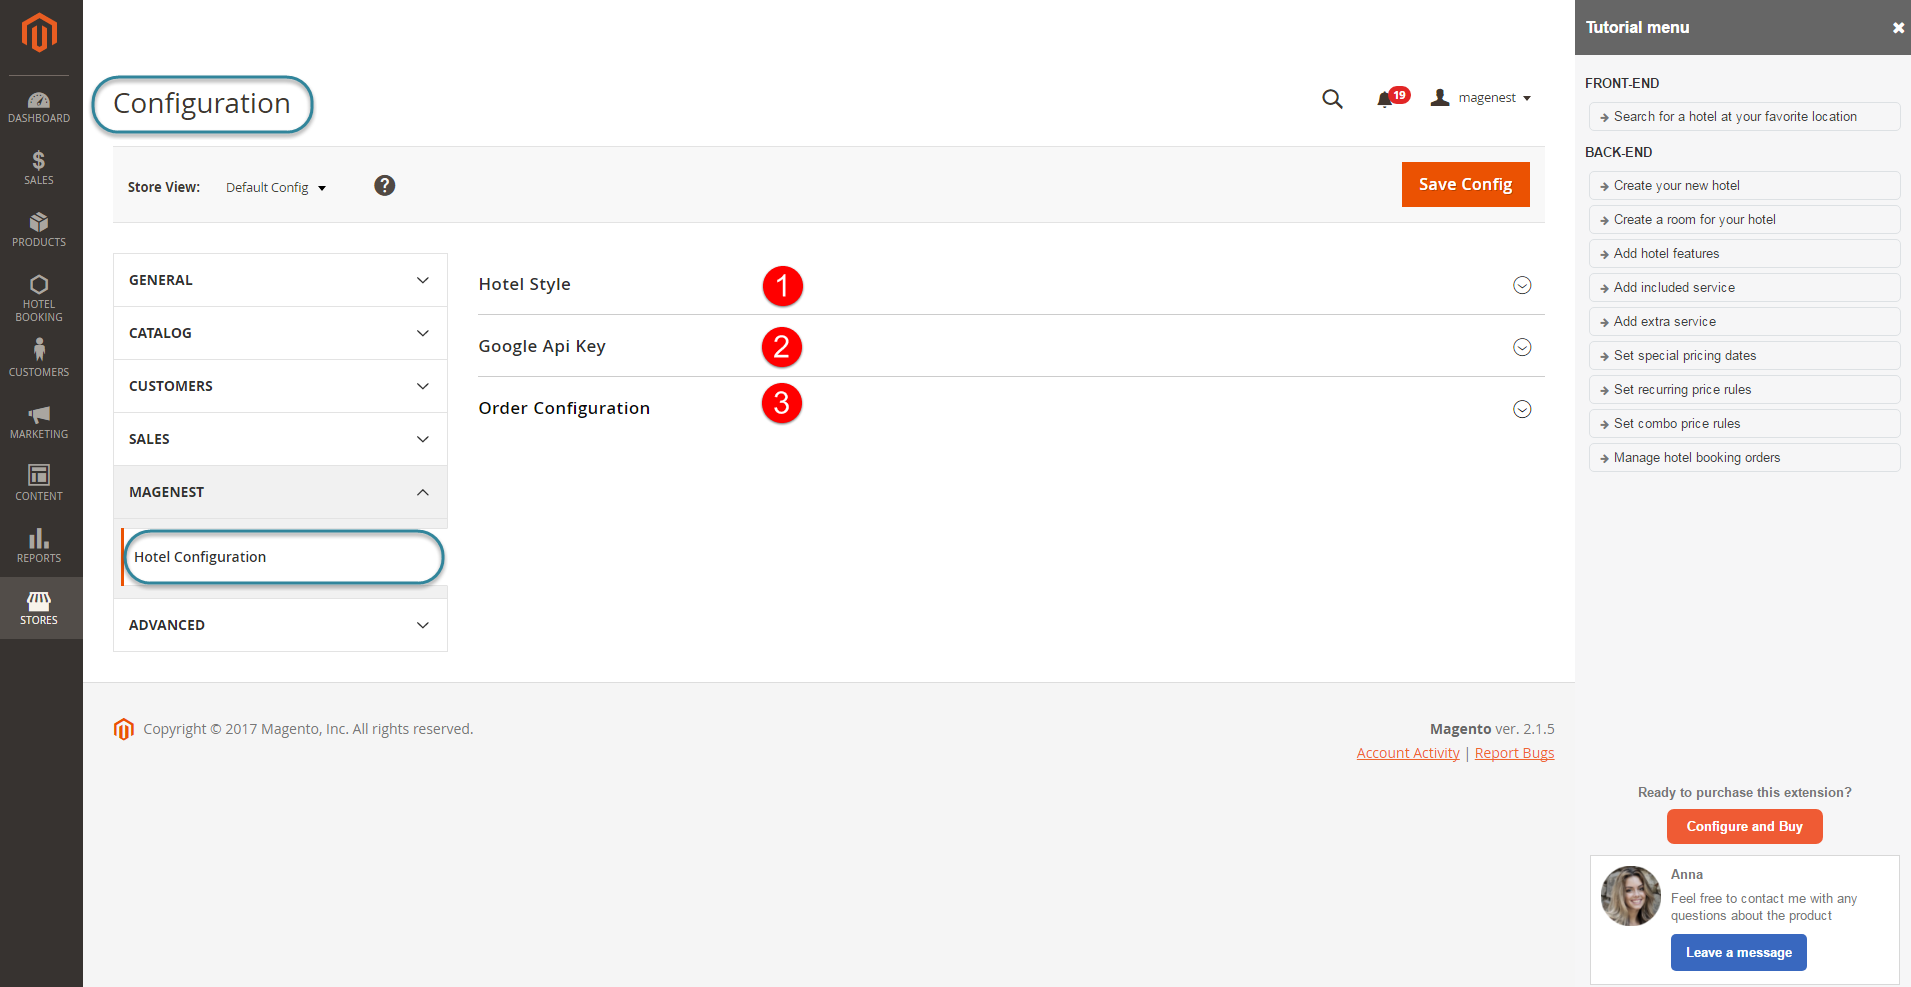
There are three sections that admins need to consider, include:
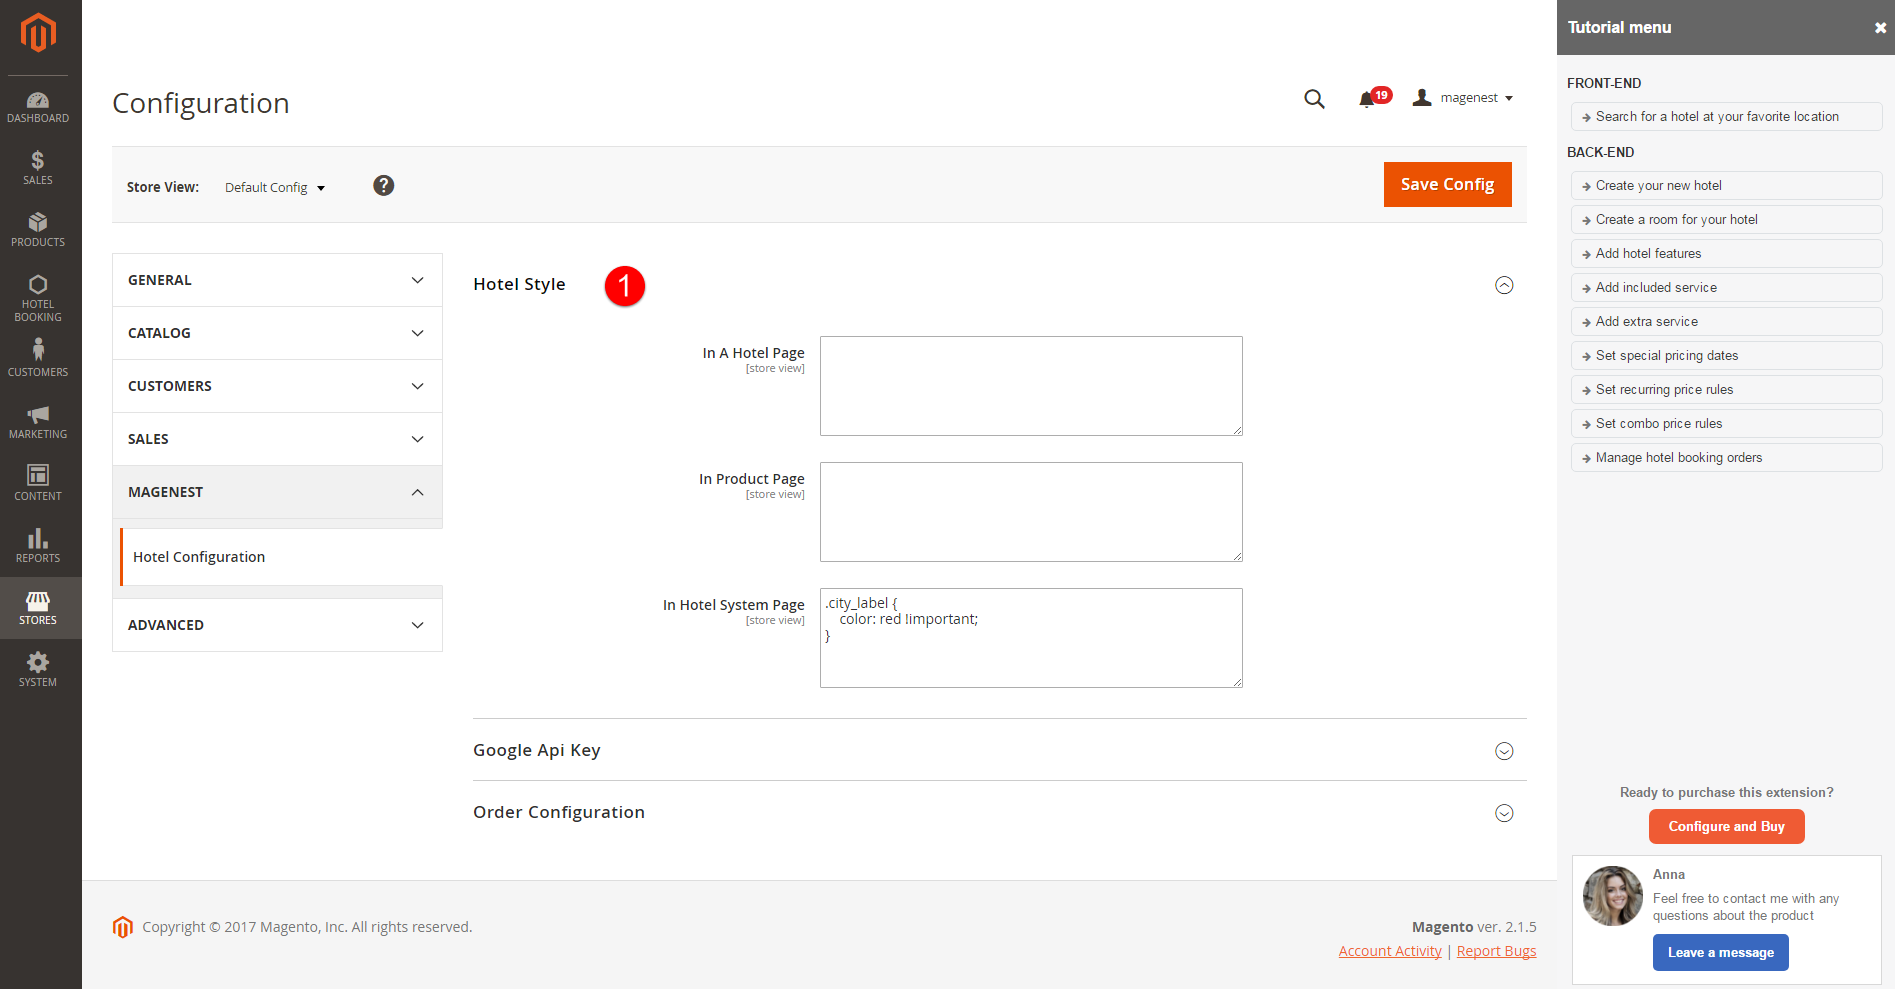
![]() Hotel Style
Hotel Style
Admins can style website easily in Product Page, A Hotel Page, and Hotel System Page.
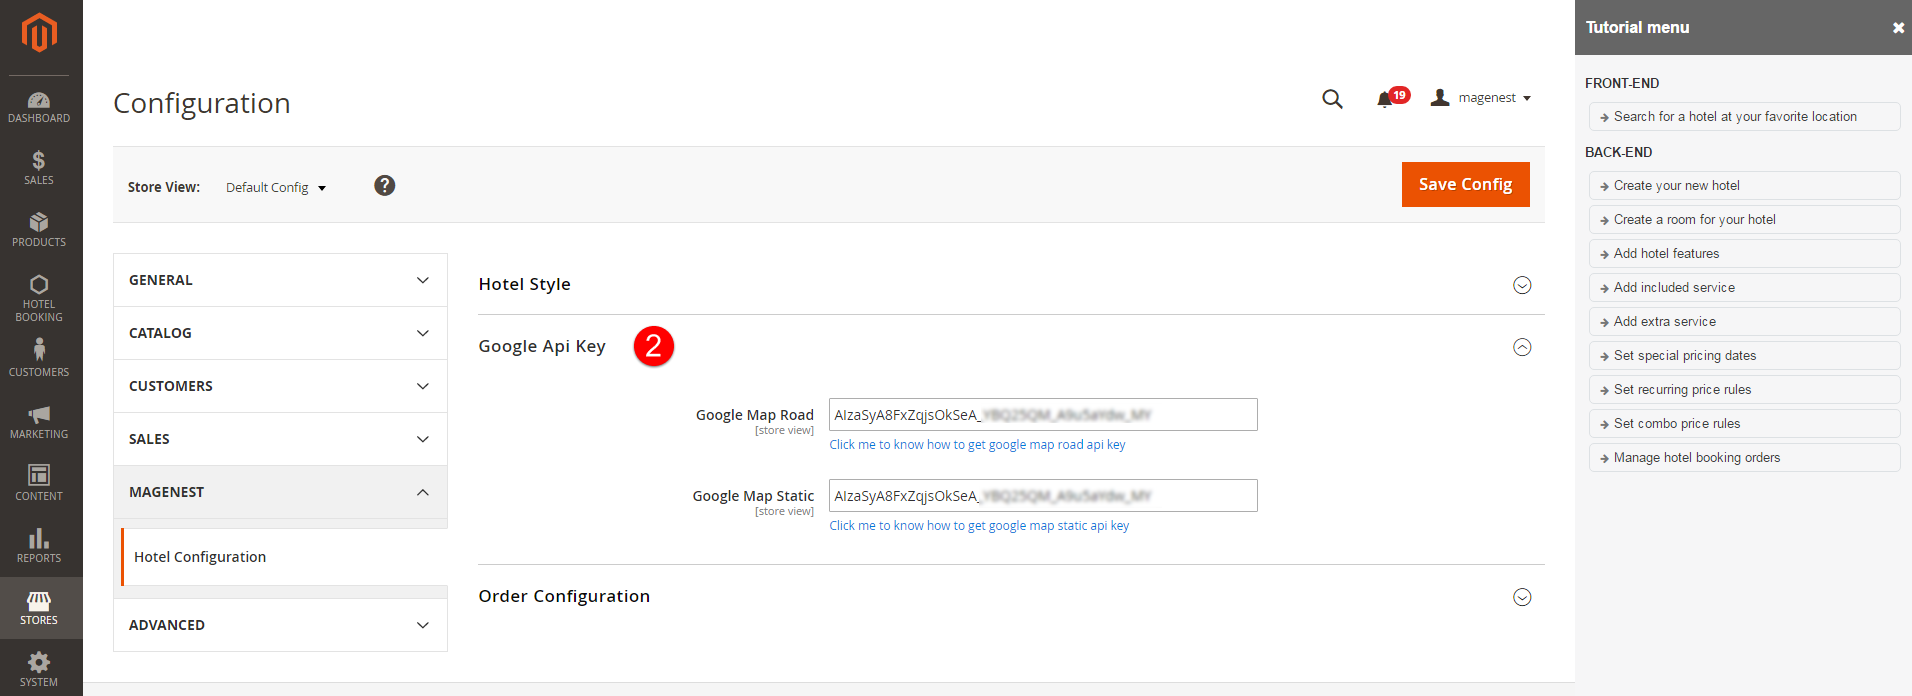
![]() Google API Key
Google API Key
Admins need to enter Google Api Key to display google map for each hotel in frontend.
![]() Order Configuration
Order Configuration
This Firstly, go to Order Settings tab on the Appointment Booking menu, this is the place where you define the email template and sender identification of the email sent each time the booking status of a booking order is changed.

- Default Order Status: specify the default status of newly placed booking orders.Send Email to Customer Automatically: admin can choose whether to send an email to customers automatically.
- Email Sender: specify the identification of the sender. You can define this in tab General > Store Email Addresses.
- Template Configuration: these are email templates for each booking status of an order.
Here are some template variables that you can embeed in your template:
- customer: customer email
- customerName: customer name
- store: store name
- itemName: name of the ordered item
- bookingStatus: new booking status of the item
- specialDate: will be available if there is any special date
- bookedDate: booked date
- start: start time
- end: end time
- staffName: staff name
- Email Template: admin can select email template for confirmed orders.
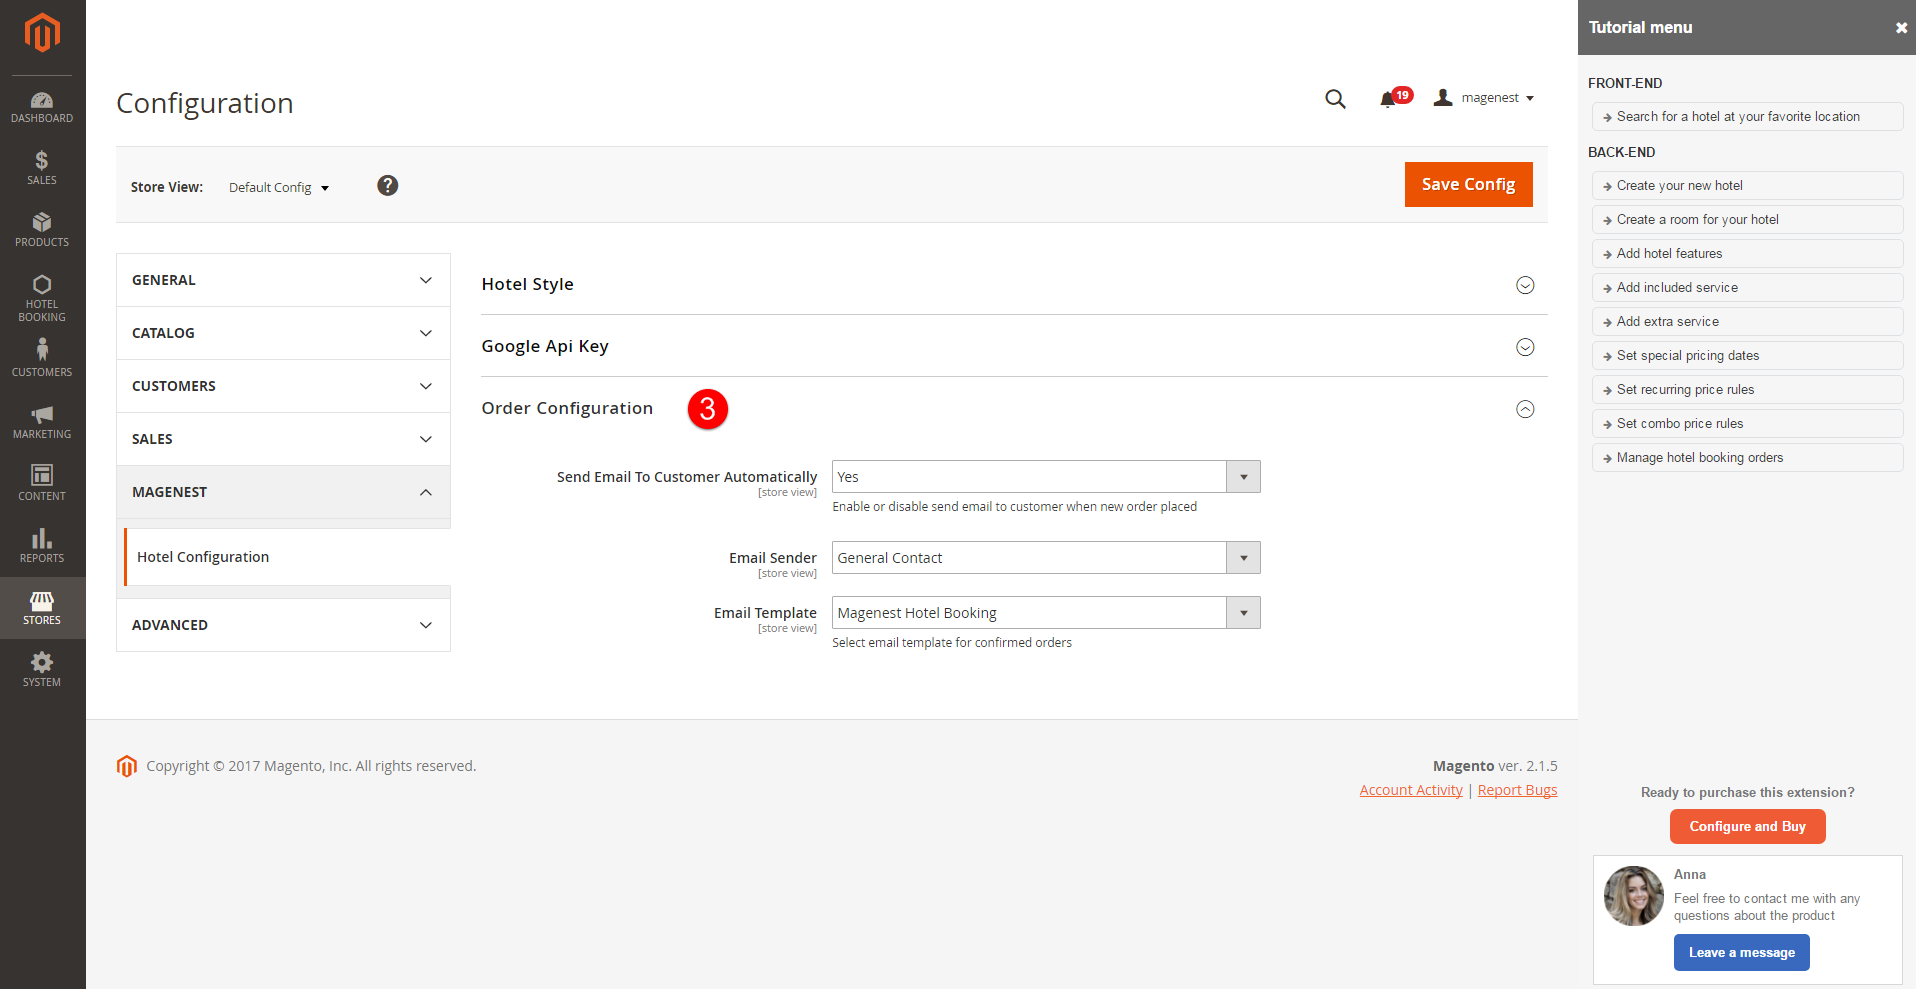
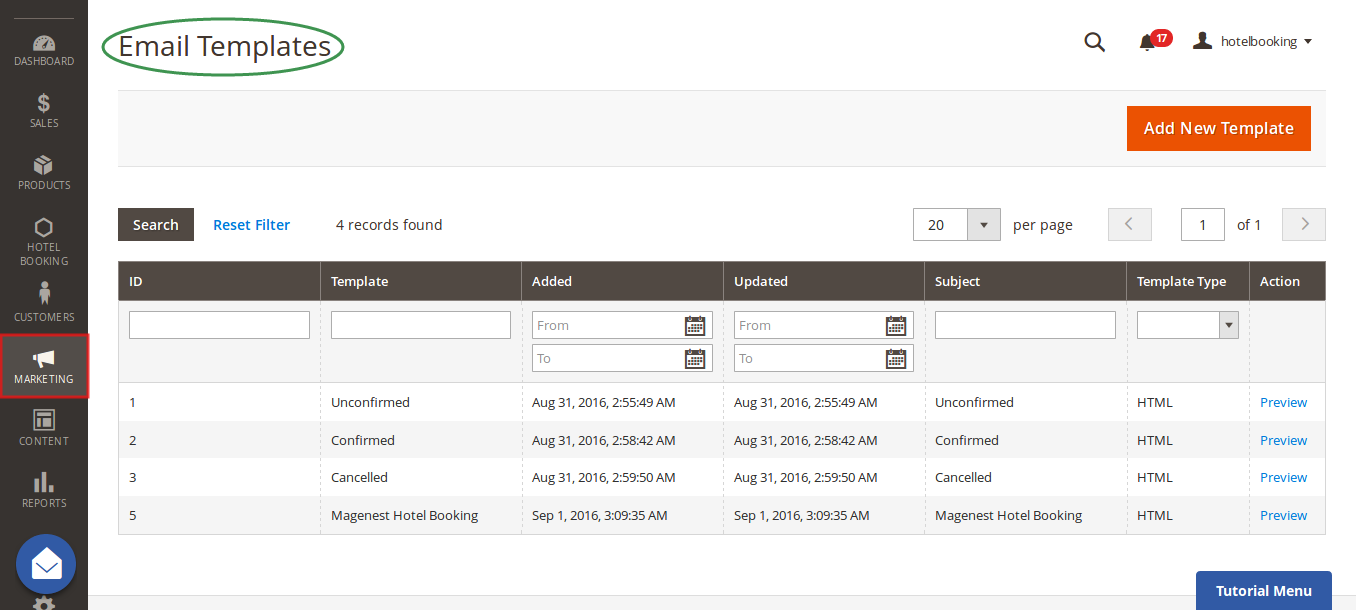
Note that you need to have email templates before going to configuration. You can use our template or create a new one from Email Templates tab.
Services And Policies
| Note | ||
|---|---|---|
| ||
You need to configure Service and Policies, including, Feature, Included Service, Extra Service, and Promotion before creating hotel systems and hotel room types. |
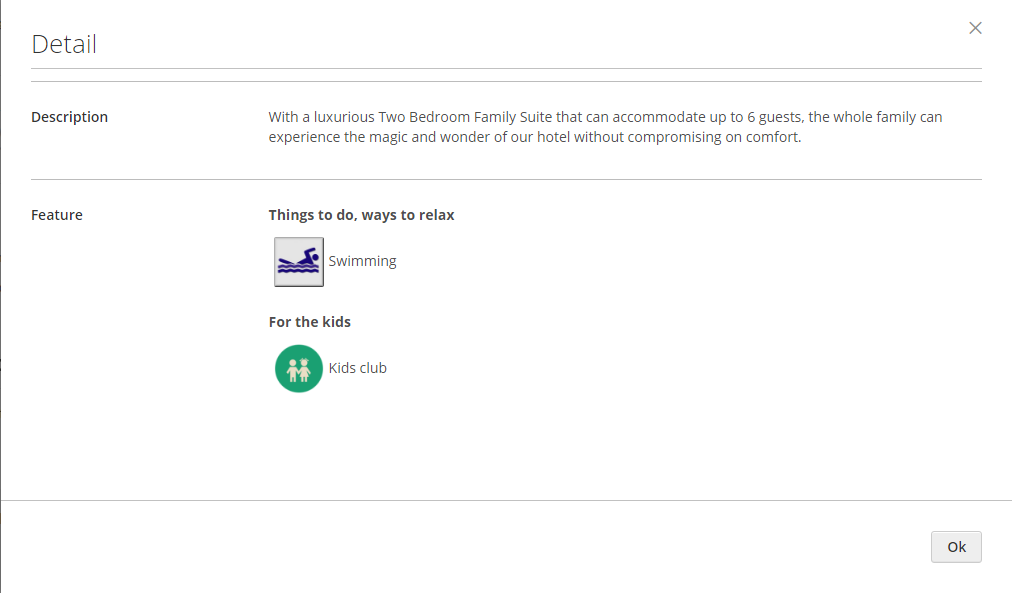
Feature:
Each feature is a group of services. For examples: Getting around, Things to do, ways to relax... Go to Hotel Booking > Features > click on Add New Features button to create a new one.
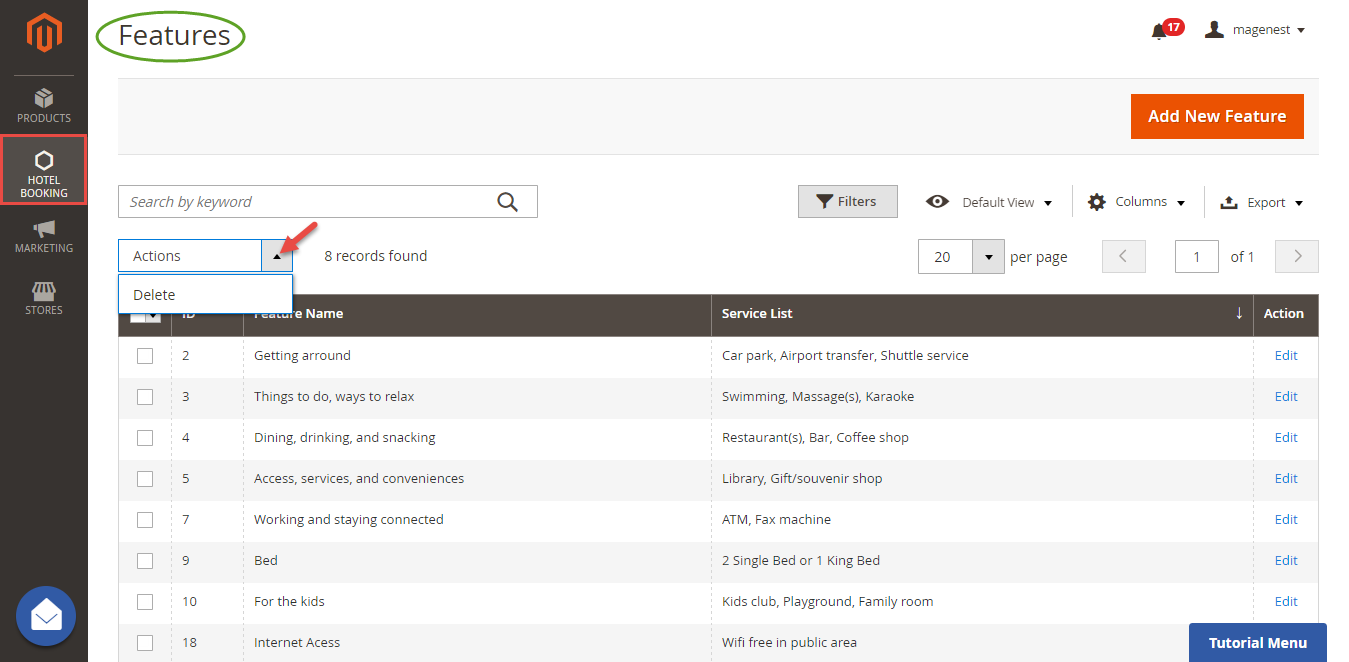
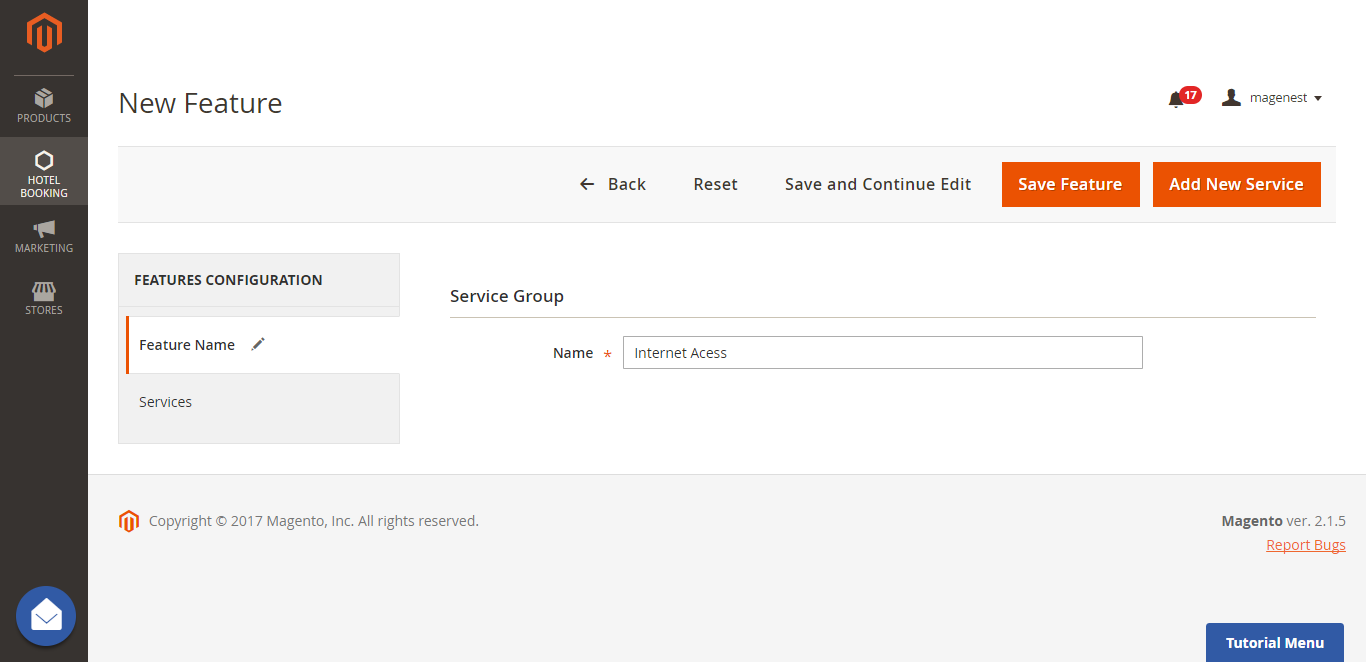
After creating a new feature successfully, click on Add New Service button to create services for that feature. One feature may contain one or more services.
Admins can view services list from Services tab in Edit Feature tab.

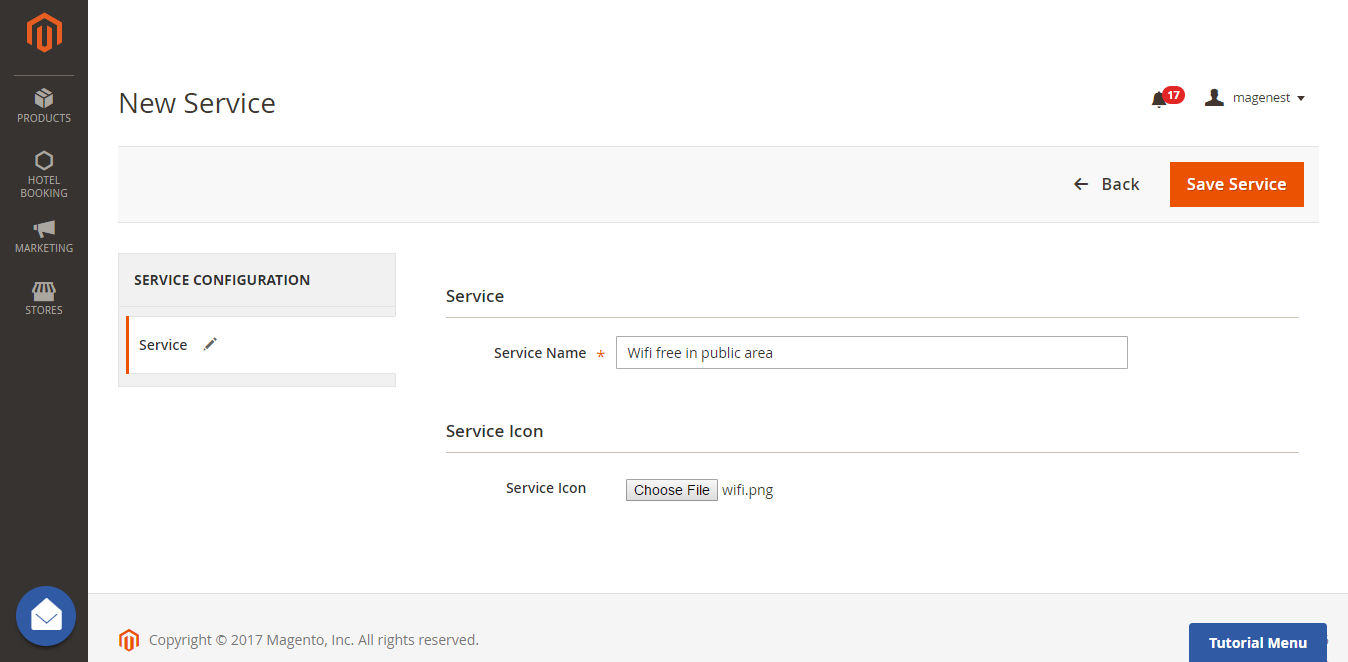
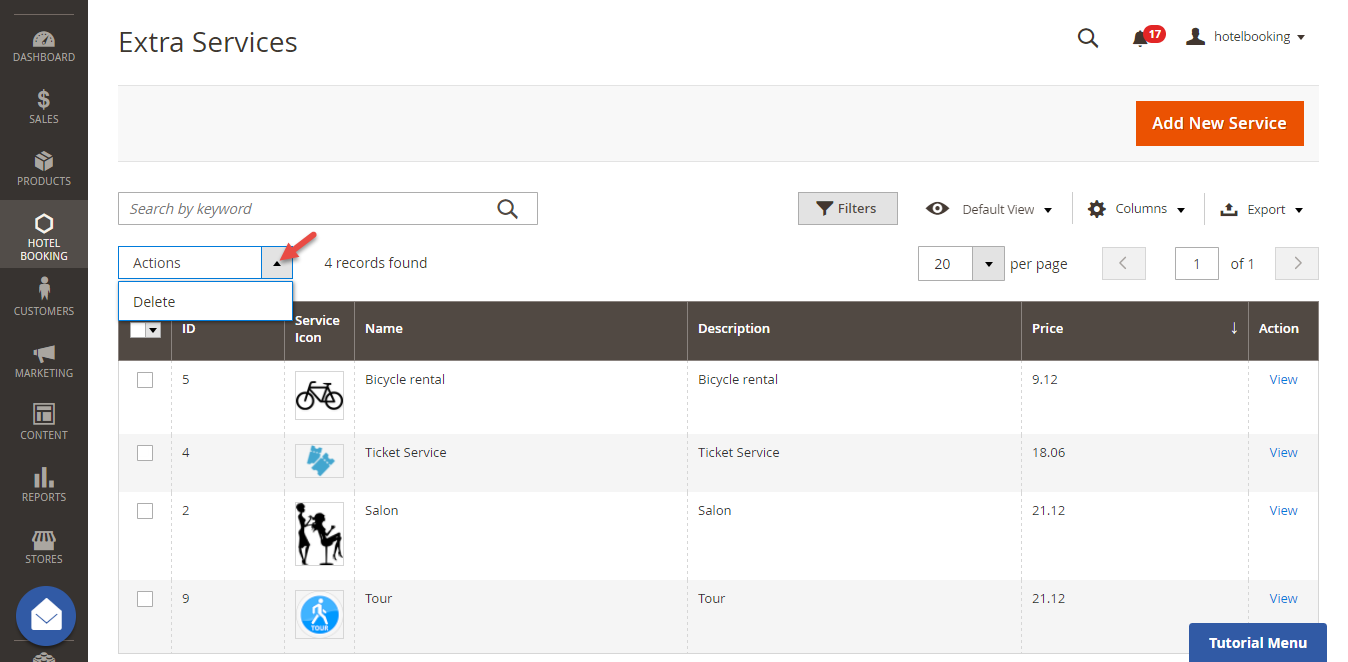
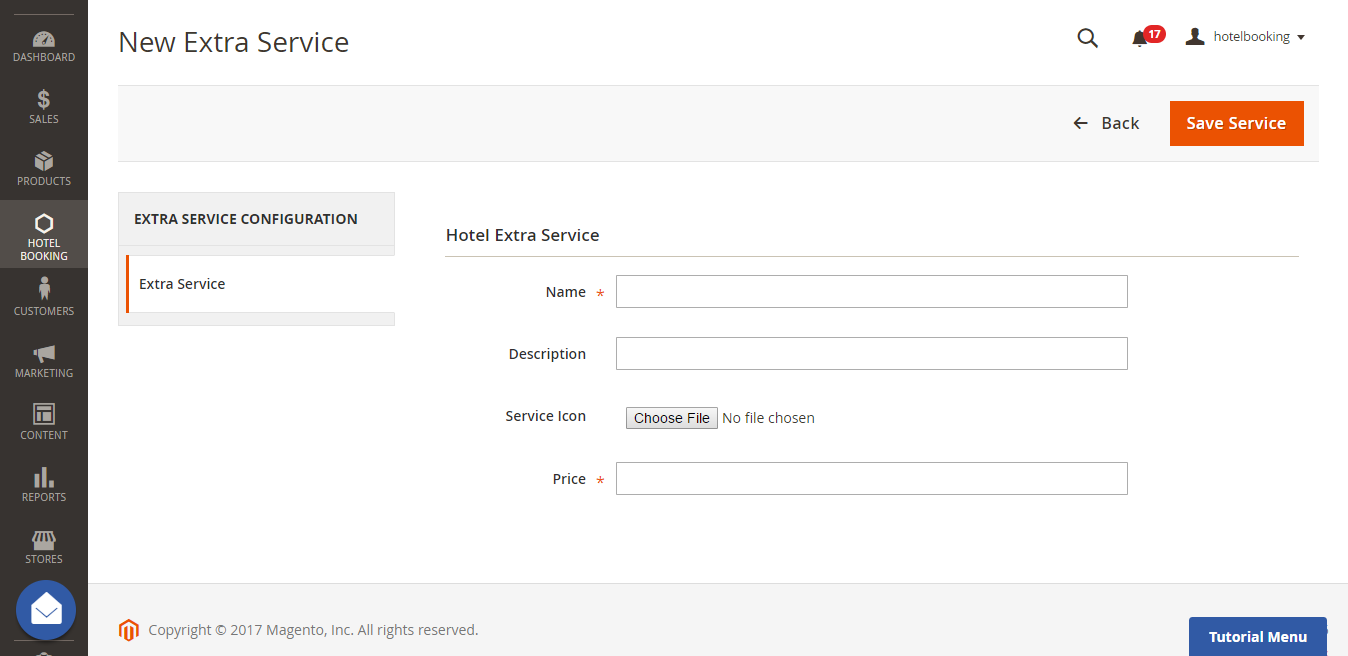
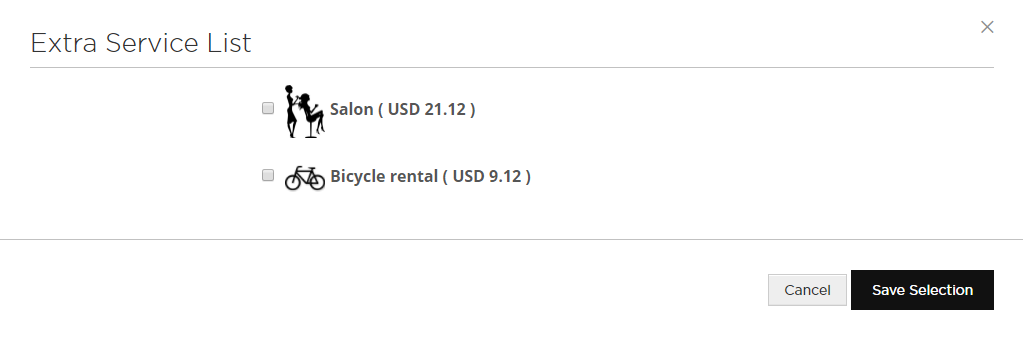
Extra Service:
Your customers can choose whether to have extra service with their hotel room. They will must pay an additional fee for these extra service. Go to Hotel Booking menu > Extra Services > Click on Add New Service button to create a new extra service:
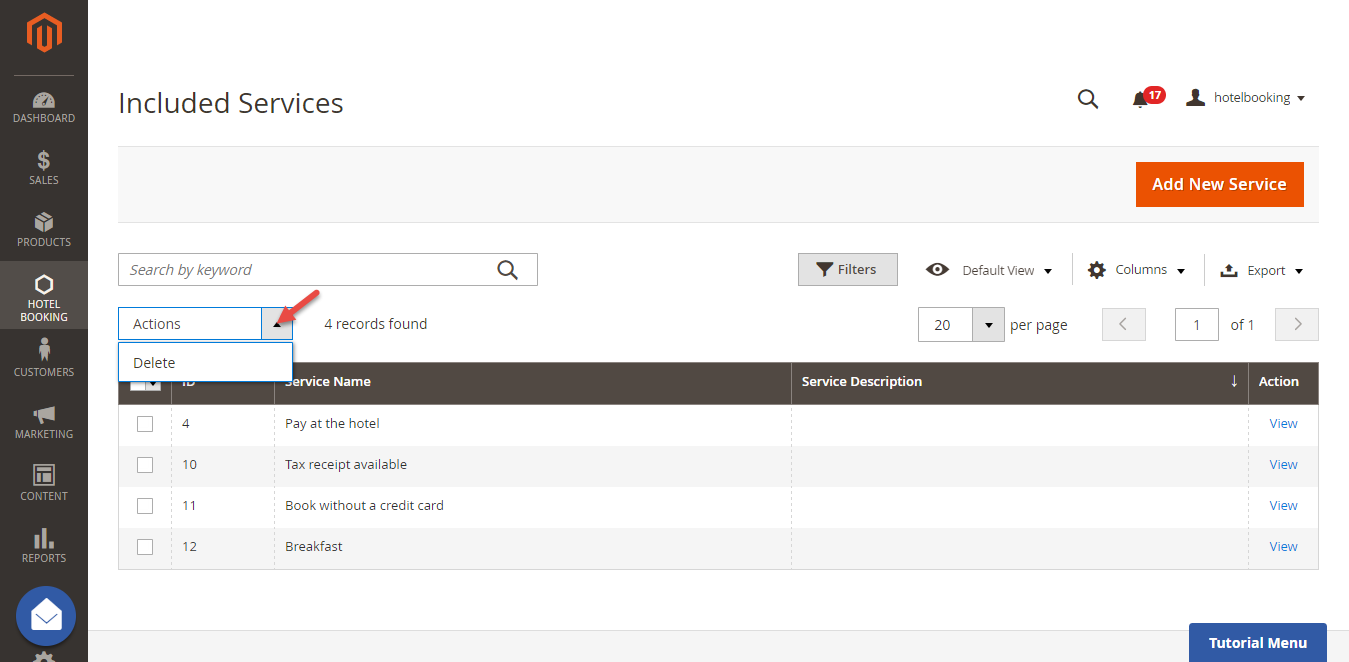
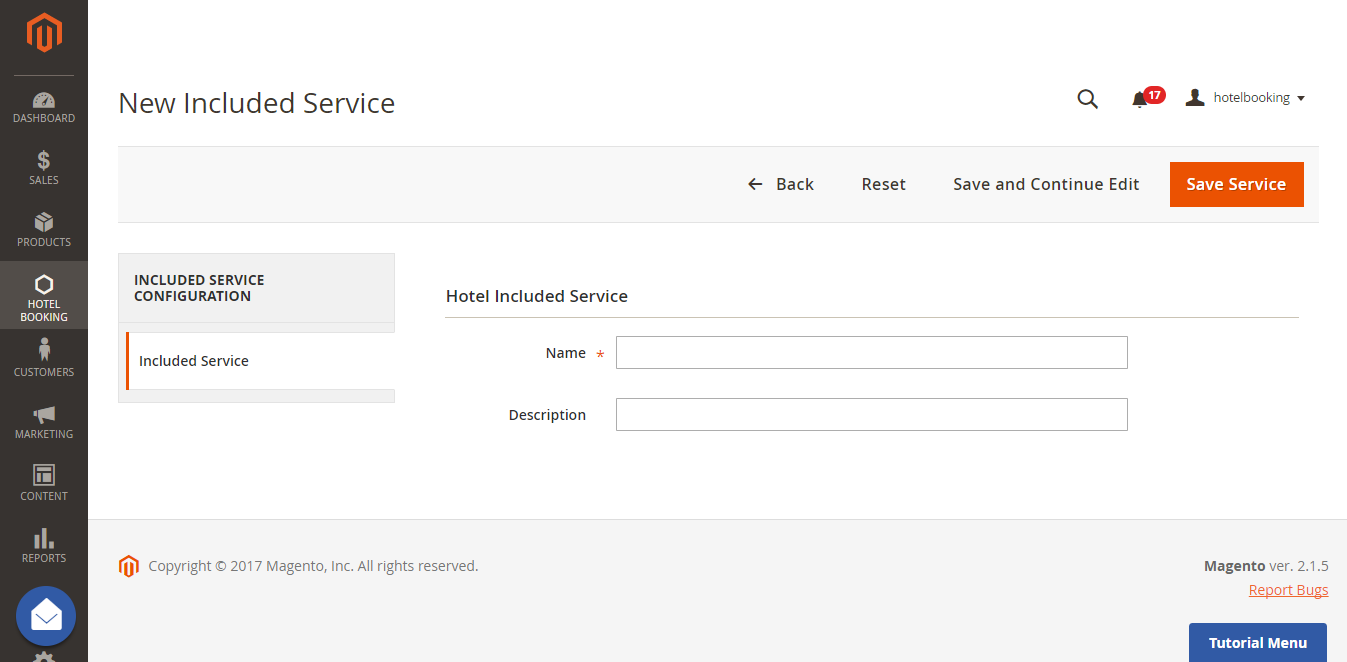
Included Service:
The included service that goes with the hotel room. Customers do not need to pay an additional fee to have this service. Go to Hotel Booking menu > Included Services > Click on Add New Service button to create a new included service.
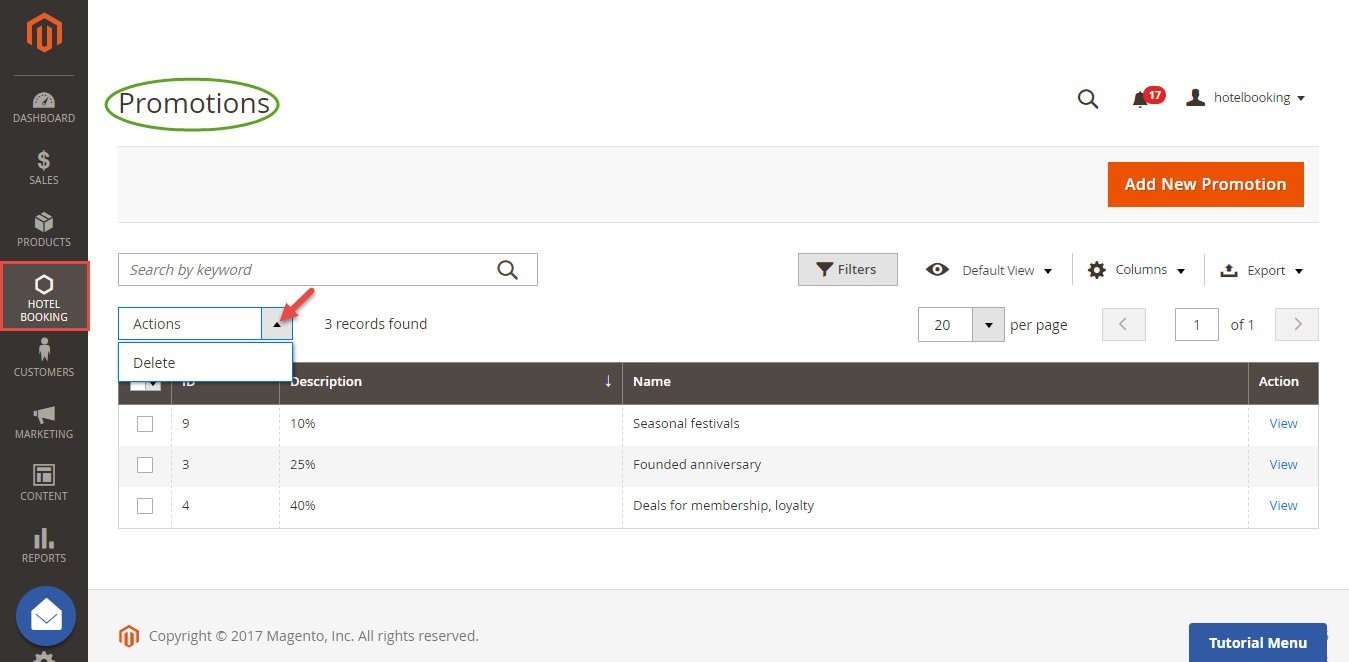
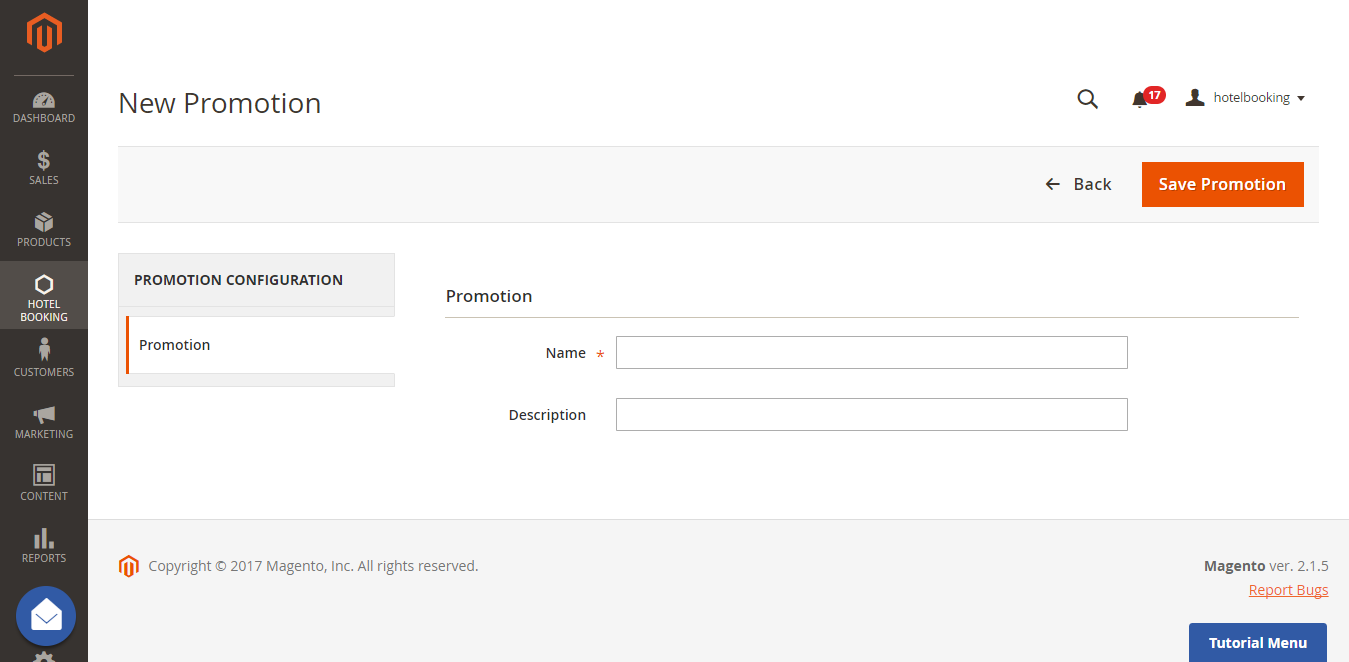
Promotion:
This is a powerful tool to boot sale. Hotelers can ease to set promotion. Go to Hotel Booking menu > Promotions > Click on Add New Promotion button to create a new promotion.
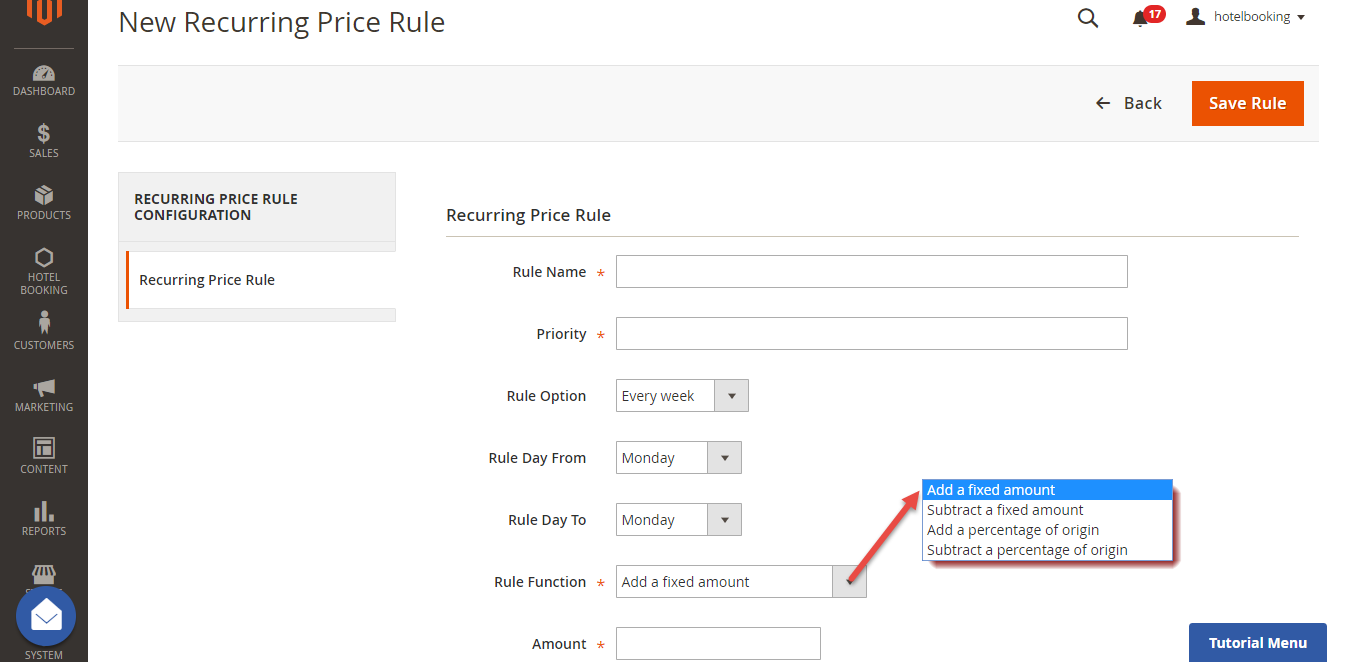
Price Rule
Price RulesWe have implemented 3 kinds of price rules: Staff Special Date Price RulesRule, Special Date Recurring Price Rules Rule, and Recurring Combo Price RulesRule. These rules will add some versatility into the effort of better-evaluating price of hotel bookings. With Staff Special Date Price Rules, go to Staff Price Rules to Special Date Price Rule tab in Appointment Hotel Booking menu .> click on Add New Special Date button to create a new one:


Rule Amount is defined so that if a staff of one type is selected on frontend by the customer, a corresponding amount will be added to the total (we will illustrate this in a later section). We recommend you to add a default type with Rule Amount set to 0 to prevent any abnormal functionality of the extension.

We have Then we have Special Date Amount, which will add or subtract a certain amount of money or percentage of origin when a certain date is selected.


Another price rules - Recurring Price RulesRule allows admins to create recurring price rules for Time Activity such as every day, every week, every month, every year.


Main Features
Define Product Schedule
The extension added a new product type called Appointment Booking into the system, so you need to add a new product of type Appointment Booking to get started.

In the product detail page, go to Advanced Settings > Appointment Booking.

You will see a row of inputs which defines a schedule for the current product. You can click on Add Schedule to add a new schedule row. All saved schedules will be sorted by weekday, in ascending order.

Click on Save and your newly filled schedules will be saved. You can also delete an existing schedule by clicking on the Delete button. One remind here, the schedule will not be saved if one input is not properly filled.
Define Staff Information
Go to Backend of Magento 2 store > System > All Users > Add New User button to add staff into stores.

At Staff Management tab, you will be taken to the users list. From now on, you will be able to make an admin user a staff. In detail, you can add some information of the staff as below.

You can also add working schedule for the staff. This is nearly identical to the discussed product schedule.

Note that, go to User info tab to reconfirm password when you make any changes.

Lastly, the user can view booked orders in which the staff has been chosen.

Usage Procedure
When a customer is on a frontend detail page of a product of type Appointment Booking, he will be able to select a date with a date picker input field as shown.

When a day is selected, the system will check if there is any product schedules available that day and display them. It will also check if the selected day is within a special date range as formerly specified.

Then if a schedule is selected, the system will now check the staff with the corresponding schedule. Some information about the staff will also be displayed.

Then when the customer add the product to cart, he will be able to view the product options which are also booking options.

When the order is successfully placed, this is what it will looks like on My Orders page in customer's My Account.

For easier management over booked appointments, the customer can also check the My Booked Appointments tab.
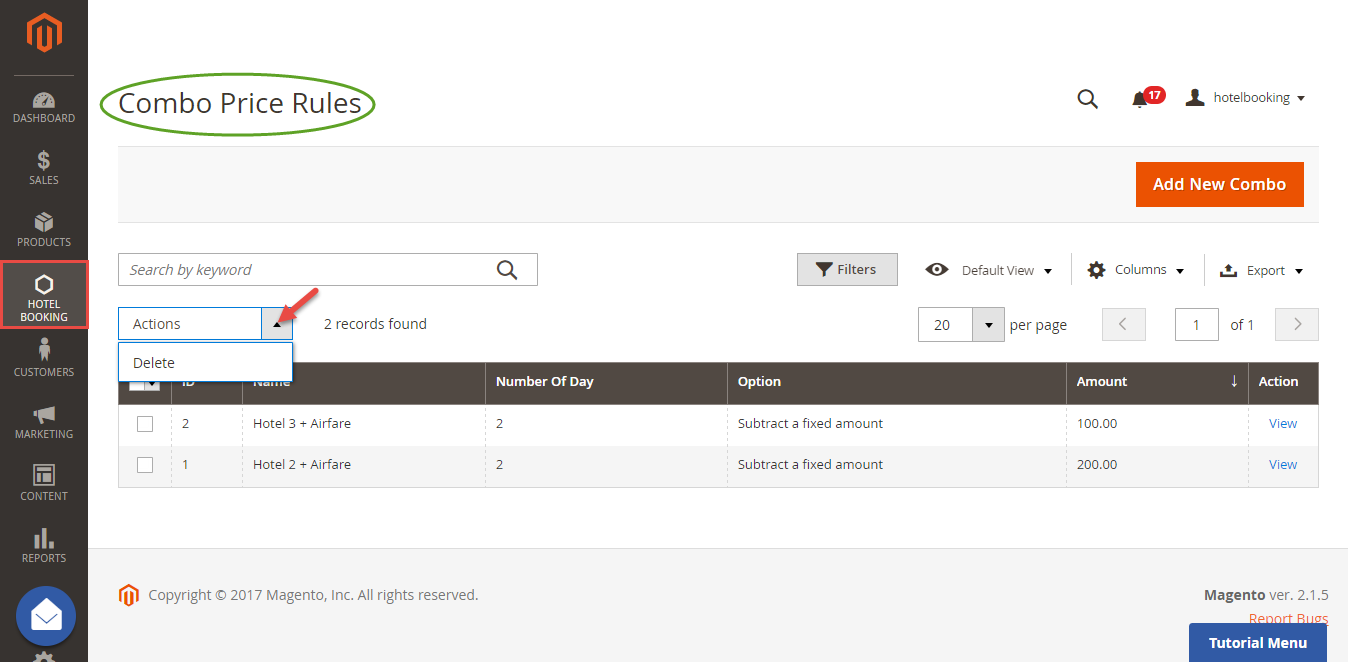
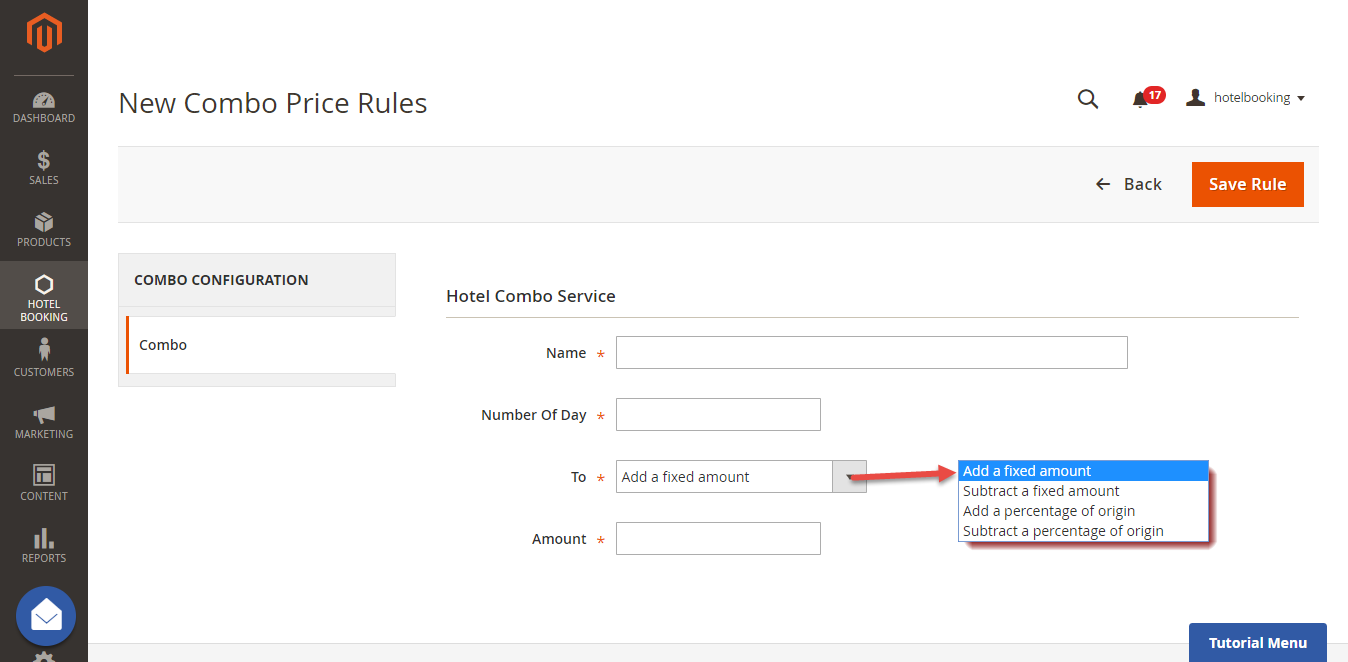
Combo Price Rule
In addition, Hotel Booking for Magento 2 by Magenest allows you to create combo price rules for your hotel. Navigate to Hotel Booking > Combo Price Rules > click on Add New Combo button to create a new one:
Main Feature
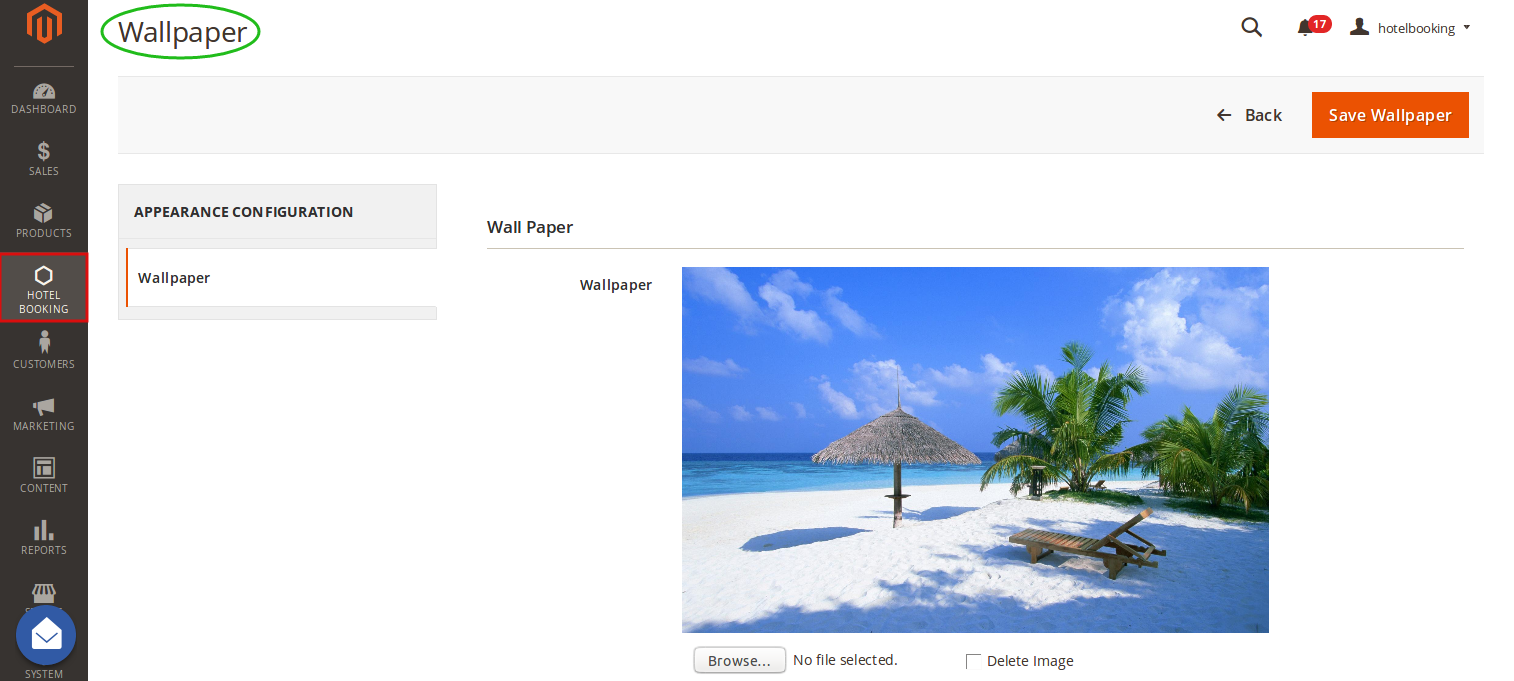
Wallpaper
Hoteliers can create wallpaper for their hotel website. From backend of Magento 2, go to Hotel Booking > Wallpaper > Choose File button.
Define Hotel System
Navigate to Hotel Booking > Hotel System. Admin will easily manage their hotel system here.
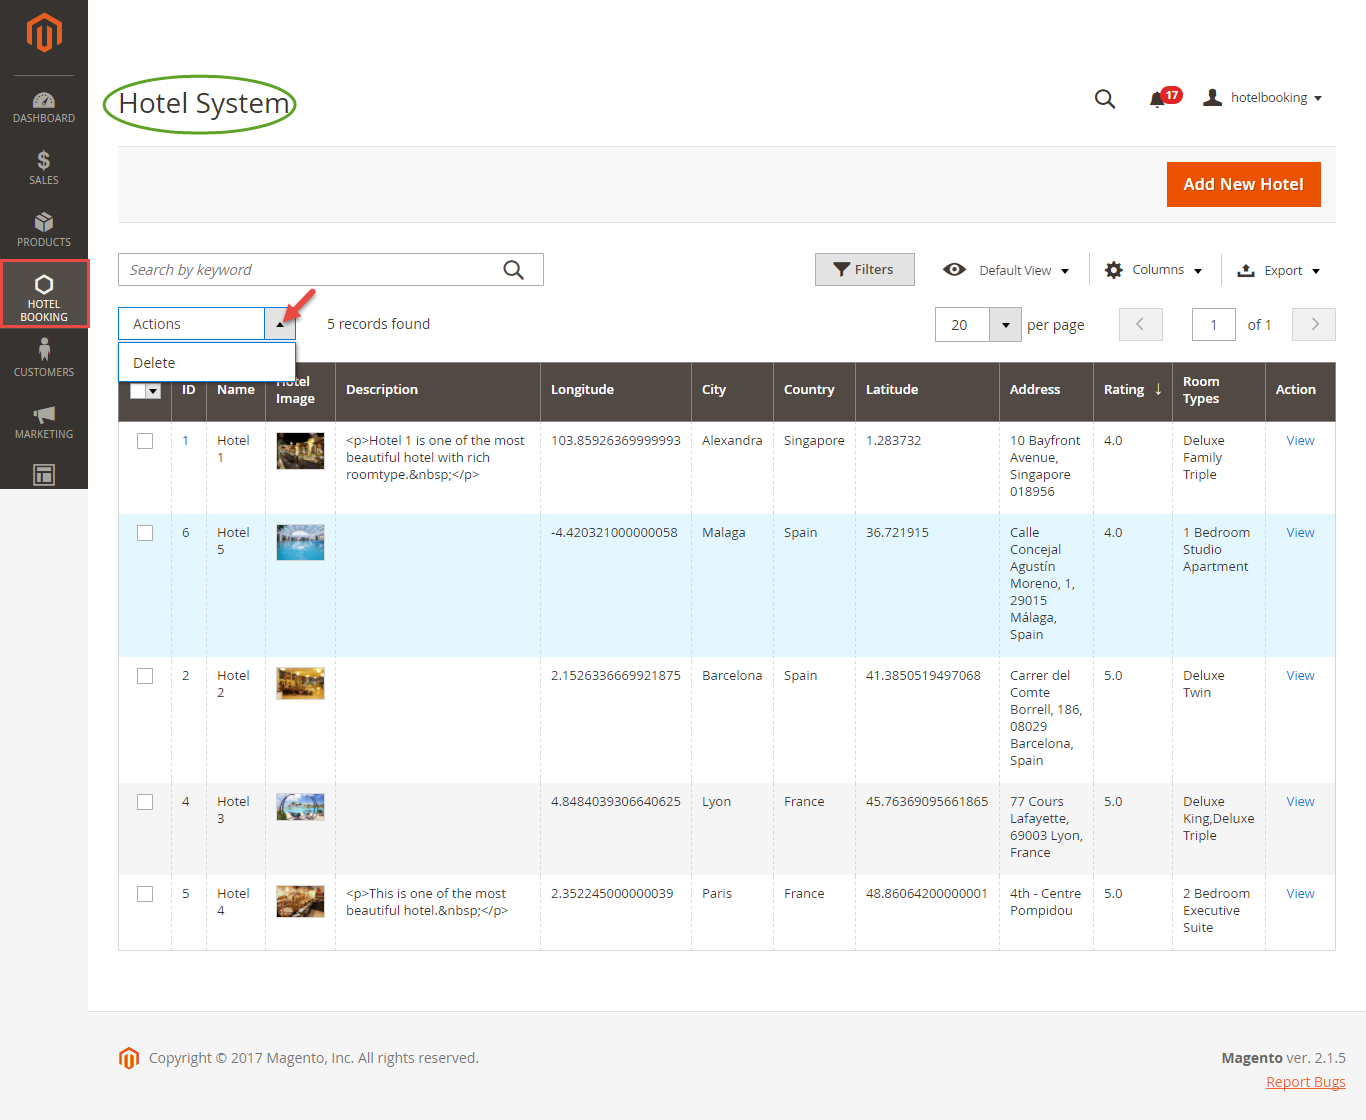
Click on Add New Hotel button to add a new hotel for hotel system. For each hotel, admin can set up all the necessary information about it such as name, country, address, city, image.
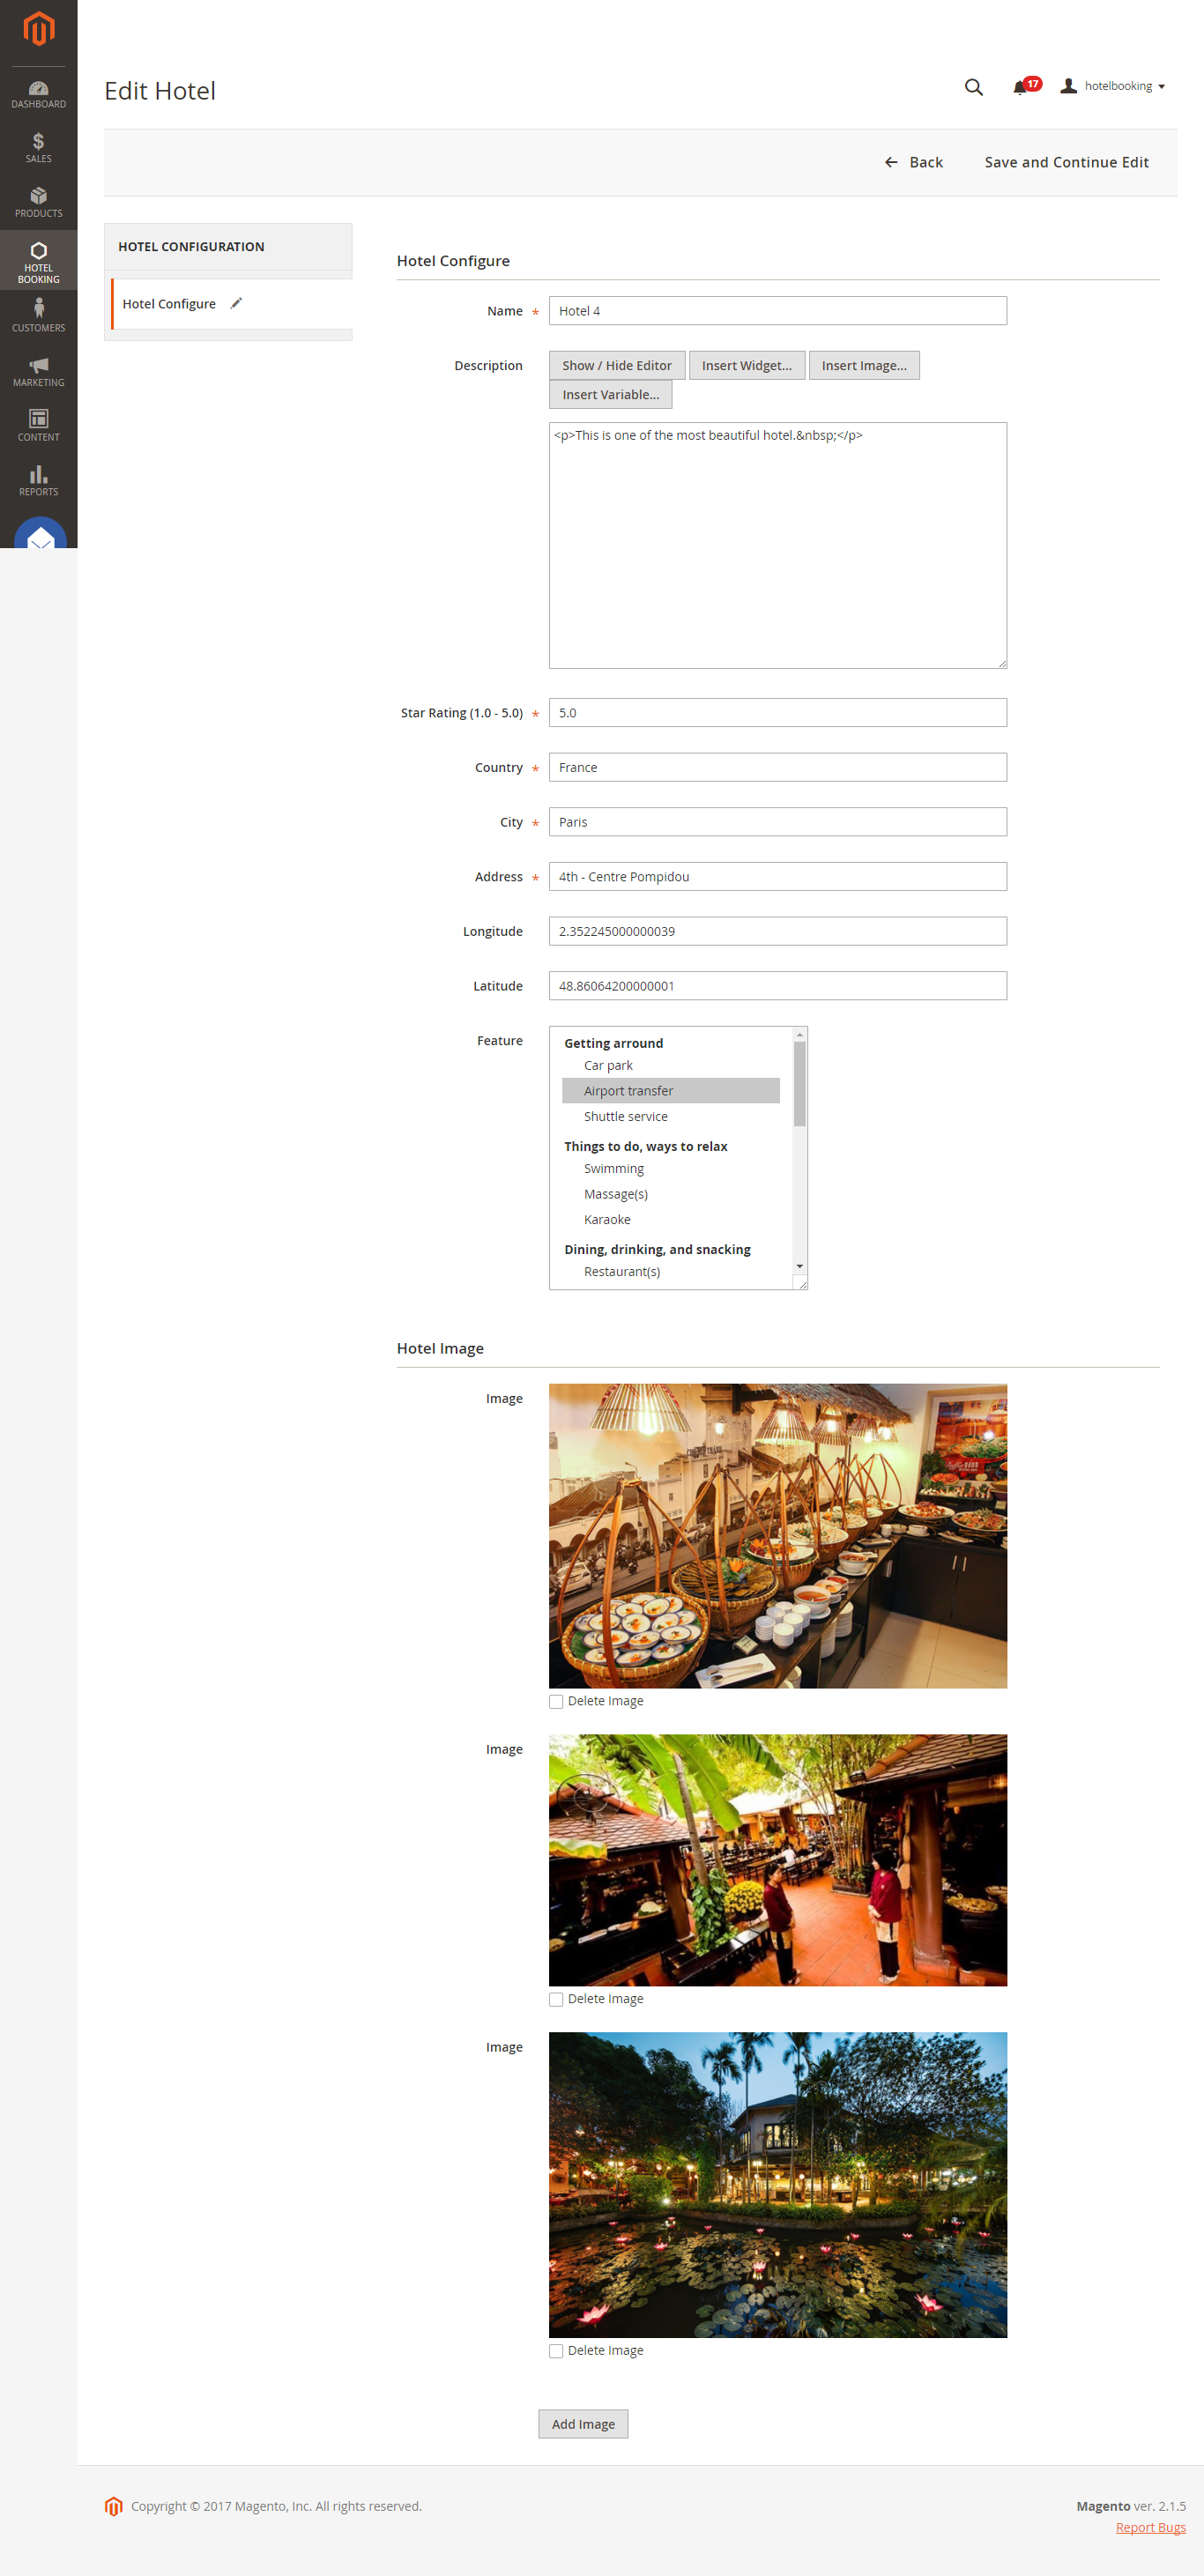
Define Room Types
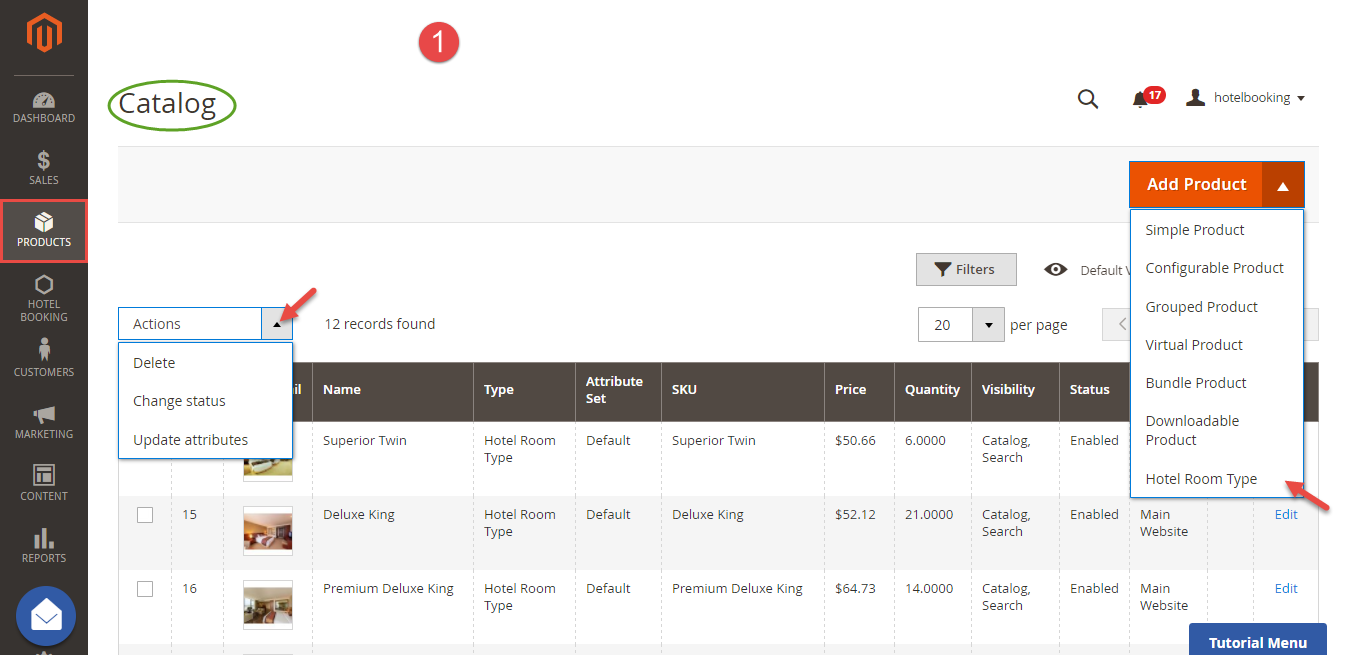
The extension added a new product type called Hotel Room Type into the system. Admin need to create a Hotel Room Type product before setting up services for that room type. Go to Products > Catalog > Choose Hotel Room Type button. Admins can set up name, the number of the hotel room...
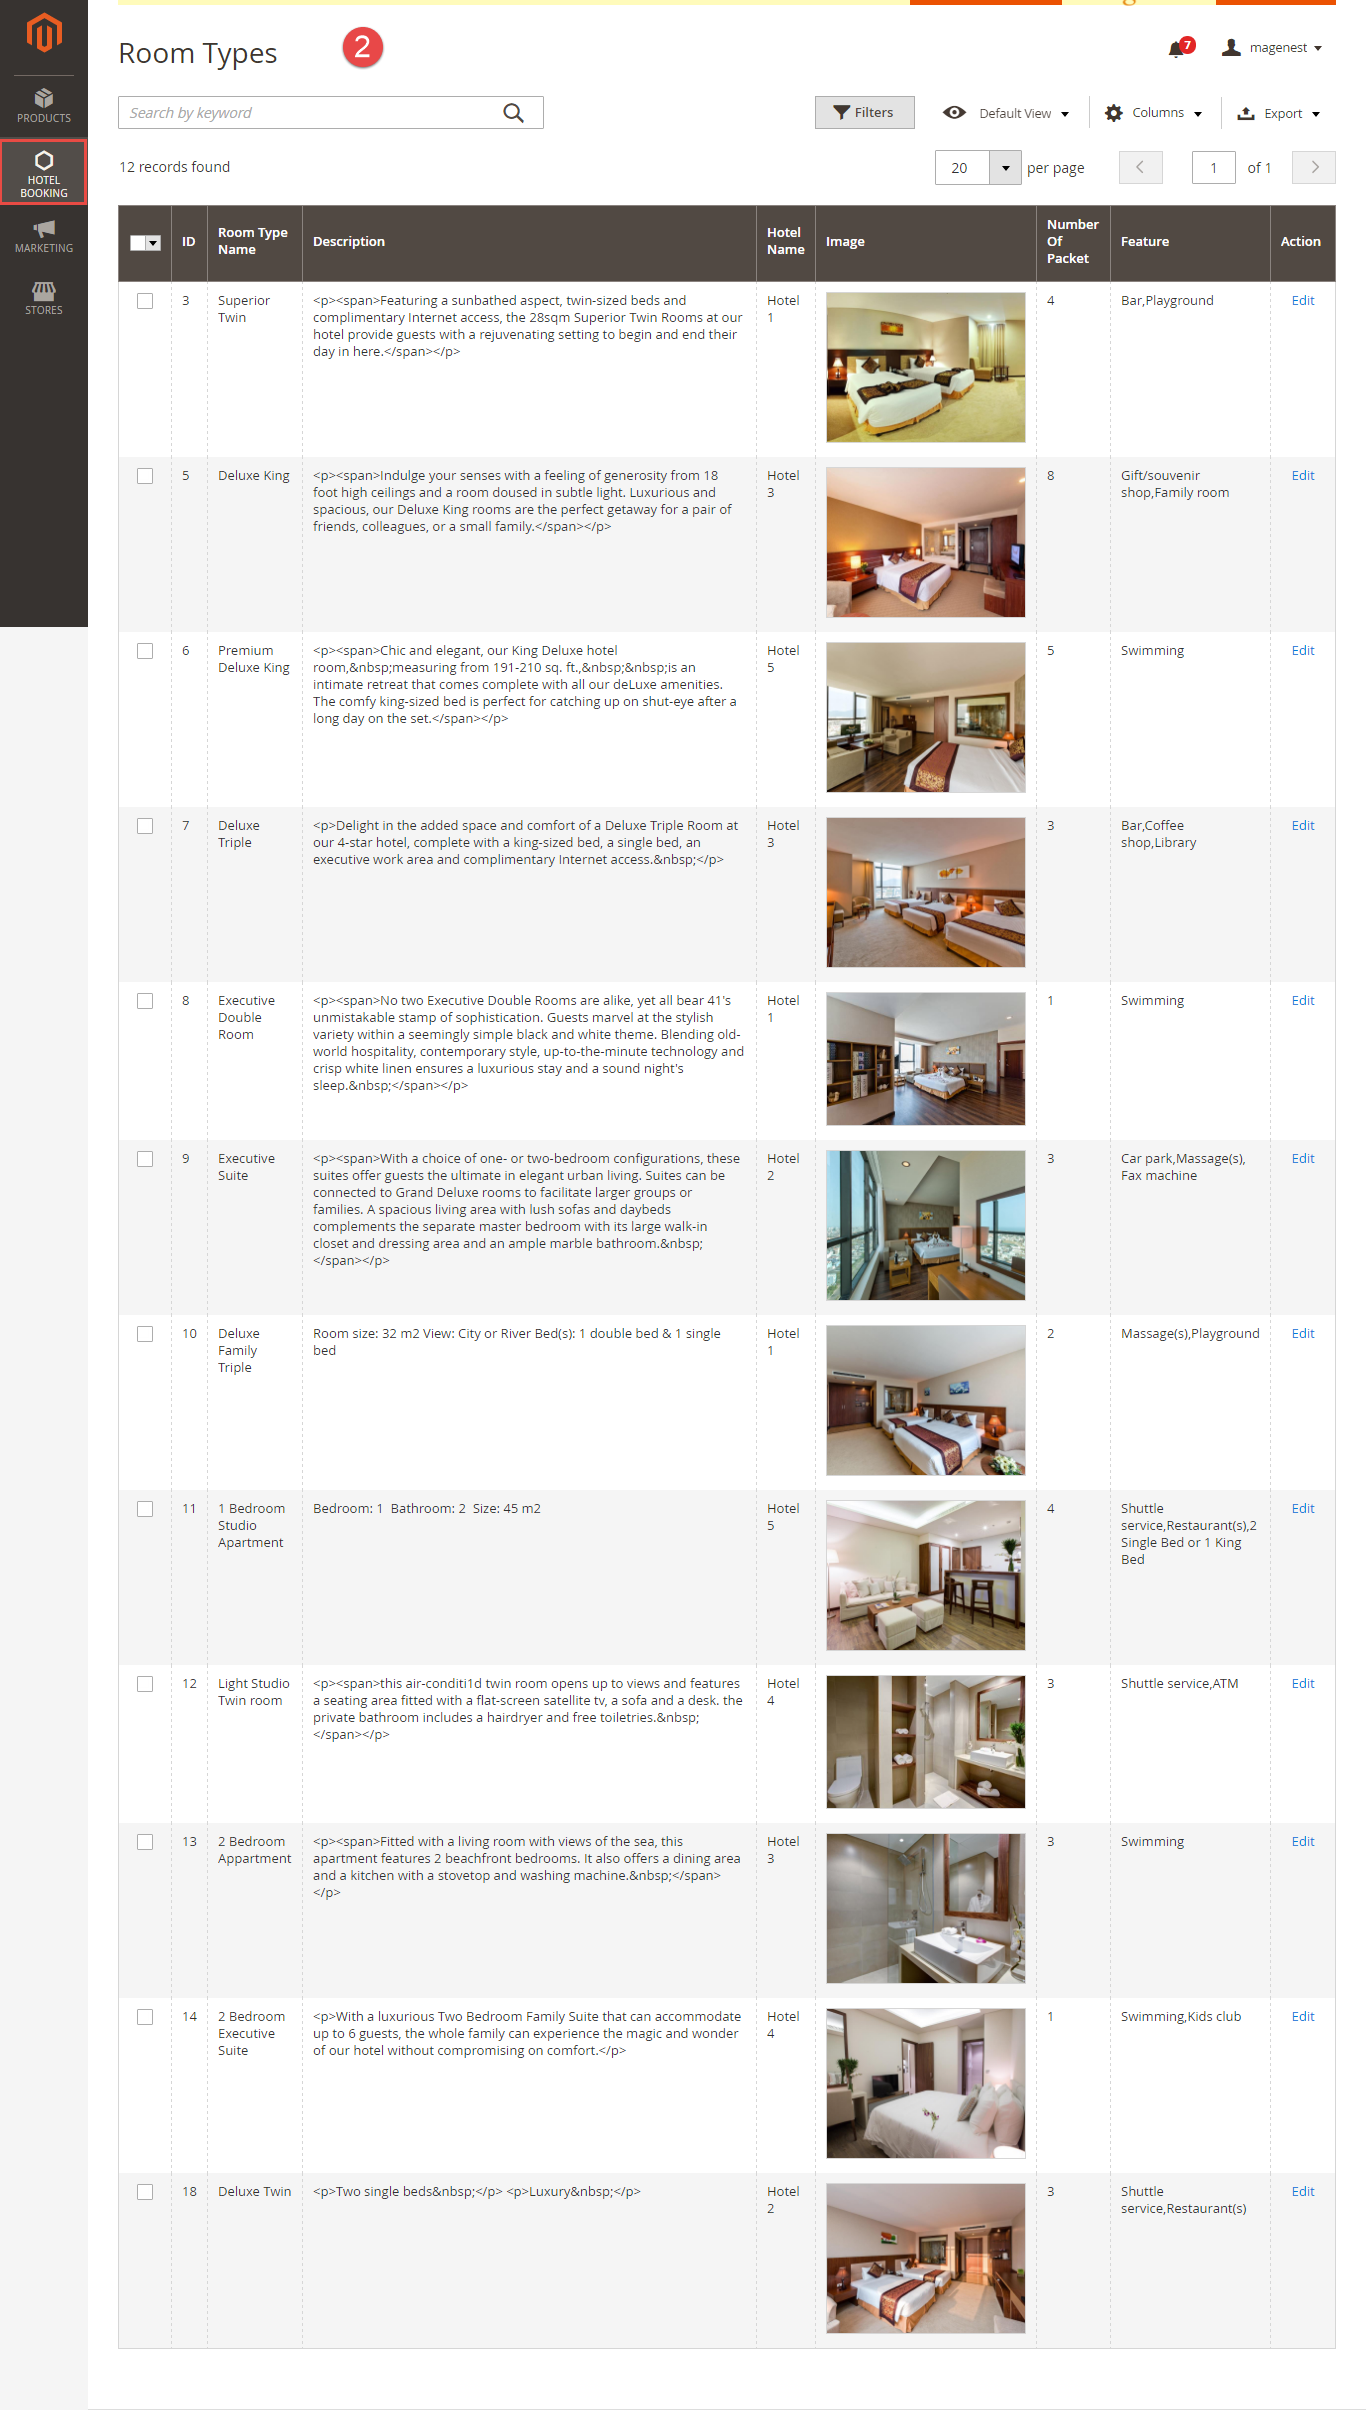
Then, navigate to Hotel Booking > Room Types, click on Edit button to set up information for your hotel rooms.
The Edit Room Type page appears as below. Each Room Type will go with one hotel.
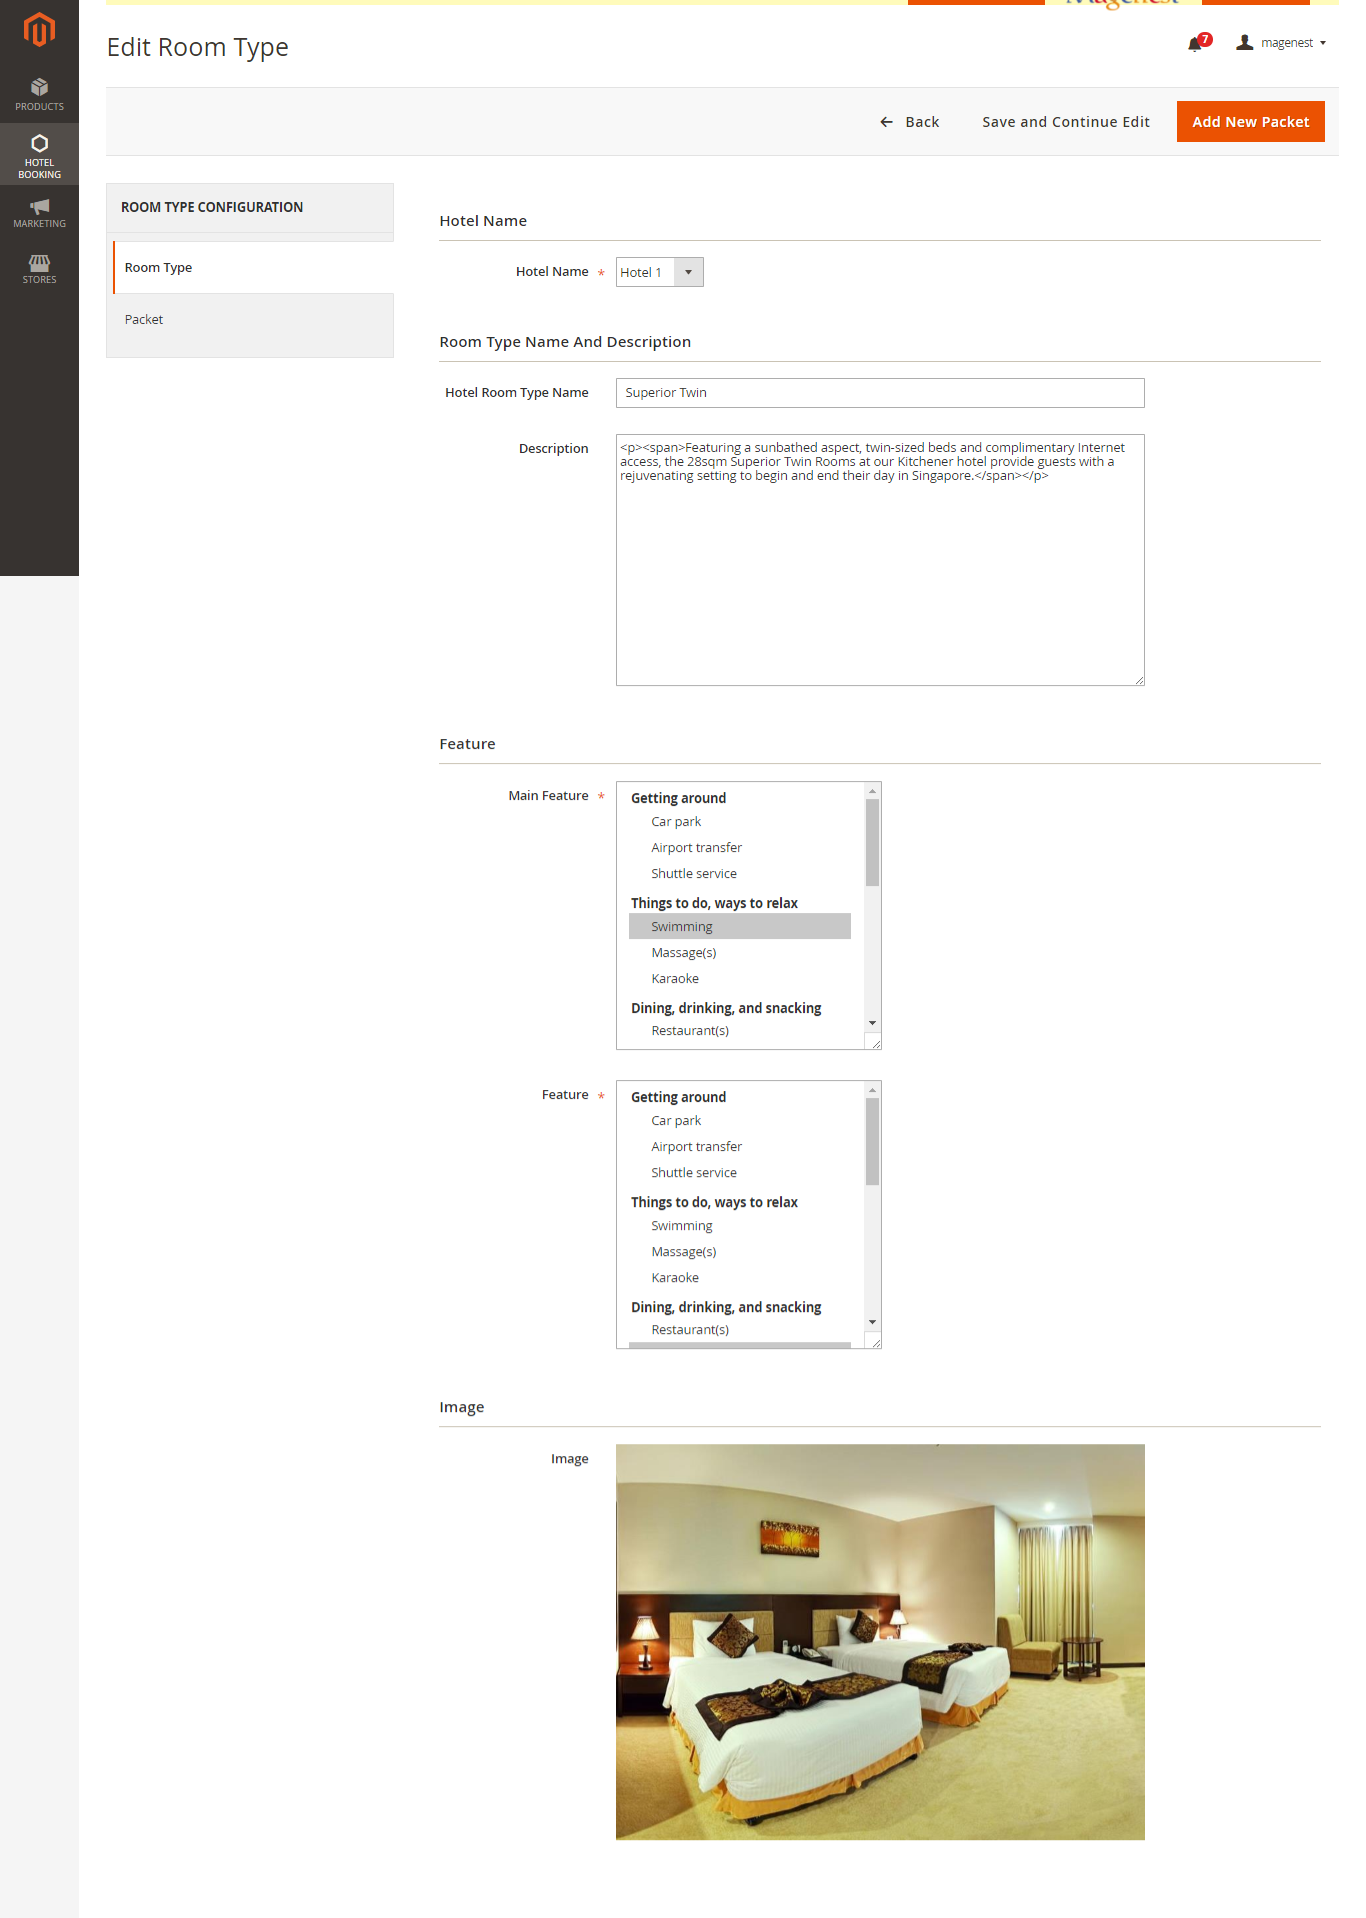
After entering the necessary information for the new hotel room. Admins can set up bundle packages by click on Add New Packet button. A packet page appears.

Click on Save Packet button and your new hotel room type with its packet will be saved.
Usage Procedure
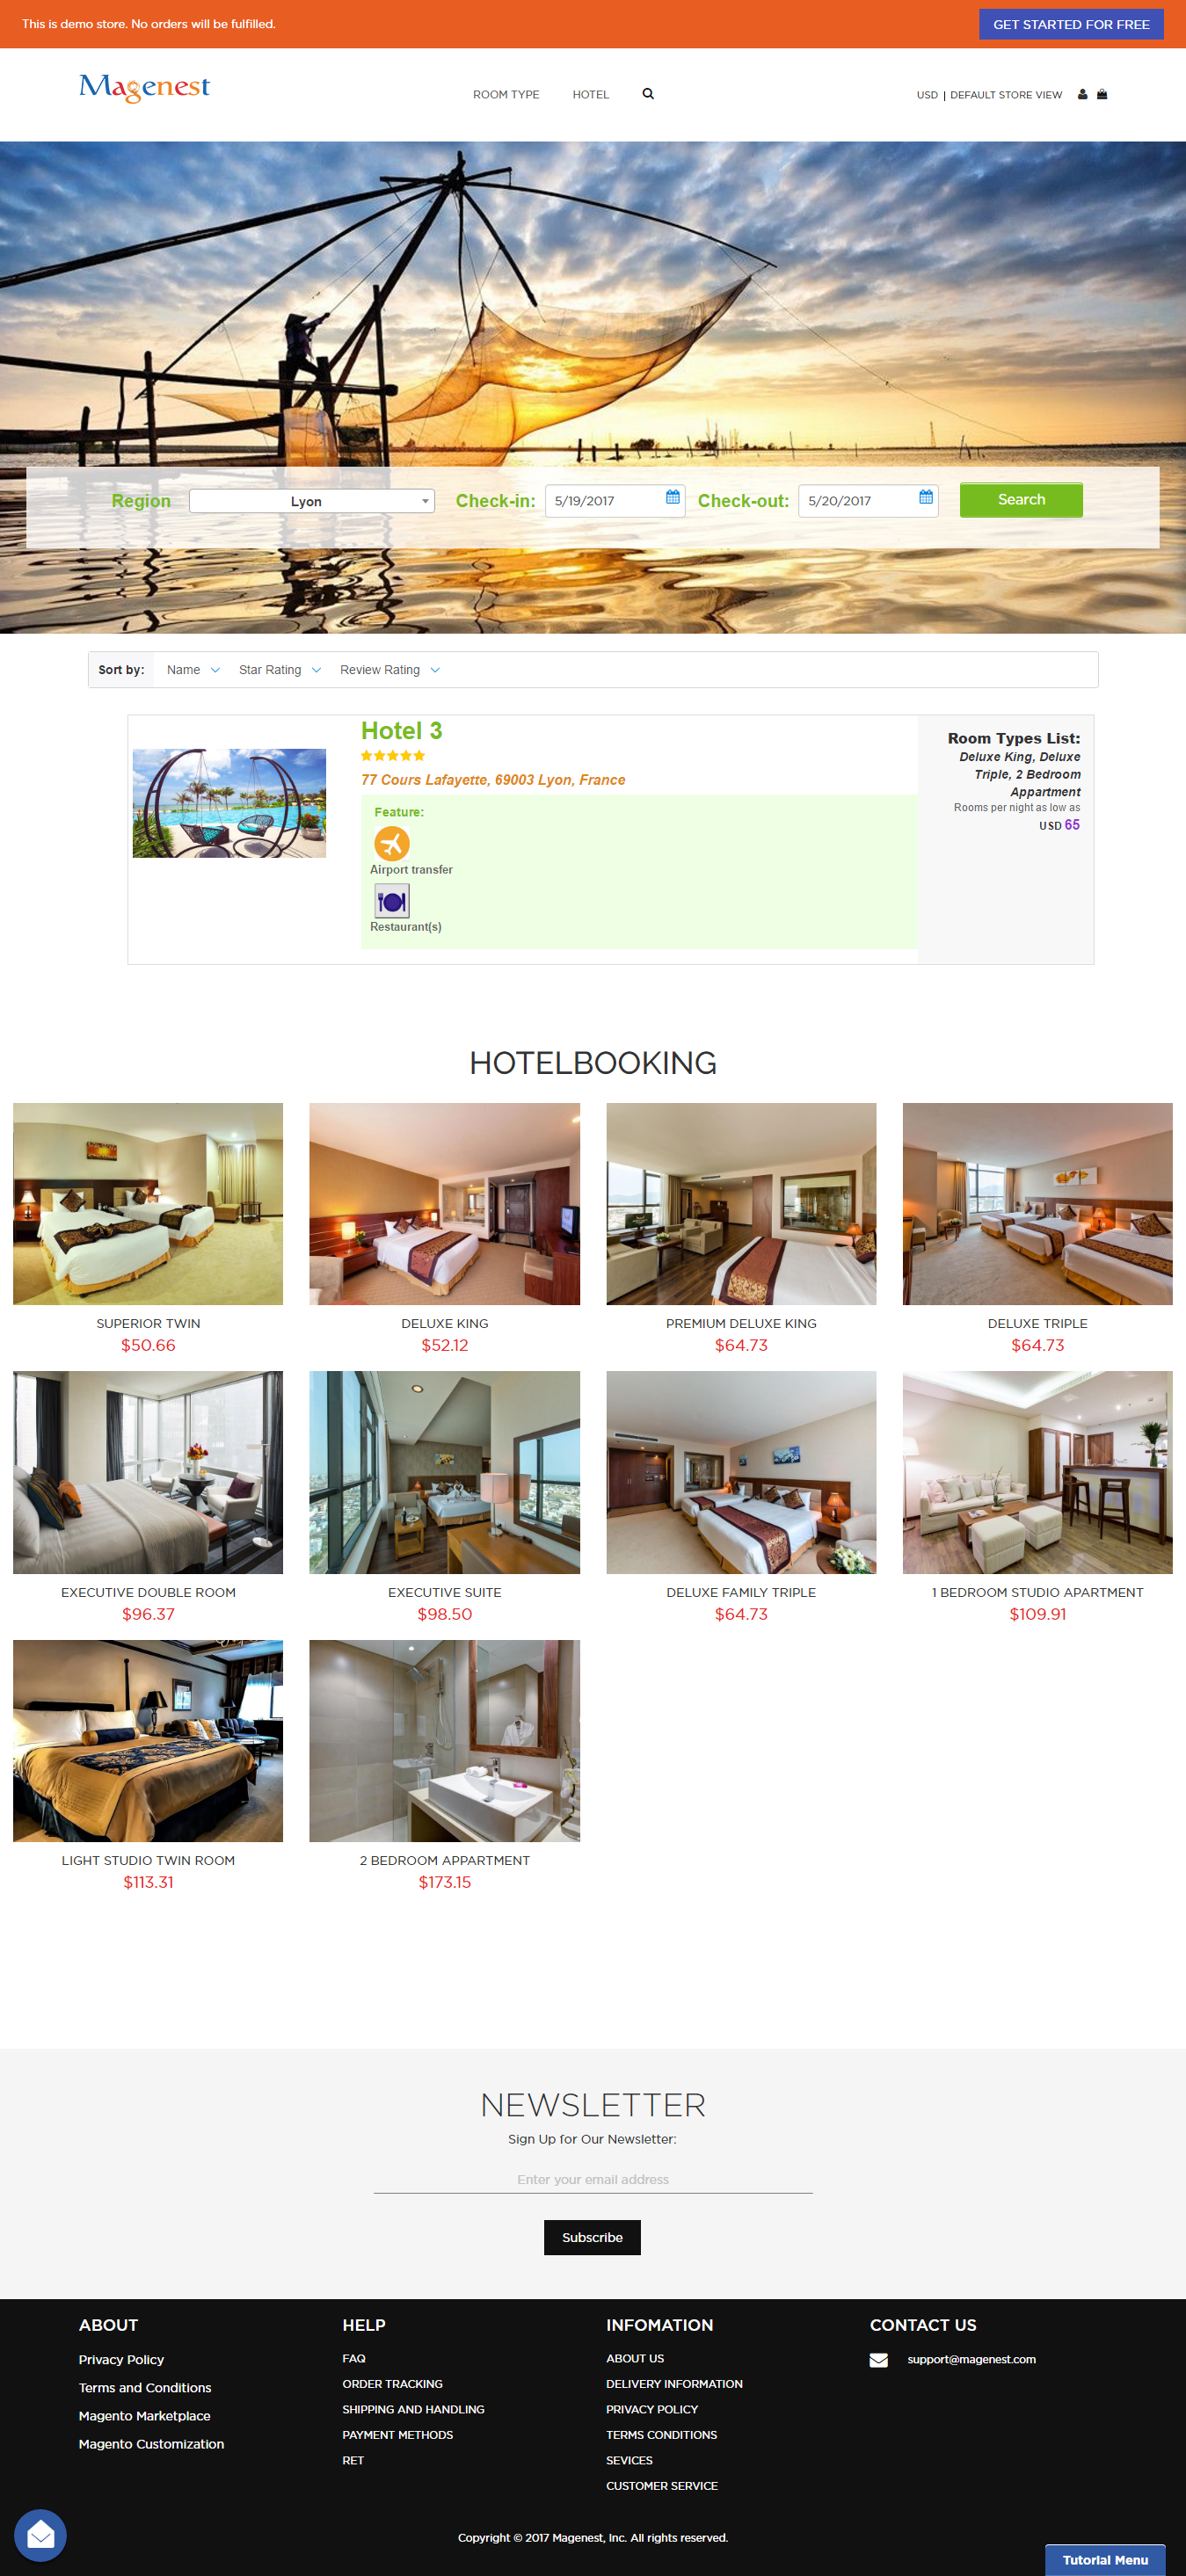
Customers can easily select a hotel that they need according to a city.
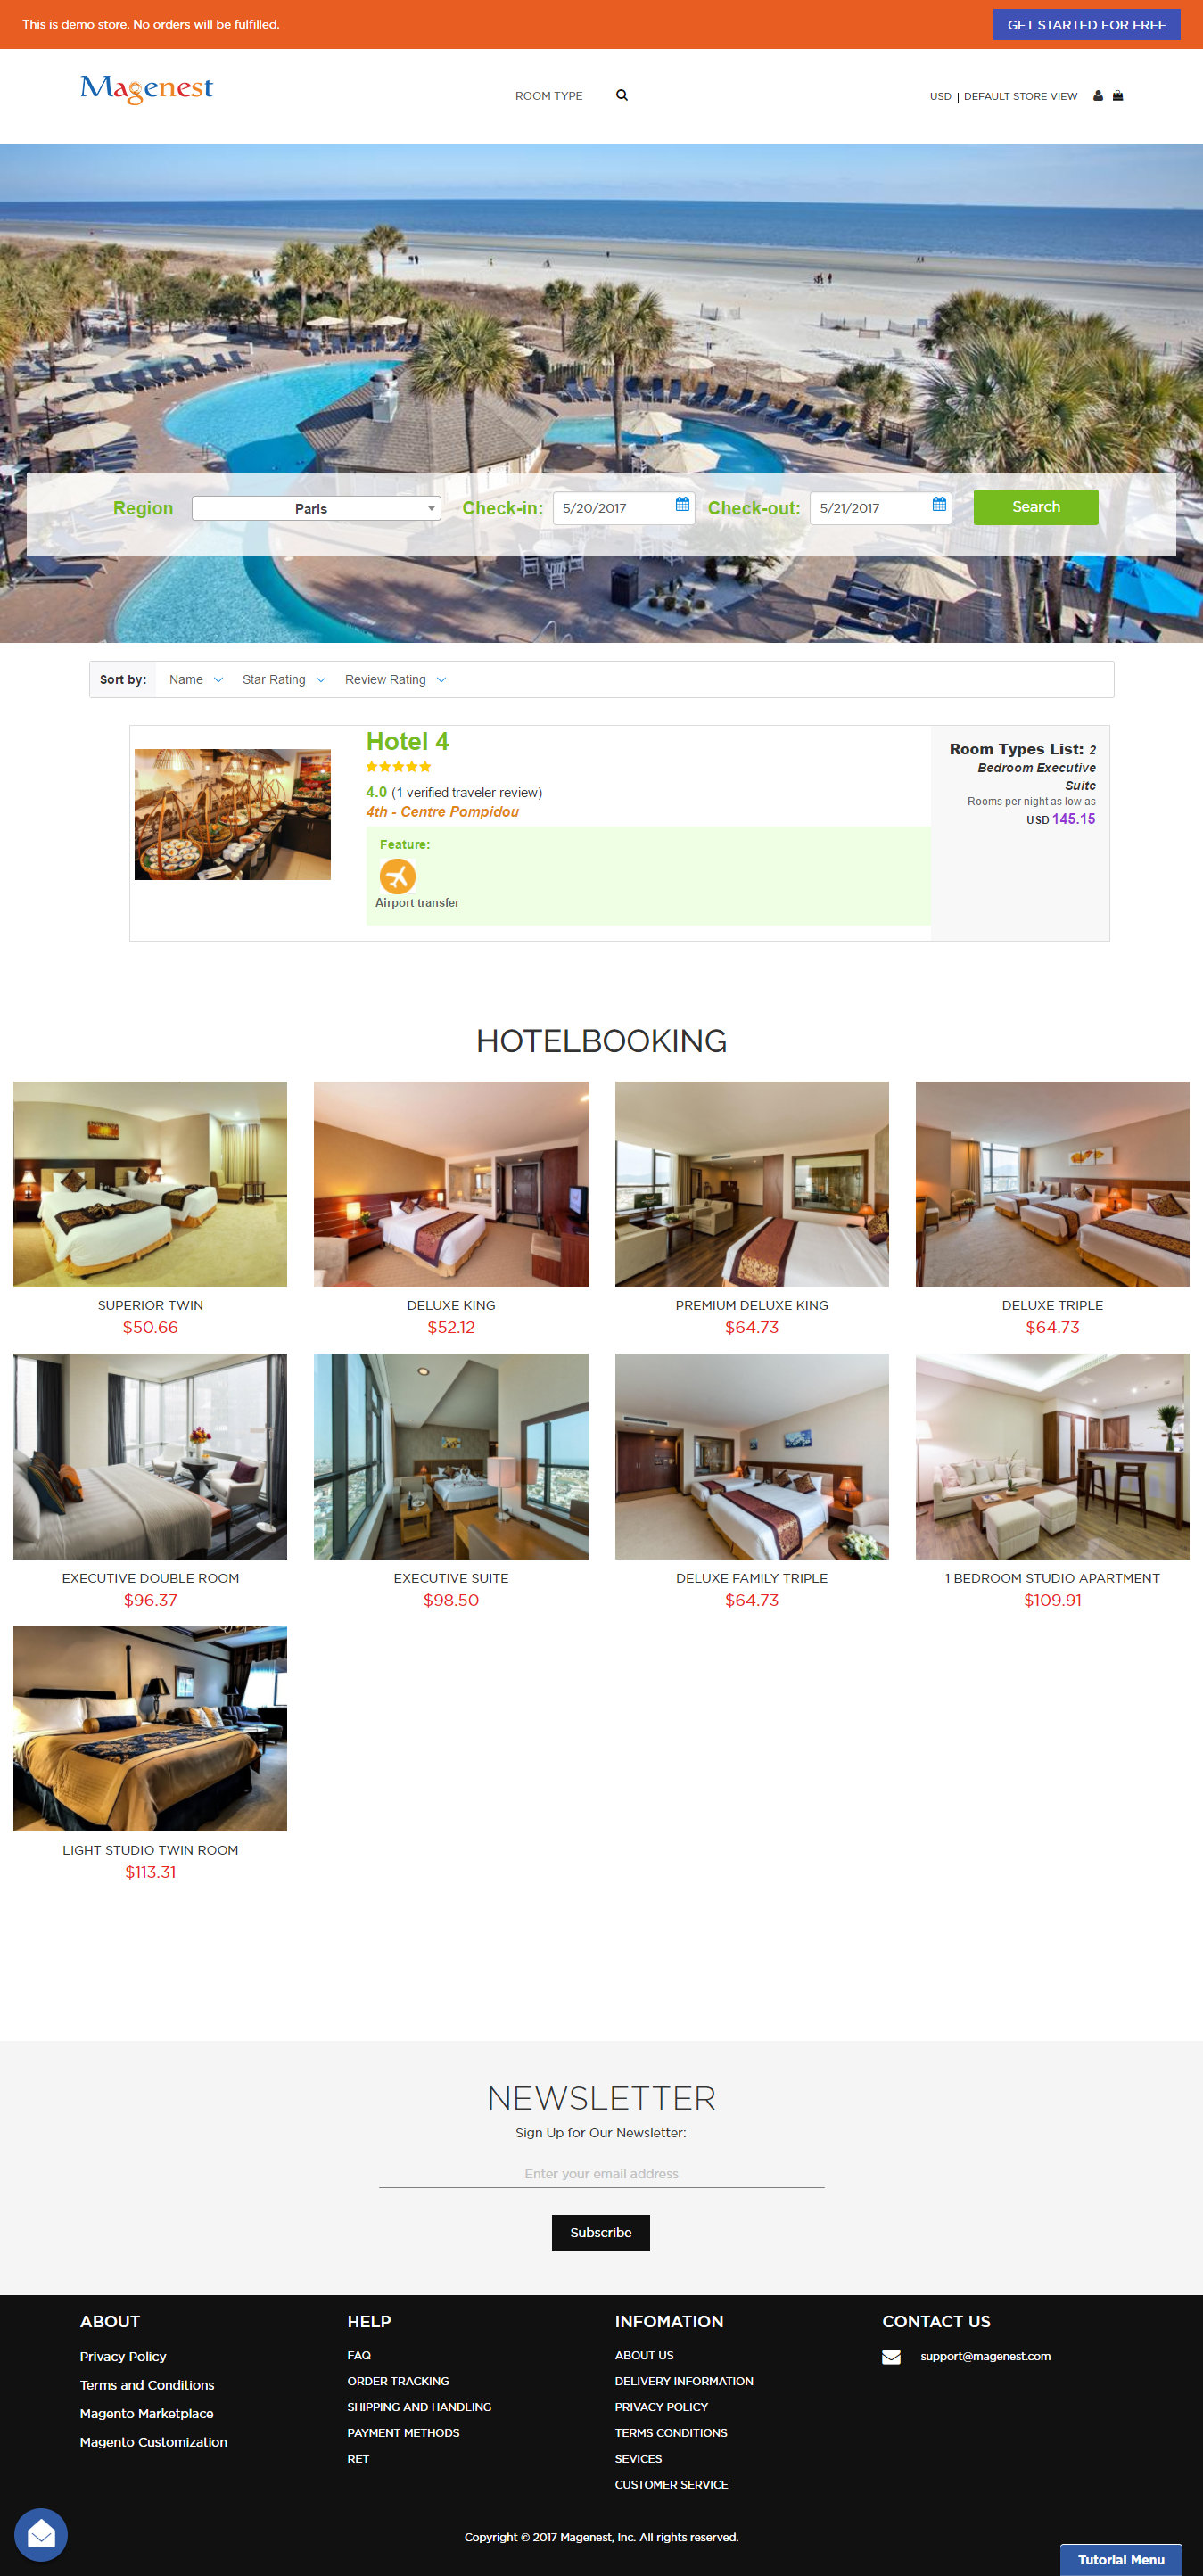
When a customer is in a frontend of Hotel Booking, he can easily find out the hotel room they want to book using search and filter.
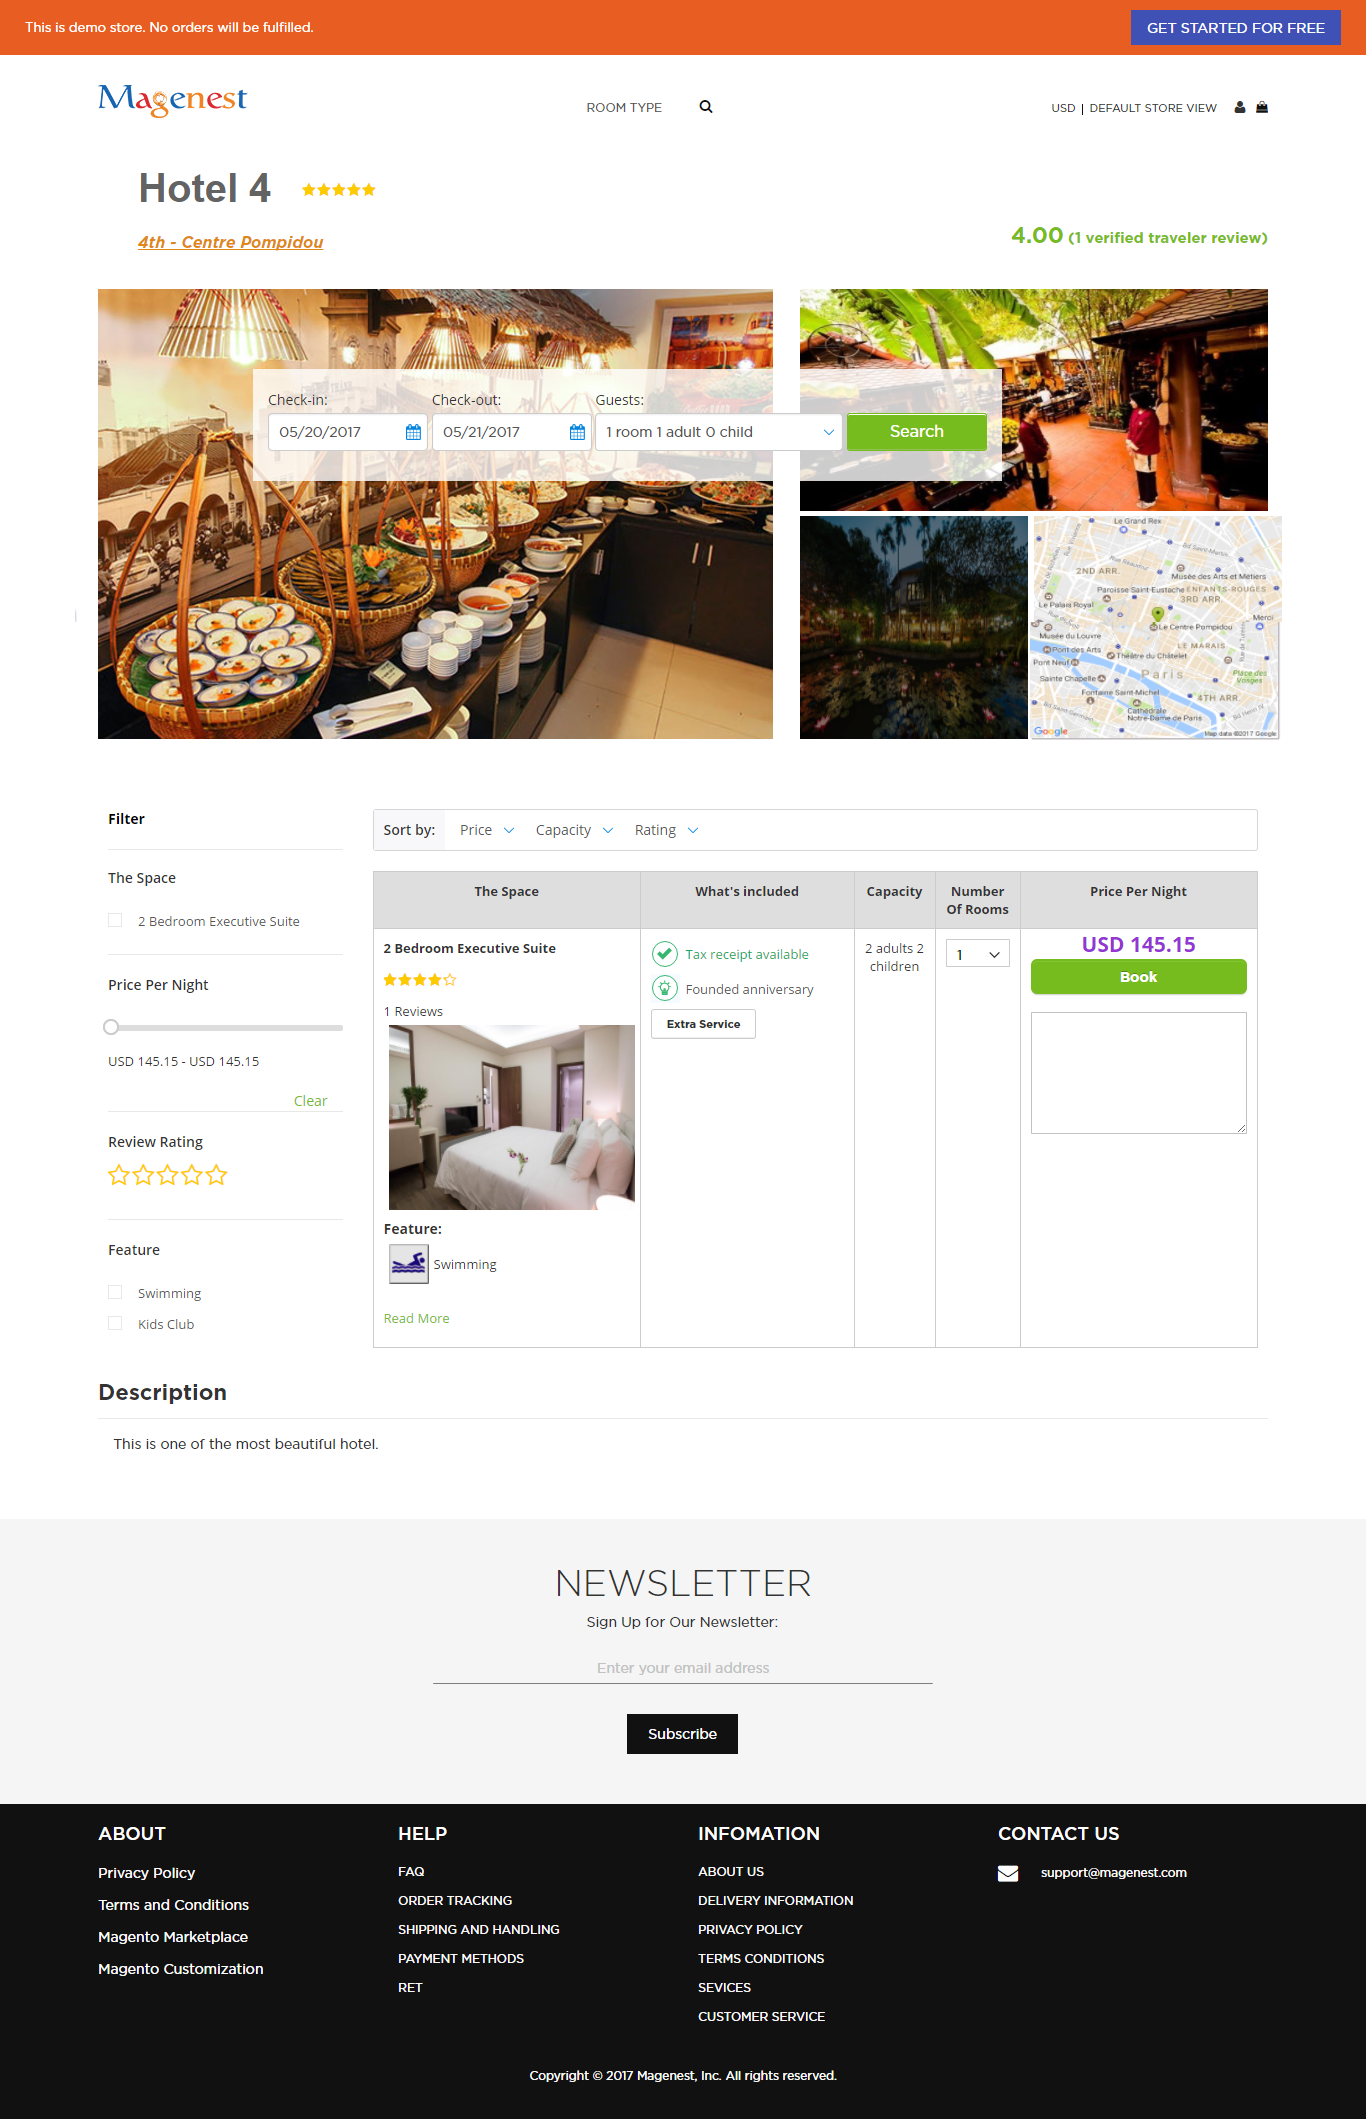
Customers can choose whether to add Extra Service to their room-booking.
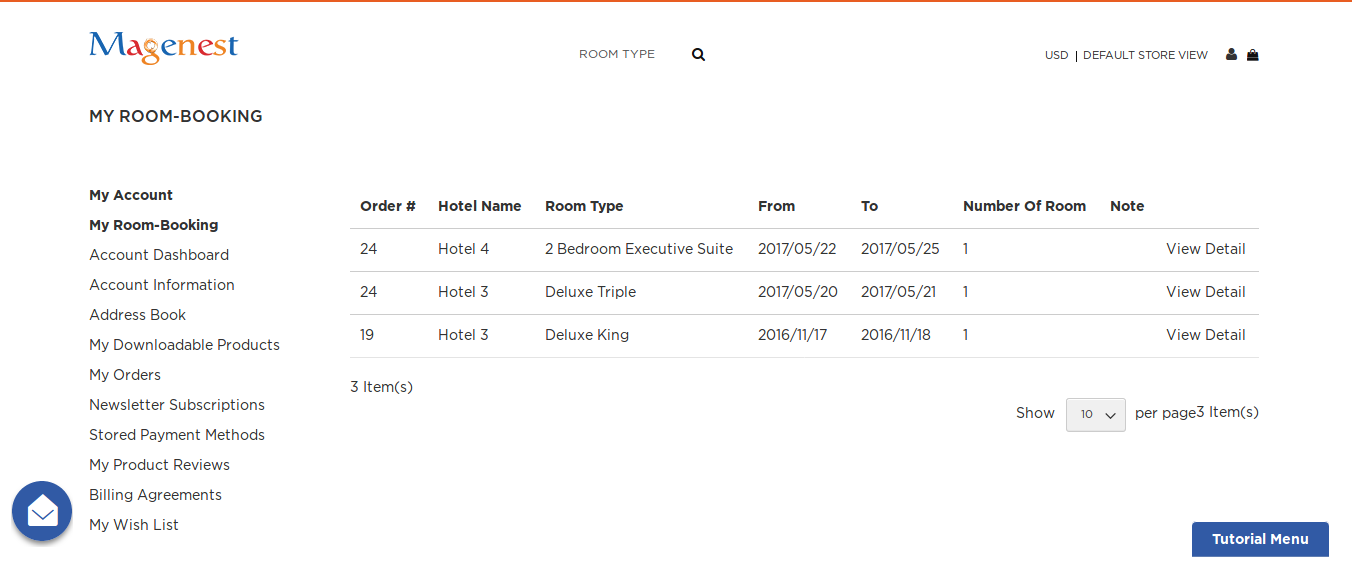
When a hotel room is booked, the system will check if there are any hotel rooms available. Customers can view everything related to their hotel booking order by click on View Detail button in My Room-Booking tab.
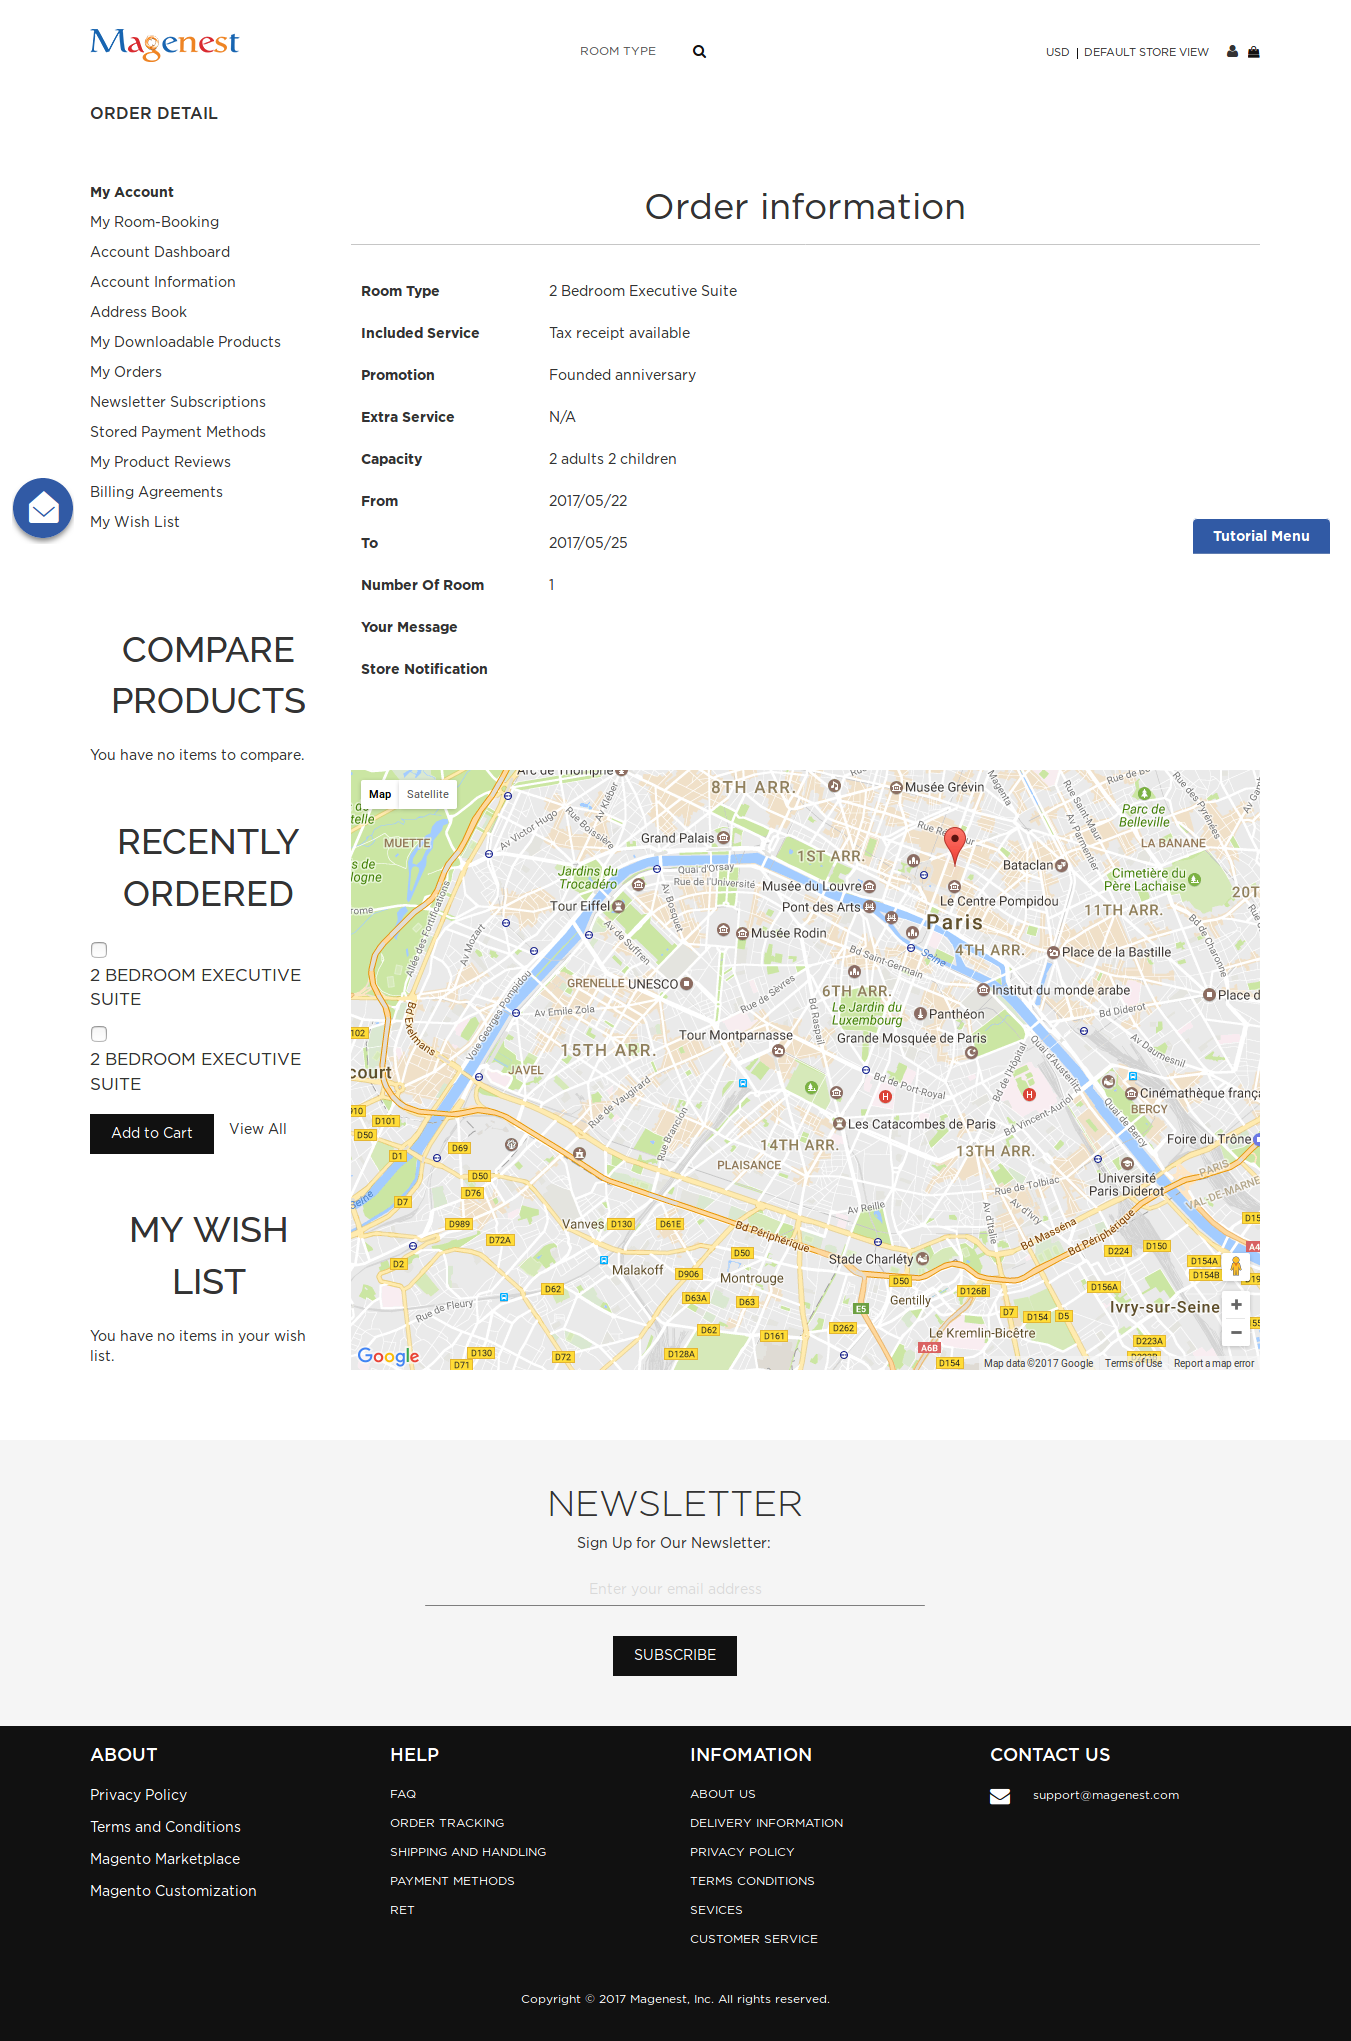
Oder Detail page:

From admin's perspective, he admins can view all booked appointments in Booking Orders tab in Appointment Booking menu.

Now the admin can view all booked appointments in Full Calendar mode, just by pressing the View in Full Calendar button above.

He can also sync and view booked appointments on his Google Calendar account by clicking Sync and View in Google Calendar button. One small reminder here, if your browser is already logged in with your Google account, you will probably encounter a cookie error. You can avoid this error by erasing cookie and cache in the browser, re-login and the extension will function as normal.
Sign in with your account and authorize connection to your created project on Google Developer Console, then your appointments will appear on your calendar as shown.

If you take a closer look into an event's details in Google Calendar, some necessary information will be displayed in the event's description.

Cancel Requests
Once the appointment has been booked but the customer changed his mind, he can send a cancel request to the admin. He need to go to My Booked Appointments tab in My Account. Besides View and Reorder button, there will be Request Cancel buttons that once clicked, a request will be sent to the admin.

On backend side, go to Cancel Requests tab, the admin can see the cancel requests.

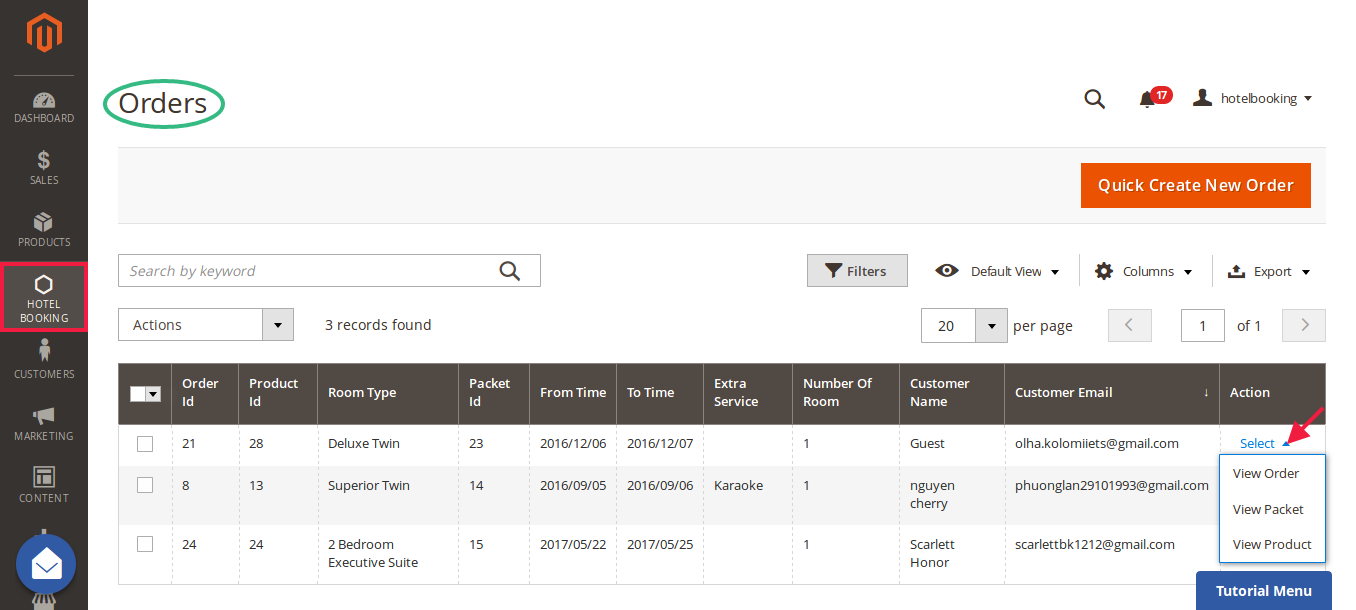
hotel room in Hotel Booking ->Orders.
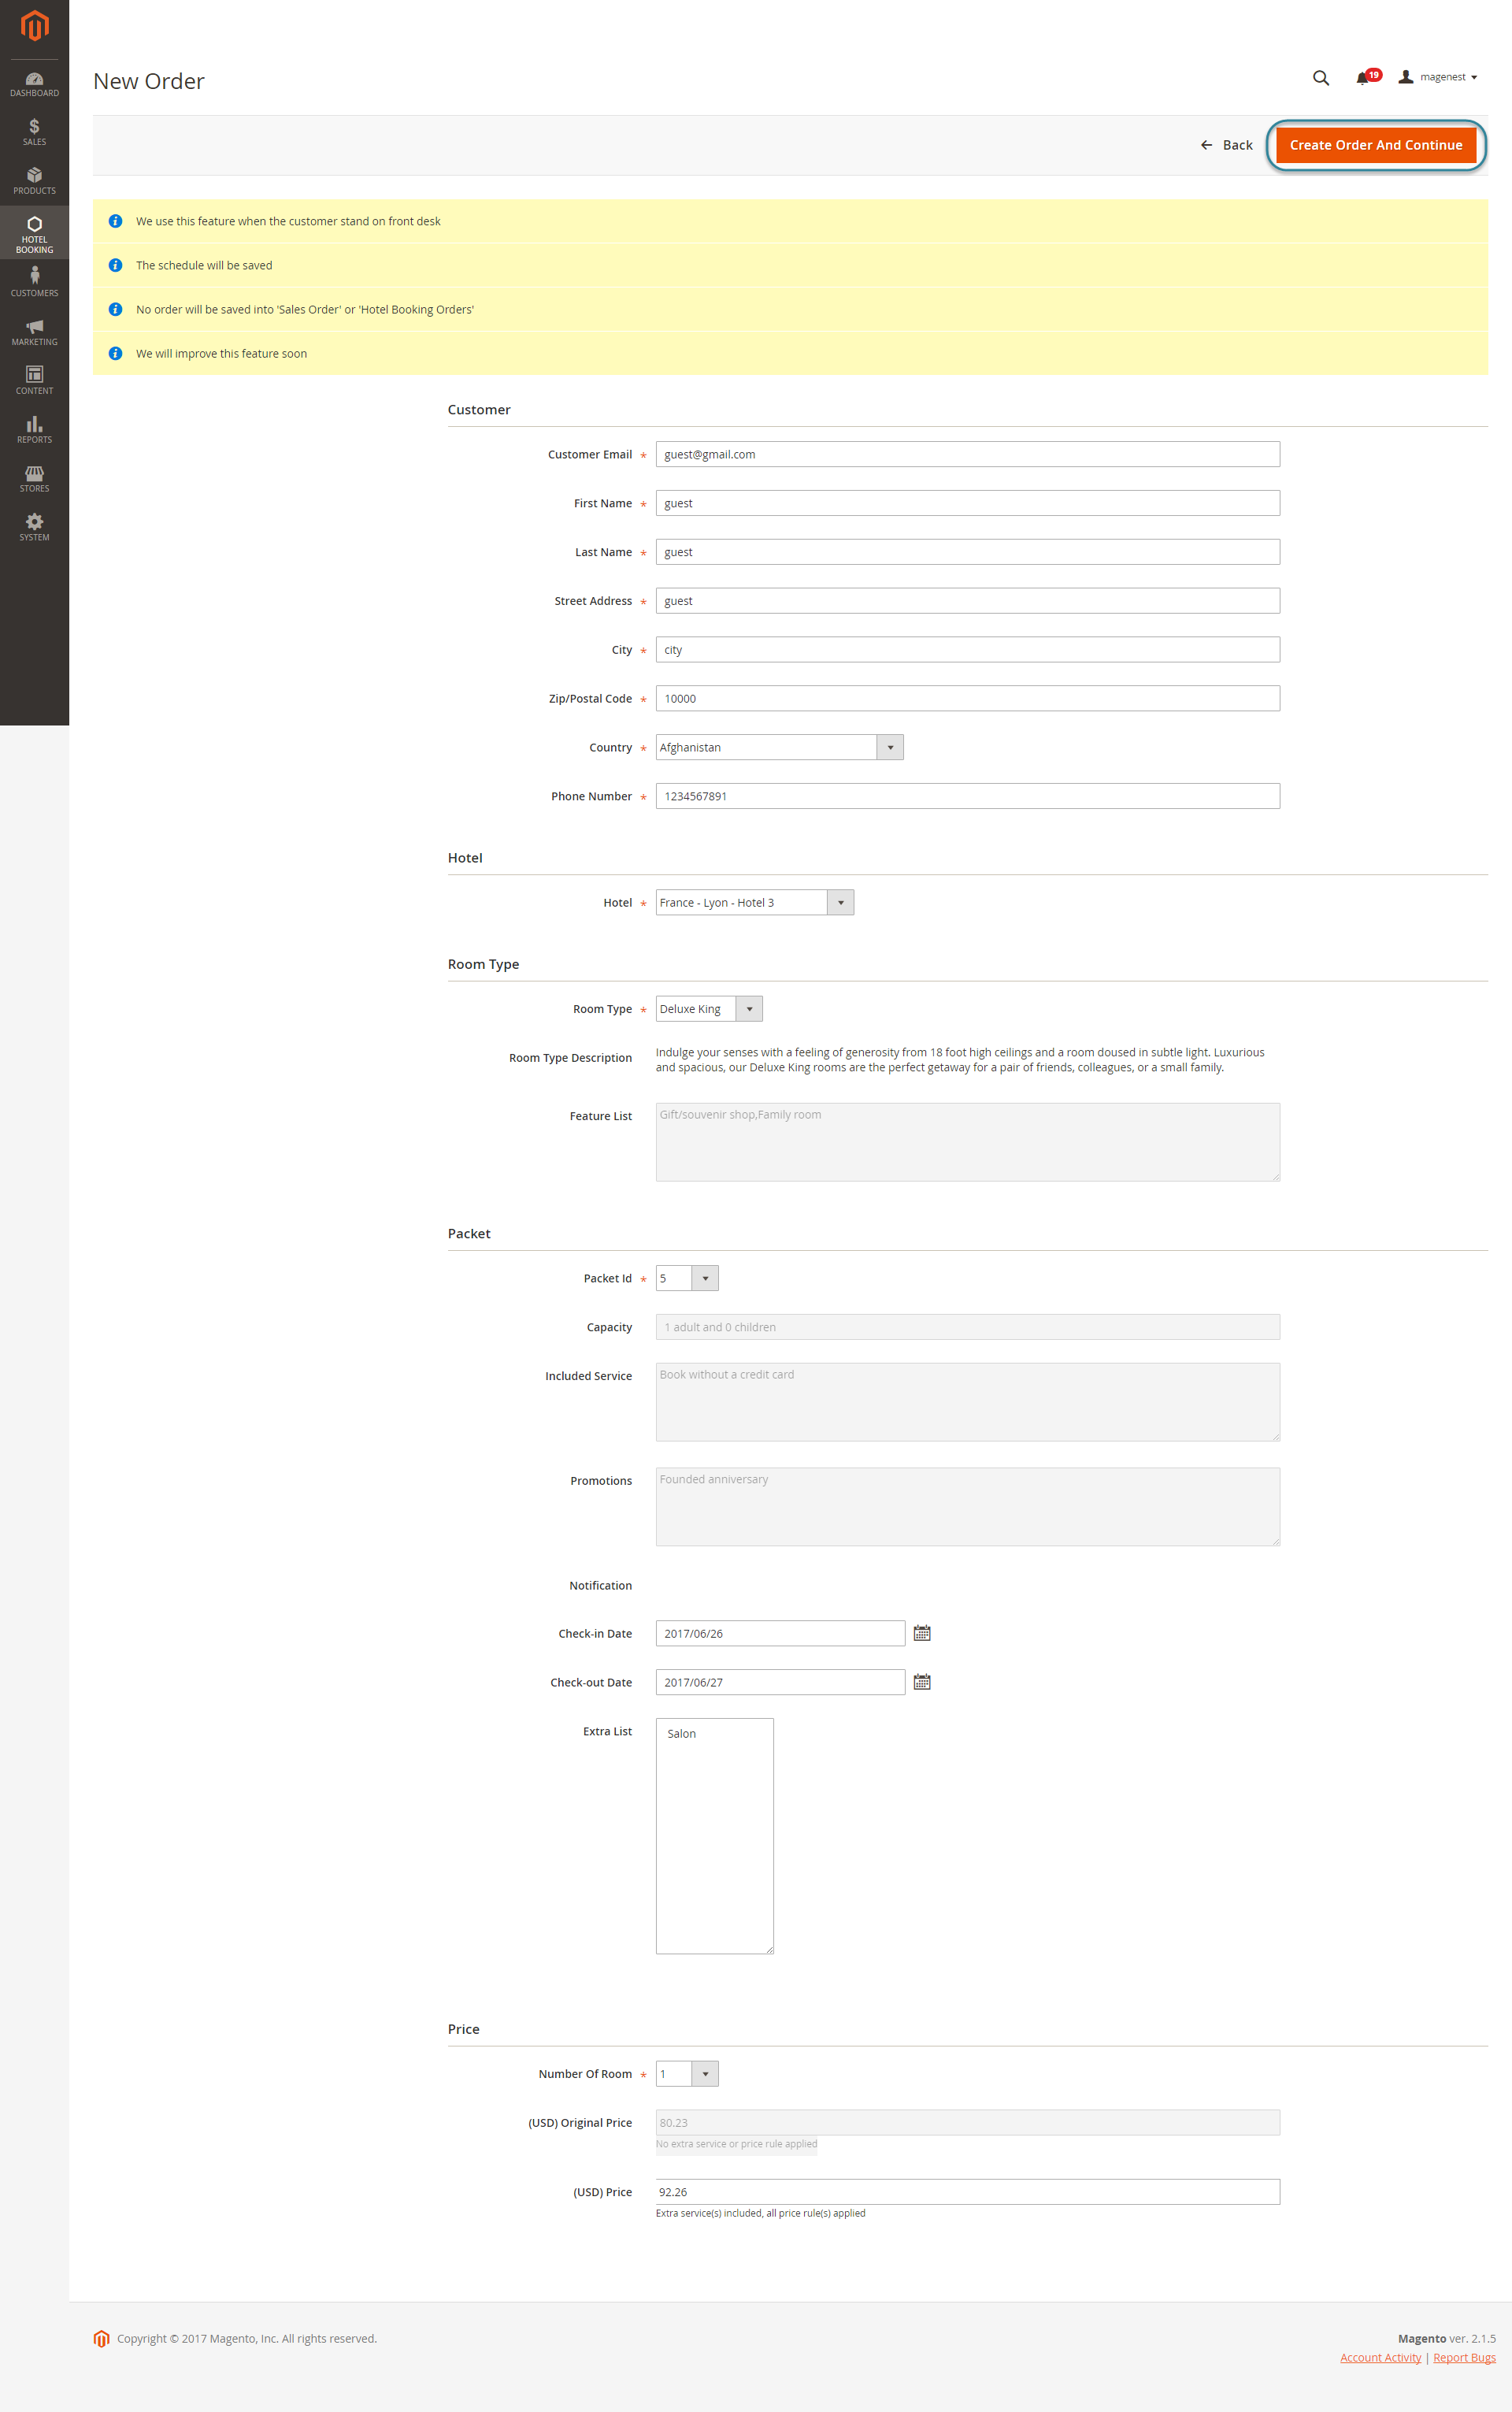
Quick create orders for customer paid at hotel directly
How to customize hotel homepage
Our Hotel Booking system allows you to customize your hotel homepage in two ways:
Using CMS Page
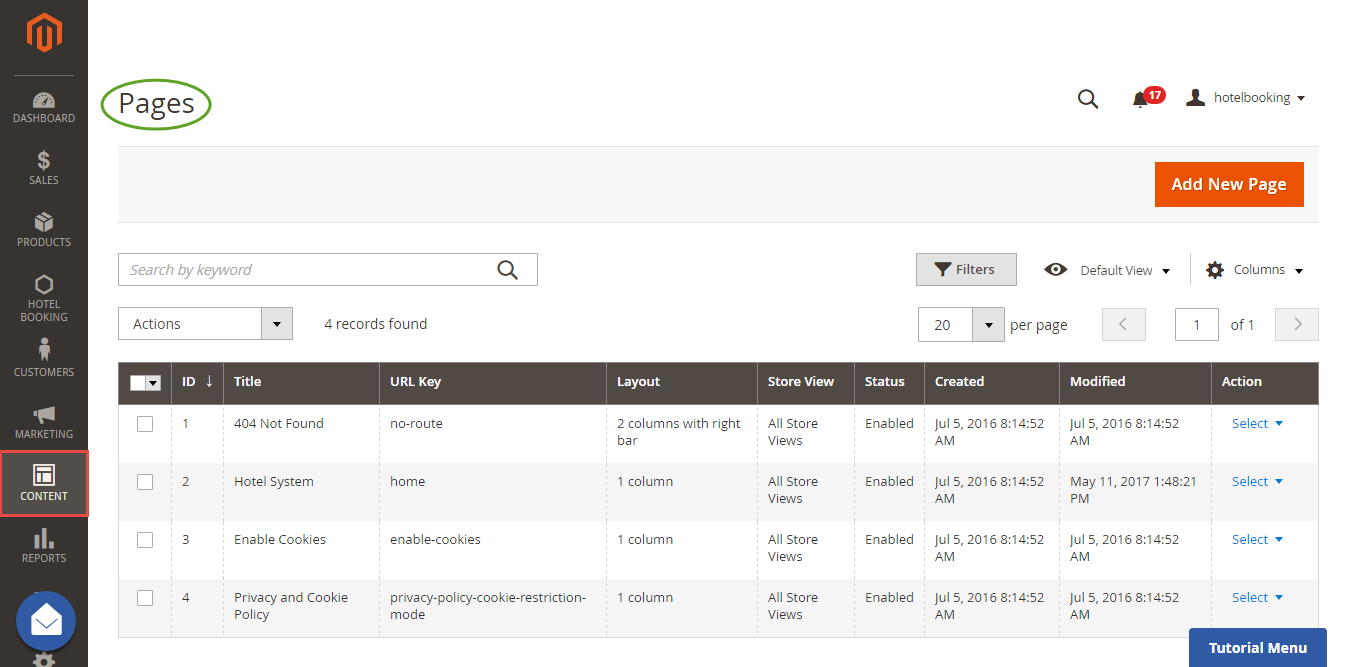
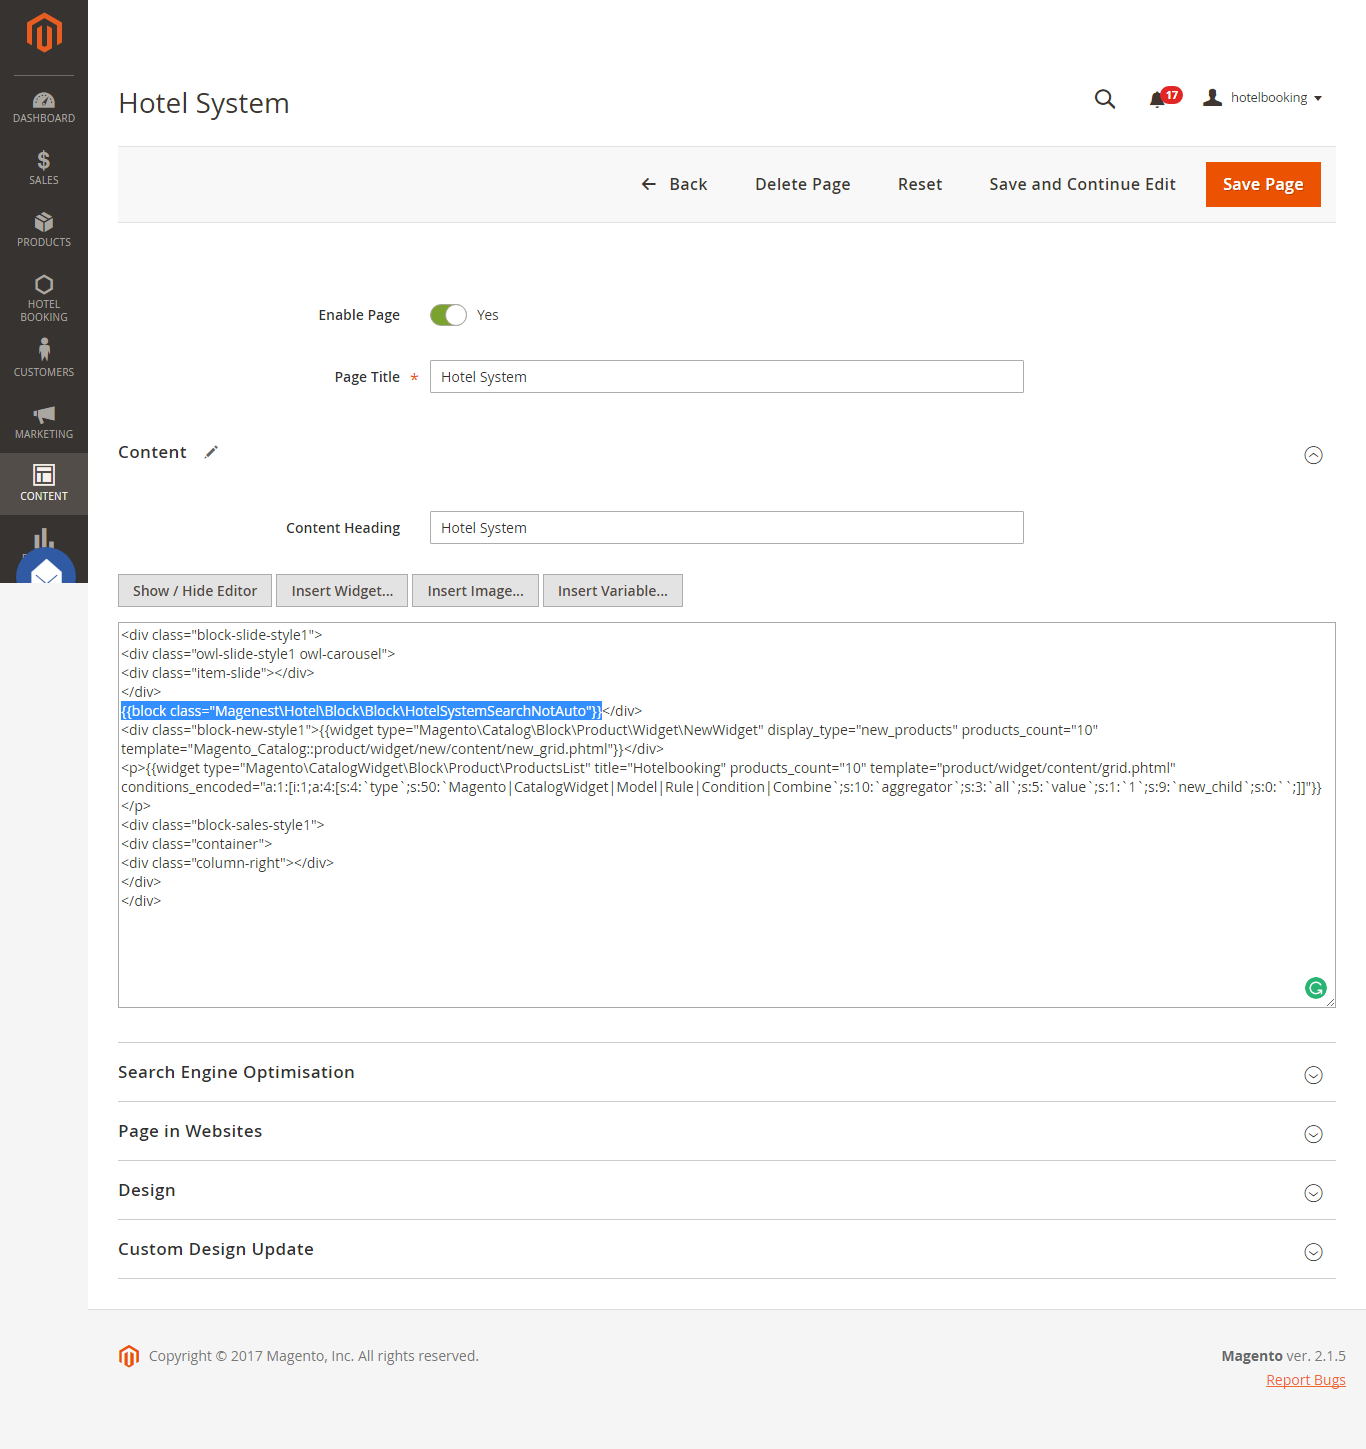
- We have already inserted "{{block class="Magenest\Hotel\Block\HotelSystemSearchNotAuto"}}" to content of page "Hotel System". You can insert this block to any CMS pages by adding this blue line like the figure below. Have fun with new home page.
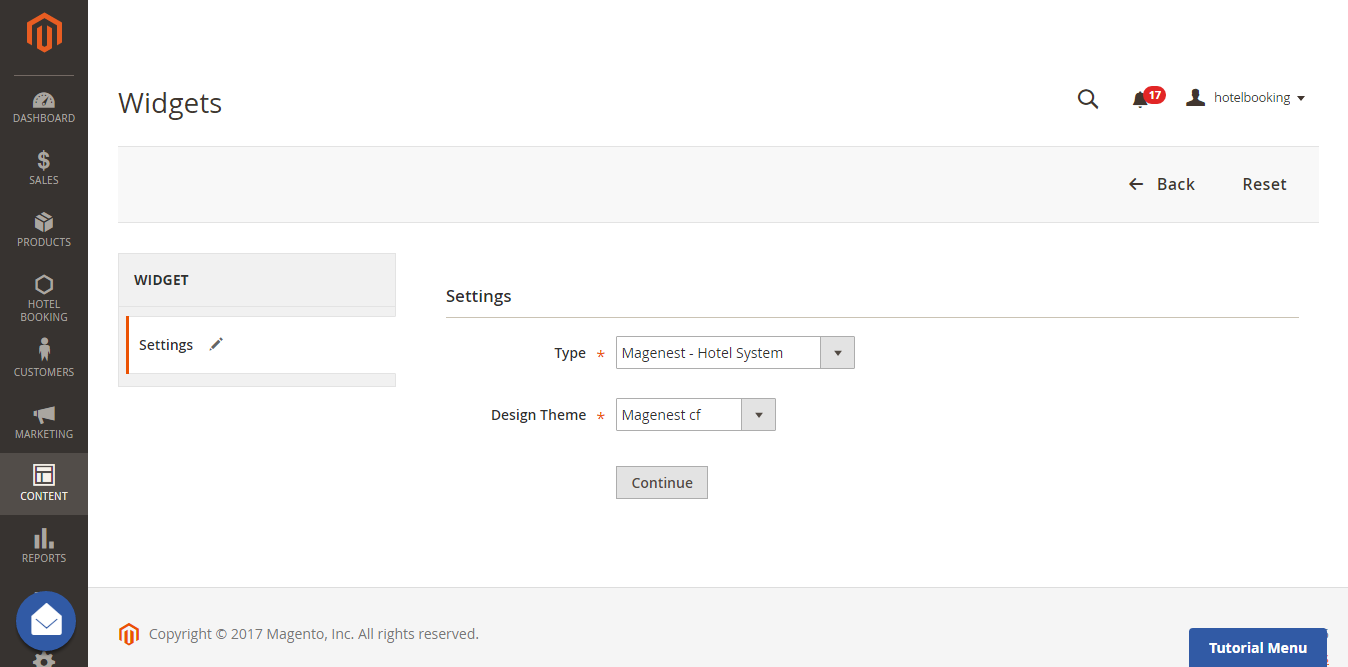
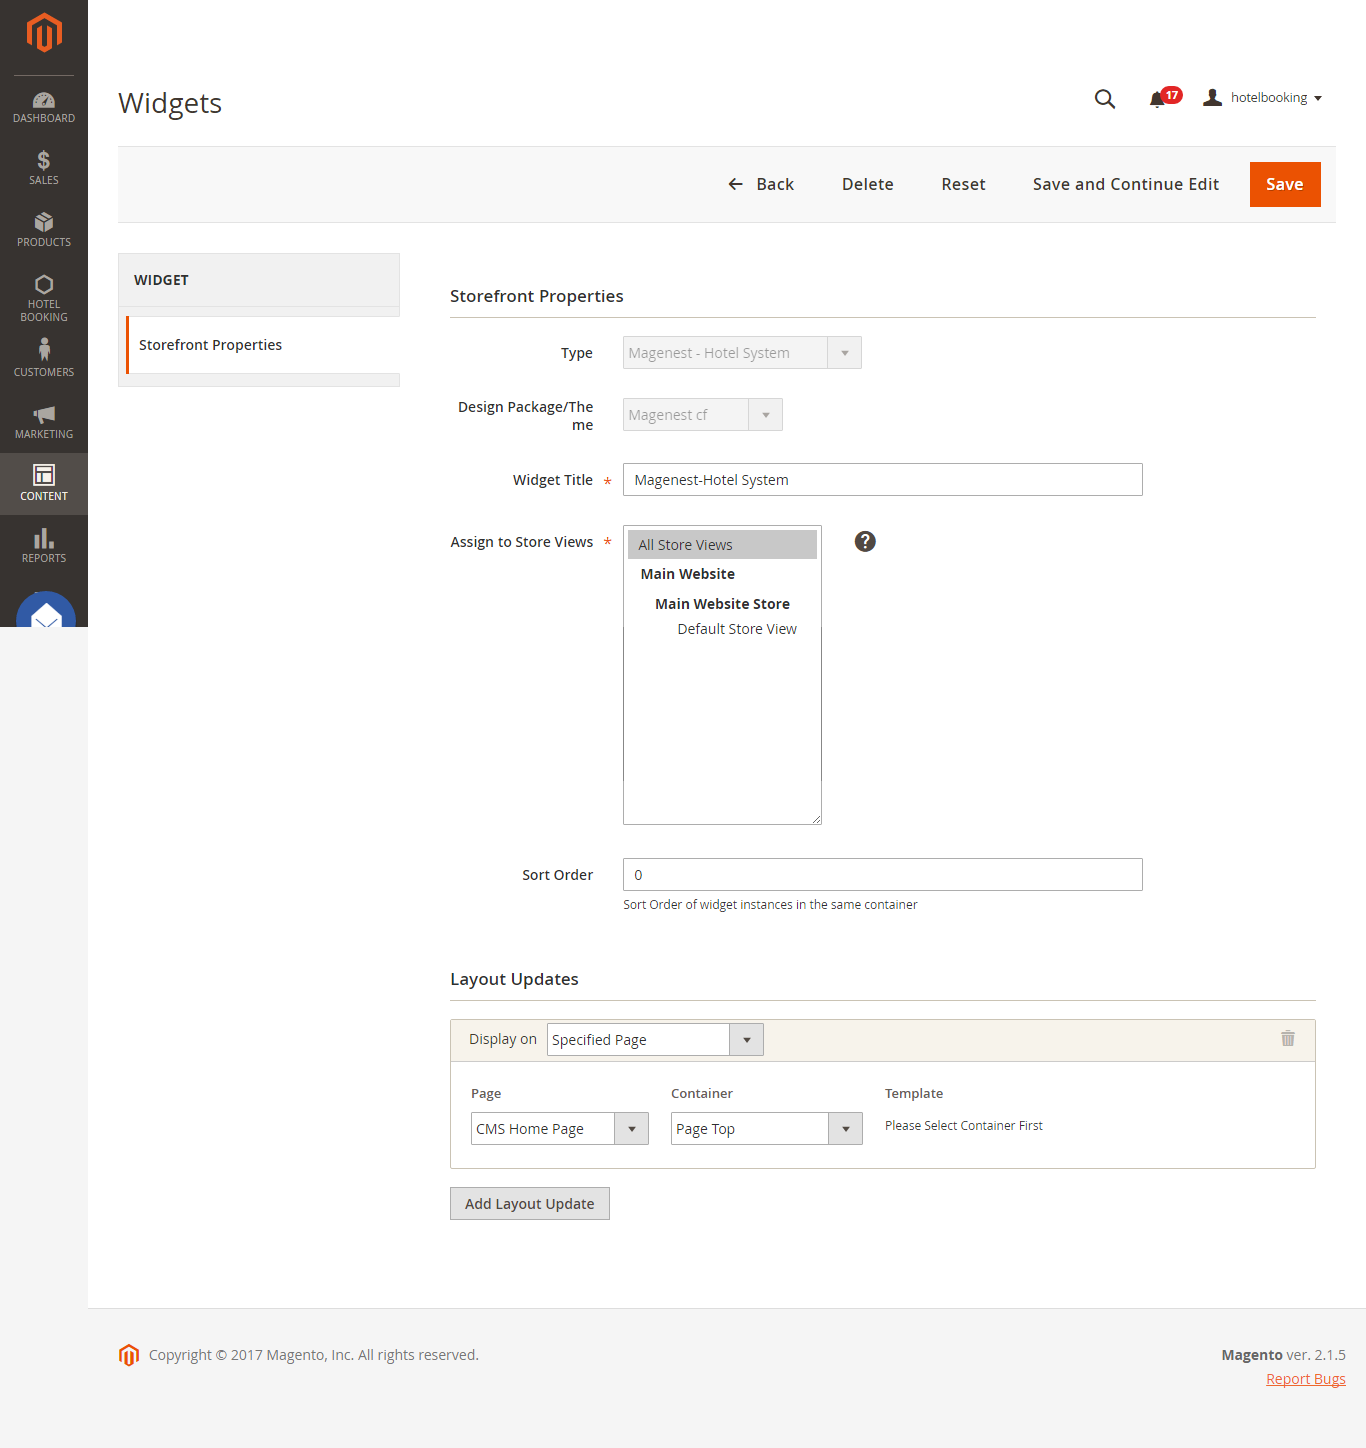
Using Widgets
- We also provide a simple widget name "Magenest - Hotel System" to help you insert to any pages you want.
...
Update
- When a bug fix or new feature is released, we will provide you with the extension's new package.
- All you need to do is repeating the above installing steps and uploading the package onto your store. The code will automatically override.
- Flush the config cache. Your store and newly installed extension should be working as expected.
Support
- We will reply to support requests after 2 business days.
- We will offer lifetime free update and 6 months free support for all of our paid products. Support includes answering questions related to our products, bug/error fixing to make sure our products fit well in your site exactly like our demo.
- Support DOES NOT include other series such as customizing our products, installation and uninstallation service.
Once again, thank you for purchasing our extension. If you have any questions relating to this extension, please do not hesitate to contact us for support.Magenest