Thank you for purchasing my our extension. If you have any questions that are beyond the scope of this help file, please feel free to email via my our user page contact form here. Thanks so much!
Created: 20/04/2016 | By: Magenest | Email: [email protected] http://servicedesk.izysync.com/servicedesk/customer/portal/23
| Table of Contents |
|---|
...
|
...
|
...
|
...
|
Introduction
...
Introduction
Subscriptions and Recurring Payments extension for Magento 2 is the exclusive special feature that has been equipped with the Magento-powered store with the feature of subscription and recurring payment. Simply, when this extension is added to increase recurring revenue stream, your business model will become more and more developed and diversified.
...
Subscriptions and Recurring Payments
...
extension provides all options for merchants
...
to configure subscription products such as magazines, newspapers, newsletters or memberships, etc.
...
All things become easy and simple with this extension. It helps customers save time to buy products from repeating order process. And you will no longer need to invoice
...
your individual customers
...
for each payment
...
. Therefore, it is one of the most helpful solutions.
For Magento Subscriptions & Recurring Payments
...
extension, you as a merchant will be able to configure subscription options for your products as desire, manage your subscribers' status and monitor recurring cycles.
...

Features
...
- Subscriptions and Recurring Payments extension enables you to fully control subscription options and manage subscription profiles.
- Customer Can Define Start Date provides merchants options to set whether
...
- the customer can define the start subscription date or not.
- Maximum Payment Failures enables merchants to set a number of scheduled payments that can fail before subscription profile is automatically suspended.
- Auto Bill on Next Cycle helps merchants to automatically bill the outstanding balance amount in the next billing cycle.
- Multiple billing options
...
- allow merchants to create different billing periods.
- Enable Trial (Trial Billing Amount, Trial Billing Period Unit, Trial Billing Frequency, Trial Billing Cycles, Enable Initial Fee) provides merchants option whether to set a trial subscription for customers or not.
- Payment Profiles Manager allows merchants to manage subscription cycles, monitor profiles status or delete a profile.
Video Tutorial Playlist
(Go to the playlist to view more: https://www.youtube.com/playlist?list=PLOgckfH7zlZsgwTPTGF7035wtVac0bXc-)
Widget Connector width 853 url https://www.youtube.com/watch?v=xhenamKwDOo&list=PLOgckfH7zlZsgwTPTGF7035wtVac0bXc-&index=1 height 480
Payment Methods
...
Subscriptions and Recurring Payments extension supports following payment methods:
PayPal Express Checkout.
- Credit Card Direct Post (Authorize.net) (NEW).
System Requirements
Your store must be running on Magento Community Edition version 2.1.x, 2.2.x
...
Configuration
Configure Paypal and Authorize.net Payment Method
On Dashboard tab, click Magenest Subscription -> Settings > Sales > Payment Methods
This extension supports Paypal and Authorize.net Payment
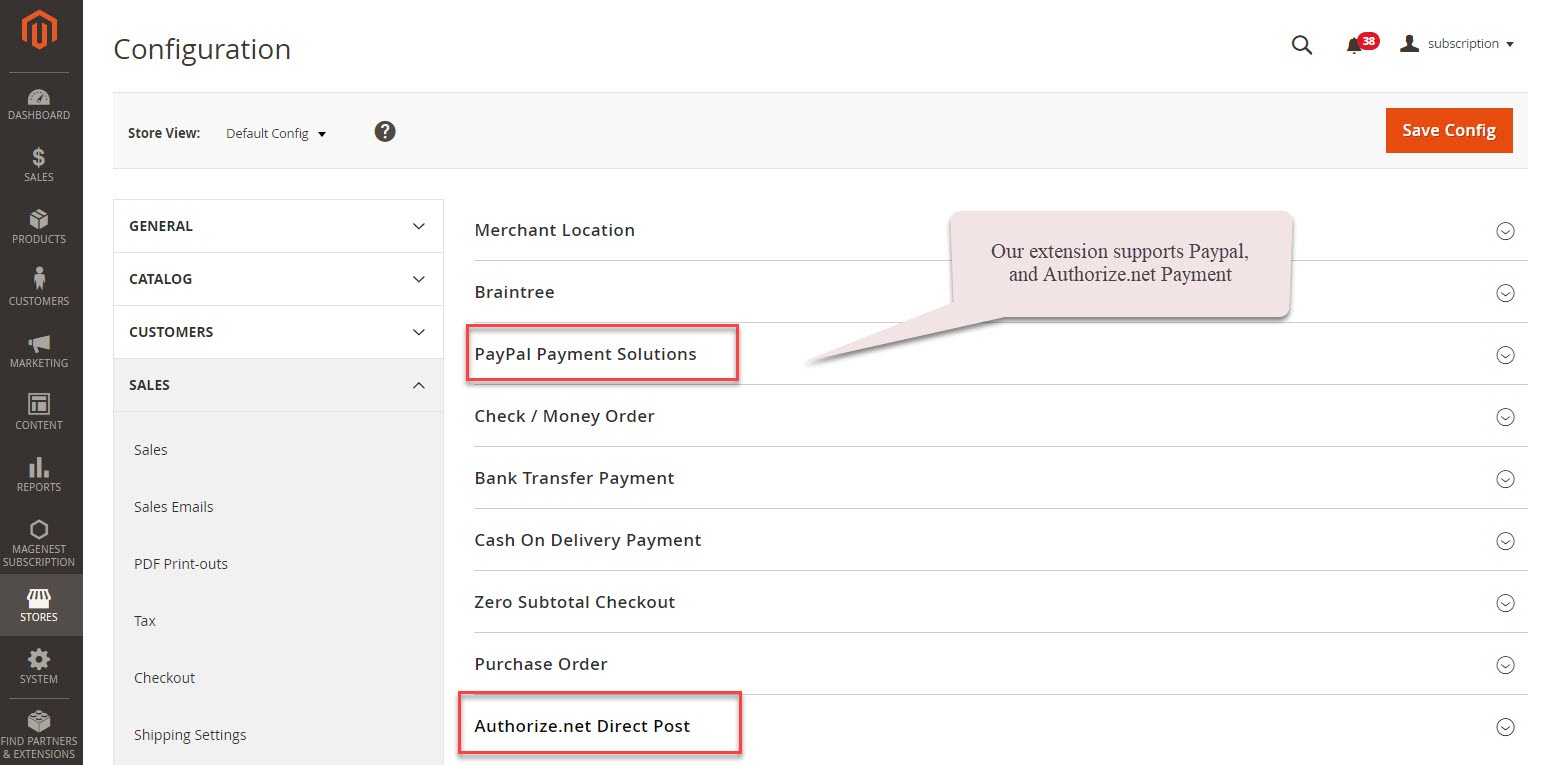
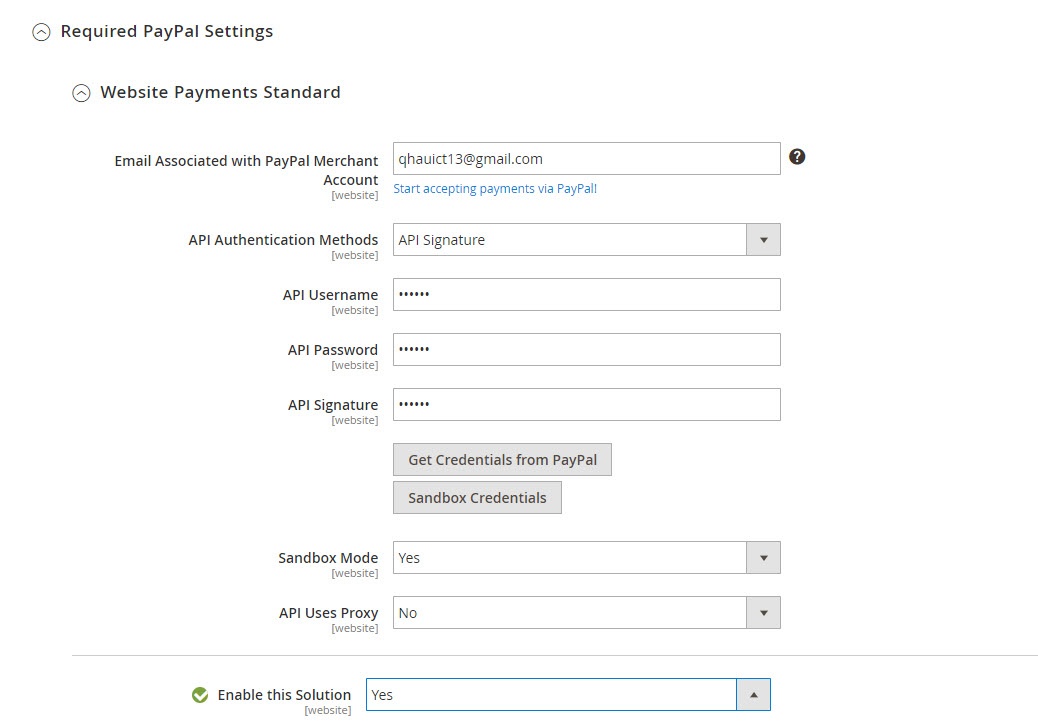
![]() PayPal Payment Solutions: set up Paypal payment. On Paypal Payment Standard section and hit Required PayPal Settings.
PayPal Payment Solutions: set up Paypal payment. On Paypal Payment Standard section and hit Required PayPal Settings.
- Enter your Email Associated with PayPal Merchant Account as required.
- Select API Signature in API Authentication Methods.
- Enter API Username, API Password and API Signature associated with your PayPal account. To get your Paypal Credentials, click on Get Credentials from Paypal button, to get a sandbox credentials, click on Sandbox Credentials button
...
PayPal Payments Advanced (Express Checkout)
...
PayPal Payments Pro (Express Checkout)
...
PayPal Payments Standard
...
PayPal Payflow Pro (Express Checkout)
...
PayPal Payflow Link (Express Checkout)
...
- Select Yes in Sandbox Mode if you are using a sandbox PayPal account or No if you go live.
- On the top right corner, click Save Config.
- Choose Yes in Enable this Solution to enable Paypal Payment.
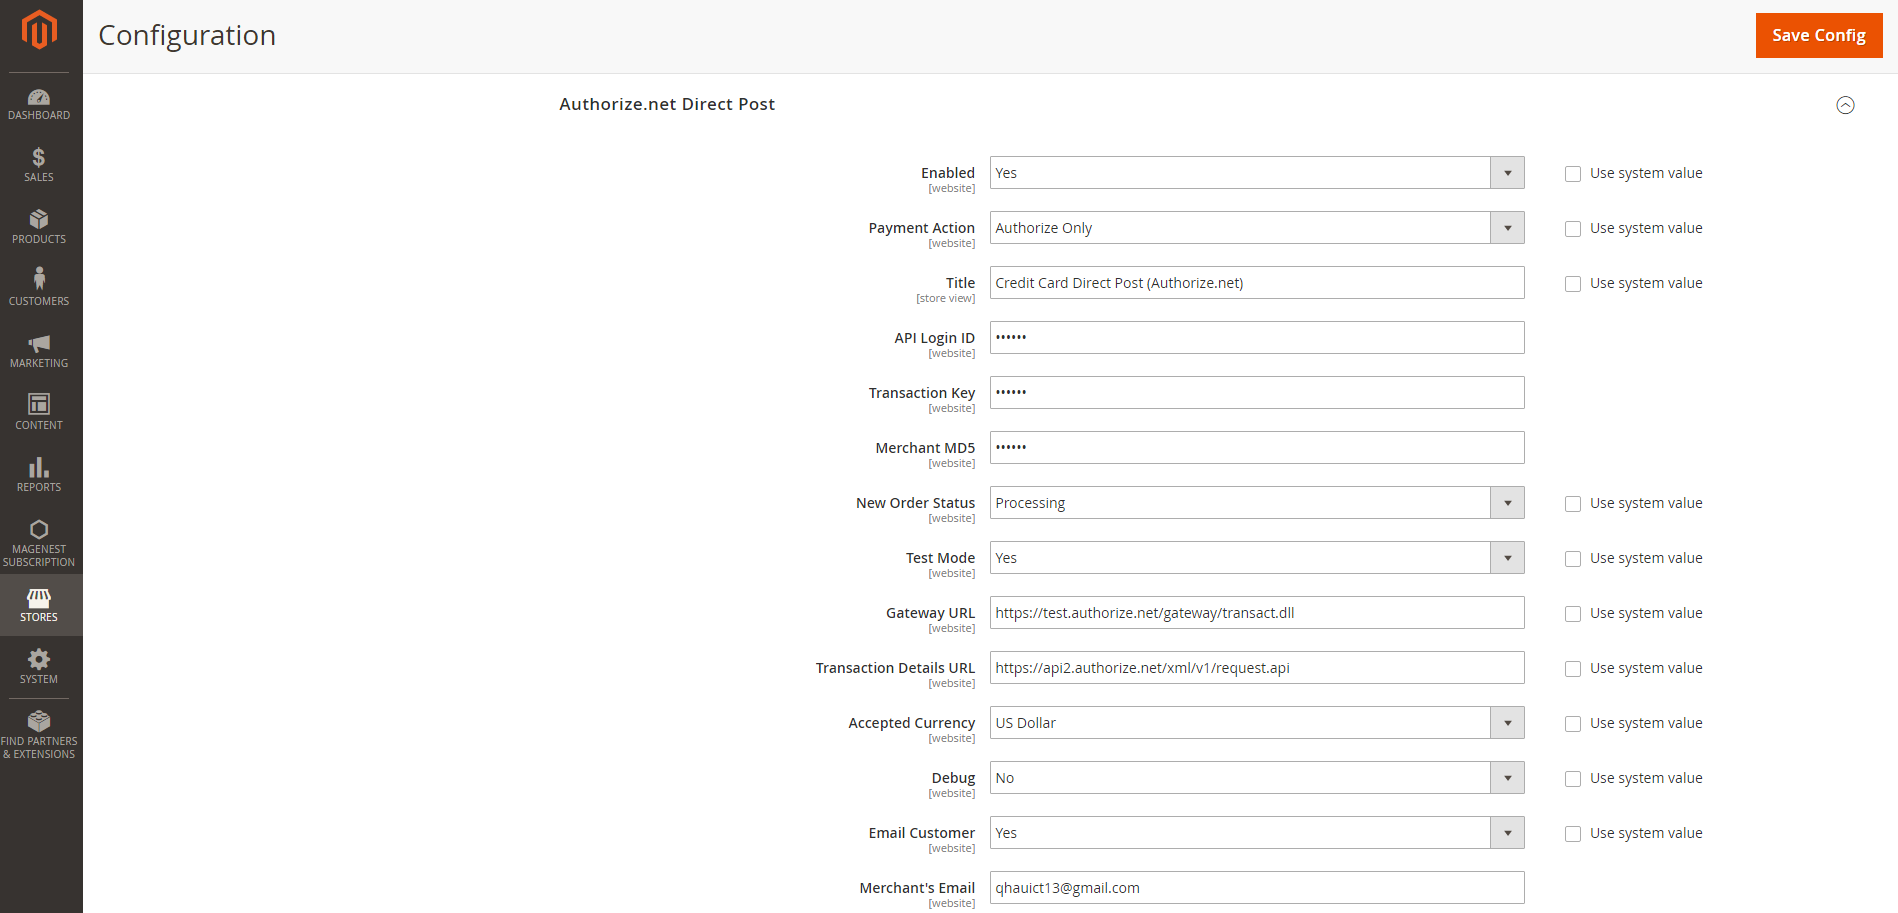
![]() Authorize.net Direct Post:
Authorize.net Direct Post:
Enabled: Choose Yes to enable this method
- Payment Action: You can choose Authorize Only or Authorize and Capture
- Authorize Only (Authorization): will check the card for validity but not charge the account yet until the order is approved and invoiced.
- Authorize and Capture(Sale): will charge the debit/credit card at the time of the order submission.
- Title: The title of the payment method that will be displayed on the checkout page
- API Login ID: Getting from the Authorize.net account.
- Transaction Key: Get from the Authorize.net account.
- Merchant MD5: Authorize.net MD5 Hash
- New Order Status: You can choose between Processing and Suspected Fraud
- Processing: The payment is made successfully and an order invoice is issued.
- Suspected Fraud: No invoice is issued.
- Test Mode: Turn this on (Yes) if you use the test credentials.
- Gateway URL: If you use the sandbox mode, the URL is https://test.authorize.net/gateway/transact.dll ; if you go live, the URL is https://secure.authorize.net/gateway/transact.dll
- Transaction Details URL: https://api2.authorize.net/xml/v1/request.api
- Accepted Currency: Choose the currency you want the payment to be
- Debug: Yes or No
- Email Customer: Turn this on (Yes) to send customer email
- Merchant's Email: your email
- Credit Card Types: You can choose which credit card types you want by choosing one or more items.
- Credit Card Verification: Choose Yes to enable CVC Verification.
- Payment from Applicable Countries:
- All allowed countries: Enable all allowed countries to make payment.
- Specific Countries: Restrict some countries by unselecting them from the Payment from Specific Countries.
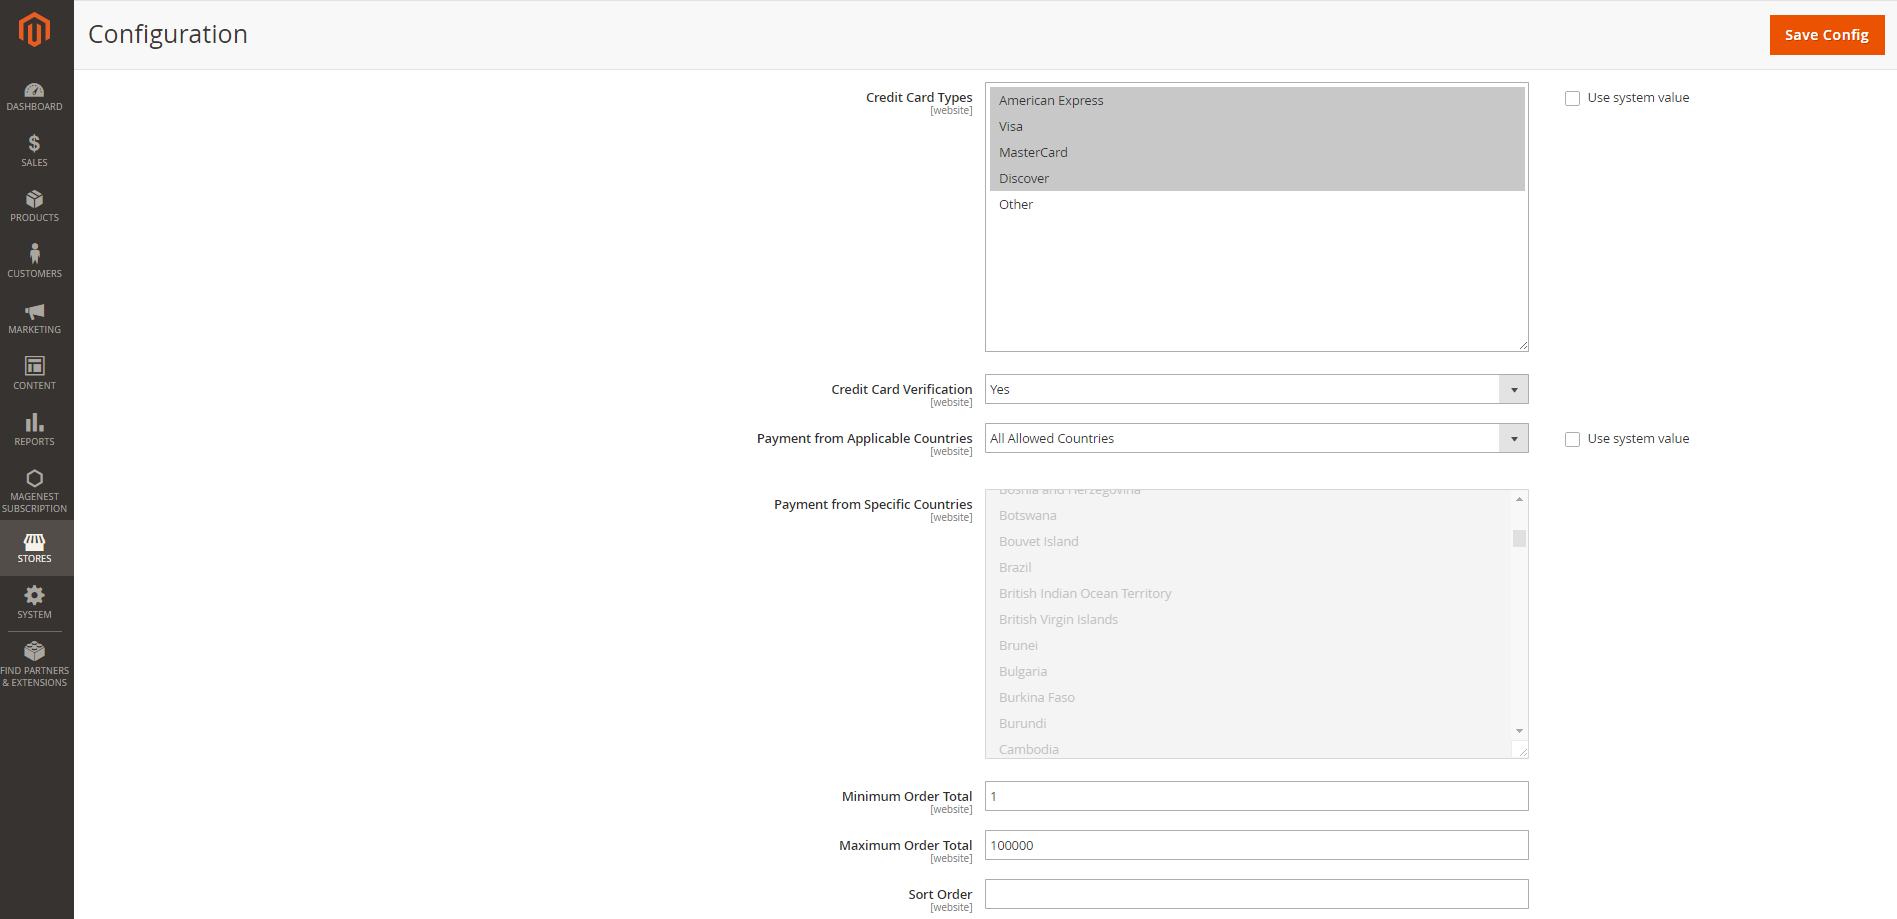
Click on Save Config button to save data entered.
Configure other subscription settings
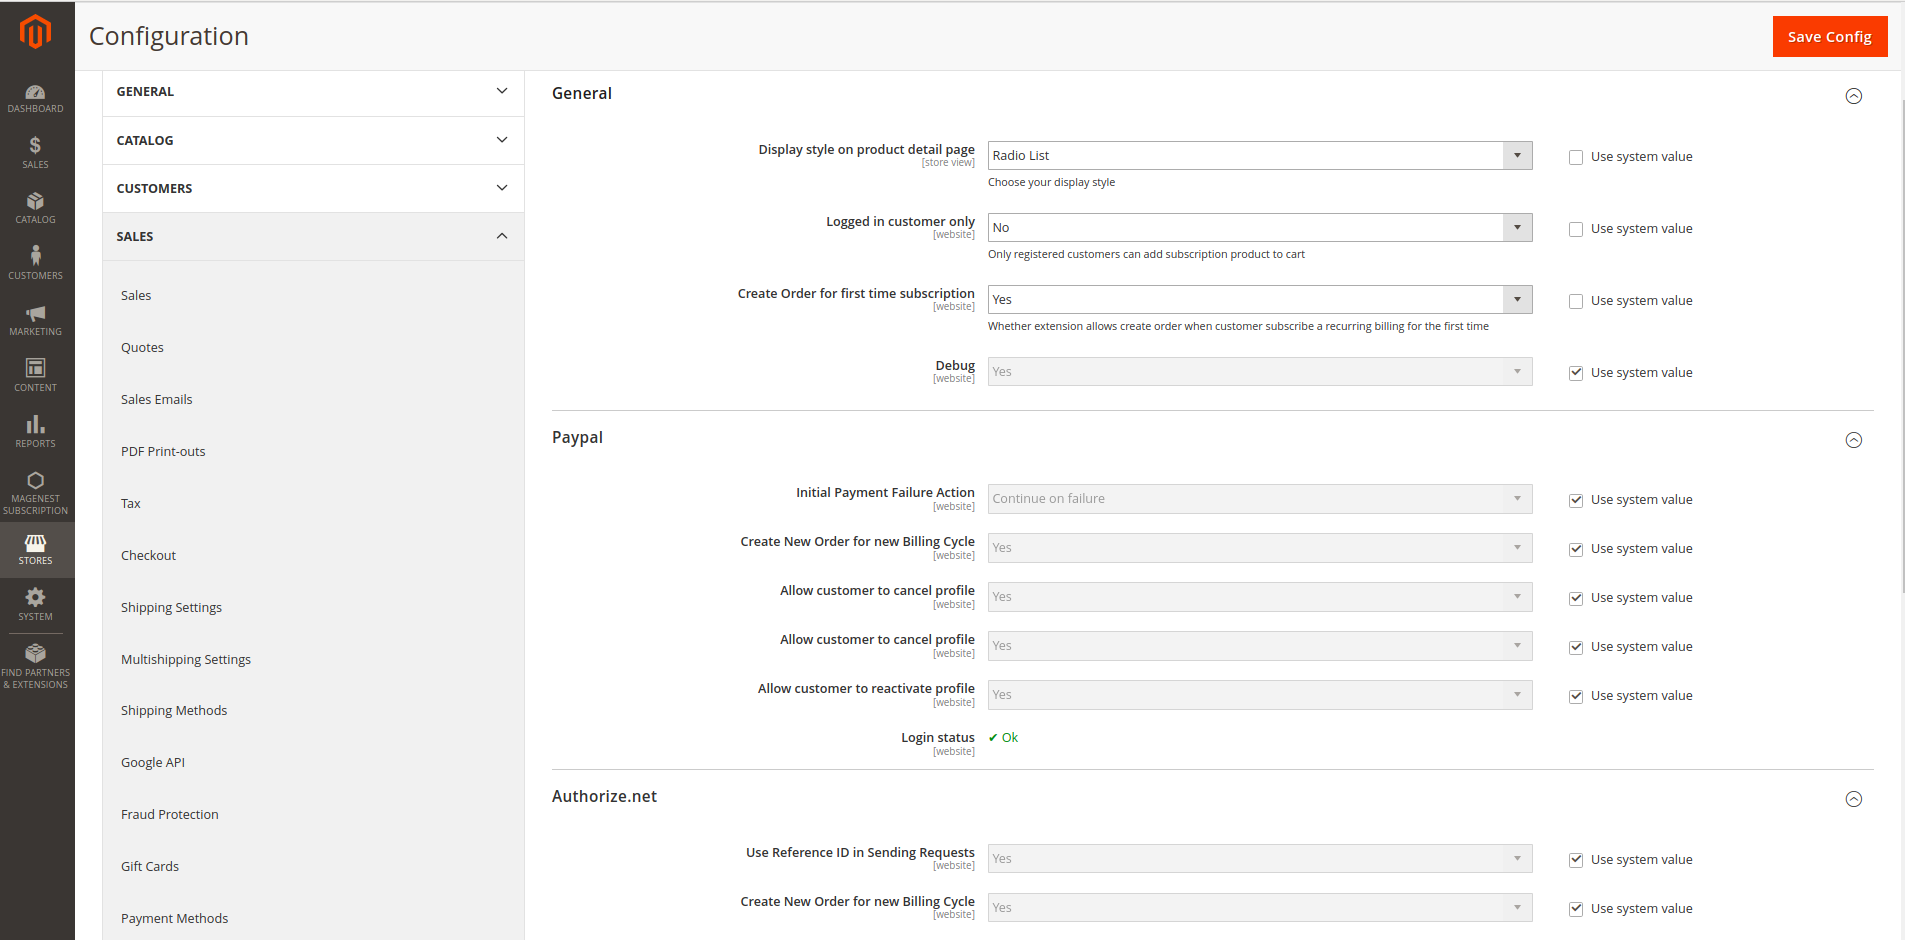
To configure the Subscription, go to Magenest Subscription > Settings > Sales > Subscription Settings
Here you can set:
![]() General settings
General settings
- Display style on product detail page: Subscription options on the frontend product detail page will be displayed as Dropdown or Radio list
- Logged in customer only: Only logged in customer can buy subscription products.
- Create order for first time subscription: Order will be created along with new subscription profile
- Debug: Enable debugging
![]() Paypal
Paypal
- Initial Payment Failure Action: You can choose whether to Continue payment on failure or cancel it.
- Create new order for new billing cycle: Whether to create new order for new billing circle
- Allow customer to cancel profile: Whether to allow customer to cancel profile from frontend
- Allow customer to reactivate profile: Allow customer to reactivate their subscription profile from frontend
![]() Email settings:
Email settings:
- Email Sender: Choose the department you want to take charge of sending customers emails
- Subscription Started: You can set whether not to send email (Don't send email) or send email by email templates when the subscription started
- Subscription Payment: You can set whether not to send email (Don't send email) or send email by email templates when the the order is placed
- Subscription Canceled: You can set whether not to send email (Don't send email) or send email by email templates when the the the subscription is canceled
- Subscription Suspended (Paypayl Only):You can set whether not to send email (Don't send email) or send email by email templates when the subscription is suspended.
Main Functions
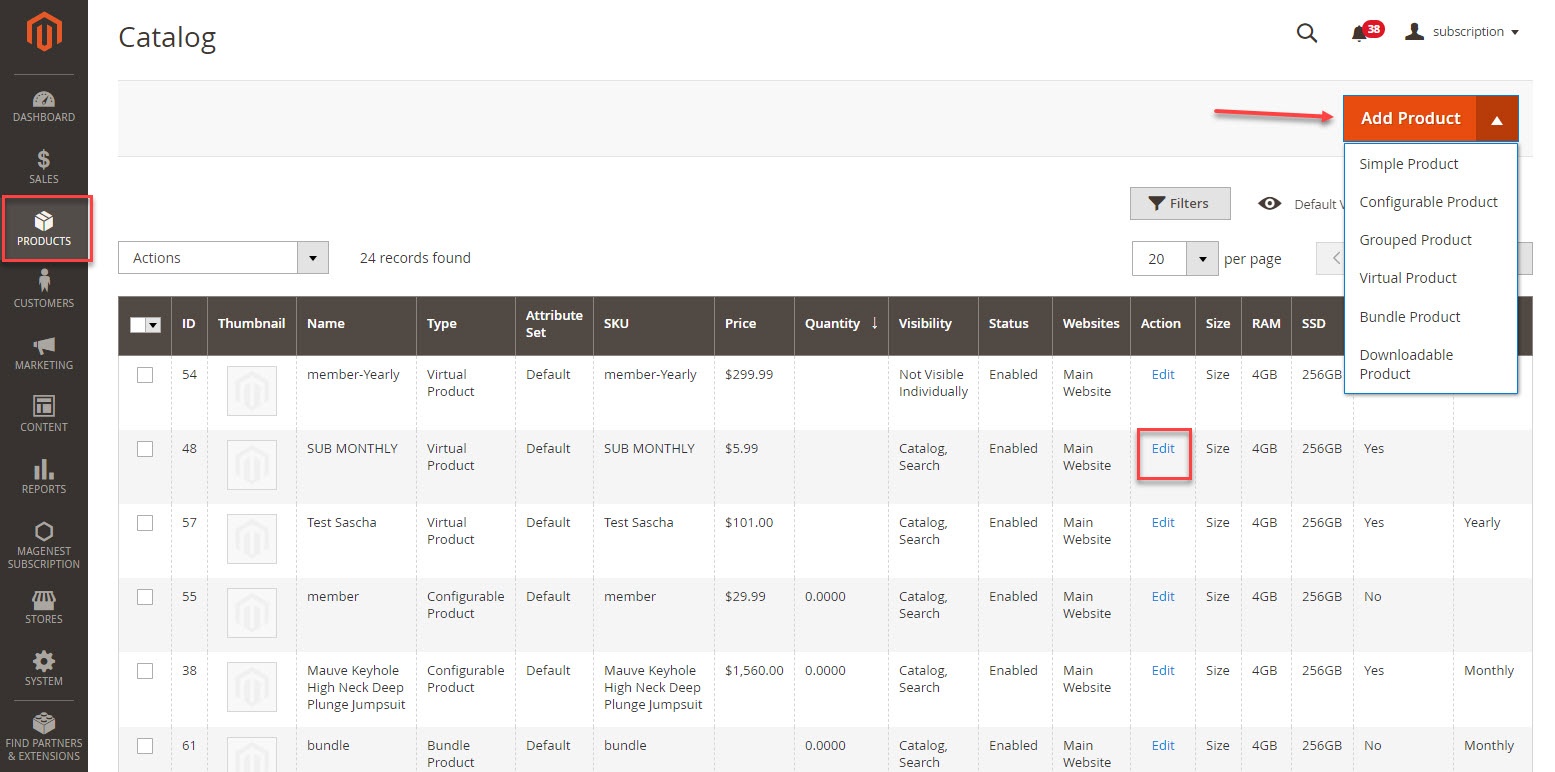
Create Subscription Product
You can set subscription for a new or an existing product by going to Products > Catalog
For a
Subscription Product Types
Supported product types for Magenest Subscriptions and Recurring Payments include:
Simple Product
Virtual Product
Downloadable Product
System Requirements
Your store should be running on Magento Community Edition version 2.0.0 or later versions.
Configuration
Configure Subscription
You can configure subscription setting for a new or an existing product.
- Log in your Magento backend system. On Dashboard tab, click Products -> Catalog.
For new product, click Add Product or select a product type to start creating a new product on your store (Magento Subscriptions and Recurring Payments supports simple, virtual and downloadable products).
For existing product, click Edit.
This will lead you to Basic Settings section where you can define your product characteristics.

- On Basic Settings tab, click Subscription Options
Enable Subscription = Yes/ No
...
![]() Subscription Options:
Subscription Options:
- Enable Subscription: Yes/ No.
- Customer Can Define Start Date
...
- : Yes/ No.
...
- Maximum Payment Failures: Allows you to set the maximum number of times that customer can fail to pay. When the number is reached, an IPN (Instant Payment Notification) message is sent to you and customer’s account will be suspended automatically.
...
- Auto Bill on Next Cycle:
...
- Yes/ No. Indicates whether you would like PayPal to automatically bill the outstanding balance amount in the next billing cycle. The outstanding balance is the total amount of any previously failed scheduled payments that have yet to be successfully paid. It is one of the following values:
- Yes - Yes: PayPal automatically bills the outstanding balance.
- No - No: PayPal does not automatically bill the outstanding balance.

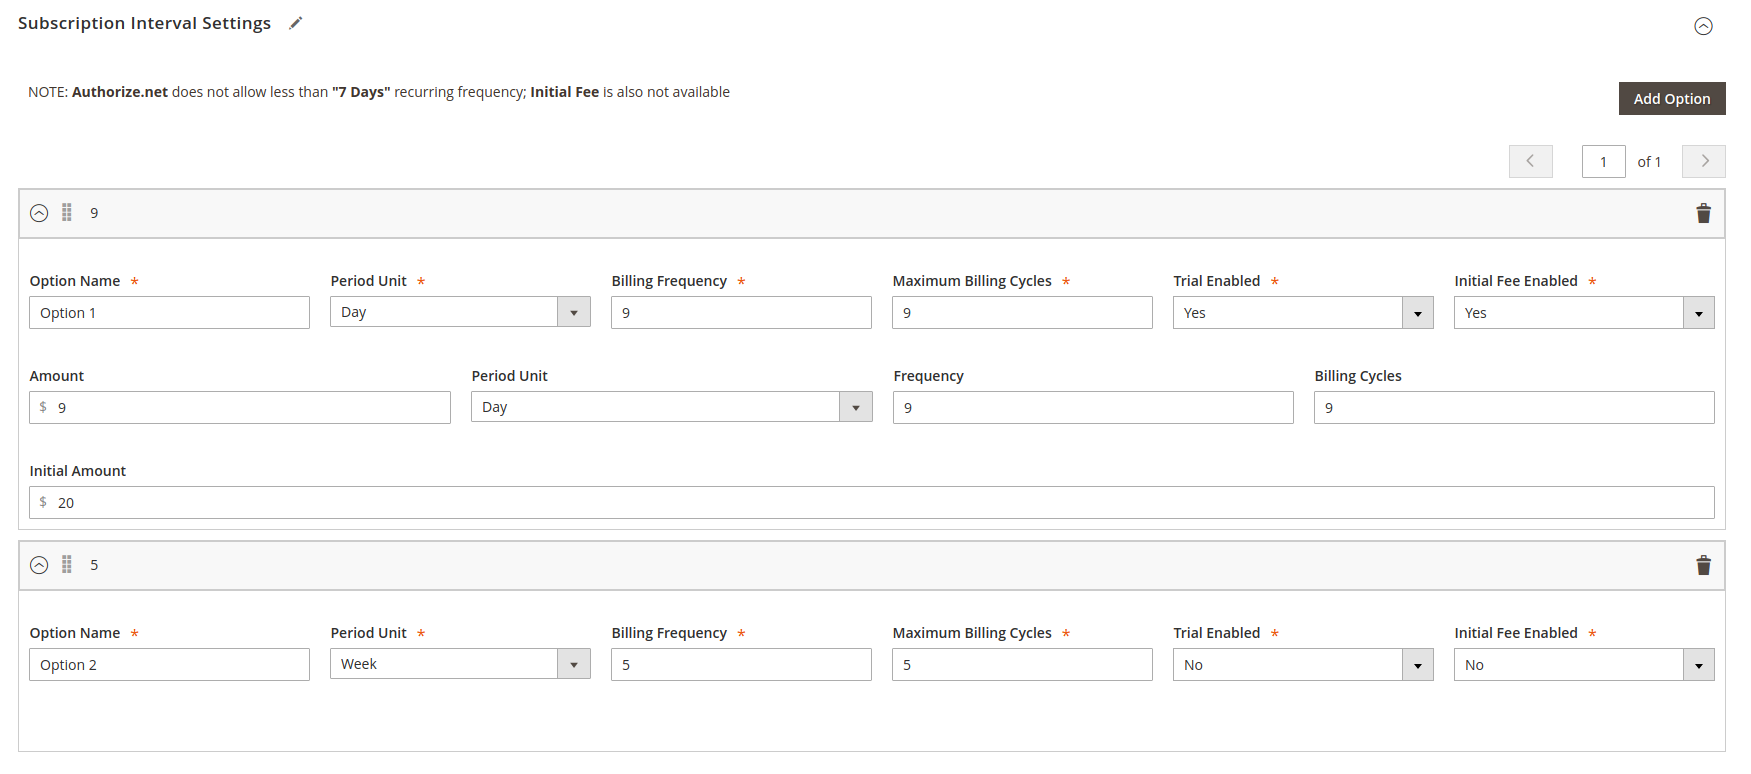
![]() Subscription Interval Settings, Click Add Option to add subscription plan for the product
Subscription Interval Settings, Click Add Option to add subscription plan for the product
Billing Options. Enables you to define set billing frequency or cycles.
Period-Unit : is is one of following values: Day, Week, SemiMonth, Month and Year.
Billing frequency : is is the number of billing period that make makes up a billing cycle.
Maximum Billing Cycles: is the number of billing cycles for the payment period.
Select Select a period unit, enter the number you want to set on Billing Frequency and Maximum Billing Cycles.
- To add other billing options, click Add Option.
- To remove a billing option, click Remove.
Trial Enabled: Enable Trial = Yes/ No Plan
Enable Initial Fee = Yes/ No. Set to Yes if you want a system to add an a one-time fixed amount payment, which will be taken upfront on subscribing to a product.
Initial Fee Amount specifies the one-time fixed amount payment that customer needs to fulfill.

Configure Payment Method
On Dashboard tab, click Stores -> Configuration.
Click Sales -> Payment Methods.

Click PayPal All-in-One Payment Solutions to set up Paypal payment. On Paypal Payment Standard section and hit Required PayPal Settings.
Enter your Email Associated with PayPal Merchant Account as required.
Select API Signature in API Authentication Methods.
Enter API Username, API Password and API Signature associated with your PayPal account.
Select Yes in Sanbox Mode if you are using a sandbox PayPal account and via versa.
On top right corner, click Save Config.

Click Authorize.net Direct Post to set up Credit Card Payment.
Enabled = Yes/No.
Payment Action = Authorize Only / Authorize and Capture.
Authorize Only: gi?i thích...
Enter Credit Card Direct Post (Authorize.net) in Title box.
Enter API Login ID, Transaction Key and Merchant MD5 associated with your Card account.
Select Processing or Suspected Fraud in New Order Status.
gi?i thích....
Test Mode = Yes/No.
Enter Gateway URL and Transaction Details URL
..............
Enter your Email associated with Card Merchant Account as required.
Choose Credit Card Types. Note that you can choose one or more.
Credit Card Verification = Yes/No.
......
On top right corner, click Save Config.

Payment Profiles Management
NOTE: Authorize.net does not allow less than "7 Days" recurring frequency; Initial Fee is also not available
Purchase the subscription product in an easy way
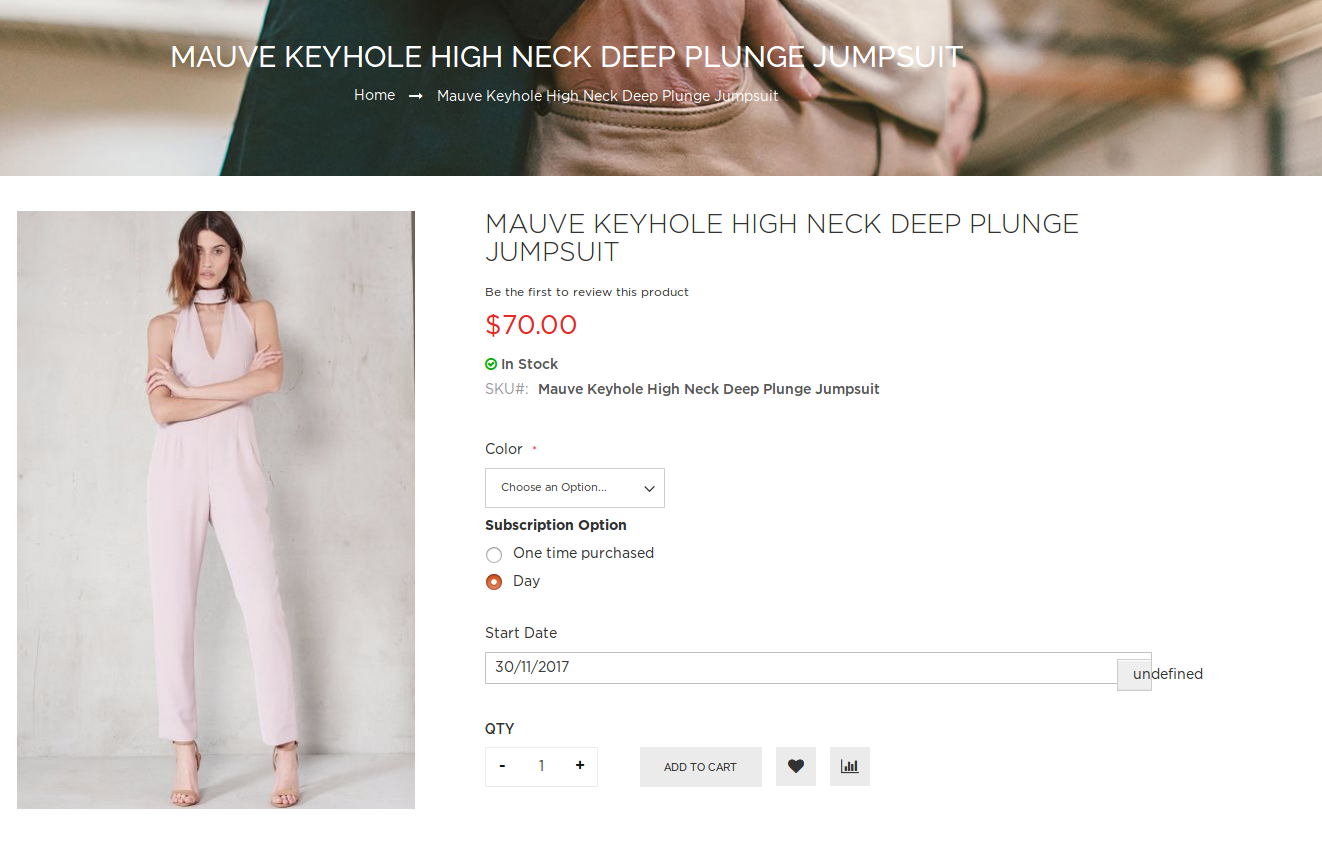
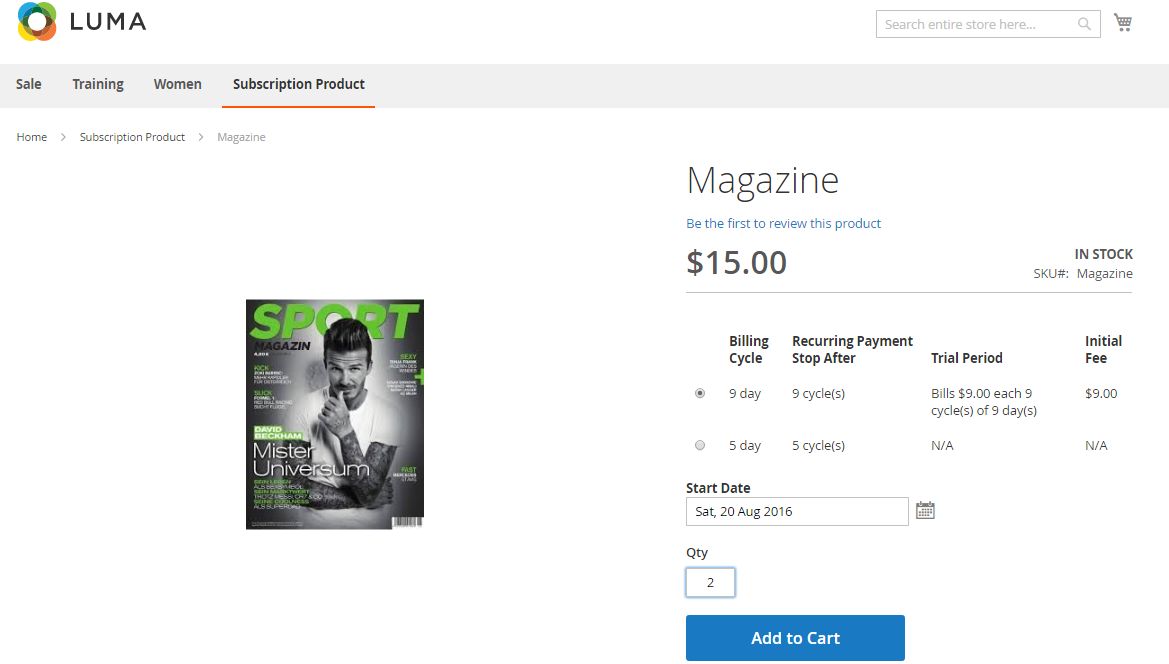
After you create the subscription product
At the frontend page, this subscription product will be shown with subscription options: Billing Cycle, Recurring Payment Stop After, Trial Period, Initial Fee and Start Date.
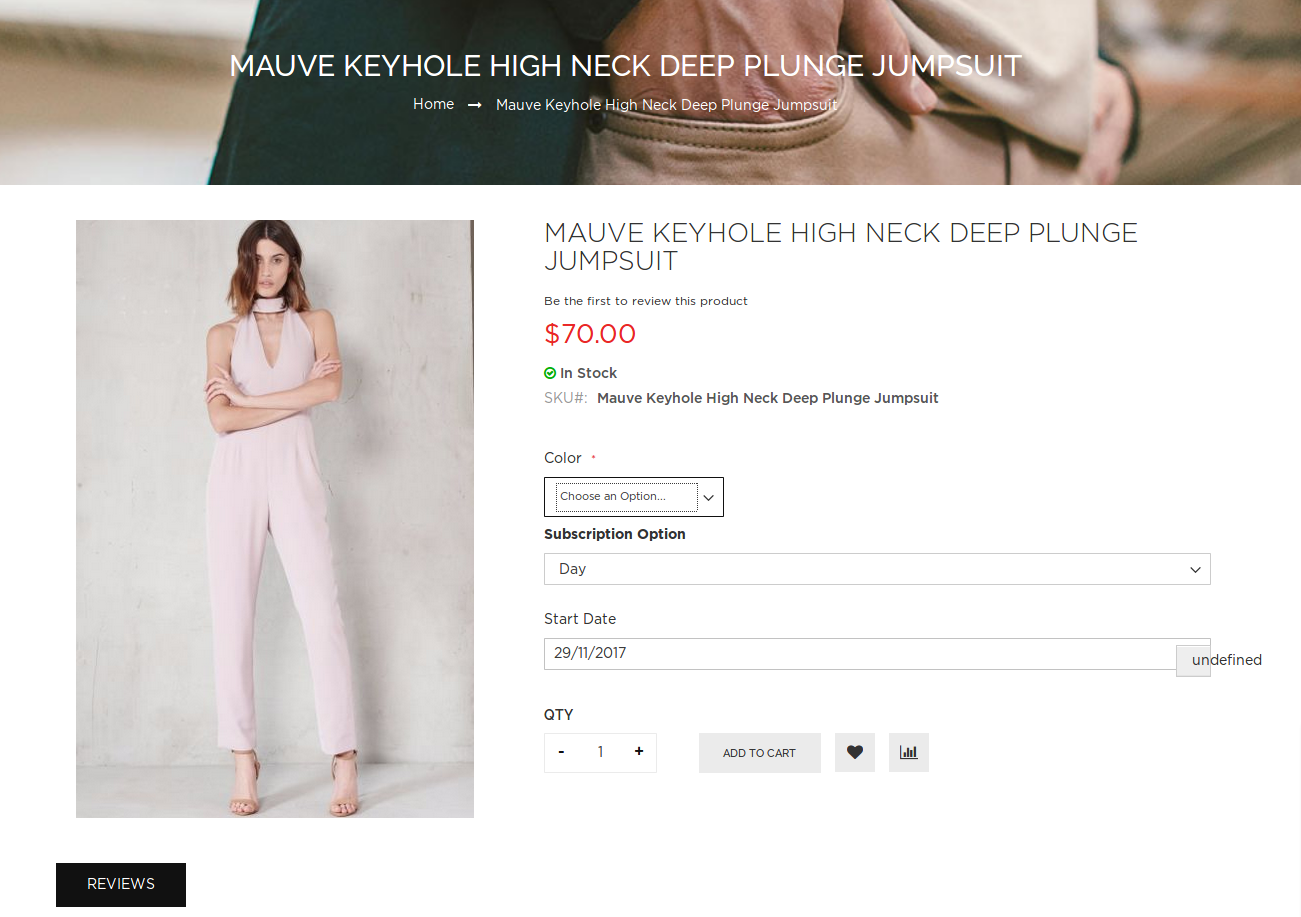
Radio list option
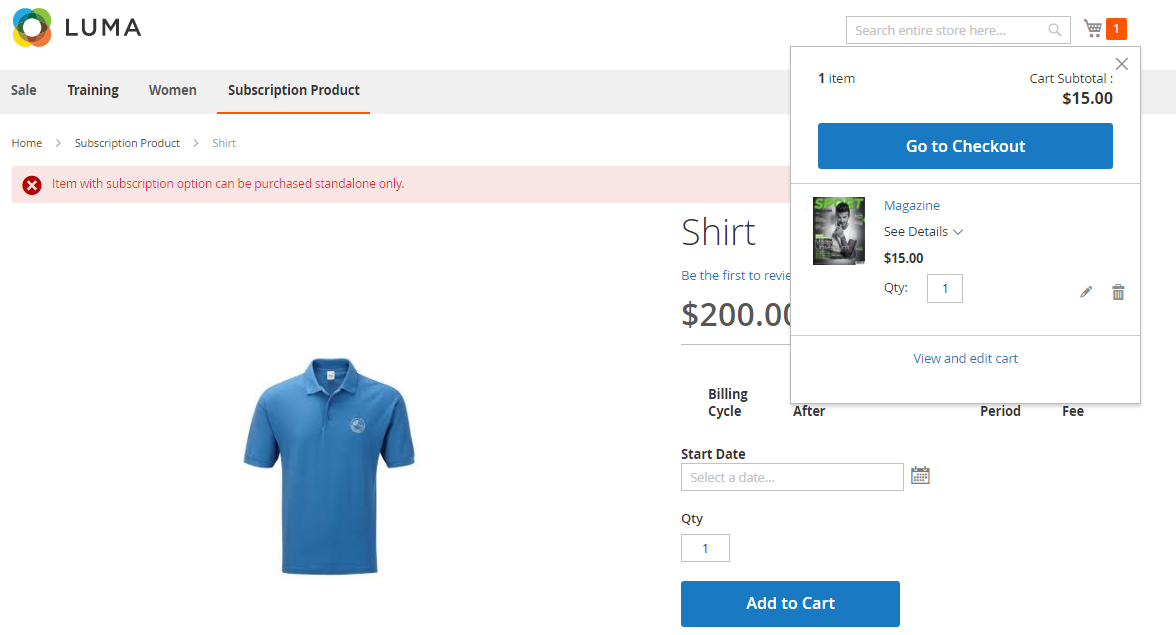
NOTE: For the cart that contains the subscription product, we currently support this cart with only one subscription product, not with one-time purchase product.
At check-out page, there are 2 ways to make Recurring Payment.
Payment through PayPal
Customers fill in their PayPal account to pay their order
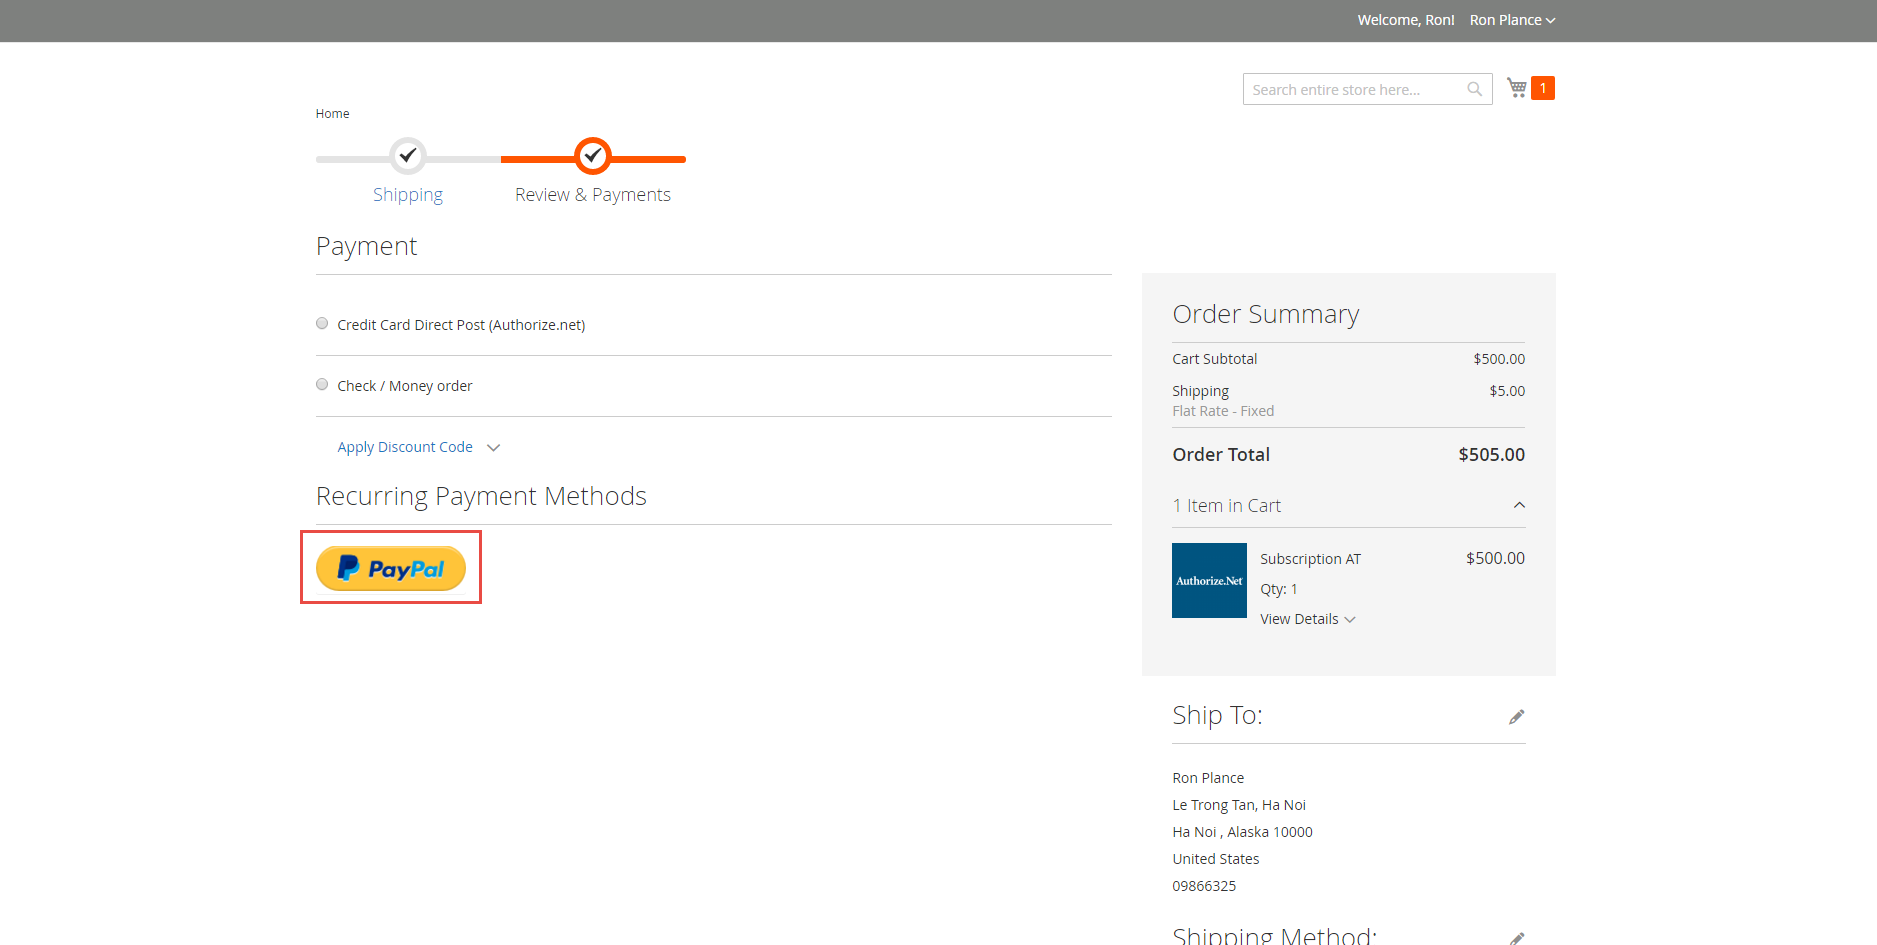
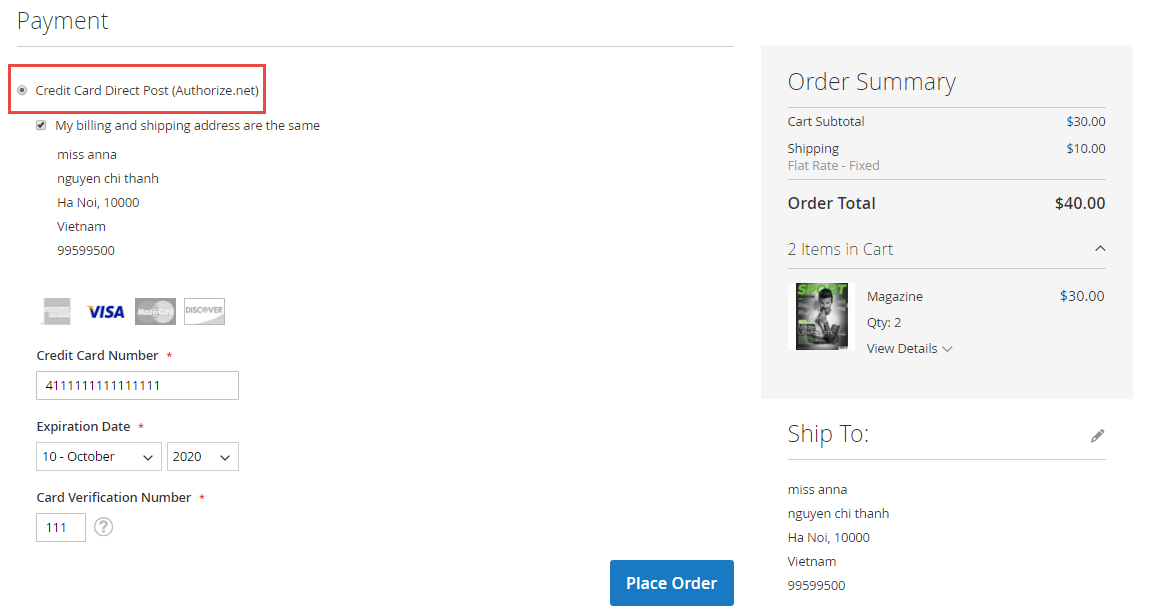
Payment through Authorize.net
Customers enter information about Credit card number, expiration date and card verification number. After that, click on "Place Order" button to order.
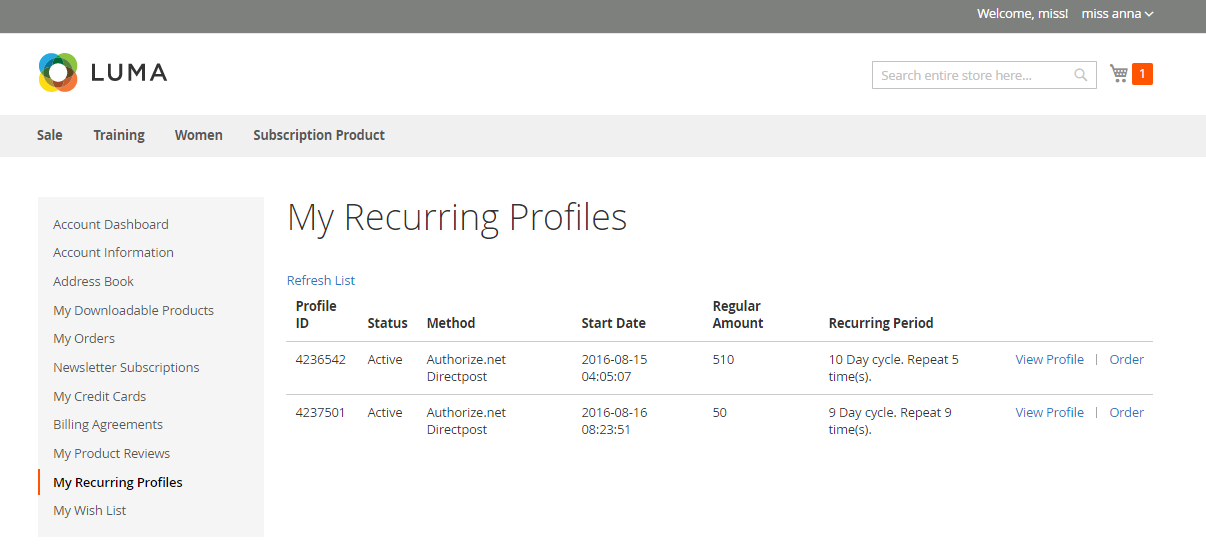
Manage recurring profiles at front end
Customers can view and manage all of their orders regarding subscription products by click on My account > My Recurring Profiles.
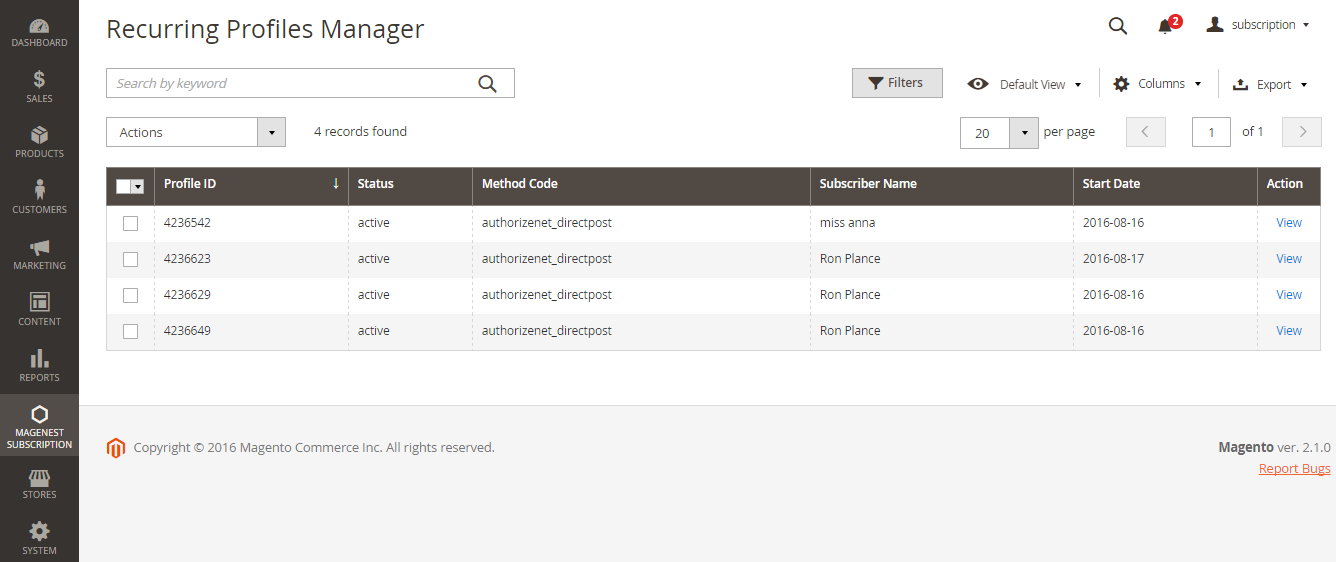
Manage recurring profiles at back end
You can manage the payment recurring profiles though Magenest Subscription You can manage the payment recurring profiles though Magenest Subscription - > Recurring Profiles. This Recurring Profiles Manager provides a table of recurring profiles with information on Profile ID, Status, Method Code, Subscriber Name and Start Date. Customers who have subscribed to your products will be listed here.
Status of the recurring payment profile is one of the following values:
...
Your subscription customers can check or modify their accounts in Account Dashboard in your frontend store. Magenest Subscriptions and Recurring Payments provides an option that customers can cancel or suspend their recurring profiles in your frontend store.
Customize Recurring Profiles Manager View
You can choose which columns to be shown on the Recurring Profiles Manager table.

By Default View, all columns (Profile ID, Status, Method Code, Subscriber Name and Start Date) are visible in the table.
To hide any column in the table, click Columns, uncheck the box of column you want to hide. To save this view setting for future usage, click the eye icon and name the view.
To set the table back to Default View, click Columns -> Reset. Or hit the eye icon, then click Default View.
Search Profile
To search for profiles, enter keyword in the Search by keyword box.
Or click Filter to search via criteria, enter information in any of the fields: Profile ID, Status, Method Code or Subscriber Name. Then click Apply Filters.

Click Clear All or hit the x icon to refresh your search result.
Note: you can filter recurring profiles via Status or Method Code. With Filter function, you can sort out which profiles are being suspended, cancelled, pending, expired or active.
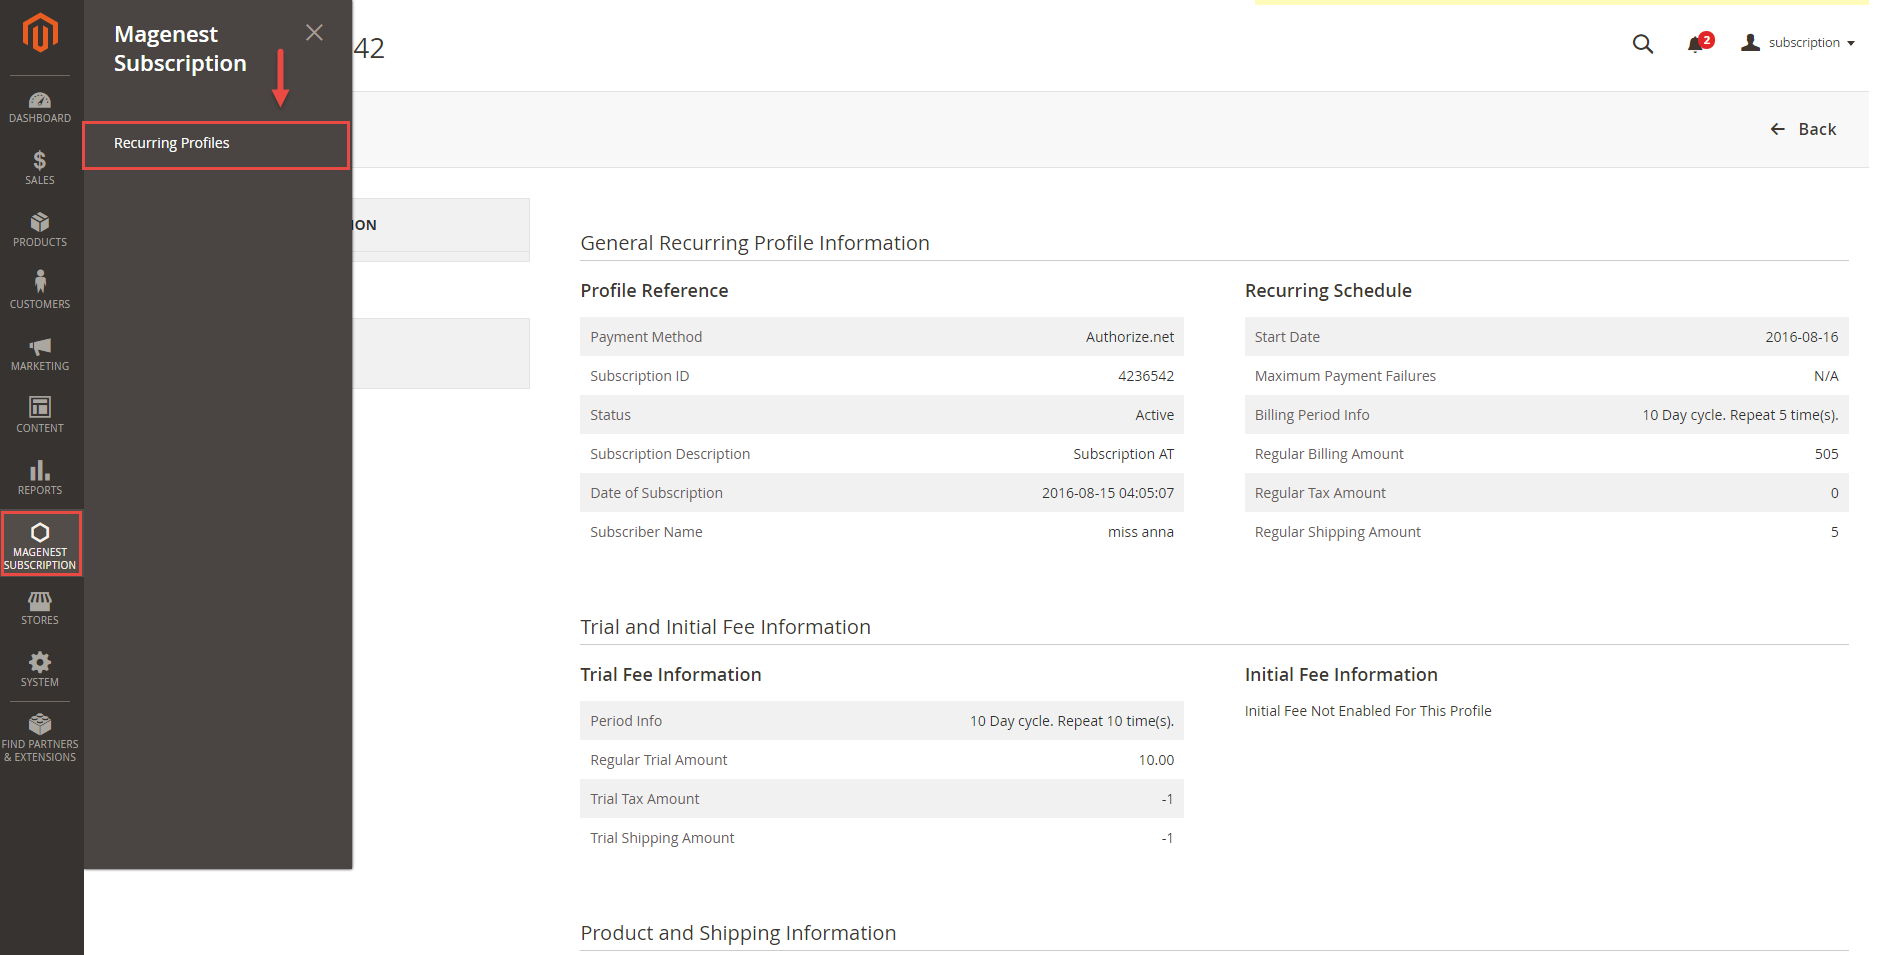
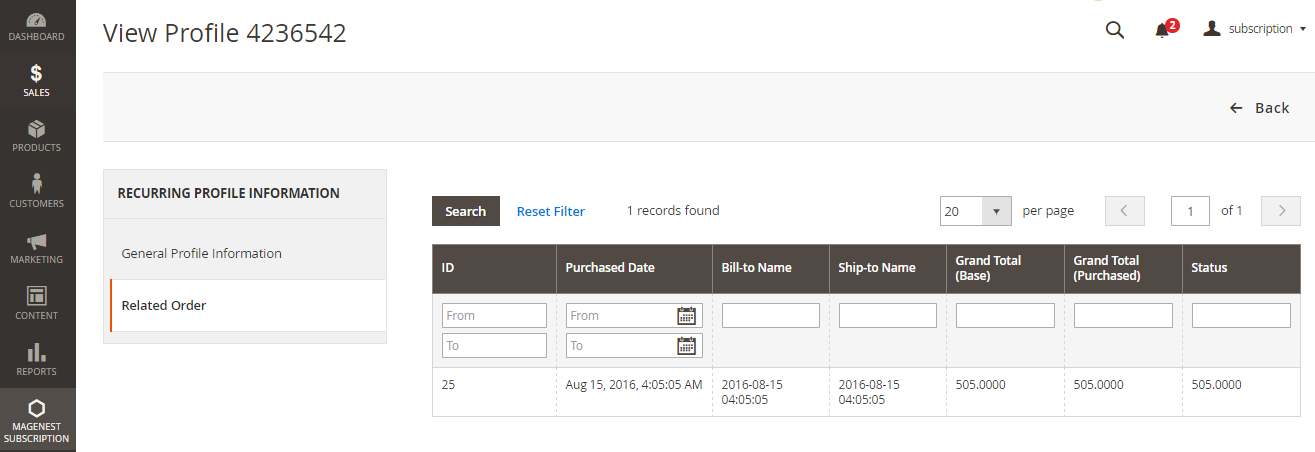
Manage Profile Details
To To check the profile in more details, click View. This will lead you to View Profile section where provides details information on Profile Reference, Recurring Schedule, Current Status of subscription cycles and Trial Information. The profile information on your backend system will appear the same as on your customer's Account Dashboard in frontend store.
...
To delete a profile, on Recurring Profiles Manager, check the box in front of the row that has profiles you want to delete, click Actions - > Delete.
Note: Cái này ?? làm gì t ko bi?t. hì
Export Profile
You can choose to export a list of recurring profiles in the format of CSV or Excel XML. At the top right corner, click Export, select format type and hit Export.

Store Appearance
This section illustrates some examples on how your store will appear when being configured with Magento Subscriptions and Recurring Payments.
...
...
...
- Customer use their Credit Card Direct Post.
...
Update
- When a new update is available, we will provide you with a new package containing our updated extension.
- You will have to delete the module directory and repeat the installing steps above.
- Flush the config cache. Your store and newly installed module should be working as expected.
...
Support
- We will reply to support requests after within 2 business days.
- We will offer offer the lifetime free update and 6 months free support for all of our paid products. Support includes answering questions related to our products, bug/error fixing to make sure our products fit well in your site exactly like our demo.
- Support DOES NOT include other series such as customizing our products, installation and uninstallation service.
Once again, thank you for purchasing our extension. If you have any questions relating to this extension, please do not hesitate to contact us for support.
...