...
Subscriptions and Recurring Payments Extension extension for Magento 2 allows merchants to create and manage subscription plans, subscription payments.
Magento 2 Subscriptions and Recurring Payments Extension provides all options for merchants to configure subscription products such as magazines, newspapers, newsletters or memberships, etc. All things become easy and simple with this extension. It helps customers save time to buy products from a repeating order process. And you will no longer need to invoice your individual customers for each payment. Therefore, it is one of the most helpful solutions.
...
Subscriptions and Recurring Payments extension supports the following payment methods:
...
Enter your Email Associated with PayPal Merchant Account
Select API Signature in API Authentication Methods
Enter API Username, API Password and API Signature associated with your PayPal account. To get your Paypal Credentials, click on Get Credentials from Paypal button, to get a sandbox credentials, click on Sandbox Credentials button
Enable Sandbox Mode if you are using a sandbox PayPal account. Disable Sandbox Mode if you go live
Choose Yes in the Enable this Solution field to enable Paypal Payment.
Enter the Merchant Account ID.
On the top right corner, click Save Config.
...
Login Status will be OK if credentials is are valid. The status will be updated only when the credentials are entered and saved.
Click on on the Save Config button to save data entered.
...
Log in to your PayPal business account at www.paypal.com.
Click on the settings icon at the top of your PayPal account page, choose Profile choose Profile > Settings.
Choose My selling tools.
Note: If you do not see the profile icon on the top right, navigate to My to My Account > Profile > My Selling Tools.
Click on the Update link in the Instant payment notifications row, in the Getting paid and managing my risk section.
Choose IPN Settings to specify your listener's URL and activate the listener. The following page opens
Specify the URL for your listener in the Notification URL field. The URL to be called follows the format: {your magento url}/subscription/webhooks/paypal
Click Receive IPN messages (Enabled) to enable your listener.
Click Save. The following page opens:


...
You can reset your IPN preferences by clicking on on the Turn Off IPN button.
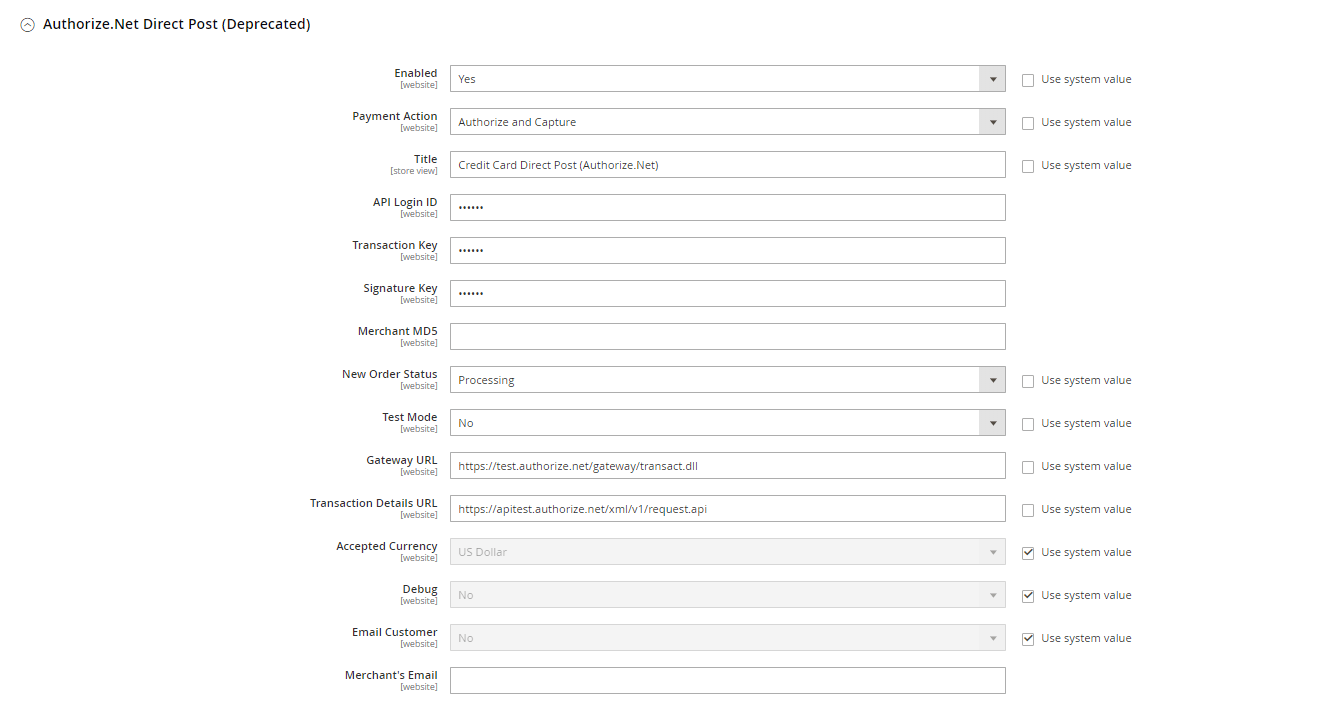
Authorize.net Direct Post Configuration
In Magento 2 back end, go to Stores > Configuration > Sales > Payment Methods > Other payment methods > Authorize.net Direct Post.
![]() In Other payment methods > Authorize.net Direct Post.
In Other payment methods > Authorize.net Direct Post.
Enabled: Enable/Disable the payment method
Payment Action: You can choose Authorize Only or Authorize and Capture
Authorize Only (Authorization): will check the card for validity but not charge the account yet until the order is approved and invoiced.
Authorize and Capture(Sale): will charge the debit/credit card at the time of the order submission.
Title: The title of the payment method that will be displayed on the checkout page
API Login ID: Getting from the Authorize.net account.
Transaction Key: Get from the Authorize.net account.
Merchant MD5: Authorize.net MD5 Hash
New Order Status: You can choose between Processing and Suspected Fraud
Processing: The The payment is made successfully and an order invoice is issued.
Suspected Fraud: No No invoice is issued.
Test Mode: Turn this on (Yes) if you use the test credentials.
Gateway URL: If you use the sandbox mode, the URL is https://test.authorize.net/gateway/transact.dll ; if you go live, the URL is https://secure.authorize.net/gateway/transact.dll
Transaction Details URL: https://api2.authorize.net/xml/v1/request.api
Accepted Currency: Choose the currency you want the payment to be
Debug: To save messages transmitted between your store and the Authorize.Net Direct Post system, set Debug to “Yes.”
Email Customer: Turn this on (Yes) to send customer email
Merchant's Email: Enter the email address where you want to receive notification of orders placed with Direct Post. Leave blank if you do not want to receive a notification.

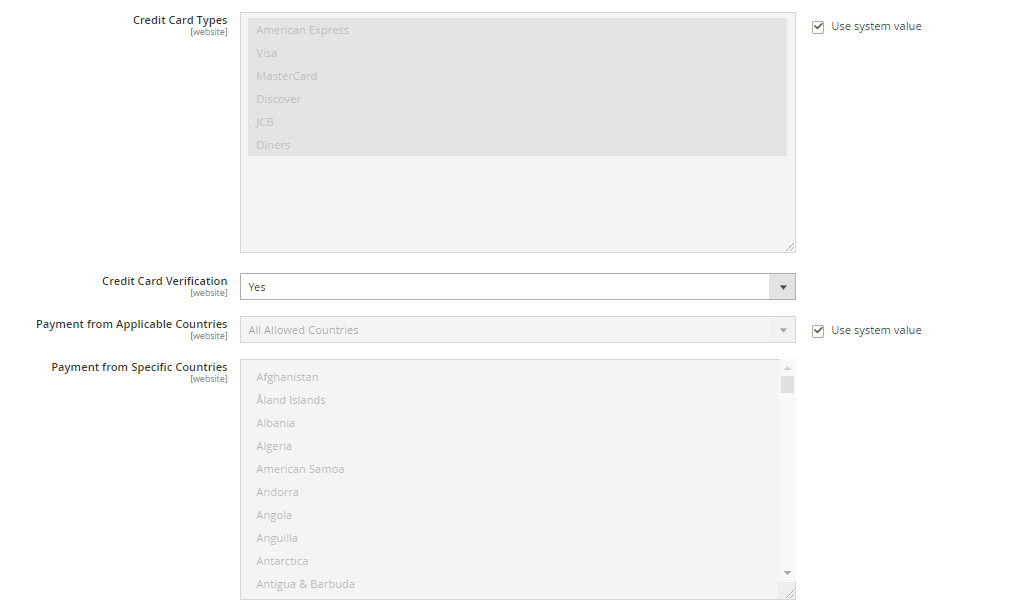
Credit Card Types: You can choose which credit card types you want by choosing one or more items.
Credit Card Verification: Enable CVC/CVV Verification.
Payment from Applicable Countries
All allowed countries: Customers from all countries specified in your store configuration can use this payment method.
Specific Countries: After After choosing this option, the Payment from Specific Countries list appears. Select each country in on the list where customers can make purchases from your store.

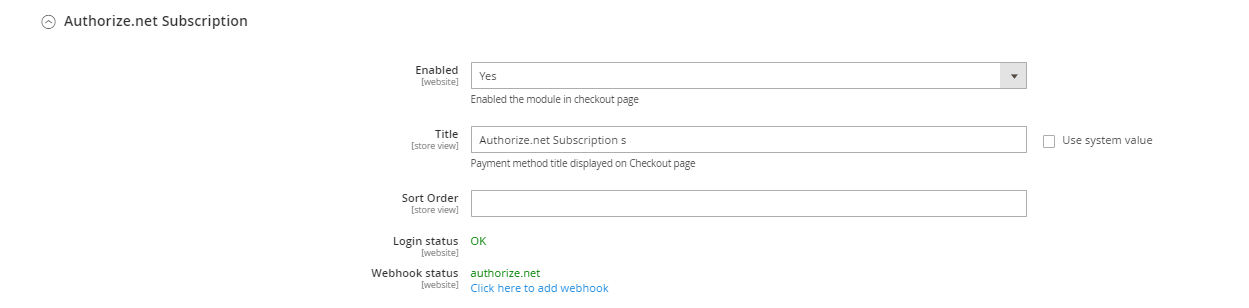
![]() In Other payment methods > In OTHER PAYMENT METHODS -> Authorize.net Subscription:
In Other payment methods > In OTHER PAYMENT METHODS -> Authorize.net Subscription:
- Enabled: Enable/Disable the subscription for the Authorize.net method.
Login Status will be OK if credentials is Status: OK if credentials are valid. The status will be updated only when the credentials are entered and saved.
...
Webhooks config: Click Click here to add webhook to add authorize.net webhooks to your store.
Click on Save Config button to save the settings
...
Stripe Configuration
![]() Requirement Settings
Requirement Settings
Sandbox Mode Enabled: Turn this on (Yes) for test mode, remember to use test key and test cards for testing. Other please turn this off (No) when you go Live.
If If you use the Test Key:
You should fill in Stripe API Test Keys in Test Publishable Key, Test Secret Key to connect Magento and Stripe Payment Gateway.
Turn on the Sandbox Mode Enabled by choosing Yes.
If If you use the Live Key:
Fill in your Stripe API Keys in Live Publishable Key, Live Secret Key to connect Magento with Stripe Payment Gateway.
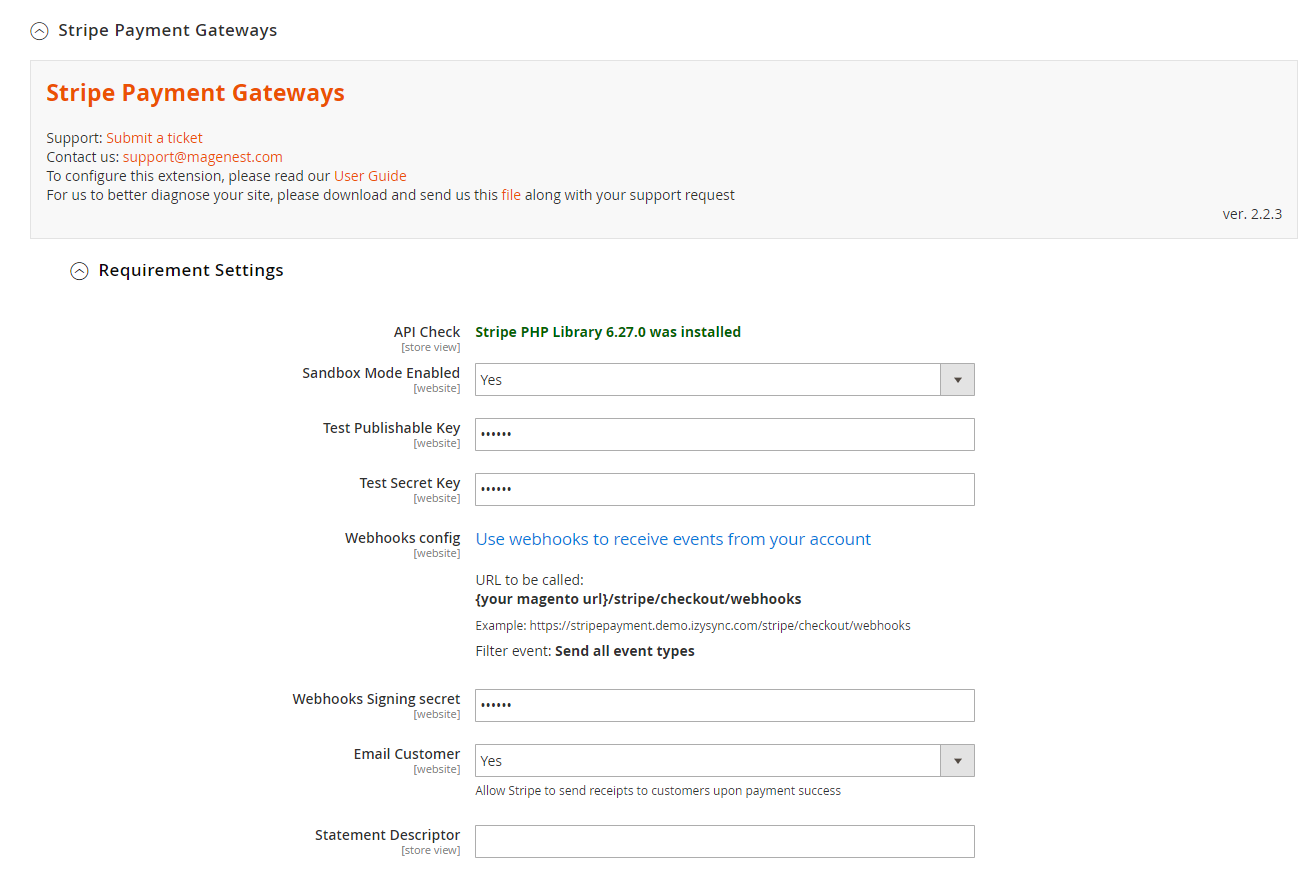
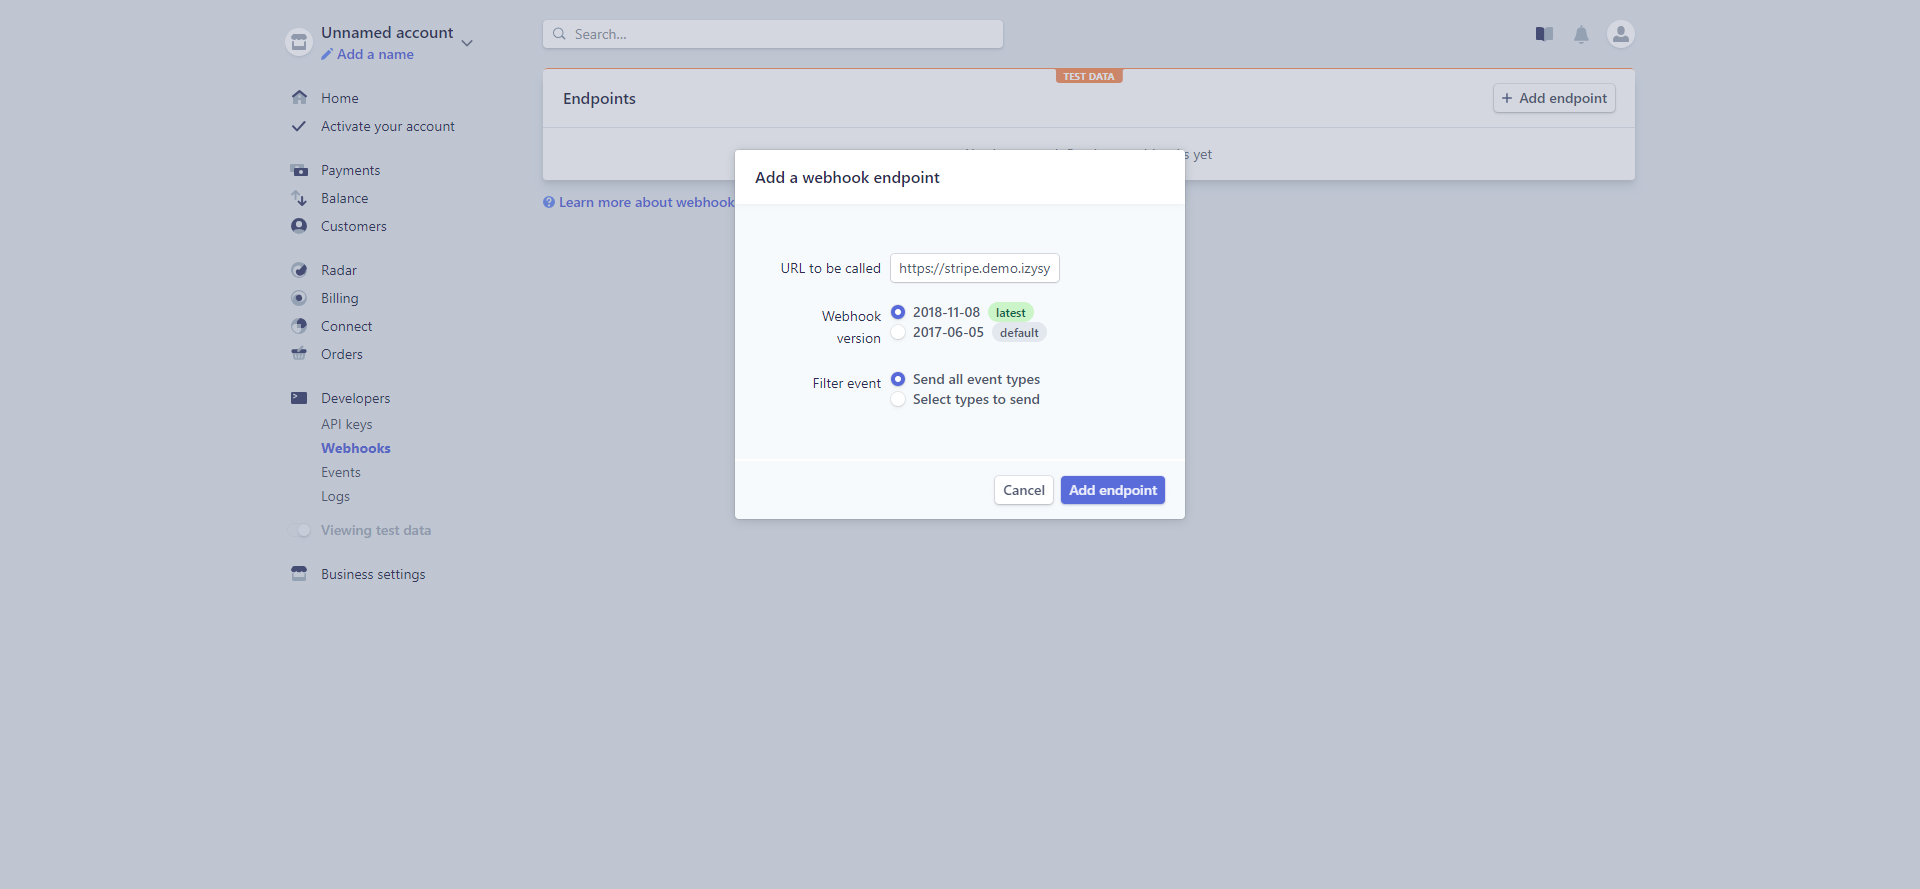
- Webhooks config: You You can configure Stripe webhooks by going to Use webhooks to receive events from your account.
Login your Stripe account, then in the Webhooks configuration, click on Add endpoint button.
The URL to be called follows the format: {your magento Magento url}/stripe/checkout/webhooks
Select the filter event as Send all event types.

- Add a webhook endpoint
...
- Copy the signing secret and paste to Magento 2 Configuration
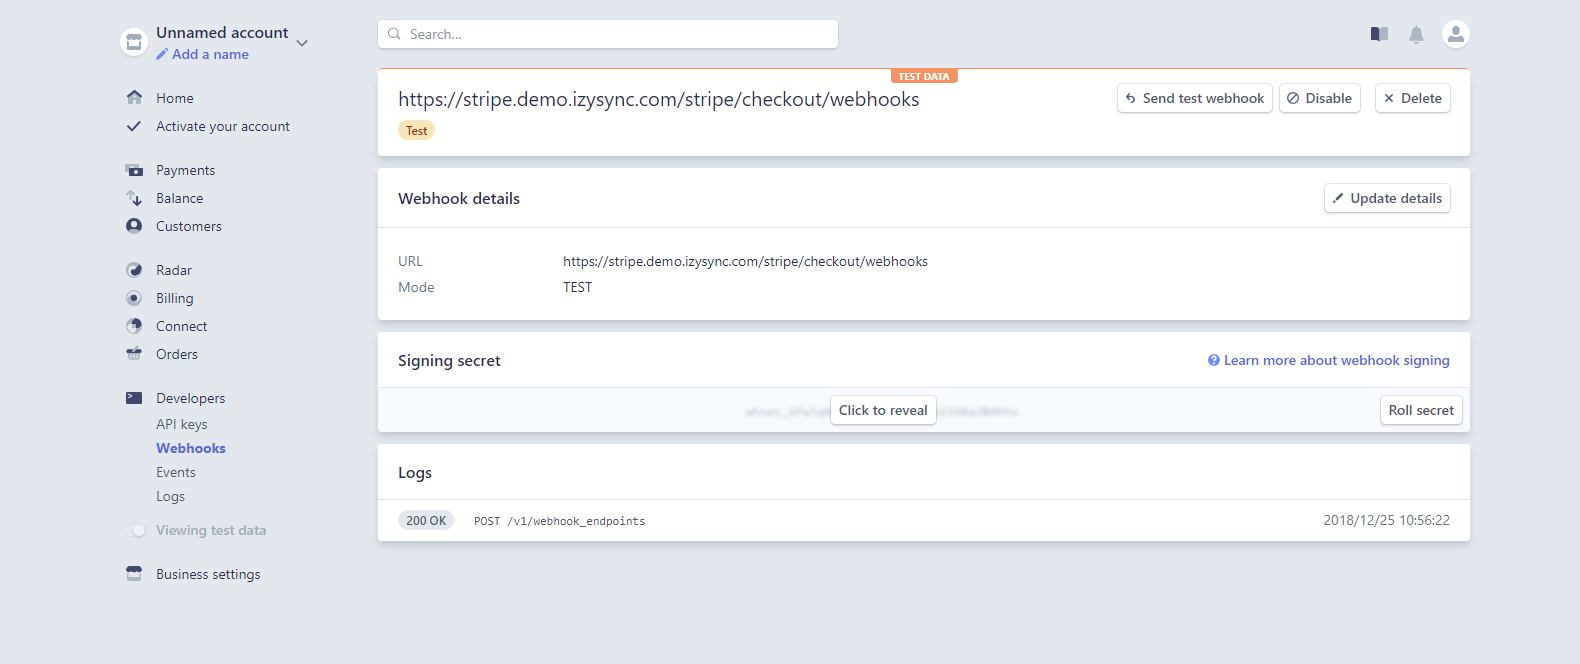
Webhooks signing secret: Enter the signing secret from Stripe+
Email Customer: Allow Stripe to send receipts to customers once the payment is made successfully.
Statement descriptor: An arbitrary string to be displayed on your customer’s statement. As an example, if your website is RunClub and the item you’re charging for is a race ticket, you may want to specify a statement_descriptor of RunClub 5K race ticket. While many payment types will display this information, some may not display it at all.
Stripe Payment
![]() Enabled: Choose Yes to enable the Stripe payment method.
Enabled: Choose Yes to enable the Stripe payment method.
...
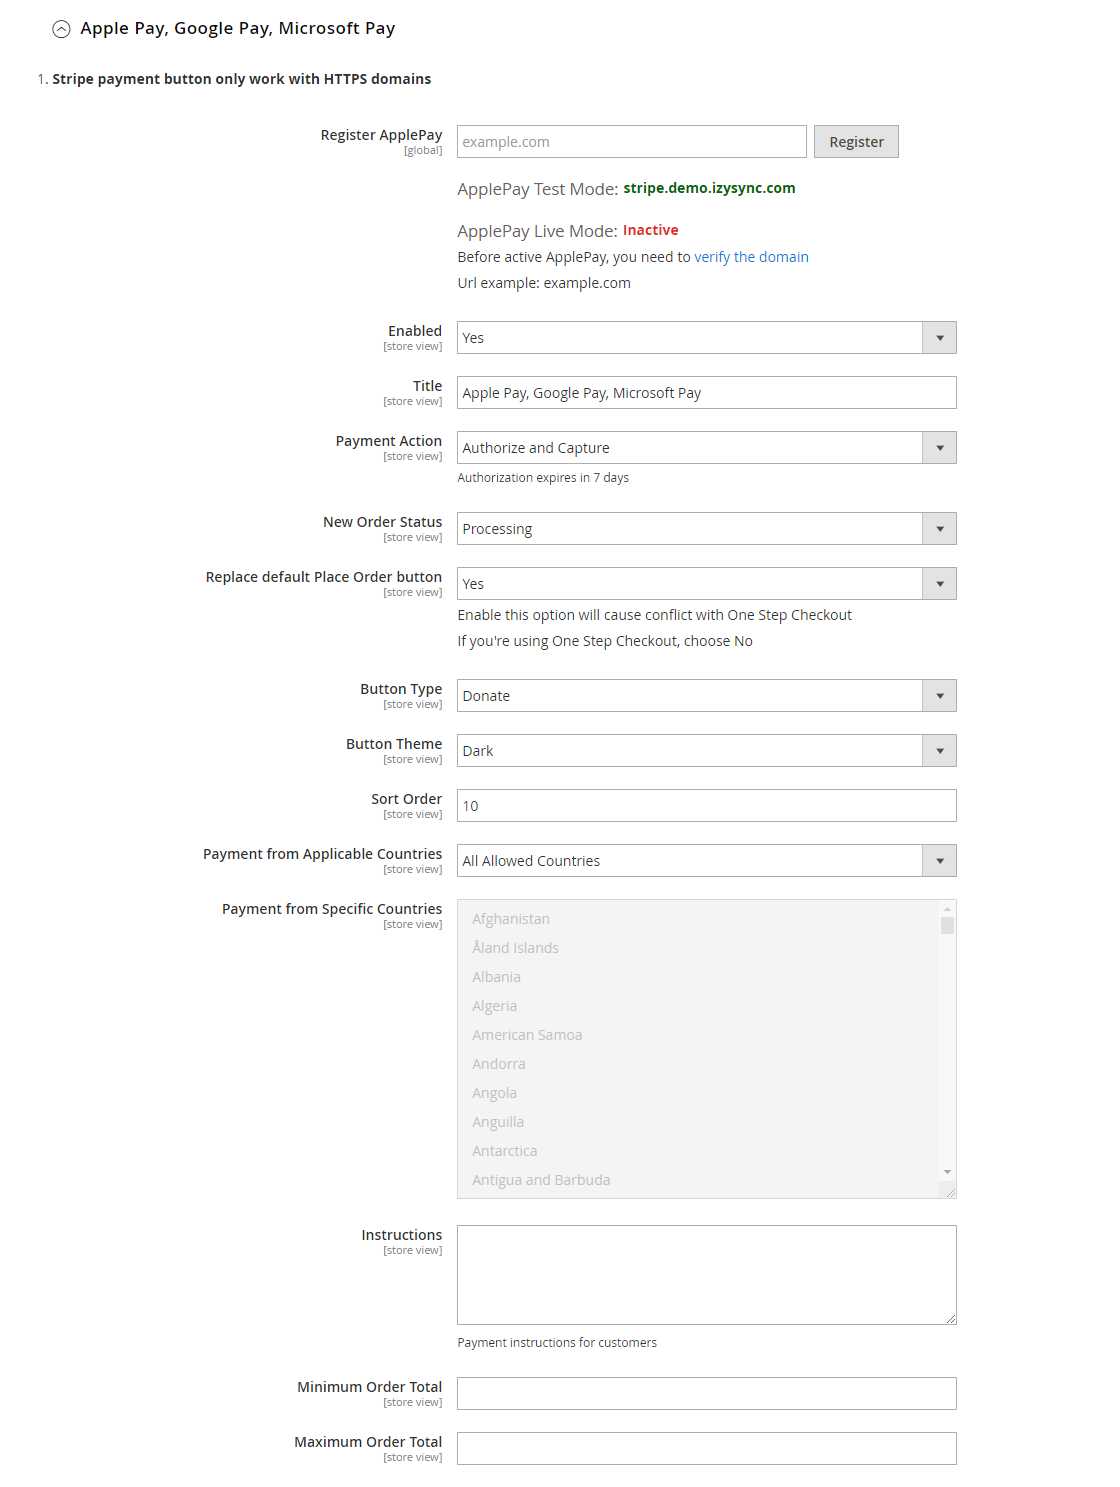
![]() Display payment button: Enable this option to display Apple Pay, Google Pay, and Microsoft Pay payment button in the Stripe payment method
Display payment button: Enable this option to display Apple Pay, Google Pay, and Microsoft Pay payment button in the Stripe payment method
![]() 3D Secure: Choose Yes to enable 3D secure for Stripe payments
3D Secure: Choose Yes to enable 3D secure for Stripe payments
The behavior and application of 3D secure varies vary across card types and networks. Some card issuers does not support this verification method, in order to deal with that, you can choose 1 of 2 options for 3D secure application:
...
![]() Enable MOTO: Allow admin to make the payment from the backend.
Enable MOTO: Allow admin to make the payment from the backend.
![]() You can set the New Order Status: Processing, Suspected Fraud
You can set the New Order Status: Processing, Suspected Fraud
...
- All allowed countries: Enable all allowed countries to make paymentpayments.
- Specific Countries: Restrict some countries by unselecting them from the Payment from Specific Countries.
![]() In addition, you can add/edit the Instructions to instruct customers on how to do paymentmake payments.
In addition, you can add/edit the Instructions to instruct customers on how to do paymentmake payments.
![]() Sort Order: The order of the payment method that will be displayed on the checkout page.
Sort Order: The order of the payment method that will be displayed on the checkout page.
Stripe IFrame Checkout Form
![]() Enabled: Choose Yes to enable the IFrame checkout form method
Enabled: Choose Yes to enable the IFrame checkout form method
...
![]() 3D secure: The 3D secure settings for this method will follow the 3D secure settings in Stripe Payment Settings. Note that you don't have to enable Stripe Payment Settings to make it work, just change the 3D secure settings then Save Config.
3D secure: The 3D secure settings for this method will follow the 3D secure settings in Stripe Payment Settings. Note that you don't have to enable Stripe Payment Settings to make it work, just change the 3D secure settings then Save Config.
![]() Name of the website displayed on Checkout: Your store name.
Name of the website displayed on Checkout: Your store name.
...
![]() Remember Me: If you set this option to Yes, Stripe will save the customer's information for later purchase in on every website that use uses Stripe Payment Gateway.
Remember Me: If you set this option to Yes, Stripe will save the customer's information for later purchase in on every website that use uses Stripe Payment Gateway.
![]() Logo image:
Logo image:
...
- All allowed countries: Enable all allowed countries to make paymentpayments.
- Specific Countries: Restrict some countries by unselecting them from the Payment from Specific Countries.
...
![]() Replace default Place order button: Enable to replace the default Place Order button with Apple Pay, Google Pay or Microsoft Pay Place Order button. Note that this option can cause conflict with One-step Checkout extension, so if currently, you are using One Step Checkout, turn this option off.
Replace default Place order button: Enable to replace the default Place Order button with Apple Pay, Google Pay or Microsoft Pay Place Order button. Note that this option can cause conflict with One-step Checkout extension, so if currently, you are using One Step Checkout, turn this option off.
![]() Note: To use Google Pay (for PC), customers have to add their credit
Note: To use Google Pay (for PC), customers have to add their credit
...
cards to the browser.
![]() Button type: You have 3 options for the payment button type - Default, Donate or Buy
Button type: You have 3 options for the payment button type - Default, Donate or Buy
...
- All allowed countries: Enable all allowed countries to make paymentpayments.
- Specific Countries: Restrict some countries by unselecting them from the Payment from Specific Countries.
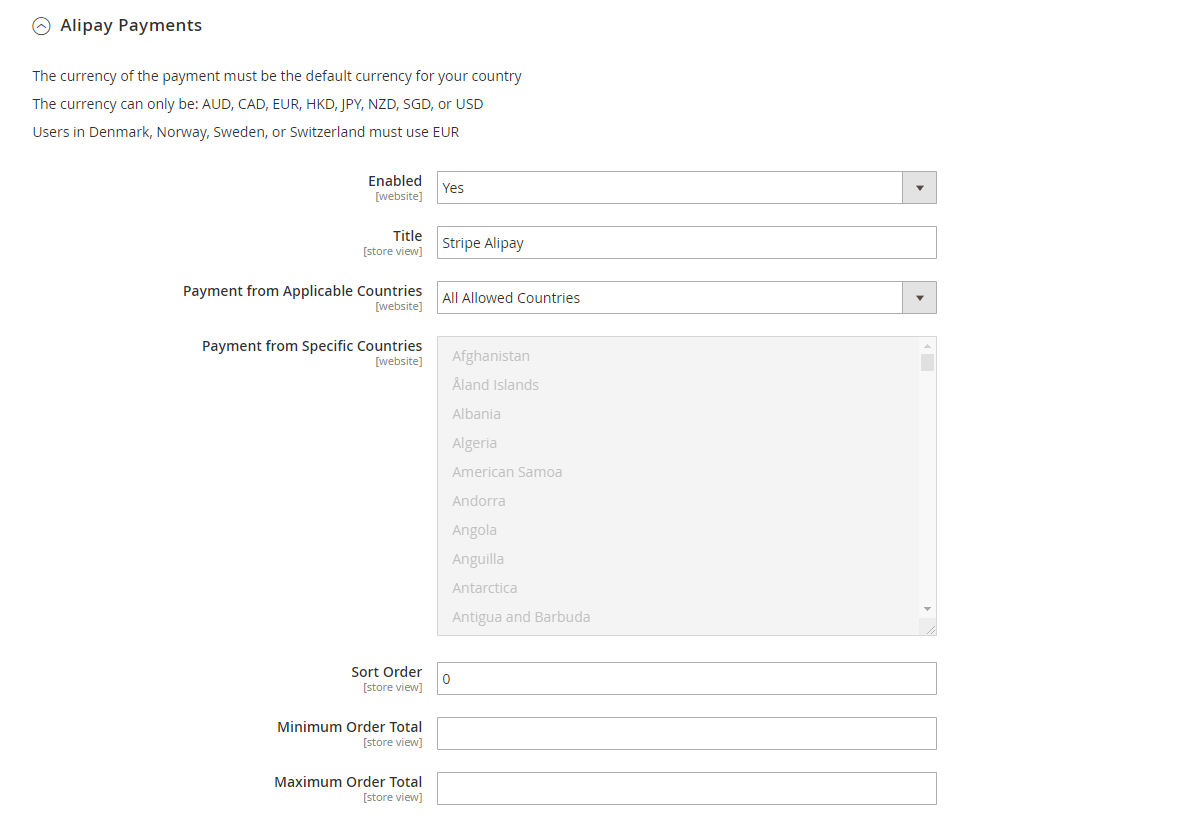
Alipay Payments
...
- Choose Yes in Enabled then Save Config.
![]() Note
Note
...
: The currency of the payment must be the default currency of your country. It could be AUD, CAD, EUR, HKD, NZD, SGD, or USD.
...
In Denmark, Norway, Sweden, and Switzerland, the currency for the payment will be exchanged to EUR.
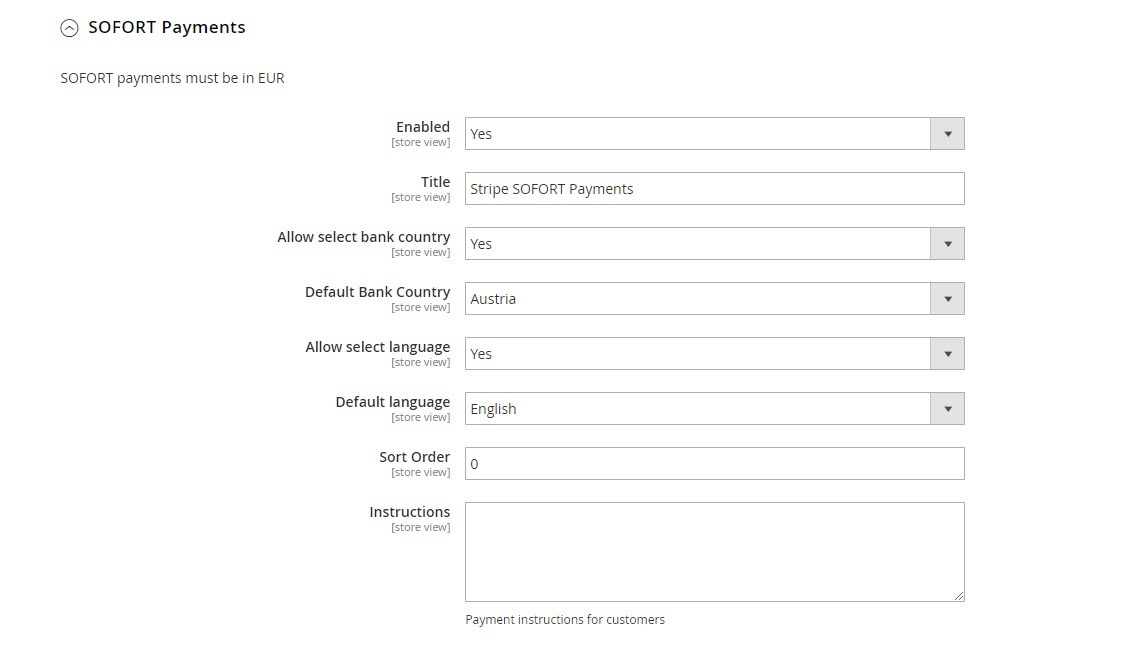
Giropay Payments
The Giropay currency is EUR.
You can enable the payment method by choosing Choose Yes in Enabled then Save Config.
...
You can enable the payment method by choosing Yes in Enabled.![]()
- Title: Fill in the title for the payment method
...
- Allow select bank country: Enable customers to choose their country to make payments.
...
- Default Bank Country: Set the default bank country to be displayed on checkout: Austria, Belgium, Germany, Italy, Netherlands, Spain
...
- Allow select language: Enable customers to choose the preferred language
...
- Default language: Set the default language for the payment method: English, German, Spanish, Italian, French, Dutch, Polish.
...
- Sort Order: The order of the payment method that will be displayed on the checkout page.
In addition, you can add/edit the Instructions to instruct customers on how to do payment.
make payments.
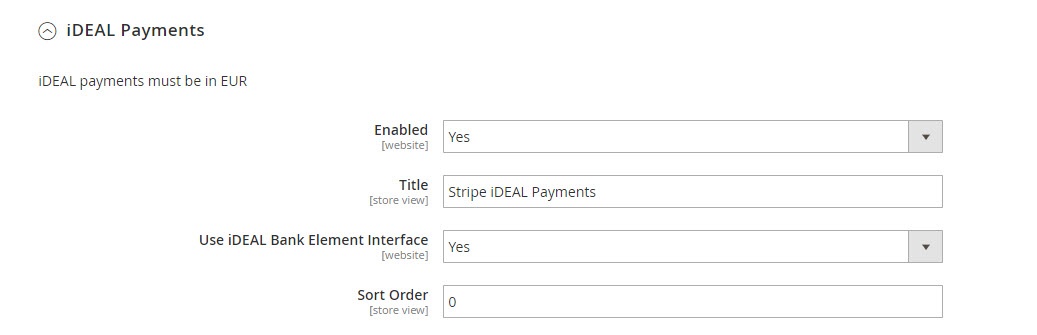
iDEAL Payments
The iDEAL currency is EUR.
You can enable the payment method by choosing Yes in Enabled.![]()
- Title: Fill in the title for the payment method
...
- Use iDEAL Bank Element Interface: If you choose Yes, the payment method will be displayed with the iDEAL interface.
If you don't use the iDEAL interface, you can choose No and change the settings as follows:![]()
- Allow select bank country: Enable customers to choose their country to make payments.
...
- Default Bank: If you don't want to allow customers to choose their bank. You can set a default bank.
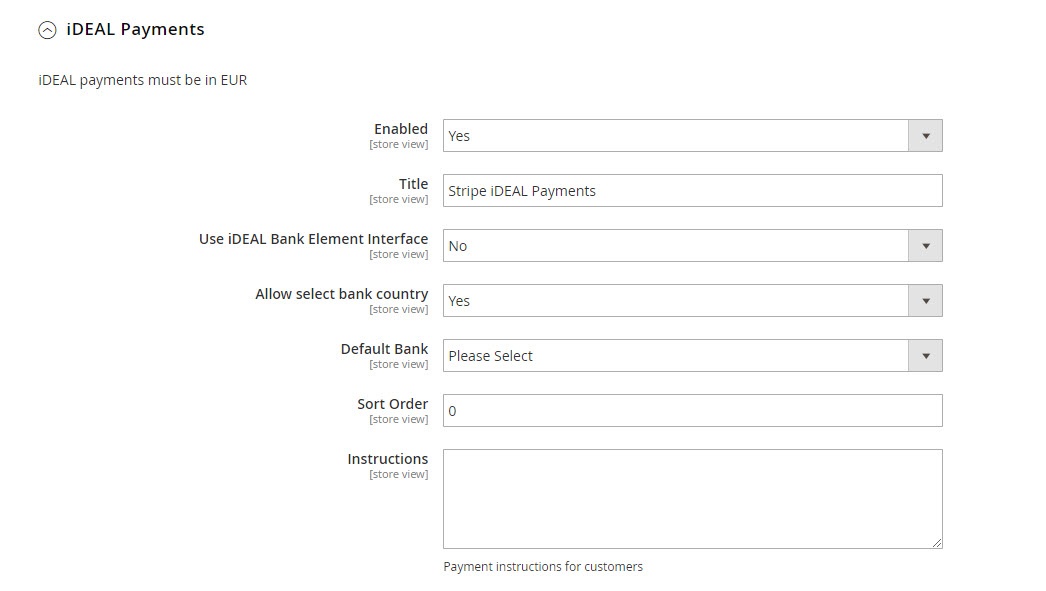
In addition, you can add/edit the Instructions to instruct customers on how to do paymentmake payments.
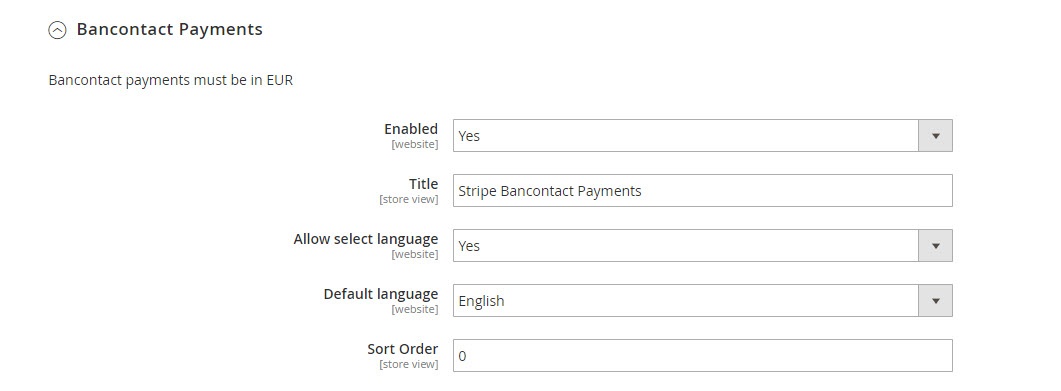
Bancontact Payments
The Bancontact currency is EUR.
You can enable the payment method by choosing Yes in Enabled.![]()
- Title: Fill in the title for the payment method
...
- Allow select language: Enable customers to choose the preferred language
...
- Default language: Set the default language for the payment method: English, German, French, Dutch.
In addition, you can add/edit the Instructions to instruct customers on how to do paymentmake payments.
P24 Payments/ EPS Payments/ Multibanco Payments
Following other payment methodmethods, in order to enable P24 Payments, EPS Payments, or Multibanco Payments, you have to choose Yes in Enabled.
You can add/edit the Instructions to instruct customers on how to do paymentmake payments.
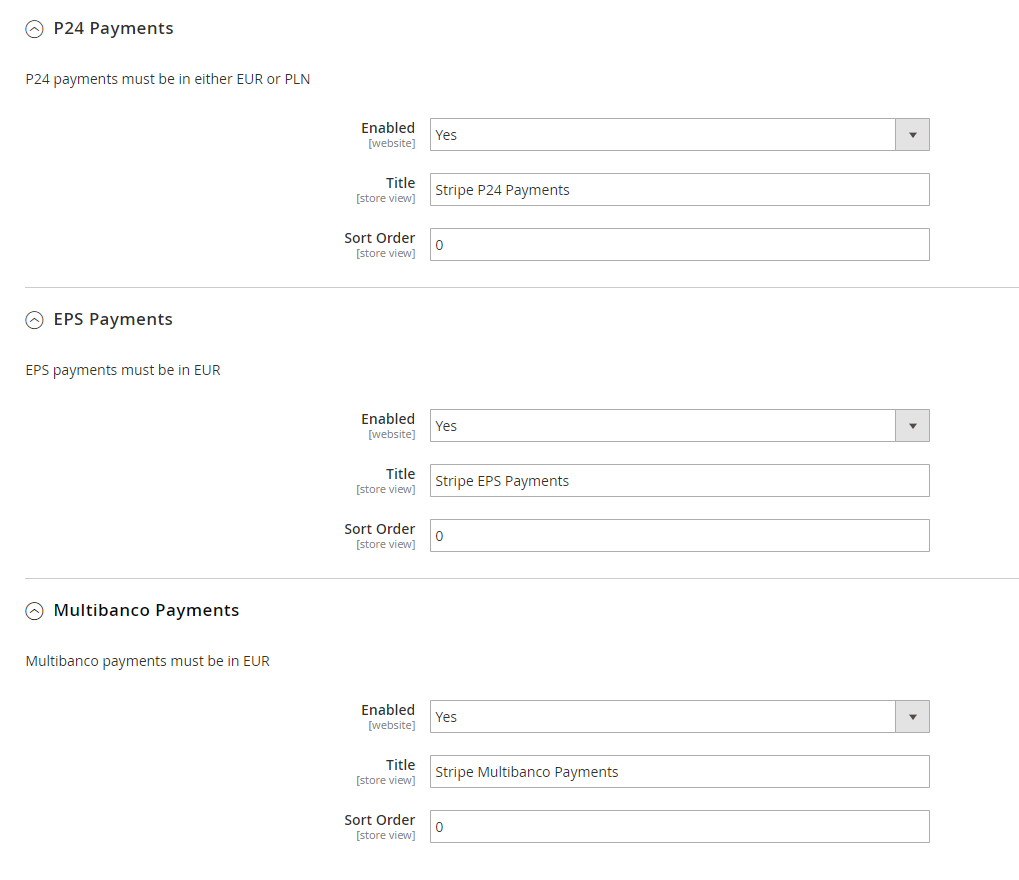
When done, please press Save Configuration then go to Cache Management to flush the cache.
...
Subscription Settings
In Magento 2 back end, go to Subscription > Settings > Sales > Subscription Settings
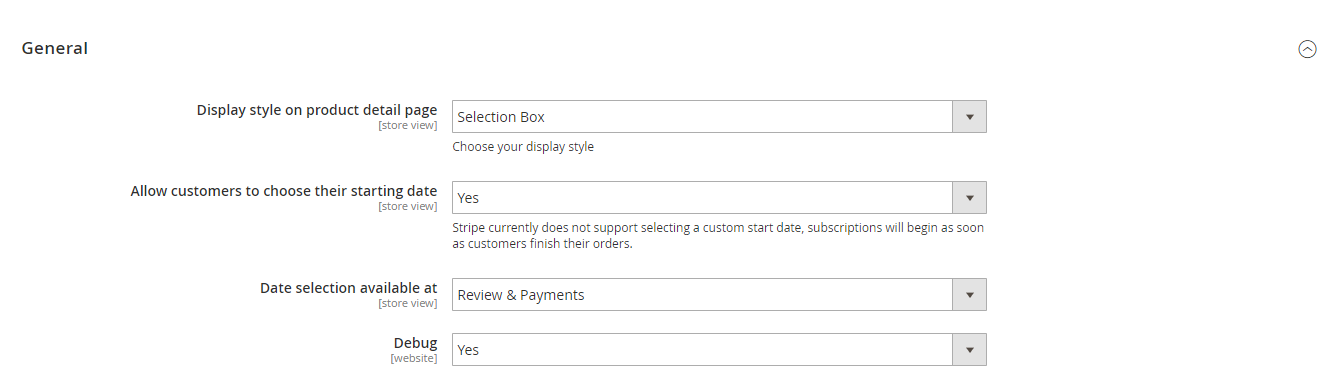
![]() General Settings
General Settings
Display style on product detail page: Subscription options on the front end product detail page will be displayed as a drop-down list or Radio button or Selection Box
Allow customers to choose their starting date: Stripe currently does not support selecting a custom start date, subscriptions will begin as soon as customers finish their orders. If you want to allow customers to choose the starting date, enable this setting
Date selection available at: Choose at the step at which step the start date will be captured.
![]() Mail Settings
Mail Settings
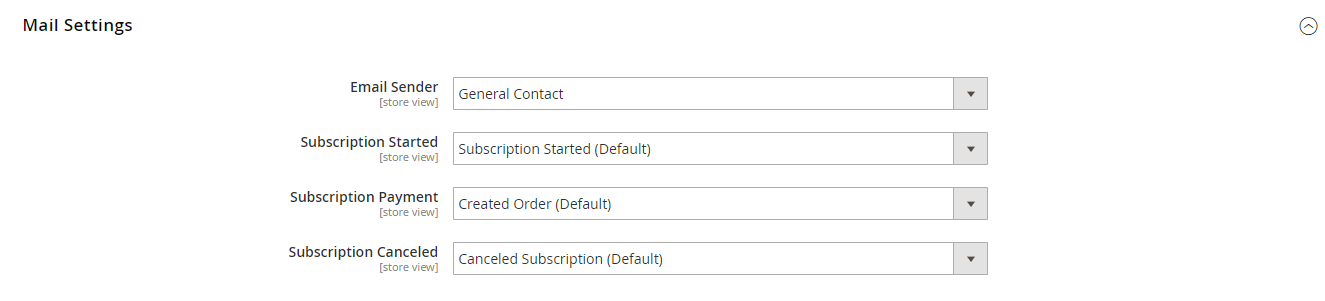
Email Sender: Choose the department you want to take charge of sending customers emails
Subscription Started: You can set whether not to send email (Don't send email) or send email by email templates when the subscription started
Subscription Canceled: You can set whether not to send email (Don't send email) or send email by email templates when the the the subscription is canceled
![]() Paypal
Paypal
Initial Payment Failure Action: You can choose whether to Continue payment on failure or cancel it.
Auto Bill: To automatically bill the next subscription amount of the next billing cycle or not.
Maximum Payment Failures: Allows you to set the maximum number of times that customer customers can fail to pay. When the number is reached, an IPN (Instant Payment Notification) message is sent to you and customer’s account will be suspended automatically.
Subscription Reactive: Select the email template to send to customers when the subscription is reactivated. You can create a new email template in Marketing > Email Templates. Choose Don't send email to turn off this setting.
Subscription Suspended (Paypay Only): Select the email template to send to customers when the subscription is reactivated. You can create new email template in Marketing > Email Templates. Choose Don't send email to turn off this setting.
...
- Customer Cancel Subscription: whether merchants allow the customer to cancel their subscription or not.

![]() Stripe
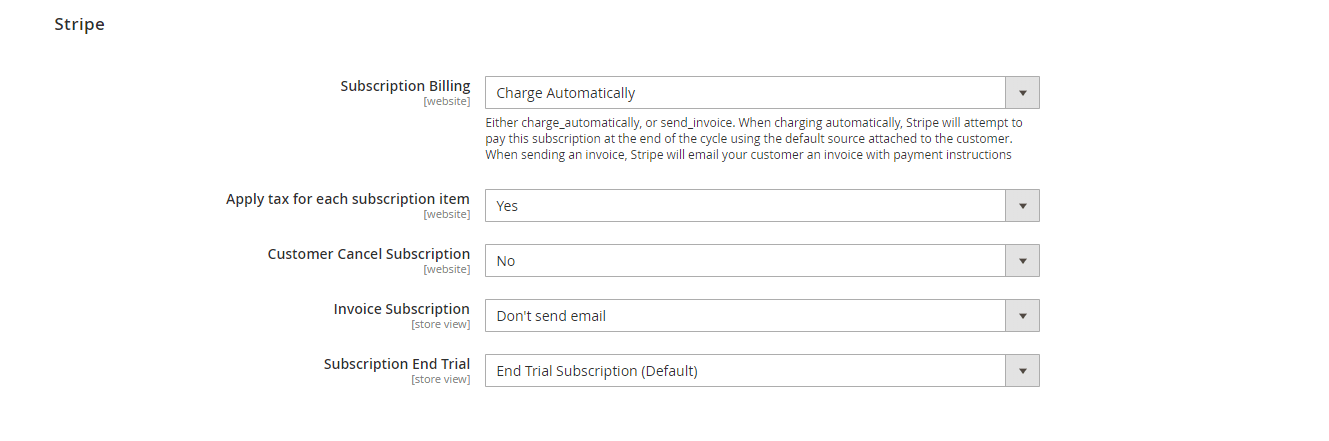
Stripe
Subscription Billing: Either charge_automatically , or send_invoice. When charging automatically, Stripe will attempt to pay this subscription at the end of the cycle using the default source attached to the customer. When sending an invoice, Stripe will email your customer an invoice with payment instructions
- Customer Cancal Cancel Subscription: Allow customer customers to cancel the subscription.
- Invoice Subscription: You can set whether not to send email (Don't send email) or send email by email templates when Stripe create creates an invoice.
Subscription End Trial: You can set whether not to send email (Don't send email) or send email by email templates when the the the subscription trial is ended

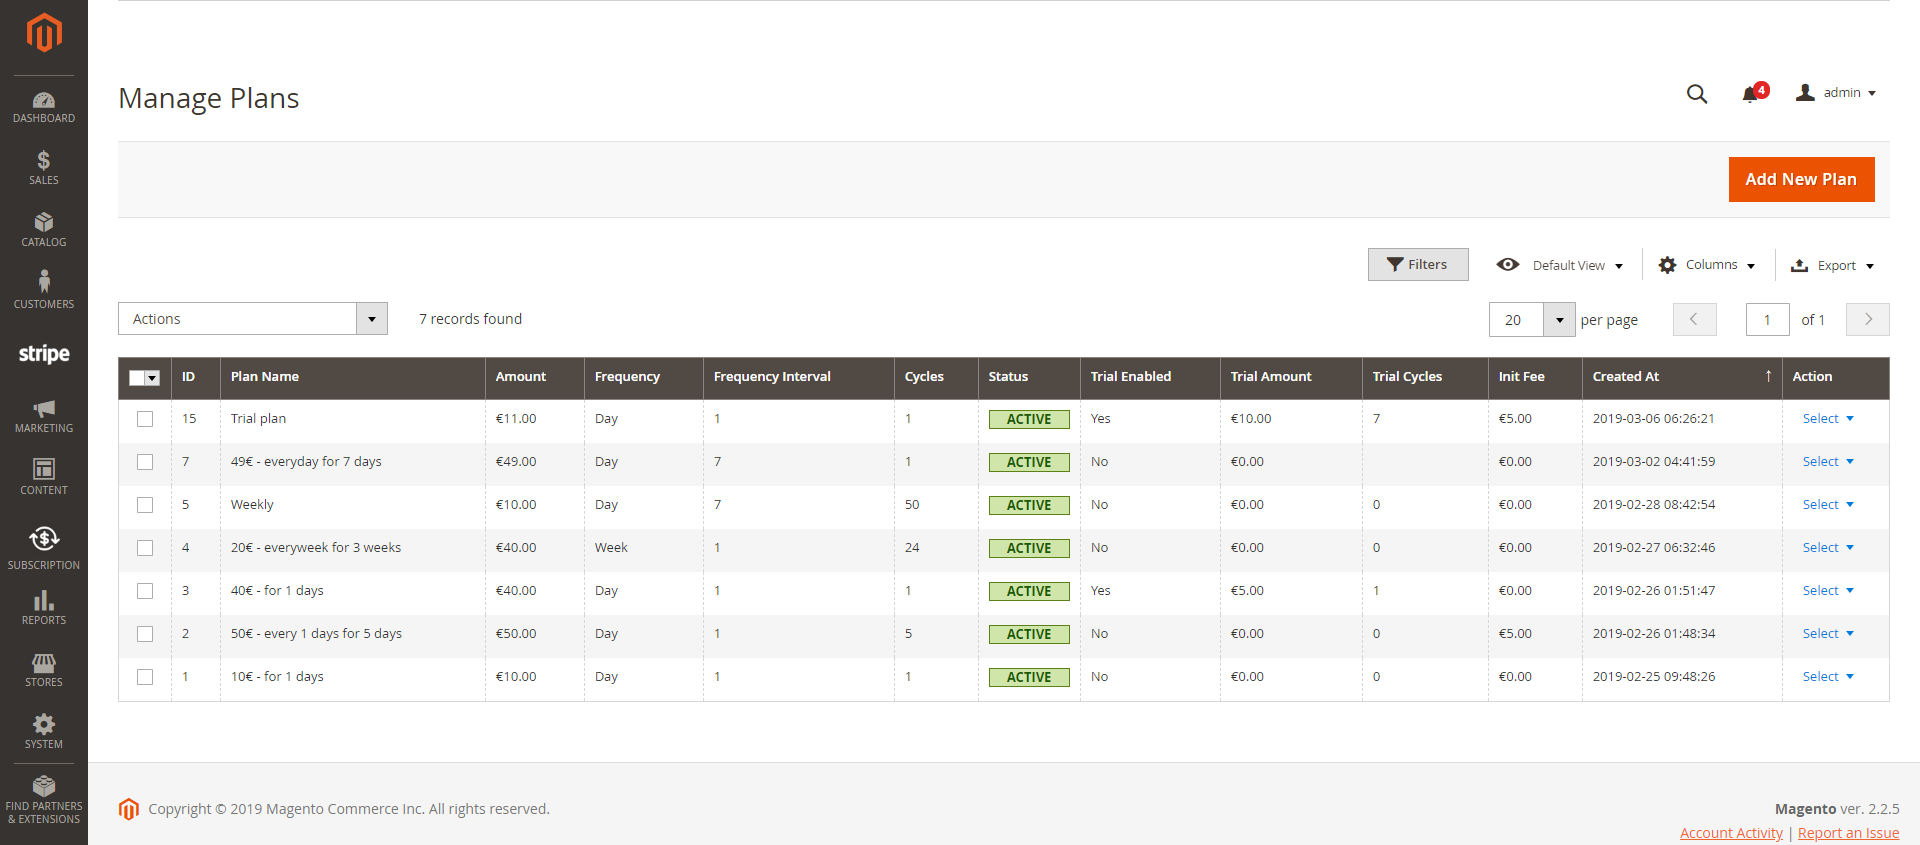
Manage Subscription Plans/ Create Subscription Plans
...
You can manage all available subscription plans in the grid table, or create a new one by clicking on Add New Plan button.
![]() Plan InformationConfiguration
Plan InformationConfiguration

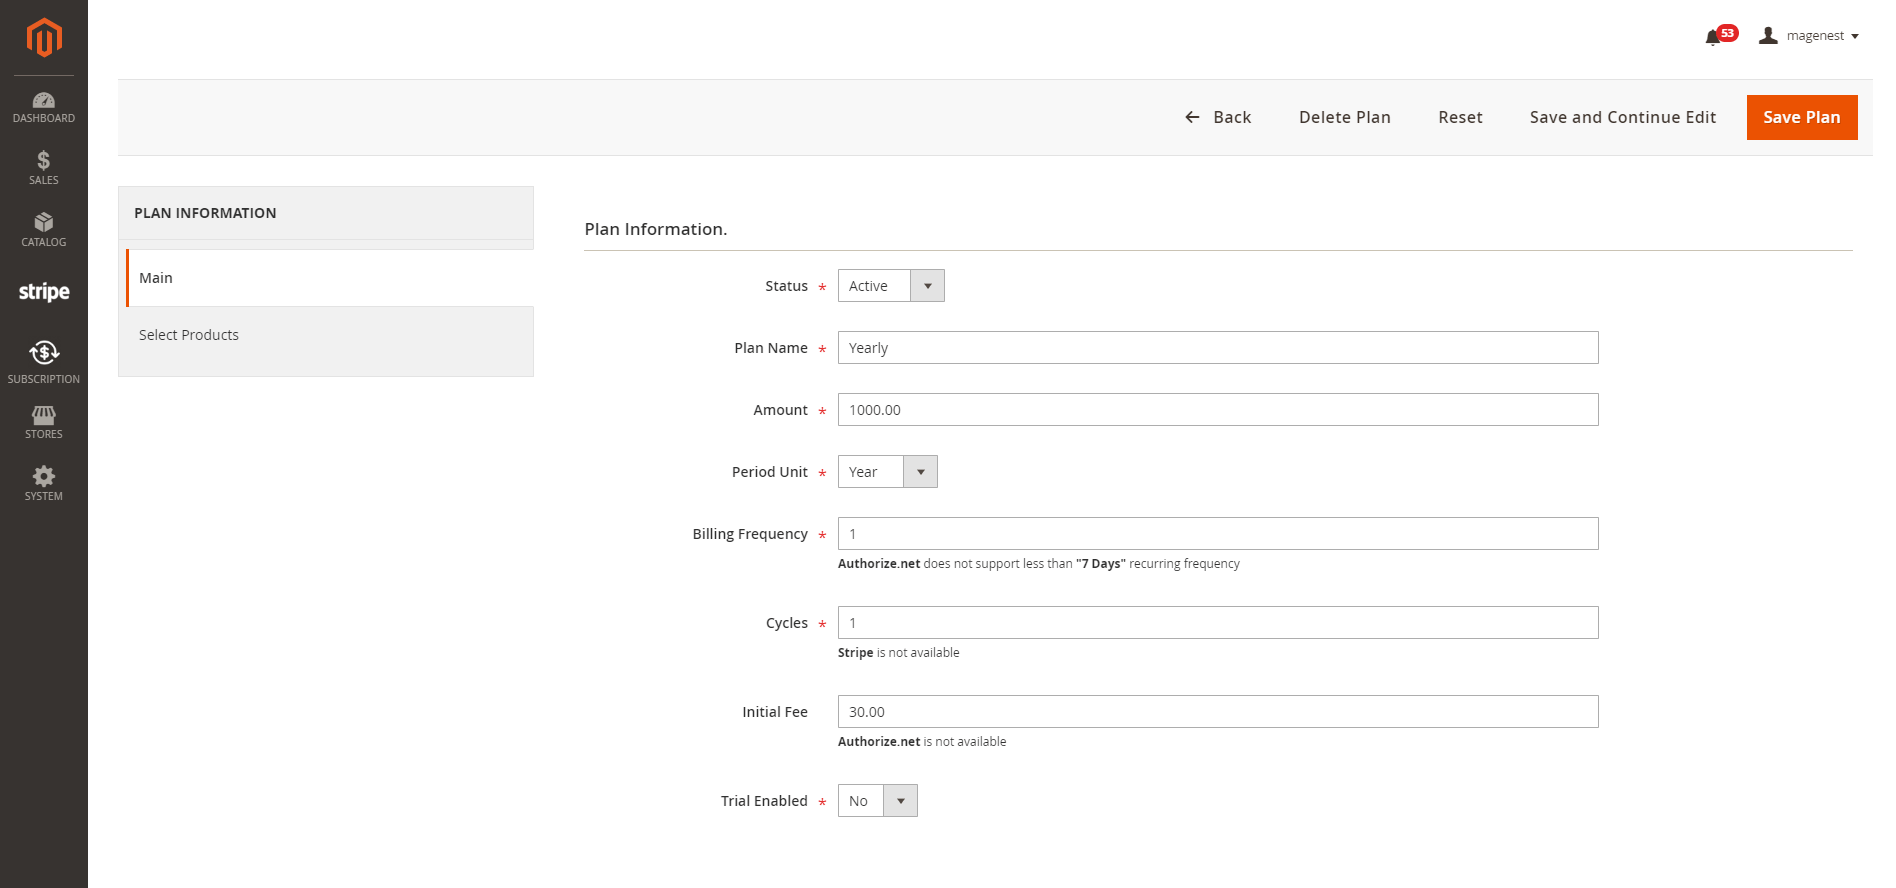
- Status: Enable/Disable the subscription plan
- Plan name: The title of the plan which will be shown in the admin panel for management
- Period Unit is one of the following values: Day, Week, SemiMonth, Month and Year.
- Billing frequency: the number of the billing period that makes up a billing cycle.
- Initial Fee Amountspecifies the one-time fixed amount payment that customer needs to fulfill.
- Trial Enabled: Add trial plan to this subscription plan
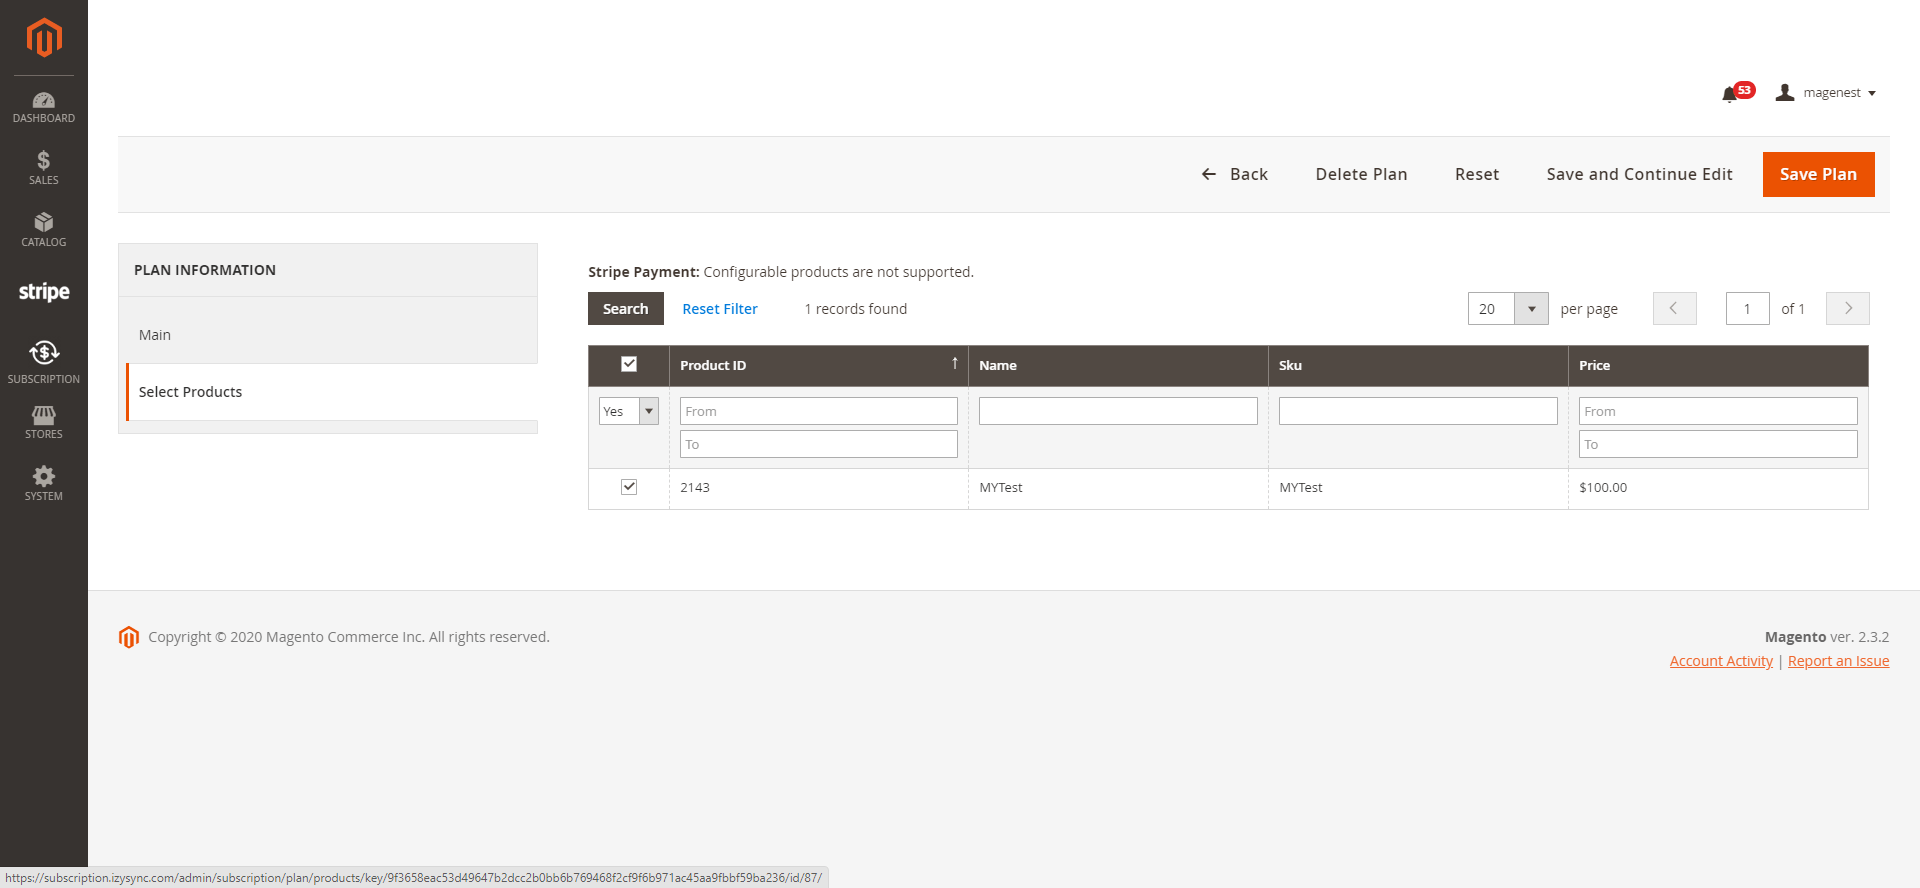
![]() Select Products:
Select Products:
In the following step, you will have to assign the subscription plan for the product(s). Select the product(s) that you want to apply this subscription plan and Save Configuration.
The product types supported are Simple Products, Virtual Products, and Configurable Products.

Turn an existing product to a subscription product
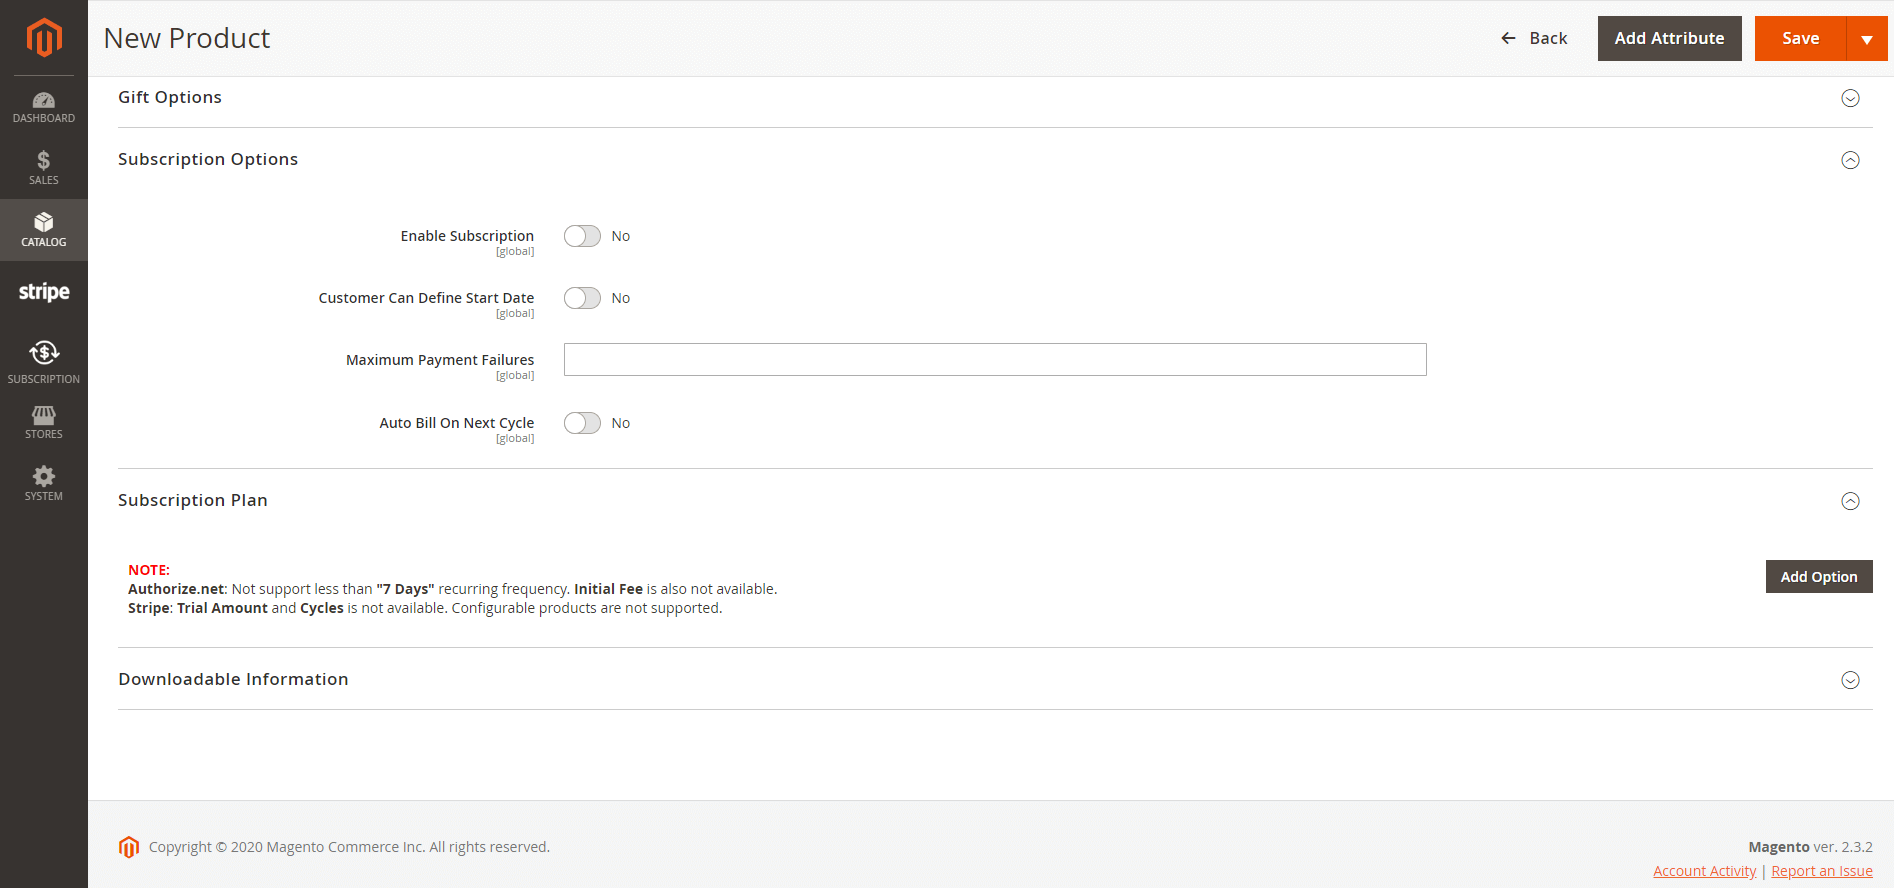
In Catalog > Products, you can enable the subscription plan in each product settings.
![]() Subscription Options:
Subscription Options:
Enable Subscription: Choose Yes to turn the product to a subscription product
- Subscription Mode:
- Subscription Only: The product could be purchased as a subscription product only
- Subscription Optional: The product could be purchased either as a subscription or a one-time purchase item

Subscription Plan: Click Add Option to
![]() Subscription Plan: Click Add Option to add subscription plan for the product
Subscription Plan: Click Add Option to add subscription plan for the product

...
Purchase the subscription product in an easy way
On the storefront, the subscription product will be shown with subscription options

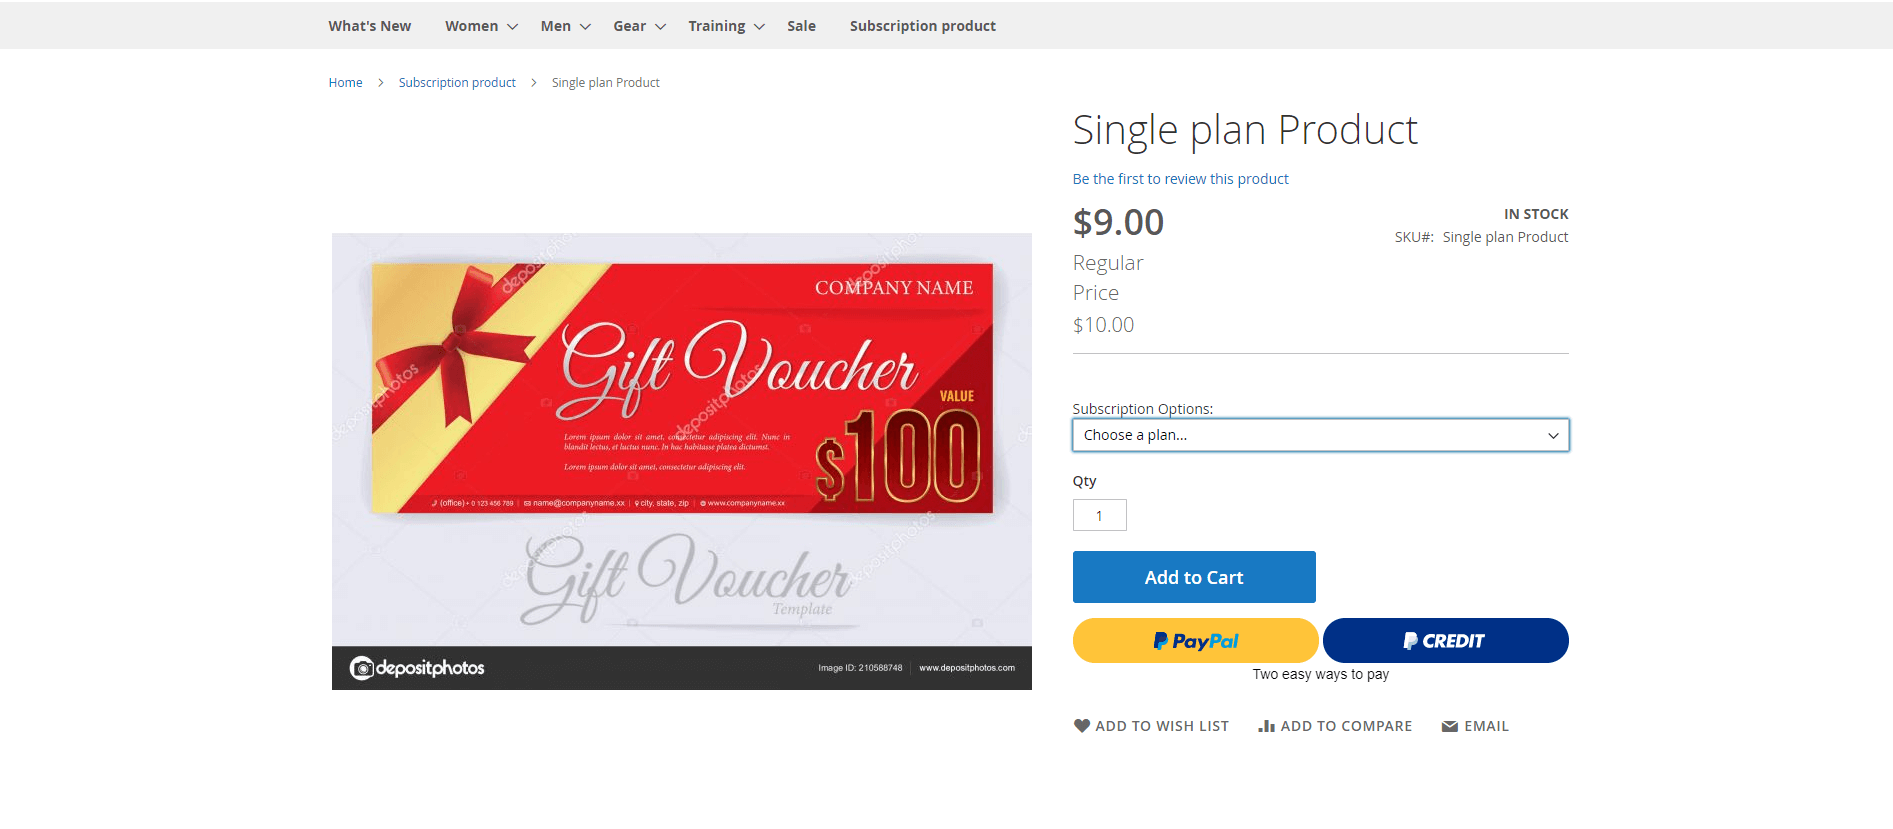
![]() NOTE: For the cart that contains the subscription product, we currently support this cart with only one subscription product, not with a one-time purchase product.
NOTE: For the cart that contains the subscription product, we currently support this cart with only one subscription product, not with a one-time purchase product.
On the checkout page, customer can select the start date from the date picker

Recurring payments
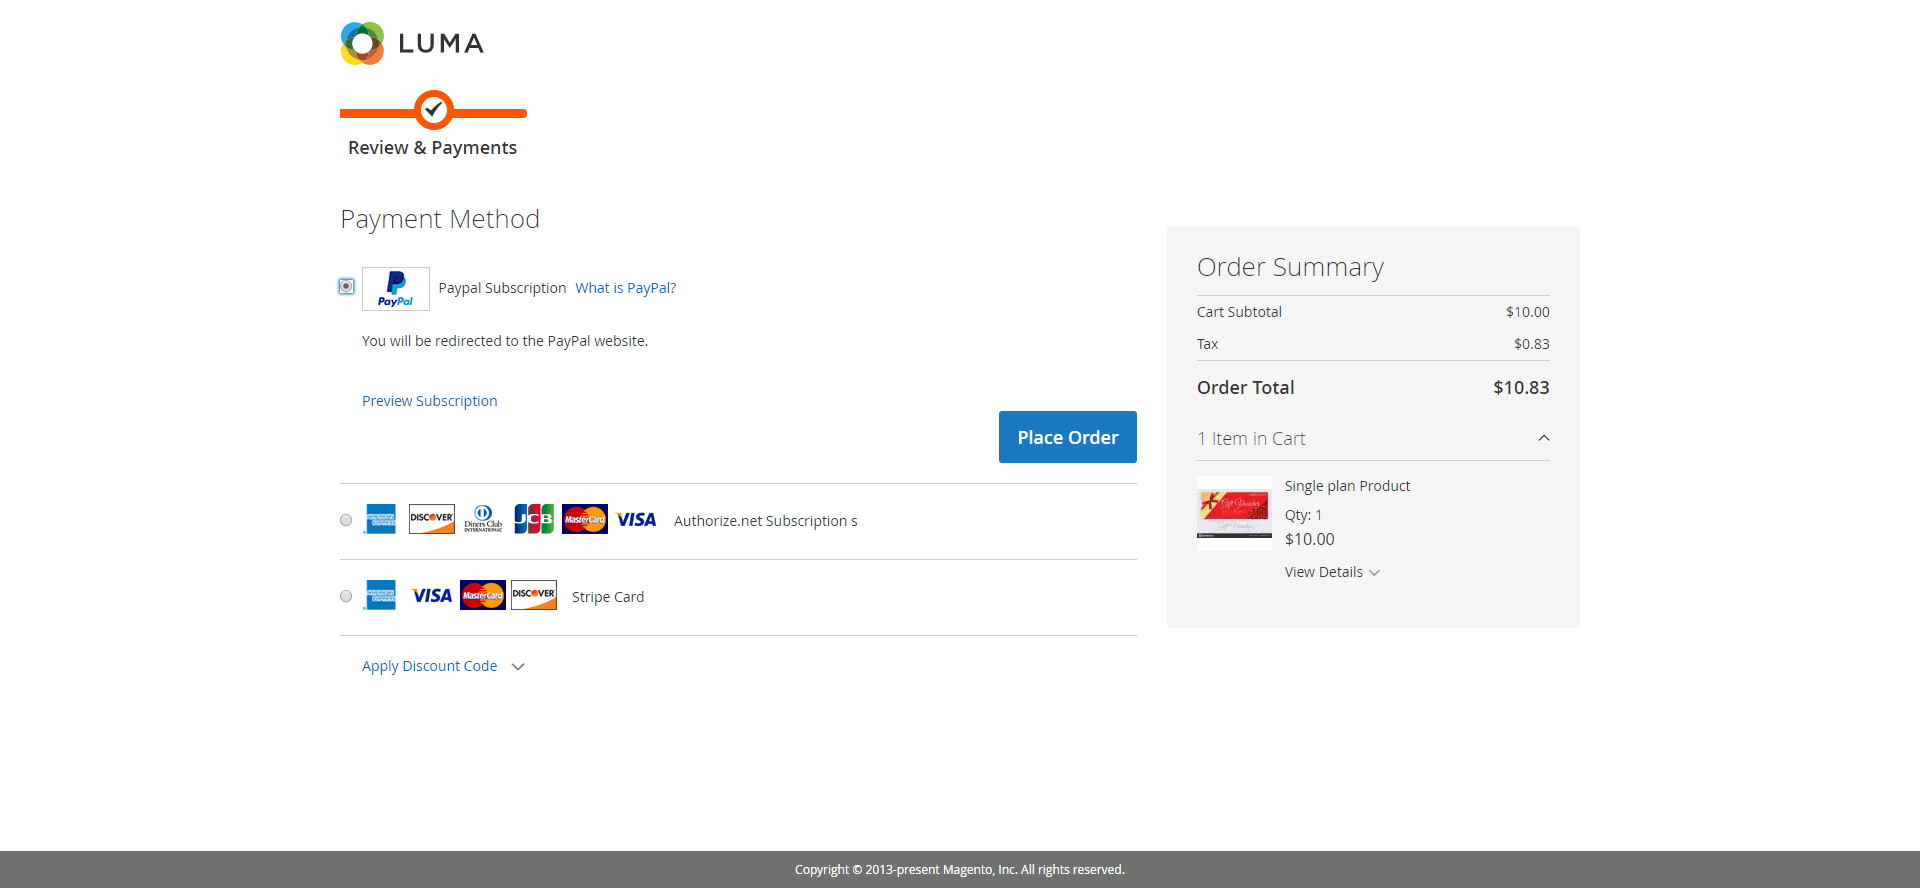
Payment through PayPal
Customers fill in their PayPal account to pay for their order.
Customers can preview subscription information before placing the order.

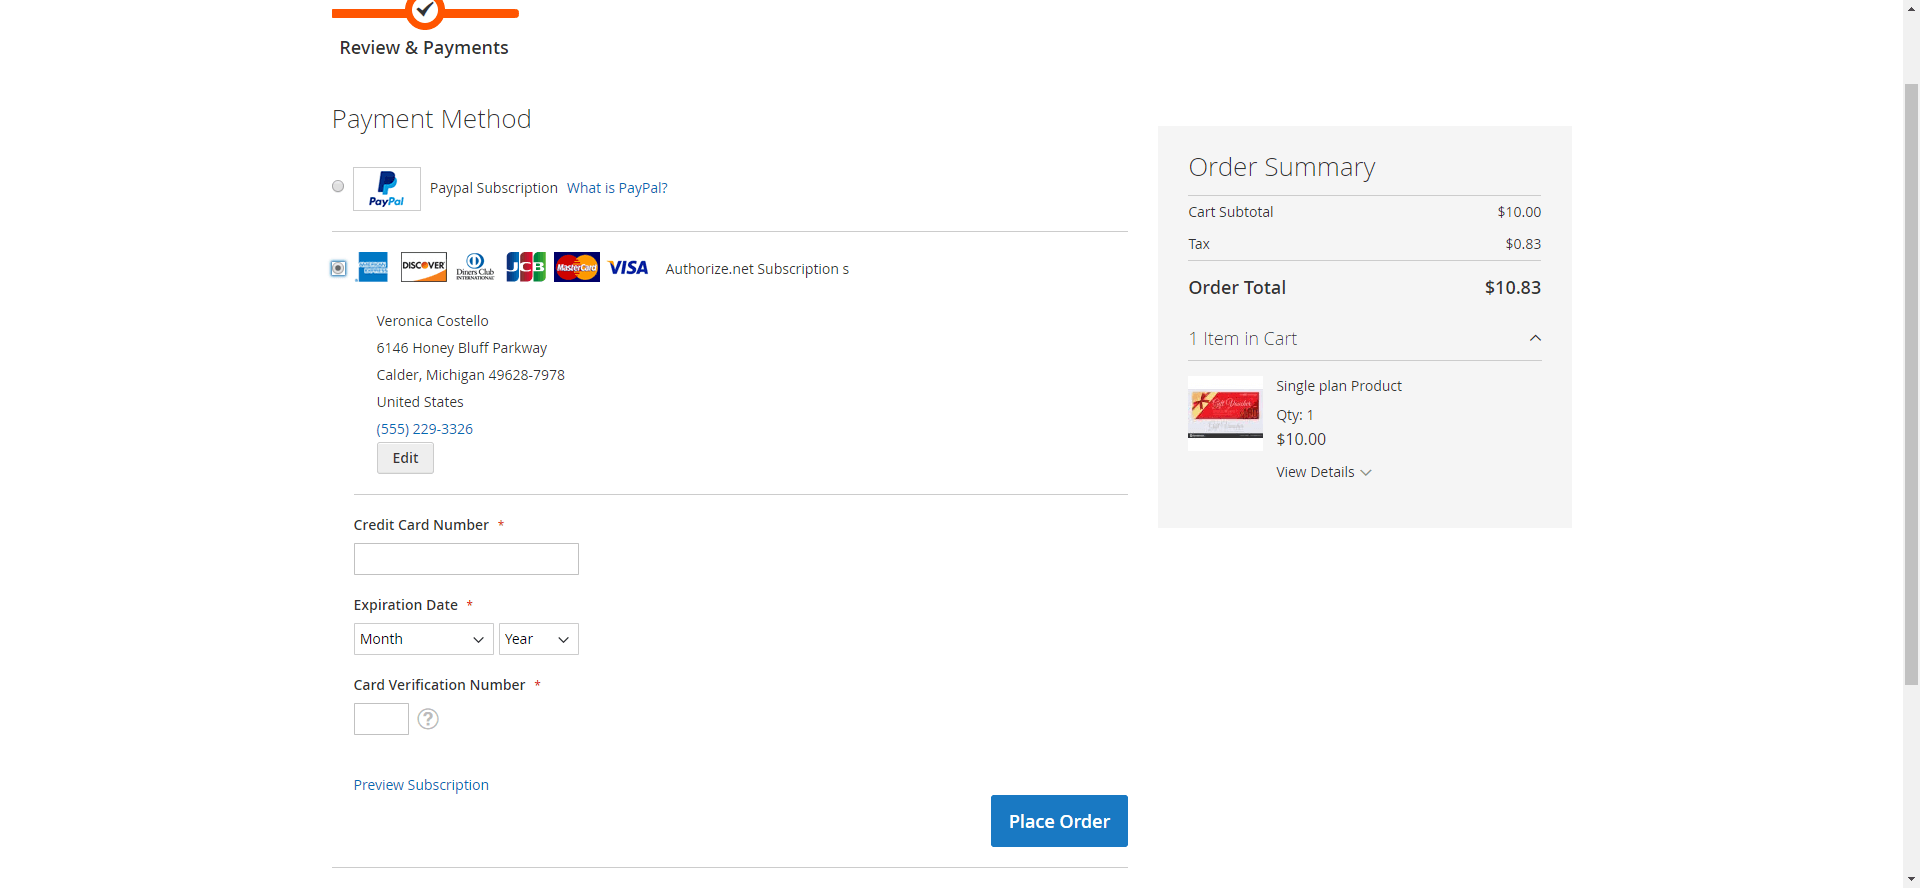
Payment through Authorize.net
Customers enter information about Credit card numbernumbers, expiration date dates, and card verification numbernumbers. After that, click on the "Place Order" button to order.
Customers can preview subscription information before placing order.

Payment through Stripe Payment
Customers enter information about Credit card numbernumbers, expiration date dates, and card verification numbernumbers. After that, click on the "Place Order" button to order.
Customers can preview subscription information before place order.


Manage recurring profiles
Manage recurring profiles at the front end
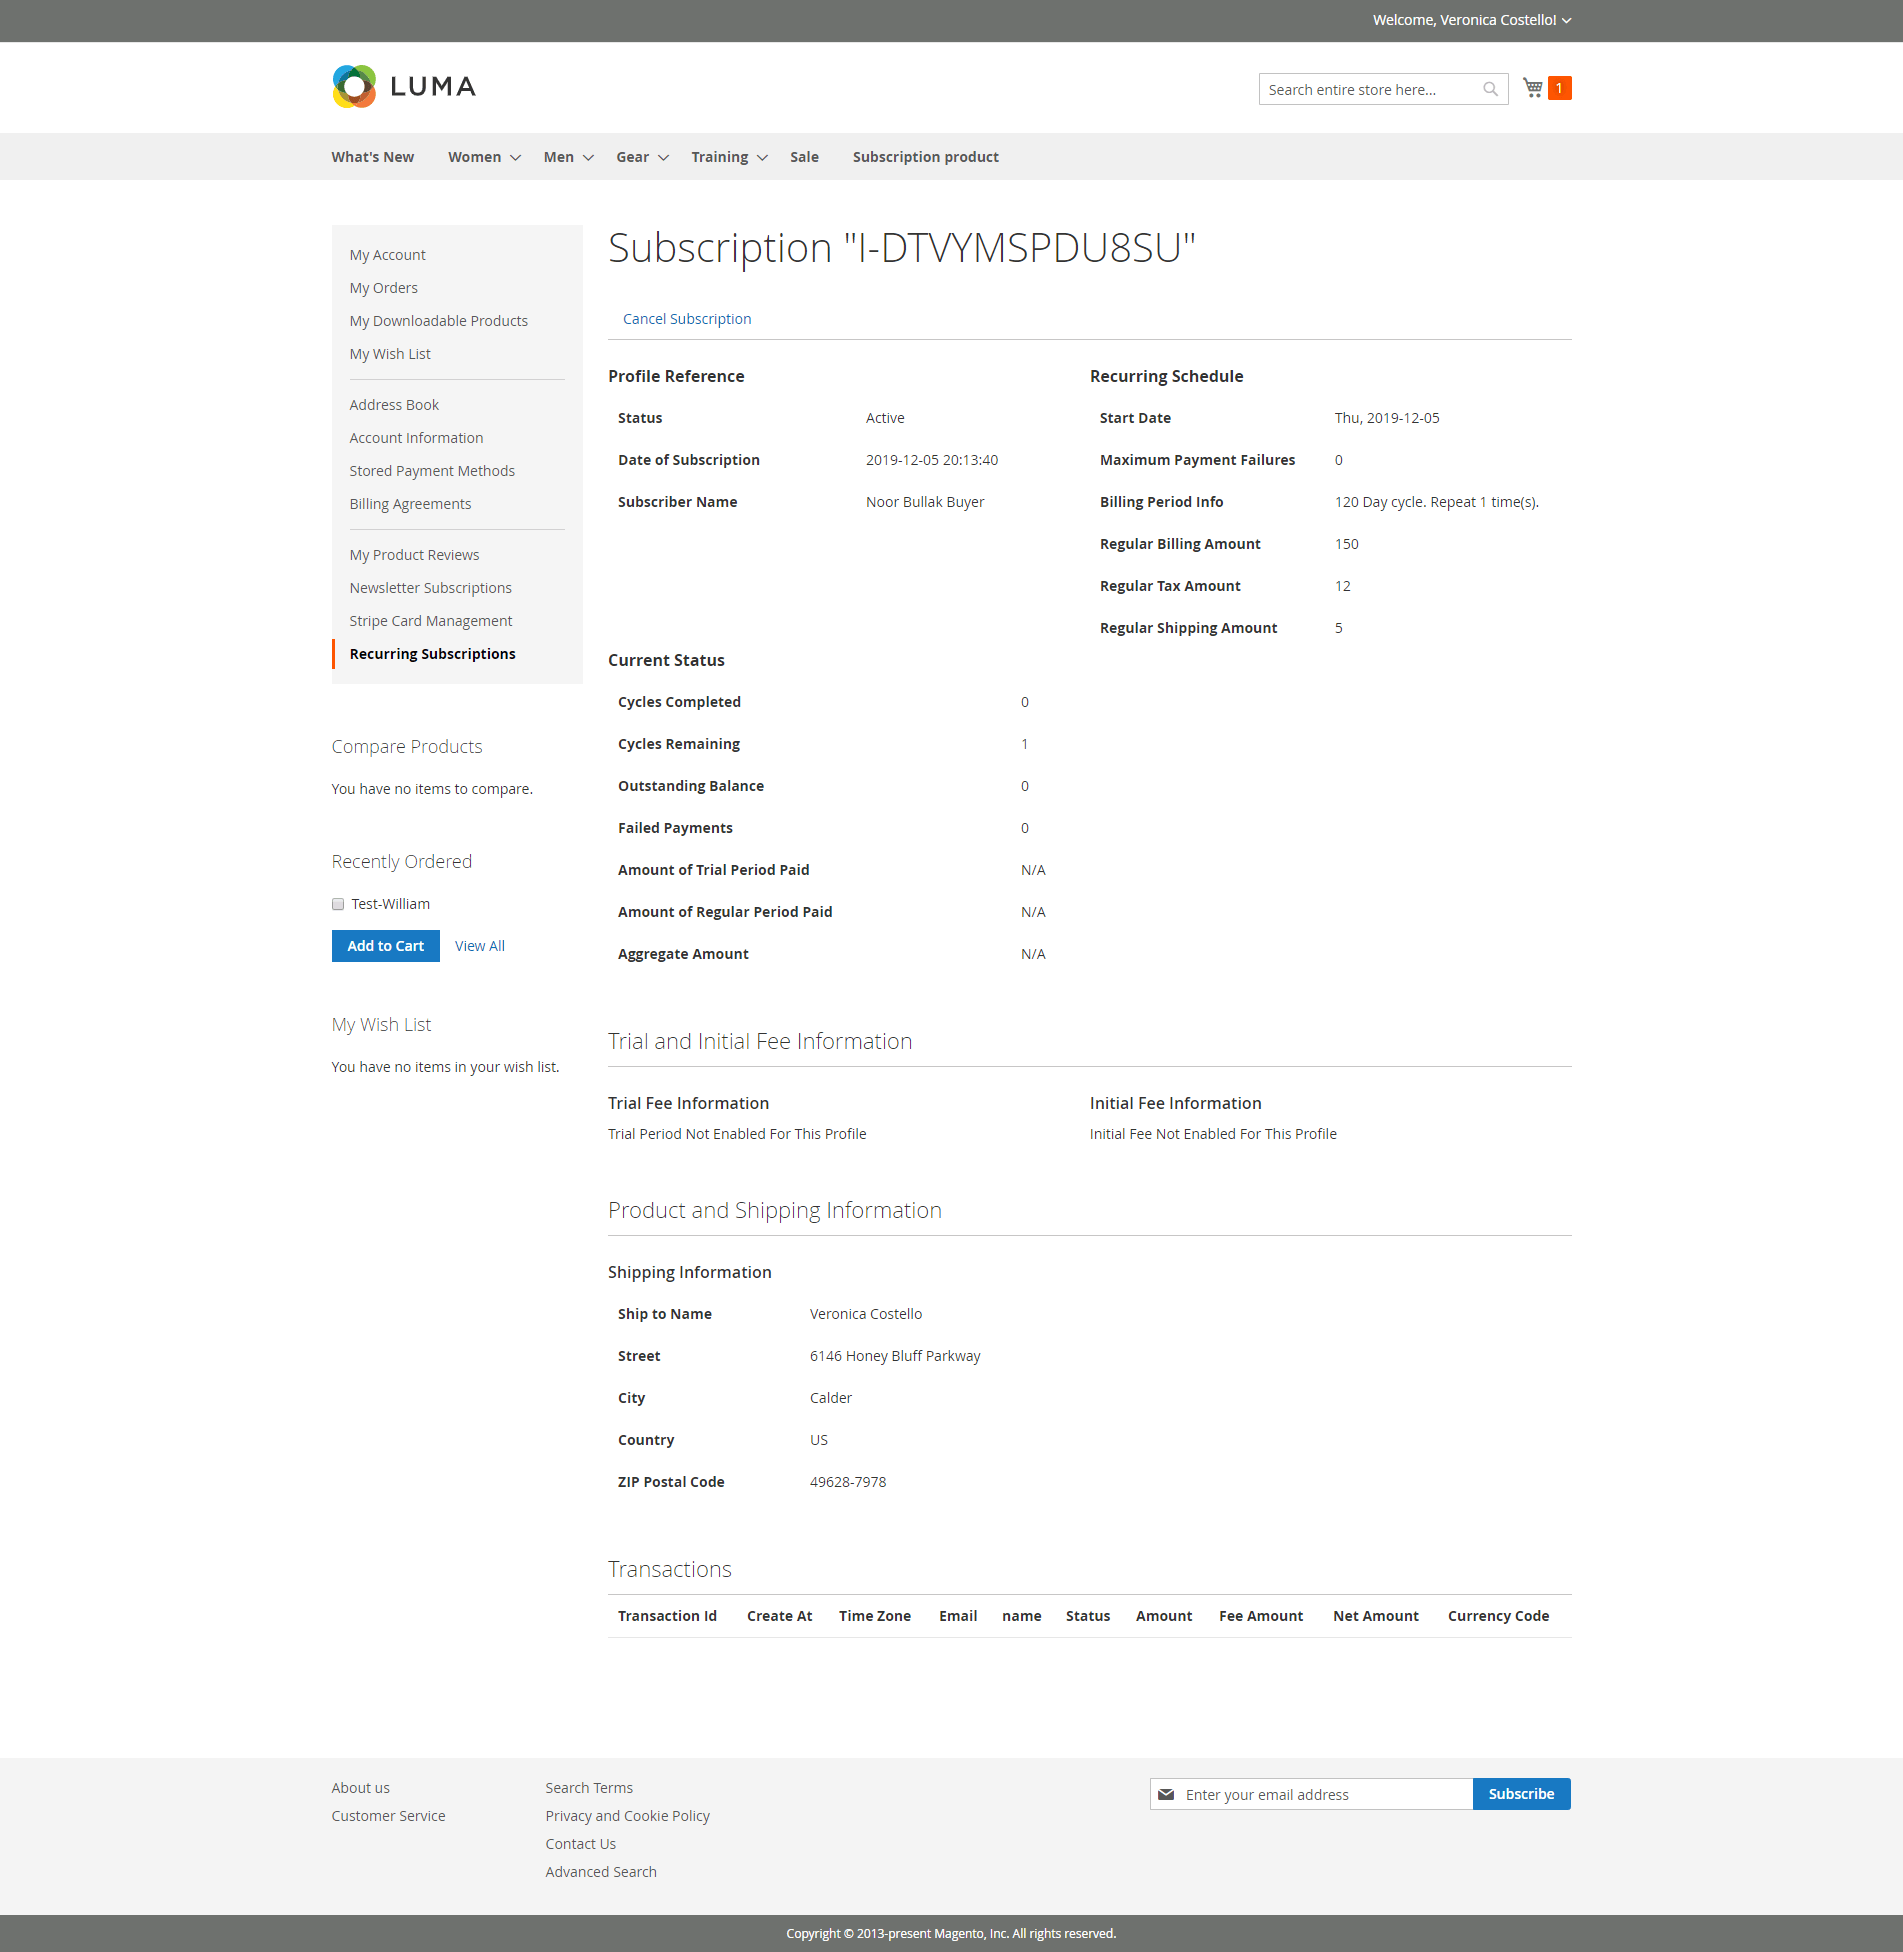
Customers can view and manage all of their orders regarding subscription products by click on My account > Recurring Subscriptions.
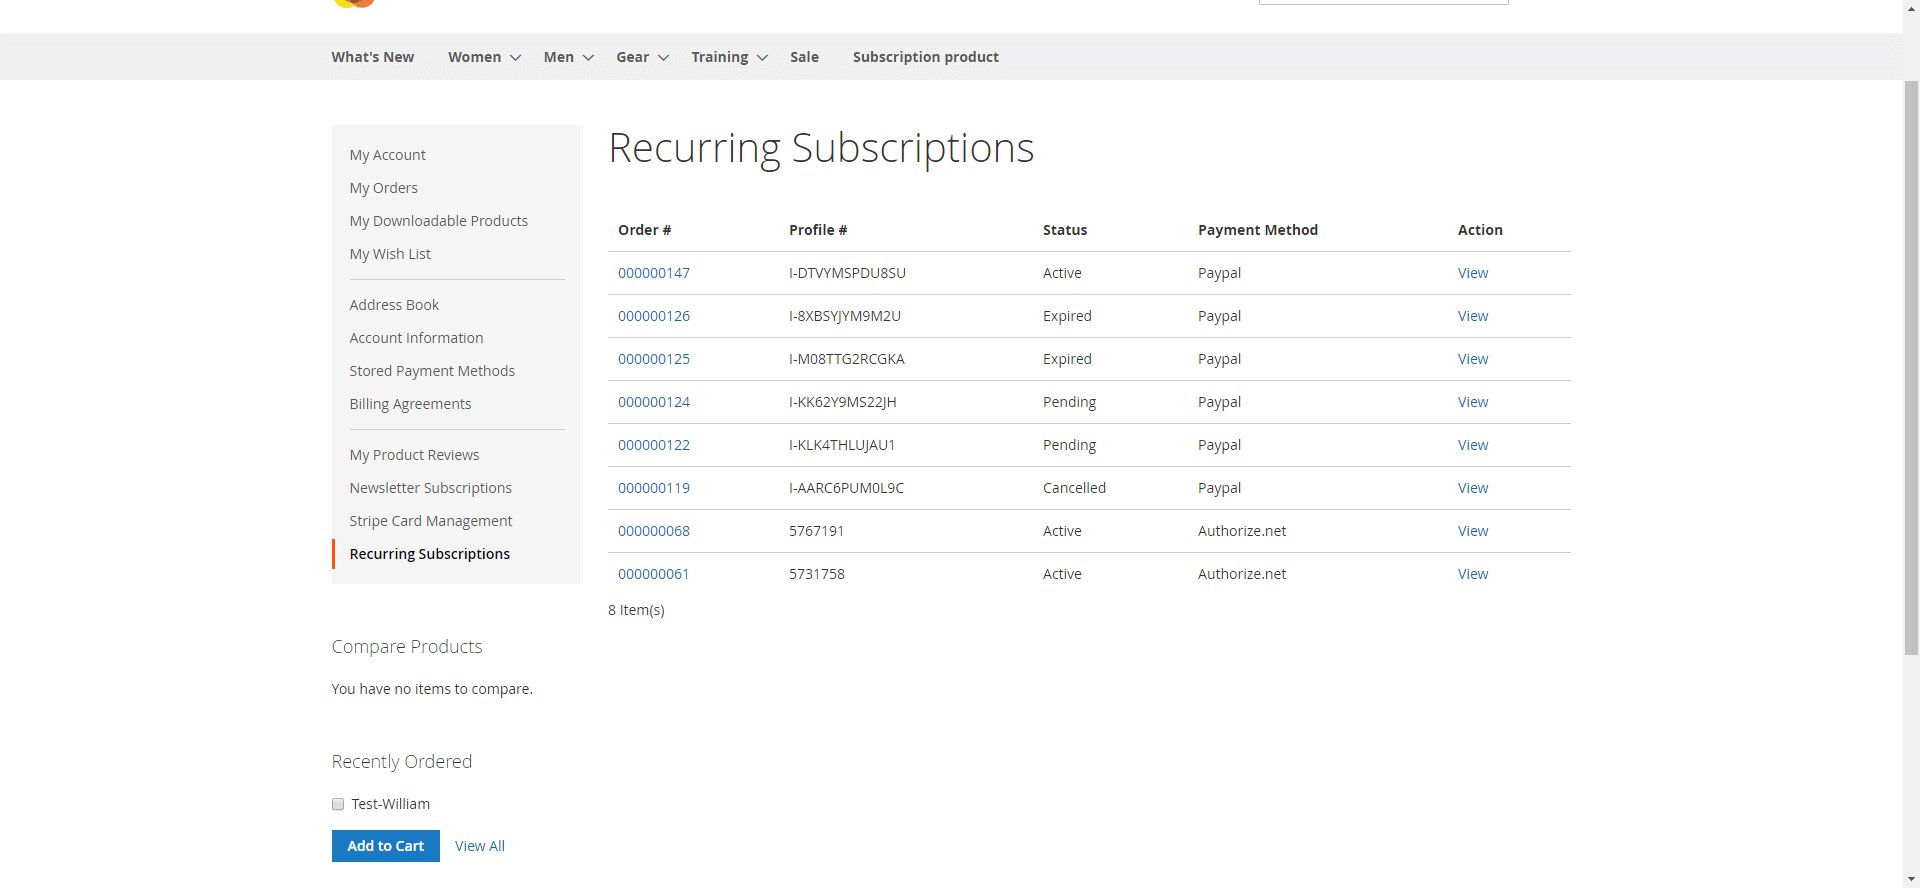

To check the profile in more detailsdetail, click View.

Manage recurring profiles at Magento 2 back end
You can manage the payment recurring profiles in Subscriptions > Manage Subscription. Customers who have subscribed to your products will be listed here.

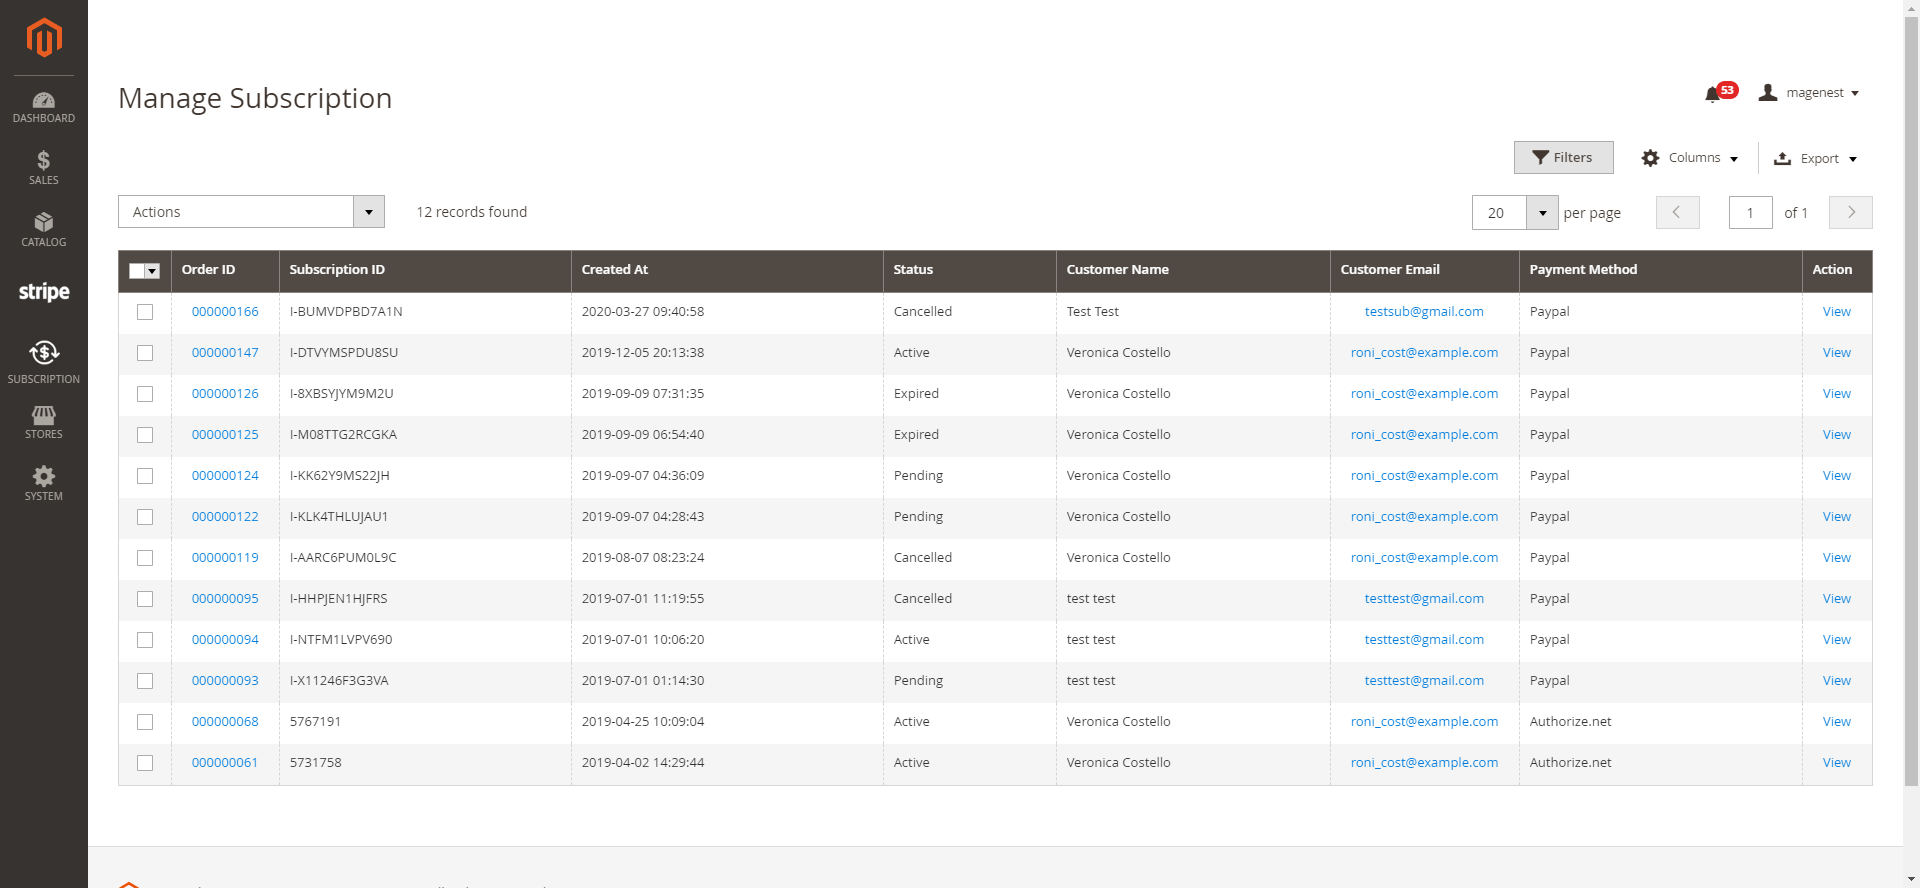
To check the profile in more detailsdetail, click View. This will lead you to View Profile section where provides details detailed information. The profile information on your back end system will appear the same as on your customer's Account Dashboard in front end store.
Subscription Information:

Invoices:


...
Update
- When a new update is available, we will provide you with a new package containing our updated extension.
- You will have to delete the module directory and repeat the installing installation steps above.
- Flush the config cache. Your store and newly installed module should be working as expected.
...
- We will reply to support requests within 2 business days.
- We will offer the a lifetime free update and 6 months of free support for all of our paid products. Support includes answering questions related to our products, bug/error fixing to make sure our products fit well in your site exactly like our demo.
- Support DOES NOT include other services such as customizing our products, installation and uninstallation service.
...
Once again, thank you for purchasing our extension. If you have any questions relating to this extension, please do not hesitate to contact us for support.Magenest