Thank you for purchasing my extension. If you have any questions that are beyond the scope of this help file, please feel free to email via my user page contact form here. Thanks so much!
Created: 20/04/2016 | By: Magenest | Email: [email protected]

Introduction
Welcome to Magento Subscriptions and Recurring Payments developed by Magenest. This extension provides merchants options to configure subscription products such as magazines, newspapers, newsletters or memberships. It will save customers’ time to buy products from repeating order process. And you will no longer need to invoice your customers individually for each payment.
With this extension, you as a merchant will be able to configure subscription options for your products as desire, manage your subscribers' status and monitor recurring cycles.
Features
- Magenest’s Subscriptions and Recurring Payments enables you to fully control subscription options and manage subscription profiles.
- Customer Can Define Start Date provides merchants options to set whether customer can define the start subscription date or not.
- Maximum Payment Failures enables merchants to set number of scheduled payments that can fail before subscription profile is automatically suspended.
- Auto Bill on Next Cycle helps merchants to automatically bill the outstanding balance amount in the next billing cycle.
- Multiple billing options allows merchants to create different billing periods.
- Enable Trial (Trial Billing Amount, Trial Billing Period Unit, Trial Billing Frequency, Trial Billing Cycles, Enable Initial Fee) provides merchants option whether to set a trial subscription for customers or not.
- Payment Profiles Manager allows merchants to manage subscription cycles, monitor profiles status or delete a profile.
Video Tutorial Playlist
(Go to the playlist to view more: https://www.youtube.com/playlist?list=PLOgckfH7zlZsgwTPTGF7035wtVac0bXc-)
Payment Methods
Magenest Subscriptions and Recurring Payments supports following payment methods:
PayPal Express Checkout
PayPal Payments Advanced (Express Checkout)
PayPal Payments Pro (Express Checkout)
PayPal Payments Standard
PayPal Payflow Pro (Express Checkout)
PayPal Payflow Link (Express Checkout)
- Credit Card Direct Post (Authorize.net)
Subscription Product Types
Supported product types for Magenest Subscriptions and Recurring Payments include:
Simple Product
Virtual Product
Downloadable Product
System Requirements
Your store should be running on Magento Community Edition version 2.0.0 or later versions.
Configuration
Configure Subscription
You can configure subscription setting for a new or an existing product.
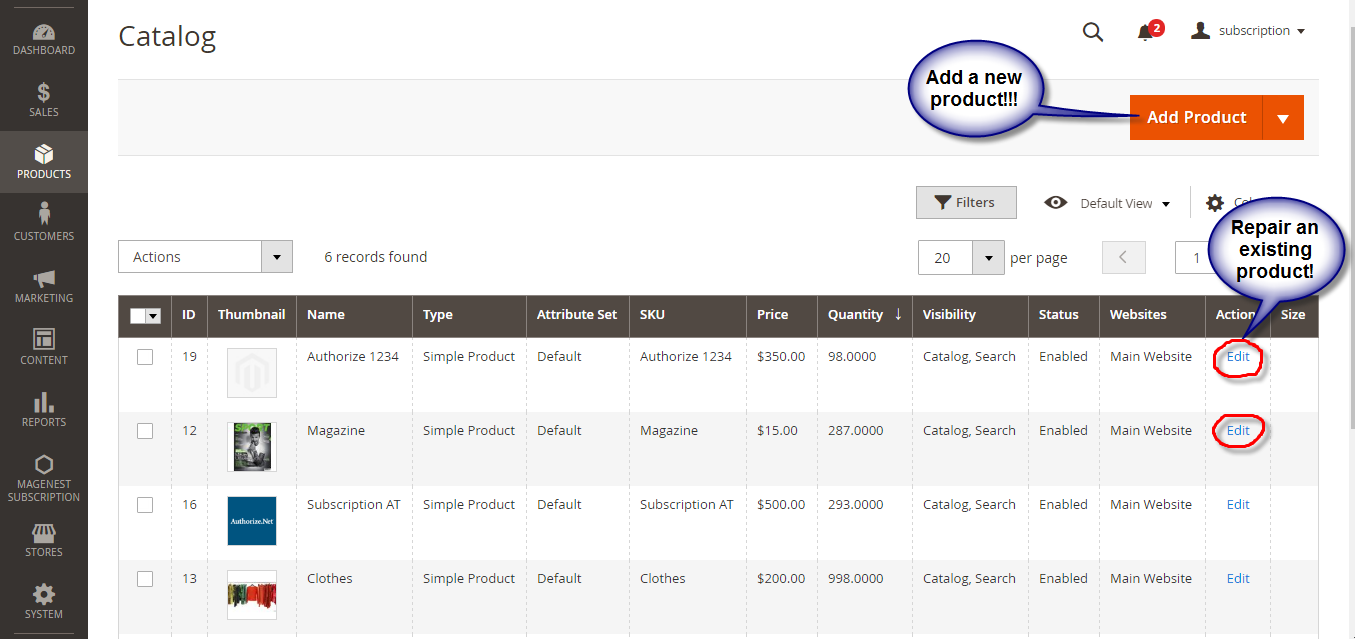
- Log in your Magento backend system. On Dashboard tab, click Products -> Catalog.
For new product, click Add Product or select a product type to start creating a new product on your store (Magento Subscriptions and Recurring Payments supports simple, virtual and downloadable products).
For existing product, click Edit.
This will lead you to Basic Settings section where you can define your product characteristics.
- On Basic Settings tab, click Subscription Options
Enable Subscription = Yes/ No
Customer Can Define Start Date = Yes/ No
Maximum Payment Failures: Allows you to set the maximum number of times that customer can fail to pay. When the number is reached, an IPN (Instant Payment Notification) message is sent to you and customer’s account will be suspended automatically.
Auto Bill on Next Cycle = Yes/ No. Indicates whether you would like PayPal to automatically bill the outstanding balance amount in the next billing cycle. The outstanding balance is the total amount of any previously failed scheduled payments that have yet to be successfully paid. It is one of the following values:
- Yes: PayPal automatically bills the outstanding balance.
- No: PayPal does not automatically bill the outstanding balance.

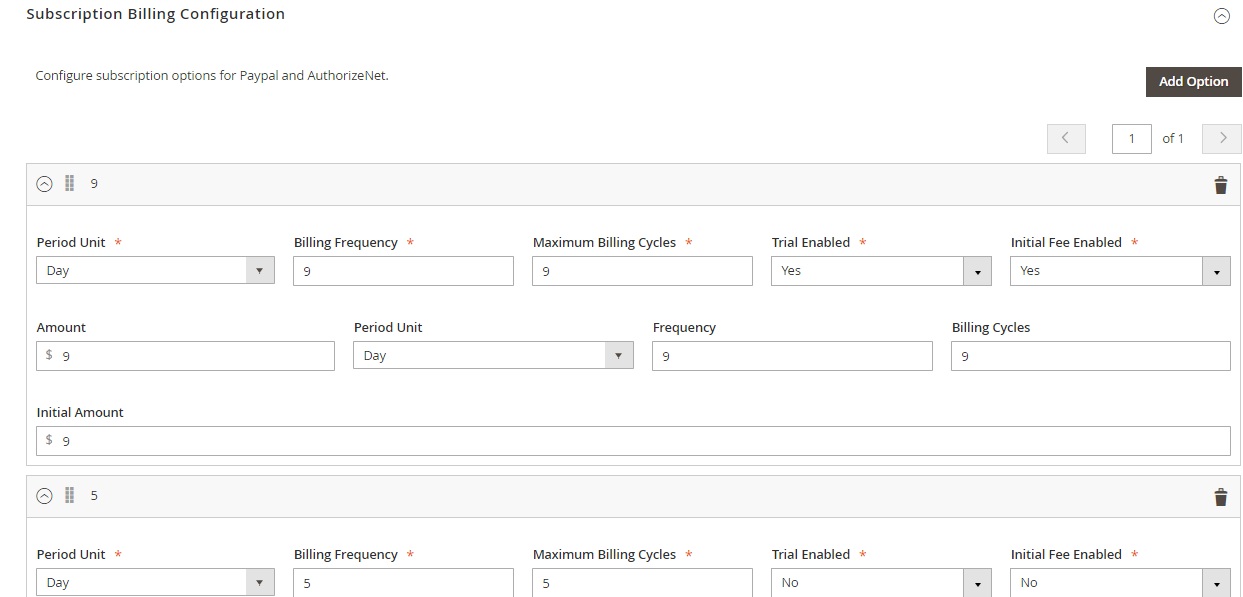
Billing Options. Enables you to define billing frequency or cycles.
Period Unit: is one of following values: Day, Week, SemiMonth, Month and Year.
Billing frequency: is number of billing period that make up a billing cycle.
Maximum Billing Cycles: is number of billing cycles for payment period.
Select period unit, enter the number you want to set on Billing Frequency and Maximum Billing Cycles.
- To add other billing options, click Add Option
- To remove a billing option, click Remove
Enable Trial = Yes/ No
Enable Initial Fee = Yes/ No. Set to Yes if you want system to add an one-time fixed amount payment, which will be taken upfront on subscribing to a product.
Initial Fee Amount specifies the one-time fixed amount payment that customer needs to fulfill.
Configure Payment Method
On Dashboard tab, click Stores -> Configuration.
Click Sales -> Payment Methods.

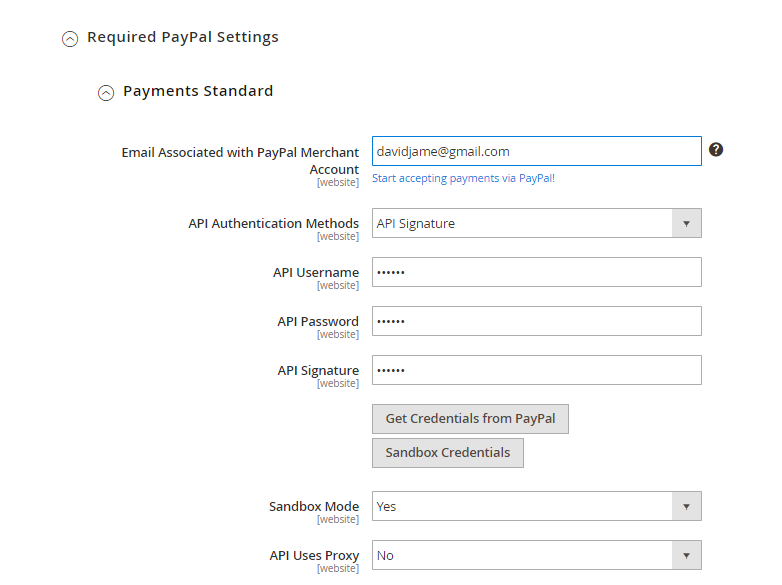
Click PayPal All-in-One Payment Solutions to set up Paypal payment. On Paypal Payment Standard section and hit Required PayPal Settings.
Enter your Email Associated with PayPal Merchant Account as required.
Select API Signature in API Authentication Methods.
Enter API Username, API Password and API Signature associated with your PayPal account.
Select Yes in Sanbox Mode if you are using a sandbox PayPal account and via versa.
On top right corner, click Save Config.
Click Authorize.net Direct Post to set up Credit Card Payment.
Enabled = Yes/No.
Payment Action = Authorize Only / Authorize and Capture.
Authorize Only: gi?i thích...
Enter Credit Card Direct Post (Authorize.net) in Title box.
Enter API Login ID, Transaction Key and Merchant MD5 associated with your Card account.
Select Processing or Suspected Fraud in New Order Status.
gi?i thích....
Test Mode = Yes/No.
Enter Gateway URL and Transaction Details URL
..............
Enter your Email associated with Card Merchant Account as required.
Choose Credit Card Types. Note that you can choose one or more.
Credit Card Verification = Yes/No.
......
On top right corner, click Save Config.

Payment Profiles Management
You can manage the payment recurring profiles though Magenest Subscription -> Recurring Profiles. This Recurring Profiles Manager provides a table of recurring profiles with information on Profile ID, Status, Method Code, Subscriber Name and Start Date. Customers who have subscribed to your products will be listed here.
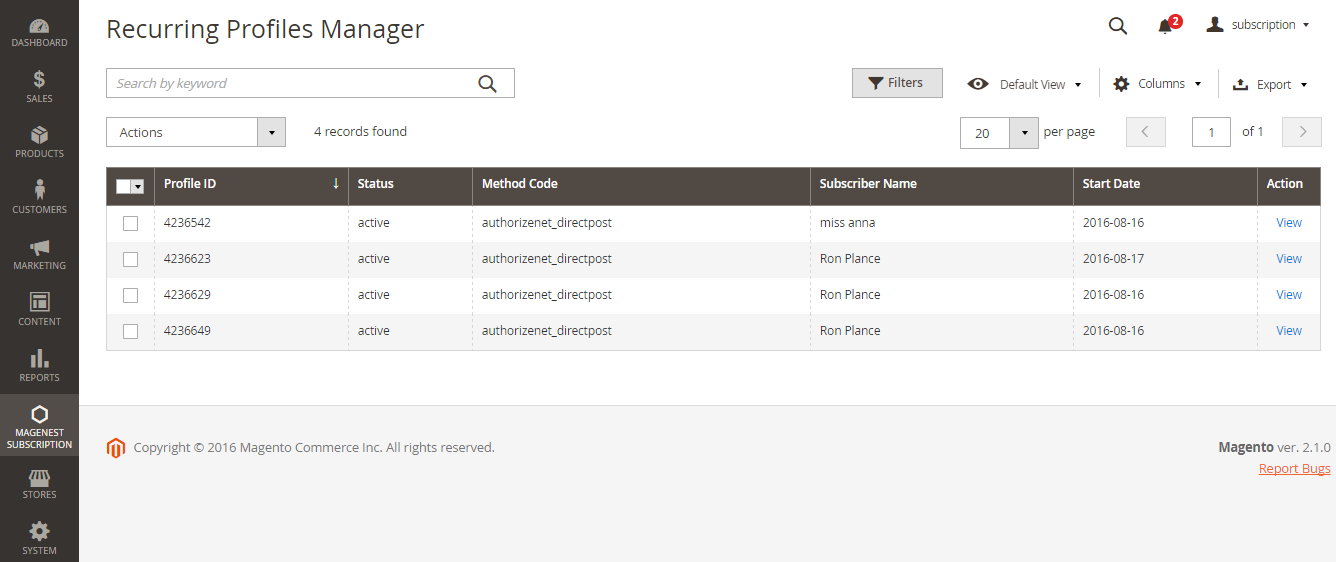
Status of the recurring payment profile is one of the following values:
- Active
- Pending
- Cancelled
- Suspended
- Expired
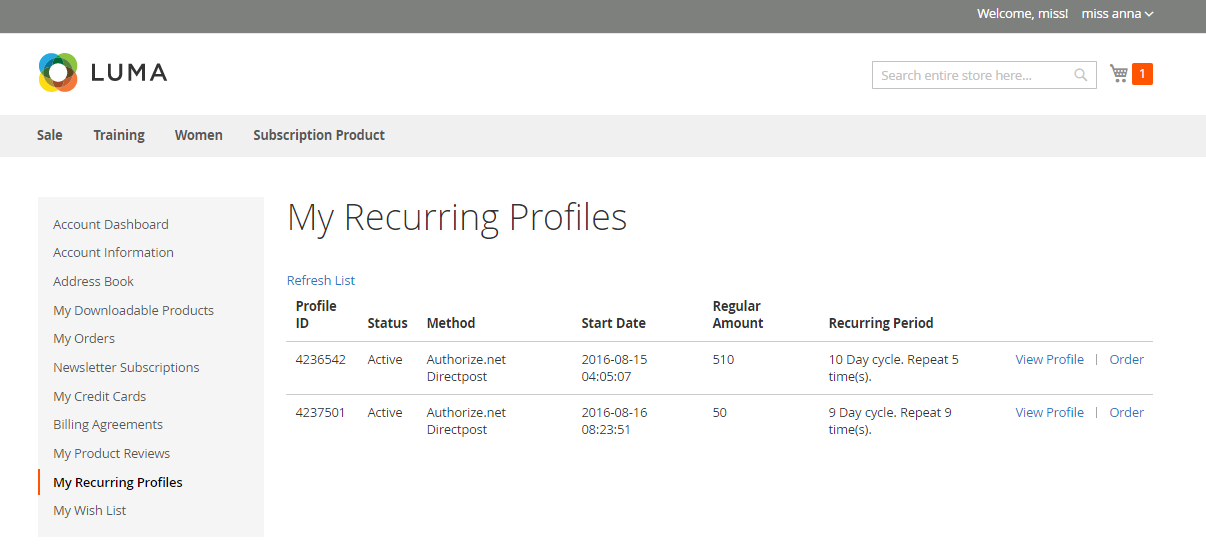
Your subscription customers can check or modify their accounts in Account Dashboard in your frontend store. Magenest Subscriptions and Recurring Payments provides an option that customers can cancel or suspend their recurring profiles in your frontend store.
Customize Recurring Profiles Manager View
You can choose which columns to be shown on the Recurring Profiles Manager table.

By Default View, all columns (Profile ID, Status, Method Code, Subscriber Name and Start Date) are visible in the table.
To hide any column in the table, click Columns, uncheck the box of column you want to hide. To save this view setting for future usage, click the eye icon and name the view.
To set the table back to Default View, click Columns -> Reset. Or hit the eye icon, then click Default View.
Search Profile
To search for profiles, enter keyword in the Search by keyword box.
Or click Filter to search via criteria, enter information in any of the fields: Profile ID, Status, Method Code or Subscriber Name. Then click Apply Filters.

Click Clear All or hit the x icon to refresh your search result.
Note: you can filter recurring profiles via Status or Method Code. With Filter function, you can sort out which profiles are being suspended, cancelled, pending, expired or active.
Manage Profile Details
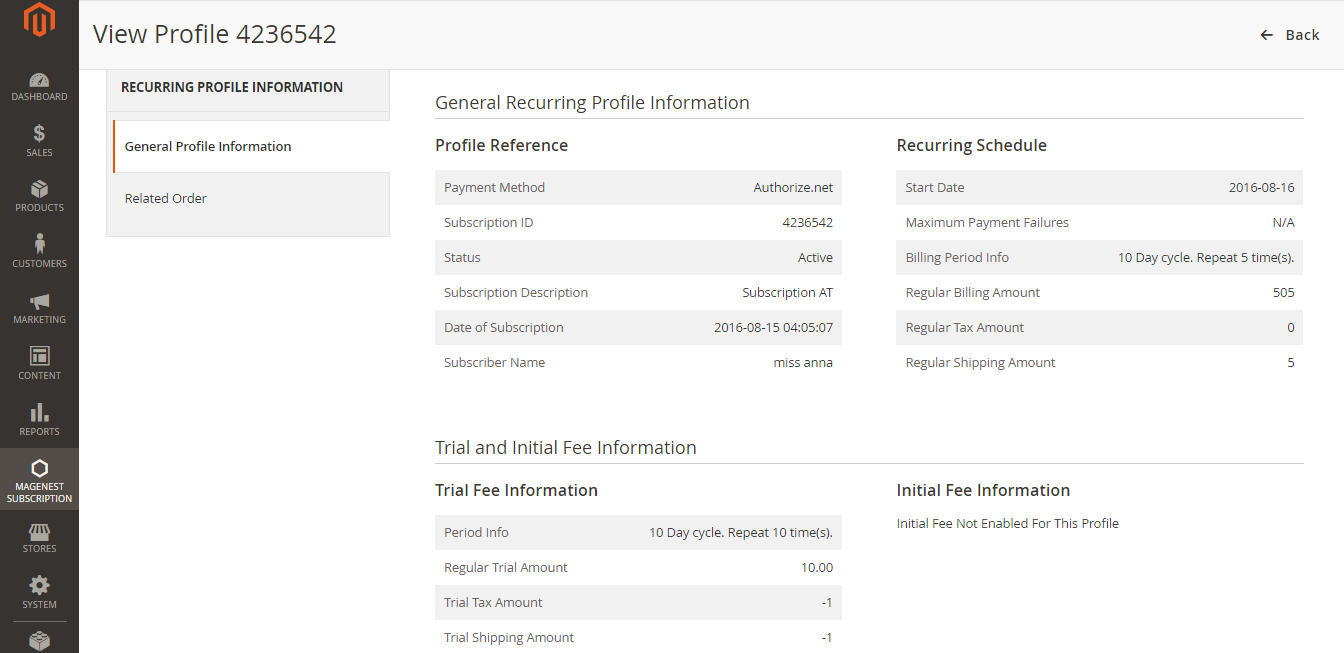
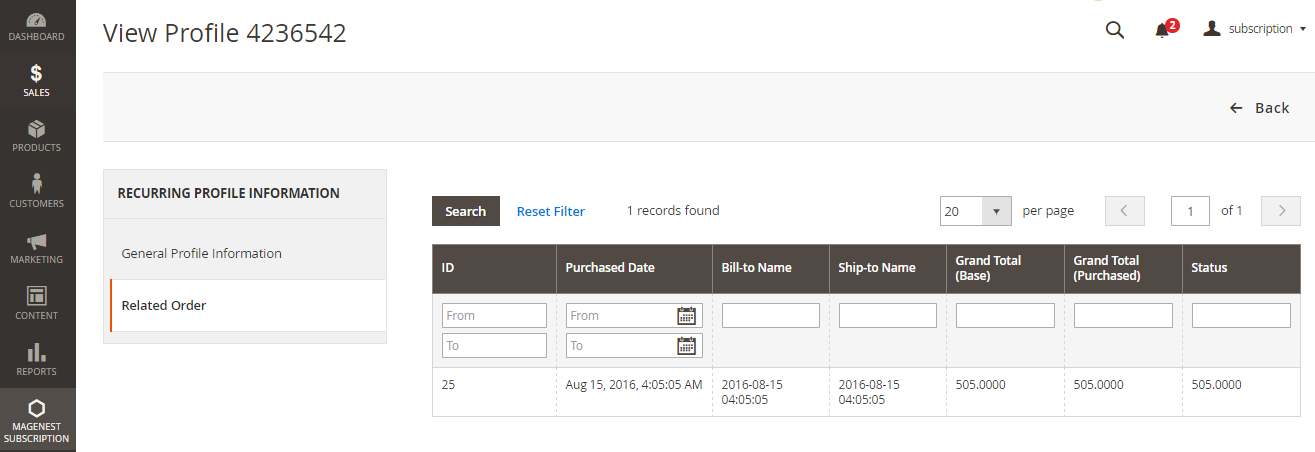
To check the profile in more details, click View. This will lead you to View Profile section where provides details information on Profile Reference, Recurring Schedule, Current Status of subscription cycles and Trial Information. The profile information on your backend system will appear the same as on your customer's Account Dashboard in frontend store.
To delete a profile, on Recurring Profiles Manager, check the box in front of the row that has profiles you want to delete, click Actions -> Delete.
Note: Cái này ?? làm gì t ko bi?t. hì
Export Profile
You can choose to export a list of recurring profiles in the format of CSV or Excel XML. At the top right corner, click Export, select format type and hit Export.

Store Appearance
This section illustrates some examples on how your store will appear when being configured with Magento Subscriptions and Recurring Payments.
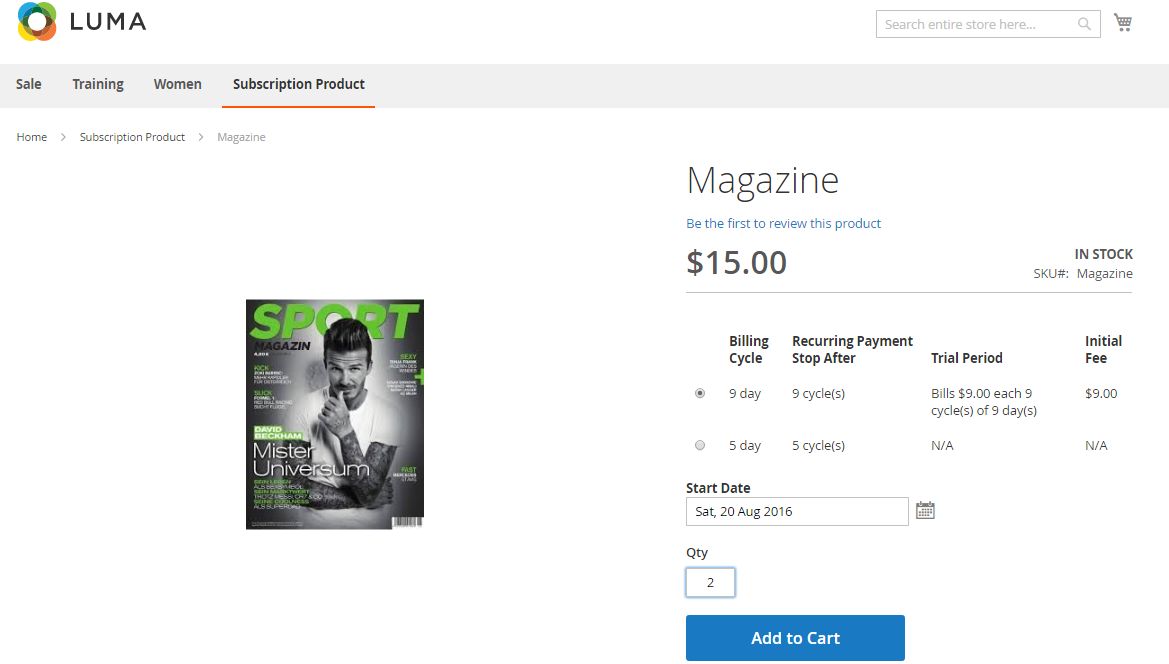
- Subscription product:
At frontend page, customer will need to choose a Subscription Billing option, starting date and entering quantity then click on Add to Cart button.
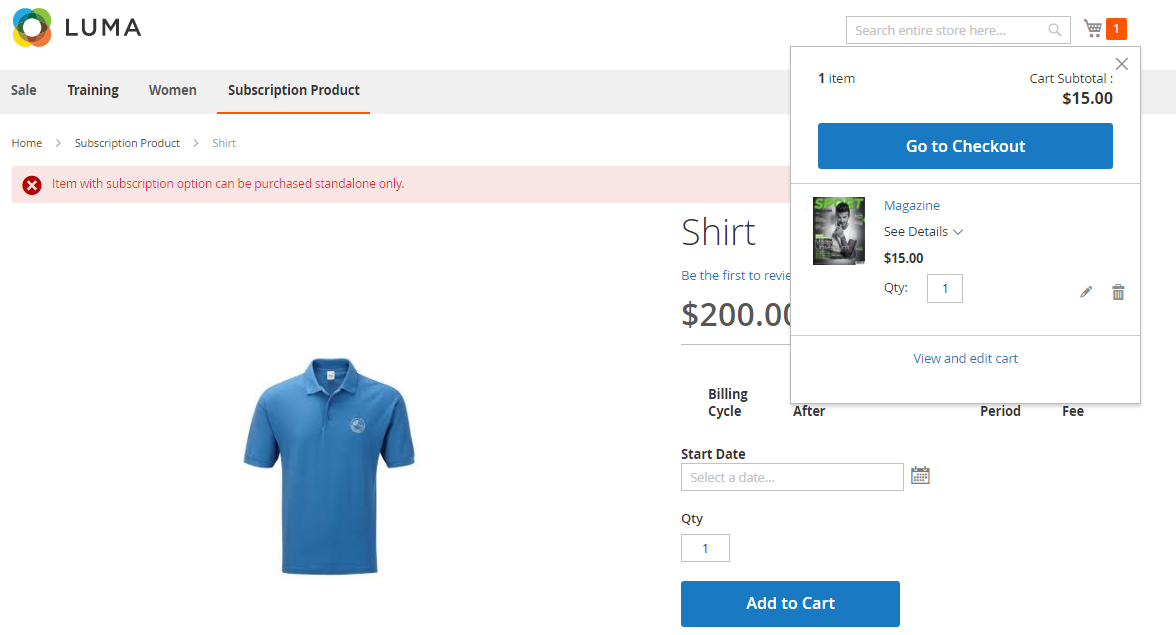
- NOTE: For the cart that contains the subscription product, we currently support this cart with only one subscription product.
- CheckOut:

There are 2 ways that customers can use to Recurring Payment.
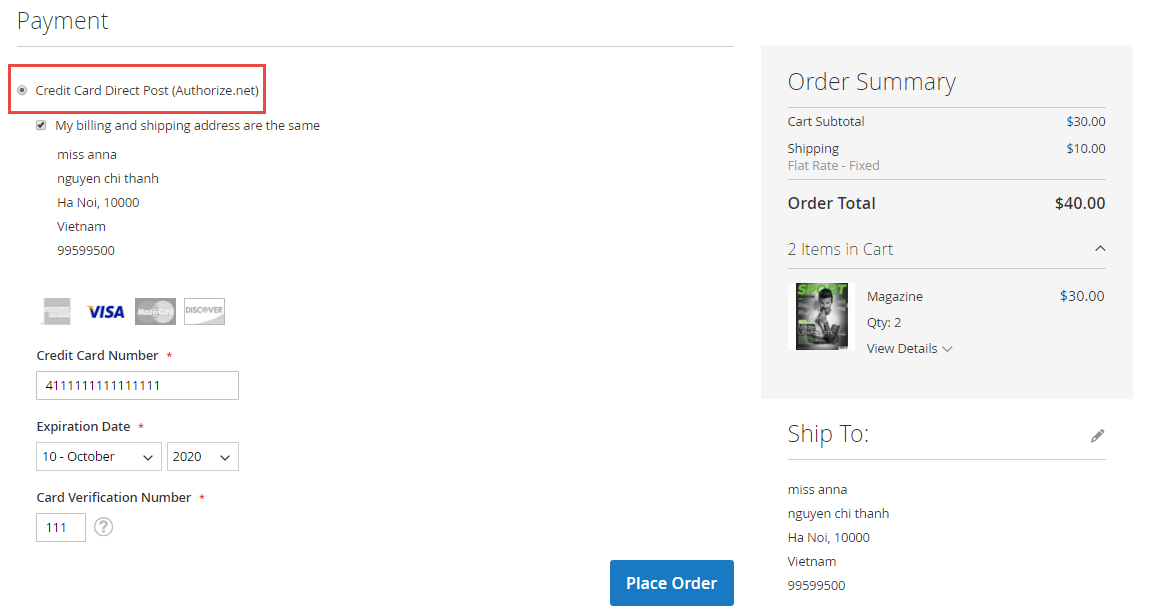
- Customer use their Credit Card Direct Post.
Customer enters information about Credit card number, expiration date and card verification number. After that, click on "Place Order" button to order.
